
Chapter 11: Troubleshooting the X
In This Chapter
![]() Mastering the scientific approach
Mastering the scientific approach
![]() Using troubleshooting techniques
Using troubleshooting techniques
![]() Performing the radical solutions
Performing the radical solutions
![]() Checking troubleshooting resources
Checking troubleshooting resources
OS X Mountain Lion is rugged, stable, and reliable — and as you can read in Chapter 9 of this minibook, practicing regular maintenance can help prevent problems caused by everything from power failures to faulty software drivers to cats on the keyboard. However, sooner or later you will encounter what I like to call The Dark Moments . . . a blank screen, a locked Mac, or an external device that sits there uselessly like an expensive paperweight.
How you handle The Dark Moments defines you as a true OS X power user because most folks seem to fall into one of two categories: Either you panic and beat your head against the wall (which really has little effect on the computer, when you think about it), or you set your brow in grim determination and follow the troubleshooting models that I provide in this chapter to locate (and, I hope, fix) the source of the problem.
Don’t Panic!
My friend, this is the first — and most important — rule of troubleshooting, and yet another of Mark’s Maxims:
 Whatever the problem, you can fix it (or get it fixed).
Most computer owners seem to forget the idea that a hardware or software error can be fixed because they panic. They simply see The Problem, and somehow they feel that they’ll never be able to use their computer again.
Although the situation might look grim, don’t ignore these facts:
![]() You don’t need to scrap your Mac. As long as you haven’t taken a hammer or a chainsaw to your Mac, the problem is only temporary. Sure, individual components do fail over time — heck, so do people — but the problem is certainly something that can be tracked down and fixed without scrapping your entire computer.
You don’t need to scrap your Mac. As long as you haven’t taken a hammer or a chainsaw to your Mac, the problem is only temporary. Sure, individual components do fail over time — heck, so do people — but the problem is certainly something that can be tracked down and fixed without scrapping your entire computer.
![]() Don’t beat yourself up. As long as you haven’t installed a virus on purpose or deleted half your system files to spite yourself, the problem isn’t your fault. Sure, it’s possible that you might have done something by accident, but don’t blame yourself — accidents happen to everybody. (Trust me, I do mean everybody. Even those Apple engineers, I’m told.)
Don’t beat yourself up. As long as you haven’t installed a virus on purpose or deleted half your system files to spite yourself, the problem isn’t your fault. Sure, it’s possible that you might have done something by accident, but don’t blame yourself — accidents happen to everybody. (Trust me, I do mean everybody. Even those Apple engineers, I’m told.)
![]() Trust your Apple dealer. As long as an Apple dealer is in your area, you can usually get your computer repaired professionally if a component’s gone south. (In some cases, professional help is a necessity: For example, I’d be a fool to try to fix a power supply or a monitor on my own because both can pack a heavy electrical punch.)
Trust your Apple dealer. As long as an Apple dealer is in your area, you can usually get your computer repaired professionally if a component’s gone south. (In some cases, professional help is a necessity: For example, I’d be a fool to try to fix a power supply or a monitor on my own because both can pack a heavy electrical punch.)
![]() Rely on your backup. As long as you’ve made a backup, you won’t lose much (if any) work. (You did back up your hard drive, didn’t you? I harp about backups further in Chapter 9 of this minibook.) I’m talking about a backup to an external hard drive here, using either an application such as Disk Utility or Mountain Lion’s Time Machine feature (also covered in Chapter 9). At the very least, make a “quickie” backup of your most important stuff, copied directly to a recordable DVD or USB flash drive.
Rely on your backup. As long as you’ve made a backup, you won’t lose much (if any) work. (You did back up your hard drive, didn’t you? I harp about backups further in Chapter 9 of this minibook.) I’m talking about a backup to an external hard drive here, using either an application such as Disk Utility or Mountain Lion’s Time Machine feature (also covered in Chapter 9). At the very least, make a “quickie” backup of your most important stuff, copied directly to a recordable DVD or USB flash drive.
Commit these facts to head and heart, and you can rest easy while you track down and attack the real enemy — whatever’s causing the problem.
The Troubleshooting Process
When I first conceived this chapter, I decided to divide this section into separate hardware and software troubleshooting procedures. However, that approach is impractical because often you won’t know whether a problem is caused by hardware or software until you’re practically on top of it.
Therefore, here’s the complete 12-step troubleshooting process that I designed while working as a consultant and Macintosh hardware technician for 20 years. Feel free to add your own embellishments in the margin or include reminders with sticky notes.
 If you’re not sure quite what’s producing the error, this process is designed to be linear — followed in order — but if you already know that you’re having a problem with one specific peripheral or one specific application, feel free to jump to the steps that concern only hardware or software.
 I recommend creating a completely default user account for troubleshooting — what techs call a “vanilla” or “clean” account. You can use your vanilla account to test whether a problem occurs system-wide or is limited to a single user account. This is a great way to determine whether an application is misbehaving because of a corrupted preference file: If the same problem doesn’t appear when you use the application with the vanilla account, the culprit is likely the user’s copy of the application’s preference file or a corrupt font. (Follow the instructions provided by the application for resetting or deleting the preference file it creates.)
Step 1: Always try a simple shutdown
You’d be amazed at how often a reboot (shutting down and restarting) can cure a temporary problem. For example, this can fix the occasional lockup in OS X or a keyboard that’s not responding because of a power failure. If possible, make sure that you first close any open documents. As your first (and best) option for shutting down, click the Apple menu (![]() ) and then choose Shut Down.
) and then choose Shut Down.
When troubleshooting, always do a shutdown instead of simply restarting the computer because when OS X shuts down, all the hardware components that make up your system are reset.
If your Mac is locked tight and you can’t use the Shut Down command, you have two choices. First, press and hold the Power button on your Mac for a few seconds. This will turn off your computer. If this doesn’t work — and, from time to time, it actually doesn’t — you have to physically pull the power cord from the wall (or turn off the surge protector, if you’re using one). This is the Last Resort.
Step 2: Check all cable connections
Check all connections: the AC power cord and the keyboard cord, as well as any modem or network connections and all cable connections to external peripherals. Look for loose connectors, especially if you have a cat or dog — don’t forget to check for chew marks. (Yep, that’s the voice of experience talking there.) If you’ve recently replaced a cable — especially a network, Universal Serial Bus (USB), or FireWire cable — replace it with a spare to see whether the problem still occurs.
Step 3: Retrace your steps
If the problem continues to occur, the next step is to consider what you’ve done in the immediate past that could have affected your Mac. Did you install any new software, or have you connected a new peripheral? If your Mac was working fine until you made the change to your system, the problem likely lies in the new hardware or software.
![]() If you added an external device: Shut down your Mac and disconnect the peripheral. Then turn on the computer to see whether all proceeds normally. If so, check the peripheral’s documentation and make sure that you correctly installed the driver — the software provided by the device manufacturer — and that you connected it properly to the right port. (You can also use the System Information utility, which I discuss later in this chapter, to check to see whether your Mac recognizes the external device.) To verify that the cable works, substitute another cable of the same type or try the peripheral on another Mac.
If you added an external device: Shut down your Mac and disconnect the peripheral. Then turn on the computer to see whether all proceeds normally. If so, check the peripheral’s documentation and make sure that you correctly installed the driver — the software provided by the device manufacturer — and that you connected it properly to the right port. (You can also use the System Information utility, which I discuss later in this chapter, to check to see whether your Mac recognizes the external device.) To verify that the cable works, substitute another cable of the same type or try the peripheral on another Mac.
Make it a practice to check the manufacturer’s website for the latest driver when you get new hardware. The software that ships in the box with your new toy could have been on the shelf for months before being sold, and the manufacturer has probably fine-tuned the driver in the interim. You should also run Software Update to verify that the drivers that Apple supplies are up-to-date. (Read about Software Update in Chapter 9 of this minibook.)
![]() If you installed new software or applied an update/patch: Follow the guidelines in Chapter 9 of this minibook to uninstall the application and search for any files that it might have created elsewhere. (Searching by date created and date modified can help you locate files that were recently created.) If this fixes the problem, it’s time to contact the developer and request technical support for the recalcitrant program; you can always reinstall the program after the problem has been solved by the developer.
If you installed new software or applied an update/patch: Follow the guidelines in Chapter 9 of this minibook to uninstall the application and search for any files that it might have created elsewhere. (Searching by date created and date modified can help you locate files that were recently created.) If this fixes the problem, it’s time to contact the developer and request technical support for the recalcitrant program; you can always reinstall the program after the problem has been solved by the developer.
Not all versions of OS X are created equal. If you recently upgraded to a major or minor new release of OS X, some of the applications that you’ve been using without trouble for months can suddenly go on the warpath and refuse to work (or exhibit quirky behavior). If this happens, visit the developer’s website often to look for a patch file that will update the application to work with the new version of OS X.
![]() If you recently made a change within System Preferences: Maybe you inadvertently “bumped” something. For instance, you might have accidentally changed your modem or network settings or perhaps made a change to your login options. Verify the settings screens that you visited to make sure that everything looks okay.
If you recently made a change within System Preferences: Maybe you inadvertently “bumped” something. For instance, you might have accidentally changed your modem or network settings or perhaps made a change to your login options. Verify the settings screens that you visited to make sure that everything looks okay.
Step 4: Run Disk Utility
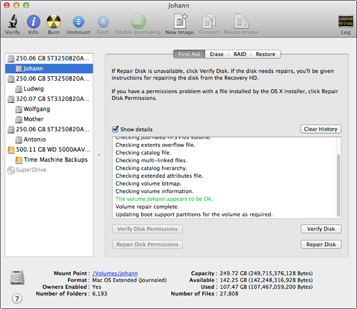
Next, click the Launchpad icon on the Dock and click the Utilities icon; then run Disk Utility (as shown in Figure 11-1) to check for disk errors and permissions errors — especially permissions errors, which can wreak absolute havoc on just about any application on your hard drive. (From the Finder menu, you can also choose Go⇒Utilities and then double-click the Disk Utility icon to launch the application.) Chapter 9 of this minibook provides all the details on Disk Utility.
Figure 11-1: Use Disk Utility to check the integrity of your drive and files.
Step 5: Run antivirus software
Run your antivirus software and scan your entire system for viruses and other malware, including all system disks and removable disks. Although OS X doesn’t come with antivirus protection built in, the world-class program Intego VirusBarrier X6 (www.intego.com
) constantly scans each file that you open or download for infections. You can also run the great freeware ClamXav 2 virus scanner (available for downloading at www.clamxav.com
).
If you haven’t already set your antivirus application to automatically update itself, download the latest virus update — usually called a signature file or data file — to keep your virus protection current.
Step 6: Check the Trash
Check the contents of your Trash to make sure that you haven’t inadvertently tossed something important that could be causing trouble for an application. Click the Trash icon on the Dock to open the Trash window and peruse its contents. (To see the file types easier, switch to List view mode.) To restore items to their rightful place, drag them from the Trash back to the correct folder on your hard drive.
Step 7: Check online connections
If you’re connected to an Ethernet network, a cable modem, or a digital subscriber line (DSL), check your equipment to make sure that you’re currently online and receiving packets normally. Your network system administrator will be happy to help you with this, especially if you’re blood relatives.
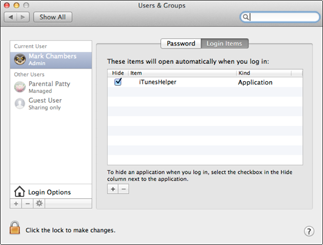
Step 8: Disable troublesome Login Items
Disable any Login Items that might be causing trouble. As you can read in Book II, Chapter 3, Login Items are launched automatically as soon as you log in. For example, an older application that doesn’t fully support OS X Mountain Lion can cause problems if used as a Login Item. You can do this from the Login Items settings in the System Preferences Accounts pane (as shown in Figure 11-2); click the Apple menu (![]() ), choose System Preferences, click Users & Groups, and then click the Login Items tab.
), choose System Preferences, click Users & Groups, and then click the Login Items tab.
Figure 11-2: A mis-behaving Login Item can cause you a world of grief.
Unfortunately, if a Login Item doesn’t display an error message, your old friend Trial-and-Error is just about the only sure-fire way to detect which item (if any) is causing the problem. Click an item to select it, click the Remove button (marked with a minus sign), and then press ![]() +Q to quit System Preferences. Log out to see whether the problem’s solved. (If not, don’t forget to add the item again to the Login Items list.)
+Q to quit System Preferences. Log out to see whether the problem’s solved. (If not, don’t forget to add the item again to the Login Items list.)
You can also disable Login Items entirely when you reboot. If the login window appears when you reboot your computer, hold down the Shift key and then click the Login button. If you don’t see the login window when you reboot, hold down the Shift key when you see the James Bond–style twirling progress indicator in the startup window and continue to hold down the key until the Finder appears.
Step 9: Turn off your screen saver
Another candidate for intermittent lockups is your screen saver, especially if you’re running a shareware effort written by a 12-year-old with a limited attention span. Display your System Preferences, choose Desktop & Screen Saver, and click the Screen Saver tab. You can deactivate the saver entirely (by moving the Start Screen Saver slider to Never) or choose the Computer Name saver (which is provided by Apple) from the Screen Savers list.
Step 10: Check for write protection
If you’re running a multiuser ship, check to make sure that another user with administrator access hasn’t accidentally write-protected your documents, your application, or its support files. If possible, log in with an administrator account yourself (as I describe in Book II, Chapter 5) and then try running the application or opening the document that you were unable to access under your own ID.
Trying an application under the aforementioned “clean” account is also a great way to determine whether your user-specific preference file for that application has been corrupted. If you can run the application using your “clean” account, contact the software developer to see how you can repair or delete a preference file that’s causing problems.
Step 11: Check your System Information
If you’ve reached this point in the troubleshooting process and haven’t found the culprit, you’ve probably experienced a hardware failure in your Macintosh. If possible, display the Hardware category within the Apple System Information utility (see Figure 11-3) and make sure that it can recognize and use all the internal drives, ports, and external devices on your Mac. To start System Information, click the Launchpad icon on the Dock, click the Utilities folder icon, and then click the System Information icon. Alternatively, open your Utilities folder (inside the Applications folder) and double-click the System Information icon.
Step 12: Reboot with the OS X Recovery HD volume
In case your Mac is in seriously sad shape and won’t even boot from its hard drive, here’s a last step that you can take before you seek professional assistance: Check your Mac from the OS X Recovery HD volume. Reboot and hold down the ![]() +R keyboard shortcut immediately after you hear the startup chord, then run Disk Utility from the window that appears. Because you’ve booted the system from the Recovery HD volume, you can verify and repair problems with your startup hard drive. (Some new Mac models also come with a diagnostic DVD that can help you pin down hardware problems.) After you’re done, restart your system.
+R keyboard shortcut immediately after you hear the startup chord, then run Disk Utility from the window that appears. Because you’ve booted the system from the Recovery HD volume, you can verify and repair problems with your startup hard drive. (Some new Mac models also come with a diagnostic DVD that can help you pin down hardware problems.) After you’re done, restart your system.
Figure 11-3: Use System Information to check the devices and ports on your system.

Booting from the Recovery HD volume also allows you to restore your system from your most recent Time Machine backup — a real life-saver if your Mac’s internal drive was the victim of catastrophe. (Think “accidental format.” No, wait, don’t even think it.)
Do I Need to Reinstall OS X?
To be honest, this is a difficult question to answer. Technically, you should never need to reinstall the Big X, but there’s also no reason why you can’t.
I can think of only two scenarios where reinstalling the operating system will likely solve a problem. One, if your system files have been so heavily corrupted — by a faulty hard drive or a rampaging virus, for example — that you can’t boot OS X at all. Two, if the operating system encounters the death-dealing kernel panic on a regular basis. A kernel panic displays a dialog that instructs you to restart your Mac (in multiple languages, no less), usually overwriting whatever’s on the monitor at the time. (This is analogous to the infamous Windows Blue Screen of Death — I’ve grown to hate that shade of blue with a passion.)
 If you receive kernel panics on an ongoing basis, something is really, really wrong. Make sure that your documents are copied to a rewriteable DVD or network drive, and don’t overwrite any existing backup that you have with a new backup because the backup application is likely to lock up as well.
To reinstall, you can turn once again to Mountain Lion’s Recovery HD volume. (That thing really comes in handy!) Reboot and hold down the ![]() +R startup shortcut immediately after you hear your Mac’s startup chord, and then click the Reinstall OS X option in the window that appears.
+R startup shortcut immediately after you hear your Mac’s startup chord, and then click the Reinstall OS X option in the window that appears.
It’s Still Not Moving: Troubleshooting Resources
As I mention earlier in this chapter, you can pursue other avenues to get help when you can’t solve a troubleshooting problem on your own. Mind you, I’m talking about professional help from sources that you can trust. Although you can find quite a bit of free advice on the Internet (usually on privately run websites and in the Internet newsgroups), most of it isn’t worth your effort. In fact, some of it’s downright wrong. That said, here are some sources that I do recommend.
The OS X Help Center
Although most OS X owners tend to blow off the Help Center when the troubleshooting gets tough, that’s never the best course of action. Always take a few moments to search the contents of the Help Center — click Help on the Finder menu — to see whether any mention is made of the problem that you’ve encountered.
The Apple OS X Support site
Home to all manner of support questions and answers, the OS X Support section of the Apple website (www.apple.com/support
) should be your next stop in case of trouble that you can’t fix yourself. Topics include
![]() Startup issues
Startup issues
![]() Internet and networking problems
Internet and networking problems
![]() Printing problems
Printing problems
You can search the Apple Knowledge Base, download the latest updates and electronic manuals, and participate in Apple-moderated discussion boards from this one central location.
Your local Apple dealer
Naturally, an Apple dealer can provide just about any support that you’re likely to need — for a price — but you can usually get the answers to important questions without any coinage changing hands. Your dealer is also well versed in the latest updates and patches that can fix those software incompatibility problems. Check your telephone book for your local dealer.