
Chapter 1: Desktop Publishing with Pages
In This Chapter
![]() Creating a Pages document
Creating a Pages document
![]() Entering and editing text
Entering and editing text
![]() Formatting text
Formatting text
![]() Inserting tables and graphics
Inserting tables and graphics
![]() Resizing objects
Resizing objects
![]() Checking your spelling
Checking your spelling
![]() Printing Pages documents
Printing Pages documents
![]() Sharing your work
Sharing your work
What’s the difference between word processing and desktop publishing? In a nutshell, it’s in how you design your document. Most folks use a word processor like an old-fashioned typewriter. Think Microsoft Word and a typical business letter. (Yawn.)
On the other hand, a desktop publishing application typically allows you far more creativity in choosing where you place your text, how you align graphics, and how you edit formats. I think desktop publishing is more visual and intuitive, allowing your imagination a free hand at creating a document.
In this chapter, I show you how to set your inner designer free from the tedious constraints of word processing! Whether you need a simple letter, a stunning brochure, or a multipage newsletter, Pages can handle the job with ease — and you’ll be surprised at how simple it is to use.
Creating a New Pages Document
Every visual masterpiece starts somewhere, and with Pages, the first stop in creating your document is the Template Chooser window. To create a new Pages document from scratch, follow these steps:
1. Click the Launchpad icon on the Dock.
2. Click the Pages icon.
Pages displays the Template Chooser window that you see in Figure 1-1.
Figure 1-1: Select a template from the Template Chooser window.
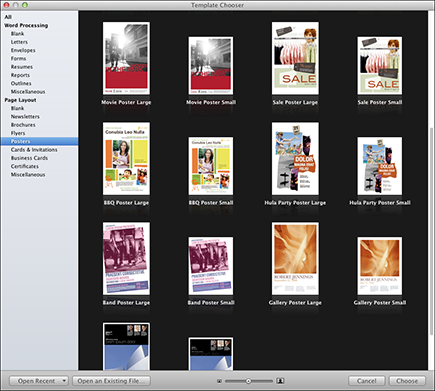
3. Click the type of document you want to create in the list to the left. The thumbnails on the right are updated with templates that match your choice.
4. Click the template that most closely matches your needs.
5. Click the Choose button to open a new document in the template you selected.
Opening an Existing Pages Document
Of course, you can always open an existing Pages document from a Finder window — just double-click the document icon. (Mountain Lion’s All My Files location in the Finder window sidebar makes it crazy-easy to track down a document.) However, you can also open a Pages document from within the program. Follow these steps:
1. From within Launchpad, click the Pages icon to run the program.
2. Press ![]() +O to display the Open dialog.
+O to display the Open dialog.
The Open dialog operates much the same as a Finder window in Icon, List, Column, or Flow view mode.
3. Click the desired drive in the Devices list at the left of the dialog and then drill down through folders and subfolders until you locate the Pages document.
Alternatively, you can use the Search box at the top-right corner of the Open dialog to locate the document. Click in the Search box and type a portion (or all) of the file name, and then choose Filename Contains from the pop-up menu that appears. You can also search the contents of your files for a specific phrase.
4. Double-click the filename to load it.
 If you want to open a Pages document that you’ve recently edited, things get even easier! Just choose File⇒Open Recent, and you can open the document with a single click from the submenu that appears.
Saving Your Work
Although Pages fully supports Mountain Lion’s Auto Save feature, you may feel the need to manually save your work after you finish it (or to take a break while designing). Follow these steps to save a document for the first time:
1. With the Pages document open, press ![]() +S.
+S.
2. Type a filename for your new document.
3. Open the Where pop-up menu and choose a location to save the document.
Alternatively, click the button sporting the down arrow to expand the Save As sheet. This allows you to navigate to a different location, or to create a new folder to store this Pages project.
4. Click Save.
 After you save a Pages document for the first time, you can create a version of that document by choosing File⇒Save a Version. To revert the current document to an older version, choose File⇒Revert Document. Pages gives you the option of reverting to the last saved version, or you can click Older Version to browse multiple versions of the document and choose one of those to revert to.
Touring the Pages Window
Before diving into any real work, take a quick tour of the Pages window! You’ll find the following major components and controls, as shown in Figure 1-2:
Figure 1-2: The major points of interest in the Pages window.
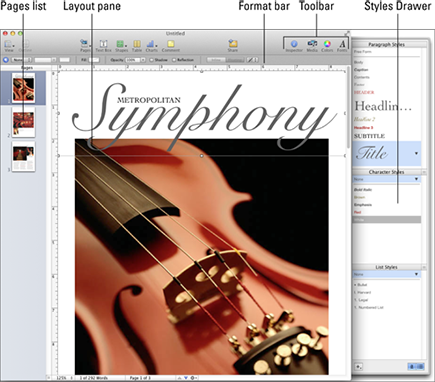
![]() Pages list: This thumbnail list displays all the pages you’ve created within your document. (For a single-page document, of course, the Page list will contain only a single thumbnail.) You can switch instantly between different pages in your document by clicking the desired thumbnail in the list.
Pages list: This thumbnail list displays all the pages you’ve created within your document. (For a single-page document, of course, the Page list will contain only a single thumbnail.) You can switch instantly between different pages in your document by clicking the desired thumbnail in the list.
![]() Layout pane: This section, which takes up most of the Pages window, is where you design and edit each page in your document.
Layout pane: This section, which takes up most of the Pages window, is where you design and edit each page in your document.
![]() Toolbar: Yep, Pages has its own toolbar. The toolbar keeps all the most common application controls within easy, one-click reach.
Toolbar: Yep, Pages has its own toolbar. The toolbar keeps all the most common application controls within easy, one-click reach.
![]() Styles Drawer: This window extension allows you to quickly switch the appearance of selected paragraphs, characters, and lists. You can hide and display the Styles Drawer from the View menu or from the View drop-down menu on the toolbar.
Styles Drawer: This window extension allows you to quickly switch the appearance of selected paragraphs, characters, and lists. You can hide and display the Styles Drawer from the View menu or from the View drop-down menu on the toolbar.
![]() Format bar: This button strip runs underneath the Pages toolbar, with tools to format selected text, paragraphs, and lists on the fly.
Format bar: This button strip runs underneath the Pages toolbar, with tools to format selected text, paragraphs, and lists on the fly.
Entering and Editing Text
If you’ve used a modern word processing program on any computer — including “freebies” such as TextEdit on a Mac or WordPad on a PC — you’ll feel right at home typing within Pages. Just in case, however, review the high points:
![]() The bar-shaped text cursor, which looks like a capital letter I, indicates where the text you enter will appear within a Pages document.
The bar-shaped text cursor, which looks like a capital letter I, indicates where the text you enter will appear within a Pages document.
![]() To enter text, simply begin typing. Your characters appear at the text cursor.
To enter text, simply begin typing. Your characters appear at the text cursor.
![]() To edit existing text in your Pages document, click the insertion cursor at any point in the text and drag the insertion cursor across the characters to highlight them. Type the replacement text, and Pages automatically replaces the existing characters with the ones you type.
To edit existing text in your Pages document, click the insertion cursor at any point in the text and drag the insertion cursor across the characters to highlight them. Type the replacement text, and Pages automatically replaces the existing characters with the ones you type.
![]() To delete text, click and drag across the characters to highlight them; then press Delete.
To delete text, click and drag across the characters to highlight them; then press Delete.
Using Text and Graphics Boxes
Within Pages, text and graphics appear in boxes, which can be resized by clicking and dragging any handle that appears around the edges of the box. When you hover your mouse cursor over one of the square handles and it changes to a double-sided arrow, Pages is ready to resize the box.
You can also move a box, including all the stuff it contains, to another location within the Layout pane. Click in the center of the box and drag the box to the desired spot, or hold down the Option key while you drag to create a copy in the new location. Pages displays blue alignment lines to help you align the box with other elements around it (or with regular divisions of the page, such as the vertical center of a poster or flyer). Figure 1-3 illustrates a box containing text that I’m moving; note the vertical alignment line that automatically appears.
Figure 1-3: Move a text box within the Layout pane.

To select text or graphics within a box, you must first click the box to select it and then click again on the line of text or the graphic that you want to change.
The Three Amigos: Cut, Copy, and Paste
“Hang on, Mark, you’ve covered moving stuff, but what if you want to copy a block of text or a photo to a second location? Or how about cutting something from a document open in another application?” Good questions, dear reader! That’s when you can call on the power of the cut, copy, and paste features within Pages. The next few sections explain how you do these actions.
Cutting stuff
Cutting selected text or graphics removes it from your Pages document and places that material on your Clipboard. (Think of the Clipboard as a holding area for snippets of text and graphics that you want to manipulate.) To cut text or graphics, select some material and do one of the following:
![]() Choose Edit⇒Cut.
Choose Edit⇒Cut.
![]() Press
Press ![]() +X.
+X.
If you simply want to remove the selected material from your Pages document (and you don’t plan to paste it somewhere else), just select the text and press the Delete key.
Copying text and images
When you copy text or graphics, the original selection remains untouched, but a copy of the selection is placed in the Clipboard. Select some text or graphics and do one of the following:
![]() Choose Edit⇒Copy.
Choose Edit⇒Copy.
![]() Press
Press ![]() +C.
+C.
If you cut or copy a new selection onto the Clipboard, it erases what was there. In other words, the Clipboard holds only the latest material you cut or copied.
You can also let your cursor do the work! Hold down the Option key while dragging selected items to copy them to a new location.
Pasting from the Clipboard
Are you wondering what you can do with stuff that’s stored on your Clipboard? Pasting the contents of the Clipboard places the material at the current location of the insertion cursor. You can repeat a paste operation as often as you like because the contents of the Clipboard aren’t cleared. However, remember that the Clipboard holds only the contents of your last copy or cut operation, so you must paste the contents before you cut or copy again to avoid losing what’s in the Clipboard.
To paste the Clipboard contents, click the insertion cursor at the location you want and do one of the following:
![]() Choose Edit⇒Paste.
Choose Edit⇒Paste.
![]() Press
Press ![]() +V.
+V.
Formatting Text the Easy Way
If you feel that some (or all) of the text in your Pages document needs a facelift, you can format that text any way you like. Formatting lets you change the color, font family, character size, and attributes as necessary.
After the text is selected, you can apply basic formatting in two ways:
![]() Use the Format bar. The Format bar appears directly underneath the Pages toolbar (refer to Figure 1-2). Click to select a font control to display a pop-up menu and then click your choice. For example, click the Font Family button and then change the font family from ho-hum Arial to a more daring font. You can also select characteristics, such as the font’s background color (perfect for “highlighting” items), or choose italicizing or bolding. The Format bar also provides buttons for text alignment (Align Left, Center, Align Right, and Justify).
Use the Format bar. The Format bar appears directly underneath the Pages toolbar (refer to Figure 1-2). Click to select a font control to display a pop-up menu and then click your choice. For example, click the Font Family button and then change the font family from ho-hum Arial to a more daring font. You can also select characteristics, such as the font’s background color (perfect for “highlighting” items), or choose italicizing or bolding. The Format bar also provides buttons for text alignment (Align Left, Center, Align Right, and Justify).
![]() Use the Format menu. Most controls on the Format bar are also available from the Format menu. Click Format and hover the mouse cursor over the Font menu item, and you can then apply bolding, italicizing, and underlining to the selected text. You can also make the text bigger or smaller. To change the alignment from the Format menu, click Format and hover the mouse cursor over the Text menu item.
Use the Format menu. Most controls on the Format bar are also available from the Format menu. Click Format and hover the mouse cursor over the Font menu item, and you can then apply bolding, italicizing, and underlining to the selected text. You can also make the text bigger or smaller. To change the alignment from the Format menu, click Format and hover the mouse cursor over the Text menu item.
Adding a Spiffy Table
In the world of word processing, a table is a celled grid that holds text or graphics for easy comparison. Many computer owners think of a spreadsheet program like Numbers when they think of a table (probably because of the rows and columns layout used in a spreadsheet), but you can create a custom table layout within Pages with a few simple mouse clicks.
Follow these steps:
1. Click the insertion cursor at the location where you want the table to appear.
2. Click the Table button on the Pages toolbar.
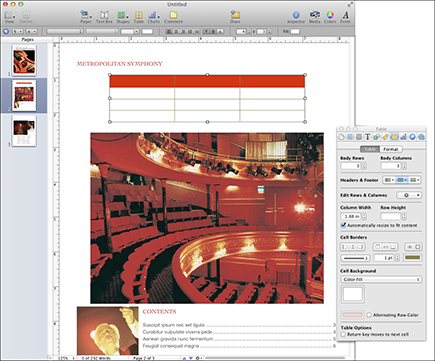
Pages inserts a simple table and displays the Table Inspector. (Both are visible in Figure 1-4.)
By default, Pages creates a table with three rows and three columns, with an extra row for headings at the top. You can change this layout from the Table Inspector by clicking in the Body Rows or Body Columns field and typing a number.
Figure 1-4: Preparing to tweak a table in my Pages document.
3. Click within a cell in the table to enter text. The table cell automatically resizes and “wraps” the text you enter to fit.
You can paste material from the Clipboard into a table. See the earlier section “Pasting from the Clipboard” for details on pasting.
4. To change the borders on a cell, click the cell to select it and then click one of the Cell Borders buttons to change the border.
Select multiple cells in a table by holding down Shift while you click.
5. To add a background color (or even fill cells with an image for a background), open the Cell Background pop-up menu and choose a type of background.
Adding Alluring Photos
You can choose from two methods of adding a picture within your Pages document: as a floating object, meaning that you can place the image in a particular spot and it doesn’t move, even if you make changes to the text; and as an inline object, which flows with the surrounding text as you make layout changes.
![]() Add a floating object. Drag an image file from a Finder window and place it where you want within your document. Alternatively, click the Media button on the toolbar, click Photos, navigate to the location where the file is saved, and drag the image thumbnail to the spot you want in the document. Figure 1-5 illustrates the Media Browser in action.
Add a floating object. Drag an image file from a Finder window and place it where you want within your document. Alternatively, click the Media button on the toolbar, click Photos, navigate to the location where the file is saved, and drag the image thumbnail to the spot you want in the document. Figure 1-5 illustrates the Media Browser in action.
Note that a floating object (such as a shape or an image) can be sent to the background, where text will not wrap around it. (Think shaded background shape, or an image as a background.) To bring a background object back as a regular floating object, click the object to select it and choose Arrange⇒Bring Background Objects to Front. (More about background objects later in this chapter.)
Figure 1-5: Hey, isn’t that the Pages Media Browser?

![]() Add an inline object. Hold down the
Add an inline object. Hold down the ![]() key while you drag an image file from a Finder window and place it where you want within your document. You can also click the Media toolbar button and click Photos to display the Media Browser. Navigate to the location where the file is saved, hold down the
key while you drag an image file from a Finder window and place it where you want within your document. You can also click the Media toolbar button and click Photos to display the Media Browser. Navigate to the location where the file is saved, hold down the ![]() key, and drag the image thumbnail to the spot where you want it in the document.
key, and drag the image thumbnail to the spot where you want it in the document.
To move either type of object to another spot on the page, click it to select it (the handles will appear around the object) and then click in the center of the object and drag it to the new position.
Adding a Background Shape
To add a shape (such as a rectangle or circle) as a background for your text, follow these steps:
1. Click the insertion cursor in the location you want.
2. Click the Shapes button on the Pages toolbar and choose a shape.
The shape appears in your document.
3. Click the center of the shape and drag it to a new spot.
Like object boxes, shapes can be resized or moved.
4. Before you can type over a shape, remember to select it and choose Arrange⇒Send Object to Background.
Are You Sure About That Spelling?
Pages can check spelling as you type (the default setting) or check it after you complete your document. If you find automatic spell-checking distracting, you should definitely pick the latter method.
As my technical editor reminds us, spell-checking confirms only that a sequence of characters is a correctly spelled word — not that it’s the right word for the job! If you’ve ever “red” a document that someone else “rote,” you know what he means, “deer” reader.
To check spelling as you type, follow these steps:
1. Click Edit and hover the mouse cursor over the Spelling menu item.
2. Click Check Spelling as You Type.
If a possible misspelling is found, Pages underlines the word with a red, dashed line.
3. Right-click the word to choose a possible correct spelling from the list, or you can ignore the word if it’s spelled correctly.
To turn off automatic spell checking, click the Check Spelling as You Type menu item again to toggle it off.
To check spelling manually, follow these steps:
1. Click within the document to place the text insertion cursor where the spell check should begin.
2. Click Edit and hover the mouse cursor over the Spelling menu item; then choose Check Spelling.
3. Right-click any possible misspellings and choose the correct spelling, or choose Ignore if the word is spelled correctly.
Printing Your Pages Documents
Ready to start the presses? You can print your Pages document on real paper, of course, but don’t forget that you can also save a tree by creating an electronic, PDF-format document instead of a printout. (For the lowdown on PDF printing, visit Book VII, Chapter 4.)
To print your Pages document on old-fashioned paper, follow these steps:
1. Within Pages, choose File⇒Print.
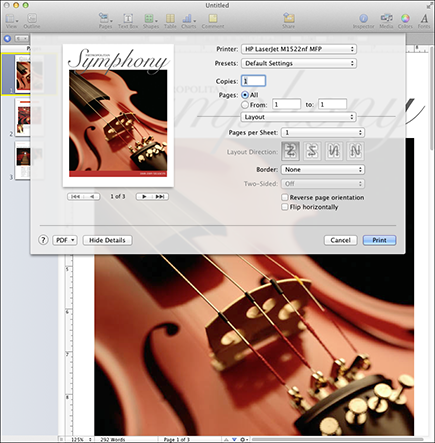
Pages displays the Print sheet you see in Figure 1-6.
2. In the Copies field, enter the number of copies you need.
3. Select the pages to print.
• To print the entire document: Select the All radio button.
• To print a range of selected pages: Select the From radio button and enter the starting and ending pages.
4. Click the Print button to send the document to your printer.
Figure 1-6: Preparing to print a work of art within Pages.
Sharing That Poster with Others
Besides printing — which is, after all, so passé — you can choose to share your Pages document electronically:
![]() Sharing through e-mail. Choose Share⇒Send via Mail, and you can choose to add your Pages document to a Mail message in three different formats: as a native Pages document file, as a Word format document, or as a PDF file. After you select a format, Pages obligingly launches Apple Mail for you automatically and creates a new message, ready for you to address and send!
Sharing through e-mail. Choose Share⇒Send via Mail, and you can choose to add your Pages document to a Mail message in three different formats: as a native Pages document file, as a Word format document, or as a PDF file. After you select a format, Pages obligingly launches Apple Mail for you automatically and creates a new message, ready for you to address and send!
![]() Exporting. Don’t forget that Pages can export your work in one of four different formats: a PDF document, a Word format document, an RTF (Rich Text Format) file, or plain text. Choose Share⇒Export, pick your format, click Next, and then select the location where Pages should save the file. Click Export and sit back while your favorite desktop publishing application does all the work.
Exporting. Don’t forget that Pages can export your work in one of four different formats: a PDF document, a Word format document, an RTF (Rich Text Format) file, or plain text. Choose Share⇒Export, pick your format, click Next, and then select the location where Pages should save the file. Click Export and sit back while your favorite desktop publishing application does all the work.
To keep your document as close to how it appears in Pages as possible, I recommend either PDF or Word. Your document will retain far more of your original formatting than an RTF or plain-text document would.