
Chapter 4: You Mean Others Can Use My Mac, Too?
In This Chapter
![]() Understanding how multiuser systems work
Understanding how multiuser systems work
![]() Configuring login settings
Configuring login settings
![]() Changing the appearance of the login screen
Changing the appearance of the login screen
![]() Tightening security during login
Tightening security during login
![]() Starting applications automatically when you log in
Starting applications automatically when you log in
Whether you’re setting up OS X for use in a public library or simply allowing your tweener to use your Mac in your home office, configuring Mountain Lion for multiple users is a simple task. However, you must also consider the possible downsides of a mismanaged multiuser system: files and folders being shared that you didn’t want in the public domain, users logging in as one another, and the very real possibility of accidental file deletion (and worse).
Therefore, in this chapter, I show you how to take those first steps before you open Pandora’s Box — setting login options, configuring the personal account that you created when you first installed the operating system, and protecting your stuff. Network administrators call this security check-up “locking things down.” Better start using the terminology now, even before you buy your suspenders and pocket protector.
How Multiuser Works on OS X
When you create multiple users in OS X, each person who uses your Macintosh — hence the term user — has a separate account (much like an account that you might open at a bank). OS X creates a Home folder for each user and saves that user’s preferences independently from those of other users. When you log in to OS X, you provide a username and a password, which identify you. The username/password combination tells OS X which user has logged in — and therefore which preferences and Home folder to use.
Each account also carries a specific level, which determines how much control the user has over OS X and the computer itself. Without an account with the proper access level, for example, a user might not be able to display many of the panes in System Preferences.
The three most common account levels are
![]() Root: Also called System Administrator, this über-account can change anything within OS X — and that’s usually A Very Bad Thing, so it’s actually disabled as a default. (This alone should tell you that the Root account shouldn’t be toyed with.) For instance, the Root account can seriously screw up the Unix subsystem within OS X, or a Root user can delete files within the OS X System Folder.
Root: Also called System Administrator, this über-account can change anything within OS X — and that’s usually A Very Bad Thing, so it’s actually disabled as a default. (This alone should tell you that the Root account shouldn’t be toyed with.) For instance, the Root account can seriously screw up the Unix subsystem within OS X, or a Root user can delete files within the OS X System Folder.
 Enable the System Administrator account and use it only if told to do so by an Apple technical support technician.
![]() Administrator: (Or admin for short.) This is the account level that you’re assigned when you install OS X. The administrator account should not be confused with the System Administrator account!
Administrator: (Or admin for short.) This is the account level that you’re assigned when you install OS X. The administrator account should not be confused with the System Administrator account!
 It’s perfectly okay for you or anyone you assign to use an administrator account. An administrator can install applications anywhere on the system, create/edit/delete user accounts, and make changes to all the settings in System Preferences. However, an administrator can’t move or delete items from any other user’s Home folder, and administrators are barred from modifying or deleting files in the OS X System Folder. (There are Unix commands you can use from the Terminal application that can work around these restrictions. However, I agree with Apple’s thinking — these locations on your system are off-limits for good reason.)
A typical multiuser OS X computer has only one administrator — like a teacher in a classroom — but technically, you can create as many administrator accounts as you like. If you do need to give someone else this access level, assign it only to a competent, experienced user whom you trust.
![]() Standard: A standard user account is the default in OS X. Standard users can install software and save documents only in their Home folders and the Shared folder (which resides in the Users folder), and they can change only certain settings in System Preferences. Thus, they can do little damage to the system as a whole. For example, each of the students in a classroom should be given a standard-level account for the OS X system that they share.
Standard: A standard user account is the default in OS X. Standard users can install software and save documents only in their Home folders and the Shared folder (which resides in the Users folder), and they can change only certain settings in System Preferences. Thus, they can do little damage to the system as a whole. For example, each of the students in a classroom should be given a standard-level account for the OS X system that they share.
If Parental Controls are applied to a standard account, it becomes a managed account, allowing you to fine-tune what a standard account user can do. (I discuss Parental Controls at length in Book II, Chapter 5.)
Chapter 5 of this minibook covers the entire process of creating and editing a user account.
Configuring Your Login Screen
Take a look at the changes you can make to the login process. First, OS X provides two methods of displaying the login screen, as well as one automatic method that doesn’t display the login screen at all:
![]() Logging in with a list: To log in, click your account username in the list, and the login screen displays the password prompt. Type your password — OS X displays Bullet1 characters to ensure security — and then press Return (or click the Log In button).
Logging in with a list: To log in, click your account username in the list, and the login screen displays the password prompt. Type your password — OS X displays Bullet1 characters to ensure security — and then press Return (or click the Log In button).
![]() Logging in with username and password: Type your account username in the Name field and press Tab. Then type your password and press Return (or click the Log In button).
Logging in with username and password: Type your account username in the Name field and press Tab. Then type your password and press Return (or click the Log In button).
![]() Automatic Login: With Automatic Login set, OS X automatically logs in the specified account when you reboot. In effect, you never see the login screen unless you click Log Out from the Apple menu (@app), or you’ve enabled Fast User Switching (more on this in a bit). Naturally, this is an attractive option to use if your computer is in a secure location — such as your office — and you’ll be the only one using your Mac.
Automatic Login: With Automatic Login set, OS X automatically logs in the specified account when you reboot. In effect, you never see the login screen unless you click Log Out from the Apple menu (@app), or you’ve enabled Fast User Switching (more on this in a bit). Naturally, this is an attractive option to use if your computer is in a secure location — such as your office — and you’ll be the only one using your Mac.
To specify which type of login screen you see — if you see one at all — head to System Preferences, click Users & Groups, and then click the Login Options button.
![]() To set Automatic Login, display the Login Options settings, and click the Automatic Login pop-up menu. Choose the account that automatically logs in from the list. When OS X displays the Password sheet that you see in Figure 4-1, type the corresponding password and then click OK.
To set Automatic Login, display the Login Options settings, and click the Automatic Login pop-up menu. Choose the account that automatically logs in from the list. When OS X displays the Password sheet that you see in Figure 4-1, type the corresponding password and then click OK.
Figure 4-1: Configuring Automatic Login from the Accounts panel.
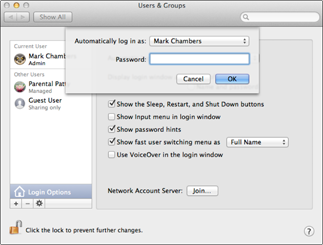
Never set the Automatic Login feature to an admin-level account unless you’re sure to be the only one using your Mac. If the computer is rebooted, you’re opening the door for anyone to simply sashay in and wreak havoc!
![]() To determine whether OS X uses a list login screen, you must again visit the Login Options settings pane (see Figure 4-2). Select the List of Users radio button for a list login screen or select the Name and Password radio button for a simple login screen where you must type your username and password. The latter option is, of course, more secure, but also less convenient than going through the list login screen.
To determine whether OS X uses a list login screen, you must again visit the Login Options settings pane (see Figure 4-2). Select the List of Users radio button for a list login screen or select the Name and Password radio button for a simple login screen where you must type your username and password. The latter option is, of course, more secure, but also less convenient than going through the list login screen.
Figure 4-2: Will that be a simple or a list login screen?

 To change settings specific to your account — no matter what your access level — log in with your account, open System Preferences, and click Users & Groups. From here, you can change your account password and picture, the card marked as yours within the Contacts application, the Apple ID associated with your account and whether Parental Controls are set. You can also specify the Login Items that will be launched automatically when you log in. (Peruse more information on Contacts in Book I, Chapter 7, and read up on how to create your Apple ID in Book I, Chapter 3.)
To log out of OS X without restarting or shutting down the computer, start from the Apple menu (![]() ) and then either choose Log Out or press
) and then either choose Log Out or press ![]() +Shift+Q. You see the confirmation dialog, as shown in Figure 4-3.
+Shift+Q. You see the confirmation dialog, as shown in Figure 4-3.
Figure 4-3: Always click Log Out before you leave your Mac!

OS X displays the login screen after one minute, but someone could still saunter up and click the Cancel button, thereby gaining access to your stuff. Therefore, make it a practice to always click the Log Out button on this screen before your hand leaves the mouse, or bypass the confirmation dialog altogether by holding down the Option key as you click Log Out from the menu!
If you want to use Mountain Lion’s nifty Resume feature (which will restore your Desktop by reopening all your open documents and applications when you log back in), make sure that the Reopen Windows When Logging Back In check box is enabled. If you disable this feature, Mountain Lion will not automatically restore your Desktop when you log back in. (I love Resume, but Apple has wisely made it optional instead of mandatory.)
You can also enable Fast User Switching from the Login Options panel. This feature allows another user to sit down and log in while the previous user’s applications are still running in the background. When you enable switching, Mountain Lion displays the active user’s name or account icon at the right side of the Finder menu bar. Click the name, and a menu appears; click Login Window, and another user can then log in as usual. From the Login Options pane, you can also choose to display the current user by the account’s short name or the account icon.
Even though you’re playing musical chairs, the Big X remembers what’s running and the state of your Desktop when you last left it. (When you decide to switch back, Mountain Lion prompts you for that account’s login password for security . . . just in case, you understand.)
Locking Down Your Mac
If security is a potential problem and you still need to share a Mac between multiple users, lock down things. To protect OS X from unauthorized use, take care of these potential security holes immediately:
![]() Disable the Sleep, Restart, and Shut Down buttons. Any computer can be hacked when it’s restarted or turned on, so disable the Sleep, Restart, and Shut Down buttons on the login screen. (After a user has successfully logged in, OS X can be shut down normally by using the menu item or the keyboard shortcuts that I cover earlier.) Open the Users & Groups pane in System Preferences, click the Login Options button, and deselect the Show the Sleep, Restart, and Shut Down Buttons check box. Press
Disable the Sleep, Restart, and Shut Down buttons. Any computer can be hacked when it’s restarted or turned on, so disable the Sleep, Restart, and Shut Down buttons on the login screen. (After a user has successfully logged in, OS X can be shut down normally by using the menu item or the keyboard shortcuts that I cover earlier.) Open the Users & Groups pane in System Preferences, click the Login Options button, and deselect the Show the Sleep, Restart, and Shut Down Buttons check box. Press ![]() +Q to quit and save your changes. (Read more about restarting and shutting down in Book I, Chapter 2.)
+Q to quit and save your changes. (Read more about restarting and shutting down in Book I, Chapter 2.)
![]() Disable list logins. With a list login, any potential hacker already knows half the information necessary to gain entry to your system — and often, the password is easy to guess. Be prudent and set OS X to ask for the username and password on the Login screen, as I describe earlier. This way, someone has to guess both the username and the password, which is a much harder proposition.
Disable list logins. With a list login, any potential hacker already knows half the information necessary to gain entry to your system — and often, the password is easy to guess. Be prudent and set OS X to ask for the username and password on the Login screen, as I describe earlier. This way, someone has to guess both the username and the password, which is a much harder proposition.
![]() Disable Automatic Login. A true no-brainer. As I mention earlier in the chapter, Automatic Login is indeed very convenient. However, all someone has to do is reboot your Mac, and the machine automatically logs in one lucky user! To disable Automatic Login, display the Users & Groups pane in System Preferences and click the Login Options button. Then, open the Automatic Login pop-up menu and choose the Off entry.
Disable Automatic Login. A true no-brainer. As I mention earlier in the chapter, Automatic Login is indeed very convenient. However, all someone has to do is reboot your Mac, and the machine automatically logs in one lucky user! To disable Automatic Login, display the Users & Groups pane in System Preferences and click the Login Options button. Then, open the Automatic Login pop-up menu and choose the Off entry.
![]() Disable the password hint. By default, OS X obligingly displays the password hint for an account after three unsuccessful attempts at entering a password. Where security is an issue, this is like serving a hacker a piece of apple pie. Warmed, with ice cream. Head to System Preferences, display the Users & Groups settings, click the Login Options button, and make sure that the Show Password Hints check box is clear.
Disable the password hint. By default, OS X obligingly displays the password hint for an account after three unsuccessful attempts at entering a password. Where security is an issue, this is like serving a hacker a piece of apple pie. Warmed, with ice cream. Head to System Preferences, display the Users & Groups settings, click the Login Options button, and make sure that the Show Password Hints check box is clear.
![]() Select passwords intelligently. Although using your mother’s maiden name for a password might seem like a great idea, the best method of selecting a password is to use a completely random group of mixed letters and numbers. If you find a random password too hard to remember, at least add a number after your password, like dietcoke1 — and no, that isn’t one of my passwords. (Nice try.) My editor suggests a favorite location spelled backward, with a number mixed in, which is easier to remember than a completely random sequence of characters!
Select passwords intelligently. Although using your mother’s maiden name for a password might seem like a great idea, the best method of selecting a password is to use a completely random group of mixed letters and numbers. If you find a random password too hard to remember, at least add a number after your password, like dietcoke1 — and no, that isn’t one of my passwords. (Nice try.) My editor suggests a favorite location spelled backward, with a number mixed in, which is easier to remember than a completely random sequence of characters!
For even greater security, make at least one password character uppercase, and use a number at the beginning and ending of the password (1dieTcoke2). Or, add a triplet number to replace characters with numbers, like this: dietc001ke.
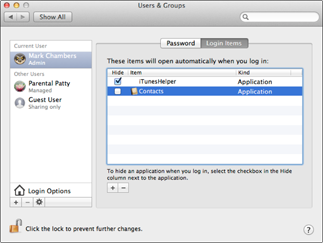
Starting Applications Automatically after Login
Here’s one other advantage to logins: Each account can have its own selection of applications that run automatically when that user logs in. These applications are Login Items, and they appear as a list in the Users & Groups pane (shown in Figure 4-4). A caveat or two:
![]() The users setting their Login Items must be logged in. Only the user can modify his or her own Login Items.
The users setting their Login Items must be logged in. Only the user can modify his or her own Login Items.
![]() Users must have access to System Preferences, or must be able to launch System Preferences. If the person is using a standard-level account and wants to access the account’s login items, the account must allow access to System Preferences. Alternatively, if the application icon appears on the Dock after you launch the application, the user can right-click the application icon on the Dock and choose Options⇒Open at Login from the contextual menu.
Users must have access to System Preferences, or must be able to launch System Preferences. If the person is using a standard-level account and wants to access the account’s login items, the account must allow access to System Preferences. Alternatively, if the application icon appears on the Dock after you launch the application, the user can right-click the application icon on the Dock and choose Options⇒Open at Login from the contextual menu.
Ready? As example, I’m setting Contacts to launch every time I log in.
Open System Preferences, click Users & Groups, click your account to select it, and then click the Login Items tab (see Figure 4-4).
Figure 4-4: Preparing to launch Contacts every time I log in.
Including an application in your Login Items list is easy: Click the button with the plus sign to navigate to the desired application, select it, and then click Add. (Alternatively, you can just drag items from a Finder window and drop them directly into the list.) Note that items in the list are launched in order. If something needs to run before something else, you can drag the item entries into any sequence. (Oh, and you can add an application that appears in the Dock to your Login Items list by just right-clicking on the icon and choosing Options⇒Open at Login from the menu!)
To launch the application in hidden mode — which might or might not display it on the Dock, depending on the application itself — click the list entry for the desired item and enable its Hide check box.