
Chapter 2: . . . And Unix Lurks Beneath
In This Chapter
![]() Discovering the benefits of Unix
Discovering the benefits of Unix
![]() Doing things with the keyboard
Doing things with the keyboard
![]() Introducing Unix commands
Introducing Unix commands
![]() Creating text files
Creating text files
![]() Exploring deep inside OS X Mountain Lion
Exploring deep inside OS X Mountain Lion
As I mention in the first chapter of the book — at the beginning of our Mountain Lion odyssey — Unix lurks deep beneath the shiny Aqua exterior of OS X. Unix is a tried-and-true operating system (OS) that’s been around for decades, since the days when minicomputers were king. If you don’t believe that it’s a powerful (and popular) OS, consider that more than half of all web servers on the Internet use some variety of Unix as their OS of choice.
Besides being battle-tested and having a long history, Unix offers some fantastic features. Unlike the graphical world of OS X, the keyboard plays an integral role in using Unix. Because Unix is text-based, it’s evolved a large set of useful keyboard-driven commands that can perform powerful feats that a mouse user just can’t easily equal, such as moving a huge number of specific files (like Word documents) from one folder to another. This chapter examines the role of the keyboard in Unix and describes how to execute standard file system commands. You also discover how to use a number of simple programs and how to retrieve information from the Internet.
Why Use the Keyboard?
To begin benefiting from the Unix underpinnings of OS X, get used to doing things with the keyboard. Although mouse skills can be applied to using Unix, you’ll generally find performing Unix functions to be faster and easier with the keyboard.
Unix keyboarding is fast
Why on Earth would any red-blooded Macintosh owner want to leave the comfort of the mouse to use a keyboard? After all, the graphical user interface (GUI) is what made the Macintosh great in the first place. After all, with the Finder, you can navigate and manage the various files on your hard drive with a few clicks. This sounds simple enough. For some tasks, though, using the keyboard can be just as fast — if not faster.
Suppose, for example, that you need to copy a file on your hard drive to somewhere on that same drive. In the traditional manner using the Finder, it’s a click-and-drag trek: Open a Finder window, navigate to the file to copy, open another Finder window (![]() +N, because clicking the Finder icon on the Dock doesn’t open a second Finder window), navigate to the folder where you wish to copy the file, duplicate the original file, and then drag that copy to its intended destination.
+N, because clicking the Finder icon on the Dock doesn’t open a second Finder window), navigate to the folder where you wish to copy the file, duplicate the original file, and then drag that copy to its intended destination.
Comparatively, by using the keyboard and the power of Unix, you can accomplish the same task with a one-line command. For some tasks, the mouse is definitely the way to go, but you can perform some other tasks just as quickly, if not faster, with the keyboard. For the skinny on one-line commands, skip to the section, “Uncovering the Terminal.”
The Unix keyboard is a powerful beast
So maybe you’re not an expert typist, and using the mouse still sounds inviting. For many scenarios, you’d be correct in assuming that a mouse can handle the job just as quickly and easily as a bunch of commands that you have to memorize. Using the keyboard, however, offers some other distinct advantages over the mouse. To allow you to control your computer from the keyboard, Unix offers a command line tool that you use to enter commands one line at a time. OS X ships with Terminal, its command line application. From within Launchpad, you can find the Terminal icon in the Utilities folder. You can also find it here:
/Applications/Utilities/Terminal
One shining feature of the command line is its efficiency. One mouse click is equal to one command. When you use the command line, you can combine commands into a kind of super command (minus the silly cape, but with bulging muscles intact), with each command performing some action of the combined whole. From the command line, you can string together a whole bunch of commands to do a very complex task.
For example, consider how many times you’d have to click a mouse in the Finder to
1. Find all files that begin with the letters MyDocument.
2. From this list of files, add a number to the beginning of the filename, indicating its size in kilobytes.
3. Save the names of all altered files to a text file.
From the command line, you could accomplish all these tasks by typing only one super command: a collection of three simple commands combined to form one instruction. The built-in Terminal program that ships with OS X Mountain Lion gives you everything you need to start using the command line. I show you how in the section, “Uncovering the Terminal,” later in this chapter.
Delving further into super commands isn’t for the faint-hearted; things get pretty ugly pretty quickly, and this chapter can show you only the very beginning of the Unix Yellow Brick Road. Therefore, if your thirst for Unix dominance so compels you, I invite you to do a little independent study to bone up on the OS. Pick up a copy of the great book of lore entitled UNIX For Dummies, 5th Edition, written by John R. Levine and Margaret Levine Young (Wiley).
Go where no mouse has gone before
The Finder is generally a helpful tool, but it makes many assumptions about how you work. One of these assumptions is that you don’t have any need to handle some of the files on your hard drive. As I mention in Book II, Chapter 6, OS X ships with its system files marked “off limits,” and I generally agree with that policy (which keeps anyone from screwing up the delicate innards of OS X). To secure your system files, Apple purposely hides some files from view.
But what road do you take if you actually need to modify those system files? Yep, you guessed it: The command line comes to the rescue! You can use the command line to peer inside every nook and cranny of your Mac’s vast directory structure on your hard drive. It also has the power to edit files that aren’t typically accessible to you. From the command line, you can pretend to be other users — even users with more permissions. By temporarily acting as a more powerful user, you can perform actions with the command line that would be impossible in the Finder. (Just remember to make sure that you know exactly what you’re doing, or you’re working with an Apple technical support person — one wrong move, and it’ll be time for an ominous chord.)
Automate to elevate
If all these benefits are beginning to excite you, hold on to your socks! Not only can you perform complex commands with the command line, but you can go even one step further: automation. If you find yourself using the same set of commands more than once — say, to copy a folder of images to another location and rename them all — you’re a likely candidate for using automation to save time. Instead of typing the list of commands each time, you can save them to a text file and execute the entire file with only one command. Now that’s power, right up there with the dynamic duo of AppleScript and Automator! (Granted, it’s not graphical like Automator, but then again, Unix has been around for decades.)
 Of course, you probably don’t like doing housekeeping tasks while you’re busy on other things, so schedule that list of commands to run in the middle of the night while you’re fast asleep. And of course, the command line lets you do that, too.
 Automation of Unix commands is totally separate from automation of OS X applications with AppleScript and Automator, which I cover in Book VIII, Chapter 3.
Remote control
“So, Mark, the command line is the cat’s meow for efficiently accessing and working with files on my Mac, and I can use it to automate many operations. Anything else?” I’m glad you asked! From the command line, you can also send commands to another computer anywhere in the world (as long as you know the right login and password). And after you log in to another computer, you can use the same commands for the remote computer.
 Unix was created with multiple users in mind. Because computers used to be expensive (and honking huge machines to boot), Unix was designed so that multiple users could remotely use the same machine simultaneously. In fact, if OS X is your first encounter with Unix, you might be surprised to know that many Unix beginners of the past weren’t even in the same room, building, state, or even country as the computer that they were using.
Not only can you work with a computer that’s in a different physical location, but it’s also very fast to do so. Instead of the bandwidth hog that is the Internet, the command line is lean and mean, permitting you to use a remote computer nearly as fast as if it were sitting on the desk in front of you. (This is a great advantage for road warriors who need to tweak a web server or an e-mail server from a continent away.)
Uncovering the Terminal
The best way to find out how to use the command line is to jump right into the Terminal application, which (as I mention earlier) comes with OS X. Click the Launchpad icon on the Dock, click the Utilities folder, and then click the Terminal icon.
You can also jump directly to the Utilities folder from the keyboard by pressing Shift+![]() +U (which displays the Utilities folder in a Finder window, as shown in Figure 2-1). Double-click the Terminal icon there. By the way, feel free to make Terminal more accessible by dragging its icon from the Utilities folder to the Dock.
+U (which displays the Utilities folder in a Finder window, as shown in Figure 2-1). Double-click the Terminal icon there. By the way, feel free to make Terminal more accessible by dragging its icon from the Utilities folder to the Dock.
Figure 2-1: Find the Terminal application in your Utilities folder.

Consider yourself prompted
Upon launch of the Terminal application, you’ll immediately notice some text in the window that appears onscreen. For example
Last login: Sun Jun 23 17:51:14 on console
WHITEDRAGON:~ markchambers$
This text details the last time that you logged in to Terminal. The last line, however, is the more important one: It’s the prompt.
The prompt serves some important functions. First, it lists the current directory, which is listed as ~ in the preceding example. A tilde character (~) denotes a user’s Home directory. By default, you’re always in your Home folder each time you begin a new session on Terminal. After the current directory, Terminal displays the name of the current user, which is mark chambers in this example.
As you’ve probably surmised, a folder and a directory are two different names for the same thing. “Folder” is the name with which most Mac users are familiar, and “directory” is a term that Unix power users prefer. I use the terms interchangeably throughout the remainder of this chapter.
The final character of the prompt is a $. Consider this your cue because immediately after this character is where you enter any command that you wish to execute.
Go ahead; don’t be shy. Try out your first command by typing uptime in Terminal. This will show you a listing of how long your Mac has been running since the last reboot or login. (It’s a good idea to type Unix commands in lowercase because case-sensitivity is all-important in Unix.) Your text appears at the location of the cursor, denoted by a small square. If you make a mistake while entering the command, no worries. Just press Delete to back up and then type the characters again. If the typing error is stuck deep in a longer command, press the left- or right-arrow key to move the cursor immediately after the incorrect character and press Delete to back up; then type the correct characters. After you type the command, press Return to execute it.
WHITEDRAGON:~ markchambers$ uptime
6:24PM up 2:42, 4 users, load averages: 2.44, 2.38, 1.90
WHITEDRAGON:~ markchambers$
In the preceding example, the computer has been running for 2 hours and 42 minutes (2:42 in line 2). Simple, eh? Immediately following the listing of the uptime command (line 3), the Terminal displays another prompt for you to enter more commands. I examine many more commands later in this chapter.
Prefer a different appearance for the Terminal window? Click the Terminal menu and choose Preferences; then click the Settings toolbar button to choose the color combinations for the Terminal window background and text.
A few commands to get started
As you use the command line to navigate through the various folders on your hard drive, you’ll lean on two vital commands: ls and cd. The ls command is shorthand for list, and it does just that: It lists the contents of the current directory. Enter ls at the prompt, and you see a listing of your Home folder.
The complementary cd command (again, note the lowercase) — change directory — opens any folder that you specify. It works much the same as double-clicking a folder in the Finder: The difference is that following the cd command, you don’t immediately see all the folder’s content. Too, the cd command requires a parameter (extra options or information that appear after the command) so that your Mac knows which folder to open.
For example, to open the Documents folder in your Home directory, type cd Documents and press Return. Hmm. Another prompt is displayed immediately. So where are all the files in the Documents folder? You must enter another command to see what items are in the folder that you just opened. Type your old friend ls again to see the contents of the Documents folder.
The preceding example works for a folder named with just one word. To open a folder with any spaces in its name, make sure to enclose the folder’s name in quotation marks, like this:
cd “My Picture Folder”
Read more about spaces and using quotation marks in your commands in the upcoming section, “Command line gotchas.” You can also precede a space (or any other character that the command line treats as special, such as an *) in a name with a backslash, like this:
cd My Picture Folder
To return to your Home folder in this example, enter a modified version of the cd command:
cd ..
This causes your Mac to move back up the folder hierarchy one folder to your Home directory. By using these three simple commands — ls, cd
foldername, and cd .. — you can traverse your entire hard drive (or at least those locations where you have permission to peruse).
After you successfully enter a command, you can recall it by pressing the up-arrow key. Press the up-arrow key again to see the command prior to that, and so forth. This is an extremely useful trick for retyping extra long file paths.
Using the mouse skills you already have
Just because the Terminal is text based doesn’t mean that it doesn’t act like a good Macintosh citizen. All the usual Mac features that you know and love are there for you to use. The familiar Copy function works anywhere, as you might expect. Paste, however, works only at the prompt position.
Drag-and-drop is also at your disposal. After you play around with the Terminal for a while, you’ll find yourself bored to tears typing the long paths that represent the files on your hard drive. To automatically enter the path of a file or folder to a command, simply drag it to the active Terminal window, as shown in Figure 2-2. The file’s full path instantly appears at the location of your cursor. (Thanks, Apple!)
Figure 2-2: Drag a file from a Finder window into Terminal to display its path.

You can even use the mouse while entering commands in the Terminal. Click and drag your mouse over text to select it. From there, you can copy to the Clipboard as you might expect with any other application.
Unix Commands 101
To use the command line effectively, familiarize yourself with other Unix commands. After all, how can you use a tool without knowing what it can do? You might have to memorize a few commands, but Unix makes it easy on you by abbreviating commands, following a standard grammar (so to speak), and providing you with extensive documentation for each command.
Anatomy of a Unix command
Unix commands can perform many amazing feats. Despite their vast abilities, all commands follow a similar structure. Note the spaces between the command, the flags, and the operands:
command <optional flag(s)> <optional operand(s)>
The simplest form of a Unix command is the command itself. (For a basic discussion on Unix commands, such as ls, see the earlier section, “A few commands to get started.”) You can expand your use of the ls command by appending various flags, which are settings that enable or disable optional features for the command. Most flags are preceded by a dash (-) and always follow the command. For instance, you can display the contents of a directory as a column of names by tacking on a -l flag after the ls command.
ls –l
Besides flags, Unix commands sometimes also have operands, which are something that is acted upon. For example, instead of just entering the ls command (which lists the current directory), you can add an operand to list a specific directory:
ls ~/Documents/myProject/
The tilde (~) denotes the user’s Home directory.
Sometimes a command can take multiple operands, as is the case when you copy a file. The two operands represent the source file and the destination of the file that you want to copy, separated by a space. The following example using the cp command (short for copy) copies a file from the Documents folder to the Desktop folder.
cp ~/Documents/MyDocument ~/Desktop/MyDocument
You can also combine flags and operands in the same command. This example displays the contents of a specific folder in list format:
ls –l ~/Documents/myProject/
Command line gotchas
In earlier sections, I describe a few simple command line functions. You might not have noticed, but every example thus far involves folder names and filenames that contain only alphabetic characters. As I discuss earlier, remember what happens if you have a folder name with a space in it. Try the following example, but don’t worry when it doesn’t work.
As you can read earlier in this chapter, the cd command stands for change directory.
cd /Example Folder
The result is an error message:
-bash: cd: /Example: No such file or directory
The problem is that a space character isn’t allowed in a path. To get around this problem, simply enclose the path in double quotation marks, like this:
cd “/Example Folder”
OS X lets you use either double or single quotation marks to enclose a path with spaces in it. Standard Unix OSes, however, use double quotation marks for this purpose.
As I mention earlier, you can get the space character to be accepted by a command by adding an escape character. (In this case, the escape character acts as a marker that skips over the space.) To escape a character, add a backslash () immediately prior to the character in question. To illustrate, try the last command with an escape character instead. Note that this time, no quotation marks are necessary.
cd /Desktop Folder
You can use either quotation marks or escape characters; they’re interchangeable. Note that the backslash () is the escape character, not the forward slash (/).
Help is on the way!
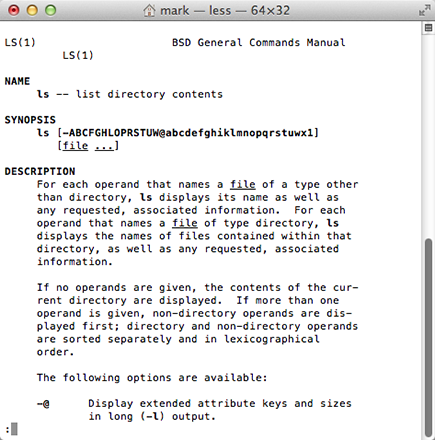
By now, you might be wondering how a computer techno-wizard is supposed to keep all these commands straight. Fortunately, you can find generous documentation for nearly every command available. To access this built-in help, use the man command. Using the man command (short for manual) will display a help file for any command that it knows about. For example, to read the available help information for the ls command, simply type man ls at the prompt. Figure 2-3 illustrates the result.
Figure 2-3: Use the man command to display help information.
Autocompletion
To speed things along, the bash shell can automagically complete your input for you while you type. A shell takes the commands you type and submits them to the OS, which then performs the tasks. Although the Terminal permits you to enter commands via the keyboard, it is the shell that interprets those commands. Many kinds of shells are available to Unix users. The shell that Mountain Lion uses by default is bash, and another common shell is tcsh. Use the autocompletion features of bash to autocomplete both commands and filenames. To demonstrate, begin by typing the following:
cd ~/De
Then press Tab, and the shell predicts what you want to type:
cd ~/Desktop/
Of course, if you have another folder that begins with the letters De in the same folder, you might need to type a few additional characters because otherwise, the shell returns the first hit it encounters. This gives the autocompletion feature more information to help it decide which characters you want to type. In other words, if you don’t type enough characters, autocompletion ends up like a detective without enough clues to figure things out.
Working with Files
If you’ve used a computer for any time at all, you’re no doubt familiar with the idea of files. Even before the first floppy drive appeared in personal computers, OSes have stored data in files, dating back to when a mainframe computer system could occupy an entire floor of an office building. OS X is no exception, and it’s important to understand how OS X arranges files into folders and how you go about accessing them via the command line. This section describes the basic file and folder information you need to know to tame the beast that is Unix.
Paths
Before you dive into Unix commands, you should first know a few facts . . . nasty things, facts, but you can’t earn your pair of techno-wizard suspenders without ’em. For starters, as a Mac user, you might not be familiar with how paths work in Unix. A path is simply a textual representation of a folder or file. The simplest paths are the root, denoted by the forward slash (/), and your Home directory, denoted by a tilde character (~), which acts as the equivalent of /Users/<
your short account name
> (in my case, /Users/markchambers). Any folder within the Home directory is represented by the folder’s name preceded by a forward slash (/). For example, a document entitled myDoc that resides in the current user’s Documents folder would have a path like this:
~/Documents/myDoc
Similarly, a folder named myFolder that resides in the current user’s Documents folder would have a path like this:
~/Documents/myFolder/
As I mention earlier, a folder (Mac-speak) and a directory (Unix-speak) are simply two different names for the same thing.
Because OS X is a multiuser environment, you might sometimes want to work with folders or files somewhere other than in your Home folder. Starting from your Home folder, enter the following command:
cd ..
This moves you to the folder right above your Home folder, which happens to be the Users folder. Using another quick ls command will show you all users who are permitted to use the machine. (By the way, Shared isn’t a user — it’s a folder with privileges set so that any user can access its contents.)
Enter cd .. once again, and you find yourself at the root of your main hard drive. The root directory is what you see in the Finder when you double-click your hard drive icon on the Desktop. Remember that a user’s Home directory is represented by a tilde character (~), and the root of the hard drive is denoted by a forward slash (/), as displayed by the prompt:
WHITEDRAGON:/ markchambers$
Skip right back to your Home directory by following this sequence:
WHITEDRAGON:/ markchambers$ cd Users
WHITEDRAGON:/Users markchambers$ cd markchambers
WHITEDRAGON:~ markchambers$
And here’s an even faster way. Instead of moving through each successive folder until you reach your intended destination, you can specify the path by using just one cd command:
WHITEDRAGON:/ markchambers$ cd /Users/markchambers
WHITEDRAGON:~ markchambers$
Of course, the Home directory is a special folder in that you can also navigate there by simply entering cd ~, but the main point here is that you can navigate directly to specific folders by using that folder’s path in conjunction with the cd command.
Furthermore, when you navigate your hard drive by using paths, you can jump directly to your desired destination from any place. When you enter cd .., it’s in relation to your current position, whereas entering
cd /Users/markchambers
always takes you to the same directory, regardless of your starting point.
Copying, moving, renaming, and deleting files
After you’re comfortable moving around the hierarchy of your hard drive, it’s a cinch to copy, move, and rename files and folders.
To copy files from the command line, use the cp command. Because using the cp command copies a file from one place to another, it requires two operands: first the source and then the destination. For instance, to copy a file from your Home folder to your Documents folder, use the cp command like this:
cp ~/MyDocument ~/Documents
Keep in mind that when you copy files, you must have proper account permissions to do so! Here’s what happens when I try to copy a file from my Desktop to another user’s Desktop (an account named fuad):
WHITEDRAGON:~ mark$ cp ~/Desktop/MyDocument ~/Users/fuad/Desktop/MyDocument
Denied! Thwarted! Refused!
cp: /Users/fuad/Desktop/MyDocument: Permission denied
If you can’t copy to the destination you desire, you need to precede the cp command with sudo. Using the sudo command allows you to perform functions as another user. The idea here is that the other user whom you’re emulating has the necessary privileges to execute the desired copy operation. When you execute the command, the command line asks you for a password. If you don’t know the password, you probably shouldn’t be using sudo. Your computer’s administrator should’ve given you an appropriate password to use. After you enter the correct password, the command executes as desired.
In case you’re curious, sudo stands for set user and do. It sets the user to the one that you specify and performs the command that follows the username.
sudo cp ~/Desktop/MyDocument ~/Users/fuad/Desktop/MyDocument
Password:
A close cousin to the cp (copy) command is the mv (move) command. As you can probably guess, the mv command moves a folder or file from one location to another. (I told you that all this character-based stuff would start to make sense, didn’t I?) To demonstrate, this command moves MyDocument from the Desktop folder to the current user’s Home folder:
mv ~/Desktop/MyDocument ~/MyDocument
Ah, but here’s the hidden surprise: The mv command can be used as a rename command. For instance, to rename a file MyDocument on the Desktop to MyNewDocument, do this:
mv ~/Desktop/MyDocument ~/Desktop/MyNewDocument
Because both folders in this example reside in the same folder (~/Desktop/), it appears as though the mv command has renamed the file.
Again, like the cp command, the mv command requires that you have proper permissions for the action you want to perform. Use the sudo command to perform any commands that your current user (displayed in the prompt) isn’t allowed to execute. On Unix systems, not all users are necessarily equal. Some users can perform functions that others can’t (handy for keeping your child’s mitts off important files on your computer). It also creates a hurdle should you choose to work on files while using your child’s restricted user account. The sudo command lets you temporarily become another user — presumably one that has permission to perform some function that the current user can’t.
What would file manipulation be without the ability to delete files? Never fear; Unix can delete anything you throw at it. Use the rm (remove) or rmdir (remove directory) command to delete a folder or file. For example, to delete MyNewDocument from the Desktop folder, execute the rm command like this:
rm ~/Desktop/MyNewDocument
Once again, deleting files and folders requires that you have permission. In other words, any time you manipulate files with the command line, you’re required to have the proper permission. If your current user lacks these permissions, using sudo helps. You should also check to make sure that your target is correctly spelled and that no pesky spaces that could wreak carnage are lurking in the command.
Opening documents and launching applications
Launching applications and opening documents is child’s play for a Unix pro like you. The open command does it all. For example, to bring the Finder to the foreground without touching the mouse, use
open /System/Library/CoreServices/Finder.app
To open a document from the command line, follow a similar scheme. For example, to view an image named myImage.tif that’s stored in your Documents folder, try this:
open ~/Documents/myImage.tif
Useful Commands
Manipulating files and viewing folder content is fun, but the command line is capable of so much more! Now focus your attention on some of the other useful tasks that you can perform with the command line.
OS X comes stocked with a full set of useful commands. You can discover many of the commands that are installed by viewing the files in /usr/bin. Type cd /usr/bin to navigate there. Other locations to peruse include /bin and /usr/local/bin.
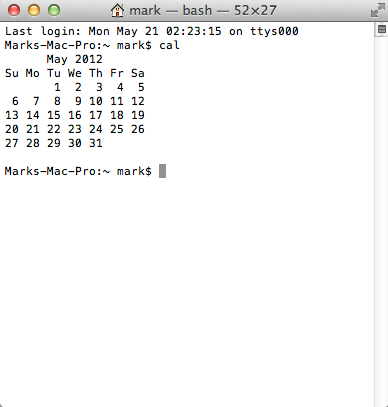
Calendar
One of my favorite command line functions is the cal command, which displays a calendar in text form. Simply entering cal at the prompt displays a calendar for the current month, as shown in Figure 2-4.
Figure 2-4: View a calendar for the current month.
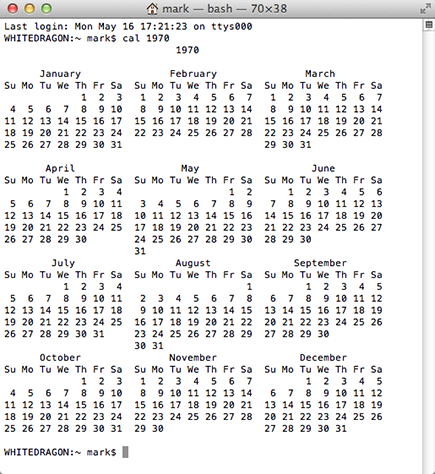
Append a number to the cal command to display a 12-month calendar for a specific year. For example, to view a calendar for 1970, type cal 1970. The result appears in Figure 2-5.
Figure 2-5: Type cal followed by a year to view the 12 months of that year.
Append a month number and a year number to display the calendar for that month. For example, to view a calendar for April 2012, type cal 04 2012.
Another useful command that’s related to the cal command is date. Type date at the command line to display the day, date, time, and year based on your computer’s settings.
WHITEDRAGON:~ markchambers$ date
Sun May 20 11:32:20 CDT 2012
Processes
Have you ever been curious why your hard drive seems to spin and grind on occasion while your system is seemingly inactive? OS X sometimes has a lot of stuff going on behind the scenes. To discover what your computer is busy doing at any time, use the top command to display all the actions that your computer is currently performing, as shown in Figure 2-6. These activities are processes; some are created when you launch applications, and others are simply tasks that OS X has to take care of to keep things running smoothly.
Figure 2-6: The top command displays all running processes.
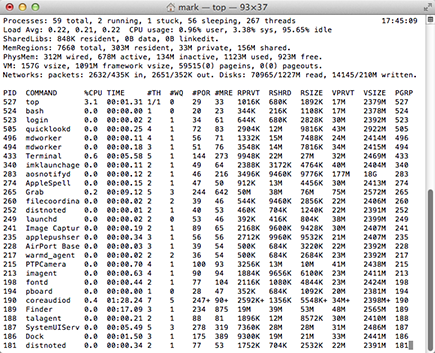
Besides listing the names of the various processes currently in use, top tells you how much of your CPU is being devoted to each process. This lets you know what process is currently hogging all your computing power.
Sometimes a process stalls, effectively freezing that action. By using the top command to find the Process ID (PID) of the offending process, you can halt the process. Simply use the kill command followed by the PID of the process you want to stop. (The man help page for the kill command gives more options that may help terminate stubborn processes with prejudice.)
 Do not take a cavalier attitude when killing processes! Although OS X is extremely stable, removing the wrong process — such as
 init or mach_init — is rather like removing a leg from one of those deep-sea drilling platforms: the very definition of Not Good. You could lock up your system and lose whatever you’re doing in other applications. If you simply want to shut down a misbehaving program, go graphical again (at least for a moment) and use the Force Quit menu command from the Apple menu (![]() ).
).
Like top, another handy command for examining process info is ps (short for process status). Most often, you’ll want to append a few flags to the ps command to get the information that you desire. For example, try the following command, which displays additional information for each process:
ps –M
The man page for ps explains what each flag means. (Read more about using the man command in the earlier section, “Help is on the way!”)
Unix Cadillac Commands
Besides working with files and processes, the command line has all kinds of sophisticated commands. For example, with the command line, you have instant access to a variety of tools for finding files or even stringing together commands.
Finding files
The command line gives you a number of ways to search for files on your hard drive. The two most commonly used commands are find and locate.
To use find, specify a starting point for the search followed by the name of the file or folder that you want to find. For example, to find the Fonts folder that belongs to your user, enter the command like this:
find ~/ -name “Fonts”
You should see at least one result of the find command.
/Users/markchambers/Library/Fonts
One great feature of the find command is that you can look for a file or folder in more than one location. Suppose you want to find a file named MyDocument that you know resides either in your Documents folder or on your Desktop. For this kind of search, use the find command like this:
find ~/Documents ~/Desktop -name “MyDocument”
In this example, you’re telling the find command which folders it should search when looking for the file named MyDocument.
Using pipes
Nearly all Unix commands can take on greater abilities by using a construct called the pipe. A pipe is represented by that funny little vertical line (|) that shows up when you press Shift+. The pipe routes data from one command to another one that follows — for example, many Unix commands produce large amounts of information that can’t all fit on one page. (You might have noticed this behavior when you used the locate command.) Joining two commands or functions together with the pipe command is piping. To tame the screens full of text, pipe the find function to the less command. The less command provides data one page at a time.
find ~/ -name “Fonts” | less
When the results fill up one page, the data stops and waits for you to press any key (except the Q key) to continue. When you reach the end of the results, press Q to quit and return to a command line prompt.
Unix Programs That Come in Handy
As a Macintosh user, you might be surprised to know that many applications on your hard drive don’t reside in one of the typical Applications folders of OS X. These applications, in fact, don’t have any GUI like what you’re accustomed to. They’re accessible only from the command line. The remainder of this chapter covers some of these applications.
Text editors
Unix has many text-editing applications for use at the command line. Some of the more popular ones include nano, vi, and emacs. Each of these text editors has its pros and cons — and say “thanks” to the thorough folks at Apple because all three are included with Mountain Lion! For my examples here, however, I use nano because it’s simple to use and sufficient for our needs.
Creating a new document
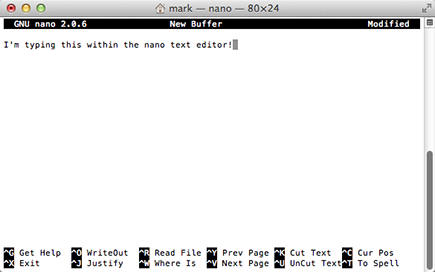
To create a text file in nano, simply type nano at the command line. The result looks like Figure 2-7.
Figure 2-7: The nano program is a full-strength text editor, right from the command line.
This is the rough-and-tumble world of Unix, which preceded the Macintosh by many years. Perhaps this also helps you appreciate why the Macintosh was so revolutionary when it was introduced. (You can just hear the designers crowing, “We’ll call this a menu! Yeah, that’s the ticket!” The only graphics that you’d see on your monitor were the comics and sticky notes you stuck to the bottom.)
At the bottom of the screen is a menu of common commands. Above the menu is a large empty space where you can enter text, much the same as the word processors you already know and love. (For those of us that remember the halcyon character-based days of DOS, think older versions of Word and WordPerfect — or, if you’re a real computing dinosaur like I am, consider the original WordStar.) Type some text in that area. Anything will do . . . a letter to a friend, a grocery list, or your school homework.
After you finish entering your desired text, save the document with the WriteOut command in the nano menu. Directly next to each command in the nano menu is a keyboard sequence used to perform that command. (Refer to the bottom of Figure 2-7.) The # character is shorthand for the Control key on your keyboard. Thus, to save a file, press #+O. This flies in the face of standard Mac keyboard conventions, where the letter O is traditionally used to mean Open.
After pressing the Control+O sequence, nano prompts you for a filename. As with most Unix files, you’re permitted to enter a simple filename here or a full path to a file. For this example, save the file to your Documents folder, naming it MyNanoDocument.
After you complete and save the document, press Control+X to transport you away from Planet Nano and back to the command line.
Networking with the Terminal
Because Unix isn’t a new phenomenon, it has many useful networking abilities built into it. In fact, Unix was instrumental in creating much of what we now take for granted: e-mail, the Internet, and the World Wide Web. Thus, you’ll be happy to know that you can communicate over networks with the Terminal in practically any manner that you can dream of . . . and then some!
WWW and FTP
If you’ve used the Internet for any time, you’re probably familiar with the various means to transport data over a network. From File Transfer Protocol (FTP) and Telnet to e-mail and the web, Unix can handle it all. In fact, Unix has a command for each of these functions (and many more that have passed into historical obscurity). Rather than use each individual command to send and retrieve data with the Terminal, Apple has conveniently provided a command that can handle them all: curl. The curl command is competent at all the standard network protocols. To see it in action, pass a web address (or URL, to The Enlightened) to the curl command:
curl http://www.mlcbooks.com
You see the HyperText Markup Language (HTML) page that’s located at www.mlcbooks.com
. Because this isn’t particularly useful for most people (it’s not very easy to read), you need to add the letter o as a flag. This specifies where you would like to save this file upon download. To save the HTML page to your Home directory, add the -o flag and a path to the destination file.
Don’t forget to precede all flags with a hyphen. For this example, it would be -o.
curl -o ~/mlcbooks.html http://www.mlcbooks.com
If you now perform an ls command, you see that curl downloaded the HTML found at www.mlcbooks.com
and saved it to a file named mlcbooks.html in your Home directory.
The beauty of curl is that it does much more than just retrieve web pages: It’s equally comfortable with FTP transfers. FTP is used to download (receive) files from a server as well as upload (send) them. Like the previous HyperText Transfer Protocol (HTTP) examples, you only have to provide an FTP address in Universal Resource Locator (URL) format, and curl takes care of the rest. Of course, most people want to save any files they download via FTP — not view them in the Terminal as I did the HTML file. Therefore, as in the previous example, you should add the -o flag and a path to the destination of your download. This time, I download a README file about curl directly from the makers of curl. (Note: Most FTP servers require a valid user ID and password before you’re allowed to download.)
curl -o ~/Desktop/README.curl ftp://ftp.sunet.se/ pub/www/utilities/curl/README.curl
With curl, Dictionary, and your Dictionary Dashboard widget on the same Macintosh, you might never use a paper dictionary again! If you’re familiar with FTP, you might be wondering whether curl can upload, too. Yes, indeed! Instead of using the -o flag, you need to use two flags: -T and -u. The -T flag denotes which file you want to upload. The -u flag denotes the username and password. Then, specify the FTP destination address of where you want to upload it. Because this example deals with an upload, the remainder of this example is for an imaginary FTP server. In real life, you’d use the appropriate FTP address, username, and password for an FTP server where you are allowed to upload.
curl -T /Desktop/README.curl -u username:passwd ftp:// ftp.yoursitehere.com
/myfiles/README.curl
This example uploads the README.curl file from the Desktop folder that I downloaded earlier to an imaginary FTP server.