
Chapter 2: Using Your Network
In This Chapter
![]() Finding out what you can do with your network
Finding out what you can do with your network
![]() Sharing your files and printers with other Macs
Sharing your files and printers with other Macs
![]() Sharing your files with Windows computers
Sharing your files with Windows computers
![]() Accessing files on Windows computers
Accessing files on Windows computers
![]() Configuring the built-in firewall
Configuring the built-in firewall
![]() Remote-controlling your Mac from afar
Remote-controlling your Mac from afar
Here’s one of those incredibly complex concepts that you always find in these computer books: After you have your network all set up and ready to go, you can do all kinds of really cool things with it. (Highly technical.) You can use your network to share files, share printers, remotely control your Mac, or even play multiuser games against other friends. To keep your files safe from unwanted snoops, you can configure the OS X built-in firewall. In this chapter, I cover the basics of file sharing, sharing printers, and using the firewall to protect yourself from intruders.
It’s All about (File) Sharing
One of the main reasons for building a network is sharing files between computers. You might even want to set up a server, which is a computer with shared files that are always available to anyone on the network. Think of a server as a common file storage area for the rest of the network. Really, any computer that shares files is technically a server because it’s serving, so to speak. But most people use the word server only to mean a computer that’s dedicated solely to serving files, printers, and so on for the rest of the network.
Creating an account
Sharing files on your Mac with other Mac users is a piece of cake. Remember, however, that you need to create an account for anyone whom you want to have access to your files. Each person assigned an account is called a user. The user accounts that you create can access a maximum of three folders, as shown in Figure 2-1:
Figure 2-1: The location of user folders and the Shared folder on your hard drive.
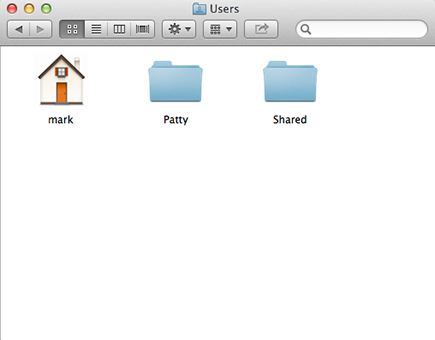
![]() The account’s Home folder: That specific account’s Home folder carries a short version of the username that’s in the Users folder on your hard drive. Figure 2-1 shows the Home folder, which is noted with an icon that looks like a house, for the mark account (where mark is the short account name for Mark Chambers, and patty is the name for one of my example users). (If you create a Sharing Only account — see Book II, Chapter 5 — Mountain Lion doesn’t create a Home folder for that account.)
The account’s Home folder: That specific account’s Home folder carries a short version of the username that’s in the Users folder on your hard drive. Figure 2-1 shows the Home folder, which is noted with an icon that looks like a house, for the mark account (where mark is the short account name for Mark Chambers, and patty is the name for one of my example users). (If you create a Sharing Only account — see Book II, Chapter 5 — Mountain Lion doesn’t create a Home folder for that account.)
![]() Each account’s Public folder: Each Admin, Standard, or Managed user account you create also has a Public folder located within its Home folder. Any files you place in the Public folder can be accessed by any user on your Mac, local or remote. (Once again, Sharing Only accounts don’t have a Public folder.)
Each account’s Public folder: Each Admin, Standard, or Managed user account you create also has a Public folder located within its Home folder. Any files you place in the Public folder can be accessed by any user on your Mac, local or remote. (Once again, Sharing Only accounts don’t have a Public folder.)
![]() The Shared folder: This folder is also in the Users folder on your hard drive. Anyone with an admin-level account on your Mac can access the Shared folder across the network, and any user account on your Mac can access the Shared folder locally, so it’s a great place to keep common files that everyone wants to copy or use.
The Shared folder: This folder is also in the Users folder on your hard drive. Anyone with an admin-level account on your Mac can access the Shared folder across the network, and any user account on your Mac can access the Shared folder locally, so it’s a great place to keep common files that everyone wants to copy or use.
 If you create a Sharing Only account, that user can only use the contents of the Shared folder. (Go figure.)
To create an account, you need to be logged in as an Admin user. I cover creating accounts in greater detail in Book II, Chapter 5, but here’s the short version:
1. Open System Preferences from the Apple menu (![]() ) or the Dock.
) or the Dock.
2. Click the Users & Groups icon.
3. Click the New User button, which carries a plus sign.
If the New User button is grayed out, you need to unlock the Users & Groups pane first. Click the padlock icon in the lower-left corner, type your Admin user account password, and then click Unlock.
4. Open the New Account pop-up menu and choose the account type.
This includes Administrator (Admin), Standard, Managed with Parental Controls, and Sharing Only.
5. Fill in the appropriate information, including the name for the account and a password.
 The name that appears as the short name determines the name of that user’s Home folder.
6. Click Create User.
7. Press ![]() +Q to exit System Preferences.
+Q to exit System Preferences.
Enabling file sharing
When you enable file sharing, your files are exchanged over Transmission Control Protocol/Internet Protocol (TCP/IP).
 As I discuss in more dry detail in Book 6, Chapter 1, TCP/IP is a protocol suite used for Internet data transfer.
Follow these steps to turn on sharing:
1. Open System Preferences.
2. Click the Sharing icon to open the Sharing Preferences pane.
3. Select the File Sharing check box to turn on File Sharing.
This provides the default system of file sharing, where your account’s Public folder is accessible to all users. You can give other users access to additional folders on your Mac by clicking the Add button (with the plus sign) under the Shared Folders list.
Transferring files the easy AirDrop way
AirDrop is the local Mac-to-Mac file transfer feature built-in to OS X Mountain Lion, and it couldn’t be much easier to use, given literally no setup and no passwords involved! However, here are three caveats (aren’t there always?):
![]() AirDrop works only with Macs running Lion and Mountain Lion, and only with specific models: MacBook Pro (late 2008 or newer), MacBook Air (late 2010 or newer), and MacBook (late 2010 and newer). The 17" MacBook Pro (late 2008) doesn’t support AirDrop.
AirDrop works only with Macs running Lion and Mountain Lion, and only with specific models: MacBook Pro (late 2008 or newer), MacBook Air (late 2010 or newer), and MacBook (late 2010 and newer). The 17" MacBook Pro (late 2008) doesn’t support AirDrop.
![]() AirDrop uses the Wi-Fi hardware built-in to today’s Mac laptops and desktops, so don’t forget to turn on Wi-Fi first. (If you’re displaying the Wi-Fi status icon on your Finder menu bar, click the icon and choose Turn Wi-Fi On.)
AirDrop uses the Wi-Fi hardware built-in to today’s Mac laptops and desktops, so don’t forget to turn on Wi-Fi first. (If you’re displaying the Wi-Fi status icon on your Finder menu bar, click the icon and choose Turn Wi-Fi On.)
![]() You have to be within Wi-Fi signal range of another Mac to use AirDrop. Note, however, that the two computers don’t have to be using the same Wi-Fi network. (For example, my iMac uses a wired connection to my network, but because the iMac has internal Wi-Fi hardware, I can use AirDrop to send files to my MacBook Pro.) Because AirDrop uses a Wi-Fi connection, file transfers are significantly slower than they would be over a wired Ethernet network.
You have to be within Wi-Fi signal range of another Mac to use AirDrop. Note, however, that the two computers don’t have to be using the same Wi-Fi network. (For example, my iMac uses a wired connection to my network, but because the iMac has internal Wi-Fi hardware, I can use AirDrop to send files to my MacBook Pro.) Because AirDrop uses a Wi-Fi connection, file transfers are significantly slower than they would be over a wired Ethernet network.
To use AirDrop to transfer files to another Mac, both users should click the AirDrop icon in any Finder window sidebar to join the AirDrop group. After a short delay, you’ll see the account pictures for all the Macs within signal range that have AirDrop open. Just drag the files you want to transfer to the person’s picture. Both you and the recipient are prompted for confirmation before the transfer begins. After the transfer is completed, the files you sent are saved in the recipient’s Downloads folder.
When you’re done using AirDrop, just close the Finder window displaying the account pictures (or click another location in the Finder window Sidebar), and you’ll exit from the AirDrop group. Don’t forget that you have to open AirDrop again if someone wants to send you files, so I personally leave my AirDrop Finder window open and minimized to the Dock.
Connecting to a shared resource
At the top of the Sharing pane, you can see that other Macintosh users can access your computer at afp://<
ip address>, where ip
address
is the IP address for your specific computer. When another Mac user wants to connect to your shared files, that person can do the following:
1. Choose Go⇒Connect to Server from the Finder menu bar.
2. After the Connect to Server dialog opens, other Mac users can type afp://<ip address> (where ip address is the IP address of your Mac) into the Server Address box and then click the Connect button.
You can also browse for a shared resource in the Connect to Server dialog. Choose Go⇒Connect to Server or press ![]() +K, and then click Browse to locate the shared computer. You might be prompted to choose whether you want to connect as a Guest or a Registered User. To connect to the server as a Registered User, you must supply the right username and password. If you connect as Guest, you don’t have to supply a password, but you will have restricted access to only the Public folder for each account on the system that you connect to. If you need to connect as a Registered User, ask an Admin user who controls that Mac to supply you with the correct username and password.
+K, and then click Browse to locate the shared computer. You might be prompted to choose whether you want to connect as a Guest or a Registered User. To connect to the server as a Registered User, you must supply the right username and password. If you connect as Guest, you don’t have to supply a password, but you will have restricted access to only the Public folder for each account on the system that you connect to. If you need to connect as a Registered User, ask an Admin user who controls that Mac to supply you with the correct username and password.
Give the username and password that you created to the person using the other Mac, and he can now access files in that account’s Home folder as well as any other Public folders on your computer.
The sidebar that appears in Finder windows offers a Shared heading. Click the Show button next to Shared to display other shared resources on your network, just as if you had clicked Browse from the Connect to Server dialog. (I’m starting to think Mountain Lion might be a synonym for convenience.)
Sharing a Connected Printer
Sharing your printer for others to use is one of the best reasons to have a network. Setting up your Mac to share your printer is very easy under OS X. Here’s a quick rundown of what you need to do:
1. Open System Preferences.
2. Click the Sharing icon under the Internet & Wireless section to open the Sharing Preferences pane.
3. Select the Printer Sharing check box.
By default, when you turn on Printer Sharing, Mountain Lion automatically shares all the current printers connected to your Mac. To select which printers can be used for shared printing from the Sharing pane, select the check box next to each printer: that is, select the check box to share that printer, or deselect it to block others from using it. (Alternatively, you can click the Print & Scan icon in System Preferences. From this pane, you can also enable and disable sharing of individual printers.)
After Printer Sharing is enabled, follow these steps to connect to that printer from other computers on your network:
1. Click System Preferences on the Dock.
2. Click the Print & Scan icon.
3. Click the Add button (a plus sign).
If the Add button is disabled, click the padlock icon in the lower-left corner, type your Admin user account password, and then click Unlock.
If you’re prompted to add a printer automatically when the Printer Setup Utility opens, click the Add button to begin the addition. (For more on adding a printer with the Printer Setup Utility, see Book VII, Chapter 4.)
4. From the Browser window that opens, click the Default button on the toolbar.
5. Click the shared printer you want to use and then click the Add button.
Already have the Printer Browser open? Then follow the easier path: Clicking the Default toolbar button displays all the available local shared printers. Click the desired printer and then click Add.
Sharing Files with Windows Computers
If you’ve deigned to allow PCs running Windows access to your network (a generous gesture to the lower classes), you’ll probably want to also share files with those computers. Sharing files with a Windows PC — actually a Windows user — is very similar to sharing files with other Mac users.
To allow file sharing with Windows computers, follow these steps:
1. Click the System Preferences icon on the Dock.
2. Click the Sharing icon to open the Sharing Preferences pane.
3. Click the File Sharing entry.
4. Click the Options button to display the Options sheet.
5. Select the On check box next to the user account (or accounts) that will be accessible by Windows PCs.
Mountain Lion will growl while you try to enable SMB (short for Server Message Block, which is a file-sharing protocol used by Windows) sharing because you have to enable Windows access on the desired account before it can be used. Mountain Lion prompts you for your password, smugly informing you that the account password will be stored “in a less secure manner.” Generally, this isn’t a problem, but never enable an account for Windows access unless only trusted individuals will use it.
6. Select the Share Files and Folders Using SMB check box.
7. Click Done to exit the Options sheet, and close the System Preferences window to save the changes.
Accessing File Shares on Windows Computers
Fair is fair: If you allow a Windows PC to access your files, you’ll also probably want to putter around with files on that Windows PC. Easy!
Accessing files on Windows computers relies on the Samba component (a part of the Unix foundation of OS X). Follow these steps:
1. Choose Go⇒Connect to Server from the Finder.
The Connect to Server dialog opens.
2. In the Address box, enter smb://<ip address>, where ip address is the IP address of the Windows computer that you want to connect to.
3. Click the Connect button.
Depending on the type of account you have on the Windows PC, OS X might display an SMB authentication dialog in which you can enter your username and password. (Think security for the Windows crowd.)
4. Choose the desired shared folder or drive to mount from the pop-up menu.
5. Mount the shared folder or drive according to the Windows version:
• If you’re accessing a file shared on a Windows 98 or Me computer: Simply click OK to mount the share.
• If you’re accessing a file shared on a Windows 2000, XP, Vista, 7, or 8 computer: Click the Authenticate button. Then enter your username and password, click OK, and then click OK again to mount the share.
After you mount the shared location, you’ll see it appear on your Desktop, just as you see a Mac volume. You can use this drive just as you do any other drive on your system. To disconnect from the Windows share, you can do one of the following:
![]() Drag the icon to the Trash on the Dock (which changes to an Eject icon when you start dragging).
Drag the icon to the Trash on the Dock (which changes to an Eject icon when you start dragging).
![]() Press
Press ![]() +E.
+E.
![]() Right-click the icon, and then choose Eject from the menu that appears.
Right-click the icon, and then choose Eject from the menu that appears.
Using FTP to Access Files
FTP — File Transfer Protocol — is part of the TCP/IP protocol suite. FTP is one of the oldest methods for sharing files between computers; however, because it’s part of the TCP/IP protocol suite, it can be used on many different kinds of computers, including those running just about any type of strange and arcane operating system. You can still manage to exchange files regardless of whether you’re using OS X, Windows, Linux, or Unix. (Heck, even dinosaurs like DOS can join the party.) FTP transfers are also faster than downloading the same file from a web server.
FTP is a client/server application. In plain English, this means that two pieces make things tick: the server (which hosts the connection, rather like a file server) and the client (which connects to the server, and which you control). OS X, thanks to its Unix foundation, has an FTP client built in. To use FTP, you need a computer running the FTP server software to give others access to files; then the other computer, or client, can connect to the FTP server. After the connection is made, the client can either send files to the server (uploading) or get files from the server (downloading).
In this section, I cover how to use FTP to access files on a server.
You can use FTP to transfer files with an FTP server by using the command line interface, in a Terminal (or shell) session. I discuss Terminal and the Unix command line in detail in Book VIII, Chapter 2.
Start by clicking the Launchpad icon on the Dock. Click the Other group, and then click the Terminal icon. (Or, from a Finder window, double-click the Terminal icon in the Utilities folder inside the Applications folder.) When you open a Terminal session, you’re presented with a window that accepts text commands. You’ll see a prompt that consists of your computer’s name and the folder that you’re in, followed by your user ID. It’s at this prompt where you type various FTP commands.
After you’re in the Terminal session, you’ll use a series of commands to connect to another computer, move in and out of folders, and transfer files.
Many FTP servers will limit you to send files only to certain folders. Most times this folder is named Upload, Uploads, or something similar.
Here is a list of the basic commands to use FTP as well as a brief description of what each command does:
![]()
ftp: This command starts the FTP command line interface session. You can tell that you’re in the FTP client application when you see ftp> as your command prompt. This is where you type all other FTP commands to do things.
![]()
open: This command is used to start your connection to another computer. Type this command followed by the IP address of the FTP server that you want to connect to.
![]()
ls: Use this command to see a listing of all files and folders in the current folder on the FTP server.
![]()
cd: This command allows you to change the folder that you’re in. Type cd <folder> (where folder is a specific folder name) to move into a subfolder on the FTP server. Type cd .. (that’s c, d, space, and two periods) to go back out a folder level.
![]()
lcd: This command acts exactly like cd except that it changes the folder that you’re currently in on your local system, not the FTP server. Use this command to put yourself in the folder on the local drive that you want to transfer files to and from.
![]()
bin: Type this command to get in binary mode to transfer files that aren’t plain-text files. Important: Always use binary mode unless you’re specifically transferring plain-text files.
![]()
ascii: This command puts you in ASCII mode for transferring text files.
![]()
get or mget: To retrieve a single file, use the get command followed by the filename of the file that you want to retrieve. If you want to get multiple files at one time, use the mget command followed by a filename, possibly containing * and/or ? as wildcards.
![]()
put or mput: To send a single file, use the put command followed by the filename to send a file to the FTP server. To send multiple files, use the mput command followed by a filename, possibly containing * and/or ? as wildcards.
![]()
quit: Use the quit command to end your FTP session.
To end a Terminal session and exit Terminal at any time, press ![]() +Q. Terminal prompts you for confirmation if necessary.
+Q. Terminal prompts you for confirmation if necessary.
Here’s an example of how to use these commands within the Terminal window:
1. In Terminal, type ftp to get into FTP mode.
2. Type open <ip address> (where ip address is the server’s network IP address) to open your connection to the FTP server.
3. Enter your username and password.
For many FTP servers, using the username anonymous and your e-mail address as the password is enough to get you logged in. Some sites even allow you to log in without any username or password at all. On secure sites, however, you must use an assigned username and password provided by the administrator of that particular server.
4. Type lcd <folder> (where folder is a specific folder name) to change into the folder on your local drive that you want files to come to or from.
5. Type the ls and cd commands to place yourself into the desired folder on the FTP server.
6. Type the ascii or bin command to set your file transfer mode to ASCII or binary, respectively.
 This is important because choosing the wrong type will likely cause the transfer to fail. Unless it’s a plain-text file, always use binary mode.
7. Type the get, mget, put, and mput commands to receive or send the desired files.
8. Type the quit command to close the connection and exit the FTP session.
If you’d rather use a drag-and-drop graphical client application for transferring files using FTP, I recommend the freeware FileZilla application (available at http://filezilla-project.org
).
Using the Built-in Firewall
A firewall watches all the network communications coming into your Mac. It automatically plays the role of security guard, blocking (denying) certain network traffic that you want to prevent from reaching your Mac. It acts as another layer of security to help keep you safe from unwanted attacks. That’s all well and good, but you must be careful to set up your firewall correctly before you turn it on because a configuration mistake could make your Mac inaccessible from the network.
For instance, if you want to enable screen sharing on your Mac (which I discuss in the next section) but you also want to keep all other traffic from coming into your Mac, you can tell the built-in firewall to allow only screen sharing. The firewall on the Mac will follow the rules you set up on what to block or allow.
When enabled, the firewall blocks all traffic that comes into your Mac. By default, however, the firewall is turned off. So, your first job is to activate the firewall, which you can do by following these steps:
1. Click the System Preferences icon on the Dock.
2. Click the Security & Privacy icon.
3. Click the Firewall tab.
4. Click the Turn On Firewall button to turn on your firewall.
Is the Turn On Firewall button disabled? Don’t panic! Just click the padlock icon in the lower-left corner, type your Admin user account password, and then click Unlock.
This enables the firewall. And, by default, virtually all incoming TCP/IP traffic is blocked.
5. Click the Firewall Options button to show the settings that you see in Figure 2-2.
Figure 2-2: You can help protect your Mac by using Mountain Lion’s built-in firewall.
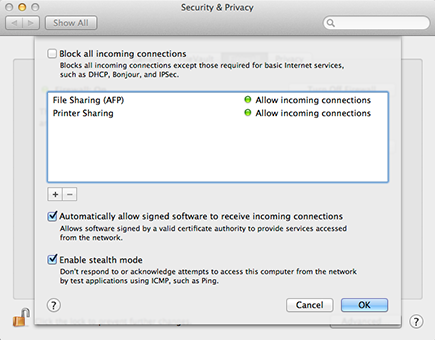
6. Select the Automatically Allow Signed Software to Receive Incoming Connections check box.
As I mention earlier, you must enable each sharing method that you want to be able to use. However, when you enable different sharing methods from the Sharing pane in System Preferences (such as File Sharing or Screen Sharing), you’ll notice that those types of traffic now appear in the Firewall list. (In other words, when you turn on a sharing method, the firewall automatically allows traffic for that sharing method, which Mountain Lion calls a service. Most excellent.)
Sometimes, you might want to allow other traffic through your firewall that isn’t on the firewall list of recognized services and applications. At that point, you can click the Add button (which bears a plus sign) to specify the application that your firewall should allow. Mountain Lion presents you with the familiar Add dialog, and you can choose the application that needs access.
7. Click OK to save your changes and return to the Security & Privacy pane, and then click the Close button to close the System Preferences window.
Remote Control of Your Mac
Forgive me whilst I wax techno-nerd here: One of the coolest advantages to a network is the ability to take control of one computer from another computer. For example, sometimes you might need to access files on your Mac while you’re on a trip, but you don’t have File Sharing enabled. What can you do? You can remotely connect into your Mac and then — just as if you were sitting in front of it — enable File Sharing (as I demonstrate earlier in the chapter). Perhaps you have a file on your computer with someone’s phone number that you suddenly need on the road. With remote control, it’s at your fingertips! (Sigh . . . ah, technology.)
Using Screen Sharing
Mountain Lion’s Screen Sharing feature, which is available from Messages, can be turned on for individual users from the Sharing pane in System Preferences. You can allow access for all user accounts on your Mac, or limit remote access to selected users. Screen Sharing is Apple’s implementation of virtual network computing (VNC) technology.
To set up Screen Sharing, follow these steps:
1. Click the System Preferences icon on the Dock.
2. Click the Sharing icon to open the Sharing Preferences pane.
3. Select the Screen Sharing check box.
4. To limit remote access for specific accounts, select the Only These Users radio button and then click the Add button (a plus sign) to select a user.
5. Close the System Preferences window to save the change.
After you enable screen sharing, you can use the Buddies⇒Share My Screen menu item in Messages to share your screen with another person. To view another person’s screen, use the Buddies⇒Ask to Share Remote Screen menu item. (For the details on Messages and Screen Sharing, see Book V, Chapter 3.)
Remotely control your Mac (for free, no less!)
Virtual network computing (available for many platforms at www.realvnc.com
) is a very nice application that enables you to remotely control a computer from pretty much anywhere that has an Internet connection. VNC is easy to install and configure, and it runs on many different platforms, ranging from Windows 7 and Unix on desktop computers and servers to iPhones, iPads, and Windows CE and Windows 8 on personal digital assistants (PDAs) and tablets. Wrap your mind around this: You could be at a friend’s house on her wireless network and use your iPhone to remotely control your Mac at home over the Internet. Pure, undiluted sassy!
Some networks have proxies and firewalls that might interfere with VNC’s operation. You can remotely control a computer that’s behind a firewall or cable/DSL router, but the firewall/router needs to be configured properly. Because the process varies from one manufacturer to the next, check your cable/DSL router manual for instructions on how to do this.
How VNC works
In a nutshell, VNC takes the graphical interface on your monitor, turns it into data, and sends it to the computer that you’re using to remotely control it. The computer that you’re using sends keyboard presses, mouse movements, and clicks to it, acting just the same way as it would if you were sitting right in front of it.
As I mention earlier, you can use Mountain Lion’s Screen Sharing feature in Messages to make a remote connection from another Mac to your Mac. However, you’re not limited to using just another Mac using Mountain Lion and Screen Sharing in Messages. You can control your Mac from a Windows PC, or from an older version of OS X as well. If you’ve already enabled Screen Sharing (as I demonstrate earlier in this chapter), follow these steps to enable any VNC connection:
1. Click the System Preferences icon on the Dock.
2. Click the Sharing icon to open the Sharing Preferences pane.
3. Click the Screen Sharing entry.
4. Click the Computer Settings button.
5. Select the VNC Viewers May Control Screen with Password check box.
6. Click within the password text box and enter a password for VNC applications.
7. Click OK to exit the Computer Settings sheet, and close the System Preferences window to save the changes.
Mr. Paranoia speaks again: Make doggone sure that you set up the password access correctly for VNC, or don’t run it! I can’t stress enough how much fun a hacker would have with free remote control over your OS X Desktop.
Remote control of another computer from your Mac
A few different VNC viewers exist for OS X. A VNC viewer is just an application you use to remotely control your computer running VNC. You can download them at www.realvnc.com/products/vnc
. If you find yourself on a computer without a VNC viewer (heaven forbid), VNC server actually runs over the web as well! As long as the computer that you’re using has a web browser that supports Java — which Safari does — you can still remotely control your computer. (You may have to download the Java runtime package from the Apple website at www.support.apple.com
. Click in the website Search box and type Java runtime to locate the latest version.)
When you connect to the computer running VNC using a web browser, the web server sends a default page that contains a Java applet. That Java applet asks you for the password to connect; upon entering the correct password, it brings up the remote control session right in the web browser.