8. Installing and Using Apps

In this chapter, you learn how to find, purchase, install, and use apps on your iPad.
Most of what you do on your iPad you do via applications, or apps. An app is a self-contained program designed to perform a particular task or serve a specific purpose. There are apps for news and weather, apps for email and text messaging, apps for Facebook and Pinterest, even apps for listening to music and watching videos. Whatever you want to do on your iPad, there’s probably an app for it.
Your new iPad came with more than a dozen apps preinstalled, but these aren’t the only apps you can use. There are tens of thousands of additional apps available, most for free or low cost, in Apple’s online App Store. It’s easy to find new apps and install them on your iPad—and then use them every day.
Working with Apps
To do just about anything on your iPad, you have to learn how to work with apps. All the apps currently installed on your iPad are displayed on the various Home screens. Each icon on the screen represents a different app. When you install a new app, an icon for that app appears on the Home screen.
Launch an App from the Home Screen
You open apps from the iPad’s Home screen.
![]() Press the Home button to return to the main Home screen.
Press the Home button to return to the main Home screen.

![]() Navigate to the Home screen that displays the icon for the app you want to open.
Navigate to the Home screen that displays the icon for the app you want to open.
![]() Tap the icon to open the app.
Tap the icon to open the app.

Launch an App from the Dock
You can also launch apps from the Dock, which floats at the bottom of every screen on your iPad. (Chapter 3, “Personalizing the Way Your iPad Looks and Works,” explains how to customize the apps on the Dock.)
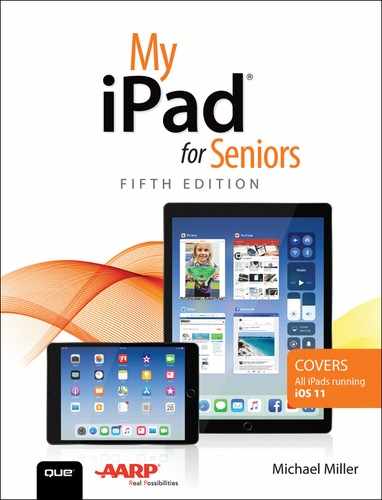
![]() The Dock floats above every Home screen and many apps. If the Dock is hidden, display it by swiping up slightly from the bottom of the screen.
The Dock floats above every Home screen and many apps. If the Dock is hidden, display it by swiping up slightly from the bottom of the screen.
![]() Tap an icon on the Dock to open that app.
Tap an icon on the Dock to open that app.

![]() If you’ve recently viewed files or documents with a given productivity app, long-press the app’s icon on the Dock to view a panel that displays those files.
If you’ve recently viewed files or documents with a given productivity app, long-press the app’s icon on the Dock to view a panel that displays those files.
![]() Tap Show More to display even more recent files.
Tap Show More to display even more recent files.
![]() Tap a file to open that file within the app.
Tap a file to open that file within the app.

Search for an App
If you have a ton of apps installed on your iPad, it may be challenging to find a specific app you want. (Which Home screen did you put it on?) If this is the case, use your iPad’s search function to find that one app you’re looking for.
![]() From the main Home screen, swipe from left to right to display the Cover Sheet. Or…
From the main Home screen, swipe from left to right to display the Cover Sheet. Or…

![]() Swipe down from the center of the Home screen to display the Search panel.
Swipe down from the center of the Home screen to display the Search panel.

![]() Enter the name of the app you want into the Search box.
Enter the name of the app you want into the Search box.
![]() As you type, your iPad suggests matching apps. Tap the name of an app to open it.
As you type, your iPad suggests matching apps. Tap the name of an app to open it.

Switch Between Apps
You can have multiple apps open at the same time, and easily switch between them.
![]() Press the Home button twice. Or…
Press the Home button twice. Or…

![]() Swipe up from the bottom of any Home screen.
Swipe up from the bottom of any Home screen.
![]() You see Apple’s App Switcher, which displays all your open apps. Swipe left or right to focus on other apps.
You see Apple’s App Switcher, which displays all your open apps. Swipe left or right to focus on other apps.
![]() Tap an app to switch to that app.
Tap an app to switch to that app.

Close an App
Apps remain open until you manually close them. When you’re not using an app, it remains paused in the background, but it doesn’t consume system resources. Because of this, you don’t have to close an app when you’re done with it—although you can if you want.
![]() Press the Home button twice. Or…
Press the Home button twice. Or…

![]() Swipe up from any Home screen.
Swipe up from any Home screen.

![]() You now see the App Switcher, with all open apps displayed. Tap and drag the app up and off the screen until it disappears.
You now see the App Switcher, with all open apps displayed. Tap and drag the app up and off the screen until it disappears.

Finding New Apps in the App Store
Where do you find new apps to use on your iPad? There’s one central source that offers apps from multiple developers—Apple’s App Store.
Browse and Search the App Store
Apple’s App Store is an online store that offers apps and games for iPads and iPhones. Most apps in the App Store are free or relatively low cost. It’s easy to find new apps by either browsing or searching.
![]() Tap the App Store icon to open the App Store.
Tap the App Store icon to open the App Store.

![]() Tap the Today tab to view stories and recommendations about featured apps and games.
Tap the Today tab to view stories and recommendations about featured apps and games.

![]() Tap the Search tab to search for apps or games by name.
Tap the Search tab to search for apps or games by name.

![]() Tap the Games tab to view new, top, and featured games for your iPad.
Tap the Games tab to view new, top, and featured games for your iPad.

![]() Tap the Apps tab to view new, top, and featured apps.
Tap the Apps tab to view new, top, and featured apps.
![]() Swipe from right to left to see more apps/games in each list.
Swipe from right to left to see more apps/games in each list.

![]() Scroll down to the Top Categories section to view apps/games by category.
Scroll down to the Top Categories section to view apps/games by category.
![]() Tap See All to view all categories.
Tap See All to view all categories.

![]() Tap a category to view apps/games in that category.
Tap a category to view apps/games in that category.

![]() Tap an app/game to view more about that item.
Tap an app/game to view more about that item.

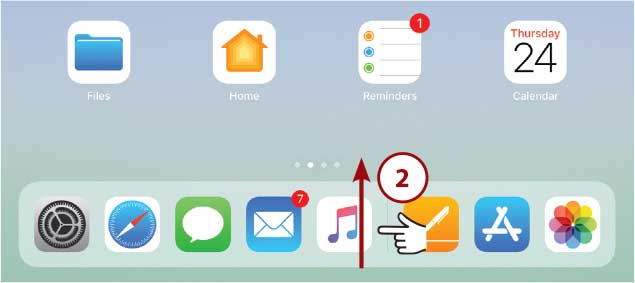
![]() Download a free app from the app panel by tapping the Get button.
Download a free app from the app panel by tapping the Get button.

![]() You see the details panel for that app; tap Install and, if prompted, enter the password for your Apple ID. The app is downloaded to and installed on your iPad.
You see the details panel for that app; tap Install and, if prompted, enter the password for your Apple ID. The app is downloaded to and installed on your iPad.
Locating and Moving Apps
When you install a new app, the icon for that app appears in the first empty space on the second or later Home screen. (New apps are not added to your main Home screen.) You can then move that icon to another position or screen if you like. (Learn more about moving and managing app icons in Chapter 3.)
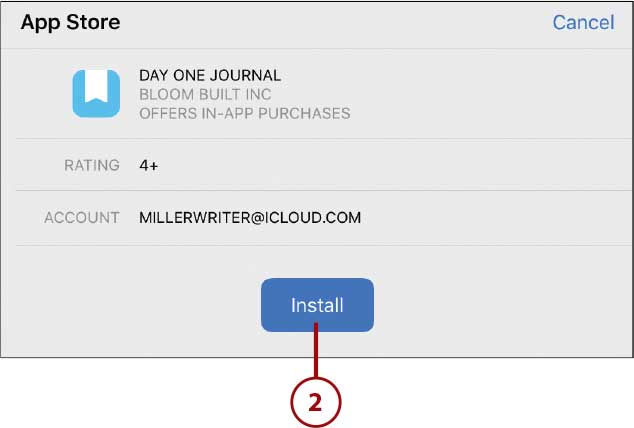
![]() Instead of a Get button, a paid app displays a price button. Tap this button to initiate the purchase.
Instead of a Get button, a paid app displays a price button. Tap this button to initiate the purchase.

![]() The details panel for a paid app displays the app’s price. Tap the Purchase button.
The details panel for a paid app displays the app’s price. Tap the Purchase button.
![]() The iTunes Store should recognize your Apple ID and then ask you for your password; if not, you need to enter both your Apple ID and password to sign in. The app is purchased and the download begins.
The iTunes Store should recognize your Apple ID and then ask you for your password; if not, you need to enter both your Apple ID and password to sign in. The app is purchased and the download begins.

>>>Go Further: PAYING FOR APPS
Naturally, you have to pay for those apps that have a price. Payment is automatic when you tap the Buy button, provided you’re signed into the iTunes Store and have a credit card on file for your Apple ID.
You may have provided credit card information when you first set up your iPad or created your Apple ID. If not, you can add a credit card to your account at any time by using the Safari app to go to https://appleid.apple.com and signing into your Apple account. On the main page, scroll down to the Payment and Shipping section and tap Edit Payment Information. Enter your credit card number, expiration date, billing address, and the like, and then tap Save. This credit card will then be used for all your App Store purchases.
Managing Installed Apps
Your iPad offers a variety of functions you can employ to better manage the apps you have installed on your device.
View and Manage Purchased Apps
All the apps you’ve ever purchased are listed in the App Store app. Even if you’ve deleted an app from your device, you can still see that app and reinstall it on your iPad at any time.
![]() From the Today tab in the App Store, tap the Profile icon to display the Account panel.
From the Today tab in the App Store, tap the Profile icon to display the Account panel.
![]() Tap Purchased to display the Purchased panel.
Tap Purchased to display the Purchased panel.

![]() Tap the All tab to view all apps you’ve purchased.
Tap the All tab to view all apps you’ve purchased.
![]() Apps that are currently installed on this device have an Open button. Tap the Open button to launch that app.
Apps that are currently installed on this device have an Open button. Tap the Open button to launch that app.
![]() Apps you’ve purchased but have yet to install or that you’ve since deleted (so they’re not currently installed) have a cloud icon. Tap this Download icon to install an app on your device.
Apps you’ve purchased but have yet to install or that you’ve since deleted (so they’re not currently installed) have a cloud icon. Tap this Download icon to install an app on your device.

![]() The App Store even keeps track of apps you’ve installed on other devices (such as your iPhone) that you can also install on your iPad. Tap Not on This iPad at the top of the page.
The App Store even keeps track of apps you’ve installed on other devices (such as your iPhone) that you can also install on your iPad. Tap Not on This iPad at the top of the page.
![]() Tap the Download icon to install an app on your iPad.
Tap the Download icon to install an app on your iPad.

Update Your Apps
From time to time the apps on your iPad get updated. Some apps add new features, some merely include bug fixes. In any case, you need to keep your apps up to date, which you do from the App Store app. All updates are always free.
![]() If you have apps that need updating, you see a number on the App Store icon. This number indicates how many apps you need to update. Tap the App Store icon to open the App Store.
If you have apps that need updating, you see a number on the App Store icon. This number indicates how many apps you need to update. Tap the App Store icon to open the App Store.

![]() From within the App Store, tap the Updates tab. All apps awaiting update are listed here.
From within the App Store, tap the Updates tab. All apps awaiting update are listed here.
![]() To update an individual app, tap that app’s Update button.
To update an individual app, tap that app’s Update button.
![]() To update all apps with pending updates, tap Update All.
To update all apps with pending updates, tap Update All.

Delete an App
Over time, you’ll probably find that you’ve installed some apps that you no longer use. You may want to delete these apps to clear up any Home screen clutter and to free up storage space for new apps.
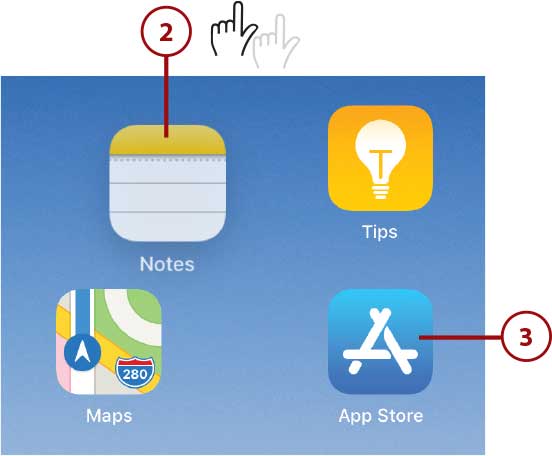
![]() Navigate to the Home screen that contains the app you want to delete; then press and hold the app you want to delete. All the app icons start to wiggle.
Navigate to the Home screen that contains the app you want to delete; then press and hold the app you want to delete. All the app icons start to wiggle.
![]() Tap the X next to the app icon you want to delete.
Tap the X next to the app icon you want to delete.

![]() Tap Delete at the prompt.
Tap Delete at the prompt.

![]() Press your iPad’s Home button to return to the normal, non-wiggly Home screen.
Press your iPad’s Home button to return to the normal, non-wiggly Home screen.

No X
If, when you press and hold an app’s icon, you don’t see a little X in the top-left corner that means you’re looking at a system app that can’t be deleted. Apps with Xs can be deleted; those without can’t.
Multitasking on Your iPad
Your iPad enables you to have multiple apps open simultaneously. Normally, you use one app full screen while the other apps hide in the background; you then use the App Switcher to change from one app to another.
You can also choose to run two apps onscreen at the same time. This type of multitasking is enabled by the Slide Over and Split View functions—both of which work better when you hold your iPad horizontally.
Open a Second App with Slide Over
Slide Over enables you to open a second app onscreen without closing the one you’re currently in. The second app (called the side app) appears in a narrow panel that floats on top of the first app on the right or left side of the screen.
Designed for iOS 11
To use an app with Slide Over or Split View, that app must be specifically designed to work with iOS 11. Almost all of Apple’s built-in apps work with these views, but not all third-party apps have been appropriately updated. If you try to move into Slide Over or Split View with a given app and it doesn’t work, that’s because the app is not yet compatible with these new iOS 11 features.
![]() With the first app open, drag the icon from the Dock for the app you want in the Slide Over panel up onto the main screen, then release. Or…
With the first app open, drag the icon from the Dock for the app you want in the Slide Over panel up onto the main screen, then release. Or…

![]() From any Home screen, tap and slightly drag the icon for the app you want in the Slide Over panel.
From any Home screen, tap and slightly drag the icon for the app you want in the Slide Over panel.
![]() While still dragging, use a second finger to tap the icon for the app you want full-screen. The full-screen app opens, and you can finish dragging the other icon to create the Slide Over panel.
While still dragging, use a second finger to tap the icon for the app you want full-screen. The full-screen app opens, and you can finish dragging the other icon to create the Slide Over panel.
![]() You can interact with the main app and the Slide Over app at the same time; they’re both “live.”
You can interact with the main app and the Slide Over app at the same time; they’re both “live.”
![]() Sometimes the Slide Over panel hovers over important information on the full-screen app, and you might need to move it to use the other app. To move the Slide Over panel to the other side of the screen, press the handle at the top of the panel and drag it to the other side.
Sometimes the Slide Over panel hovers over important information on the full-screen app, and you might need to move it to use the other app. To move the Slide Over panel to the other side of the screen, press the handle at the top of the panel and drag it to the other side.

![]() To display a different app in the Slide Over panel, tap and drag that app’s icon from the Dock onto the screen.
To display a different app in the Slide Over panel, tap and drag that app’s icon from the Dock onto the screen.
![]() To turn the Slide Over panel into a Split View app, flick down the handle at the top of the panel.
To turn the Slide Over panel into a Split View app, flick down the handle at the top of the panel.
![]() To hide the Slide Over panel, press the handle at the top of the panel and drag it off the right side of the screen.
To hide the Slide Over panel, press the handle at the top of the panel and drag it off the right side of the screen.

![]() To redisplay the Slide Over panel, swipe in from the right side of the screen.
To redisplay the Slide Over panel, swipe in from the right side of the screen.

Display Two Apps at Once with Split View
The Slide Over feature lets you see two apps at once, although the second app is in a narrow panel. If you want to display two apps on the screen in more equally sized panels, use iPad’s Split View.
![]() With the first app open, tap and drag the icon for the second app from the Dock.
With the first app open, tap and drag the icon for the second app from the Dock.

![]() Drag the icon to the right edge of the screen; the first app should shrink to the left. You can now drop the icon for the second app into the blank space at the right side of the screen.
Drag the icon to the right edge of the screen; the first app should shrink to the left. You can now drop the icon for the second app into the blank space at the right side of the screen.

![]() The two apps are displayed side by side. To change the space assigned to each app, drag the handle between the two apps left or right, as necessary.
The two apps are displayed side by side. To change the space assigned to each app, drag the handle between the two apps left or right, as necessary.
![]() To turn a Split View app into a Slide Over panel, flick down the app handle at the top of that app.
To turn a Split View app into a Slide Over panel, flick down the app handle at the top of that app.
![]() To return to single-app view, drag the app divider handle to the right edge of the screen (to close the right-hand app) or to the left (to close the left-hand app).
To return to single-app view, drag the app divider handle to the right edge of the screen (to close the right-hand app) or to the left (to close the left-hand app).

Drag and Drop Text and Pictures Between Apps
Apple’s new iOS 11 lets you easily copy text and pictures between apps using either Slide Over or Split View. You do this with simple drag and drop.
![]() In either Slide Over or Split View, press to select the text or picture you want to copy.
In either Slide Over or Split View, press to select the text or picture you want to copy.

![]() Still holding down the selection, drag it to the point in the other app where you want to copy it.
Still holding down the selection, drag it to the point in the other app where you want to copy it.

![]() Release your finger, and the item is placed in the second app.
Release your finger, and the item is placed in the second app.

>>>Go Further: PICTURE IN PICTURE
Your iPad also offers a picture in picture mode for use with certain apps. If you’re watching a TV show or movie, or conducting a FaceTime video chat, you can keep that video or chat playing in a separate window while you do other stuff on the iPad screen. The video or chat appears in a small window that floats on top of the active app, so you can keep watching while you work.
To activate picture in picture mode, tap the Picture in Picture icon (in the video app) or press the iPad’s Home button (when using FaceTime). The video screen shrinks to a corner of your display. Your Home screen or other apps appear beneath the video window, and you can then use whatever app you want while the video or chat keeps playing.
When you display the picture in picture window, you can make the window bigger by expanding two fingers on the window. Pinch two fingers together to make the video window smaller. And, if you want, you can use your finger to drag the video window to a different corner or position on the screen.
To return the video window to full screen, tap the window to display the control icons and then tap the Picture in Picture icon.