
5. Connecting to the Internet and Browsing the Web

In this chapter, you learn how to connect your iPad to Wi-Fi networks and hotspots to access sites and information on the Internet. You also learn how to use the Safari web browser to surf the Web.
A lot of what you do with your iPad requires a connection to the Internet. Sending and receiving email, searching for information, video chatting with FaceTime, watching streaming videos or listening to streaming music—all of these activities require an Internet connection.
You connect your iPad to the Internet via a Wi-Fi wireless connection. Your iPad has built-in Wi-Fi, so it’s just a matter of connecting to a private Wi-Fi network (like you probably have at home) or a public Wi-Fi hotspot. After you’re connected, you can do all that fun Internet-related stuff—as well as use those apps that also require an Internet connection.
Connecting to a Wi-Fi Network
To get the most out of your iPad, you need to connect it to the Internet, via a wireless network. You can connect to your home Wi-Fi network, or to any public Wi-Fi network or hotspot.
Wi-Fi
Wi-Fi (short for Wireless Fidelity) is the consumer-friendly name for the IEEE 802.11 wireless networking standard. Most of today’s wireless networks are Wi-Fi networks and use Wi-Fi-certified products.
Connect to Your Home Wireless Network
Obviously, if you have a wireless network in your home you’ll want to connect your iPad to that. Once you’ve initially connected, you won’t need to manually reconnect in the future; your iPad remembers the network settings and reconnects automatically.
To connect to your home network, you need to know the name of the network (sometimes called an SSID, for service set identifier) and the network password (sometimes called a security key).
![]() From the Dock or Home screen, tap the Settings icon to open the Settings screen.
From the Dock or Home screen, tap the Settings icon to open the Settings screen.

![]() In the left column, tap Wi-Fi. (If you’re not yet connected, it should say “Not Connected.”)
In the left column, tap Wi-Fi. (If you’re not yet connected, it should say “Not Connected.”)

![]() Make sure the Wi-Fi switch is in the “on” position. If it isn’t, tap to turn it on.
Make sure the Wi-Fi switch is in the “on” position. If it isn’t, tap to turn it on.
![]() You see a list of the wireless networks within range. Tap to select your home network. This displays the password panel.
You see a list of the wireless networks within range. Tap to select your home network. This displays the password panel.

Public Versus Private Networks
Private wireless networks require a password to connect, and are indicated with a lock icon in the network list. Public networks (sometimes called open networks) let you connect without a password, and are not accompanied by the lock icon.
![]() Use the onscreen keyboard to enter the password for your network.
Use the onscreen keyboard to enter the password for your network.
![]() Tap Join. You are now connected to the network and can access the Internet.
Tap Join. You are now connected to the network and can access the Internet.

Current Connection
If you’re currently connected to a wireless network, you see that network’s name in the Wi-Fi field in the left column of the Wi-Fi page. You can connect to a different network if you like; see the “Change Networks” task later in this section.
Connect to a Public Wireless Hotspot
Most wireless networks and hotspots you find out in the real world are public networks—that is, you don’t need a special password to connect. All you have to do is identify the network from the list and click to connect. (You’ll know you’re connected when you see the Wi-Fi icon in the status bar at the top of the screen.)
Some public networks, however, do require you to read through and agree to their terms of service after you connect but before you can use the network.
If this is the case, the site typically launches a connection page in your web browser. (In some instances, you may need to launch the Safari browser manually and try to access a web page; this will then launch the wireless connection page.) When you see the connection page from the wireless network or hotspot, you might need to check an “I read that” option or click a “connect” button.
For example, if you connect to the wireless networks at your local Starbucks or McDonald’s, you need to manually log in from their respective log-in pages. In some instances, there may be a fee to use the wireless network, in which case you’ll need to enter your credit card number to proceed.
Hotel Wi-Fi
If you’re connecting to the wireless network in a hotel without free Wi-Fi, you typically enter your room number to add the charges to your bill. Given that some hotels charge $10 or more per night, it’s always a smart idea to shop around for hotels that offer free Wi-Fi.
![]() From the Settings screen, tap Wi-Fi in the left column.
From the Settings screen, tap Wi-Fi in the left column.

![]() Make sure the Wi-Fi switch is in the “on” position. If it isn’t, tap to turn it on.
Make sure the Wi-Fi switch is in the “on” position. If it isn’t, tap to turn it on.
![]() You see a list of the wireless networks and hotspots within range. Tap to select the desired network.
You see a list of the wireless networks and hotspots within range. Tap to select the desired network.

![]() If the hotspot requires you to sign in, it should launch a log-in screen and display a sign-in page. (If this doesn’t happen automatically, you might need to manually launch the Safari web browser and then enter any web page address to open the sign-in page.) Check to agree to any terms and conditions and then click the “accept” or “sign in” button.
If the hotspot requires you to sign in, it should launch a log-in screen and display a sign-in page. (If this doesn’t happen automatically, you might need to manually launch the Safari web browser and then enter any web page address to open the sign-in page.) Check to agree to any terms and conditions and then click the “accept” or “sign in” button.

Change Networks
Sometimes, especially out in public, you may have several different Wi-Fi networks available to you—and your iPad might automatically connect to one other than the one you wanted to connect to. If this is the case, it’s easy enough to switch networks.
![]() From the Settings screen, observe the Wi-Fi field in the left column. The currently connected network is displayed. If you don’t want to connect to this network, tap the Wi-Fi field to display a list of other available networks.
From the Settings screen, observe the Wi-Fi field in the left column. The currently connected network is displayed. If you don’t want to connect to this network, tap the Wi-Fi field to display a list of other available networks.

![]() Tap the network you want to connect to. Your iPad disconnects from the previous network and connects instead to the newly selected one.
Tap the network you want to connect to. Your iPad disconnects from the previous network and connects instead to the newly selected one.

Connect to a Network You’ve Previously Connected To
This one’s easier. When you’re in range of a wireless network or hotspot you’ve previously connected to, your iPad automatically connects to it again. You don’t have to choose it from the list; the iPad automatically discovers the network and makes the connection.
If it’s a private network, like your home network, your iPad remembers the previously entered password and enters it for you. If it’s a public network or hotspot that requires logging in via your web browser, you might be asked to agree to terms and click the “sign in” button again. (Or you might not; some sites allow reconnection without having to sign back in.)
It’s Not All Good: Connection Problems
Not all Internet connections are good. Sometimes the Wi-Fi network or hotspot you connect to has problems, which can keep your iPad from connecting to the Internet.
For example, the Wi-Fi hotspot I use at one of my local coffeehouses has a tendency to go missing every few hours. That is, I’ll be connected one minute and the next minute find that I’m not connected—and that the hotspot itself is no longer visible on my iPad. Normally I wait a minute or two, the hotspot reappears, and my iPad reconnects. The best I can figure is that the coffeehouse’s Wi-Fi router has rebooted, for some reason, which kicks everyone using it off until it powers back on.
You can also run into similar connection problems with your home Wi-Fi network. In many cases, the problem corrects itself automatically within a few minutes. If the problem persists, try turning off your iPad’s Wi-Fi and then turning it back on. This forces your iPad to establish a new connection to the wireless network or hotspot, which often fixes the problem.
Using the Safari Web Browser
After your iPad is connected to a Wi-Fi network or hotspot, you should have access (via that network) to the Internet. That’s where all the fun stuff happens—including surfing the Web.
To surf the Web you need an app called a web browser. You’re probably familiar with using a web browser on your computer or phone, and it works similarly on your iPad.
The browser that Apple includes with your iPad is called Safari. It works like most other web browsers, and it’s ready for use whenever you are.
Other Web Browsers
Safari is preinstalled on your iPad, but you can use other web browsers, if you like. The most popular non-Apple browser is Google Chrome, which is available for free from the iTunes App Store. Many people prefer Chrome to Safari, especially if they use Chrome on their computer or other devices.
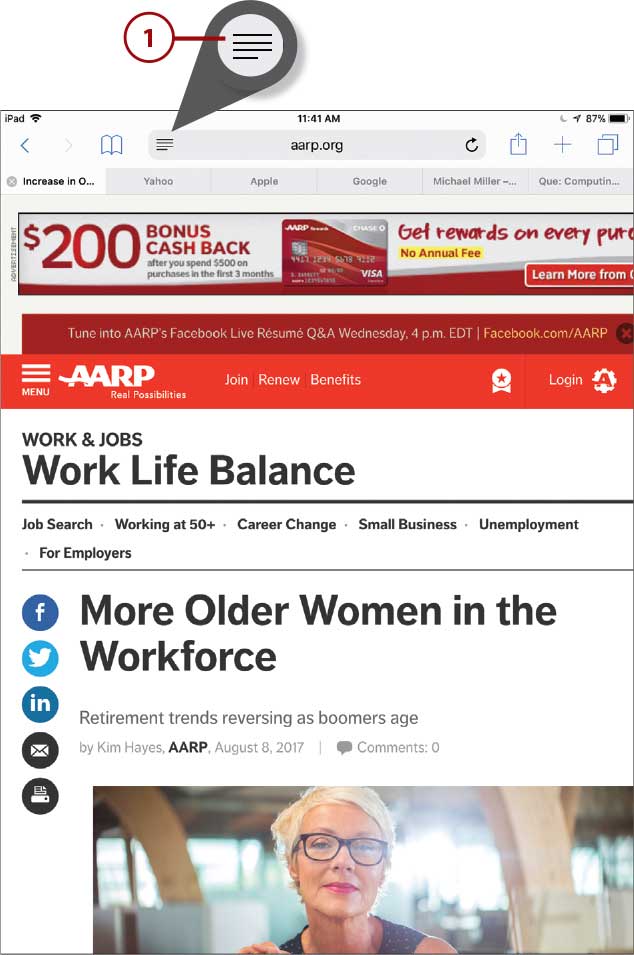
Launch the Safari Browser
The icon for the Safari browser is located by default in the Dock at the bottom of all Home screens.
![]() From the Dock or Home screen, tap the Safari icon to open the Safari browser.
From the Dock or Home screen, tap the Safari icon to open the Safari browser.

![]() The first time you launch Safari, it opens to a blank page, possibly with some website suggestions. If you’ve previously used the browser, it opens your last open page.
The first time you launch Safari, it opens to a blank page, possibly with some website suggestions. If you’ve previously used the browser, it opens your last open page.

Enter a Web Address
To go directly to a given website or web page, you must enter the web address of that page into the Address box at the top of the browser screen.
![]() Tap within the Address box to display the onscreen keyboard.
Tap within the Address box to display the onscreen keyboard.

![]() Enter the address of the web page you want to visit.
Enter the address of the web page you want to visit.
![]() As you type, Safari might suggest matching web pages. Tap any page to go to it. Or…
As you type, Safari might suggest matching web pages. Tap any page to go to it. Or…
![]() Finish entering the full address and then tap Go on the keyboard to go to that page.
Finish entering the full address and then tap Go on the keyboard to go to that page.

![]() The web page appears onscreen. Swipe up to scroll down the page.
The web page appears onscreen. Swipe up to scroll down the page.
![]() If a page has trouble loading, or if you want to refresh the content, you can reload the page by tapping the Reload button.
If a page has trouble loading, or if you want to refresh the content, you can reload the page by tapping the Reload button.

A web address is called a Uniform Resource Locator, or URL. Technically, all URLs start with either http:// or (for secure sites) https://. You don’t need to type this part of the URL, however; Safari assumes it and enters it automatically.
The main part of most web addresses starts with www followed by a dot, then the name of the website, then another dot and the domain identifier, such as com or org. As an example, my personal website is www.millerwriter.com. (You don’t have to enter the “www.”; Safari does this for you.)
Use Web Links
Pages on the Web are often connected via clickable (on your iPad, tappable) links, called web links. A web link can be within a page’s text (typically underlined or in a different color) or embedded in an image. Tap a link to go the linked-to page.
![]() On the current web page, tap the web link.
On the current web page, tap the web link.


View Multiple Pages in Tabs
Safari, like most modern web browsers, lets you open more than one page at a time, using tabs. You can open different web pages in different tabs, and easily switch between them.
![]() Tap the + icon to create a new tab.
Tap the + icon to create a new tab.

![]() Enter the desired web address into the new tab’s Address box.
Enter the desired web address into the new tab’s Address box.
![]() Tap a different tab to view that tab. Or…
Tap a different tab to view that tab. Or…
![]() Tap the tabs icon to view thumbnails of all open tabs.
Tap the tabs icon to view thumbnails of all open tabs.

![]() Tap to switch to a different tab.
Tap to switch to a different tab.
![]() Swipe a tab to the left to close it. Or…
Swipe a tab to the left to close it. Or…
![]() Tap the X on any tab to close it.
Tap the X on any tab to close it.

Bookmark Pages
You can save any page you visit by bookmarking that page. It’s easy, then, to revisit those pages you’ve bookmarked.
![]() Navigate to the page you want to bookmark and then tap the Share icon. The Share panel displays.
Navigate to the page you want to bookmark and then tap the Share icon. The Share panel displays.

![]() Tap Add Bookmark.
Tap Add Bookmark.

![]() Accept, edit, or enter the web page name in the Add Bookmark panel.
Accept, edit, or enter the web page name in the Add Bookmark panel.
![]() Tap Save. The page is now saved in your bookmarks.
Tap Save. The page is now saved in your bookmarks.

Favorites
Safari offers a special category of bookmarks, called Favorites. You save a page to your Favorites list by tapping Add to Favorites in the Share panel. All Favorites can be accessed by selecting Favorites in the Bookmark panel; Favorites are also displayed when you tap + to open a new empty tab.
![]() Tap the Bookmark icon to open the Bookmark panel so you can view and revisit bookmarked pages.
Tap the Bookmark icon to open the Bookmark panel so you can view and revisit bookmarked pages.
![]() Make sure the Bookmarks tab is selected.
Make sure the Bookmarks tab is selected.
![]() Some bookmarks are organized into folders. Tap a folder name to view all bookmarks in that folder.
Some bookmarks are organized into folders. Tap a folder name to view all bookmarks in that folder.
![]() Tap the name of a bookmark to open the corresponding web page.
Tap the name of a bookmark to open the corresponding web page.

>>>Go Further: ADD TO HOME SCREEN
If you find yourself visiting a given web page with regularity, you might want to create a shortcut to it on your iPad’s Home screen. When you add an icon for a page to the Home screen, tapping that icon launches Safari and opens that page.
To add an icon for a given web page, navigate to that page, tap the Share icon, and then tap Add to Home Screen. When the Add to Home panel appears, tap Add.
Revisit Past Pages
How easy is it to return to a web page you’ve previously viewed? Safari keeps track of all your web browsing history, and revisiting a page is as easy as tapping it in the Bookmark panel.
![]() View the page you just visited by tapping the back (left arrow) icon.
View the page you just visited by tapping the back (left arrow) icon.
![]() Return to the next page by tapping the forward (right arrow) icon.
Return to the next page by tapping the forward (right arrow) icon.

![]() Tap the Bookmark icon to open the Bookmark panel.
Tap the Bookmark icon to open the Bookmark panel.
![]() Tap History to view pages you’ve visited, newest first.
Tap History to view pages you’ve visited, newest first.

Browse the Web in Private
There are some web pages you might want to browse in private, and not let others know you’ve seen. When you want to browse anonymously, use Safari’s Private mode. Pages you visit while in Private mode are not stored to your history, and are not otherwise tracked on your device or elsewhere.
![]() From within Safari, tap the Tabs icon.
From within Safari, tap the Tabs icon.

![]() Tap Private.
Tap Private.
![]() Tap Done. You are now in private browsing mode.
Tap Done. You are now in private browsing mode.

![]() Use Safari as normal. None of your activity will be tracked.
Use Safari as normal. None of your activity will be tracked.
![]() Tap the Tabs icon to exit private browsing mode.
Tap the Tabs icon to exit private browsing mode.

![]() Tap Private. You now see any tabs you had open before entering private browsing mode.
Tap Private. You now see any tabs you had open before entering private browsing mode.
![]() Tap Done.
Tap Done.

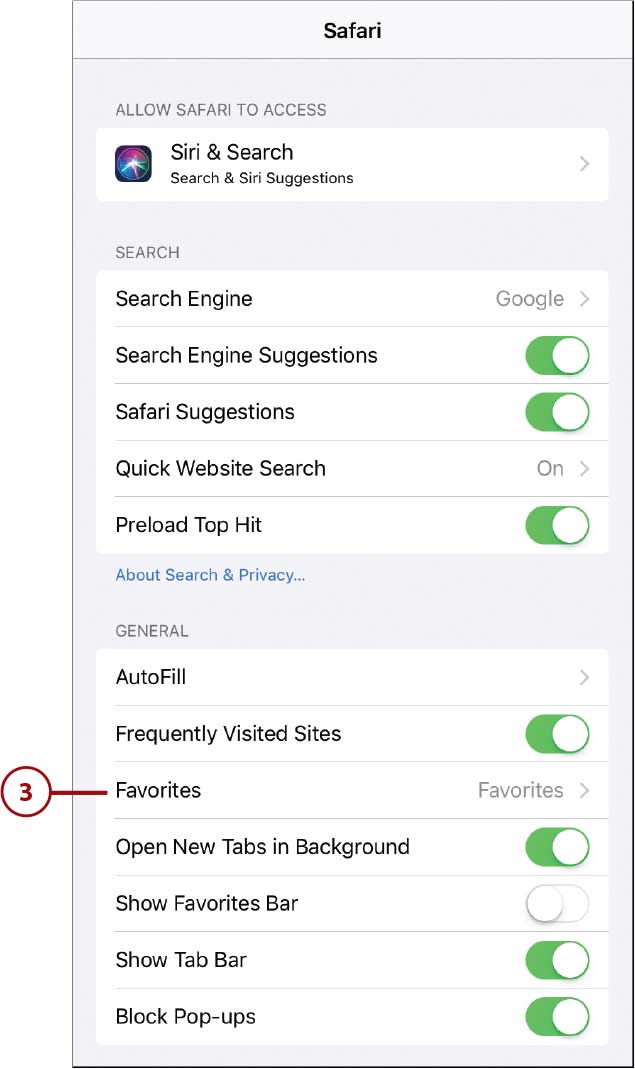
Configure Safari Settings
Safari is configured perfectly for most users by default, but there are a number of settings you can change to better personalize your Safari browsing experience. You access all these settings from your iPad’s Settings screen.
![]() From the Dock or Home screen, tap the Settings icon to open the Settings screen.
From the Dock or Home screen, tap the Settings icon to open the Settings screen.

![]() Scroll down the left column to the apps section and tap Safari.
Scroll down the left column to the apps section and tap Safari.

![]() Tap to edit any setting.
Tap to edit any setting.
>>>Go Further: BLOCK ONLINE ADS
If you’re like me, you quickly tire of all the online ads displayed on various web pages. (There are even ads on Facebook and many web-based email services!) Fortunately, you can block many if not all of these ads by installing an ad blocker extension in the Safari web browser. With an ad blocker installed, ads simply don’t display on a web page—you see a blank space where the ad is supposed to be. Ad blockers don’t hurt your browser or your iPad, and make browsing the Web that much more pleasant.
There are a variety of different ad blockers available in the iTunes App Store. Some are free; some aren’t. The most popular ones include 1Blocker, Adblock, Norton Ad Blocker, and Weblock.
You may have to manually enable any ad blocker you install. From your iPad’s Settings screen, tap Safari in the left column and then tap Content Blockers. (This option is not available until you install an ad blocker.) You can then enable or disable any ad blocker you’ve installed.
Making the Web More Readable
Viewing web pages in Safari might not always be easy. Some pages, especially those not optimized for mobile viewing, may contain very small type or columns that wrap too far off the side of a page, making them less than readable.
Fortunately, there are ways to make small type on web pages a little larger—and web pages more readable, in general.
Zoom into a Page
If you find a particular web page difficult to read, the first thing you can do is try to zoom into the text—that is, make the text larger onscreen.
![]() Double-tap a block of text to make it fill the screen. (This works on some web pages, but not all.) Double-tap again to return the text to normal size.
Double-tap a block of text to make it fill the screen. (This works on some web pages, but not all.) Double-tap again to return the text to normal size.

![]() Place two fingers together on the screen and then expand them. As you move your fingers apart, you zoom into that portion of the page. To zoom back out, pinch your two fingers back together.
Place two fingers together on the screen and then expand them. As you move your fingers apart, you zoom into that portion of the page. To zoom back out, pinch your two fingers back together.

Read Articles with Safari Reader
Safari Reader is a special reading mode that makes some web pages easier to read by removing ads, images, videos, and other extraneous elements. Not all web pages can be viewed with Safari Reader, but those that can are a lot easier to read than normal cluttered web pages. (Safari Reader is especially useful for reading articles on web news sites.)
![]() If a page can be viewed with Safari Reader, it has a Reader icon in the Address bar. Tap this icon to switch to Reader mode.
If a page can be viewed with Safari Reader, it has a Reader icon in the Address bar. Tap this icon to switch to Reader mode.
![]() Tap the Reader icon again to return to normal web page view.
Tap the Reader icon again to return to normal web page view.

Searching the Web
With so much information available on the Web, how do you find the stuff you want or need to know? It’s easy, thanks to Google.
Search the Web with Google
Google is the default search engine for the Safari web browser. You can search Google from within Safari, or from Google’s own website.
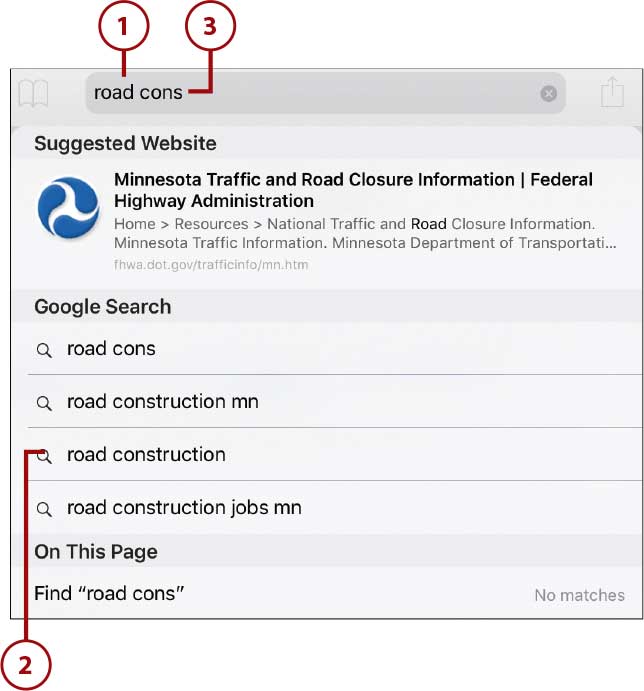
![]() To search within Safari, tap within the Address box and enter your query.
To search within Safari, tap within the Address box and enter your query.
![]() As you type, Safari displays several suggested searches. Go to the Google Search section and, if the search you want is listed, tap it.
As you type, Safari displays several suggested searches. Go to the Google Search section and, if the search you want is listed, tap it.
![]() Otherwise, continue entering your query and tap Go on the onscreen keyboard. Or….
Otherwise, continue entering your query and tap Go on the onscreen keyboard. Or….
![]() Go directly to the Google web page at www.google.com, enter your query into the Search box, and tap the Search button.
Go directly to the Google web page at www.google.com, enter your query into the Search box, and tap the Search button.

![]() Google displays a page of search results. Tap to open a given web page. Or…
Google displays a page of search results. Tap to open a given web page. Or…
![]() Display different types of results by selecting a results type along the top of the page—All, Images, Shopping, Videos, News, Maps, and so forth.
Display different types of results by selecting a results type along the top of the page—All, Images, Shopping, Videos, News, Maps, and so forth.

![]() Further refine your results by tapping Search. This displays a new search bar; tap to filter results by time and other options.
Further refine your results by tapping Search. This displays a new search bar; tap to filter results by time and other options.

Change Your Search Engine
If you’d rather use a different search engine with Safari, such as Microsoft’s Bing or Yahoo!, you can do that.
![]() From your iPad’s Settings screen, tap Safari in the left column.
From your iPad’s Settings screen, tap Safari in the left column.

![]() In the Search section, tap Search Engine.
In the Search section, tap Search Engine.

![]() Tap to select your desired search engine.
Tap to select your desired search engine.
