18. Controlling Your Smart Home

In this chapter, you learn how to use Apple HomeKit and the Home app on your iPad to control smart devices in your home.
One of the big trends today is setting up so-called “smart” devices to control various functions in your home. We’re talking smart lighting that turns on and off according to a preset schedule, smart thermostats that learn your behavior and adjust the temperature accordingly, and smart locks and doorbells that let you see who’s at the door and unlock the door if you wish, all from a corresponding app on your iPad or smartphone.
Most smart devices come with their own mobile apps. This is fine—unless you have multiple smart devices, in which case you have to deal with multiple apps. You can get around this multiple-app mayhem by using Apple’s Home app on your iPad. The Home app works with Apple’s HomeKit protocol to control multiple smart devices from multiple manufacturers.
If you’d like more information about using smart home devices and apps, check out Que’s companion book, My Smart Home for Seniors, available wherever books are sold.
Understanding Apple HomeKit
Apple HomeKit is a system for controlling smart devices from a variety of suppliers with a single app—or with Apple’s Siri voice-controlled personal assistant. If a smart device is compatible with HomeKit (not all are), it’s a simple matter to link the device to the Home app on your iPad (or iPhone) and control it along with other devices with a tap of your finger.
It’s actually kind of a big deal to have centralized control of multiple smart devices with a single app. For one thing, using one app is a lot more convenient than using multiple apps. Beyond convenience, however, HomeKit also lets you centralize control of multiple devices in a single room, as well as create scenes that control multiple connected devices with a single tap. HomeKit makes possible a lot of combined automation that makes your smart devices work smarter together.
How HomeKit Works
HomeKit isn’t a smart home system per se; it doesn’t operate from a central hub, as do SmartThings, Wink, and similar systems. Instead, HomeKit is more like the standalone smart controllers offered by Amazon (Echo) and Google (Home), but it works through a smartphone/tablet app instead of a piece of hardware.
So how does HomeKit work? It all revolves around Apple’s Home app, which comes installed on your new iPad. (And can be downloaded from the App Store for use on many older models.)
If a smart device is compatible with the HomeKit standard, it’s typically discovered by Apple’s Home app when you first power on the device. (If it’s not automatically discovered, you can add it manually to the app.) After a device is linked to the Home app, you specify what room it’s in. You can then control the device from the Home app, or via any scenes or automations you create. (Your iPad must be connected to your home Wi-Fi network to do this; Home can’t control your smart devices remotely.)
What’s Compatible with HomeKit
To work with HomeKit, smart devices need to be certified by Apple. This means that it’s more likely that newer products will be compatible with HomeKit, as it’s easier to get them certified while they’re being developed, and less likely that existing products will go back and get certified.
So what’s compatible? The list changes daily, but includes big names such as August, Ecobee, Honeywell, iHome, Insteon, and Philips. Missing from the list, unfortunately, are several major smart systems, including Nest, SmartThings by Samsung, WeMo by Belkin, and Wink. That said, Apple continues to work with other companies to gain compatibility with their smart devices. You can check a current compatibility list at www.apple.com/ios/home/accessories/.
Adding Devices and Rooms
Before you can use the Home app to control devices from your iPad, you have to add those devices to the app. You can also assign devices to specific rooms in your home.
Add a New Device
Apple calls smart devices, whether light bulbs or thermostats, “accessories.” Compatible accessories are relatively easy to add to the Home app. Just make sure the accessory is powered on and connected to your home’s Wi-Fi network—and that your iPad is connected to the same network.
![]() Tap the Home icon to launch the Home app.
Tap the Home icon to launch the Home app.

![]() The first time you open the Home app, you see the Welcome screen; tap Get Started to proceed. Each subsequent time you launch the app, you see the Home screen; tap the + button to proceed.
The first time you open the Home app, you see the Welcome screen; tap Get Started to proceed. Each subsequent time you launch the app, you see the Home screen; tap the + button to proceed.

![]() Your new device should appear in the Add Accessory panel. Tap it.
Your new device should appear in the Add Accessory panel. Tap it.

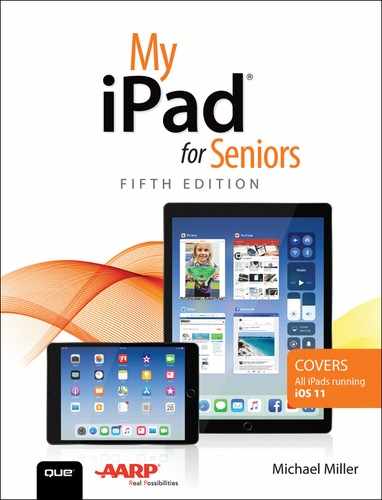
![]() Look for the HomeKit code on the new device or in the device’s documentation. Position the camera of your iPad to capture this code.
Look for the HomeKit code on the new device or in the device’s documentation. Position the camera of your iPad to capture this code.
![]() If for some reason step 5 doesn’t work, tap Enter Code Manually to enter the code with your phone or tablet’s onscreen keyboard.
If for some reason step 5 doesn’t work, tap Enter Code Manually to enter the code with your phone or tablet’s onscreen keyboard.
![]() Change the name of this accessory by tapping the current name and then entering a new one. (Siri identifies this device by the name you give it here.)
Change the name of this accessory by tapping the current name and then entering a new one. (Siri identifies this device by the name you give it here.)
![]() By default, the new accessory is added to your default room. To add the accessory to a different room, tap Location and select another room.
By default, the new accessory is added to your default room. To add the accessory to a different room, tap Location and select another room.
![]() Include this accessory in your favorites on the Home app’s home screen by tapping “on” the Include in Favorites switch.
Include this accessory in your favorites on the Home app’s home screen by tapping “on” the Include in Favorites switch.
![]() Tap Next.
Tap Next.

![]() If the accessory requires additional setup, tap View and follow the onscreen instructions.
If the accessory requires additional setup, tap View and follow the onscreen instructions.
![]() Tap Done to complete the installation.
Tap Done to complete the installation.

Add a New Room
When you install a new accessory you assign this device to a given room in your home. You can create additional rooms corresponding to your actual physical rooms.
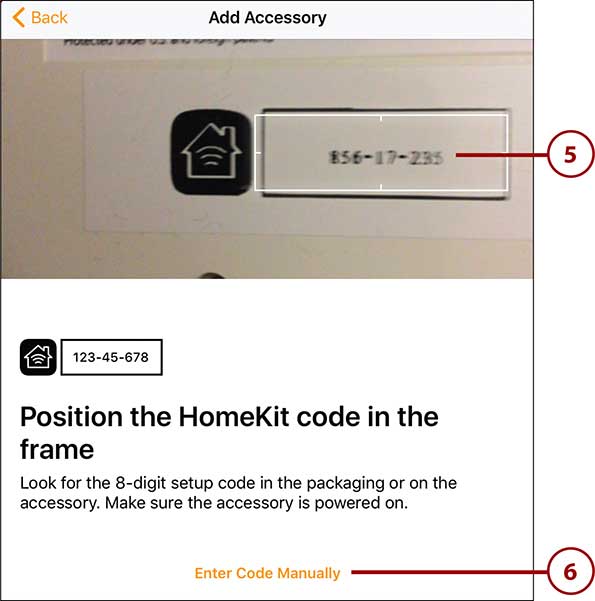
![]() Tap the Rooms icon to display the Room screen.
Tap the Rooms icon to display the Room screen.

![]() Tap the Menu button in the upper-left corner of the screen.
Tap the Menu button in the upper-left corner of the screen.
![]() Tap Room Settings.
Tap Room Settings.

![]() Tap Add Room.
Tap Add Room.

![]() Enter a name for this room into the Room Name field.
Enter a name for this room into the Room Name field.
![]() Change the room’s background wallpaper by tapping Choose from Existing and then making a selection.
Change the room’s background wallpaper by tapping Choose from Existing and then making a selection.
![]() Alternatively, you can take a photo of the room to use for the wallpaper. Tap Take Photo and proceed from there.
Alternatively, you can take a photo of the room to use for the wallpaper. Tap Take Photo and proceed from there.
![]() Tap Save. The room is now created and added to your room list.
Tap Save. The room is now created and added to your room list.

Assign an Accessory to a Room
By default, any new accessory/device you install is assigned to the Home app’s default room (which is rather unimaginatively labeled “Default Room”). You can, however, assign an accessory to a different room, or move an accessory from one room to another.
One Room per Accessory
Just as it is in the physical world, in the Home app each accessory can be assigned to one room only. You can’t assign accessories to multiple rooms.
![]() Tap the Rooms icon to display the Room screen.
Tap the Rooms icon to display the Room screen.
![]() Swipe left or right until you get to the room that contains the accessory you want. Alternatively, tap the Menu button at the top left and select the room from those listed.
Swipe left or right until you get to the room that contains the accessory you want. Alternatively, tap the Menu button at the top left and select the room from those listed.

![]() Touch and hold the accessory you want to move.
Touch and hold the accessory you want to move.

![]() Tap Details.
Tap Details.


![]() Tap to select the room you want to move this accessory to.
Tap to select the room you want to move this accessory to.
![]() Tap Done to return to the previous screen.
Tap Done to return to the previous screen.

![]() Tap Done.
Tap Done.

![]() The accessory is moved to the room you selected.
The accessory is moved to the room you selected.

Create a Scene
The Home app doesn’t limit you to controlling one device at a time. You can control multiple accessories at the same time by creating what Apple calls scenes.
For example, you can create a scene called “Good Morning” that turns on the smart lights in your bedroom and turns up your smart thermostat, or one called “Arrive Home” that turns on your living room lights and unlocks the front door. You activate a scene with a single tap from the home or room screen, or via Siri command.
![]() On either the Home or Rooms screen, tap the +.
On either the Home or Rooms screen, tap the +.
![]() Tap Add Scene.
Tap Add Scene.

![]() Tap one of the suggested scenes (Arrive Home, Good Morning, Good Night, or Leave Home) or tap Custom to create a different scene.
Tap one of the suggested scenes (Arrive Home, Good Morning, Good Night, or Leave Home) or tap Custom to create a different scene.

![]() If you chose one of the default scenes for a given room, you see the devices for that room. To include additional devices or to remove one of the current ones, tap Add or Remove Accessories.
If you chose one of the default scenes for a given room, you see the devices for that room. To include additional devices or to remove one of the current ones, tap Add or Remove Accessories.

![]() Tap those accessories you want to add, or tap to remove those accessories you don’t want to include.
Tap those accessories you want to add, or tap to remove those accessories you don’t want to include.
![]() Tap Done.
Tap Done.

![]() Back in the New Scene pane, tap and hold an accessory to adjust its settings.
Back in the New Scene pane, tap and hold an accessory to adjust its settings.
![]() Tap Test This Scene to see if the scene works as you want.
Tap Test This Scene to see if the scene works as you want.
![]() Make sure the Show in Favorites switch is “on” to display this scene on the home screen.
Make sure the Show in Favorites switch is “on” to display this scene on the home screen.
![]() Tap Done to add this scene.
Tap Done to add this scene.

Controlling Your Smart Devices
Once you’ve installed a device/accessory in the Home app, you can then use your iPad to control that device in various ways.
Control a Device or Scene
Turning a device on or off, or activating a scene, is as easy as tapping your phone or tablet’s screen. For many devices, additional controls are also available.
![]() On either the Home or Rooms screen, tap an accessory or scene to turn it on or off. The tile for the accessory or scene dims when the device is turned off; the tile has a white background when the device is turned on.
On either the Home or Rooms screen, tap an accessory or scene to turn it on or off. The tile for the accessory or scene dims when the device is turned off; the tile has a white background when the device is turned on.
![]() Tap and hold the tile for an accessory to access additional controls.
Tap and hold the tile for an accessory to access additional controls.

![]() For example, with smart lights, you can tap and drag the divider bar to increase or decrease the light’s brightness.
For example, with smart lights, you can tap and drag the divider bar to increase or decrease the light’s brightness.

Controlling Devices and Scenes with Siri
You’re probably used to asking your iPad’s Siri personal assistant to do all manner of things, from looking up information to reading the latest news and weather reports. Well, you can also use Siri within the Home app to control your connected smart devices, using voice commands.
To use Siri to control any devices and scenes you’ve added to the Home app, all you have to do is say “Siri,” then speak the desired command. It’s that easy.
Obviously, which commands you speak depend on which devices you have installed, and what you want them to do. For example, if you want to turn off the lights in your bedroom, say
Siri, turn off the lights in the bedroom.
Pretty simple. If you want to reduce the brightness for a given light or room, say
Siri, set brightness for the living room lights to 50 percent.
To set your smart thermostat, say
Siri, set the temperature to 70 degrees.
You can even ask questions of Siri regarding your smart devices, like this one:
Siri, did I lock the front door?
If you have scenes created (refer to the “Create a Scene” task earlier in this chapter), you can turn on a scene by saying
Siri, set my relaxing scene.
It’s all very common sense. All you have to do is speak to Siri via your iPad, and she works within the Home app to do the rest.
Automating Multiple Devices
Until now you’ve seen how to use the Home app to directly control individual accessories or groups of accessories in a given room, by tapping a tile for a device or scene. You can also use the Home app to automate operations across multiple accessories based on a specified trigger. You can trigger these automations when your location changes (when you leave the house, for example), at a specified time of day, or when another accessory does something.
Set Up Your iPad as a Home Hub
Normal Home commands flow directly from your iPad to the device or devices specified. Automations, however, are triggered by other events—a given time, a location change, or a control from another device. For automations to work, then, you need some sort of central control that’s active even if your phone is with you across town.
To create and use automations, then, you need to set up what Apple calls a Home Hub. You can do this with your iPad.
Apple TV
If you have an Apple TV box connected to a television in your home, you can also use this as your Home Hub.
If you choose to use your iPad as a Home Hub, it needs to stay in your home, connected to your home Wi-Fi network, to work. (It can’t control your home devices when it’s not home!) And, of course, you need to set it up in advance.
![]() From the Dock or a Home screen, tap Settings to open the Settings app.
From the Dock or a Home screen, tap Settings to open the Settings app.

![]() In the left column, tap Accounts & Passwords.
In the left column, tap Accounts & Passwords.

![]() In the right column, tap iCloud.
In the right column, tap iCloud.

![]() Make sure that Home and Keychain are both turned on.
Make sure that Home and Keychain are both turned on.

![]() In the left column, tap to select Home.
In the left column, tap to select Home.

![]() Tap “on” the Use This iPad as a Home Hub switch.
Tap “on” the Use This iPad as a Home Hub switch.

Create a Location Automation
A location automation is triggered when your iPhone comes near or leaves a specified location. That location can be your home (to trigger actions for when you leave or arrive home), your office or club, or any place on the map.
![]() From within the Home app, tap the Automation icon to display the Automation screen. Any previously created automations are displayed here.
From within the Home app, tap the Automation icon to display the Automation screen. Any previously created automations are displayed here.
![]() Tap Create New Automation.
Tap Create New Automation.

![]() In the New Automation pane, tap My Location Changes.
In the New Automation pane, tap My Location Changes.

![]() Your home and other nearby locations are listed. Tap to select one of these, or enter a name or address into the search box to search for and select a different location.
Your home and other nearby locations are listed. Tap to select one of these, or enter a name or address into the search box to search for and select a different location.
![]() Tap When I Arrive to trigger the automation when you arrive at the selected location, or tap When I Leave to trigger the automation when you leave the location.
Tap When I Arrive to trigger the automation when you arrive at the selected location, or tap When I Leave to trigger the automation when you leave the location.
![]() Your selected location displays as a red pin on the map at the bottom of the pane. Drag the blue dot to enlarge or shrink the area around the selected location; this will be the range that triggers the action.
Your selected location displays as a red pin on the map at the bottom of the pane. Drag the blue dot to enlarge or shrink the area around the selected location; this will be the range that triggers the action.
![]() Tap Next.
Tap Next.

![]() Select those scenes and accessories you want to trigger when you arrive at or leave the selected location.
Select those scenes and accessories you want to trigger when you arrive at or leave the selected location.
![]() Tap Next.
Tap Next.

![]() Review the automation you’ve created and then tap Done.
Review the automation you’ve created and then tap Done.

Create a Time Automation
A time automation is triggered at a specific time on a specific day or days. This is kind of like an alarm that triggers the designated accessories or scenes.
![]() From the Automation screen, tap Create New Automation.
From the Automation screen, tap Create New Automation.

![]() In the New Automation pane, tap A Time of Day Occurs.
In the New Automation pane, tap A Time of Day Occurs.

![]() Use the Time of Day controls to select the hour, minute, and AM/PM you want this automation to run. (Alternatively, you can opt to run the automation at sunrise or sunset.)
Use the Time of Day controls to select the hour, minute, and AM/PM you want this automation to run. (Alternatively, you can opt to run the automation at sunrise or sunset.)
![]() Tap those days of the week you want this automation to run. You can select one, some, or all days.
Tap those days of the week you want this automation to run. You can select one, some, or all days.
![]() Tap Next.
Tap Next.

![]() Select those scenes and accessories you want to trigger at the designated time.
Select those scenes and accessories you want to trigger at the designated time.
![]() Tap Next.
Tap Next.

![]() Review the automation you’ve created and then tap Done.
Review the automation you’ve created and then tap Done.

Create a Controlled Automation
Finally, you can create a controlled automation. This is an automation that is triggered when a designated device is activated. For example, the automation may be triggered when the front door opens.
![]() From the Automation page, tap Create New Automation.
From the Automation page, tap Create New Automation.

![]() In the New Automation pane, tap An Accessory Is Controlled.
In the New Automation pane, tap An Accessory Is Controlled.

![]() On the Accessory Automation pane, tap the device that will start this automation.
On the Accessory Automation pane, tap the device that will start this automation.
![]() Tap Next.
Tap Next.

![]() Tap the action that will start this automation.
Tap the action that will start this automation.
![]() Tap Next.
Tap Next.

![]() Tap the scenes or accessories you want to activate when the automation is triggered.
Tap the scenes or accessories you want to activate when the automation is triggered.
![]() Tap Next.
Tap Next.

![]() Review your new automation and then tap Done.
Review your new automation and then tap Done.
