
15. Shooting, Editing, and Sharing Photos and Videos

In this chapter, you learn how to use your iPad to shoot photos and videos, and then edit and share what you shot.
Your iPad is much like an iPhone or other smartphone in terms of the features it offers. (But with a much bigger screen, of course.) This is especially true when it comes to photography, as your iPad features two built-in cameras—one facing outward and one pointing toward your face. You can use these cameras to shoot still photos and videos, and then use various apps to edit and share those items with others.
Shooting Digital Photos
Yes, you can use your iPad to shoot digital photos. You can take a picture of anything in front of you, or switch to the front-facing FaceTime camera and take a picture of yourself. (That’s called a selfie.) You use the iPad’s screen to preview the picture, then aim the camera at whatever it is you’re shooting and press the Shutter button. You can then edit the pictures you take to crop them, rotate them, adjust brightness and color, and even apply filters for special effects.
Launch the Camera App
Since you never know when a good photo op will present itself, Apple offers three different ways to quickly launch your iPad’s camera.
![]() From the iPad’s Home screen, tap the Camera icon.
From the iPad’s Home screen, tap the Camera icon.

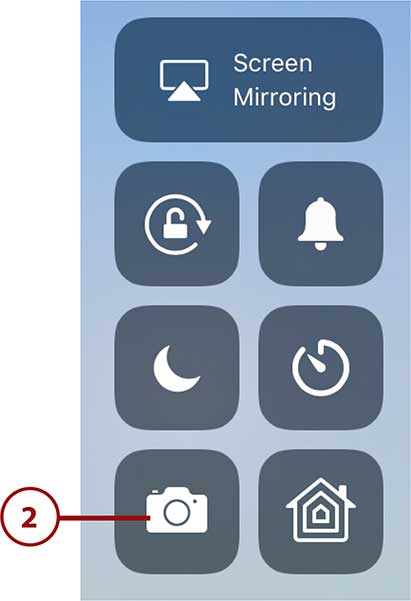
![]() From any screen, swipe up from the bottom to display the Control Center and then tap the Camera icon.
From any screen, swipe up from the bottom to display the Control Center and then tap the Camera icon.
![]() From the Lock or Cover Sheet screen, swipe from right to left. (That’s right—you don’t have to unlock your iPad to use the camera!)
From the Lock or Cover Sheet screen, swipe from right to left. (That’s right—you don’t have to unlock your iPad to use the camera!)

Take a Picture
When it comes to taking pictures with your iPad, you can shoot in the 16:9 aspect ratio that mirrors the iPad screen or in a square format better suited for some types of web uploads (such as your profile picture in Facebook). Use the rear-facing iSight camera to take pictures of things in front of you or (as discussed in the next task) the front-facing FaceTime camera to take selfies.
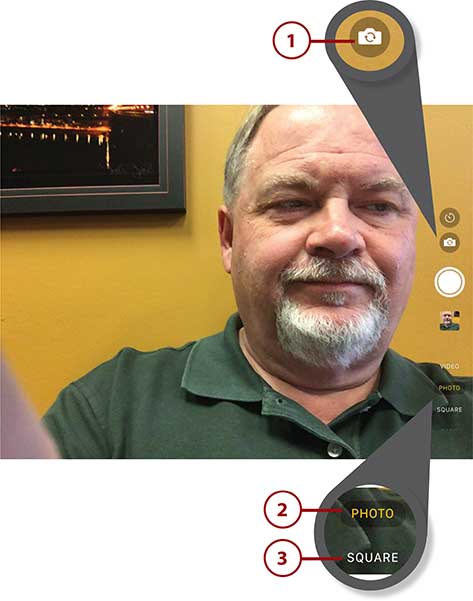
![]() Open the Camera app and make sure the rear-facing camera is selected. If not, tap the Switch button.
Open the Camera app and make sure the rear-facing camera is selected. If not, tap the Switch button.
![]() Hold your iPad vertically to take a portrait photo, or horizontally to take a landscape photo. The onscreen controls rotate accordingly.
Hold your iPad vertically to take a portrait photo, or horizontally to take a landscape photo. The onscreen controls rotate accordingly.

![]() Tap Photo in the lower right to shoot 16:9 ratio photos.
Tap Photo in the lower right to shoot 16:9 ratio photos.
![]() Tap Square in the lower right to shoot square photos.
Tap Square in the lower right to shoot square photos.
![]() To enable HDR photos, which provide higher contrast results, tap to enable the HDR button.
To enable HDR photos, which provide higher contrast results, tap to enable the HDR button.
HDR
HDR stands for high dynamic range, which combines the results of three photos automatically shot in rapid succession (with different exposure settings) to create more detail in high-contrast photos.
![]() To use the timer (good if you want to include yourself in the shot—set the timer and run around in front of the camera!), tap the Timer button and select either a 3- or 10-second timer. The timer activates when you press the Shutter button.
To use the timer (good if you want to include yourself in the shot—set the timer and run around in front of the camera!), tap the Timer button and select either a 3- or 10-second timer. The timer activates when you press the Shutter button.

![]() Drag the zoom slider on the left side of the screen to zoom into a shot. Alternatively, expand two fingers onscreen to zoom in.
Drag the zoom slider on the left side of the screen to zoom into a shot. Alternatively, expand two fingers onscreen to zoom in.

![]() Optionally, tap the subject of the photo onscreen to focus on that person or object. This displays a box around the selected area, and an Exposure slider; drag the slider up to increase the exposure (makes the shot brighter) or down to decrease the exposure (darkens the shot).
Optionally, tap the subject of the photo onscreen to focus on that person or object. This displays a box around the selected area, and an Exposure slider; drag the slider up to increase the exposure (makes the shot brighter) or down to decrease the exposure (darkens the shot).

Your iPad’s iSight camera includes auto focus and auto exposure, which uses face-recognition technology to identify the subject of the picture and focus and set exposure automatically. You can override these automatic controls by tapping to select a person or object onscreen different from the one your iPad selects.
![]() Use the iPad’s display to aim the camera and compose your picture, then press the Shutter button to take the photo. Alternatively, press either Volume button on the side of your iPad to take the picture.
Use the iPad’s display to aim the camera and compose your picture, then press the Shutter button to take the photo. Alternatively, press either Volume button on the side of your iPad to take the picture.
![]() Tap the preview thumbnail to view the picture you just took.
Tap the preview thumbnail to view the picture you just took.

Burst Shots
To take a series of rapid-fire (“burst”) shots, press and hold the Shutter button. Release the button to stop shooting. (Not available on older iPad minis.)
>>>Go Further: CONFIGURING THE CAMERA APP
Your iPad’s Camera app works just fine “out of the box,” as it were, but there are a few options you can configure to personalize the way it works. To configure the Camera app, tap the Settings icon on the Dock or Home screen, then select Camera in the left column.
Here are a few of the settings you might want to change:
• To have the Camera app remember the last type of picture you took (Photo, Video, or Square), tap Preserve Settings and then tap “on” the Camera Mode switch.
• Tap “on” the Grid switch to display an onscreen grid, to help you better compose your photos.
• By default, the Camera app can shoot and read the QR codes you see on many products and items. To turn off this feature, tap “off” the Scan QR Codes switch.
• By default, the iSight camera records video at 1080p HD resolution, with a frame rate of 30 fps. This works fine in most instances, but if you want to record at a slightly lower resolution (which creates smaller files and saves space on your device), tap Record Video and select 720p HD at 30 fps.
• When you shoot HDR photos, the Camera app by default stores all three photos used to create the final HDR photo. If you’d rather save on storage space, tap off the Keep Normal Photo switch in the HDR section.
The default settings work fine in most cases, but if you need to change any of them, that’s how to do it.
Take a Selfie
Use the front-facing FaceTime camera on your iPad to take selfies of yourself. (Is that redundant?) When you use the FaceTime camera, you have fewer shooting options available—for example, you can’t shoot HDR photos, or zoom into the shot.
![]() Open the Camera app and tap the Switch button to switch to the front-facing FaceTime camera. Rotate the iPad vertically to take a portrait picture (most common for selfies) or horizontally to take a landscape photo.
Open the Camera app and tap the Switch button to switch to the front-facing FaceTime camera. Rotate the iPad vertically to take a portrait picture (most common for selfies) or horizontally to take a landscape photo.
![]() Tap Photo to take a 16:9 ratio photo.
Tap Photo to take a 16:9 ratio photo.
![]() Tap Square to take a square photo. (Great for profile pictures on many websites.)
Tap Square to take a square photo. (Great for profile pictures on many websites.)
![]() Smile at the camera (and look at your smiling face onscreen) and then press the Shutter button to take the picture.
Smile at the camera (and look at your smiling face onscreen) and then press the Shutter button to take the picture.
![]() Tap the preview thumbnail to view the selfie you just took.
Tap the preview thumbnail to view the selfie you just took.

Screen Capture
To take a screenshot of what’s currently displayed on your iPad’s screen, simultaneously press and release the Sleep/Wake and Home buttons on your iPad. Screenshots are stored in the Photos app or iCloud Photo Library.
Take a Panoramic Photo
Apple’s Camera app also lets you take panoramic photos that include a wide expanse not normally captured in a single photo. To create a panoramic photo, you shoot multiple photos from left to right, then the Camera app digitally stitches them together.
Panoramic photos are great for capturing outdoor landscapes, as well as “panning” a room indoors.

![]() From within the Camera app, make sure the iSight (rear-facing) camera is selected, then tap Pano in the lower-right corner.
From within the Camera app, make sure the iSight (rear-facing) camera is selected, then tap Pano in the lower-right corner.
![]() Hold the iPad vertically (portrait mode) and tap the Shutter button. (If you hold the iPad horizontally, the Photos app takes a vertical panoramic photo that stretches from the bottom to the top.)
Hold the iPad vertically (portrait mode) and tap the Shutter button. (If you hold the iPad horizontally, the Photos app takes a vertical panoramic photo that stretches from the bottom to the top.)

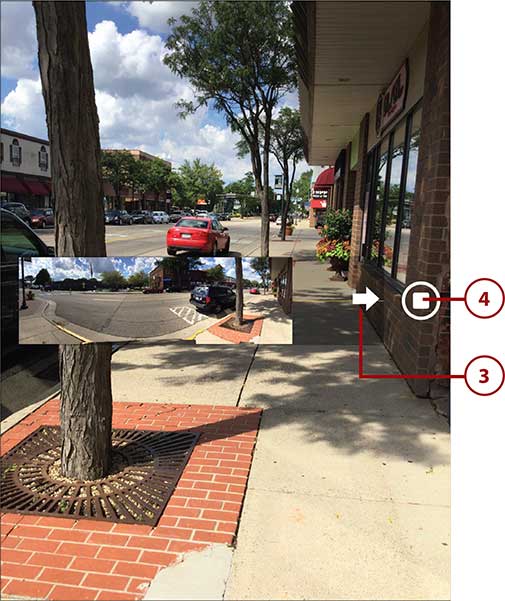
![]() As directed onscreen, move or pan the iPad slowly in the direction of the arrow. The progress of your pan appears in an inset over the main display.
As directed onscreen, move or pan the iPad slowly in the direction of the arrow. The progress of your pan appears in an inset over the main display.
![]() Tap the Shutter button when you’re done panning.
Tap the Shutter button when you’re done panning.
Viewing and Editing Your Photos
While the iPad may be a little inconvenient as a day-to-day digital camera, it’s actually pretty good for viewing and editing photos. The large screen, combined with handy touchscreen operation, makes it easy to look at the photos you’ve taken and make minor changes to them, if necessary.
You use Apple’s Photos app to both view and edit your photos. In fact, you can use the iPad’s Photos app to view and edit not only pictures taken with your iPad, but also photos taken by any of your Apple devices. When you use the iCloud Photo Library, all photos you take with your iPad and iPhone are automatically uploaded and stored online, and available to all your Apple devices. So take a picture with your iPhone and edit it with your iPad—it’s the best way to use both devices!
>>>Go Further: CONFIGURING THE PHOTOS APP
Just as you might want to configure a few settings in your iPad’s Camera app, you also might want to customize a handful of settings in the accompanying Photos app. Go to your iPad’s Settings page and tap Photos in the left column, then look at the following settings in the right column:
• Tap “on” the iCloud Photo Library control to automatically upload your pictures to your iCloud account. To share these photos with others, scroll down and tap “on” iCloud Photo Sharing, too.
• To automatically beam the photos you take to other Apple devices in your home (when they’re all connected to the same Wi-Fi network), tap “on” the Upload to My Photo Stream switch.
• To save storage space on your iPad, select Optimize iPad Storage; full-resolution photos will still be stored online in your iCloud account. If you’d rather keep full-resolution versions on your iPad, select Download and Keep Originals instead.
There are even more settings you can configure, but these are the main ones you want to pay attention to.
View Your Photos
You can view photos you’ve just taken from within the Camera app or from Apple’s Photos app.
![]() From within the Camera app, tap the preview thumbnail to display the photo full screen. (Tap the back arrow to return to the camera to shoot some more photos.) Or…
From within the Camera app, tap the preview thumbnail to display the photo full screen. (Tap the back arrow to return to the camera to shoot some more photos.) Or…

![]() From the Home screen, tap the Photos icon to open the Photos app.
From the Home screen, tap the Photos icon to open the Photos app.

![]() You can let the Photos app organize your photos, by “smart” groups, or you can organize them yourself, in albums. To view the app’s smart groups, tap Photos.
You can let the Photos app organize your photos, by “smart” groups, or you can organize them yourself, in albums. To view the app’s smart groups, tap Photos.
![]() The largest type of smart group is called a Year; this simply organizes your photos by year taken. The next smallest group is called a Collection, which is typically a group of photos that share a time range or topic in common. The smallest group is called a Moment, which is typically photos within a Collection taken on a given date. The heading of a given screen indicates which type of smart group you’re viewing. To move to the next smallest smart group, tap a Year or Collection.
The largest type of smart group is called a Year; this simply organizes your photos by year taken. The next smallest group is called a Collection, which is typically a group of photos that share a time range or topic in common. The smallest group is called a Moment, which is typically photos within a Collection taken on a given date. The heading of a given screen indicates which type of smart group you’re viewing. To move to the next smallest smart group, tap a Year or Collection.
![]() To move to the next largest group, tap the Back icon at the top of the screen.
To move to the next largest group, tap the Back icon at the top of the screen.

![]() Tap Memories to view photos and videos curated by the Photos app into collages and short videos.
Tap Memories to view photos and videos curated by the Photos app into collages and short videos.
![]() Tap a memory to view it.
Tap a memory to view it.

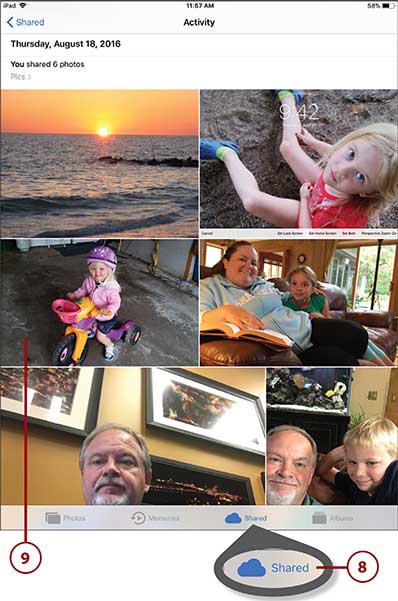
![]() Tap Shared to view photos from this and other devices stored in the iCloud Photo Library.
Tap Shared to view photos from this and other devices stored in the iCloud Photo Library.
![]() Tap to view a specific photo.
Tap to view a specific photo.
![]() Tap Albums to view your photos organized by album.
Tap Albums to view your photos organized by album.
![]() Tap an album to view the photos stored within.
Tap an album to view the photos stored within.

![]() Tap to view a specific photo.
Tap to view a specific photo.

![]() Tap the Heart icon to add this photo to your Favorites album.
Tap the Heart icon to add this photo to your Favorites album.
![]() Tap the Trash Can icon to delete the photo.
Tap the Trash Can icon to delete the photo.
![]() Additional photos in this group or album are displayed as thumbnails in a strip along the bottom of the screen. Drag the strip left or right to see additional photos.
Additional photos in this group or album are displayed as thumbnails in a strip along the bottom of the screen. Drag the strip left or right to see additional photos.
![]() Tap the Back icon to return to the previous group or album.
Tap the Back icon to return to the previous group or album.

>>>Go Further: USING THE iCLOUD PHOTO LIBRARY
While you can store your photos (up to 1,000 of them, anyway) locally on your iPad, you can store many more photos online in Apple’s iCloud Photo Library. When you enable the iCloud Photo Library on your device, all photos and videos you shoot are automatically uploaded to and stored on Apple’s iCloud online storage service.
You can then access your photos and videos from any connected computer or device, just by going to the iCloud website (www.icloud.com) and logging in with your Apple ID. Any edits or changes you make to the stored photos are visible on all your devices.
To enable iCloud Photo Library storage, tap the Settings icon, select Photos, and then tap “on” the iCloud Photo Library switch. You’re ready to go.
(Note that if you use the iCloud Photo Library, you no longer use the iTunes software to synchronize photos and videos between your iPad and your computer.)
Organize Photos in Albums
The Photos app does a good job automatically organizing your photos into smart groups. That said, you might want to organize your photos your own way, by creating virtual photo albums to group photos by type, activity, location, and so forth.
![]() From within the Photos app, tap Albums to display your existing albums. (If you’re within a given album, tap the Back icon to return to the main Albums screen.)
From within the Photos app, tap Albums to display your existing albums. (If you’re within a given album, tap the Back icon to return to the main Albums screen.)

![]() Tap an album to view the photos stored within. Or…
Tap an album to view the photos stored within. Or…
![]() Tap the + icon to create a new album.
Tap the + icon to create a new album.

![]() From the New Album panel, enter a name for this album.
From the New Album panel, enter a name for this album.
![]() Tap Save.
Tap Save.

![]() You’re prompted to add photos to your new album. Tap to select those photos you want to add. (You can select multiple photos; as you select each photo, a blue check mark appears on each item you select.)
You’re prompted to add photos to your new album. Tap to select those photos you want to add. (You can select multiple photos; as you select each photo, a blue check mark appears on each item you select.)
![]() Tap Done. The selected photos are added to your new album.
Tap Done. The selected photos are added to your new album.

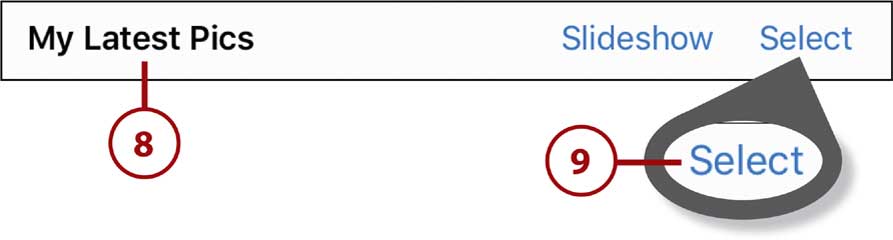
![]() To add additional photos to an album, open the group or album that contains the photo(s) you want to add.
To add additional photos to an album, open the group or album that contains the photo(s) you want to add.
![]() Tap Select.
Tap Select.
![]() Tap to select the photos you want to add.
Tap to select the photos you want to add.
![]() Tap Add To.
Tap Add To.

![]() Tap to select the album you want to add these pictures to. The pictures are now added.
Tap to select the album you want to add these pictures to. The pictures are now added.

Slideshows
The Photos app enables you to play a slideshow of photos from any given album. Just open the album, then tap Slideshow in the top-right corner of the screen.
>>>Go Further: WORKING WITH SMART ALBUMS
The Photos app in iOS 11 includes several “smart” albums that are automatically filled with appropriate photos, as best as the app can determine.
Let’s start with the People album. This album uses facial recognition technology to identify and include photos that have people’s faces in them. It also groups photos by like faces, so that all photos of a given person should be grouped together. Tap a group to view all photos of that person.

The Places album attempts to organize your photos by where they were taken. (That’s if your iPad knows this; you have to take a photo with your device’s location services enabled for this to work.) Open the Places album and you see a map of the U.S. with one or more places pinpointed; tap a location to view photos taken at that location. (And if the grouping is too vague—for example, all photos taken within a state are grouped together—just zoom into the map to display more local locations.) If the map is too confusing to you, tap Grid to display location photos in a traditional grid listing.

The Photos app also groups photos by type, so you’ll see albums for Selfies, Panoramas, Screenshots, and the like. Just tap an album to view its contents.
Crop and Straighten a Picture
Not every picture you take is perfect. Fortunately, digital pictures can be easily edited. You use the Photos app to make any necessary corrections to your photos.
![]() From within the Photos app, open the photo you want to edit.
From within the Photos app, open the photo you want to edit.
![]() Tap Edit to display the editing screen.
Tap Edit to display the editing screen.

![]() Tap the Crop button.
Tap the Crop button.

![]() To crop the picture, drag the corners of the screen until you like what you see.
To crop the picture, drag the corners of the screen until you like what you see.
![]() To rotate the picture 90 degrees counterclockwise, tap the Rotate button at the top of the screen.
To rotate the picture 90 degrees counterclockwise, tap the Rotate button at the top of the screen.
![]() To straighten or rotate the picture in smaller increments, drag your finger on the rotation dial until the picture is as you like it.
To straighten or rotate the picture in smaller increments, drag your finger on the rotation dial until the picture is as you like it.
![]() Tap Done when you’re satisfied with the results. (If you don’t like the changes, tap Cancel in the lower-right corner to undo them and return to the original photo.)
Tap Done when you’re satisfied with the results. (If you don’t like the changes, tap Cancel in the lower-right corner to undo them and return to the original photo.)

Apply Auto-Enhance
Sometimes a picture doesn’t look quite right, but you don’t want to do a lot of manual fine-tuning to fix it. In these instances, use the Photo app’s Auto-Enhance control and let the app do the fixing for you. Auto-Enhance adjusts brightness, contrast, color, and other controls to try to make your picture look better.
![]() From within the editing screen for a photo, tap the Auto-Enhance (magic wand) button.
From within the editing screen for a photo, tap the Auto-Enhance (magic wand) button.
![]() If you like what you see, tap Done. (If you don’t like the results, tap the Auto-Enhance button again to turn off the auto enhancement.)
If you like what you see, tap Done. (If you don’t like the results, tap the Auto-Enhance button again to turn off the auto enhancement.)

Apply a Filter
Another easy way to change the way a picture looks is to apply a photo filter. The Photos app comes with more than a half-dozen filters that can change the mood of a picture.
![]() From within the editing screen for a photo, tap the Filters button.
From within the editing screen for a photo, tap the Filters button.
![]() You now see the available filters. Tap a filter to apply it to your photo.
You now see the available filters. Tap a filter to apply it to your photo.
![]() If you like this filter, tap Done. (If you don’t like this filter, select another or tap Cancel.)
If you like this filter, tap Done. (If you don’t like this filter, select another or tap Cancel.)

Adjust Brightness and Color
The Photos app also offers more traditional editing controls you can use to enhance your photos—brightness and contrast (what the app calls Light), color saturation (Color), and more.
![]() From within the editing screen for a photo, tap the Adjustments button.
From within the editing screen for a photo, tap the Adjustments button.
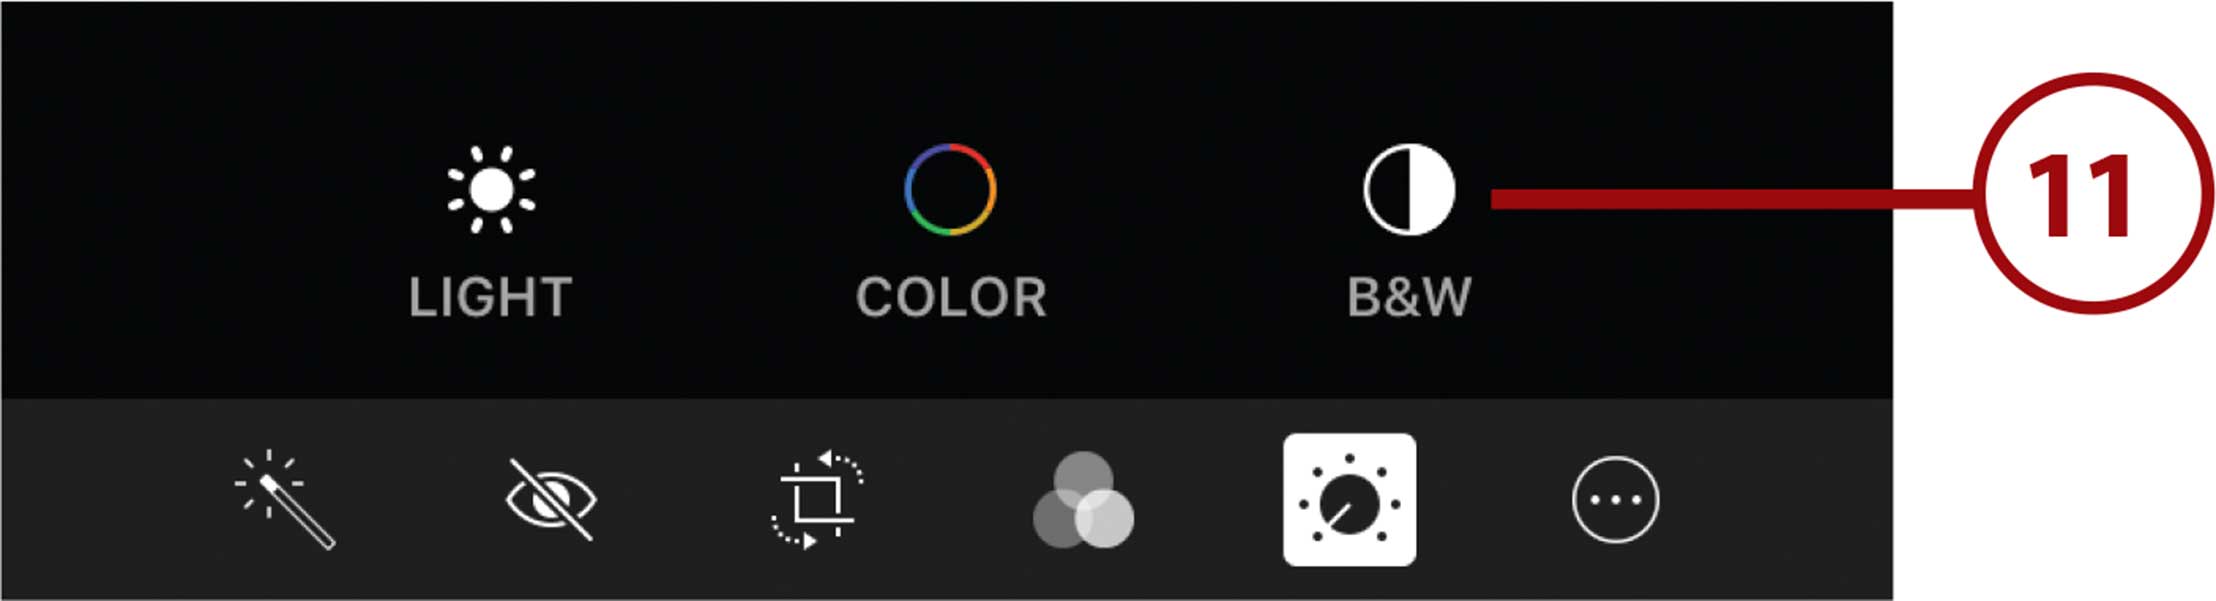
![]() Tap Light to adjust brightness.
Tap Light to adjust brightness.

![]() Tap the thumbnail that best represents the brightness/contrast you want. Or…
Tap the thumbnail that best represents the brightness/contrast you want. Or…
![]() To more precisely adjust brightness characteristics, tap the More button.
To more precisely adjust brightness characteristics, tap the More button.

![]() Tap to adjust any of the following characteristics: Brilliance, Exposure, Highlights, Shadows, Brightness, Contrast, and Black Point.
Tap to adjust any of the following characteristics: Brilliance, Exposure, Highlights, Shadows, Brightness, Contrast, and Black Point.

![]() Use the slider to adjust the selected adjustment.
Use the slider to adjust the selected adjustment.
![]() Tap the More button to return to the previous screen, then tap Close.
Tap the More button to return to the previous screen, then tap Close.

![]() Tap Color to adjust color saturation (how much color there is in the photo).
Tap Color to adjust color saturation (how much color there is in the photo).

![]() Tap the thumbnail that best represents the desired color saturation. Or…
Tap the thumbnail that best represents the desired color saturation. Or…
![]() To more precisely adjust color characteristics, tap the More button and then tap to adjust any of the following characteristics: Saturation, Contrast, and Cast (tint).
To more precisely adjust color characteristics, tap the More button and then tap to adjust any of the following characteristics: Saturation, Contrast, and Cast (tint).

![]() Tap the B&W button to turn your picture into a black-and-white photo, and make appropriate adjustments.
Tap the B&W button to turn your picture into a black-and-white photo, and make appropriate adjustments.
![]() Tap the thumbnail that best represents the black-and-white look you want. Or…
Tap the thumbnail that best represents the black-and-white look you want. Or…
![]() To more precisely adjust black-and-white characteristics, tap the More button and tap to adjust any of the following characteristics: Intensity, Neutrals, Tone, and Grain.
To more precisely adjust black-and-white characteristics, tap the More button and tap to adjust any of the following characteristics: Intensity, Neutrals, Tone, and Grain.

![]() Tap Done when you’re done editing. (Or tap Cancel to undo your changes and return to the original photo.)
Tap Done when you’re done editing. (Or tap Cancel to undo your changes and return to the original photo.)

Revert to Original
When you make changes to a photo, the Photos app keeps a copy of the original photo. You can discard any changes and revert back to the original photo at any time by re-opening the photo for editing and tapping Revert. When prompted, tap Revert to Original, and that’s what you get.
Mark Up a Photo
You can also, if you want, “mark up” a photo by drawing on it or adding text to the picture.
![]() From within the editing screen for a photo, tap the More button.
From within the editing screen for a photo, tap the More button.
![]() Tap Markup.
Tap Markup.

![]() Tap the Pen icon to draw on the photo. (Alternatively, tap the Highlighter icon to highlight an area, the Pencil icon to draw a fine line, or the Eraser icon to erase something you’ve previously drawn.)
Tap the Pen icon to draw on the photo. (Alternatively, tap the Highlighter icon to highlight an area, the Pencil icon to draw a fine line, or the Eraser icon to erase something you’ve previously drawn.)
![]() Tap a color to select the pen color.
Tap a color to select the pen color.
![]() Drag your finger across the screen to draw.
Drag your finger across the screen to draw.
![]() To add text to a picture, tap the More (+) icon.
To add text to a picture, tap the More (+) icon.

![]() Select Text. This places a text box on the screen.
Select Text. This places a text box on the screen.

![]() Double-tap the text box to display the onscreen keyboard, and then type the text you want. Close the keyboard to see other text options.
Double-tap the text box to display the onscreen keyboard, and then type the text you want. Close the keyboard to see other text options.
![]() To change the text color, tap the text box and then select the color you want.
To change the text color, tap the text box and then select the color you want.
![]() To change the size and other characteristics of the text, select the text box and then tap the Font button.
To change the size and other characteristics of the text, select the text box and then tap the Font button.

![]() Tap to select a different font family.
Tap to select a different font family.
![]() Use the slider to change the size of the text.
Use the slider to change the size of the text.
![]() Tap one of the alignment buttons to change how the text is aligned (left, center, justified, or right).
Tap one of the alignment buttons to change how the text is aligned (left, center, justified, or right).

![]() Tap Done when you’re done.
Tap Done when you’re done.

Shooting and Editing Videos
The rear-facing and front-facing cameras in your iPad can also be used to shoot videos. That means you can shoot videos of family gatherings, vacations, sporting events, and more—even selfie videos of yourself!
Shoot a Video
Shooting a video with your iPad is almost as easy as shooting a still photograph.
![]() Tap the Camera icon to open the Camera app.
Tap the Camera icon to open the Camera app.

![]() Hold your iPad vertically to take a portrait video, or horizontally to take a landscape video. The onscreen controls rotate accordingly.
Hold your iPad vertically to take a portrait video, or horizontally to take a landscape video. The onscreen controls rotate accordingly.
![]() Tap Video in the lower-right corner of the screen.
Tap Video in the lower-right corner of the screen.
![]() Tap the Switch button to switch between the rear-facing (iSight) and front-facing (FaceTime) cameras.
Tap the Switch button to switch between the rear-facing (iSight) and front-facing (FaceTime) cameras.

Widescreen Videos
Most videos are shot in landscape format, which requires you to hold your iPad horizontally. This is the orientation used by all movies and TV shows; it produces a 16:9 ratio widescreen picture, which fits perfectly on your TV screen.
![]() Drag the zoom slider on the left side of the screen to zoom into a shot. Alternatively, expand two fingers onscreen to zoom in.
Drag the zoom slider on the left side of the screen to zoom into a shot. Alternatively, expand two fingers onscreen to zoom in.

![]() Optionally, tap the subject of the video onscreen to focus on that person or object. This displays a box around the selected area, and an Exposure slider; drag the slider up to increase the exposure (makes the video brighter) or down to decrease the exposure (darkens the video).
Optionally, tap the subject of the video onscreen to focus on that person or object. This displays a box around the selected area, and an Exposure slider; drag the slider up to increase the exposure (makes the video brighter) or down to decrease the exposure (darkens the video).

![]() Use the iPad’s display to aim the camera and compose your picture and then press the red Record button to start recording. Alternatively, press either Volume button on the side of your iPad to initiate recording.
Use the iPad’s display to aim the camera and compose your picture and then press the red Record button to start recording. Alternatively, press either Volume button on the side of your iPad to initiate recording.

![]() As you record, the elapsed time is displayed at the top of the screen.
As you record, the elapsed time is displayed at the top of the screen.
![]() Tap the Record button again to stop recording.
Tap the Record button again to stop recording.

>>>Go Further: SLO-MO AND TIME-LAPSE VIDEOS
The Photos app enables you to take two special types of videos. You can shoot video for slow-motion playback or record a series of still photographs as a time-lapse video.
To shoot in slow motion, select Slo-Mo as the recording type. Your video is then shot at a super-fast 120 frames per second (fps). When a fast fps video is played at a normal (30 fps) frame rate, you get crystal-clear slow motion. You select which parts of your video to play in slow motion when you edit the video.
To record a time-lapse video, you have to keep your iPad perfectly still over the period of time you’re shooting. Select Time-Lapse as the recording type, tap the Record button, and the Camera app starts capturing individual shots. Tap Record again to end the recording, and the individual shots are compiled into a short video.
Trim a Video
After you’ve shot a video, you can trim the beginning and end to make the video shorter and focus on the important parts. You can do this editing from within the Camera or Photos apps.
![]() After you’ve shot the video in the Camera app, tap the thumbnail to display the video playback screen. Or…
After you’ve shot the video in the Camera app, tap the thumbnail to display the video playback screen. Or…

![]() From within the Photos app, tap to open the video you want to trim.
From within the Photos app, tap to open the video you want to trim.

![]() Tap Edit.
Tap Edit.

![]() In the series of thumbnails (called a timeline) beneath the video, touch and drag either of the arrows until a yellow border appears in the timeline.
In the series of thumbnails (called a timeline) beneath the video, touch and drag either of the arrows until a yellow border appears in the timeline.
![]() Drag the yellow left and right arrows until you’ve selected the portion of the video you want to keep. (Everything outside the yellow selected section will be trimmed.)
Drag the yellow left and right arrows until you’ve selected the portion of the video you want to keep. (Everything outside the yellow selected section will be trimmed.)
![]() Tap the Play button to play the selected (yellow) section of the video.
Tap the Play button to play the selected (yellow) section of the video.
![]() Tap Done when you’re done.
Tap Done when you’re done.

If you want to further edit a video you’ve shot, you can use the iMovie app, which is included with your iPad. This is a powerful yet easy-to-use app that lets you create projects that include multiple video clips, photos, music, and more.
When you create a new project, you select which elements you want to include, then add them to the project’s timeline. You can select various project themes that determine the final look and feel, add fades between elements (and at the start and finish), apply filters, and more. If you’re so inclined, check it out!
Sharing Photos and Videos
When you take a photo or video that you like, you might want to share it with friends and family. Fortunately, the Camera and Photos apps both make it easy to share your pics and vids via text message, email, social media, and more.
Share via Text Message
You can share photos and videos with your contacts via the Messages app.
![]() From within the Camera or Photos app, open the item you want to share and then tap the Share icon.
From within the Camera or Photos app, open the item you want to share and then tap the Share icon.

![]() Tap Message to display the New Message pane.
Tap Message to display the New Message pane.

![]() Enter the name of the person you want to share with into the To field. (You can enter multiple people if you want.)
Enter the name of the person you want to share with into the To field. (You can enter multiple people if you want.)

![]() The photo or video is added to the conversation. Tap within the item to add a text message.
The photo or video is added to the conversation. Tap within the item to add a text message.
![]() Tap the Send icon to send the message.
Tap the Send icon to send the message.

Share via Email
You can also send a photo or video to any of your contacts via email, using your iPad’s Mail app.
![]() From within the Camera or Photos app, open the item you want to share and then tap the Share icon.
From within the Camera or Photos app, open the item you want to share and then tap the Share icon.

![]() Tap Mail to display the New Message pane.
Tap Mail to display the New Message pane.

![]() Tap within the To field and enter the names or email addresses of the intended recipients.
Tap within the To field and enter the names or email addresses of the intended recipients.
![]() Tap within the Subject field and enter a subject for this email.
Tap within the Subject field and enter a subject for this email.
![]() Tap within the main text area and enter any accompanying message.
Tap within the main text area and enter any accompanying message.
![]() Tap Send to send the email.
Tap Send to send the email.

Share via Facebook
If you’re on Facebook or other social media, you can also post a photo or video to that social network. This example uses Facebook, but the steps are similar if you’re posting to Twitter or other networks.
![]() From within the Camera or Photos app, open the item you want to share and then tap the Share icon.
From within the Camera or Photos app, open the item you want to share and then tap the Share icon.

![]() Tap Facebook to display the Facebook pane.
Tap Facebook to display the Facebook pane.

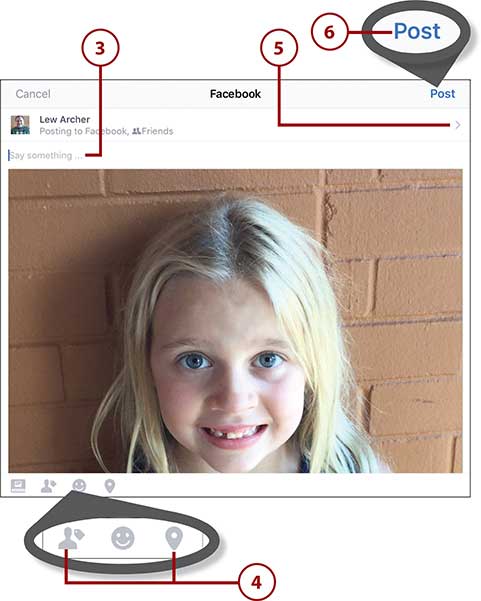
![]() Tap within the Say Something field and enter the text of your post.
Tap within the Say Something field and enter the text of your post.
![]() Tag any friends or locations in this photo or video, if you want.
Tag any friends or locations in this photo or video, if you want.
![]() Tap the right arrow to select your privacy options—who you want to see this post.
Tap the right arrow to select your privacy options—who you want to see this post.
![]() Tap Post to post this photo or video as a new status update.
Tap Post to post this photo or video as a new status update.
>>>Go Further: OTHER SHARING OPTIONS
Your iPad offers several other ways to share your photos and videos.
If you’ve enabled iCloud photo sharing, and created shared folders for your friends and family members, you can upload your photos and videos to a shared folder. Just open the photo or video, tap the Share button, and then tap iCloud Photo Sharing. You can add a comment to accompany this item and select which shared album you want to post to.
When it comes to videos, many people like to post their videos to YouTube, the world’s largest video sharing community. (Chapter 17, “Watching TV Shows, Movies, and Other Videos,” covers watching YouTube videos.) If you have a YouTube account, it’s easy to post your videos directly from your iPad. Just open the video, tap the Share button, and then tap YouTube. You’re prompted to supply a title and other information for the video, and then you can begin uploading. When the uploading is complete, anyone on YouTube can view it.