
Chapter 12: Implementing and Managing FSLogix
In this chapter, we take more of an in-depth look at FSLogix and the benefits associated with it. First, in Chapter 5, Implementing and Managing Storage for Azure Virtual Desktop, we covered some of the planning requirements for FSLogix and storage, and now we move on to the implementation and management of FSLogix.
FSLogix profile containers enable you to roam user data between computing session hosts. This allows you to remove the user's dependency on a specific device. The benefits of this include the fact that the user's sign-in times are minimized as they don't have to create a new profile with each logo, along with providing the flexibility of connecting to different business desktops/remote apps with the same user profile experience.
To summarize how FSLogix works, it uses both a filesystem driver and a registry filter driver, which handles any filesystem or registry requests that allow the user profiles to be redirected.
Here are the topics that will be covered in this chapter:
- Installing and configuring FSLogix
- Configuring antivirus exclusions
- Configuring profile containers
- Configuring Cloud Cache
- Microsoft Teams exclusions
- FSLogix profile container best practices
Installing and configuring FSLogix
The following conceptional architecture diagram shows how FSLogix works within the Windows operating system:

Figure 12.1 – Architecture diagram of FSLogix
The preceding architecture diagram shows how the FSLogix filter driver sits within an operating system and some of the services it redirects. The diagram depicts the redirection of user data using filter drivers to a remote storage solution.
Now, let's take a brief look at the license requirements for FSLogix profile containers.
License requirements for FSLogix profile containers
To use FSLogix profile containers, you must have one of the following licenses:
- Microsoft 365 E3/E5
- Microsoft 365 A3/A5/Student Use Benefits
- Microsoft 365 F1/F3
- Microsoft 365 Business
- Windows 10 Enterprise E3/E5
- Windows 10 Education A3/A5
- Windows 10 VDA per user
- Remote Desktop Services (RDS) Client Access License (CAL)
- RDS Subscriber Access License (SAL)
- Azure Virtual Desktop per-user access license
You will note that these license requirements are the same as those for accessing the Azure Virtual Desktop service.
Let's now take a quick look at the key capabilities of FSLogix profile containers.
FSLogix key capabilities
We now take a look at the key capabilities/benefits of using FSLogix profile containers:
- Redirect user profiles to a network storage location. Mounting the profile as a VHD(X) and using the profile over the network eliminates delays often associated with other solutions that copy profiles to and from the network location. In addition, this provides a seamless experience for the end user. When using FSLogix, the experience is similar to native local profiles where the operating system looks for the data in C:users, which has been redirected using FSLogix.
- FSLogix also offers the ability to redirect only the required portion of the profile that contains Office data by using FSLogix Office Container. Office Container allows your organization, which is already using an alternate profile solution, to enable Office in a pooled virtual desktop environment.
- FSLogix Profile Container is used with Cloud Cache to create resilient and highly available user profile environments. Cloud Cache places a portion of the profile VHD(X) on the local hard drive. Cloud Cache also provides the administrator with the ability to specify multiple remote profile locations. Local Cache, with multiple remote profile containers, insulates users from network and storage failures, making this an excellent solution for enterprise and disaster recovery scenarios.
Now that we have covered the basics of what FSLogix is, let's take a look at installing the FSLogix components for profile containers.
FSLogix installation and configuration
In this section, I will provide instructions on how to download and install FSLogix.
Before we get started, I want to set out the steps for deploying FSLogix profile containers at a high level. The following diagram shows the steps for configuring FSLogix profile containers:
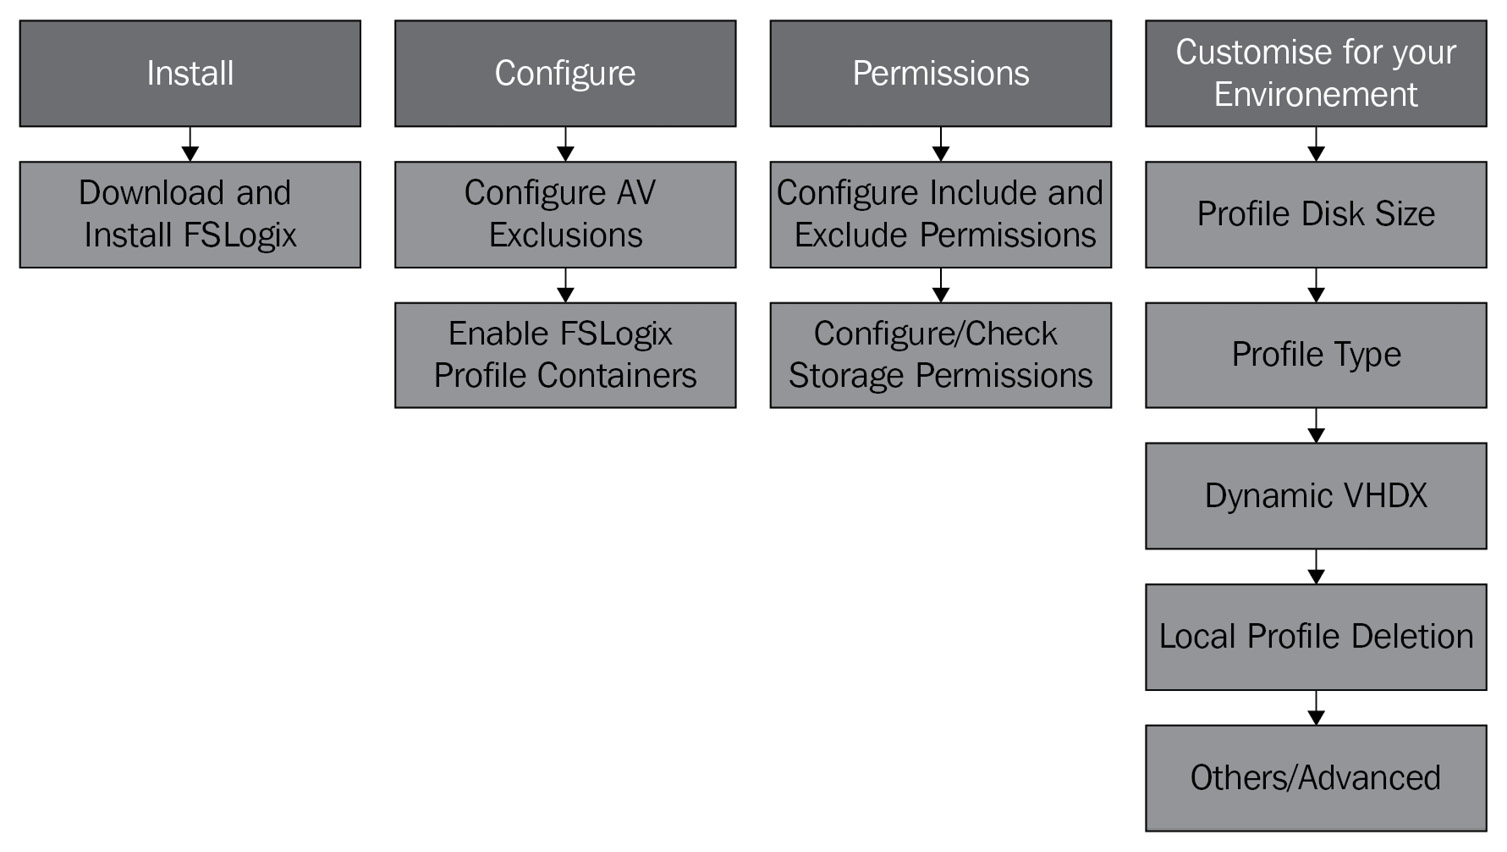
Figure 12.2 – Process diagram detailing the high-level steps for deploying FSLogix
As you can see, in the following two sections, FSLogix installation and configuration and Configuring profile containers, we will look at the four areas of deployment set out in the preceding diagram. You may want to refer back to this to ensure that you have configured all the required steps.
Getting started
Important Note
To obtain the latest copy of FSLogix, you can download it from the following link: https://aka.ms/fslogix/download.
To configure both profile containers and office containers, you must download and install FSLogix Apps on the session host. FSLogix Apps install all the required core drivers and components for FSLogix to work.
Tip
When using the Azure Marketplace templates, FSLogix will come preinstalled on the Windows 10 Multi-Session + Microsoft 365 app image template.
Once you have downloaded and unzipped the files, follow these steps:
- Navigate to the FSLogix_Apps_2.9.7838.44263x64Release directory and run the installer named FSLogixAppsSetup.exe.
- Click Install, as shown in the following screenshot of the installer.
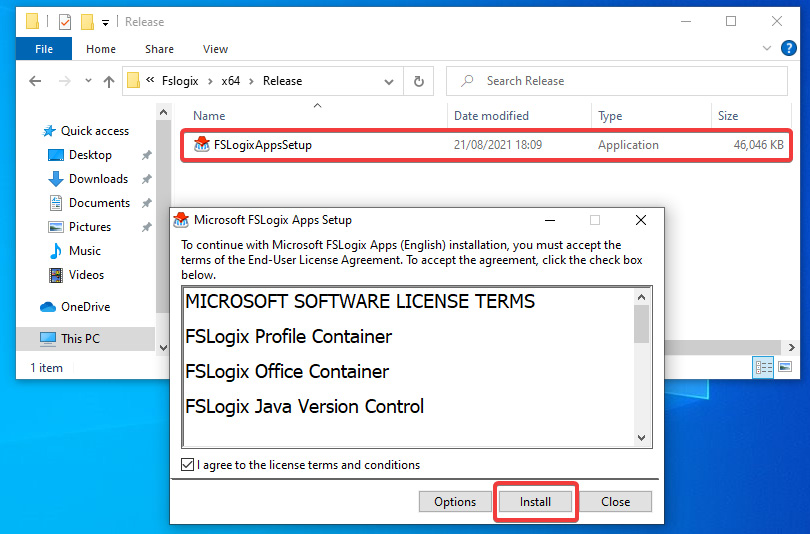
Figure 12.3 – Screenshot showing the installation of FSLogixAppsSetup
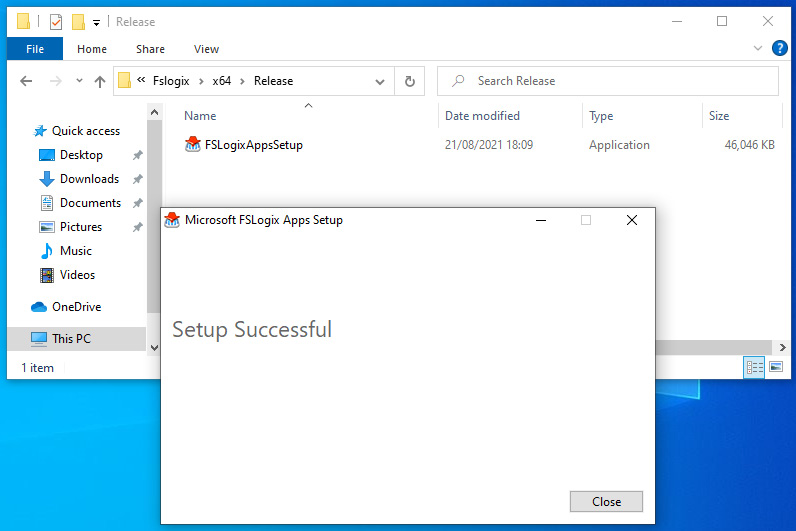
Figure 12.4 – Screenshot showing the FSLogix Apps Setup complete
- You can also check to ensure that the files are present as FSLogix is installed on the following path: C:Program FilesFSLogixApps.
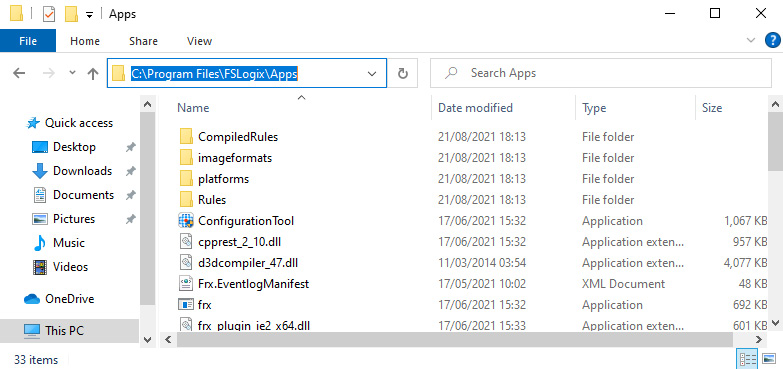
Figure 12.5 – Screenshot showing the location of the installed FSLogix files
You should now see the FSLogix files within the Program Files directory.
Tip
To install silently, use the following switches: "C: empFslogixWin32ReleaseFSLogixAppsSetup.exe" /install /quite /norestart.
We now move on to configuring the required antivirus exclusions for FSLogix profile containers.
Configuring antivirus exclusions
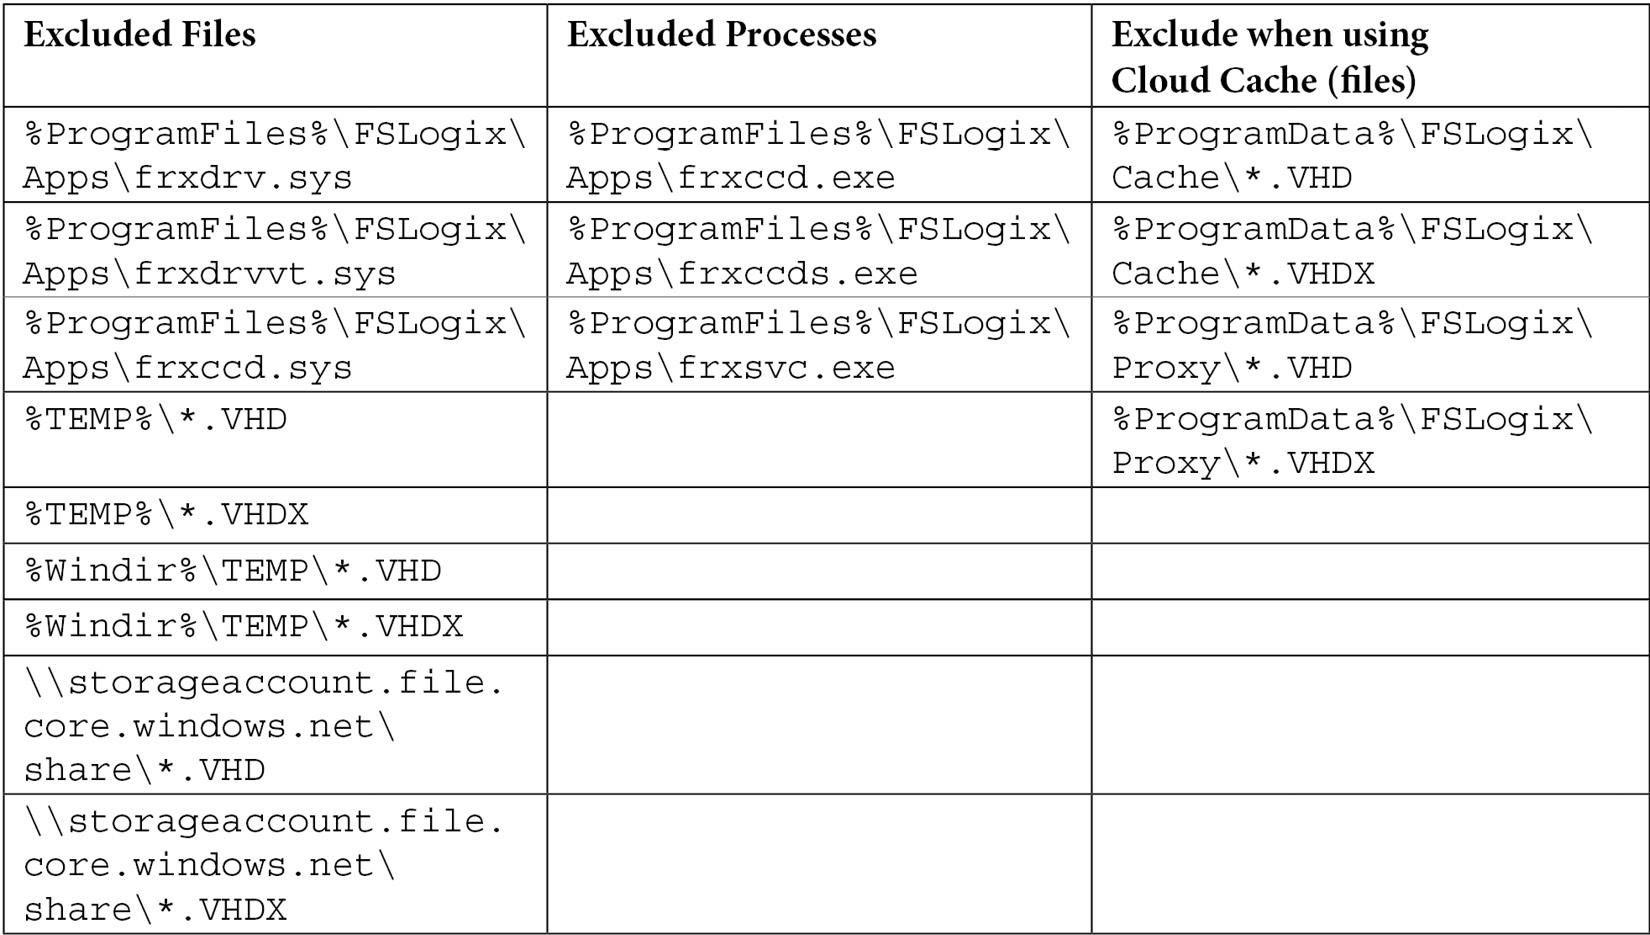
This section looks at the required antivirus file and process exclusions as are necessary for FSLogix. Even if you are using Microsoft Defender Antivirus, it is recommended that you configure the recommended exclusions.
The following table shows the files, processes, and Cloud Cache file exclusions you should configure in your Azure Virtual Desktop environment:
Configuring exclusions using PowerShell
The following script can be used to configure your template image with the required exclusions for FSLogix profile containers. You will note that this particular script is for Microsoft Defender. The script essentially adds exclusions for the profile container virtual disks, both VHD and VHDX:
# A140 FSLOGIX AV Exc
#Defender Exclusions for FSLogix
$Cloudcache = $false # Ensure you Set for true if using cloud cache
$StorageAcct = "
storageacct" # Enter a Storage Account Name
$filelist = ' # Files to be excluded
"%ProgramFiles%FSLogixAppsfrxdrv.sys", '
"%ProgramFiles%FSLogixAppsfrxdrvvt.sys", '
"%ProgramFiles%FSLogixAppsfrxccd.sys", '
"%TEMP%*.VHD", '
"%TEMP%*.VHDX", '
"%Windir%TEMP*.VHD", '
"%Windir%TEMP*.VHDX", '
"\$Storageacct.file.core.windows.netshare*.VHD", '
"\$Storageacct.file.core.windows.netshare*.VHDX"
$processlist = ' # processes to be excluded
"%ProgramFiles%FSLogixAppsfrxccd.exe", '
"%ProgramFiles%FSLogixAppsfrxccds.exe", '
"%ProgramFiles%FSLogixAppsfrxsvc.exe"
Foreach($item in $filelist){
Add-MpPreference -ExclusionPath $item}
Foreach($item in $processlist){
Add-MpPreference -ExclusionProcess $item}
If ($Cloudcache){
Add-MpPreference -ExclusionPath "%ProgramData%FSLogixCache*.VHD"
Add-MpPreference -ExclusionPath "%ProgramData%FSLogixCache*.VHDX"
Add-MpPreference -ExclusionPath "%ProgramData%FSLogixProxy*.VHD"
Add-MpPreference -ExclusionPath "%ProgramData%FSLogixProxy*.VHDX"}
Now that we have installed FSLogix on the session host/session host template, we can proceed with configuring profile containers.
Configuring profile containers
In this section, we run through the configuration of FSLogix profile containers. The configuration of profile containers to redirect user profiles is relatively straightforward as this consists of several registry settings you can add to the master image template or roll out using group policy.
The two areas we will look at are the configuration of the storage location and the setup of the Include and Exclude user groups.
Important Note
Ensure that you exclude your VHD(X) files from any antivirus software.
Before you can configure group policy, you need to ensure that the FSLogix adm/admx files are copied into the correct policy definition folder or central store. These files can be found in the downloaded ZIP archive I showed in the previous section.

Figure 12.6 – Screenshot showing the FSLogix ADMX file added to the PolicyDefinitions folder
Once FSLogix is added to the PolicyDefinitions folder/Group Policy Central Store, you will see the folder appear within Computer Configuration | Administrative Templates | FSLogix.
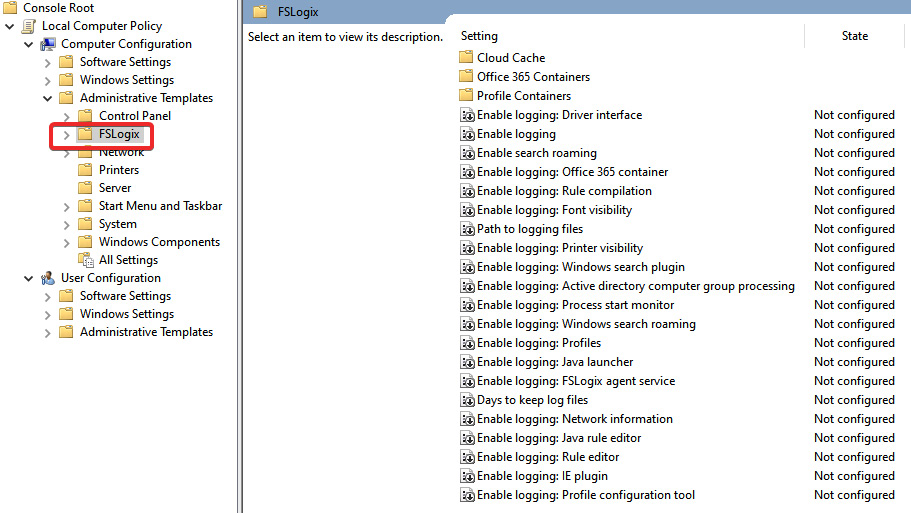
Figure 12.7 – Screenshot showing the FSLogix folder within group policy
Two required settings must be applied for FSLogix profile containers to work. These are (1) the setting to enable profile containers, and (2) specifying the VHDLocations storage location.
To configure these, perform the following steps:
- Create a group policy object within Active Directory.
- Navigate to the FSLogix policies within Computer Configuration | Administrative Templates | FSlogix.
- Select the Profile Containers folder:
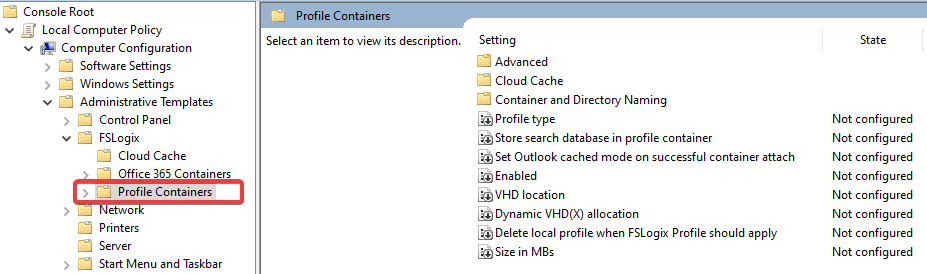
Figure 12.8 – Screenshot showing the Profile Containers folder in group policy

Figure 12.9 – Screenshot showing the FSLogix profile containers Enabled policy
- Then, open the VHD location policy and enter a file path to store your user's roaming profile containers. Then, click OK.

Figure 12.10 – Screenshot showing the VHD location path for storing FSLogix profiles
Tip
It is recommended that you use Azure Files for smaller deployments and Azure NetApp Files for enterprise FSLogix deployments.
Let's now take a look at configuring this using the registry rather than group policy.
Configuring using the registry
You can also configure FSLogix profile containers within the registry. You do this by enabling FSLogix profile containers and setting the path configuration settings with the following registry path: HKLMSOFTWAREFSLogixProfiles.
The following table lists the two mandatory settings that must be configured for FSLogix Profile Containers to work:

The table is taken from the Microsoft documentation: https://docs.microsoft.com/en-us/fslogix/configure-profile-container-tutorial#configure-profile-container-registry-settings.
The following screenshot shows you what the configuration looks like within the registry:

Figure 12.11 – Screenshot of registry settings for enabling and configuring the storage path for FSLogix
This configures the basics for getting started with FSLogix profile containers.
FSLogix Include/Exclude Lists
We will now take a look at FSLogix Profile Exclude and Include Lists.
Important Note
By default, the Everyone group is added to the FSLogix Profile Include List group.
When configuring profile containers, you need to consider the local administrators and other user accounts that should remain as local profiles. The way to do this is to enter users or groups into the FSLogix Profile Exclude List.
You can do this by navigating to Local Users and Groups > Select Groups, and you will see the FSLogix Profile Exclude List group. Within this group, add the users and groups you would like to exclude.
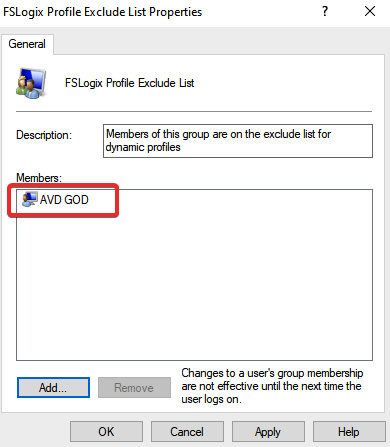
Figure 12.12 – Screenshot showing the Exclude List for FSLogix profile containers
There may be cases where you want to remove everyone's configuration from the Include List; however, this does not need to be changed in most deployments.
The following table details the permissions you should configure on the storage for FSLogix profile containers.

In the next section, we take a look at Cloud Cache and its benefits.
Configuring Cloud Cache
Cloud Cache is a technology (a part of FSLogix) that enables you to use multiple remote locations continually updated during the user session. One of the use cases for Cloud Cache is disaster recovery and business continuity as it provides real-time, active-active redundancy for a profile container.
If the main or a storage provider becomes unavailable, Cloud Cache will continue to function/operate with the other storage providers. If an unavailable storage provider becomes available within the user session, it will be updated with the local cache. If the provider does not become available until after the user has signed out of their session, then the storage provider will be updated during the next session.
Important Note
When using Cloud Cache, all profile data writes go through the local cache first, and then the remote storage locations.
It is important to note that configuring Cloud Cache differs from configuring the typical FSLogix profile containers. The settings are configured in the same way as in the group policy or registry; however, you need to ensure that you remove any settings in the VHDLocations policy as Cloud Cache uses CCDLocations.
You should also note that the value when configuring Cloud Cache is also different to profile containers. Instead of entering the UNC path, you will need to use the value described below. Finally, you will note that I have detailed both SMB shares and the use of Azure Page Blob storage.
Important Note
To use Azure Blob storage, you must generate an access key within the chosen Azure storage account.

We now take a closer look at configuring Cloud Cache and the associated steps.
Configuring Cloud Cache
The following diagram shows the steps for configuring Cloud Cache; you will note that the diagram covers all the bases for existing FSLogix profile container implementations and greenfield deployments.

Figure 12.13 – Screenshot showing the process diagram for FSLogix Cloud Cache
We will skip the installation step as this was shown in the previous, Installing and configuring FSLogix section.
To configure Cloud Cache, we need to enable and configure the group policy object Cloud Cache Locations:
- Within Group Policy, navigate to Computer Configuration > FSLogix > Profile Containers > Cloud Cache > Cloud Cache Locations.
- Set the policy to Enabled and enter the storage paths described in the policy description and the Cloud Cache Storage Configuration types table, as shown in the following screenshot:
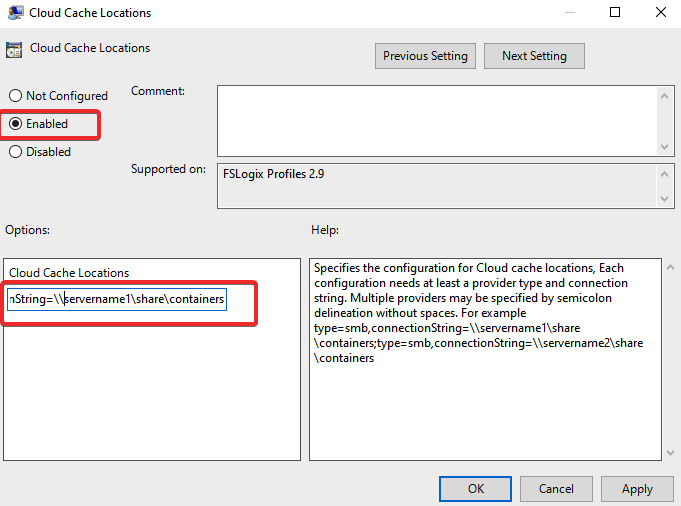
Figure 12.14 – Screenshot showing the Cloud Cache locations policy within group policy
- Once you have set the policy to Enabled and entered the required Cloud Cache locations, click OK.
You can also configure this using the registry on the Image template by using the following:

The preceding table was taken from the following Microsoft page:
As shown in the following screenshot, you can see that CCDLocations has been set with the storage provider locations, and that FSLogix is enabled:

Figure 12.15 – Screenshot showing the registry method for configuring Cloud Cache
Note
There are several additional configurations for FSLogix Cloud Cache; however, they are not covered within this book.
In this section, we looked at how to configure Cloud Cache for user profile roaming. In the next section, we will take a look at Microsoft Teams exclusions for FSLogix.
Microsoft Teams exclusions
Microsoft Teams has a caching folder that can cause bloat on your user profile disk. The following details show how you can set an exclusion using an XML file to prevent both the media stack folder and meeting-addinCache from being stored in the profile container.
You first need to create an XML file with the required exclusions; you can do this using notepad.exe or another text editing tool. You then enter the required exclusions:
- media-stack folder
- meeting-addinCache (%appdata%MicrosoftTeamsmeeting-addinCache)
The XML file should look something like the following example:
?xml version="1.0" encoding="UTF-8"?>
<FrxProfileFolderRedirection ExcludeCommonFolders="0">
<Excludes>
<Exclude Copy="0">AppDataRoamingMicrosoftTeamsmedia-stack</Exclude>
<Exclude Copy="0">AppDataRoamingMicrosoftTeamsmeeting-addinCache</Exclude>
</Excludes>
</FrxProfileFolderRedirection>
You may have noticed from the preceding example that the exclude is configured with Copy=" 0". This means that no files are copied in or out.
You can configure other redirection values:
- 1 = Copy files to base. Any existing file in an excluded folder will be copied to base.
- 2 = Copy files back to the virtual profile. Any modified file in the base will be copied back to the profile on user sign-out.
- 3 = Files are copied from/to base. This is a combination of options 1 and 2.
Once you have configured your XML file, you need to save and store this. The session host needs to access the redirection file from a folder share. In this example, I have configured the local C:RedirectFiles directory; however, you may wish to use the Active Directory NETLOGIN share.
To configure FSLogix to use the redirection file, you will need to follow the steps listed here:
- Within Group Policy, navigate to Computer Configuration > Administrative Templates > FSLogix > Profile Containers > Advanced > Provide RedirXML file to customize redirections.
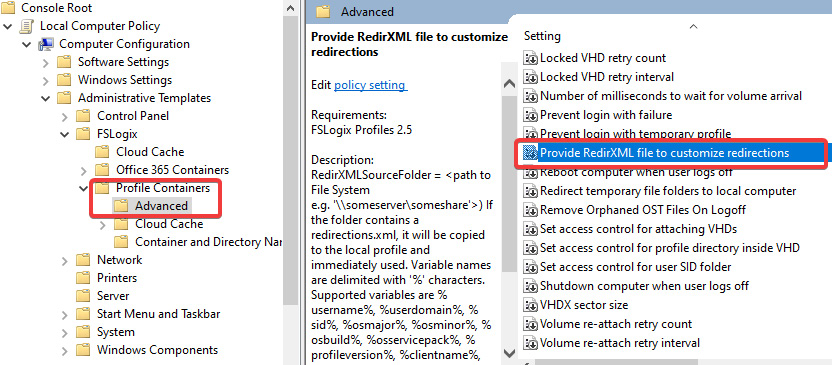
Figure 12.16 – Screenshot showing the redirection policy in group policy for configuring custom redirections
- Enter the path for the folder directory. This can be a local path on the Template image or a network share, as described above. You only specify the folder, not the file itself.

Figure 12.17 – Screenshot showing the policy for pointing to the RedirXML folder
- Once you have added and enabled the policy and entered the path, click OK.
There you have it. We have configured redirection exclusions for Microsoft Teams.
To configure via the registry, enter the following values:

You need to create a registry string value as detailed in the preceding table under the following registry path: ComputerHKLMSOFTWAREFSLogixProfiles.
The following screenshot shows how this should look once you have added the registry value:
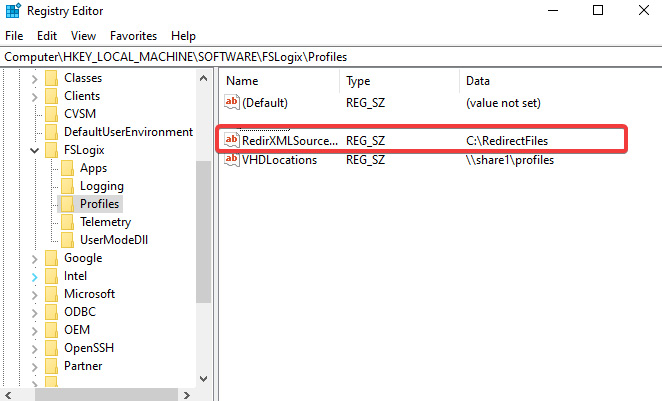
Figure 12.18 – Screenshot showing you the registry method for configuring the RedirXLM folder source
You can now test to see whether redirection is working for your FSLogix roaming profile users.
For more information on setting up Azure Files, please refer to Chapter 5, Implementing and Managing Storage for Windows Virtual Desktop.
You can also read more from Microsoft's site here: https://docs.microsoft.com/en-us/azure/virtual-desktop/fslogix-containers-azure-files.
FSLogix profile container best practices
This short section details the best practices for enterprises. There are a few settings you can apply to your FSLogix deployment to improve management and the cleanup of profiles.
The following table shows some of the best practice settings when configuring FSLogix profile containers within an enterprise:

In this section, we briefly took a look at some of the best practices/recommended configurations you should apply when configuring FSLogix profile containers.
Summary
In this chapter, we ran through the implementation of FSLogix profile containers and Cloud Cache. First, we started with the basics of installing the software on a session host and the configuration of antivirus exclusions, and then we moved on to what is required to set up profile containers. We then discussed the need to remove the profile containers' VHDLocation path when configuring Cloud Cache and some of your other options. We then took a look at creating profile exclusions for Microsoft Teams and finished off the chapter by looking at a few enterprise best practices you can configure for FSLogix.
In the next chapter, we will take a look at configuring user experience settings. We will talk about Universal Print, group policy configurations, and troubleshooting both user profile issues and Azure Virtual Desktop clients.
Questions
- What are the maximum concurrent handles you can have in Azure Files?
- When configuring the storage path for FSLogix Cloud Cache, what is the correct value for the storage location?
- What is the reason for configuring Microsoft Teams exclusions for FSLogix profile containers?
- What do you need to do before you can start configuring and using FSLogix profile containers?
Answers
- 2,000 handles.
- CCDLocations.
- Microsoft Teams has a caching folder that can cause bloat on your user profile disk.
- Ensure that you download and install FSLogix Apps. Remember that if you are using a Microsoft gallery image, this is usually installed as part of the image. Always check beforehand.