
Chapter 8: Azure AD Join for Azure Virtual Desktop
In this chapter, we will look at Azure Active Directory (Azure AD) join for Azure Virtual Desktop. Using Azure AD join for Azure Virtual Desktop has many benefits for organizations, including Single Sign-On (SSO), virtual machines just using one identity provider, and being able to avoid some of the complexities associated with having an Active Directory domain controller.
It is important to note that other services may still require an Active Directory Domain Services environment for access to applications and Server Message Block (SMB).
In this chapter, we will take a look at the following:
- Prerequisites for Azure AD join for Azure Virtual Desktop
- Deploying an Azure AD-joined host pool
- Enabling user access
- Configuring local admin access
Prerequisites
It is important to note that there are a few limitations when using Azure AD join for Azure Virtual Desktop at the time of writing. As you may know, many Microsoft services, third-party platforms, and others require access to an Active Directory environment for authentication and user/group permissions. Therefore, it is important to assess your organization's current requirements to ensure that Azure AD join is a suitable solution:
- Azure AD join is only supported when using Azure Virtual Desktop for Azure Resource Manager. The classic version of Azure Virtual Desktop is not supported.
- The session hosts must be Windows 10 Enterprise Version 2004 or later.
- Azure AD-joined VMs don't currently support external users.
Important Note
Azure AD join is different from an Active Directory Domain Services controller in that the session host Virtual Machines (VMs) are automatically joined with the Azure AD tenant of the subscription that deploys the VMs. There is no way to specify a different Azure AD tenant for the host VMs. This means you will need to ensure that the required Azure tenant is linked to the subscription you wish to deploy the Azure AD-joined VM to.
Let's now look at deploying an Azure AD-joined host pool.
Deploying an Azure AD-joined host pool
In this section, we will look at deploying a host pool using Azure AD join.
Before we get started, I want to cover the use of FSLogix profile containers with Azure AD join. When using Azure AD join, there are a few slight differences compared to the traditional way when using Active Directory Domain Services. The following link takes you to the Microsoft documentation detailing how to configure FSLogix profile containers with Azure Files and Azure AD. Please note this feature is in preview at the time of writing: https://docs.microsoft.com/azure/virtual-desktop/create-profile-container-azure-ad.
Let's now move on and look at the creation of an Azure AD-joined host pool:
- We first need to navigate to the Azure Virtual Desktop service to get started.
- Proceed to create a new host pool.
- Within the host pool creation screen, under the Virtual Machine tab, in the Domain to join section, select Azure Active Directory:
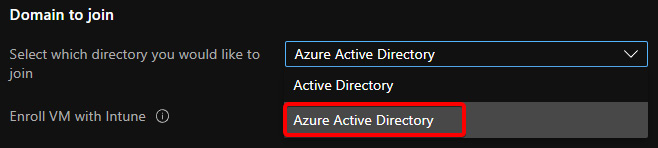
Figure 8.1 – Domain join options within the host pool creation wizard
- When you select Azure Active Directory, you will see the Enroll VM with Intune option appear. You would use the Enroll VM with Intune option if you wanted to use Intune to manage policies, distribute software, and generally manage VMs:
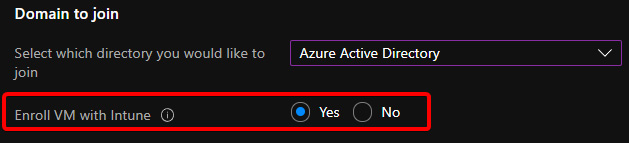
Figure 8.2 – Screenshot showing the Enroll VM with Intune field
You can read more on Intune as a part of Microsoft Endpoint Manager (MEM) here: https://techcommunity.microsoft.com/t5/intune-customer-success/getting-started-with-microsoft-endpoint-manager/ba-p/2497614.
Important Note
You need to ensure that you have set up MEM before using the Enroll VM with Intune feature; otherwise, the host pool deployment will fail.
- Once the deployment has finished, you should see an extension called AADLoginForWindows, which is used to create the Azure AD join and Intune enrollment if you selected the Enroll VM with Intune option. If you choose not to use Intune enrollment, you will need to configure customizations and policies locally using a master image:

Figure 8.3 – Azure AD-joined host pool deployment successful
- Once the deployment has been completed, you will see the device registered within Azure AD under Devices | All Devices, as shown in the following screenshot:

Figure 8.4 – VM registered under devices within Azure AD
- The device will also appear in MEM if enrolled with Intune:

Figure 8.5 – Endpoint Manager | All Devices
- You will also see the Azure AD registration within the Audit logs section when you navigate to Azure Active Directory | Devices | Audit logs, as shown in the following screenshot:

Figure 8.6 – Azure AD device registrations within the Audit logs section
- If the VM does not appear to enroll or you would like to confirm enrollment, you can log in locally to the VM and use the following command using an elevated Command Prompt: dsregcmd /status:

Figure 8.7 – The dsregcmd /status command
- Finally, you can also check the event logs using Event Viewer. The Azure AD registration logs are in the following section of Event Viewer: Applications and Services Logs | Microsoft | Windows | User Device Registration | Admin:

Figure 8.8 – Azure AD registration logs within Event Viewer
Now that we have deployed the Azure AD-joined host pool, we will now take a look at enabling access for users in the next section.
Enabling user access
Before users can sign in to the session hosts within the Azure AD-joined host pool, you must configure the required permission using Role-Based Access Control (RBAC). First, we need to add the required users and Azure AD groups to the host pool default desktop application group. We also need to add the Virtual Machine User Login RBAC role.
Important Note
The Virtual Machine User Login RBAC role is not an Azure Virtual Desktop role. This is required to enable access to sign in to a VM. The Azure role enables logon by applying the DataAction permission.
Depending on your requirements and host pool deployment, you may want to review the scope for this role. For example, assigning an Azure AD group at the resource group level may make more sense than assigning the RBAC role for each user per VM.
Important Note
It is not advised to set the Virtual Machine User Login RBAC role at the subscription level; you would essentially give all assigned users the ability to sign in to all VMs within the subscription.
To assign the Virtual Machine User Login role, do the following:
- Go to your host pool resource group in the Azure portal and select Access control (IAM).
- Select + Add:

Figure 8.9 – The + Add button
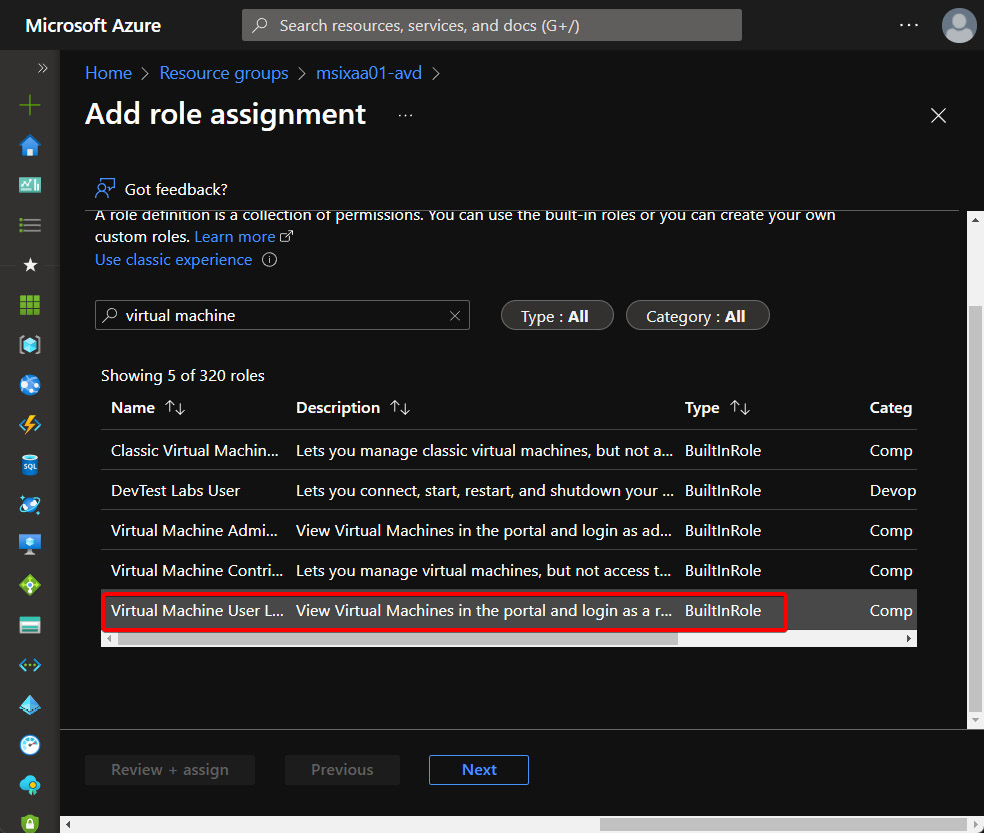
Figure 8.10 – Virtual Machine User Login role selection
- Under Members, click Select members and select the required user group assigned to the Desktop application group; in this example, the user group is called AZJoingroup:
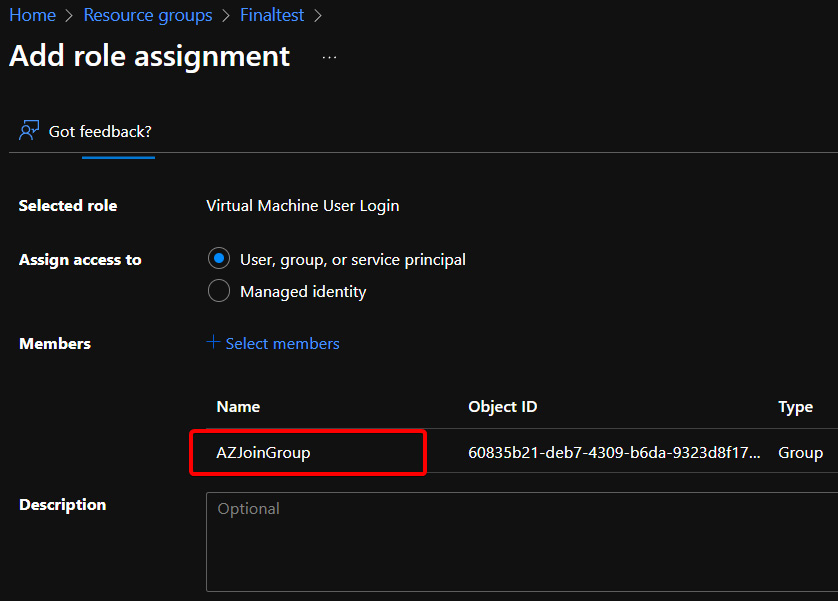
Figure 8.11 – The Add role assignment screen with the AZJoinGroup group added as a member
- Click Review + assign.
- You should now see Virtual Machine User Login appear on the Access Control (IAM) page, as shown in the following screenshot:

Figure 8.12 – Azure AD group added to the Virtual Machine User Login role
This section looked at assigning the Virtual Machine User Login role to give Azure user accounts access to VMs. In the next section, we will look at connecting to session hosts using the Windows Remote Desktop client.
Connect to Azure AD-joined session hosts using the Remote Desktop client
Before you can sign in to your Azure Virtual Desktop Azure AD-joined session host, you must ensure your local PC meets the following requirements:
- The local PC is Azure AD-joined to the same Azure AD tenant used for Azure Virtual Desktop.
- The local PC is hybrid AD-joined to the same Azure AD tenant used for Azure Virtual Desktop.
- You are using Windows 10 build 2004 or later and Azure AD registered with the same Azure AD tenant for Azure Virtual Desktop.
If you do not meet the preceding criteria, you can enable the RDSTLS protocol, an enhanced RDP security protocol. You can read more on RDSTLS here: https://docs.microsoft.com/openspecs/windows_protocols/ms-rdpbcgr/83d1186d-cab6-4ad8-8c5f-203f95e192aa.
You can add the RDSTLS protocol using a custom RDP property with the host pool: targetisaddjoined:i:1. You will also need to use the same custom RDP property when using web, Android, macOS, and iOS clients:

Figure 8.13 – Custom RDP property targetisaddjoined:i:1
Azure AD join host pool access uses the Public Key User to User (PKU2U) protocol for authentication. To sign in, both the session host and the local PC must have PKU2U set to Enabled. If you are using Windows 10 build 2004 or later, you can enable the protocol by following these steps:
- Open Regedit and navigate to HKLM | SYSTEM | CurrentControlSet | Control | Lsa | pku2u.
- Set AllowOnlineID to 1.
You can also set this using Group Policy by completing the following steps:
- Open either the local Group Policy Object (GPO) or create a GPO within Group Policy.
- Navigate to Computer Configuration | Policies | Windows Settings | Security Settings | Local Policies | Security Options.
- Under Policy, set Network Security: Allow PKU2U authentication requests to this computer to use online identities to Enabled.
In the next section, we will take a brief look at configuring local admin access when using Azure AD join.
Configuring local admin access
To give the user local admin access to a VM, you will need to assign the Virtual Machine Administrator Login role to the VM using the same process as shown in the Enabling user access section.
Important Note
It is recommended that you only assign users to the required VMs when assigning the Virtual Machine User Login role. For example, if you assign this role to a group at the subscription level, all users within the group would have local admin rights to all the VMs. This is not a recommended approach.
You can add the required user to the Virtual Machine Administrator Login role as shown in the following screenshot:

Figure 8.14 – Virtual Machine Administrator Login role assigned to the VM
Once you have added the required permissions, you should see the user account now logs in as an administrator:
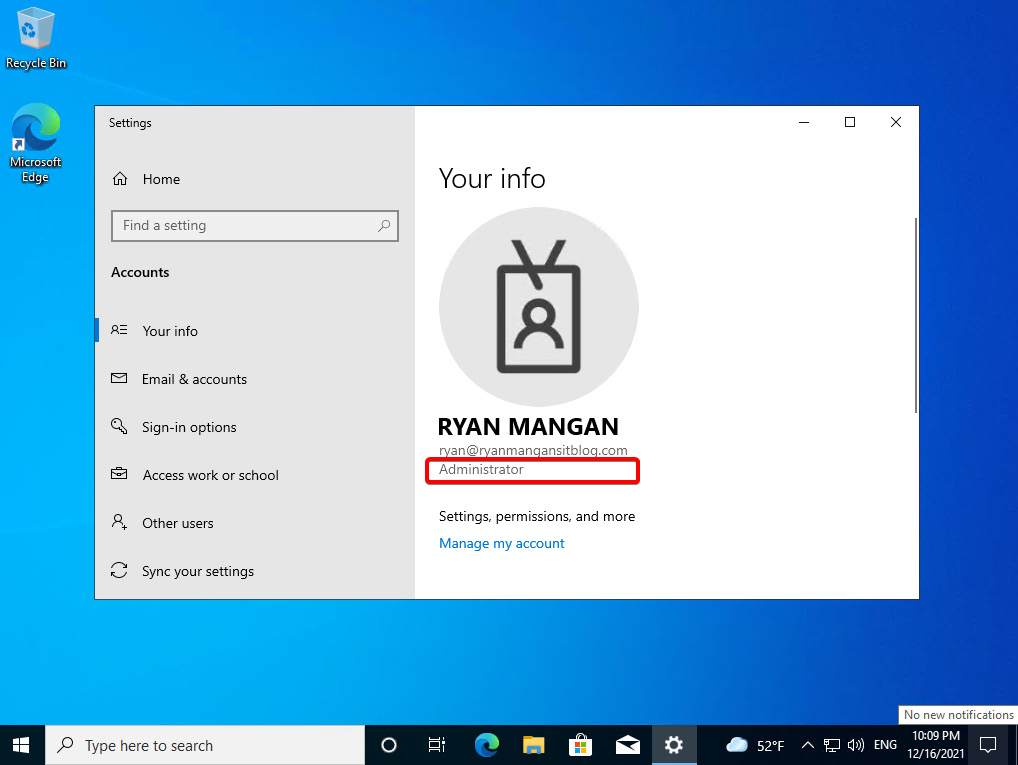
Figure 8.15 – User logging in as an administrator
This brief section looked at assigning local admin rights to an Azure AD-joined host pool.
Summary
This chapter looked at the Azure AD join feature for Azure Virtual Desktop. First, we looked at the prerequisites, then we studied deploying an Azure AD-joined host pool, and we finished off the chapter by looking at applying the required permissions and setting the custom RDP property for access on devices that are not Azure AD-joined or hybrid domain-joined. In the next chapter, we will take a look at creating and managing Session Host images.
Questions
- Which command would you use to check to see whether a session host is Azure AD-joined?
- What is the minimum version of Windows 10 that you can use with Azure AD join?
- After deploying an Azure AD-joined host pool, what are the two things you need to do regarding permissions?
- What custom RDP property should you assign when using a macOS device with an Azure AD-joined host pool?
Answers
- dsregcmd /status
- Windows 10 Enterprise build 2004
- Add the Azure AD group to the default desktop application group. Then, add the Virtual Machine User Login role for the Azure AD group within the host pool resource group.
- targetisaddjoined:i:1