
Chapter 10: Managing Access
In this chapter, we will journey through the process of managing access within Azure Virtual Desktop (AVD). First, we look at planning, managing, and restricting access to AVD resources. This consists of exploring how Role-Based Access Control (RBAC) works in combination with the permissions that must be synchronized with the Active Directory domain. Also, we will briefly look at group policy and the value it brings to a virtual desktop environment.
In this chapter, we will cover the following topics:
- Introduction to Azure RBAC
- Planning and implementing Azure role-based controls
- The delegated access model
- Assigning RBAC roles to IT admins
- Creating a custom role using rights assignments
- Configuring user restrictions by using Azure AD groups
Introduction to Azure RBAC
Azure RBAC stands for Azure Role-Based Access Control. Essentially, this feature allows you to apply access management to your Azure management groups/subscriptions. In addition, Azure RBAC enables you to configure granular control with access to Azure resources and specify which user/admin actions can be taken with the resources you have granted access to.
Here are some examples of the access control conditions you can set:
- Allow one user to manage virtual machines in a specific subscription and another user to only manage networks. This is an example of separating the network controls from the virtual machine controls.
- Provide access to a specific user to only manage all of the resources within a specific resource group.
- Grant access to an application to access specific resources or a resource group.
Lets now take a look at the components of the Desktop Virtualization Contributor:
- Security principle
- Role definition
- Scope
Let's discuss these elements in more detail:
- Security principle: A security principle is an object that represents a user, group, service principles, or managed identity. You can assign a role to any of these security principles:

Figure 10.1 – The different security principles
- Role definition: A role definition is a collection of permissions that you can assign for different operations. These can then be assigned to the security principle. Azure does include several built-in roles, so you don't have to configure custom roles, but you can if you want to. A good example is the virtual machine contributor role that allows a user to create and manage virtual machines.
- Scope: The scope refers to the resources you apply to grant access to. There are four levels within the scope that you can specify, including the management group, subscription, resource group, and the specific resources themselves:
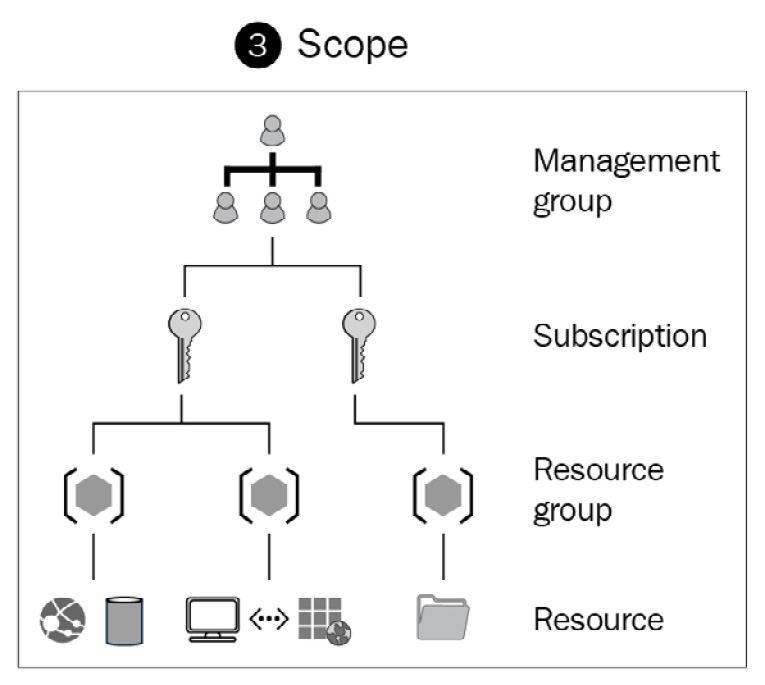
Figure 10.2 – The different scope levels
Now that we have reviewed the three core elements of RBAC in more detail, let's move on to role assignments.
Essentially, a role assignment is a process of assigning a role definition to a security principle and at the required scope level (that is, applying RBAC permissions to users and groups).
Tip
You can find the complete list of Azure's built-in roles at https://docs.microsoft.com/azure/role-based-access-control/built-in-roles.
In this section, we learned about the basics of Azure RBAC; next, let's look at the built-in roles of AVD and learn how to use RBAC with AVD.
Planning and implementing Azure roles and RBAC for AVD
As with all Azure resources, AVD uses Azure RBAC to assign roles and permissions to both users and IT admins, as mentioned earlier. In this section, we will take a look at the RBAC roles that can be used within AVD, and I will show you how to apply these role assignments and create custom roles.
Tip
RBAC roles that are specific to AVD do appear in the AZ140 exam. It is advised that you pay attention to these different roles, as you might see a question in the exam.
AVD has many built-in management roles that you can use for host pools, app groups, and workspaces. This provides you with more granular control over administrative tasks, which can be extremely useful in larger organizations. It is recommended that all organizations leverage RBAC roles to use the least-privilege model ensuring access to systems is carefully controlled.
Additionally, it is important to note that the roles are named in compliance with Azure's least-privilege methodology and standard role naming conventions.
Tip
AVD does not have a specific owner role. However, you can use the Azure standard owner role for service objects. It is recommended that you follow the least-privilege methodology when assigning admin permissions to AVD administrators.
The following screenshot shows the specific desktop virtualization roles that are available in RBAC:
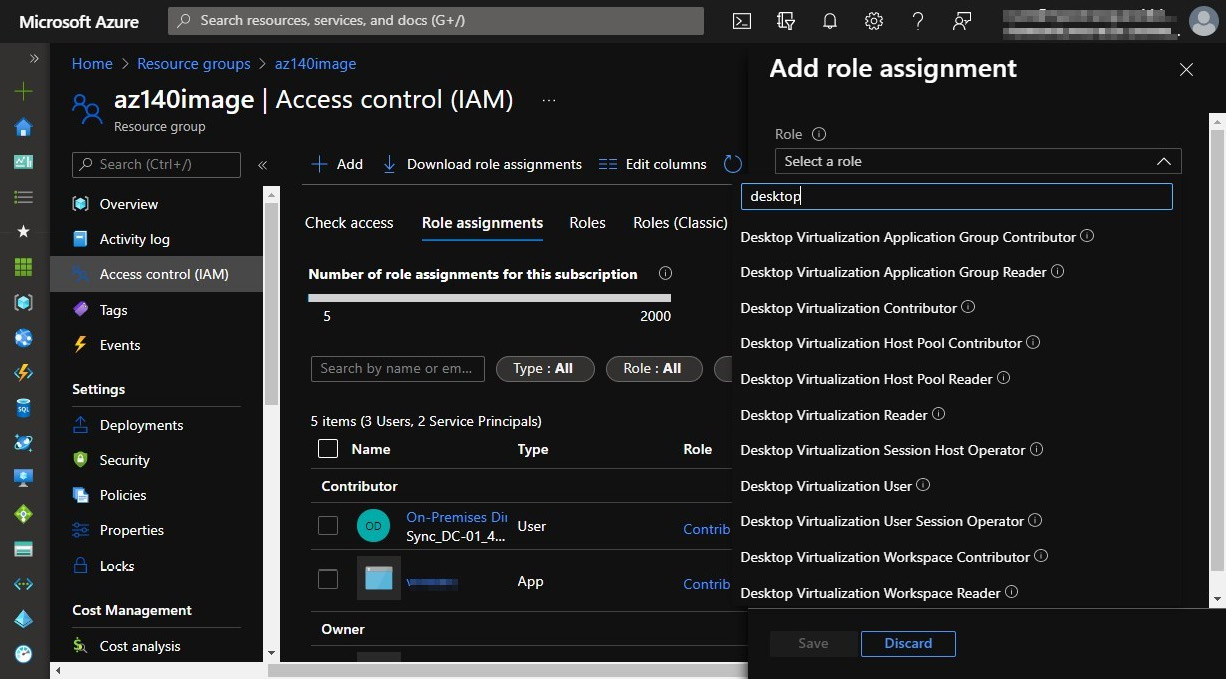
Figure 10.3 – The Access control menu within an Azure resource
The following table details the built-in roles for AVD that you can use to separate management roles from host pools, app groups, and workspaces. You will note that these roles are for the management of AVD, not user access:


The https://docs.microsoft.com/azure/virtual-desktop/rbac link details the up-to-date list of RBAC roles for AVD.
Now we will take a look at the delegated access model for AVD.
The delegated access model
Delegated access in AVD lets you specify the level and total amount of access that a particular user is allowed. This can be done by assigning a role that can be built-in or custom.
Important Note
The delegated access model is based on the Azure RBAC model. Essentially, you can customize roles with granular controls ensuring the least-privilege methodology is followed as per security best practices. You should also note that the Desktop Virtualization User role is the lowest role and is required for user access to the AVD environment.
You can read more about AVD delegated access at https://docs.microsoft.com/azure/virtual-desktop/delegated-access-virtual-desktop.
This section looked at different built-in RBAC roles for AVD and briefly covered the delegated access model. Now we will move on to look at how to configure RBAC through the Azure portal.
Assigning RBAC roles to IT admins
This section looks at assigning RBAC roles to specific resources and resource groups for AVD.
Within a subscription, resource group, or a specific resource, you will see Access control (IAM) in the menu options:
Figure 10.4 – The Access control (IAM) menu button is shown in each Azure resource
This is where you can assign roles to users, groups, and service principals. As mentioned earlier, these are called security principles.
To assign a security principle to a role that is within scope, you can click on the Access control button; as shown in this example, this is at the subscription level. Click on Add | Add role assignment (Preview):
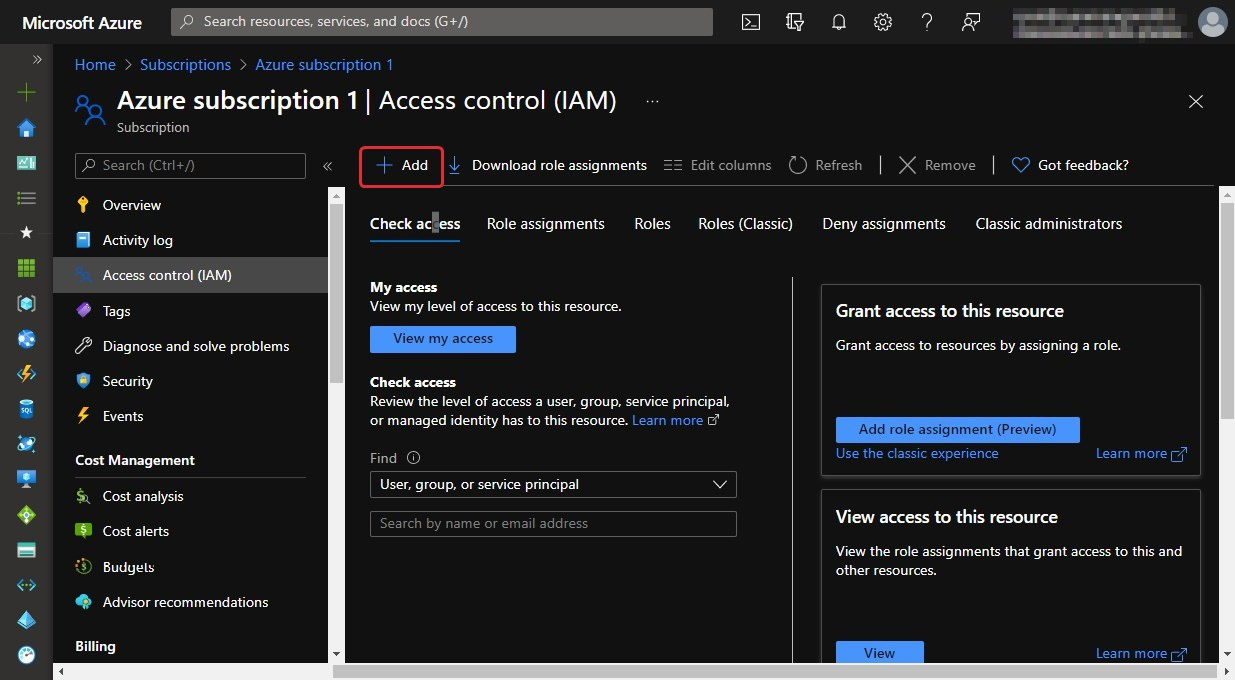
Figure 10.5 – The buttons for adding role assignments
Then, you should see the Add role assignment tab appear. Select the role you require, select the security principle, and then click on Save:
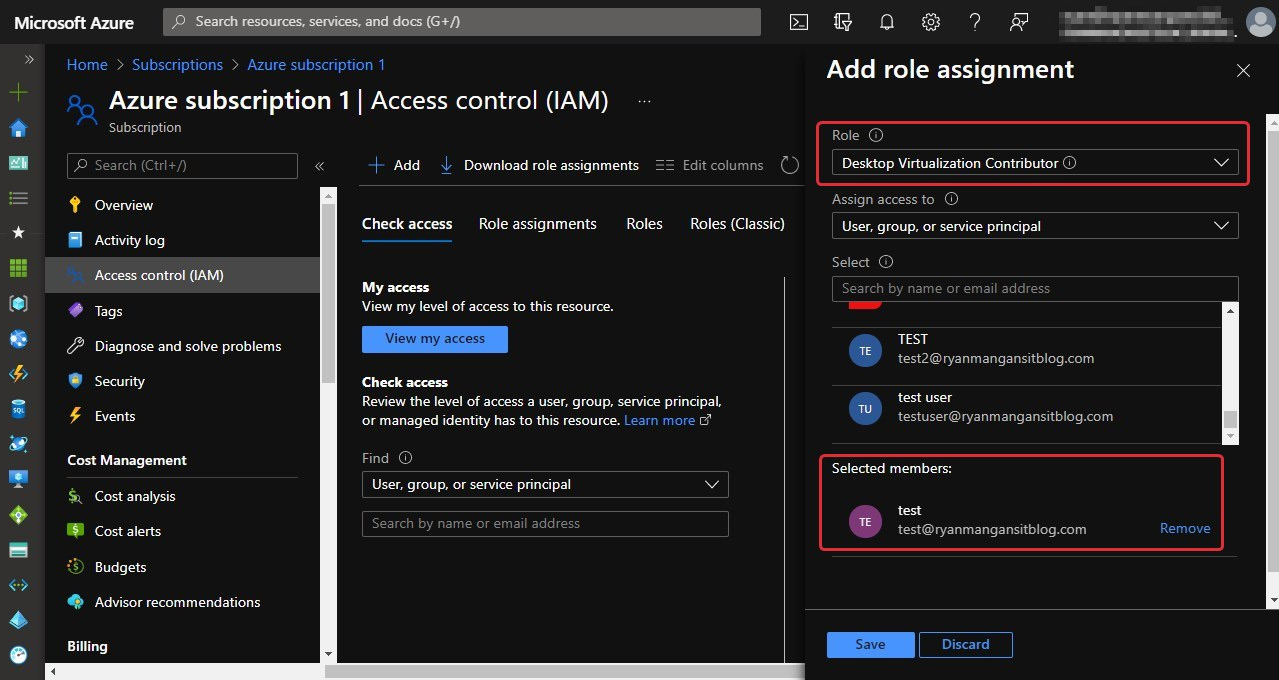
Figure 10.6 – The selection of a role and user when adding a role assignment
Now you will see the Desktop Virtualization Contributor role with the user account assigned in the bottom section of the screenshot (Figure 10.7):

Figure 10.7 – The new role assignment added to the resource
There you have it; you have just assigned a user account to the desktop virtualization contributor RBAC role at the subscription level. Additionally, as a best practice, it is recommended that you assign roles to Azure Active Directory groups that offer more flexibility and security rather than specific users.
Important Note
Deny assignments are created and managed by Azure. You cannot directly create your own deny assignments.
Now, let's look at how to do the same using PowerShell.
The PowerShell way to assign role assignments
Before you can start assigning roles via PowerShell, first, you need to ensure that the AVD PowerShell model is set up. Please refer to the Setting up PowerShell for Azure Virtual Desktop section in Chapter 6, Creating Host Pools and Session Hosts.
To assign a user to an app group using PowerShell, you could use the following cmdlets:
New-AzRoleAssignment -SignInName <userupn> -RoleDefinitionName "Desktop Virtualization User" -ResourceName <appgroupname> -ResourceGroupName <resourcegroupname> -ResourceType 'Microsoft.DesktopVirtualization/applicationGroups'
Here's the result of using the preceding command:
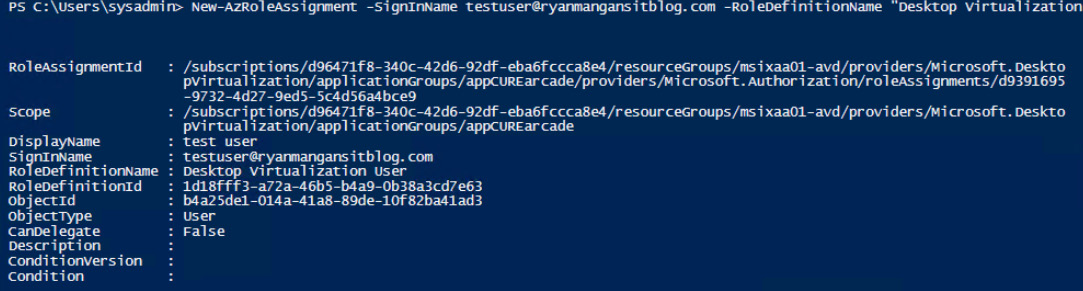
Figure 10.8 – Using New-AzRoleAssignement
To assign a group, you can use the following:
New-AzRoleAssignment -ObjectId <usergroupobjectid> -RoleDefinitionName "Desktop Virtualization User" -ResourceName <appgroupname> -ResourceGroupName <resourcegroupname> -ResourceType 'Microsoft.DesktopVirtualization/applicationGroups'
When using a group, you need to use the object ID, which can be found within the Azure Active Directory page within the Azure portal. Within groups, select the required group. You will then see the object ID that is required:
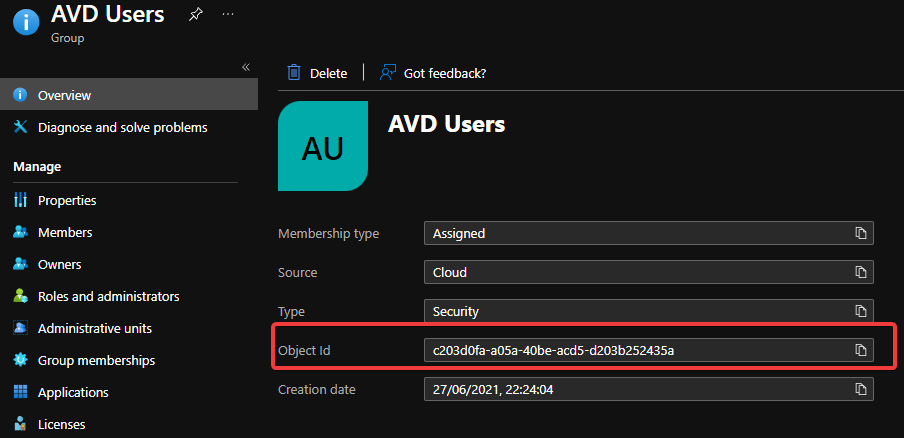
Figure 10.9 – An example group and its associated object ID
Once you have the required object ID for the associated group, you are ready to assign the desktop virtualization user role definition:
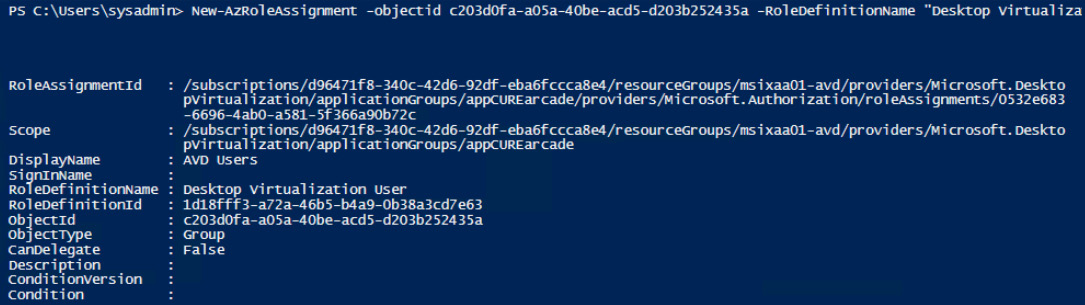
Figure 10.10 – An example of assigning a role assignment to a group using PowerShell
You can read more about assigning roles using PowerShell at https://docs.microsoft.com/azure/role-based-access-control/role-assignments-powershell.
In the next section, we will look at how to create a custom role using the Azure portal.
Creating a custom role using the Azure portal
The following section provides high-level steps regarding how to create a custom role assignment. Custom role assignments are useful when you want to grant very specific actions to admins and users. In larger organizations, you might wish to create more granular roles to suit your IT department's support structures or other use cases:
- The following screenshot shows the Access control (IAM) menu within a resource. You can see the Add custom role option within the drop-down menu:

Figure 10.11 – The add function of a custom role
- When clicking on the Add custom role option, you will see the Create a custom role page appear. Enter a role name, description, and choose the base permissions. It is recommended that you clone a role rather than start from scratch. You can also start from JSON if you wish.
- As shown in the following screenshot, we are cloning a role. In this case, we will use the Desktop Virtualization User role. Once you have filled out the form, click on Next:
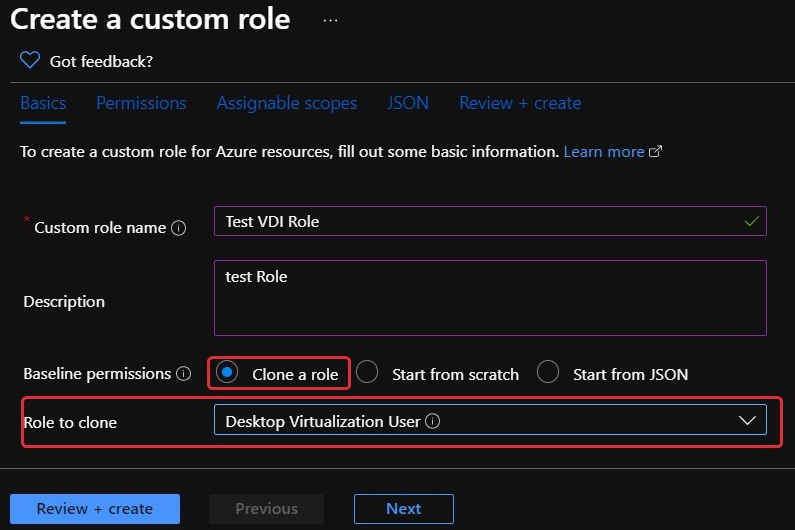
Figure 10.12 – The Create a custom role page
- On the Permissions tab, you will see two buttons: Add permissions and Exclude permissions. To add permissions, click on the Add permissions button:
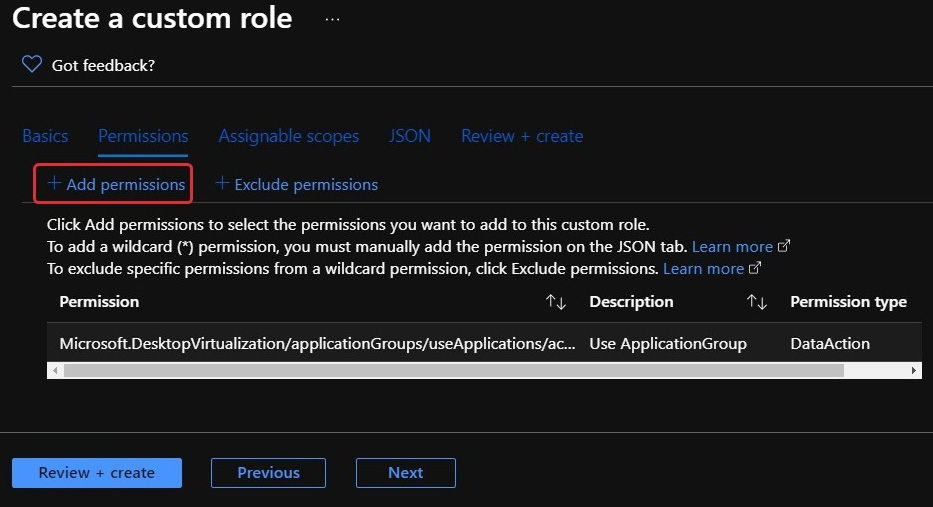
Figure 10.13 – The Add permissions button within the Create a custom role page
- You will then see the Add permissions page appear. You can use the search bar to search for specific permissions, as shown in the following screenshot:
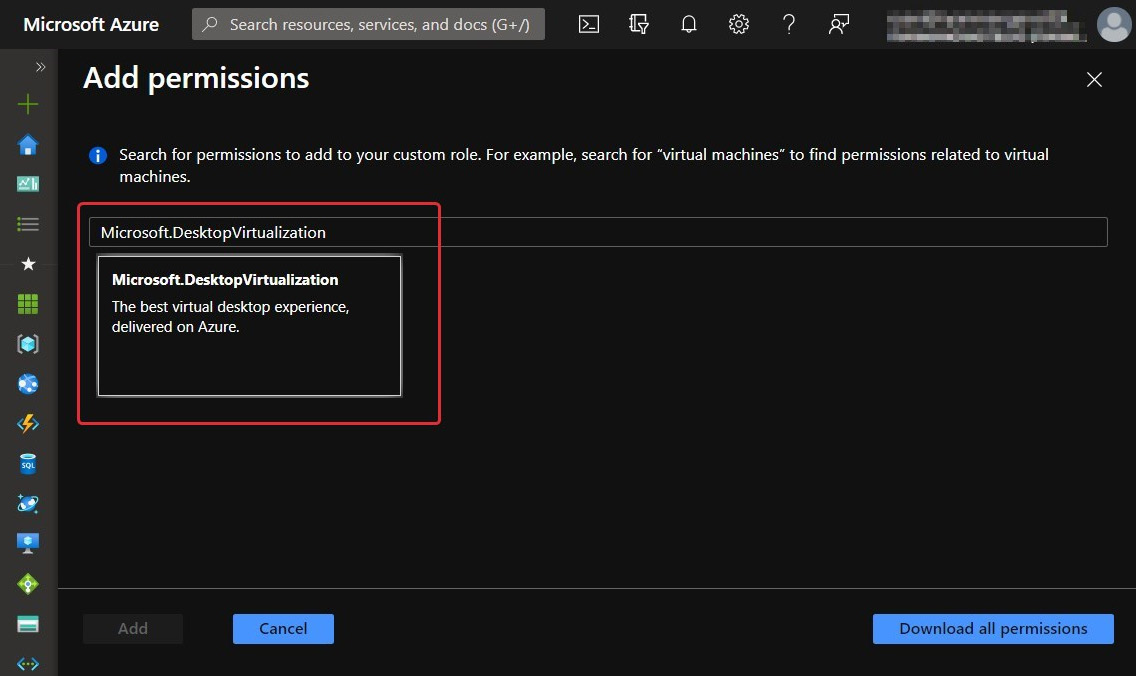
Figure 10.14 –Searching for Microsoft.DesktopVirtualization permissions
- In this example, I will select the Microsoft.DesktopVirtualisation permissions. Once selected, you will be presented with a new page, as shown in the following screenshot. Select the permissions you want; these can be either Actions or Data Actions:
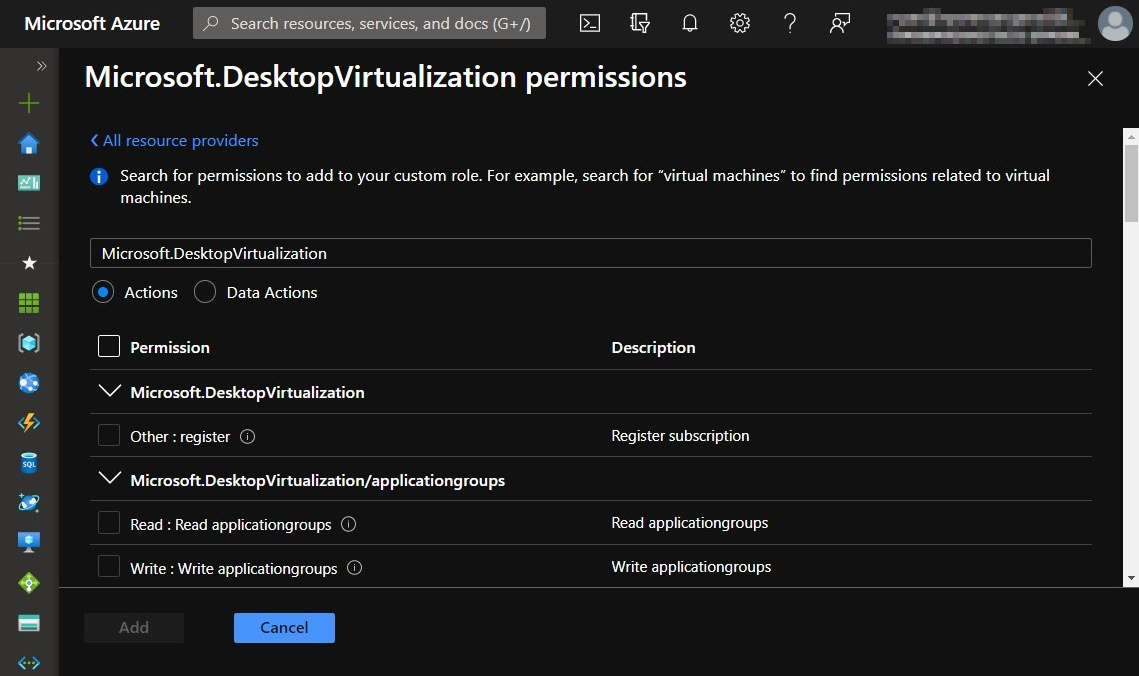
Figure 10.15 – The Microsoft.Desktopvirtualization permissions page with the add custom role
Tip
Actions are an array of strings that specify the management operation that the role allows. DataActions refers to an array of strings that specifies the data operations the role allows to be performed on the data within that object. You can read more at https://docs.microsoft.com/azure/role-based-access-control/custom-roles#how-to-determine-the-permissions-you-need.
- Once you have selected the required permissions, click on Add.
- You will then see the added permission appear with the Create a custom role page:
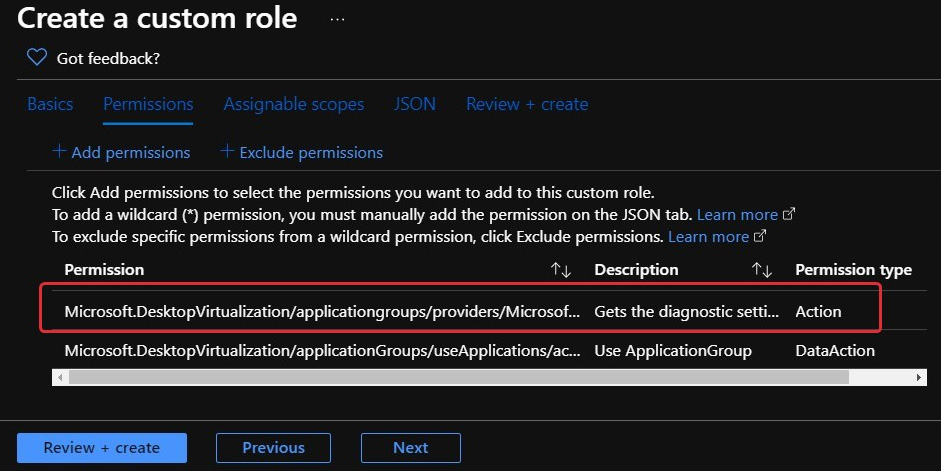
Figure 10.16 – The added role of getting diagnostic settings
- Once you have finished adding permissions, click on the Review + create button, as shown in the preceding screenshot.
- Check what you have configured and, once complete, proceed by clicking on the Create button:
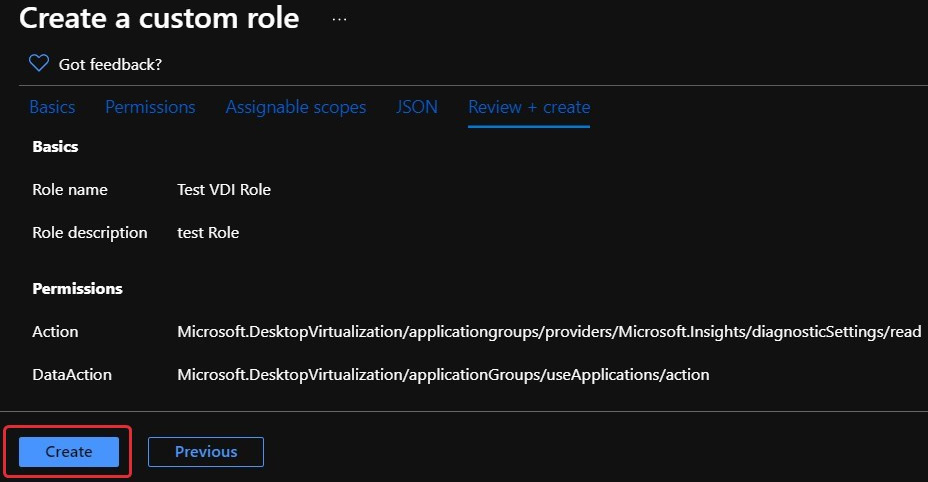
Figure 10.17 – The custom role configured before creating
- Once created, you can search for the customer role underneath the Roles tab within the access control page:
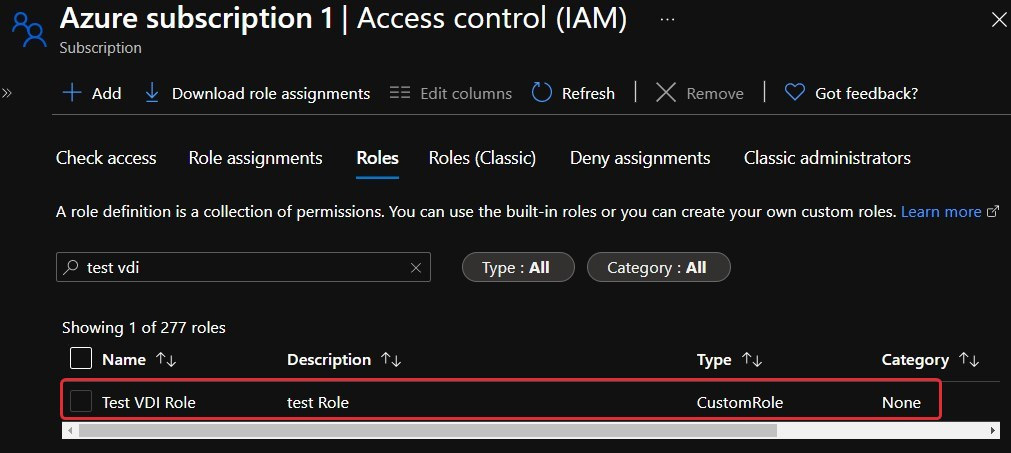
Figure 10.18 – The newly created custom role
This concludes the creation of a custom role. In the next section, we will look at how to manage local roles, groups, and right assignments on session hosts.
Managing local roles, groups, and rights assignments on AVD session hosts
In this section, we will take a look at managing local roles, groups, and rights assignments. When working in a pooled desktop environment, it's important to ensure that each session host is configured to ensure the user experience is identical for each host within the pool. When configuring local roles, groups, and rights assignments, you can configure these on the gold master image (image template) or configure group policy to apply to single or multiple host pools centrally.
Tip
Using group policy is great when working with multiple host pools, as you don't need to worry about customizing the image with roles, groups, and rights assignments.
The use of local roles and groups might be required for specific requirements such as applications or allowing additional access permissions to the local operating system.
For example, if you are using FSLogix profile containers, you might wish to have a specific group of users assigned to the FSLogix profile containers.
Let's suppose you need to apply local groups to all session hosts within a pool. In that case, you can use the restricted groups setting via group policy. This allows you to configure local groups and apply them to your session hosts within an organizational unit.
The following example shows you a screenshot of Group Policy Management Editor | Computer Configuration | Policies | Security Settings | Restricted Groups.
The Restricted Groups setting is a great way to automatically configure local groups to session hosts.
The following screenshot shows the restricted groups setting within the Computer Configuration tab, underneath Windows Settings:
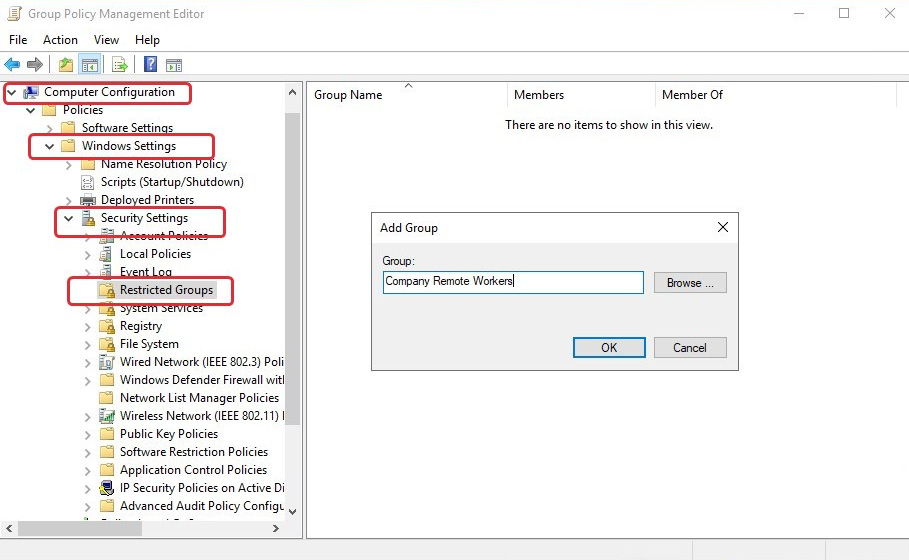
Figure 10.19 – The creation of a group within the Restricted Groups setting
The example in the following screenshot shows how you can add members to a group that can be either users or groups. Additionally, you can link this group to a member of another group. For example, the screenshot shows the Company Remote Workers group has been added and configured with a domain security group:
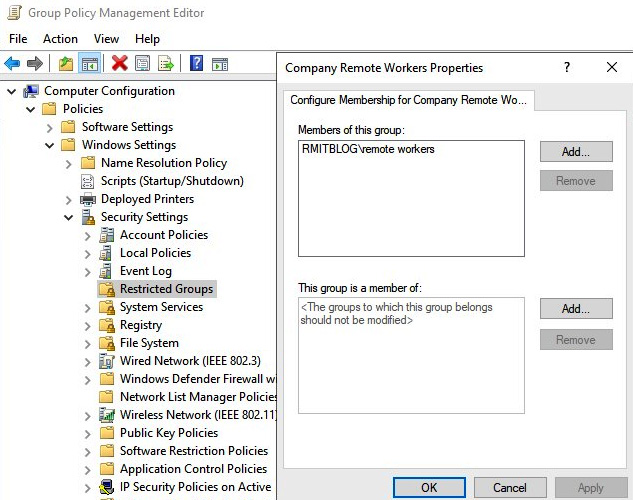
Figure 10.20 – The configuration of membership for the new group
Now that we have covered the Restricted group settings, let's take a look at User Rights Assignments.
User Rights Assignments are used for customizing specific items such as preventing the change of a time zone or making changes to a specific application; you can even configure who can shut down the session host. Again, as stated earlier, the configuration and customization of user rights assignments are unique to the organization, and it is recommended that rights assignments are carefully considered and tested.
The following screenshot shows the group policy setting for rights assignments under Computer Configuration | Policies | Windows Settings | Security Settings | User Rights Assignment:
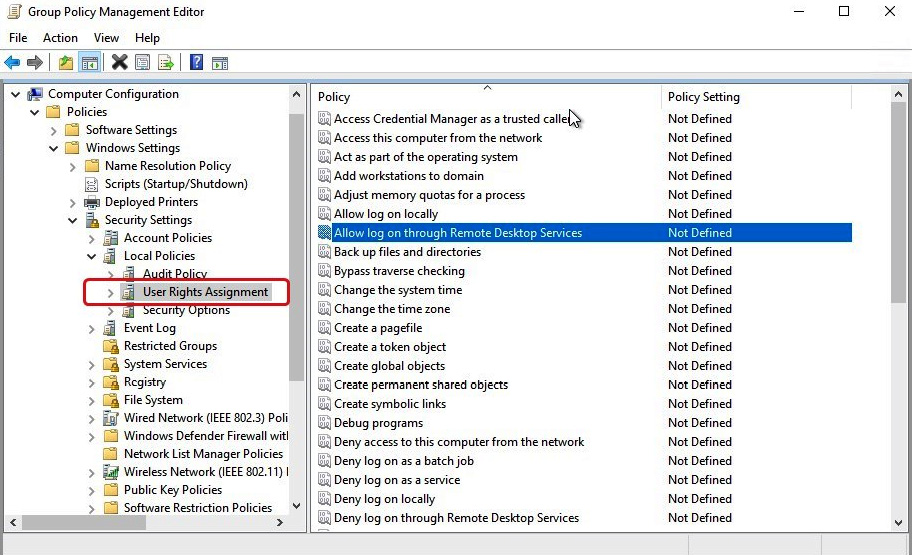
Figure 10.21 – The User Rights Assignment settings you can configure within group policy
You can use group policy to customize a wide range of optimizations/customizations and controls for AVD. Where possible, you should use group policy; however, it's important to note that some group policy settings could impact login performance compared to configuring directly on the image template.
Group Policy Tip
LSDOU: A really good acronym to remember when it comes to group policy is LSDOU. This means Local Group Policy objects are applied first, LS, then, Domain (D), and, finally, Organizational Unit OU policies.
Block Inheritance: This can be used if you want to ignore group policies above the OU your session hosts reside in. It is important to note that any enforced GPOs still apply when block inheritance is set.
Loopback: This is useful for desktop virtualization environments, as you can take the user settings and apply them to a group of session hosts (user settings linked to the computer OU will be applied). Remember to ensure that both user and computer objects are added to the scope tab of the group policy object for this to work, and ensure the GPO status is set to enabled.
Please note Loopback is known to slow down group policy processing.
The next section looks at configuring user restrictions by using Azure AD group policies and AD policies.
Configuring user restrictions by using Azure Active Directory Domain Service group policies
Using group policy to restrict visibility and access to items such as the operating system disk and removing the restart button from the start menu are typically done via group policy. It is recommended, where possible, to use group policy rather than direct configurations on the image template.
If you are using Azure Active Directory group policies, you will need to build a Windows Server management virtual machine that is joined to the Azure Active Directory Domain Services. Additionally, you will need a user account that is a member of the Azure AD DC administrators group in your Azure AD tenant. You can read more about the requirements and setup process at https://docs.microsoft.com/azure/active-directory-domain-services/manage-group-policy.
Tip
You can now use AVD with Intune for configuring policies and controls; for more information, please refer to https://docs.microsoft.com/en-us/mem/intune/fundamentals/azure-virtual-desktop.
Summary
This chapter looked at the Azure roles and the specific RBAC for AVD resources. I, hopefully, refreshed your memories of Active Directory and discussed some useful tips for managing local roles, groups, and rights assignments. Then, we finished by looking at the requirements for Azure Active Directory Domain Service to be able to use group policies.
In the next chapter, we will look at the application of security and compliance.
Questions
- You have a group policy object named user_personalization that only contains user settings. The policy is linked to the AVD Session host OU. What should you configure for the settings within the policy to apply to users when they sign in to the session hosts?
- Which Desktop Virtualization role allows you to manage all aspects of the AVD service?
- What are the three key elements of RBAC?
Answers
- Loopback processing
- Desktop Virtualization Contributor
- Security principle, role definition, and scope