
Chapter 15: Configuring Apps on a Session Host
In this chapter, we take a look at configuration applications for Azure Virtual Desktop. We start by looking at Application Masking, used to hide applications from users who do not require those specific applications. We then cast our eyes over deploying an application as a RemoteApp. As we progress through the chapter, we will also implement OneDrive for Business on a multi-session environment, implementing Microsoft Teams AV redirection. Then, we will finish off the chapter with some troubleshooting advice and guidance on application issues relating to Azure Virtual Desktop.
In this chapter, we look at the following:
- Configuring Application Masking
- Deploying RemoteApp applications
- Configuring and managing OneDrive for Business for a multi-session environment
- Configuring and managing Microsoft Teams AV redirection
- Implementing and managing multimedia redirection
- Managing internet access for Azure Virtual Desktop sessions
Application Masking
Application Masking is a part of the FSLogix portfolio that can manage access to applications, fonts, and other items based on criteria. The Apps RuleEditor is used to create app masking rules, edit rules, manage user and group assignments, and test created rule sets. This is incredibly useful for controlling application access via user groups.
To get started with Application Masking, you need to install the application FSLogixAppRuleEditorSetup.exe, which can be downloaded with the other FSLogix products here: https://aka.ms/fslogix/download.
Rule types available
Application Masking supports the following four rule types:
- Specify Value rule: Used to assign a value for the specified item
- App Container rule: Used to redirect applications or app data to a specified VHD
- Redirection rule: Used to redirect applications or app data to a specified item
- Hiding rule: Used to redirect applications or app data to a specified criteria

Figure 15.1 – FSLogix Apps RuleEditor icon in the Start menu
- Now let's create our first rule:
- Once the FSlogix Apps RuleEditor has been launched, click File and then New to create a new rule:

Figure 15.2 – Creating a new rule in the FSLogix Apps RuleEditor
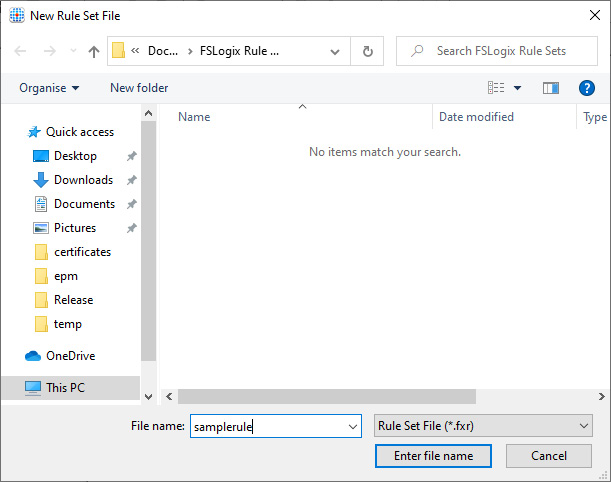
Figure 15.3 – Dialog box for saving the new rule file
- Once you have added a name and clicked Enter file name, you will see the following Rule Set form appear:
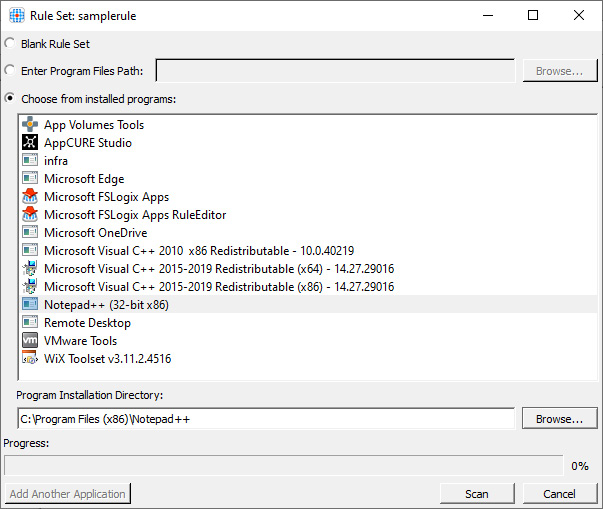
Figure 15.4 – The Rule Set form where we select an application from the installed programs list
- We will choose a program from the installed programs for this example. Select Notepad++ and click Scan. Once the scan has been completed, you can click the Ok button, which has changed from Scan to Ok:
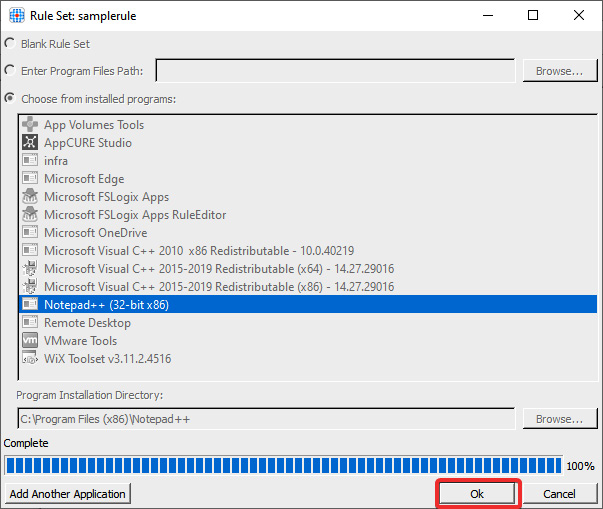
Figure 15.5 – The scan has been completed and you can now click Ok
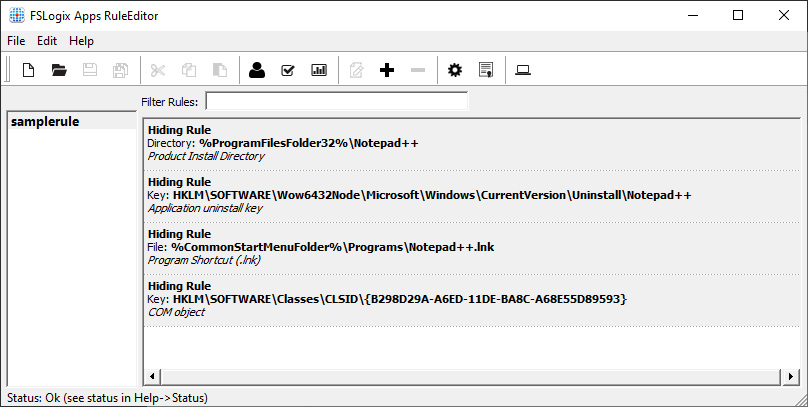
Figure 15.6 – A hiding rule has been created
- To manage assignments, right-click on samplerule as shown in the following screenshot and click Manage Assignments. This will load the Assignments page:
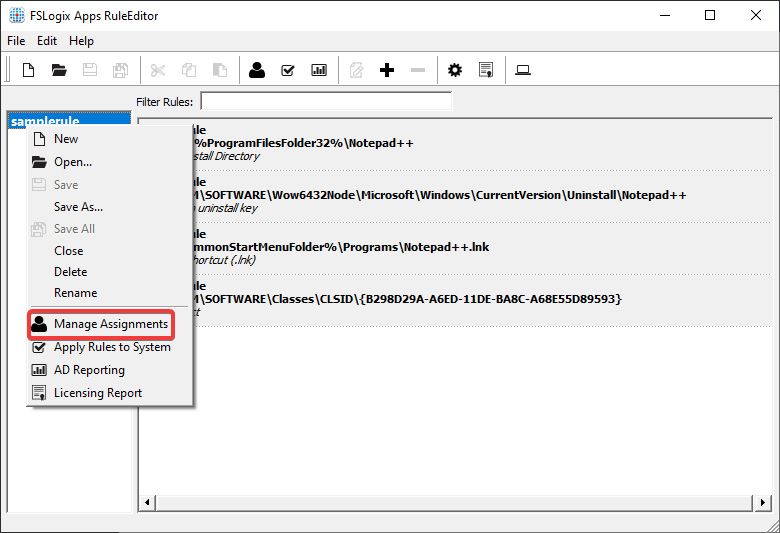
Figure 15.7 – Manage Assignments option
- Within the Assignments page, you can add the required user/group permissions for this rule:
Important Note
There are several options available to you when it comes to assignments. You have a choice of not only user and group but also additional options including process, network location, computer, directory container, and environment variable.
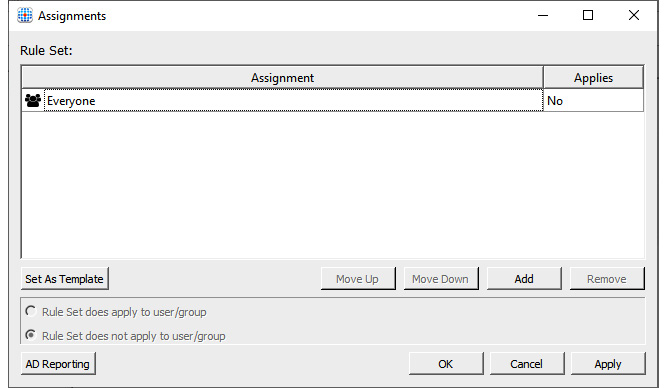
Figure 15.8 – Assignments form where you can set different assignments such as users and groups
Important Note
Good practice would be to use Active Directory groups to break down applications into department groups or groups relating to specific requirements. This then essentially enables granular access and better IT administrator control for user access to applications using FSLogix Application Masking.
- Now that we have finished configuring the rule, you may want to test it before we deploy to a production environment. To do that, we would click the checkbox in the main form taskbar as shown in the following screenshot:

Figure 15.9 – The test check button on the taskbar
- Once you have finished testing using the built-in test capability, the next step is to publish these rules to the session hosts. To do this, you would simply need to copy the created rule to the c:Program FilesFSLogixAppsRules path.
- Once you have completed the task in step 9, you should see the rule name you created earlier with a different extension, fxac, in C:Program FilesFSLogixAppsRulesCompiledRules:
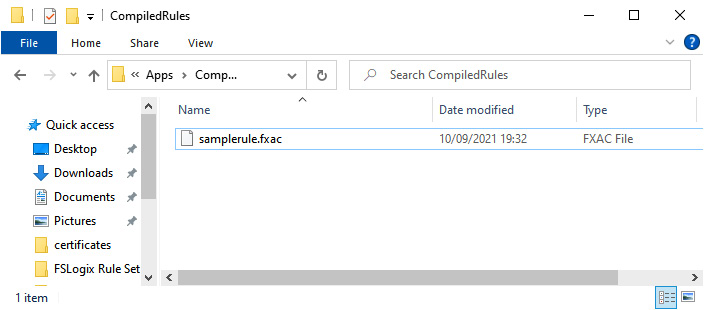
Figure 15.10 – The compiled rule once you've added the rule to C:Program FilesFSLogixAppsRules
Important Note
You can use traditional file transfer technologies or apply the rules within a master image by copying the rule file to the required location. You can also use custom script extensions to distribute the rules.
To summarize, we have created a simple hiding rule from the installed programs. After that, you can apply many custom/granular configurations and controls to your rule sets, including redirection rules, specify value rules, and app container (VHD) rules.
Application file containers
In this section, we take a look at creating application file containers. App containers allow IT admins to move applications and application data directories to VHD and VHDX volumes. The FSLogix app virtual disk is attached when the directory contents are accessed, and redirection is completed to the attached volume.
The auto-attach VHD feature is an excellent feature for applications that cannot use MSIX app attach and for those native apps that are large in size, which can impact the overall size of gold images. In addition, redirected applications are immediately available when needed.
VHD creation
The first thing we need to do to configure application file containers is to create a virtual disk. You can do this using the FSLogix toolset, specifically the frx.exe CLI tool.
You first need to navigate to the program folders where the tool is located as detailed here: Cd "C:Program FilesFSLogixApps".
You then can run the following command line to create a new VHD file:
frx create-vhd -filename=C: emp otepad.vhd
The following screenshot shows the cmdlets for creating the required virtual disk to be used with application file containers:

Figure 15.11 – Run the frx tool to create a new VHD file
Once the VHD file has been created, you need to copy the application directories to the VHD. This can be done by using the frx tool.
Tip
You can create both VHD and VHDX virtual disks. It is recommended that you use VHDX virtual disks as you have more flexibility in terms of management using PowerShell.
As per the steps to create a VHD, you first need to navigate to the FSLogixapps path, which is Cd "C:Program FilesFSLogixApps".
You then need to run the following commands to copy the application directory to the previously created virtual disk:
frx copyto-vhd -filename=C: emp otepad.vhd -src="C:Program Files (x86)Notepad++"
The following screenshot shows the application folder being copied to the created virtual disk using the FRx tool:

Figure 15.12 – Application files copied to the VHD
Now that we have completed the steps to create the VHD and copied the files from the application directory to the VHD, we can move on to the VHD deployment section.
VHD deployment
You can store your application disks on a local path or network path as long as the latency does not impact performance. If you decide to store your application file containers on a network store, you will need to ensure the session host has read permissions to the network drive – the same requirements MSIX app attach has. For details on configuring storage permissions for application file containers, please refer to Chapter 14, MSIX App Attach in the Configuring Azure Files for MSIX App Attach section.
Rule creation
Now we have the VHD file stored in the required location, the next step is to create an app container (VHD) rule using the FSLogix App RuleEditor tool.
To do this, we will create an app container VHD rule specifying the folder path we wish to redirect and the location of the VHD/VHD disk:

Figure 15.13 – Edit Rule form with the App Container (VHD) Rule selected
Once you have finished configuring the rule, save and make a copy of the rule ready for the next step.
Rule deployment
To deploy the redirection shown in the first section of this chapter, you will need to copy the created rules into the C:Program FileFSlogixAppsRules folder on all the required session hosts.
Important Note
The application folder path must be present on the session host for redirection to work. Therefore, you will need to delete the folder contents once the disk copy has been completed. However, the empty folder must remain.
Once deployed, you will see a VHD disk mounted, and the application directory populated with the application files from the mounted disk:
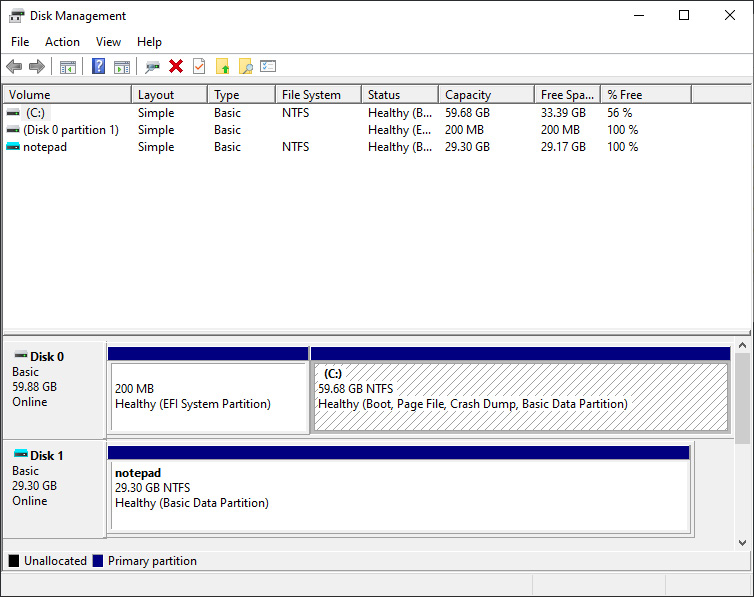
Figure 15.14 – Attached application file container for Notepad
In this section, we looked at implementing application masking. We started off by creating a hiding rule via assignments. We then took a look at application file containers where we copied the contents of an application to a VHD and then created the redirection rule so that the VHD became the app file source. We'll now move on to deploying applications as a RemoteApp.
Deploying an application as a RemoteApp
Please note that before proceeding with this section you will need to ensure applications have been installed on the session host first.
In this section, we take a look at deploying a RemoteApp within Azure Virtual Desktop. RemoteApps are essentially configured within the application groups. As mentioned in previous chapters, there are two types of application groups – one being a desktop app group and the second, a RemoteApp group.
Reminder
You can use MSIX app attach to deliver applications to RemoteApp user sessions.
Work through the following steps to create a RemoteApp group:
- Sign in to the Azure portal and search for Azure Virtual Desktop.
- On the Azure Virtual Desktop page, select Host pools and then select Application groups.
- Click Create to create a new application group:
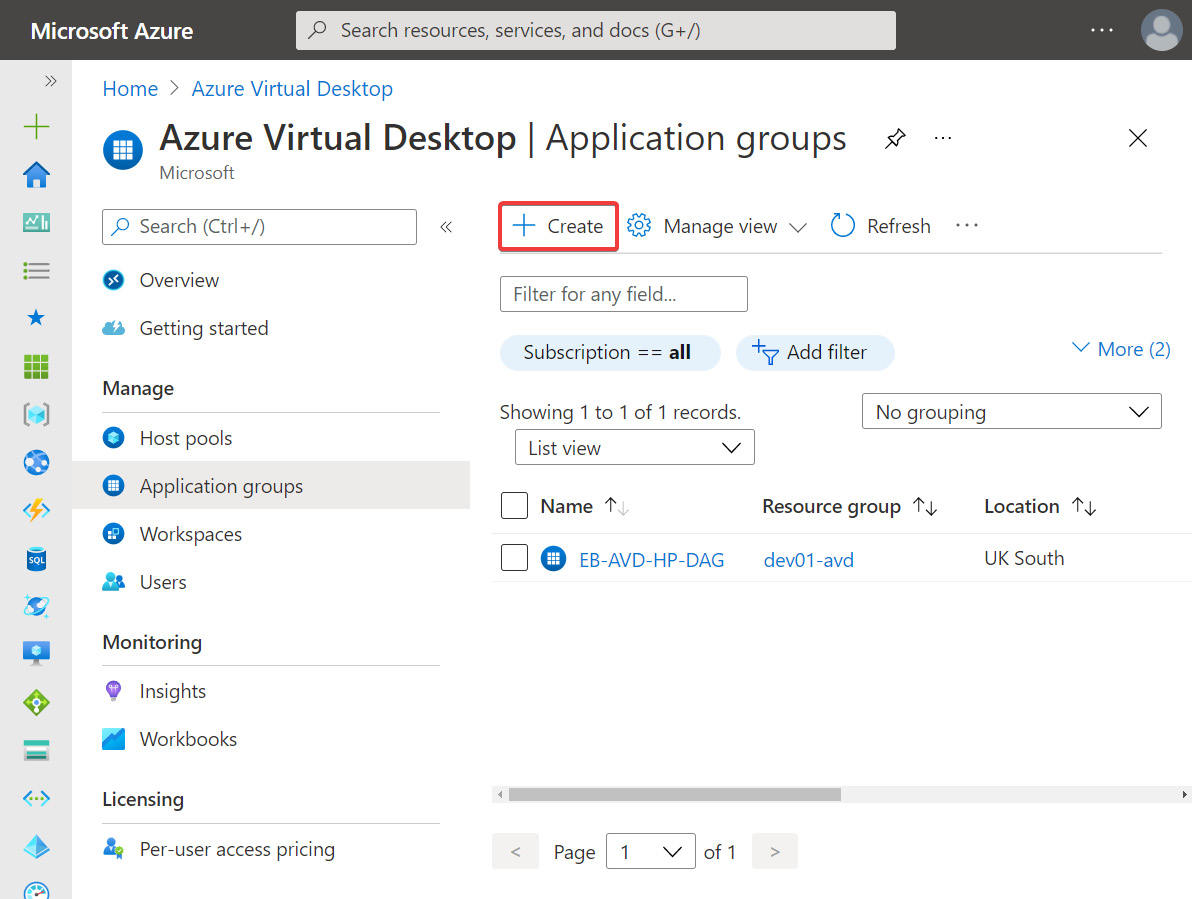
Figure 15.15 – Application groups page within Azure Virtual Desktop

Figure 15.16 – The Create an application group page within Application groups
- Ensure Application group type is set to RemoteApp and enter a name:
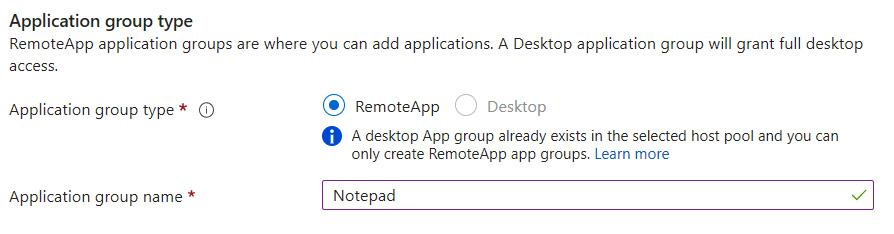
Figure 15.17 – The Application group type section
- Once you have filled out the required fields, click Next: Applications to move on to the Applications tab.
- Select Start menu as the application source and the application in this example is Notepad:

Figure 15.18 – The Add application blade within an application group
- Enter a Display name for the application and leave the other options as is, then click Save.
- Once you have finished adding applications, click Next: Assignments to move on to the Assignments tab:
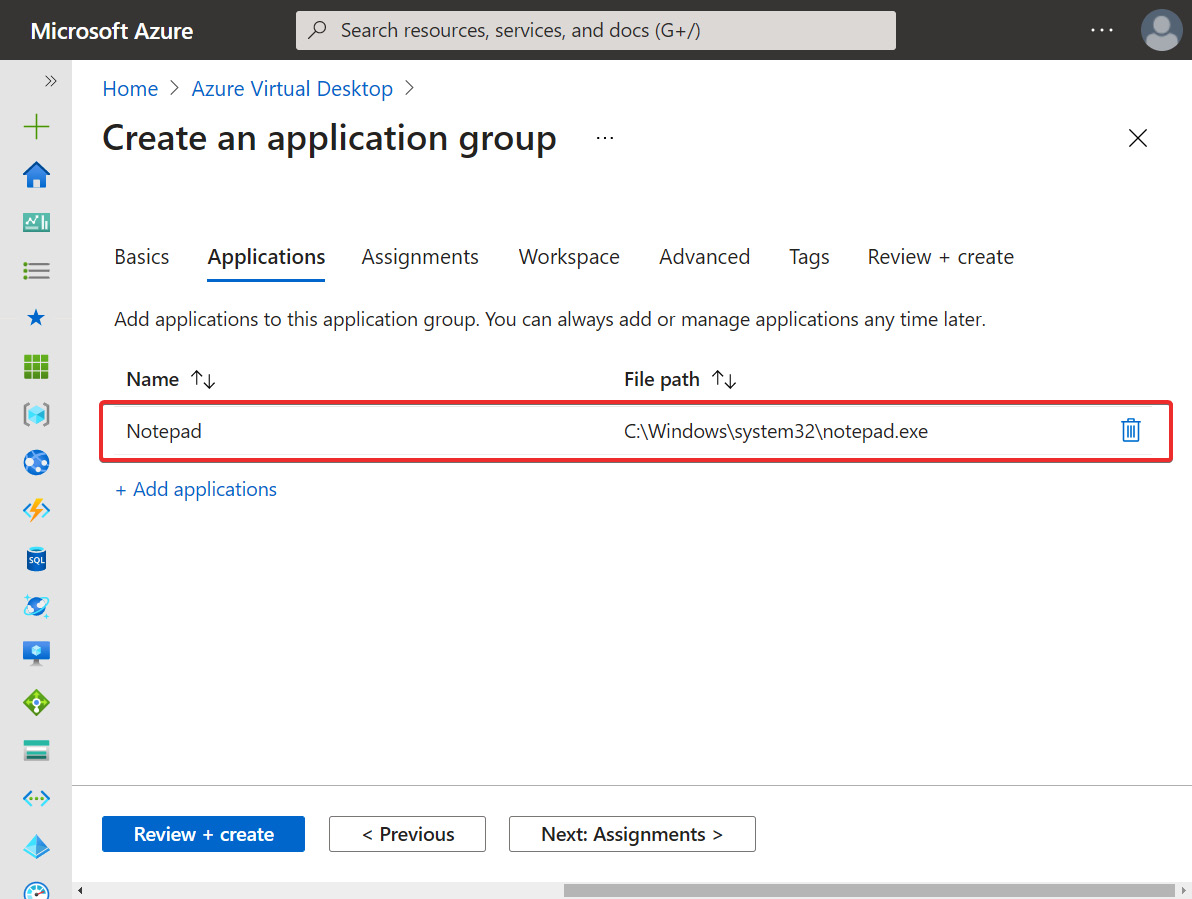
Figure 15.19 – Application added to the Create an application group page
- Within Assignments, add the users/groups you want to have access to the remote application. Once complete, click Next: Workspace to move on to the Workspace tab:
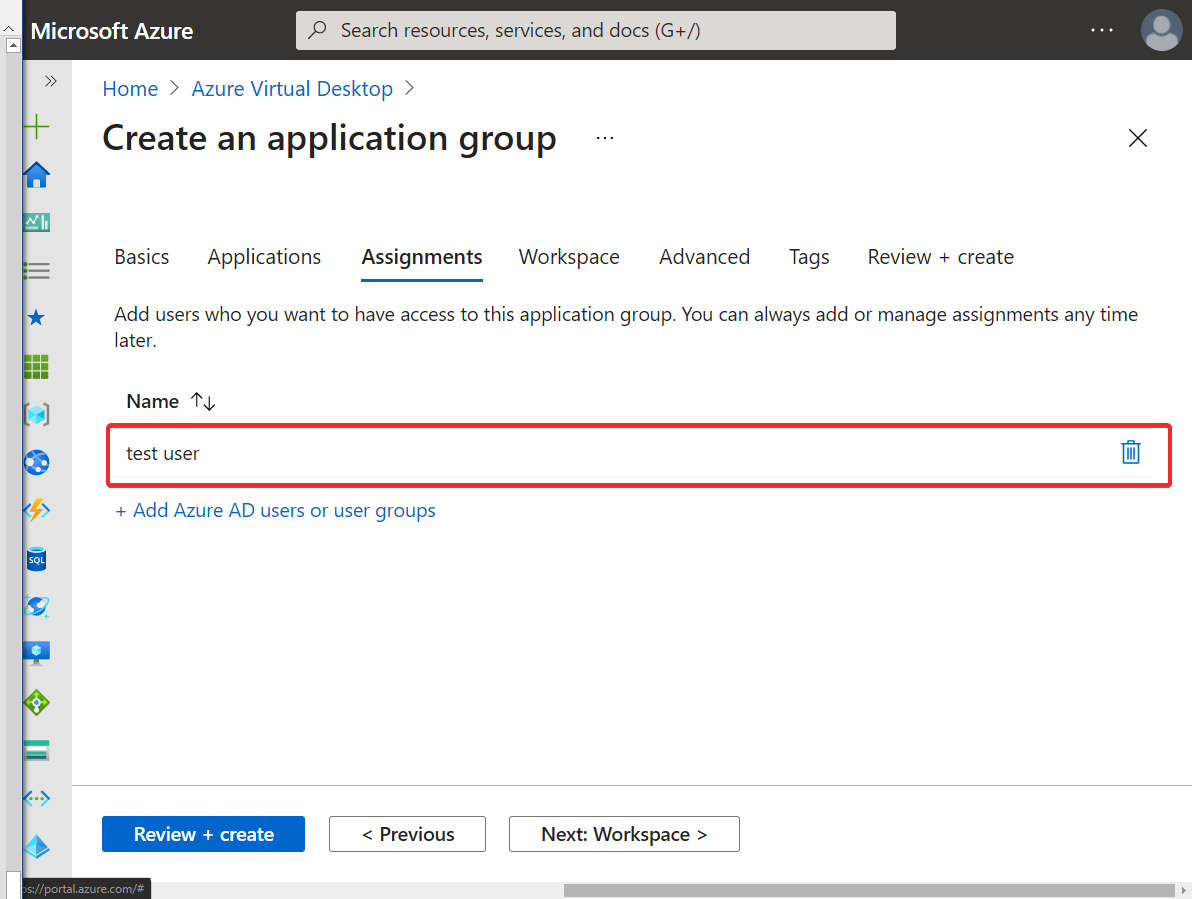
Figure 15.20 – A user account added on the Assignments tab
- If you want to register the application group to a workspace, select Yes to register the application group. If you want to do this later, select No. If you have an existing workspace, you can register your application group to it:
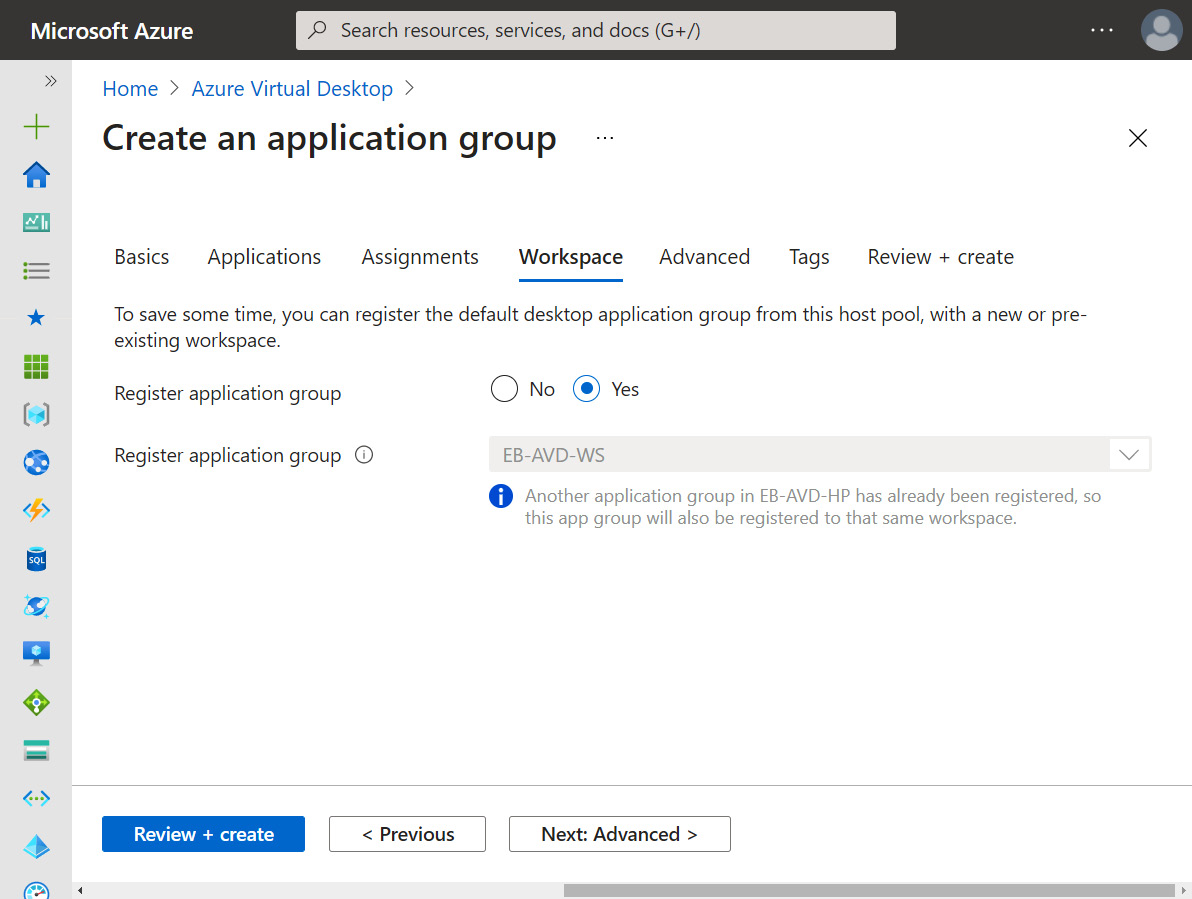
Figure 15.21 – Workspace tab within the Create an application group page
Important Note
Application groups can only be registered to workspaces created in the same region as the host pool. If you've previously registered another app group from the same host pool as your new app group to a workspace, it will be selected, and you won't be able to edit it, as shown in the preceding screenshot. All application groups from a host pool must be registered to the same workspace.
- Click Next: Advanced and configure Diagnostic and Tags. If Tags and diagnostics are not required, then you can click Review + create instead.
- Within the Review + create tab, check your configurations, then click Create.
- Once the deployment has been completed, you should see the Notepad application appear as a remote app in the Remote Desktop client, as shown in the following screenshot:
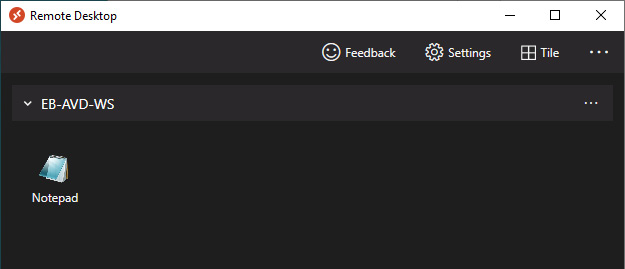
Figure 15.22 – Remote Desktop client, displaying the Notepad application we just published as a RemoteApp
This concludes the steps to deploy a RemoteApp. In this section, we looked at the steps required to deploy a RemoteApp. We'll now look at how to implement and manage OneDrive for Business for a multi-session environment.
Implementing and managing OneDrive for Business for a multi-session environment
In this section, we will look at OneDrive for Business and how to deploy for a multi-session environment. A typical OneDrive installation installs per user; this means that the OneDrive client is installed under the %localappdata% folder. When deploying OneDrive (sync app) for a multi-session/VDI environment, you need to install the per-machine installation option. This installs OneDrive under the Program Files (X86) or Program Files directory depending on the operating system architecture. The reason being, if you install per user, you will need to run the OneDrive setup for each user on the session host, which causes issues.
Important Note
To ensure that you can apply sync app updates, you need to ensure that computers in your environment can communicate with the following URLs: oneclient.sfx.ms and g.live.com. Make sure you don't block these URLs.
To Install OneDrive per machine, please follow these steps:
- You can download OneDrive from the Microsoft site. The following link is for version 21.150.0725.0001 (August 11, 2021): https://go.microsoft.com/fwlink/?linkid=844652.
- To deploy OneDrive per machine, use the OneDriveSetup.exe /allusers cmdlet as shown in the following screenshot:
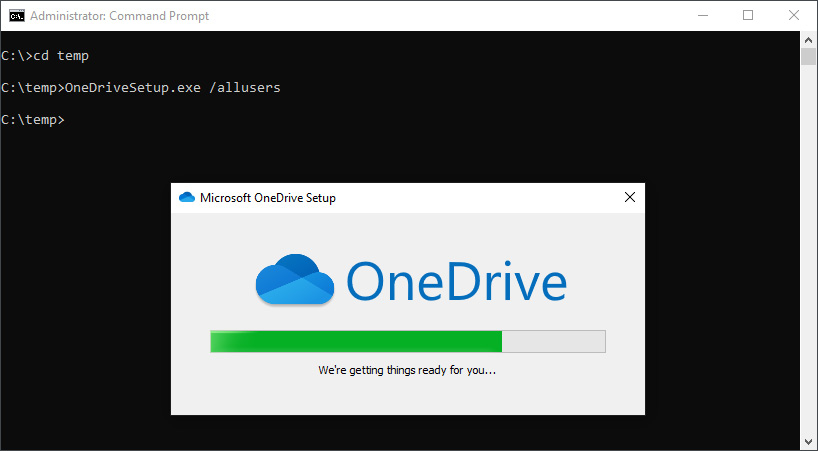
Figure 15.23 – Installation of OneDrive using the per machine option
- Once you have installed OneDrive (sync app), you should see the application within Program Files (x86) or Program Files as shown in the following screenshot:

Figure 15.24 – OneDrive program files after installing using the per machine option
Important Note
Using the images provided by Microsoft can save you a lot of time as configurations have already been done by Microsoft.
For more information on OneDrive and controlling its behavior best practice, please see the following link detailing the settings you can configure for OneDrive with Azure Virtual Desktop: https://docs.microsoft.com/en-us/onedrive/use-group-policy#manage-onedrive-using-group-policy.
In this section, we looked at how to deploy OneDrive for multi-session deployments. In the next section, we take a look at implementing and managing Microsoft Teams AV redirection.
Implementing and managing Microsoft Teams AV redirection
This section looks at the specific configurations required for Microsoft Teams AV redirection for Azure Virtual Desktop. AV redirection is essentially an optimization for Microsoft Teams. It works by enabling the Windows desktop client to handle audio and video locally for Teams calls and meetings.
You can experience high CPU usage and poor performance when the session host handles audio and video. By redirecting to the local client, you reduce the resources used on the session host virtual machine and improve the overall experience as audio and video is handled by the local client device:
- The first step is to ensure that you have installed the Teams desktop application on the session host template. This must be installed per device and not per user. If you use the images managed by Microsoft then everything is configured for you.
- You then need to add the following registry key to HKEY_LOCAL_MACHINESOFTWAREMicrosoftTeams as shown in the following table:

You can add the registry key using the following within Command Prompt run as an administrator:
reg add"HKLMSOFTWAREMicrosoftTeams" /v IsWVDEnvironment /t REG_DWORD /d 1 /f
- Install the Teams WebSocket Service on the virtual machine image. You can download it from here: https://query.prod.cms.rt.microsoft.com/cms/api/am/binary/RWFYsj. If you experience installation issues, you will need to install the latest Microsoft Visual C++ Redistributable. You can find it at this URL: https://support.microsoft.com/help/2977003/the-latest-supported-visual-c-downloads.
- Once you have installed the required components, you will need to reboot the session host image/template.
Important Note
The configuration for AV redirection is already set up for you when using an image from the gallery, specifically the Windows 10 images with Microsoft 365 Apps in the title.
The following screenshot shows the WebRTC Redirector installed:
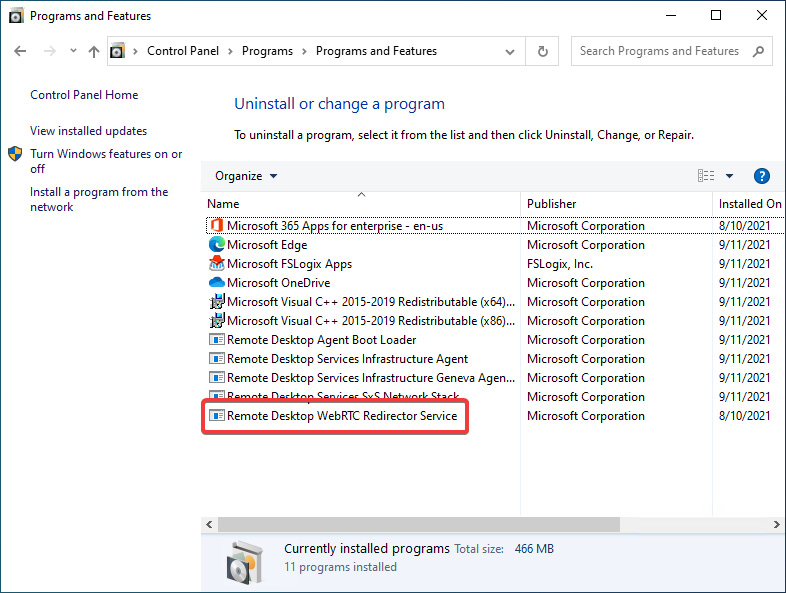
Figure 15.25 – Remote Desktop WebRTC redirector service installed on a templated image
You can also see that the required registry key has been pre-added, as shown in the following screenshot:
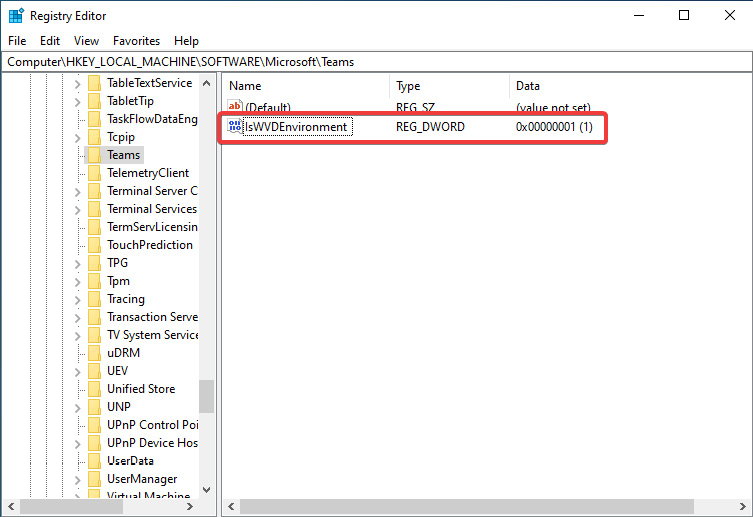
Figure 15.26 – Required registry setting included within the image template
Now that we have configured Teams AV redirection, let's look at the next steps of verifying the configuration is working.
Verifying media optimizations are loaded
We have installed the required components for AV redirection. We now need to verify that teams are configured for AVD redirection. You can check this by navigating to the Version button as shown in the following screenshot:
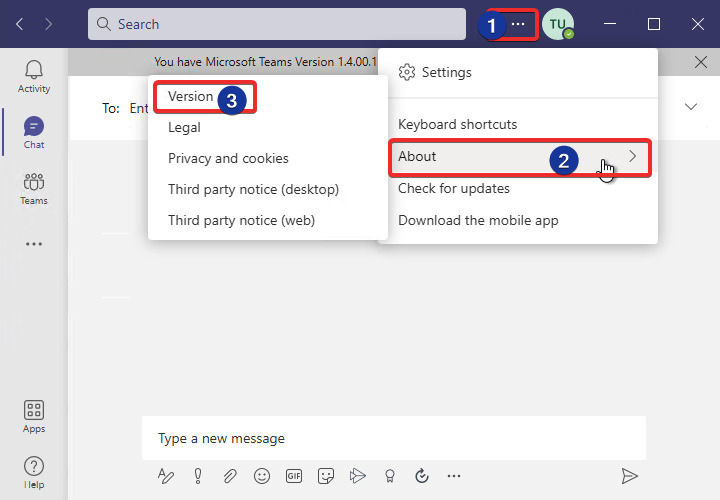
Figure 15.27 – Display the Microsoft Teams version
Once you have clicked Version as shown in the preceding screenshot, marked with the number 3, you should see the version appear as a banner within the Teams app as shown in the following screenshot:
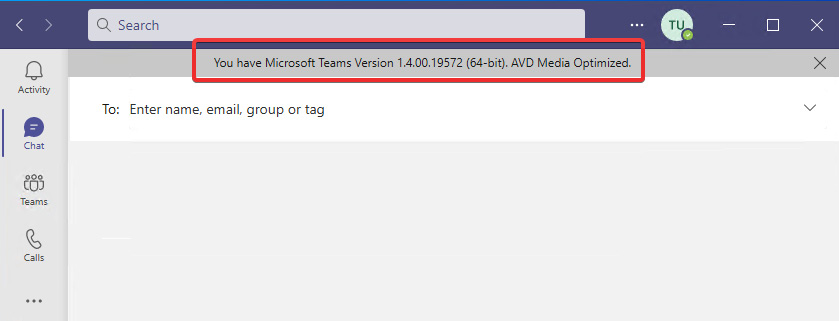
Figure 15.28 – Version output confirming AVD Media Optimized is configured
As shown in the preceding screenshot, you can see that we now have confirmed that Microsoft Teams is configured with Microsoft Teams AV redirection. The version will state AVD Media Optimized when configured correctly.
In this section, we looked at how to configure AV redirection for Microsoft Teams within Azure Virtual Desktop. This included how to check whether AV redirection is configured. In the next section, we look at multimedia redirection.
Implementing and managing multimedia redirection
In this section, we take a look at Multimedia Redirection (MMR) for Azure Virtual Desktop, which at the time of writing is in preview. MMR provides smooth video playback through the Microsoft Edge and Google Chrome web browsers. When MMR is enabled, the media element is remoted to the Remote Desktop client (local machine), reducing resource utilization, specifically the CPU on a session host. This is a feature similar to AV redirection for Microsoft Teams.
Important Note
To use MMR, you need to make sure you use the Remote Desktop client version 1.2.2222 or later. Additionally, you can check if MMR is supported as MSMmrDVCPlugin.dll should be present in the Remote Desktop client application installation path.
Getting started with MMR
In this section, we will configure MMR for use with Microsoft Edge and allow youtube.com to use MMR. You can add multiple sites or all of them if required.
You firstly need to download and install the MsMmrHostmri installer, which installs the MMR extensions for your web browser on the session host. You can download it from here: https://query.prod.cms.rt.microsoft.com/cms/api/am/binary/RWIzIk.
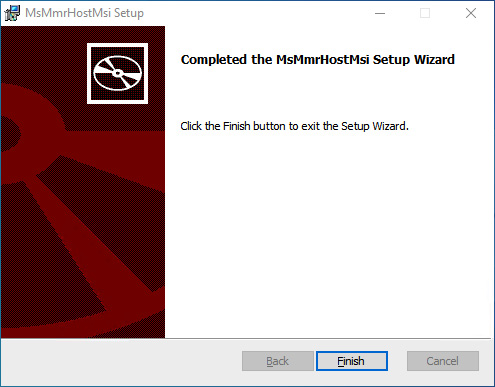
Figure 15.29 – The MsMmrhostMsi installation has been completed
Now that we have installed MSMmrHostMsi, we can proceed to the next part of this section, which looks at controlling which websites can use MMR.
Restricting which websites can use MMR
We'll now take a look at how to allow and block websites, configuring Microsoft Edge or Google Chrome for MMR. This example looks at Microsoft Edge only. You can use Group Policy for configuring MMR. Before we can do this, we need to download and install the MS Edge Group Policy administrative template: https://aka.ms/EdgeEnterpris:
- Once you've downloaded the CAB file, extract it to a suitable location on your session host such as c: emp.
- Copy the ADM and ADMX files to the PolicyDefinitions folder. If using the Group Policy Central Store, copy to the policy definition path:

Figure 15.30 – ADML files that have been copied to the PolicyDefinitions folder
- Create a new policy within Group Policy Manager | User configuration | Administrative Templates | Microsoft Edge | Extensions | Configure Extensions Management Settings.
- Set the policy as enabled and enter the following code in the Configure Extensions Management Settings policy:
{ "joeclbldhdmoijbaagobkhlpfjglcihd": { "installation_mode": "force_installed", "runtime_allowed_hosts": [ "*://*.youtube.com" ], "runtime_blocked_hosts": [ "*://*" ], "update_url": "https://edge.microsoft.com/extensionwebstorebase/v1/crx" } }
You can customize the runtime allowed/blocked hosts. In this example, we are allowing youtube.com:

Figure 15.31 – Configure extension management settings policy for Microsoft Edge
We'll now move on to look at MMR in action.
Testing MMR
When the session host has rebooted, open Microsoft Edge and you will see a Remote Desktop client icon in the menu bar, as shown in the following screenshot. Additionally, when loading an allowed/supported multimedia site, the MMR icon will show a green checkbox if configured correctly, including communicating correctly with the Remote Desktop client:
Figure 15.32 – MMR enabled on a Remote Desktop client session
The following table shows the three different icon states that will help you if you need to troubleshoot any issues:

The preceding table is taken from the Microsoft site; you can find it here: https://docs.microsoft.com/en-us/azure/virtual-desktop/multimedia-redirection#the-multimedia-redirection-status-icon.
In this section, we looked at MMR for Azure Virtual Desktop. In the next section, we move on to look at managing internet access for Azure Virtual Desktop sessions.
Managing internet access for Azure Virtual Desktop sessions
In this section, we will take a brief look at controlling internet access for Azure Virtual Desktop.
A typical way to manage access to the internet within Microsoft Azure is by using Network Security Groups (NSGs). NSGs are used to filter inbound and outbound network traffic from a virtual network subnet. You can filter traffic by IP address, port, and protocol. To restrict internet access for Azure Virtual Desktop users, you can use an NSG to block web traffic.
To block internet access, complete the following steps:
- Navigate to the session host subnet's NSG.
- Within the Settings menu located on the left-hand side within the NSG, click Outbound security rules.
- Add a new rule.
- Set Source to Any; the source port ranges should be the default *. Set Destination to Service Tag and Destination service tag to Internet. Then specify Service as HTTPS and Action as Deny. You do need to specify a priority and ensure the priority does not impact other services on the virtual network. Please note that you will need to repeat these steps for HTTP traffic to change the service to HTTP. The following screenshot shows an example:
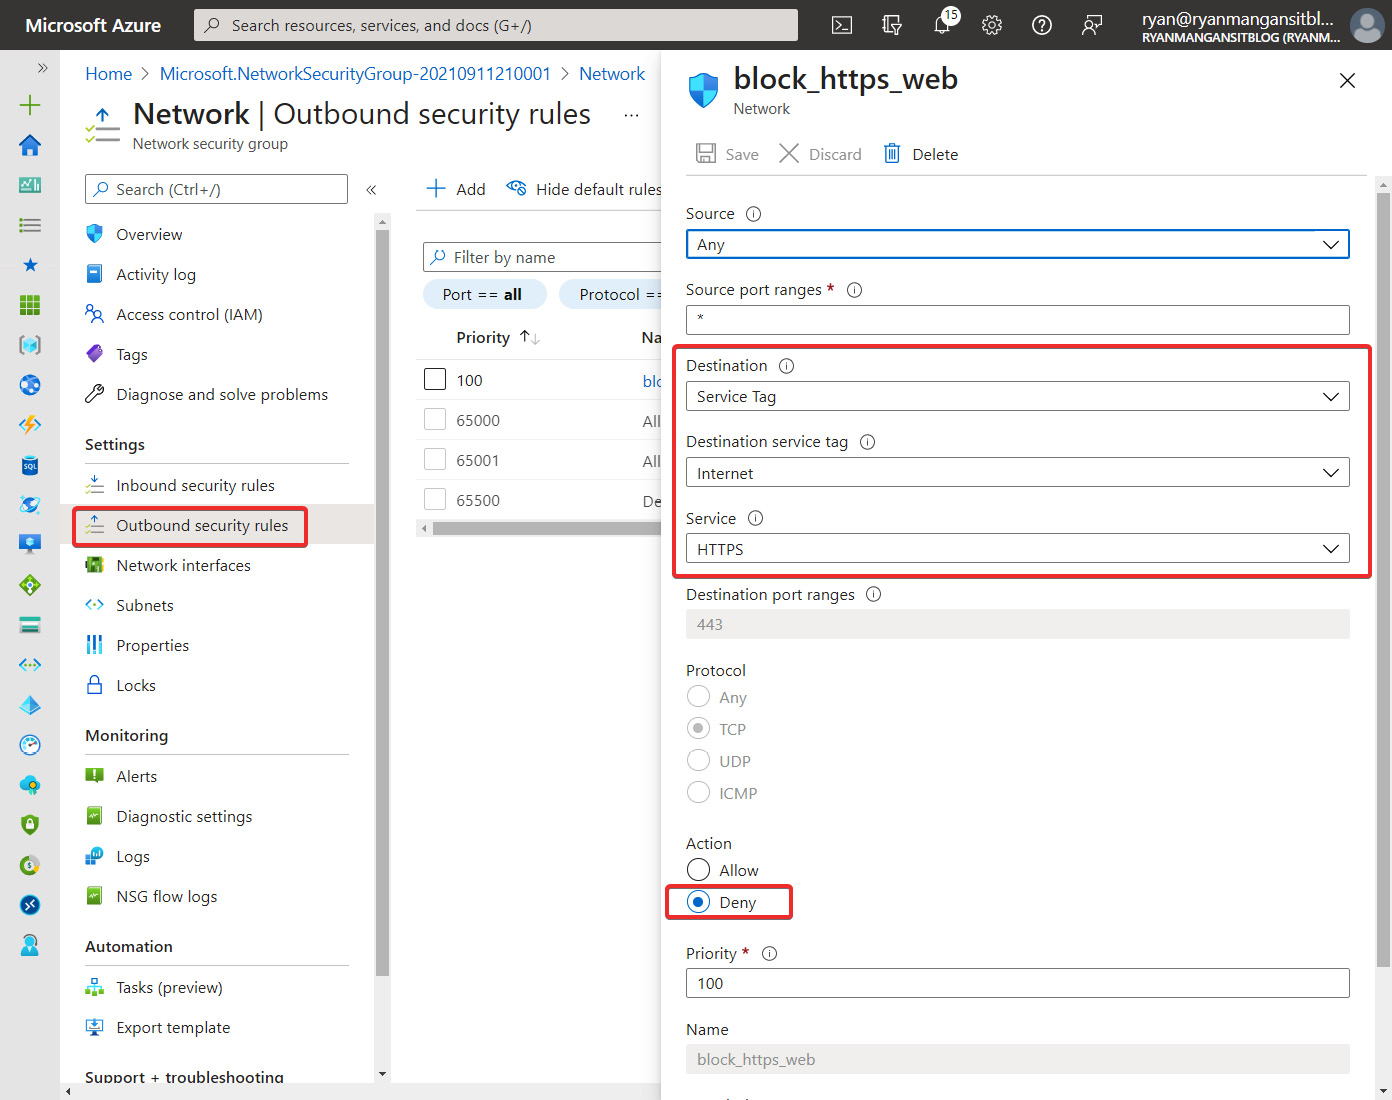
Figure 15.33 – Outbound security rules page of an NSG. What is also shown is the blade for adding a security rule to restrict HTTPS access to the internet
- Once the policy is set, you should see the message ERR_CONNECTION_TIMED_OUT when opening Microsoft Edge, as shown in the following screenshot:

Figure 15.34 – The screen after applying the security rule
Tip
For more granular control of internet access from the session host, you should look at a third-party Network Virtual Appliance (NVA) or Azure Firewall. Using an NVA offers advanced third-party features, including content filtering and specific application control policies that take effect at the perimeter.
This section took a summary look at restricting internet access to session hosts without impacting other services and granular control access to specific services using an NSG.
Summary
We started this chapter by looking at Application Masking and hiding applications from users outside the correct security groups, and other assignment options. We then moved on to take a look at the benefits of application file containers and how to redirect application files to a VHD or VHDX. Next, we looked at how to deploy and configure a RemoteApp, and in the example used, we published Notepad as a RemoteApp to the Remote Desktop client.
We then looked at deploying OneDrive for multiple sessions using per-machine installation. Next, we covered both Microsoft Team AV redirection and multimedia redirection. Finally, to finish the chapter, we looked at how to restrict session host internet access using a network security group.
I hope you found this chapter interesting and are looking forward to the next, where we take a look at planning and implementing business continuity and disaster recovery.
Questions
- What are the four app masking rules you can configure?
- Can application groups be registered to workspaces in different regions to the host pool?
- Which DLL should you check for to ensure multimedia redirection has been installed correctly?
- Which FSLogix App Masking rule would you use to separate applications using virtual disks?
Answers
- Specify Value, App Container, Redirection rule, Hiding rule
- No
- MSMmrDVCPlugin.dll
- Application file containers