
Chapter 5: Implementing and Managing Storage for Azure Virtual Desktop
In this chapter, we'll learn how to implement and manage storage for AVD. We'll create a storage account and configure Azure Files for FSLogix Profile Containers.
The following topics will be covered in this chapter:
- Configuring storage for FSLogix components
- Configuring storage accounts
- Creating file shares
- Configuring disks
Configuring storage for FSLogix components
This chapter looks at the storage options that are available for FSLogix Profile Containers when preparing and configuring AVD. We will focus on Azure Files as the storage option of choice as this is the most commonly used storage option for AVD.
FSLogix Profile container storage options
There are three common storage options available for Azure Virtual Desktop (AVD). This section provides a comparison of the options available to you.
Important Note
Microsoft recommends storing FSLogix Profile Containers in Azure Files unless there is a specific requirement not to. However, this may not meet all organization's requirements.
FSLogix is a profile solution that was acquired by Microsoft to provide Azure Virtual Desktop with roaming profiles by dynamically attaching a virtual hard disk at sign-in. The user profile that's stored on the virtual disk becomes immediately available and appears in the system like a typical user profile.
Important Note
You can use the FSLogix Profile solution outside of AVD.
The following table provides a comparison of the different storage options and features:
This table was taken from the following site: https://docs.microsoft.com/en-us/azure/virtual-desktop/store-fslogix-profile?WT.mc_id=modinfra-17152-thmaure#azure-platform-details.
As shown in the preceding table, Azure Files is the likely candidate for AVD deployments, while Azure NetApp Files offers high performance. There is also an Azure Virtual Machine (VM) option for using Storage Spaces Direct.
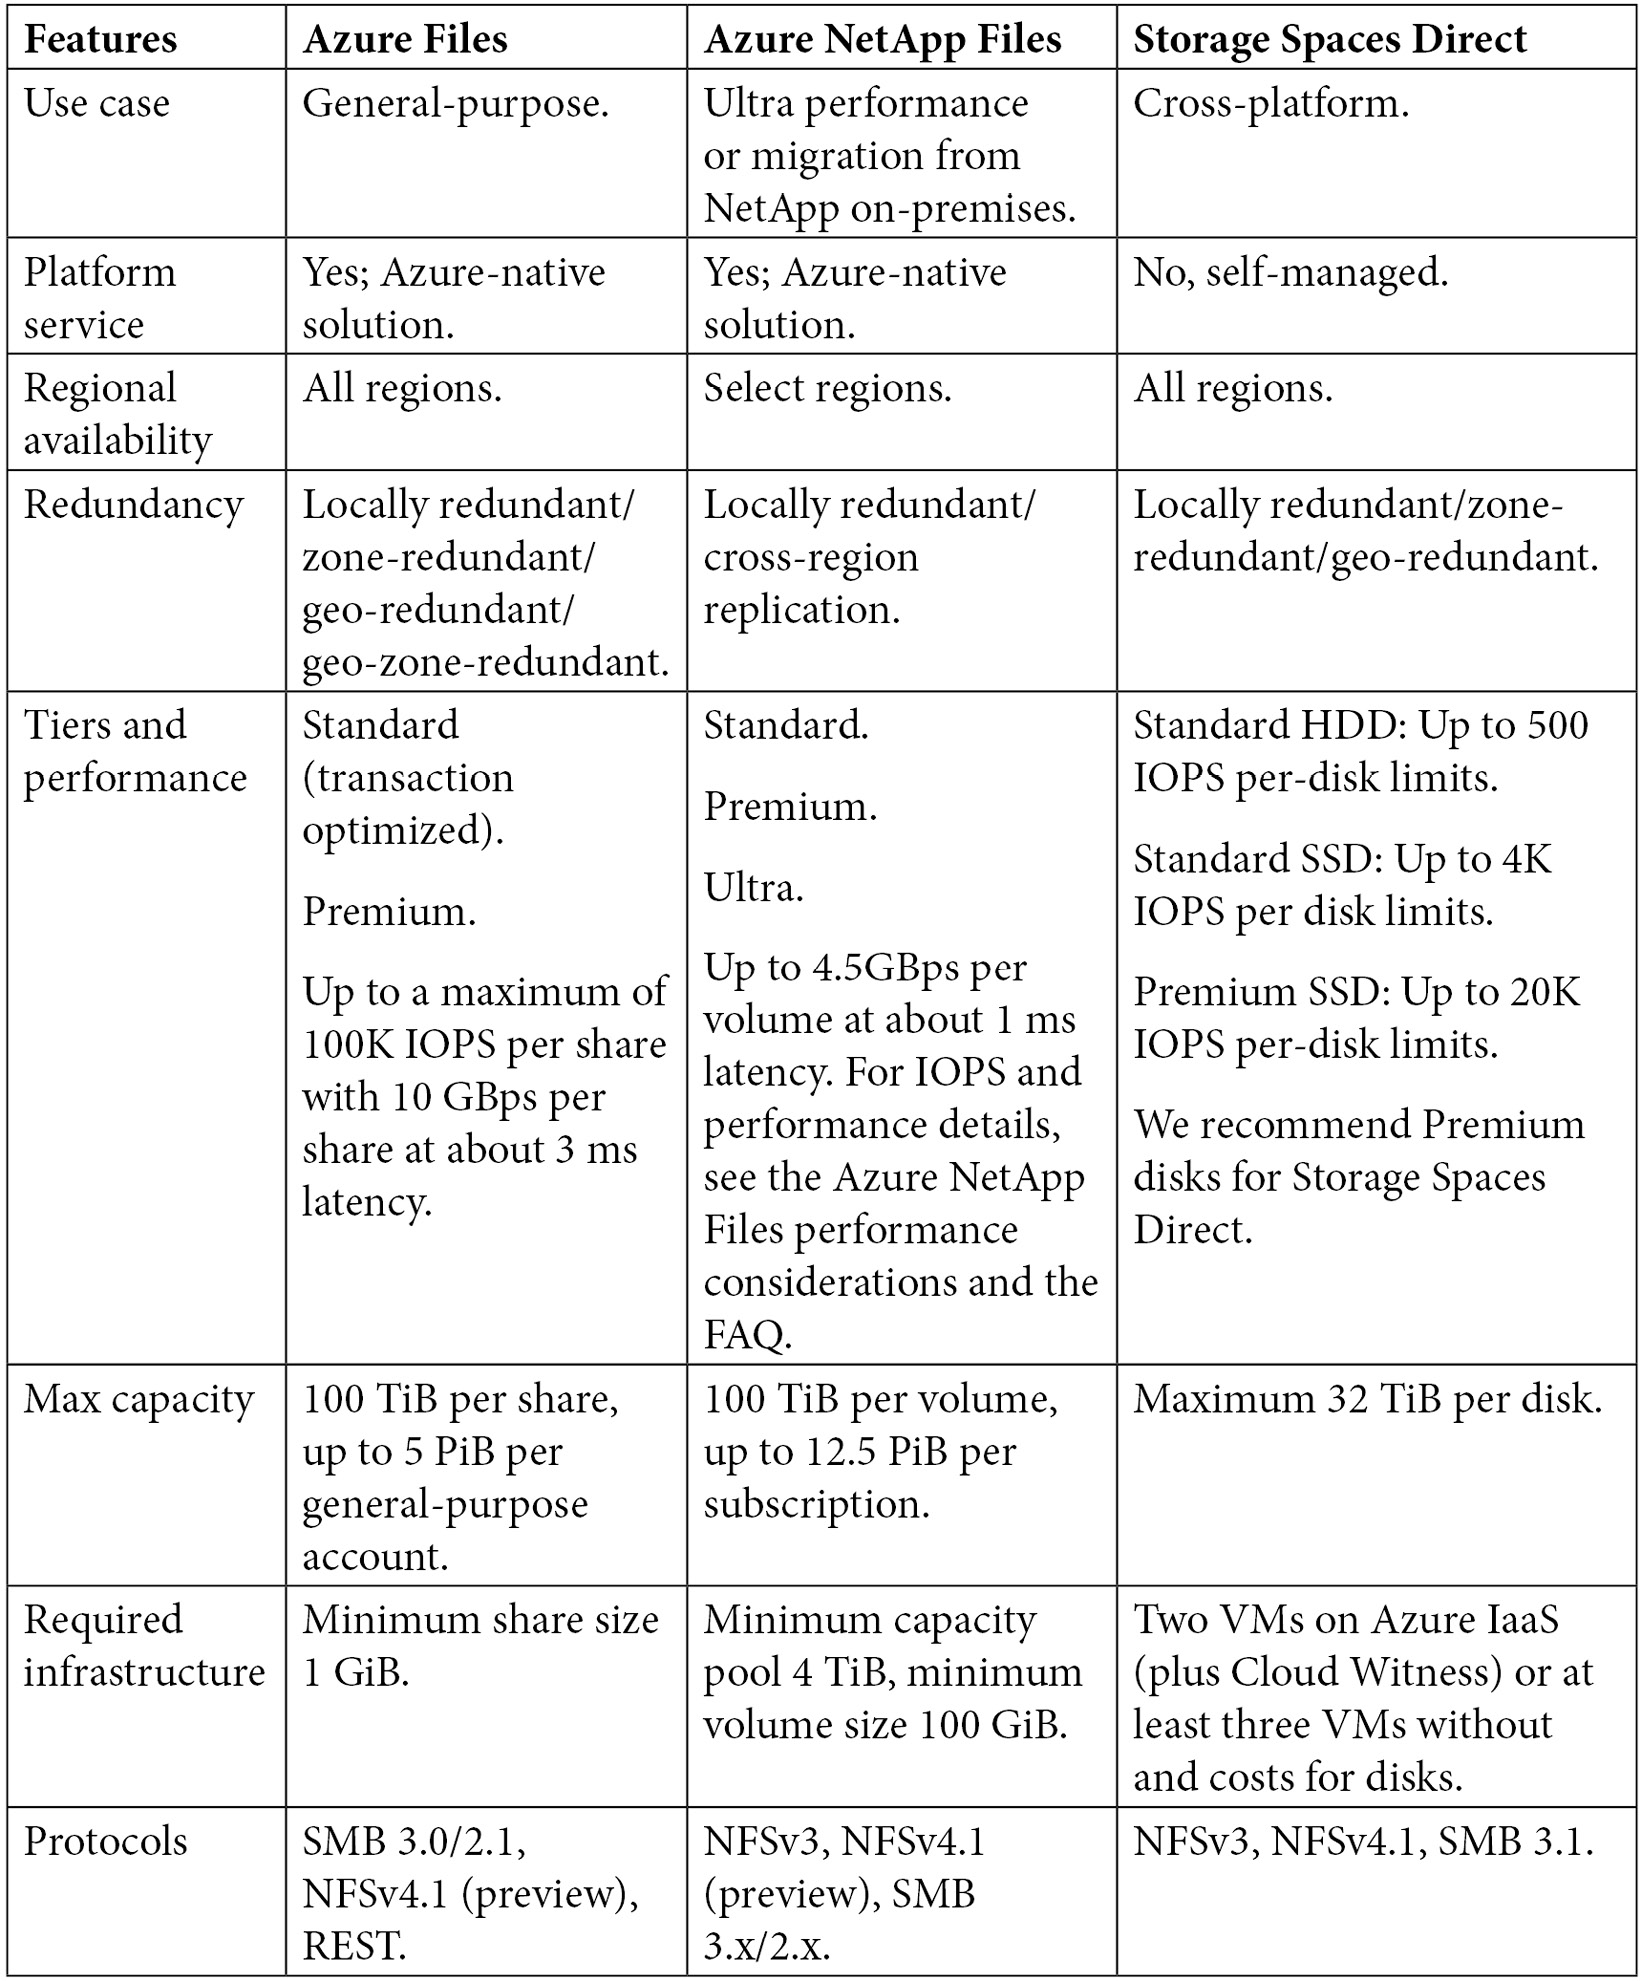
The following table details the features available for Azure Files, Azure NetApp Files, and Storage Spaces Direct:

This table was taken from the following site: https://docs.microsoft.com/en-us/azure/virtual-desktop/store-fslogix-profile?WT.mc_id=modinfra-17152-thmaure#azure-management-details.
The preceding table shows the features that are available for each service, including Azure Files, Azure NetApp Files, and Storage Spaces Direct.
This section looked at the three storage options that are available when you're planning to configure FSLogix Profile Containers. In the next section, we will look at the two different Azure Files tiers.
The different Azure Files tiers
Azure Files has two different tier types of file storage: standard and premium. The key difference between the two is performance, as premium uses solid-state drives (SSDs) and are deployed in the file storage account type. Premium file share types are helpful in larger organizations where the requirement for higher performance and low latency is required due to the number of users accessing the file share storage.
Standard file shares use hard disk drives (HDDs) and are deployed as general-purpose version 2 (GPv2) storage account types. Therefore, you should expect to use standard file shares in small environments or organizations with low I/O needs.
Important Note
Standard file shares are only available in pay-as-you-go billing models. This means that billing is based on the total storage used, whereas when you're using premium file shares storage, you pay for the configured capacity.
The following table provides examples of when you should use standard file shares versus premium file shares:

This section explored the two different Azure files storage tiers and when to use each type. The next section looks at Azure Files integration with Azure Active Directory Domain Service.
Best practices for Azure Files with AVD
The following are some of the best practices associated with Azure Files when you're configuring it for use with AVD:
- It is advised that you create your storage accounts in the same region as the session host VMs. This is to ensure that latency is kept to a minimum. This also applies to optimal performance when you're using FSLogix Profile Containers.
- It is recommended that you should be using Active Directory integrated file shares for security and that the following permissions should be set:
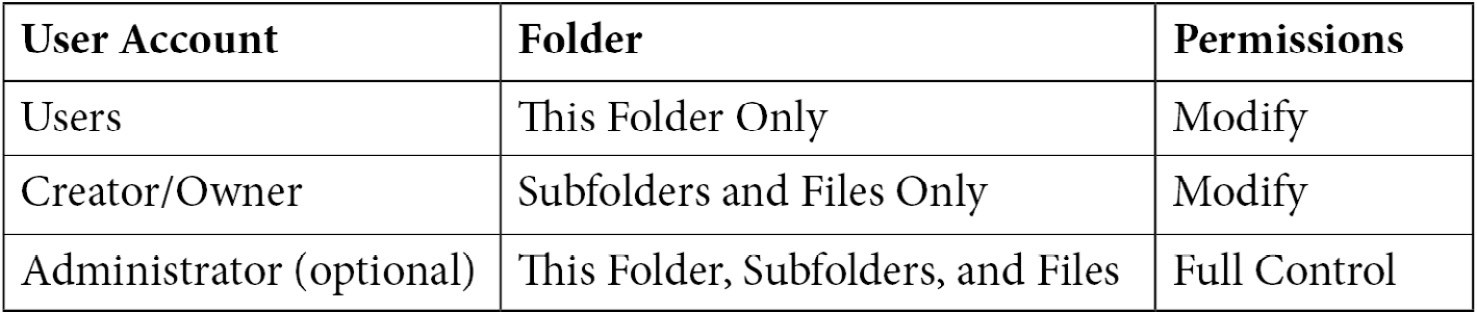
- When you're storing images in Azure Files, it is advised that you store the master image in the same region as where the VMs are being provisioned.
This section looked at the different storage options available to you, including Azure Files, Azure NetApp Files, and Storage Spaces Direct. We also looked at the different storage tiers for Azure Files, Active Directory Domain Services integration, and storage best practices when configuring FSLogix Profile Containers.
Now, let's learn how to configure a storage account.
Configure storage accounts
This section will look at creating a storage account and configuring data protection.
To create a storage account, you need to follow the stepwise procedure detailed in the following subsections.
Step 1 – create a new storage account
From the left menu within the Azure portal, select Storage accounts to display a list of your storage accounts. You can also search for storage accounts in the top search bar. This is shown in the following screenshot:

Figure 5.1 – Using the search bar to show the Storage accounts service in the Azure portal
Once on the Storage accounts page, you will see all the storage accounts and an icon to create one in the page's navigation bar. To create a new storage account, click Create:
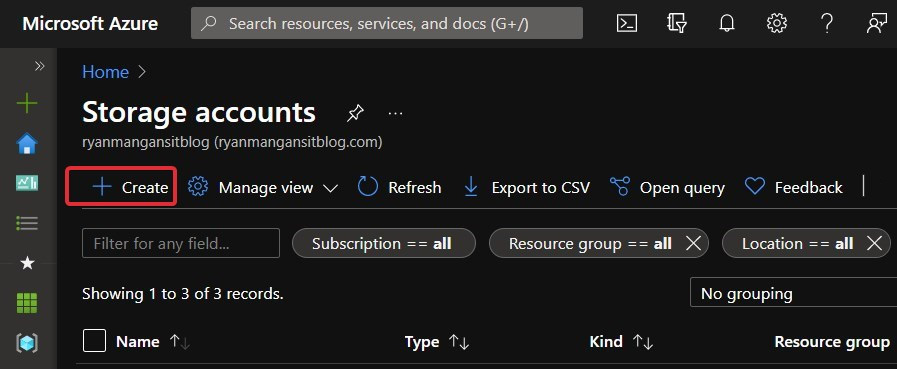
Figure 5.2 – Storage accounts
Once you have clicked Create, we can move on to the next section.
Step 2 – configure the basics
Once you have selected Storage accounts and clicked Create, you will see the basic Create a storage account page:
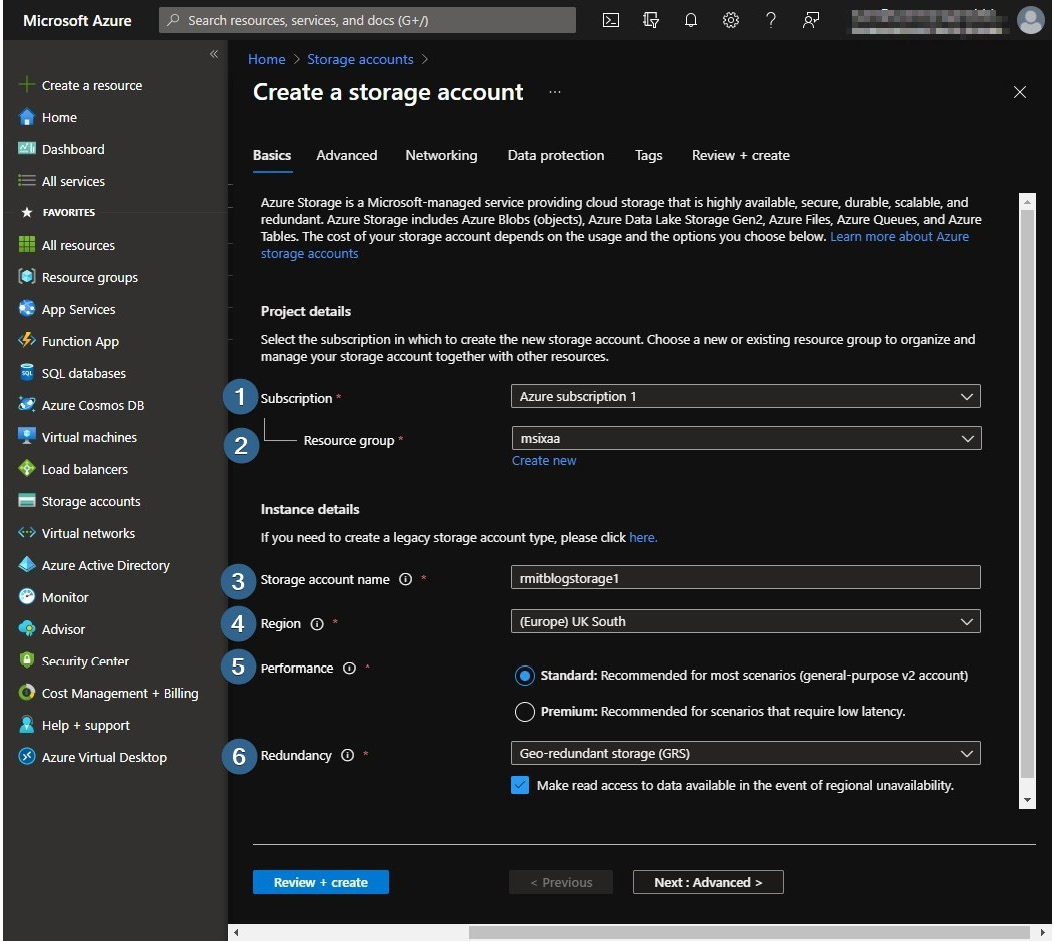
Figure 5.3 – Creating a storage account
The following table details the steps shown in the preceding screenshot. You are required to complete these steps before progressing to the Advanced tab:
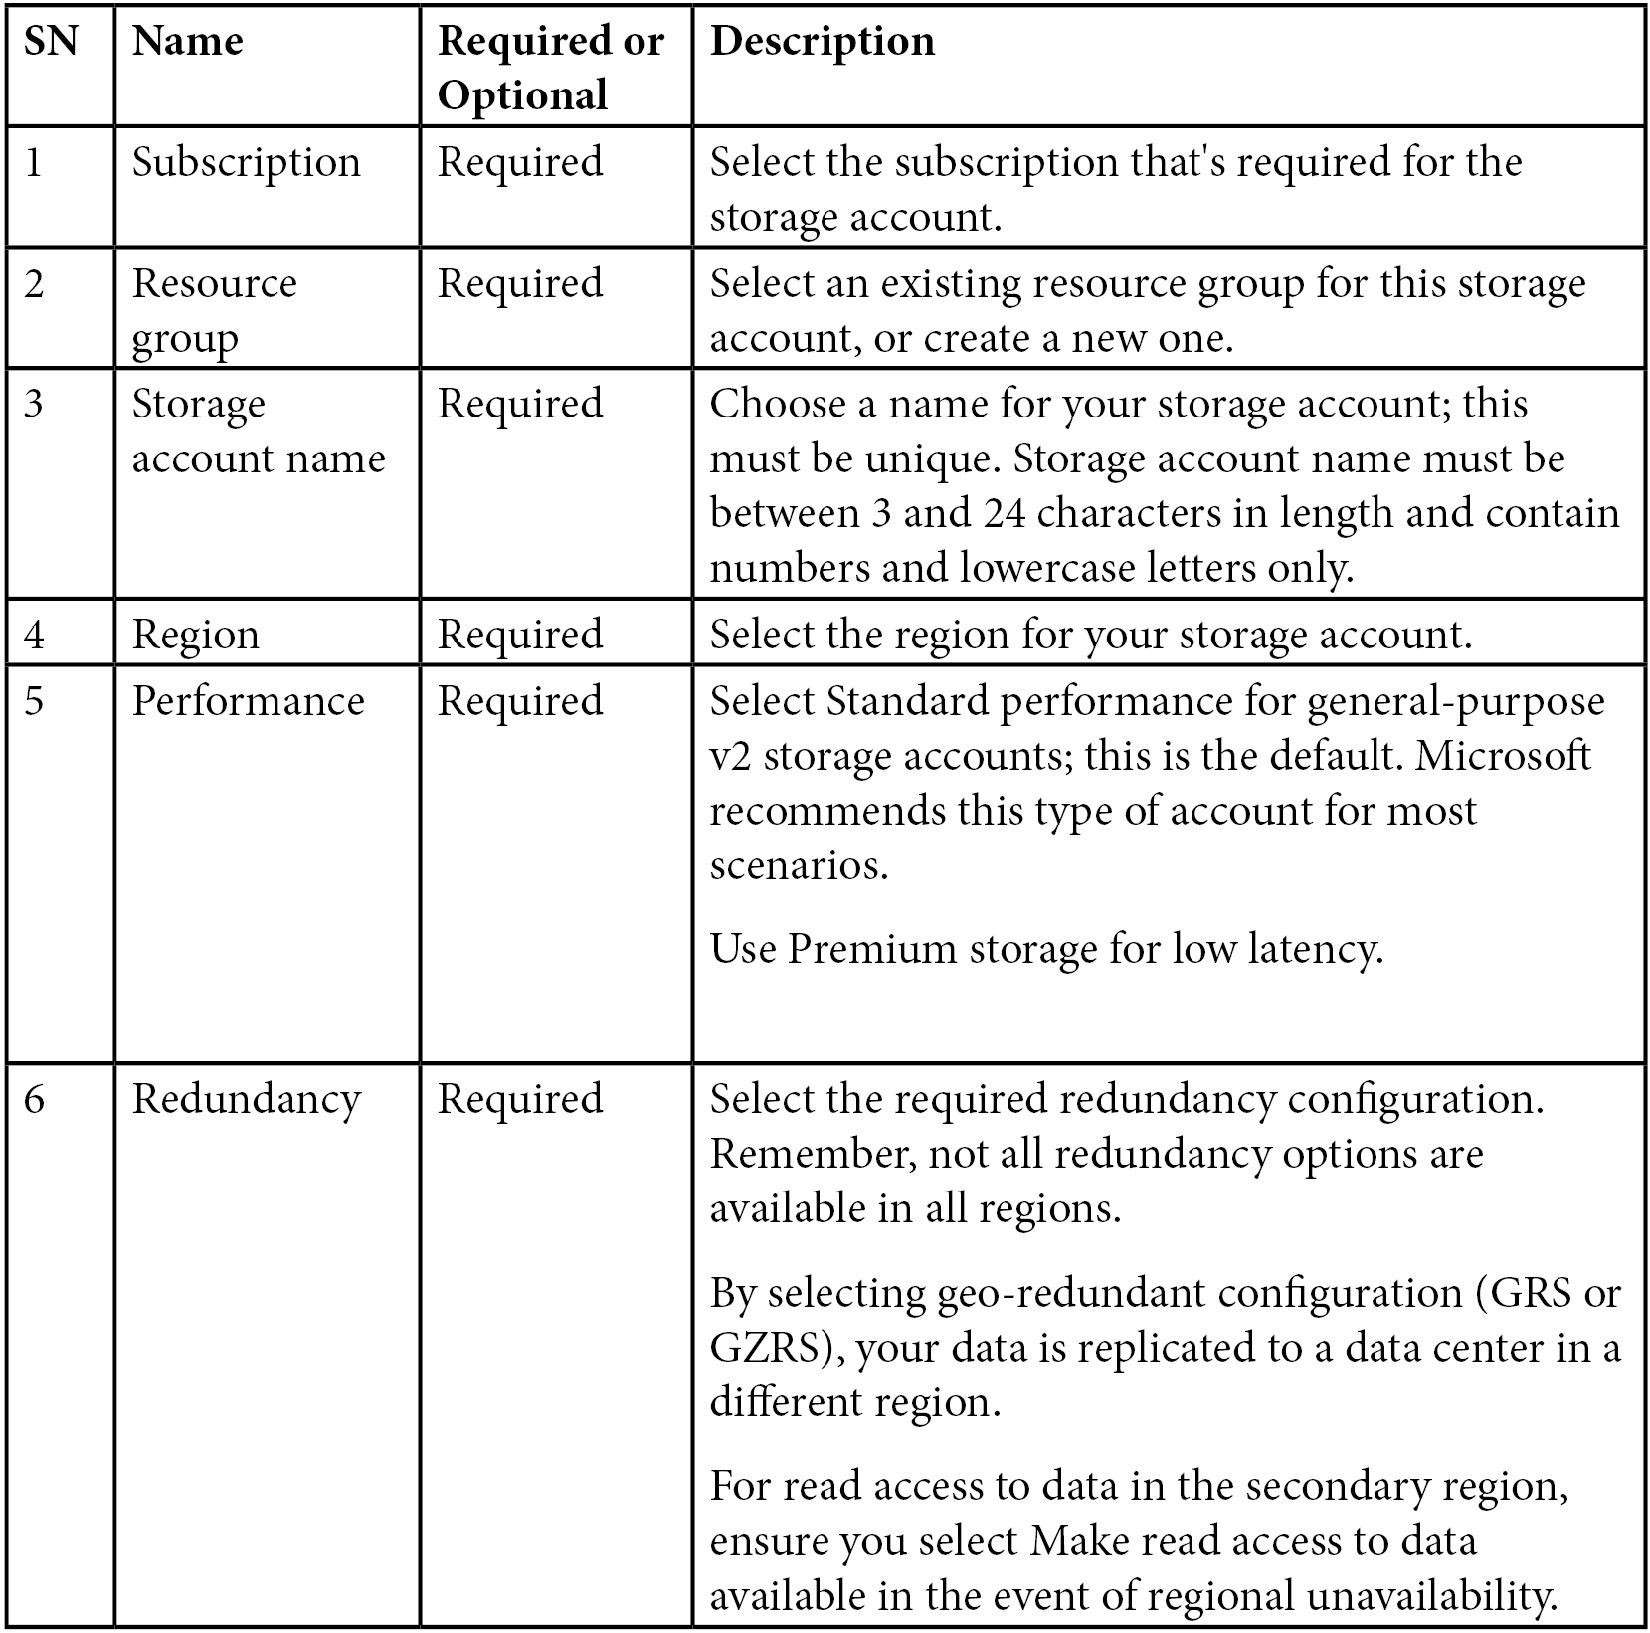
Once you have configured the Basics section of creating a new storage account, we can look at configuring advanced settings.
Important Note
Not all regions are supported for all types of storage accounts or redundancy configurations. The choice of region can also have a billing impact.
Step 3 – configure advanced settings
Once you're in the Advanced tab, you will see several security and storage configuration options. You can leave these as-is or customize them as required:

Figure 5.4 – Advanced tab – Create a storage account
The following table details the 10 configuration options. Eight are optional, while two are mandatory. These configuration settings are cross-referenced in the preceding screenshot:


Once you have chosen the required advanced settings, you can start configuring the Networking section.
Step 4 – configure networking
This step is where you configure specific network connectivity requirements, including public and private endpoints. You can also specify the required routing option:
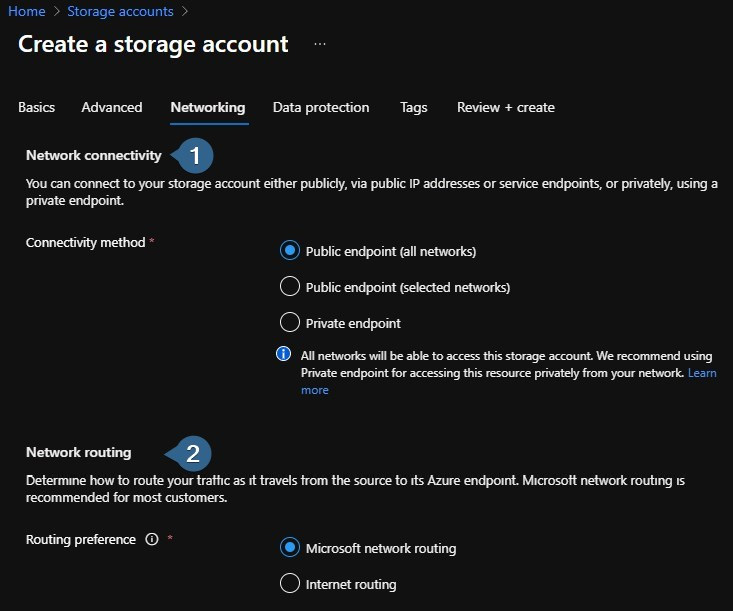
Figure 5.5 – The Networking tab
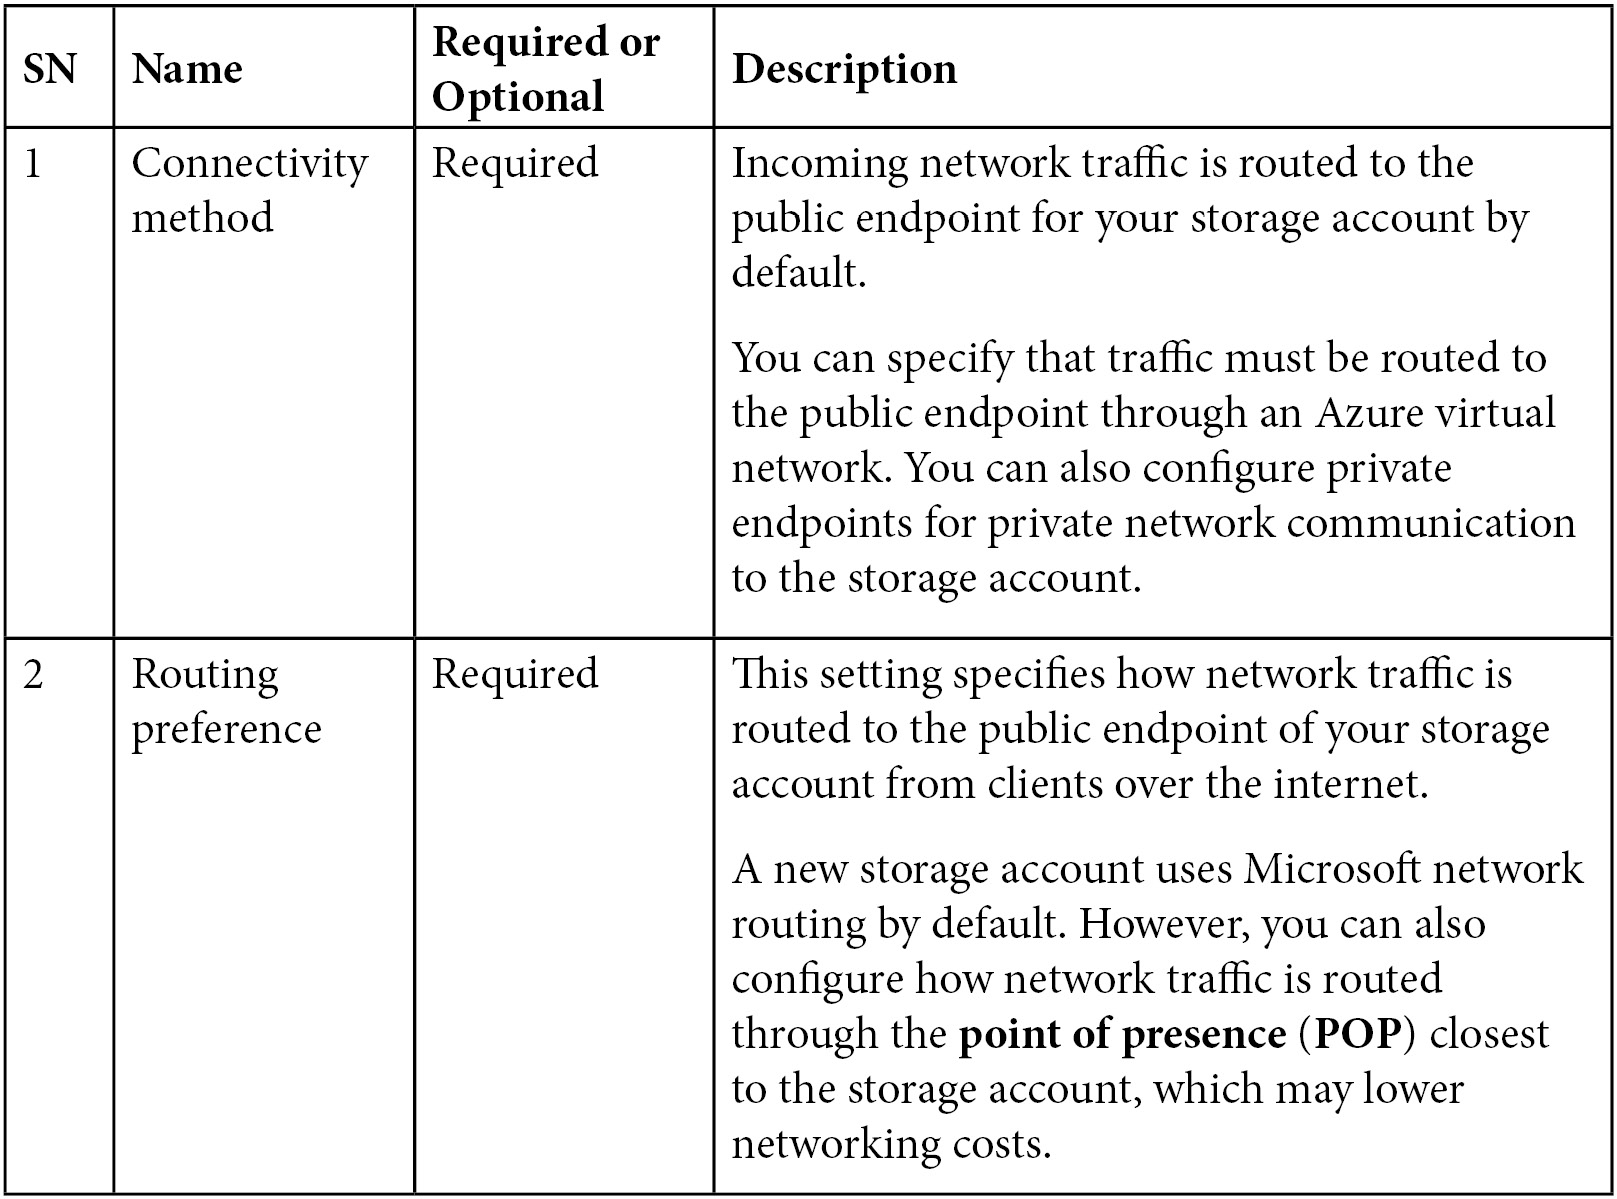
The preceding screenshot is numbered to reference the Connectivity method and Routing preference areas shown in the following table:
Now that you have configured the networking section of the Creating a storage account, we can move on to step five, where we will configure the data protection settings for the storage account.
Step 5 – configure data protection
Within this tab, you can configure the various recovery and tracking options for your storage account. The following screenshot, whose numbers are referenced in the following table, shows several options that are available to you:

Figure 5.6 – The Data protection tab
The preceding screenshot is annotated with numbers one to six; this correlates with the following table, which shows the options for configuring data protection for the new storage account:


Once you have selected the required options for data protection, you can set Tags or proceed to the Review + create tab.
Within the Review + create tab, check if all the settings are as you require, then proceed to create the storage account:
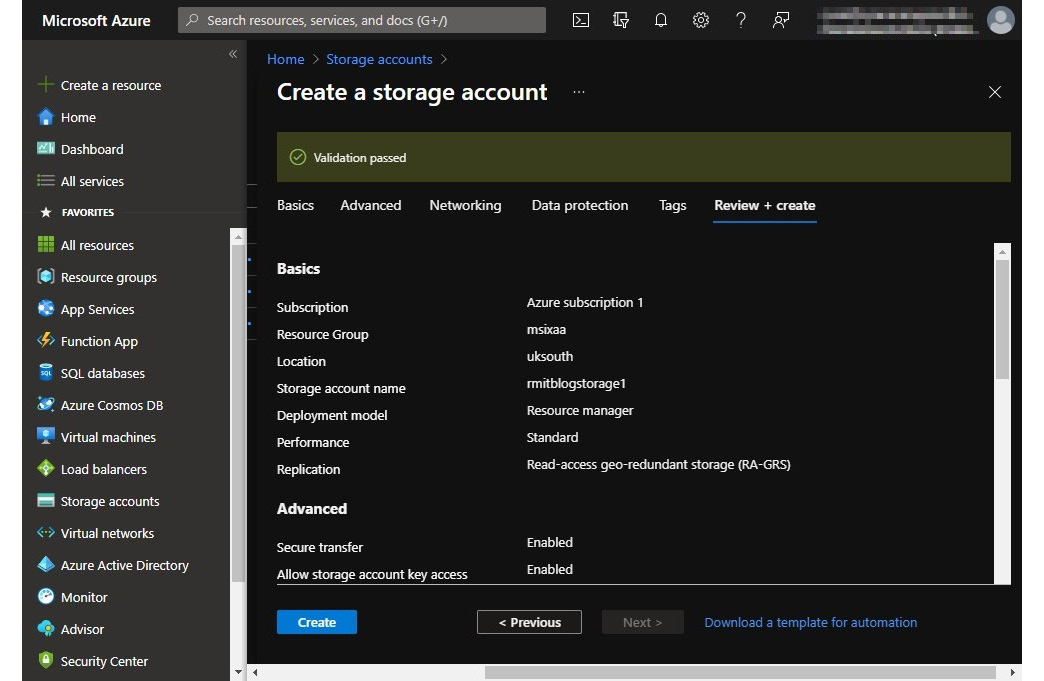
Figure 5.7 – The Review + create tab
Once the storage account has been created, you will see it appear on the Storage accounts page. In the next section, we will look at configuring an Azure file share.
Configuring file shares
Once you have created your storage account, you need to create a file share for FSLogix Profile Containers. This section will look at configuring a file share in a storage account ready for use with FSLogix.
Before we get started with Azure file shares, let's have a look at the different tiers that are available per share:
- Premium file shares use SSDs, which provide higher constant performance and lower latency than standard storage. This file share tier type is beneficial for larger shares or high I/O workload requirements.
- Transaction optimized file shares, similar to standard storage, use HDDs. This is suitable for heavy workloads but does not provide the required latency that premium file shares offer.
- Hot file shares provide storage optimized for general-purpose file sharing for items such as department shares. Hot files use HDDs.
- Cool file shares provide cost-effective storage for archive storage requirements. This type of storage tier uses HDDs.
Important Note
For larger organizations and high I/O workloads, it is recommended that you use the premium storage tier for Azure file shares.
Creating an azure file share is quite simple. You need to make sure you have created a storage account before proceeding. Within the storage account, you need to navigate to the File Shares icon within the table of contents for the storage account:
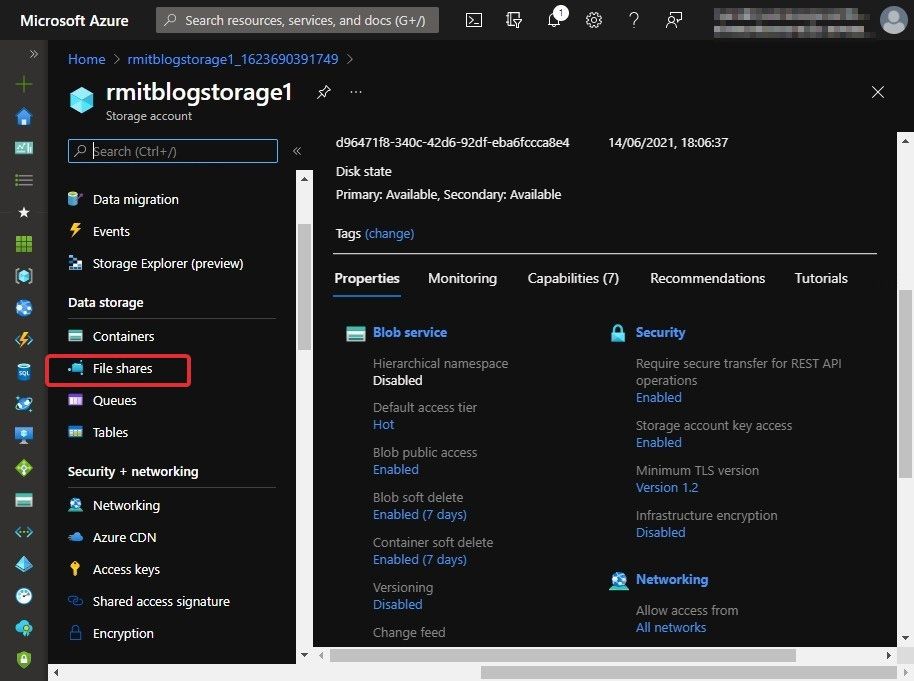
Figure 5.8 – The File shares link within the storage account
On the File shares page, click the File share button, as shown in the following screenshot:
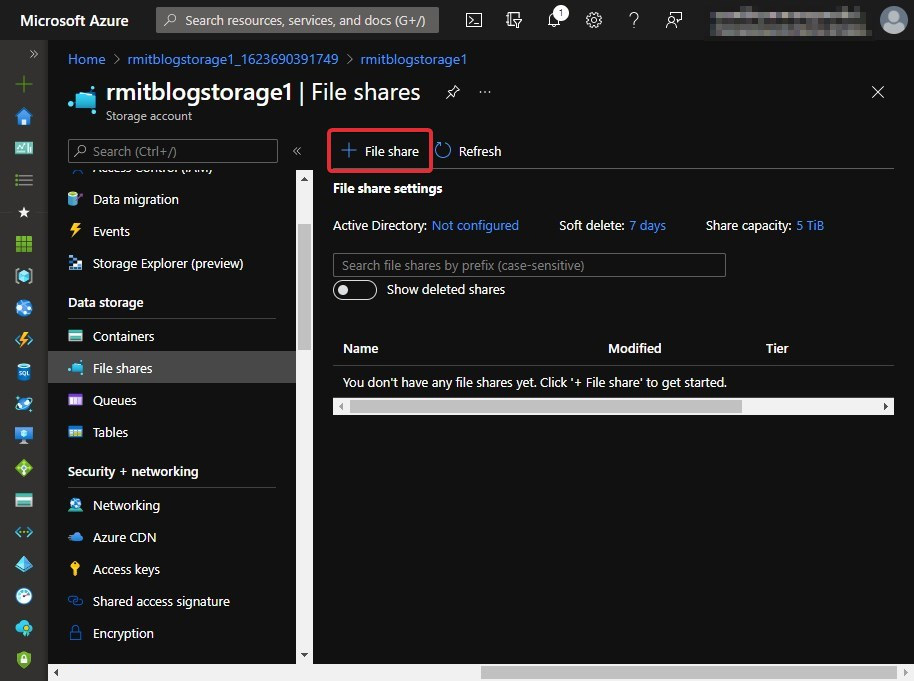
Figure 5.9 – The File share button
Once you have clicked the File share button, you will see the New file share blade appear. Fill in the following fields in this blade to create a new file share:
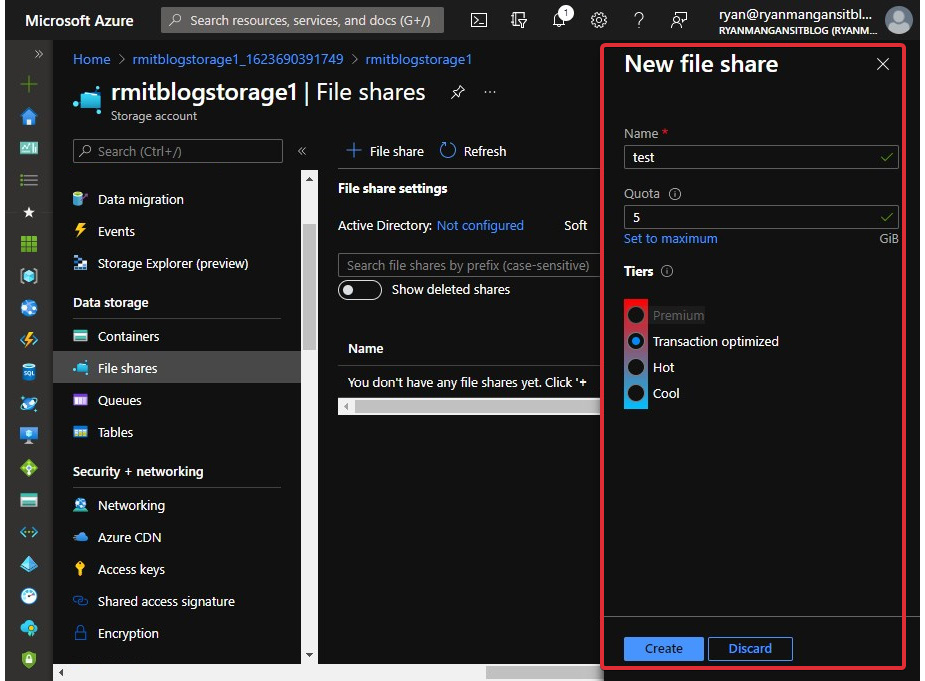
Figure 5.10 – The New file share blade
You will need to enter a Name for the share, a Quota size, and choose the tier you would like.
Once you have entered the required details, click Create to finish creating the new share:

Figure 5.11 – The newly created file share
Note that the experience within a storage account using premium storage for file storage has a slightly different UI experience, as shown in the following screenshot:
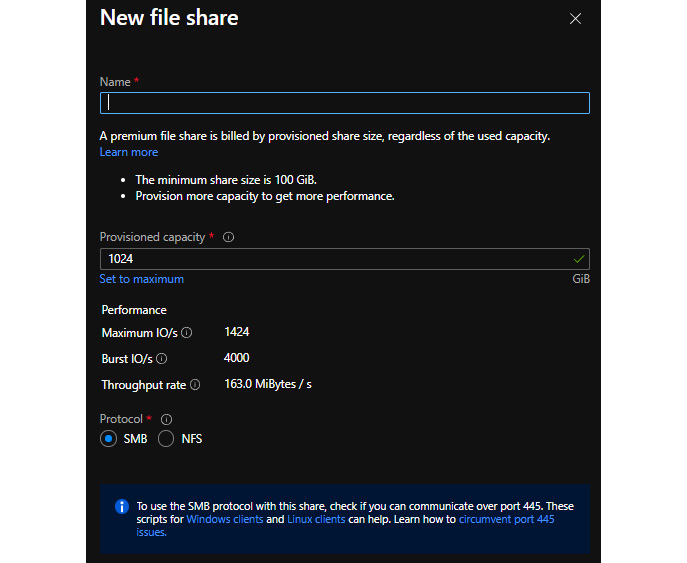
Figure 5.12 – Configuring premium file shares
This section summarized the different Azure file share storage tier options and how to create a new Azure file share. In the next section, we will look at Azure Managed Disks, ephemeral OS disks, and learn how to prepare a custom image.
Configuring disks
This section will look at Azure Managed Disks, the different available options, and how to prepare a custom VHD image.
An Azure managed disk is essentially a virtual disk (block-level storage volume) in conjunction with Azure VMs. Managed disks are designed to provide an availability of 99.999%. This is achieved by providing three replica copies of your data, which provides high durability.
The following table details the different types of managed disks that are available:

This table was taken from the following site: https://docs.microsoft.com/en-us/azure/virtual-machines/disks-types.
As shown in the preceding table, each type of disk has a specific use case. For AVD multi-session deployments, it is recommended that you use premium SSDs to avoid any IOPs bottlenecks. You can use standard SSDs for personal desktop deployments. It is not recommended to use standard HDD disks for AVD deployments as performance could be degraded:
Important Note
It is recommended that premium SSDs be used for session hosts.

This table was taken from Microsoft's documentation site: https://docs.microsoft.com/en-us/azure/virtual-machines/disks-types#premium-ssd-size.
Typically, Azure Managed Disks are locally redundant storage (LRS). This means that the storage is replicated three times within a single data center in the region where you deployed the VM.
You can also configure zone-redundant storage (ZRS) for managed disks. ZRS replicates Azure Managed Disks synchronously across three Azure availability zones within a selected Azure region. Each zone is a separate physical location with independent networking, cooling, and power.
There is no difference in latency or performance; the only improvement when using ZRS is the improved data protection.
Ephemeral OS disks
Ephemeral OS disks, also known as stateless disk storage, are created on the Azure Hypervisor's local storage as part of the VM cache. One benefit of using ephemeral disks over Azure Managed Disks is that ephemeral disks are free. This allows the stateless disk storage to provide lower latency and faster reads and writes.
The following table details the differences between Azure Managed Disks and ephemeral disks:

This table was taken from the following Microsoft site: https://docs.microsoft.com/en-us/azure/virtual-machines/ephemeral-os-disks.
Note that you cannot start and stop/deallocate an Azure VM that's been configured with an ephemeral OS disk (OS cache). The only options that are available to you are to restart or reimage.
Important Note
If you want to use ephemeral disks, you need to use a custom ARM template or third-party tooling and PowerShell.
In this section, we looked at what ephemeral disks are, the pros and cons, and the differences between Azure Managed Disks and ephemeral disks. In the next section, we will create a custom master VHD image.
Creating a VHD image
In this section, you will learn how to prepare a master virtual hard disk (VHD) image for Azure. Note that Microsoft recommends that you use an image from the Azure image gallery. However, this section covers both options, giving you the ability to customize an image offline and upload it to Azure when you're finished. You can also use Microsoft Deployment Toolkit and SCCM to create images for AVD. To upload these images, you can use the following tools:
- Azure portal: Use the upload feature within the storage account.
- Azure Storage Explorer: https://azure.microsoft.com/features/storage-explorer/
- Az copy: https://docs.microsoft.com/azure/storage/common/storage-ref-azcopy
Important Note
Ensure your image does not have the AVD agent installed on the VM. The agent can cause issues, including blocking registration and preventing user session connections.
Creating a VM
There are two options for creating a VM. First, you can provision the VM in Azure, and then customize and install the required software. Alternatively, you can create an image locally using Hyper-V and customize it to your requirements.
First, let's look at deploying a VM in Azure:
- Within the Azure search bar, type virtual; the Virtual machines page link will be shown. Click on Virtual machines:

Figure 5.13 – Search bar displaying the Virtual machines page link in the Azure portal
- Within the Virtual machines page, click Create and select Virtual Machine. This will open the Create a virtual machine page:

Figure 5.14 – Creating a VM within the Virtual machines page in the Azure portal
- Within the Create a virtual machine page, you will need to fill in all the required fields:
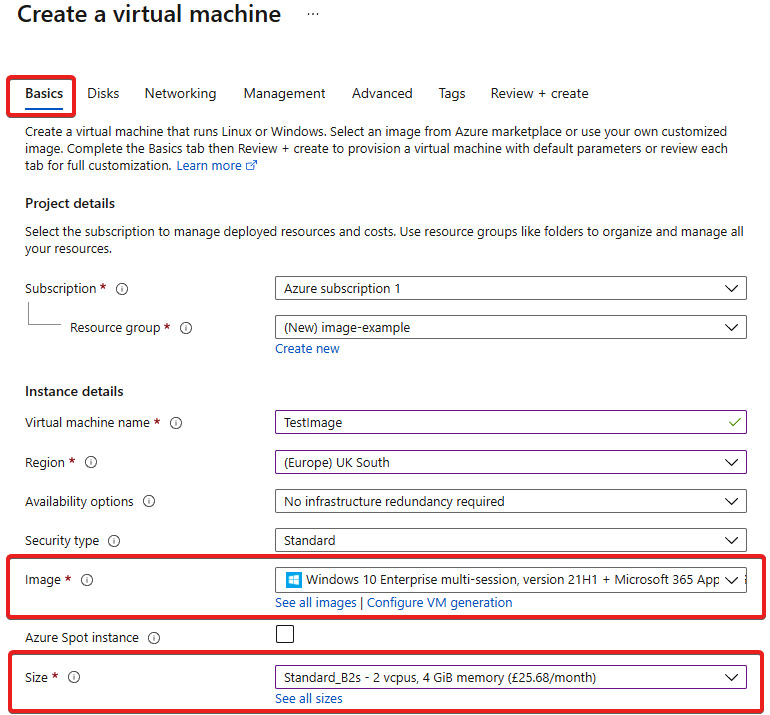
Figure 5.15 – The Basics tab within the Create a virtual machine page
- Within the same tab, provide an administrator username and password.
- Set the inbound port rules if required.
- Check the Licensing check box to confirm that you have the correct licensing rights:
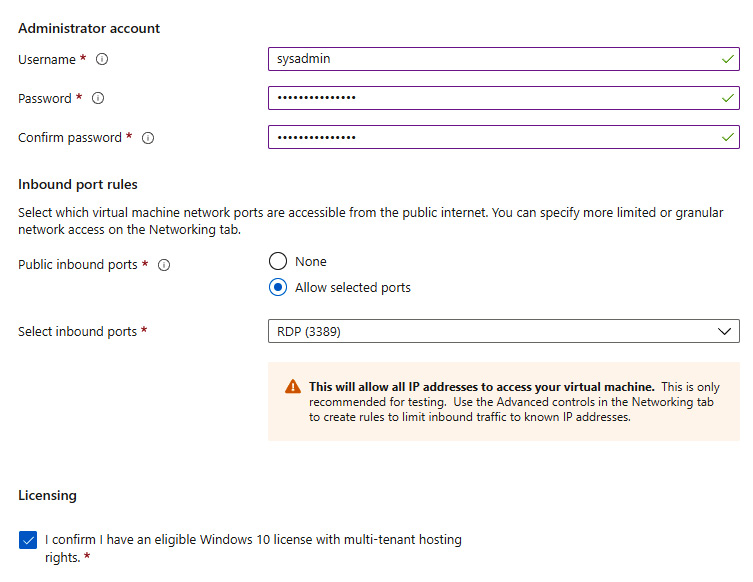
Figure 5.16 – The Administrator account section within the Basics tab of the Create a virtual machine page within the Azure portal
- On the Disks tab, select the required disk. As we mentioned previously, a premium SSD is recommended:
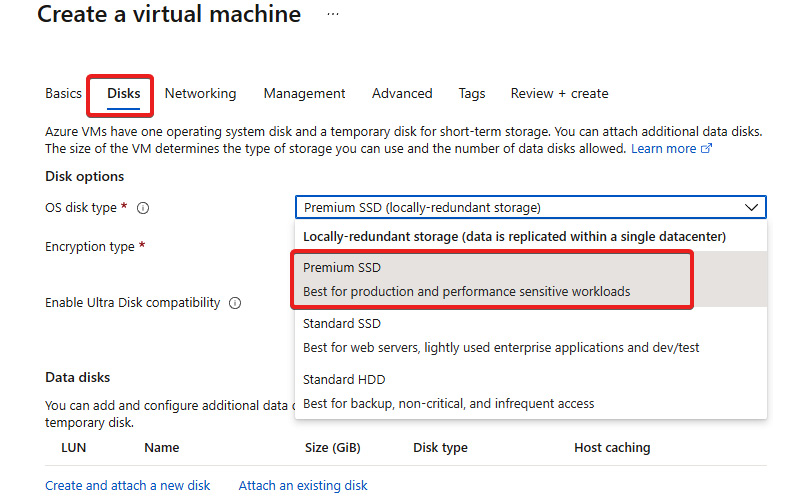
Figure 5.17 – The Disks tab within the Create a virtual machine page of the Azure portal
- Once you have finished choosing the required disk and settings within the Disks tab, click the Networking tab and configure the required networking.
- Under the Networking tab, configure the following:
- Select the required Virtual network.
- Select the required Subnet.
- Set a public VM, if required.
- Set the network security groups, if required:
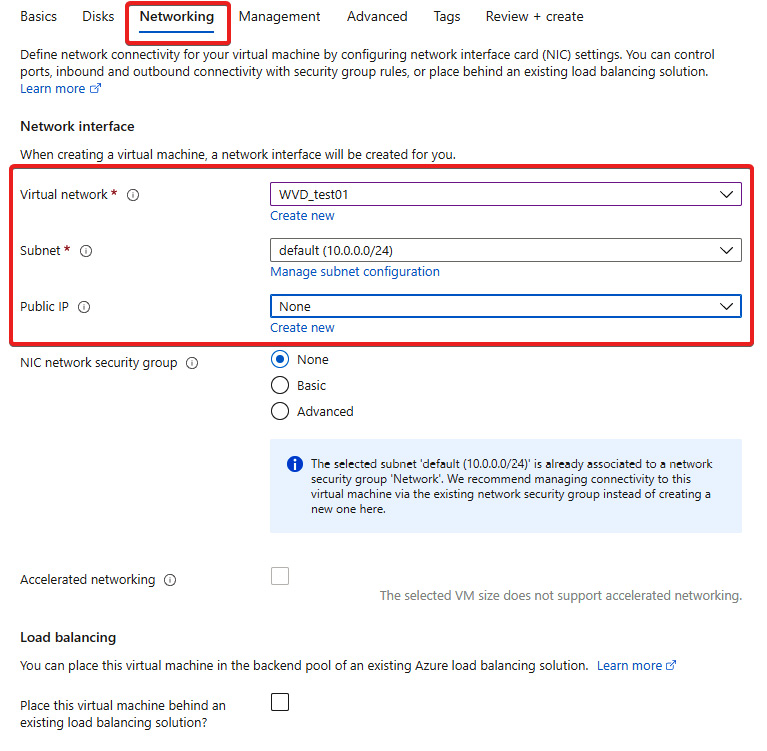
Figure 5.18 – The Networking tab within the Create a virtual machine page of the Azure portal
- If you require specific settings under the Management, Advanced, and Tags tabs, complete the required settings and progress to the Review + create tab. If you do not require specific settings under these tabs, skip to the Review + create tab:

Figure 5.19 – The Review + create tab of the Create a virtual machine page within the Azure portal
This section showed you how to deploy a VM image template for AVD in the Azure portal. Next, we will learn how to create a local image on Hyper-V.
Creating a local image
First, you will need to download the required OS image. Then, using Hyper-V, you must create a VM using the downloaded VHD. You need to ensure that you complete the following steps:
- Specify the generation as Generation 1:
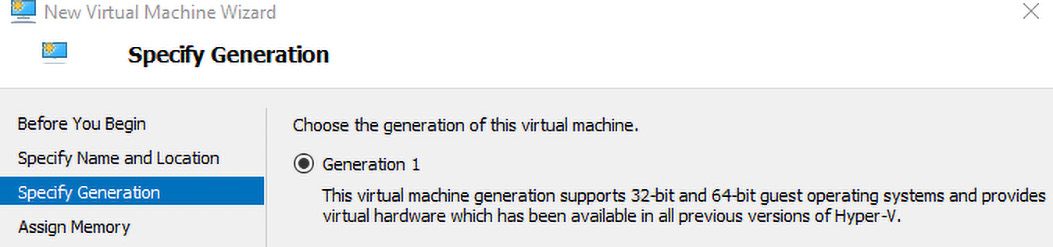
Figure 5.20 – Choosing Generation 1 in Hyper-V
- Disable the checkpoints for the VM:

Figure 5.21 – Disabling the Enable checkpoints box
The following PowerShell cmdlet allows you to disable checkpoints:
Set-VM -Name <VMNAME> -CheckpointType Disabled
Now, let's look at the difference between dynamic and fixed disks since Azure only supports the fixed disk format.
Dynamic disks versus fixed disks
When creating a VM from an existing VHD, it creates a dynamic disk by default. However, you can change this by selecting the Edit Disk… option within Hyper-V.
You can also use PowerShell to change a dynamic disk to a fixed disk, as follows:
Convert-VHD –Path c: estMY-VM.vhdx –DestinationPath c: estMY-NEW-VM.vhd -VHDType Fixed
This section detailed the options available to you when creating an image. We also covered some of the requirements for if you decide to customize an image outside of AVD using Hyper-V.
Summary
In this chapter, we looked at implementing and managing storage for AVD. First, we explored the requirements for storing FSLogix Profile Containers, storage account tiers, Azure Files storage tiers, and Azure Files integration with Active Directory Domain Services. Next, we looked at creating a new storage account and configuring Azure File Shares. Then, we reviewed the differences between Azure Managed Disks and ephemeral Operating System disks and finished by looking at the options available for creating a VM with Azure.
In the next chapter, we will look at creating and configuring host pools and session hosts.
Questions
Here are a few questions to test your understanding of this chapter:
- What is the recommended storage solution for FSLogix Profile Containers?
- Do all regions support all types of storage accounts and redundancy configurations?
- When it comes to storage accounts for larger organizations and high I/O workloads, what is the recommended storage tier?
- What is the recommended disk type for session hosts?
- What disk format does a virtual hard disk need to be to upload and function correctly within Azure?
Answers
- Azure Files
- No
- Premium tier
- Premium SSD
- Fixed disk
Further reading
Please refer to the following links for more information regarding the topics that were covered in this chapter:
- Using Azure NetApp Files for FSLogix: https://docs.microsoft.com/en-us/azure/architecture/example-scenario/wvd/windows-virtual-desktop-fslogix#storage-options-for-fslogix-profile-containers
- Settig up an Azure NetApp Files account for FSLogix: https://docs.microsoft.com/azure/virtual-desktop/create-fslogix-profile-container