
The first steps are often the hardest and we've seen lots of users struggling with the installation of their Magento environment. But once done, we're ready to continue and start some sales! Unfortunately, there's more that needs to be done before you can bring your store live to the public. This chapter will help you to learn about the settings that control Magento.
This chapter is written especially for you, if you:
- Need to take the first steps after installation: what to do next?
- Want to learn how to set up websites, stores, and storefronts in Magento
- Need to set up a solid system for calculating tax on your orders
- Want to learn what you need to do with all those different settings Magento has to offer
Before you can actually start creating products and do the first sales, there's a lot you need to understand about Magento. Flexibility is its strength, but that also means that there's a lot to learn and do before being able to do sales.
In the previous chapter, we did an empty local installation of Magento, as well as an online installation using Installatron. For that second install, we've chosen to install Magento's example data as well. Depending on the steps you've taken, your store might currently be filled or completely empty. In the following screenshot you can see both scenarios:

Don't worry too much if your store looks like the one on the left. Having the sample data available is convenient, but remember that you must find out where everything is located and replace or delete it before you'll be able to bring your store live. An empty store works just as well, because in that case you only have to concentrate on what you need to add. During the next few chapters, we'll be working from our local, empty Magento installation.
What we didn't do yet, is to take a look at the Magento Admin panel, from which you will configure and maintain your online store. Let's do that first. If you're on a local installation please browse to:
http://www.localhost.com/magento/admin
Or, when you installed the software at a provider go to:
http://www.yourdomain.com/admin
Please note that the exact path depends on the settings you used during installation. Our demo store installed using Installatron can for instance be found at:
http://www.boostingecommerce.com/test/admin
If the URL you used is correct, you should see the Magento login screen as follows:
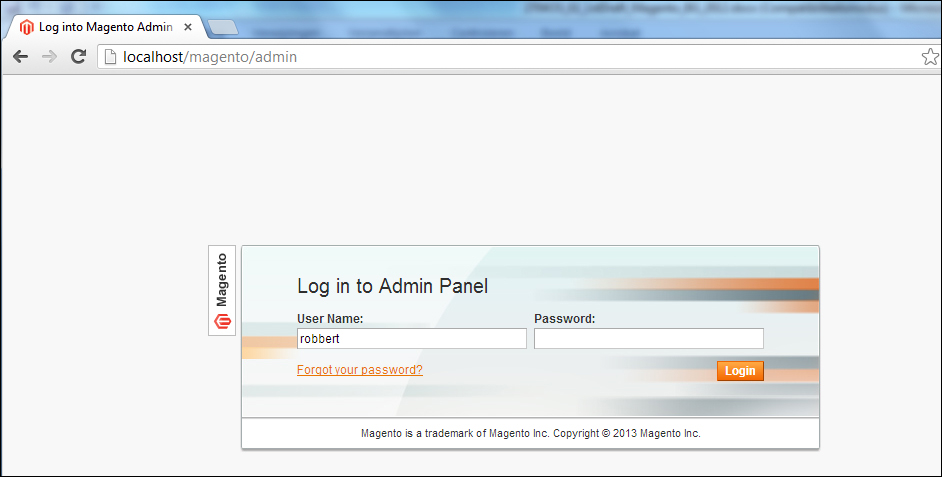
Use the user name and password you created during installation and log in. Next, the Magento Dashboard will appear:
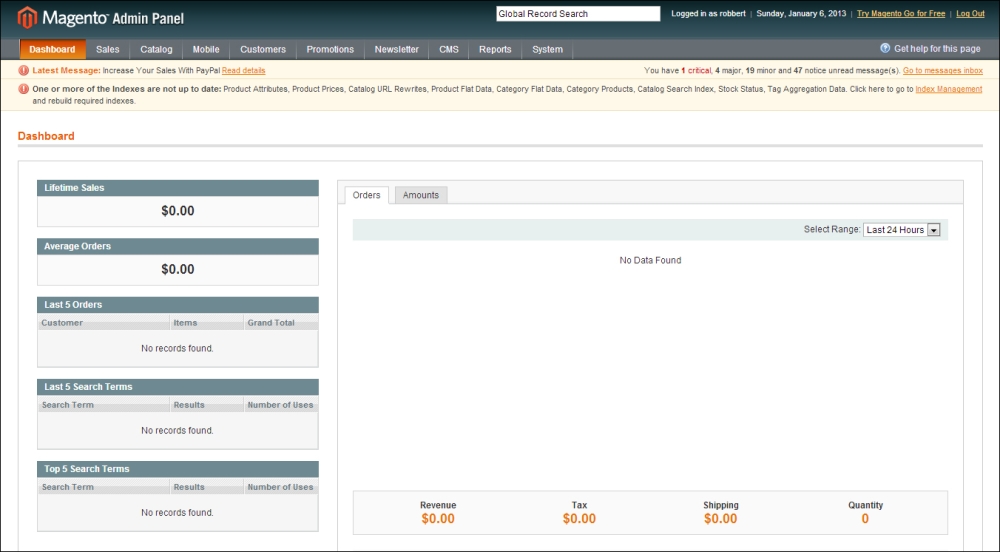
Let's have a quick look at what's available here:
- On the top there's a search form, a (commercial) link to Magento Go, and a link to Log Out.
- Underneath that you'll find the main menu, which we'll soon get to learn more about.
- Next, there's space allocated for system messages. In this example, we will immediately see a warning about indexes being out of date. You do not have to worry about this now, since will touch the topics of caching and indexes later on.
- Just above that line, there's another commercial link to Paypal and a link to your inbox messages. Just go ahead and click on it to check what's in it. The messages system of Magento will warn you about important (security) updates, so it's wise to pay attention to it. Just after installation, you may assume that you're on the latest version and that all the messages shown here are obsolete already. Especially when you're planning for a production environment, it would be wise to mark the messages "as read", otherwise they'll keep on coming back. After cleaning up, click on the Dashboard link in the top left menu to return:

- Finally, the largest part of the Dashboard screen has been taken by sales statistics. Since we are working on our empty local installation everything is still zero at this moment.
Remember that the Magento admin panel is currently accessible through http://www.localhost.com/magento/admin or http://www.yourdomain.com/admin, using your own domain name. But there's a downside to this. Having the Magento admin panel reachable in the same way for all Magento stores on the web is a security risk. Hackers will know where to find your admin panel and that's one of the first steps to get access. So, it's better to change this path. Doing so requires some additional, and more difficult steps.
You can find some good instructions using the following link:
http://blog.chapagain.com.np/magento-how-to-change-admin-url-path/
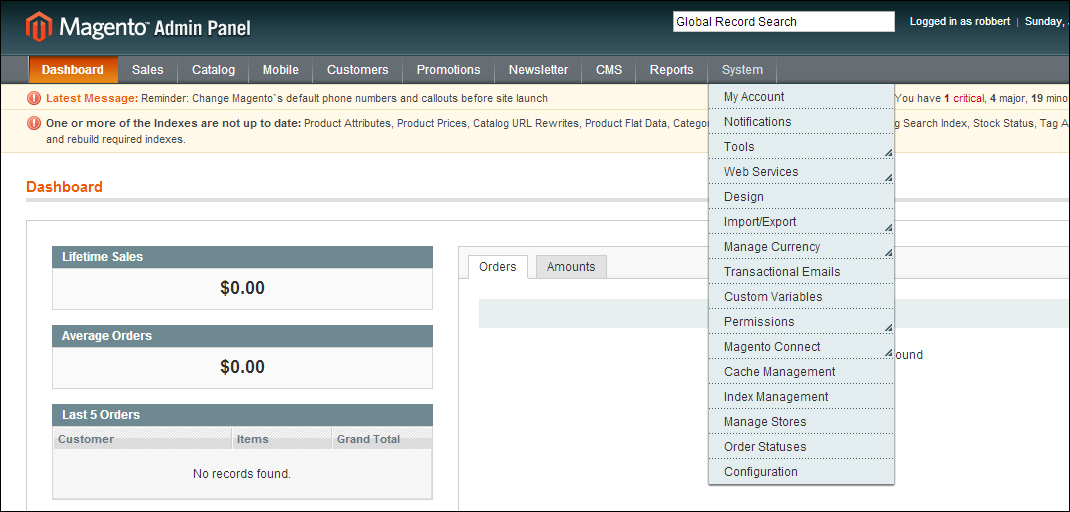
The System menu, in the top-right corner, will give you almost everything you need to configure your online store. Almost everything, because some settings, such as taxes for instance, will be set up somewhere else. More about taxes later on in this chapter, but let's first have a look at what the System menu has to offer:
|
System Menu item |
What you will need it for |
|---|---|
|
My Account |
A simple screen holding your login details, e-mail address, and password. |
|
Notifications |
The messages screen we already visited above. |
|
Tools |
Holds a tool to create and manage backups of your store. We will cover more on maintaining your store later in Chapter 11, Maintaining and Administrating Your Store. Keep in mind that making backup copies of your store is essential! There's also a tool for compiling Magento, to increase performance, but using it during the set up and development of your store isn't useful. |
|
Web Services |
These are tools to let your store interact with other systems. Using these requires a deeper technical knowledge and is beyond the scope of this book. |
|
Design |
Holds a tool to add temporary design changes to your store. This could be used to display banners during a certain period, but normally you would handle that kind of things in a different way. We will cover more on using designs for your store in Chapter 9, Customizing Your Store's Appearance. |
|
Import/Export |
These are tools to export data from Magento to another solution, or to import data from other sources. This could be used to import a customer- or item-database for instance. This requires some technical knowledge to make use of it. |
|
Manage Currency |
This tool can be used to maintain currency rates. It could be important if you want to offer automatic currency calculations. You'll often see that you will prefer manual price changes, even if you're working with multiple currencies. That is caused by the fact that automatic currency changes would result in prices like $14.91 instead of $14.95 or simply $15. But, it is possible to use and maintain this table manually as well as automatically. |
|
Transactional Emails |
This is an important area, because in here you'll be able to control the contents of the automatic messages that Magento will send to your customers. More on Transactional Emails can be found in Chapter 9, Customizing Your Store's Appearance. |
|
Custom Variables |
These can be used in your Transactional Emails. By defining some custom HTML code here, you'll be able to simply call that piece of code from within your e-mails. This is especially helpful to make sure that you do not have to change every single e-mail template if only one item, (such as a banner for instance) is to be changed. Custom variables can also be used on content pages. |
|
Permissions |
This gives you the possibility to define users and their roles in order to make sure that employees can only access the parts they need. This is helpful in larger companies, when you're working with multiple people on the same store. |
|
Magento Connect |
In here you'll be able to add extensions to increase the functionality of Magento. Working with extensions through Magento Connect is really great, but you have to be careful as well. We'll cover this part in depth in Chapter 11, Maintaining and Administrating Your Store. |
|
Cache Management |
Caching is important to keep Magento running at a reasonable speed. In this area, you can refresh your caches. This is often helpful when you're in the process of setting up your store or making changes to it. For now just remember that if you make changes to your store that are not visible to the visitor, please go here to refresh the cache. |
|
Index Management |
The same is applicable to (database) indexes, as they make sure that the information being retrieved from your database is found quickly. Every now and then you need to refresh the indexes of your database. |
|
Manage Stores |
An important area if you want to run multiple online stores. More on this topic in the next section. |
|
Order Statuses |
A table holding the different statuses an order could have. Normally you do not need to touch it. |
|
Configuration |
This is where the action is. In this menu item, there are lots and lots of settings that control your store. The most important ones will be discussed during the remaining part of this chapter. |