
Chapter 15: Reducing Deployment Downtime
So far in this book, we have discussed DevOps practices such as Infrastructure as Code (IaC), continuous integration/continuous deployment (CI/CD) pipelines, and the automation of different types of tests.
In Chapter 1, The DevOps Culture and Infrastructure as Code Practices, we saw that these DevOps practices will improve the quality of applications and thus improve the financial gain of a company. We will now go deeper into DevOps practices by looking at how to ensure the continuous availability of your applications even during your deployments, and how to deliver new versions of these applications more frequently in production.
Often, what we see is that deployments require your applications to be interrupted by—for example—infrastructure changes or service shutdowns. Moreover, what we also see is that companies are still reluctant to deliver more frequently in production. They are not equipped to test the application in the production environment, or they are waiting for other dependencies.
In this chapter, we will look at several practices that will help you improve application delivery processes. We'll start with a way to reduce the downtime of your infrastructure and applications during Terraform deployments. Then, we will discuss the concept and patterns of blue-green deployment and how to configure it with some Azure resources. Finally, we will present the details of implementing a feature flag in your application, which will allow you to modify the operation of an application without having to redeploy it in production.
You will also learn how to configure Terraform code to reduce application downtime. You'll be able to configure Azure resources with blue-green deployment and implement feature flags in your applications with either an open source component or the LaunchDarkly platform.
In this chapter, we will cover the following topics:
- Reducing deployment downtime with Terraform
- Understanding blue-green deployment concepts and patterns
- Applying blue-green deployments on Azure
- Introducing feature flags
- Using an open source framework for feature flags
- Using the LaunchDarkly solution
Technical requirements
In order to understand the Terraform concepts that will be presented in this chapter, you need to have read Chapter 2, Provisioning Cloud Infrastructure with Terraform.
We will look at an example of how to implement blue-green deployment in Azure. If you don't have an Azure subscription, you can create a free Azure account here: https://azure.microsoft.com/en-gb/free/.
Then, we will look at an example of how to use feature flags in an ASP.NET Core application. To use our example, you will need to install the .NET Core software development kit (SDK), which can be downloaded from https://dotnet.microsoft.com/download.
For code editing, we used the free Visual Studio Code (VS Code) editor, which is available for download here: https://code.visualstudio.com/.
The complete source code for this chapter can be found at https://github.com/PacktPublishing/Learning-DevOps-Second-Edition/tree/main/CHAP15.
Check out the following video to see the Code in Action:
Reducing deployment downtime with Terraform
In Chapter 2, Provisioning Cloud Infrastructure with Terraform, we detailed the use of Terraform by looking at its commands and life cycle and put it into practice with an implementation in Azure.
One of the problems with Terraform is that, depending on the infrastructure changes that need to be implemented, Terraform may automatically destroy and rebuild certain resources.
To fully understand this behavior, let's look at the output of this following Terraform execution, which provisioned an Azure Web App in Azure and has been modified with a name change:

Figure 15.1 – Terraform downtime
Here, we can see that Terraform will destroy the web app and then rebuild it with the new name. Although destruction and reconstruction are done automatically, while Terraform is destroying and rebuilding the web app, the application will be inaccessible to users.
To solve this problem of downtime, we can add the Terraform create_before_destroy option, as follows:
resource "azurerm_app_service" "webapp" {
name = "MyWebAppBook1" #new name
location = "West Europe"
resource_group_name = "${azurerm_resource_group.rg-app.name}"
app_service_plan_id = "${azurerm_app_service_plan.serviceplan-app.id}"
app_settings = {
WEBSITE_RUN_FROM_PACKAGE = var.package_zip_url"
}
lifecycle { create_before_destroy = true}
}
By adding this option, Terraform will do the following:
- First, Terraform creates a new web app with a new name.
- During the provisioning of the new web app, it uses the Uniform Resource Locator (URL) for the application package in ZIP format that's provided in the app_settings property. Use WEBSITE_RUN_FROM_PACKAGE to launch the application.
- Then, Terraform will destroy the old web app.
Using the Terraform create_before_destroy option will ensure the viability of our applications during deployments.
However, be careful, as this option will only be useful if the new resource that's being created allows us to have the application running very quickly at the same time as it's provisioning so that a service interruption doesn't occur.
In our example of a web app, this worked when we used the WEBSITE_RUN_FROM_PACKAGE property of the web app. For a virtual machine (VM), we can use a VM image created by Packer. As we saw in Chapter 4, Optimizing Infrastructure Deployment with Packer, Packer contains information regarding the VM applications that have already been updated inside the VM image.
Note
For more information on the create_before_destroy option, please view the following Terraform documentation: https://www.terraform.io/language/meta-arguments/lifecycle.
We have just seen that, with Terraform and IaC, it is possible to reduce downtime during deployments in the case of resource changes.
We will now look at the concepts and patterns of a practice called blue-green deployment, which allows us to deploy and test an application in production with great confidence.
Understanding blue-green deployment concepts and patterns
Blue-green deployment is a practice that allows us to deploy a new version of an application in production without impacting the current version of the application. In this approach, the production architecture must be composed of two identical environments; one environment is known as the blue environment while the other is known as the green environment.
The element that allows routing from one environment to another is a router—that is, a load balancer.
The following diagram shows a simplified schematic of a blue-green architecture:

Figure 15.2 – Blue-green architecture
As we can see, there are two identical environments—the environment called blue, which is the current version of the application, and the environment called green, which is the new version or the next version of the application. We can also see a router, which redirects users' requests either to the blue environment or the green environment.
Now that we've introduced the principle of blue-green deployment, we will look at how to implement it in practice during deployment.
Using blue-green deployment to improve the production environment
The basic usage pattern of blue-green deployment goes like this: when we're deploying new versions of the application, the application is deployed in the blue environment (version N) and the router is configured in this environment.
When deploying the next version (version N+1), the application will be deployed in the green environment, and the router is configured in this environment.
The blue environment becomes unused and idle until the deployment of version N+2. It also will be used in the case of rapid rollback to version N.
This practice of blue-green deployment can also be declined on several patterns—that is, the canary release and dark launch patterns. Let's discuss the implementation of each of these patterns in detail. We will start with the canary release pattern.
Understanding the canary release pattern
The canary release technique is very similar to blue-green deployment. The new version of the application is deployed in the green environment, but only for a small, restricted group of users who will test the application in real production conditions.
This practice is done by configuring the router (or load balancer) to be redirected to both environments. On this router, we apply redirection restrictions of a user group so that it can only be redirected to the green environment, which contains the new version.
Here is a sample diagram of the canary release pattern:

Figure 15.3 – Blue-green canary release
In the preceding diagram, the router redirects 90% of users to the blue environment and 10% of users to the green environment, which contains the new version of the application.
Then, once the tests have been performed by this user group, the router can be fully configured in the green environment, thus leaving the blue environment free for testing the next version (N+2).
As shown in the following diagram, the router is configured to redirect all users to the green environment:
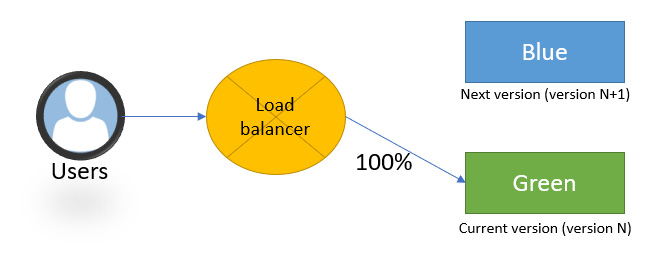
Figure 15.4 – Blue-green architecture with router
This deployment technique thus makes it possible to deploy and test the application in the real production environment without having to impact all users.
We will look at a practical implementation of this blue-green deployment pattern in Azure later in this chapter, in the Applying blue-green deployments on Azure section. But before that, let's look at another blue-green deployment pattern— the dark launch pattern.
Exploring the dark launch pattern
The dark launch pattern is another practice related to blue-green deployment that consists of deploying new features in hidden or disabled mode (so that they're inaccessible) into the production environment. Then, when we want to have access to these features in the deployed application, we can activate them as we go along without having to redeploy the application.
Unlike the canary release pattern, the dark launch pattern is not a blue-green deployment that depends on the infrastructure but is implemented in the application code. To set up the dark launch pattern, it is necessary to encapsulate the code of each feature of the application in elements called feature flags (or feature toggles), which will be used to enable or disable these features remotely.
We will look at the implementation and use of feature flags with an open source framework and a cloud platform in the last few sections of this chapter.
In this section, we have presented the practice of blue-green deployment, along with its concepts and patterns, such as the canary release and dark launch patterns. We have discussed that this practice requires changes to be made in the production infrastructure since it's composed of two instances of the infrastructure—one blue and one green—as well as a router that redirects users' requests.
Now that we've talked about blue-green deployment patterns, we will look at how to implement one in practice in an Azure cloud infrastructure.
Applying blue-green deployments on Azure
Now that we've looked at blue-green deployment, we'll look at how to apply it to an Azure infrastructure using two types of components—App Service slots and Azure Traffic Manager.
Let's start by looking at the most basic component—App Service slots.
Using App Service with slots
If we have an Azure subscription and want to use blue-green deployment without investing a lot of effort, we can use App Service slots (Azure Web Apps or Azure Functions).
In Azure App Services such as a Web App, we can create a second instance of our Web App by creating a slot for it (up to 20 slots, depending on the App Service plan). This slot is a secondary web app but is attached to our main web app.
In other words, the main web app represents the blue environment, and the slot represents the green environment.
To use this web app and its slot as a blue-green architecture, we will perform the following configuration steps:
- Once the web app slot has been created, the new version of the application will be deployed in this slot and we can assign a percentage of traffic, as shown in the following screenshot:

Figure 15.5 – Azure deployment slots
Here, we've assigned 10% of traffic to the web app slot, which includes changes to the new version of the application.
- As soon as the new version of the application has been tested on the slot, we can swap the slot to the main web app (the blue environment), as shown in the following screenshot:

Figure 15.6 – Azure swap slots
With this swap, the web app takes the content of its slot, and vice versa.
The web app now contains the new version (N+1) of the application, and the slot contains the older version (N). In case there is an urgent problem, we can recover the previous version of the application by redoing a swap.
Note
To learn more about configuring and using Web App slots, you can read the following documentation: https://docs.microsoft.com/en-us/azure/app-service/deploy-staging-slots.
This is exactly what we saw in the canary release pattern, which allows us to distribute production traffic for a group of users as well as route the application to the environment that has the N+1 version of the application.
Now that we've discussed the use of slots, we'll take a look at the Azure Traffic Manager component, which also allows us to implement blue-green deployment.
Using Azure Traffic Manager
In Azure, there is a component called Azure Traffic Manager that allows us to manage traffic between several resource endpoints, such as two web apps.
To do this, we need to have two web apps: one for the blue environment and another for the green environment.
Then, in our Azure subscription, we have to create a Azure Traffic Manager that we'll configure with the following steps:
- In the Traffic Manager, we will first configure a profile that determines the traffic routing method. In our case, we will configure a Weighted profile—that is, configure it according to a weight that we will assign in our web app. The following screenshot shows the configuration of the profile by weight:

Figure 15.7 – Azure Traffic Manager configuration
Note
To find out about the other profile configuration options and how they work, you can read the following documentation: https://docs.microsoft.com/en-us/azure/traffic-manager/traffic-manager-routing-methods.
- Then, we will record the endpoints that make up our two web apps. For each of them, we'll configure a preponderance weight, as shown in the following screenshot:
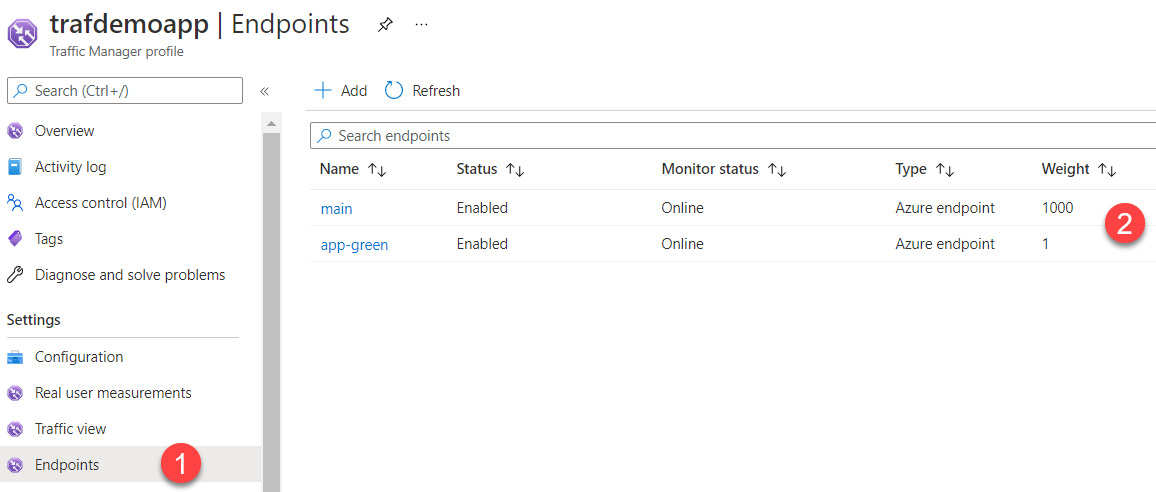
Figure 15.8 – Azure Traffic Manager endpoints
Thus, the main endpoint (that is, the blue environment) has the maximum weight, which is equivalent to 100% traffic.
Note
If you would like to know more about configuring Traffic Manager, you can follow this tutorial: https://docs.microsoft.com/en-us/azure/traffic-manager/tutorial-traffic-manager-weighted-endpoint-routing.
As for the App Service slots, with Traffic Manager, we can adjust this weight according to the traffic we want on each endpoint and then apply blue-green deployment.
We have just discussed the implementation of blue-green deployment and, more specifically, with the canary release pattern in an Azure infrastructure using a couple of solutions, as summarized here:
- For the first solution, we used a slot that was under a web app and we configured their user-traffic percentage.
- For the second solution, we used and configured an Azure Traffic Manager resource that acts as a router between two web apps.
Now, let's look at the dark launch pattern in detail, starting with an introduction to feature flags and their implementation.
Introducing feature flags
Feature flags (also called feature toggles) allow us to dynamically enable or disable a feature of an application without having to redeploy it.
Unlike blue-green deployment with the canary release pattern, which is an architectural concept, feature flags are implemented in the application's code. Their implementation is done with a simple encapsulation using conditional if rules, as shown in the following code example:
if(activateFeature("addTaxToOrder")==True) {
ordervalue = ordervalue + tax
}else{
ordervalue = ordervalue
}
In this example code, the activateFeature function allows us to find out whether the application should add the tax to order according to the addTaxToOrder parameter, which is specified outside the application (such as in a database or configuration file).
Features encapsulated in feature flags may be necessary either for the running of the application or for an internal purpose such as log activation or monitoring.
The activation and deactivation of features can be controlled either by an administrator or directly by users via a graphical interface.
The lifetime of a feature flag can be either of the following:
- Temporary: To test a feature. Once validated by users, the feature flag will be deleted.
- Definitive: To leave a feature flagged for a long time.
Thus, using feature flags, a new version of an application can be deployed to the production stage faster. This is done by disabling the new features of the release. Then, we will reactivate these new features for a specific group of users such as testers, who will test these features directly in production.
Moreover, if we notice that one of the application's functionalities is not working properly, it is possible for the feature flags to disable it very quickly, without us having to redeploy the rest of the application.
Feature flags also allow A/B testing—that is, testing the behavior of new features by certain users and collecting their feedback.
There are several technical solutions when it comes to implementing feature flags in an application, as outlined here:
- You develop and maintain your custom feature flags system, which has been adapted to your business needs. This solution will be suitable for your needs but requires a lot of development time, as well as the necessary considerations of architecture specifications such as the use of a database, data security, and data caching.
- You use an open source tool that you must install in your project. This solution allows us to save on development time but requires a choice of tools, especially in the case of open source tools. Moreover, among these tools, few offer portal or dashboard administration that allows for the management of feature flags remotely. There is a multitude of open source frameworks and tools for feature flags. Please go to http://featureflags.io/resources/ to find them. Please refer to the following as well:
- RimDev.FeatureFlags (https://github.com/ritterim/RimDev.FeatureFlags)
- Flagr (https://github.com/checkr/flagr)
- Unleash (https://github.com/Unleash/unleash)
- Togglz (https://github.com/togglz/togglz)
- Flip (https://github.com/pda/flip).
- You can use a cloud solution (a platform as a service, or PaaS) that requires no installation and has a back office for managing feature flags, but most of them require a financial investment for large-scale use in an enterprise. Among these solutions, we can mention the following:
- LaunchDarkly (https://launchdarkly.com/)
- Rollout (https://app.rollout.io/signup)
- Featureflag.tech (https://featureflag.tech/)
- Featureflow (https://www.featureflow.io/).
In this section, we have talked about how the use of feature flags is a development practice that allows you to test an application directly in the production stage.
We also mentioned the different feature flag usage solutions and illustrated their implementation. Let's discuss one of its implementations with an open source tool known as RimDev.FeatureFlags.
Using an open source framework for feature flags
As we've seen, there are a large number of open source tools or frameworks that allow us to use feature flags in our applications.
In this section, we will look at an example of implementing feature flags within a .NET (Core) application using a simple framework called RimDev.FeatureFlags.
RimDev.FeatureFlags is a framework written in .NET that's free and open source (https://github.com/ritterim/RimDev.FeatureFlags) and is packaged and distributed via a NuGet package. It can be found here: https://www.nuget.org/packages/RimDev.AspNetCore.FeatureFlags.
To store the feature flag data, RimDev.FeatureFlags uses a database that must be created beforehand. The advantage of RimDev.FeatureFlags is that once implemented in our application, it provides a web user interface (UI) that allows us to enable or disable feature flags.
As a prerequisite for this example, we need to have an ASP.NET Core MVC application already initialized. We will use a SQL Server database that has been created to store feature flag data.
To initialize RimDev.FeatureFlags in this application, we will perform the following steps:
- The first step consists of referencing the NuGet RimDev.FeatureFlags package in our application and modifying (with any text editor) the .csproj file of the application, which is located at the root of the application's files and contains some application parameters, by adding a PackageReference element, as follows:
<ItemGroup>
...
<PackageReference Include="RimDev.AspNetCore.FeatureFlags" Version="2.1.3" />
</ItemGroup>
Alternatively, we can execute the following command in a terminal command line to reference a NuGet package in the existing project:
dotnet add package RimDev.AspNetCore.FeatureFlags
- Then, we'll go to the appsettings.json configuration file to configure the connection string to the database we created beforehand with the following code:
"connectionStrings": {
"localDb": "Data Source=<your database server>;Database=FeatureFlags.AspNetCore;User ID=<your user>;Password=<password data>
}
- In the startup.cs file, which is located at the root of the application's files, we'll add the configuration to RimDev.FeatureFlags with this block of code:
private readonly FeatureFlagOptions options;
public Startup(IConfiguration configuration)
{
Configuration = configuration;
options = new FeatureFlagOptions()
.UseCachedSqlFeatureProvider(Configuration.GetConnectionString("localDb"));
}
In the preceding code snippet, we initialized the options of RimDev.FeatureFlags by using the database connection. We can configure service loading with the following code:
public void ConfigureServices(IServiceCollection services)
{
...
services.AddFeatureFlags(options);
}
public void Configure(IApplicationBuilder app, IHostingEnvironment env)
{
...
app.UseFeatureFlags(options);
app.UseFeatureFlagsUI(options);
}
As soon as the application starts, RimDev will load the feature flag data into the application context. With this, we've configured RimDev.FeatureFlags in our project.
Now, we will create feature flags and use them in the application. For this example, we will create a feature flag called ShowBoxHome that may or may not display the image in the middle of our application's home page. Let's look at how to create and manipulate these feature flags in our project, as follows:
- First, we will create feature flags by creating a new class that contains the following code:
using RimDev.AspNetCore.FeatureFlags;
namespace appFeatureFlags.Models{
public class ShowBoxHome : Feature {
public override string Description { get;
} = "Show the home center box.";
}
}
This class contains the ShowBowHome feature flag. An override description is given to this feature flag.
- Then, in our controller, we call the ShowBoxHome class with the following code:
public class HomeController : Controller {
private readonly ShowBoxHome showboxHome;
public HomeController (ShowBoxHome showboxHome){
this.showboxHome = showboxHome;
}
public IActionResult Index() {
return View(new HomeModel{ShowboxHome = this.showboxHome.Value});
}
...
}
The controller receives the values of the feature flags stored in the database, which were loaded when the application was started.
- We'll also create a HomeModel class that will list all the feature flags needed for the home page, as follows:
public class HomeModel
{
public bool ShowBoxHome { get; set; }
}
- Finally, in Views/Home/index.chtml, we'll use this model to display the image in the center of the home page, depending on the value of the feature flag, with the following code:
@if(Model.ShowBoxHome){
<div><img src="img/test.png"></div>
}
Once the development process has come to an end, deploy and run our application. By default, there is no image in the middle of the home page, as shown in the following screenshot:
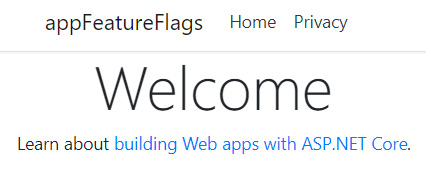
Figure 15.9 – Feature flag demonstration home application
To display the image, we need to activate the feature dynamically, like so:
- Go to the back office at http://<yoursite>/_features. We'll see a switch called ShowHomeBow.
- We activate the flags by switching on the toggle, as shown in the following screenshot:

Figure 15.10 – Feature flag demonstration feature toggle
Reload the home page of our application. Here, we can see that the image is displayed in the center of the page:

Figure 15.11 – Feature flag demonstration application
By using the RimDev.FeatureFlags framework and feature flags, we were able to enable or disable a feature of our application without having to redeploy it.
Note
The complete source code for this application can be found at https://github.com/PacktPublishing/Learning-DevOps-Second-Edition/tree/main/CHAP15/appFF.
We have just seen how to use an open source tool to implement basic feature flags in a .NET Core application. We noticed that, with the use of an open source tool, we can create a database in our infrastructure. This use of feature flags is quite basic, and moreover, access to the UI for managing feature flags is not secure.
Finally, as with any open source tool, it is important to check whether it is maintained and updated regularly by its editor or community. However, the use of open source tools for feature flags remains appealing and inexpensive for small business projects.
Now, let's look at another tool solution for feature flags, which is to use a PaaS solution in the cloud. One example of such a solution is LaunchDarkly.
Using the LaunchDarkly solution
In the previous section, we discussed using open source tools for feature flags, which can be a good solution but requires some infrastructure components and is dependent on a development language (in our example, it was .NET Core).
For better use and management of feature flags, we can use a cloud solution that does not require the implementation of an architecture and provides a lot of features around feature flags.
Among these cloud solutions (software as a service, or SaaS), there is LaunchDarkly (https://launchdarkly.com/), which is a SaaS platform that is composed of a feature flag management back office and SDKs that allow us to manipulate the feature flags in our applications.
The LaunchDarkly SDKs are available for many development languages, such as .NET, JavaScript, Go, and Java. A complete list of SDKs is available here: https://docs.launchdarkly.com/sdk.
In addition to the classic version of feature flag management with RimDev.FeatureFlags, LaunchDarkly allows feature flags to be managed by a user and also provides A/B testing features that are linked to feature flags. A/B testing can measure the use of the application's features through feature flags.
However, LaunchDarkly is a paid solution (https://launchdarkly.com/pricing/). Fortunately, it provides a 30-day trial so that we can test it out. Please take a look at how to use LaunchDarkly so that you can implement feature flags in a .NET application.
For that, we will start by creating some feature flags, as follows:
- First, log in to your LaunchDarkly account by clicking on the Sign In button that is located in the top menu of the LaunchDarkly site. Alternatively, you can go to https://app.launchdarkly.com/.
- Once we're connected to our account, in the Account settings section, we can create a new project called DemoBook, as illustrated in the following screenshot:

Figure 15.12 – LaunchDarkly project creation
By default, two environments are created in the project. We'll be able to create our own environments and then test the feature flags in different environments. In addition, each of these environments has a unique SDK key that will serve as authentication for the SD3.
- Then, in the environment called Test, we'll navigate to the Feature flags menu and click on the Create flag button, then we'll create a feature flag called ShowBoxHome, as shown in the following screenshot:

Figure 15.13 – LaunchDarkly feature flag creation
Once created, we can activate it by clicking on the On/Off toggle switch.
Now that we have configured and created a feature flag in the LaunchDarkly portal, we will see how we can use the SDK in the application code.
Note
In LaunchDarkly, the variations that are made to feature flags are done by users connected to the application. This means that the application must provide an authentication system.
To use the SDK and launch the application, follow these steps:
- The first step is to choose an SDK that corresponds to the application development language. We can do this by going to https://docs.launchdarkly.com/docs/getting-started-with-launchdarkly-sdks#section-supported-sdks. In our case, we have a .NET application, so we will follow this procedure: https://docs.launchdarkly.com/docs/dotnet-sdk-reference.
- Now, let's integrate the reference to the NuGet LaunchDarkly.ServerSdk package (https://www.nuget.org/packages/LaunchDarkly.ServerSdk/) in the .csproj file of our application by adding it to the reference packages, like so:
<ItemGroup>
<PackageReference Include="LaunchDarkly.ServerSdk" Version="6.3.1" />
...
</ItemGroup>
- In the .NET code, we do this in the controller. To do this, we need to import the SDK with the using command, as follows:
using LaunchDarkly.Client;
- Still in the controller code, we add the connection to LaunchDarkly, as invoked by FeatureFlag. The code is illustrated in the following snippet:
public IActionResult Index() {
LdClient ldClient = new LdClient("sdk-eb0443dc-xxxx-xxx-xx-xxx");
User user = LaunchDarkly.Client.User.WithKey(User.Identity.Name);
bool showBoxHome = ldClient.BoolVariation("show-box-home", user, false);
return View(new HomeModel{ShowBoxHome = showBoxHome});
}
For the connection to LaunchDarkly, we need to use the SDK key that was provided when the project was created. Then, in the preceding code, we connect the user who is connected to the application to the feature flag that we created previously in the portal.
- Finally, in the Home/Index.chtml view, we add the following code to add a condition that will display the image, depending on the value of the feature flag:
<div class="text-center">
@if(Model.ShowBoxHome){
<div><img src="img/test.png"></div>
}
<div>
- Finally, we deploy and execute the application. As illustrated in the following screenshot, the home page shows the central image because the feature flags are set to true by default:

Figure 15.14 – LaunchDarkly feature flag demonstration application
- Then, we go to the LaunchDarkly portal and modify the configuration of this feature flag for the current user with a false value. On the Users management page, we select the user, as illustrated in the following screenshot:
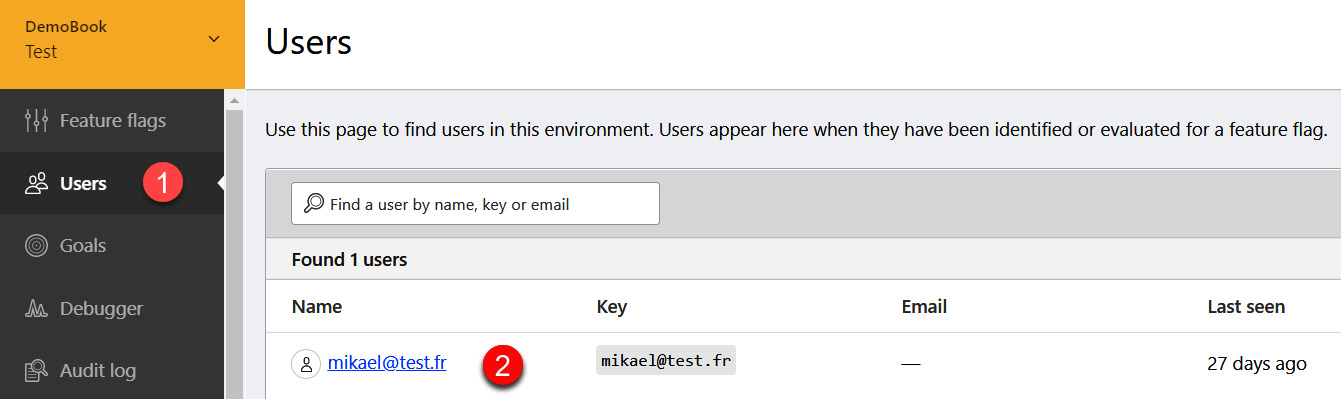
Figure 15.15 – LaunchDarkly user
Then, we update the value of the feature flag to false, as illustrated in the following screenshot:

Figure 15.16 – LaunchDarkly feature flag user settings
- By reloading the page, we can see that the central image is no longer displayed, as illustrated here:

Figure 15.17 – Feature flag demo application with LaunchDarkly
This is an example of how to use LaunchDarkly, which has many other interesting features, such as a user management system, feature usage with A/B testing, integration with CI/CD platforms, and reporting.
Note
The complete code source for this application can be found at https://github.com/PacktPublishing/Learning-DevOps-Second-Edition/tree/main/CHAP15/appdemoLD.
What we have discussed in this section is an overview of LaunchDarkly, which is a feature flag cloud platform. We studied its implementation in a web application with the creation of feature flags in the LaunchDarkly portal.
Then, we manipulated this feature flag in the application code via the SDK provided by LaunchDarkly. Finally, in the LaunchDarkly portal, we enabled/disabled a feature for a user who wants to test a new feature of the application without having to redeploy it.
Summary
In this chapter, we focused on improving production deployments. We started by using Terraform to reduce downtime during provisioning and resource destruction.
Then, we focused on the practice of blue-green deployment and its patterns, such as canary release and dark launch. We looked at the implementation of a blue-green deployment architecture in Azure using App Service and the Azure Traffic Manager component.
Finally, we detailed the implementation of feature flags in a .NET application using two types of tools—RimDev.FeatureFlags, which is an open source tool that offers a basic feature flag system, and LaunchDarkly, which is a cloud-based solution. It's not free of charge but provides complete and advanced feature flag management.
The next chapter is dedicated to GitHub. Here, we will look at the best practices for contributing to open source projects.
Questions
- In Terraform, which option can we use to reduce downtime?
- What is a blue-green deployment infrastructure composed of?
- What are the two blue-green deployment patterns that we looked at in this chapter?
- In Azure, what are the components that allow us to apply a blue-green deployment practice?
- What is the role of feature flags?
- What is the RimDev.FeatureFlags tool?
- Which feature flag tool discussed in this chapter is a SaaS solution?
Further reading
If you want to find out more about zero-downtime and blue-green deployment practices, take a look at the following resources:
- Zero Downtime Updates with HashiCorp Terraform: https://www.hashicorp.com/blog/zero-downtime-updates-with-terraform
- BlueGreenDeployment by Martin Fowler: https://martinfowler.com/bliki/BlueGreenDeployment.html
- Feature Toggles (aka Feature Flags) by Martin Fowler: https://martinfowler.com/articles/feature-toggles.html
- Blue-Green Deployment on Azure with Zero Downtime (article): http://work.haufegroup.io/Blue-Green-Deployment-on-Azure/
- Feature flag guide: http://featureflags.io/
- LaunchDarkly feature flag use cases: https://launchdarkly.com/use-cases/