
Chapter 3: Using Ansible for Configuring IaaS Infrastructure
In the previous chapter, we talked about provisioning an Azure cloud infrastructure with Terraform. If this infrastructure contains virtual machines (VMs), once they've been provisioned, it is necessary to configure their systems and install all the necessary middleware. This configuration will be necessary for the proper functionality of the applications that will be hosted on the VM.
There are several Infrastructure as Code (IaC) tools available for configuring VMs and the most well-known are Ansible, Puppet, Chef, SaltStack, and PowerShell DSC. Among them, Ansible from Red Hat (https://www.ansible.com/overview/it-automation) stands out for its many assets, as follows:
- It is declarative and uses the easy-to-read YAML language.
- Ansible only works with one executable.
- It does not require agents to be installed on the VMs to be configured.
- A simple SSL/WinRM connection is required for Ansible to connect to remote VMs.
- It has a template engine and a vault to encrypt/decrypt sensitive data.
- It is idempotent.
The main uses cases of Ansible are as follows:
- Configuring a VM with middleware and hardening, which we will learn about in this chapter
- Infrastructure provisioning, such as Terraform, but using YAML configuration
- Security compliance to test that the system or network configuration conforms to the enterprise requirements
In this chapter, we will learn how to install Ansible, and then use it to configure a VM with an inventory and a playbook. We will also learn how to protect sensitive data with Ansible Vault before discussing how to use a dynamic inventory in Azure.
The following topics will be covered in this chapter:
- Installing Ansible
- Creating an Ansible inventory
- Executing the first playbook
- Executing Ansible
- Protecting data with Ansible Vault
- Using a dynamic inventory for an Azure infrastructure
Technical requirements
To follow along with the chapter, you must meet the following technical requirements:
- To install Ansible, we need an OS such as Red Hat, Debian, CentOS, macOS, or any of the BSDs. For those who have Windows, you can install the Windows Subsystem for Linux (WSL); refer to the documentation at https://docs.microsoft.com/en-us/windows/wsl/install-win10.
- Python 2 (version 2.7) or Python 3 (version 3.5+) must be installed on the machine that runs Ansible. You can download it here: https://www.python.org/downloads/. For more information about the Ansible requirements, refer to the documentation here: https://docs.ansible.com/ansible/latest/installation_guide/intro_installation.html#control-node-requirements.
- An Ansible playbook uses YAML configuration files, so any code editor would work; however, we will be using Visual Studio Code as it is very suitable. You can download it here: https://code.visualstudio.com/.
- Most of this chapter will not focus on a particular cloud provider, except for the last section on Azure. We will need an Azure subscription for this, which we can get for free from here: https://azure.microsoft.com/en-us/free/.
- To run the Ansible dynamic inventory for Azure, we need to install the Azure Python SDK: https://docs.microsoft.com/en-us/azure/python/python-sdk-azure-install?view=azure-python.
- The complete source code for this chapter is available here: https://github.com/PacktPublishing/Learning-DevOps-Second-Edition/tree/main/CHAP03.
Check out the following video to see the Code in Action:
Installing Ansible
Before we start using Ansible, we must know which OS we can use it on and how to install and configure it. Then, we must learn about some of the concepts surrounding the artifacts that it needs to operate.
In this section, we will look at how to install Ansible on a local or server machine and how to integrate Ansible in Azure Cloud Shell. Then, we will talk about the different elements or artifacts that make up Ansible. Finally, we will configure Ansible.
To get started, we will learn how to download and install Ansible with an automatic script.
Installing Ansible with a script
Unlike Terraform, Ansible is not multiplatform and can only be installed on Red Hat, Debian, CentOS, macOS, or any of the BSDs. You install it using a script that differs according to your OS.
For example, to install the latest version on Ubuntu, we must run the following script in a Bash Terminal:
sudo apt-get update
sudo apt-get install software-properties-common
sudo apt-add-repository --yes --update ppa:ansible/ansible
sudo apt-get install ansible
Important Note
This script is also available here: https://github.com/PacktPublishing/Learning-DevOps-Second-Edition/blob/main/CHAP03/install_ansible_ubuntu.sh.
This script updates the necessary packages, installs the software-properties-common dependency, adds the Ansible repository, and installs the latest version of Ansible.
Important Note
The Ansible installation scripts for all distribution types are available here: https://docs.ansible.com/ansible/latest/installation_guide/intro_installation.html#installing-ansible-on-specific-operating-systems.
To install Ansible locally on a Windows OS machine, there is no native solution, but it can be installed on a local VirtualBox VM or WSL. WSL allows developers who are on a Windows OS to test their scripts and applications directly on their workstations, without having to install a VM.
Important Note
Read this article to learn how to install Ansible on a local VirtualBox environment: https://phoenixnap.com/kb/install-ansible-on-windows. For more details about WSL, read the documentation here: https://docs.microsoft.com/en-us/windows/wsl/about.
To test whether it has been successfully installed, we can run the following command to check its installed version:
ansible --version
The result of executing this command provides some information on the installed version of Ansible, like this:

Figure 3.1 – The ansible --version command
To display a list of all Ansible commands and options, execute the ansible command with the --help argument:
ansible --help
The following screenshot shows the execution of this command:

Figure 3.2 – The ansible --help command
As we can see, installing Ansible on a local or remote machine is quite simple and can be automated by a script. If we deploy infrastructure in Azure, we can also use Ansible as it is integrated into Azure Cloud Shell.
Now, let's look at how Ansible is integrated into Azure Cloud Shell.
Integrating Ansible into Azure Cloud Shell
As we learned in Chapter 2, Provisioning Cloud Infrastructure with Terraform, Azure Cloud Shell integrates third-party tools that can be used in Azure without having to install them on a VM. Among these tools is Terraform, which we saw in detail in the previous chapter, but there is also Ansible, which Microsoft has integrated to allow us to automatically configure the VMs that are hosted in Azure.
To use Ansible in Azure cloud, we must do the following:
- Connect to the Azure portal at https://portal.azure.com.
- Open Cloud Shell.
- Choose Bash mode.
- In the Terminal that opens, we now have access to all Ansible commands.
The following screenshot shows the ansible command in Azure Cloud Shell:

Figure 3.3 – Ansible in Azure Cloud Shell
This way, it will be possible to use Ansible for development and testing without installing any software.
Also, Ansible has modules that allow us to provision an Azure infrastructure (such as Terraform, but this aspect of Ansible will not be covered in this book), so its integration into Azure Cloud Shell allows for simplified authentication.
Important Note
Detailed documentation on integrating Ansible into Azure Cloud Shell is available here: https://docs.microsoft.com/en-us/azure/ansible/ansible-run-playbook-in-cloudshell.
Before we start using Ansible, we will review the important concepts (or artifacts) of Ansible that will serve us throughout this chapter.
Ansible artifacts
To configure a system, Ansible needs several main artifacts:
- The hosts: These are target systems that Ansible will configure; the host can also be a local system.
- The inventory: This is a file in INI or YAML format that contains the list of target hosts that Ansible will perform configuration actions on. This inventory can also be a script, which is the case with a dynamic inventory.
Important Note
We will look at how to implement an Ansible inventory in the Creating an Ansible inventory section, while we will look at how to implement a dynamic inventory in the Using a dynamic inventory for Azure infrastructure section.
- The playbook: This is the Ansible configuration script that will be executed to configure hosts.
Important Note
We will learn how to write playbooks in the Executing the first playbook section, later in this chapter.
After learning how to install Ansible, we looked at the essential elements of Ansible, which are hosts, inventory, and playbooks. Now, let's learn how to configure Ansible.
Configuring Ansible
By default, the Ansible configuration is in the /etc/ansible/ansible.cfg file, which is created while Ansible is being installed. This file contains several configuration keys, such as an SSL connection, a user, a protocol, transport, and many others.
As we mentioned previously, this file is created by default while Ansible is being installed. To help the user get started, initial content is placed in it. This content contains a multitude of configuration keys that are commented out so that they are not applied by Ansible but can be activated at any time by the user.
Note
If we use Ansible inside Azure Cloud Shell, we need to create this file (ansible.cfg) manually inside our Azure cloud drive and set the ANSIBLE_CONFIG environment variable with the path to the created file. The documentation for this environment variable is available here: https://docs.ansible.com/ansible/latest/reference_appendices/config.html#envvar-ANSIBLE_CONFIG.
The following screenshot shows an extract from this /etc/ansible/ansible.cfg configuration file with some keys in the comments, as shown by the # symbol:

Figure 3.4 – Ansible configuration file
If we want to change the default Ansible configuration, we can modify this file.
Important Note
For more details about all Ansible configuration keys, see the official documentation: https://docs.ansible.com/ansible/latest/reference_appendices/config.html#ansible-configuration-settings.
We can also view and modify this configuration using the ansible-config command. For example, to display the Ansible configuration file, we can execute the following command:
ansible-config view
The following screenshot shows the execution of this command:

Figure 3.5 – Ansible view configuration with the CLI
In this section, we learned how to install Ansible and explored some of Ansible's artifacts. Finally, we looked at different ways to configure Ansible.
In the next section, we will detail a static Ansible inventory and how to create it to target hosts.
Creating an Ansible inventory
The inventory contains the list of hosts that Ansible will perform administration and configuration actions on.
There are two types of inventories:
- Static inventory: Hosts are listed in a text file in INI (or YAML) format; this is the basic mode of Ansible inventory. The static inventory is used in cases where we know the host addresses (IP or FQDN).
- Dynamic inventory: The list of hosts is dynamically generated by an external script (for example, with a Python script). The dynamic inventory is used if we do not have the addresses of the hosts, for example, as with an infrastructure that is composed of on-demand environments.
In this section, we will learn how to create a static inventory in init format, starting with a basic example, and then we will look at the groups and host configuration.
Let's start by learning how to create a static inventory file.
The inventory file
For Ansible to configure hosts when running the playbook, it needs to have a file that contains the list of hosts; that is, the list of IP or Fully Qualified Domain Name (FQDN) addresses of the target machines. This list of hosts is noted in a static file called the inventory file.
By default, Ansible contains an inventory file that's created while it's being installed; this file is /etc/ansible/hosts and it contains several inventory configurations examples. In our case, we will manually create and fill this file in a directory of our choice, such as devopsansible.
Let's do this step by step:
- First, we must create the directory with the following basic command:
mkdir devopsansible
cd devopsansible
- Now, let's create a file named myinventory (without an extension) where we will write the IP addresses or the FQDN of the targets hosts, as shown in the following example:
192.10.14.10
mywebserver.entreprise.com
localhost
When Ansible is executed based on this inventory, it will execute all of the requested actions (playbook) on all the hosts mentioned in this inventory.
Important Note
For more information about the inventory file, read the documentation at https://docs.ansible.com/ansible/latest/user_guide/intro_inventory.html.
However, when you're using Ansible in an enterprise, the same Ansible code (or playbook) contains the configuration actions that are performed for all of the VMs of an application. Since these VMs have different roles within the application, such as an application that consists of one (or more) web server and one database server, we must divide our inventory to separate the VMs by functional roles.
To group VMs by role in the inventory, we will organize our VMs into groups that will be noted between [], which gives us the following inventory:
[webserver]
192.10.20.31
mywebserver.exemple.com
[database]
192.20.34.20
In this example, we have defined two groups, webserver and database. All the hosts are distributed into these groups.
As another example, we can also group the hosts by environments with this sample inventory:
[dev]
192.10.20.31
192.10.20.32
[qa]
192.20.34.20
192.20.34.21
[prod]
192.10.12.10
192.10.12.11
Later in this chapter, we will learn how these groups will be used in playbook writing.
Now, let's learn how to complete our inventory by configuring hosts.
Configuring hosts in the inventory
As we have seen, the entire Ansible configuration is in the ansible.cfg file. However, this configuration is generic and applies to all Ansible executions, as well as connectivity to hosts.
However, when using Ansible to configure VMs from different environments or roles with different permissions, it is important to have different connectivity configurations, such as different admin users and SSL keys per environment. For this reason, it is possible to override the default Ansible configuration in the inventory file by configuring specific parameters per host, as defined in this inventory.
The main configuration parameters that can be overridden are as follows:
- ansible_user: This is the user who connects to the remote host.
- ansible_port: It is possible to change the default value of the SSH port.
- ansible_host: This is an alias for the host.
- ansible_connection: This is the type of connection to the remote host and can be Paramiko, SSH, or local.
- ansible_private_key_file: This is the private key that's used to connect to the remote host.
Important Note
The complete list of parameters is available in the following documentation: https://docs.ansible.com/ansible/latest/user_guide/intro_inventory.html#list-of-behavioral-inventory-parameters.
Here is an example of an inventory where we have configured the connection of the hosts:
[webserver]
webserver1 ansible_host=192.10.20.31 ansible_port=2222
webserver2 ansible_host=192.10.20.31 ansible_port=2222
[database]
database1 ansible_host=192.20.34.20
ansible_user=databaseuser
database2 ansible_host=192.20.34.21
ansible_user=databaseuser
[dev]
webserver1
database1
[qa]
webserver2
database2
The following can be seen in this inventory example:
- The connection information has been specified beside each host.
- The alias implementation (such as webserver1 and webserver2) is used in another group (such as the qa group in this example).
Having implementing an Ansible inventory, we will now learn how to test this inventory.
Testing the inventory
Once the inventory has been written, it is possible to test whether all of the hosts mentioned can be accessed from Ansible. To do this, we can execute the following command:
ansible -i inventory all -u demobook -m ping
The -i argument is the path of the inventory file, the -u argument corresponds to the remote username that's used to connect to the remote machine, and -m is the command to execute. Here, we execute the ping command on all the machines in the inventory.
The following screenshot shows the execution of this command:
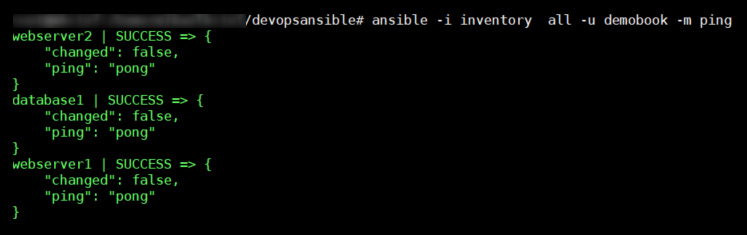
Figure 3.6 – Testing the ansible ping command with the all option
We can also test connectivity on the hosts of a particular group by calling this command with the group name instead of all. For example, in our case, we will execute this command:
ansible -i inventory webserver -u demobook -m ping
The following screenshot shows the execution of this command:

Figure 3.7 – Testing the ansible ping command for a specific host
In this section, we learned that Ansible needs an inventory file to configure hosts. Then, we created and tested our first inventory file before learning how to configure this file even further.
In the next section, we will learn how to set up and write the configuration action code in Ansible playbooks.
Executing the first playbook
One of the essential elements of Ansible is its playbooks because, as stipulated in the introduction, they contain the code of the actions or tasks that need to be performed to configure or administer a VM.
Indeed, once the VM has been provisioned, it must be configured, and all of the middleware needed to run the applications that will be hosted on this VM must be installed. Also, it is necessary to perform administrative tasks concerning the configuration of directories and their access.
In this section, we will see what a playbook is made up of, its modules, and how to improve our playbook with roles.
Now, let's start studying how to write a basic playbook.
Writing a basic playbook
The code of a playbook is written in YAML, a declarative language that allows us to easily visualize the configuration steps.
To understand what a playbook looks like, let's look at a simple and classic example; that is, installing an NGINX server on an Ubuntu VM. Previously, we created a working devopsansible directory, inside which we will create a playbook.yml file and insert the following content code:
---
- hosts: all
tasks:
- name: install and check nginx latest version
apt: name=nginx state=latest
- name: start nginx
service:
name: nginx
state: started
---
Let's take a look at this in detail:
- First of all, the YAML file starts and ends with the optional --- characters.
- The - hosts property contains the list of hosts to configure. Here, we have written the value of this property as all to install NGINX on all of the VMs listed in our inventory. If we want to install it on only a particular group, for example, on the webserver group, we will note this as follows:
---
- hosts: webserver
- Then, we indicate the list of tasks or actions to be performed on these VMs, with the property of the list of tasks.
- Under the tasks element, we describe the list of tasks and, for each of them, a name that serves as a label, in the name property. Under the name, we call the function to be executed using the Ansible modules and their properties. In our example, we have used two modules:
- apt: This allows us to retrieve a package (the apt-get command) to get the latest version of the nginx package.
- service: This allows us to start or stop a service – in this example, to start the NGINX service.
What we can see is that we do not require any knowledge of development or IT scripting to use Ansible; the important thing is to know the list of actions you can perform on VMs to configure them. The Ansible playbook is, therefore, a sequence of actions that are encoded in Ansible modules.
We have just seen that the tasks that are used in playbooks use modules. In the next section, we will provide a brief overview of modules and their use.
Understanding Ansible modules
In the previous section, we learned that, in Ansible playbooks, we use modules. This has made Ansible so popular today that there is a huge list of public modules provided by Ansible natively (+200). The complete list is available here: https://docs.ansible.com/ansible/latest/collections/index_module.html.
These modules allow us to perform all of the tasks and operations to be performed on a VM for its configuration and administration, without having to write any lines of code or scripts.
Within an enterprise, we can also create our custom modules and publish them in a private registry internally. More information can be found here: https://docs.ansible.com/ansible/latest/dev_guide/developing_modules_general.html.
Now that we've learned how to write a simple playbook and how to use modules, we will improve the playbook even further with roles.
Improving your playbooks with roles
Within an enterprise, when configuring a VM, we notice a certain repetition of tasks for each application. For example, several applications require the identical installation of NGINX, which must be performed in the same way.
With Ansible, this repetition will require duplicating the playbook code, as seen in our playbook example in the Executing a basic playbook section, between several playbooks (because each application contains a playbook). To avoid this duplication and, hence, save time, avoid errors, and homogenize installation and configuration actions, we can encapsulate the playbook code in a directory called role that can be used by several playbooks.
To create the nginx role corresponding to our example, we will create the following directory and file tree within our devopsansible directory:

Figure 3.8 – The Ansible architecture folder
Then, in the main.yml file, which is located in tasks, we will copy and paste the following code from our playbook in the file that is created:
- name: install and check nginx latest version
apt: name=nginx state=latest
- name: start nginx
service:
name: nginx
state: started
Then, we will modify our playbook to use this role with the following content:
---
- hosts: webserver
roles:
- nginx
Following the node roles, we will provide a list of roles (the names of the role directories) to be used. So, this nginx role is now centralized and can be used in several playbooks without having to rewrite its code.
The following is the code of a playbook that configures a VM web server with Apache and another VM that contains a MySQL database:
---
- hosts: webserver
roles:
- php
- apache
- hosts: database
roles:
- mysql
Important Note
For more information on role creation, read the official documentation at https://docs.ansible.com/ansible/latest/user_guide/playbooks_reuse_roles.html.
However, before we start creating a role, we can use Ansible Galaxy (https://galaxy.ansible.com/), which contains a large number of roles provided by the community and covers a high number of configuration and administration needs.
Within an enterprise, we can also create custom roles and publish them in a private galaxy within the company. More information can be found here: https://docs.ansible.com/ansible/latest/dev_guide/developing_modules_general.html.
In this section, we learned how to write a playbook, as well as how to improve one with roles. All of our artifacts are finally ready, so we will now be able to execute Ansible.
Executing Ansible
So far, we've learned how to install Ansible, listed the hosts in the inventory, and set up our Ansible playbook. Now, we can run Ansible to configure our VMs.
For this, we will run the Ansible tool with the ansible-playbook command, like this:
ansible-playbook -i inventory playbook.yml
The basic options for this command are as follows:
- The -i argument with the inventory file path
- The path of the playbook file
The following is the execution of this command:

Figure 3.9 – Executing the Ansible playbook
The execution of this command applies the playbook to the hosts in the inventory in several steps:
- Gathering facts: Ansible checks that the hosts can be reached.
- The task's playbook is executed on hosts.
- PLAY Recap: This is the status of the changes that were executed on each host; the value of this status can be as follows:

Table 3.1 – The values of PLAY Recap
If we need to upgrade our playbook to add or modify middleware on our VMs, during the second execution of Ansible with this upgraded playbook, we will see that Ansible did not reapply the complete configuration of the VMs; it only applied the differences.
The following screenshot shows the second execution of Ansible with no changes made to our playbook:

Figure 3.10 – The Ansible playbook's execution with changed information
Here, we can see that Ansible didn't change anything on the hosts (changed=0).
We can also add some useful options to this command to provide the following:
- A preview of Ansible changes before applying the changes
- More logs in the execution output
These options are not only important for the playbook development phase, but also for debugging them in case of errors during their execution.
Now, let's look at how to use these preview options.
Using the preview or dry run option
When coding an Ansible playbook, we often need to test different steps without applying them directly to infrastructure. Hence, it is very useful, especially when automating VM configuration with Ansible, to have a preview of its execution. This allows us to check that the syntax of the playbook is maintaining good consistency with the system configuration that already exists on the host.
With Ansible, it's possible to check the execution of a playbook on hosts by adding the --check option to the command:
ansible-playbook -i inventory playbook.yml --check
Here is an example of this dry run execution:

Figure 3.11 – The Ansible playbook dry run execution
With this option, Ansible does not apply configuration changes to the host; it only checks and previews the changes that have been made to the hosts.
Important Note
For more information on the --check option, please refer to the following documentation: https://docs.ansible.com/ansible/latest/user_guide/playbooks_checkmode.html.
We have just seen that Ansible allows us to check a playbook before applying it to a host; it is also necessary to know that there are other tools to test the functionality of a playbook (without having to simulate its execution), such as Vagrant by HashiCorp.
Vagrant allows us to locally create a test environment composed of VMs very quickly that we can run our playbooks on and see the results. For more information on the use of Ansible and Vagrant, refer to the following documentation: https://docs.ansible.com/ansible/latest/scenario_guides/guide_vagrant.html.
We have just learned how to preview the changes that will be applied by Ansible. Now, let's look at how to increase the log level output of Ansible's execution.
Increasing the log level output
In case of errors, it is possible to add more logs during the output by adding the -v, -vvv, or -vvvv option to the Ansible command.
The -v option enables basic verbose mode, the -vvv option enables verbose mode with more outputs, and the -vvvv option adds verbose mode and the connection debugging information.
Executing the following command applies a playbook and will display more log information using the -v option that has been added:
ansible-playbook -i inventory playbook.yml -v
This can be useful for debugging in case of Ansible errors.
Important Note
The complete documentation on the ansible-playbook command is available here: https://docs.ansible.com/ansible/2.4/ansible-playbook.html.
We have just learned how to execute Ansible with its inventory and playbook by exploring some options that allow for the following:
- Previewing the changes that will be made by Ansible
- Increasing the level of logs to make debugging easier
In the next section, we will talk about data security while using Ansible Vault.
Protecting data with Ansible Vault
So far, we've learned how to use Ansible with an inventory file that contains the list of hosts to configure, and with a playbook that contains the code of the host's configuration actions. But in all IaC tools, it will be necessary to extract some data that is specific to a context or environment inside variables.
In this section, we will look at how to use variables in Ansible and how to protect sensitive data with Ansible Vault.
To illustrate this use and protection of variables, we will complete our example by installing a MySQL server on the database server.
Let's begin by looking at the use and utility of variables in Ansible.
Using variables in Ansible for better configuration
When deploying infrastructure with IaC, the code that's used is often composed of two parts:
- A part that describes the elements or resources that make up the infrastructure.
- Another part that differentiates the properties of this infrastructure from one environment to another.
This second part of differentiation for each environment is done by using variables, and Ansible has a whole system that allows us to inject variables into playbooks.
To learn how to use variables in Ansible, we will complete our code and add a role called mysql to the roles directory with the following tree structure:

Figure 3.12 – The Ansible role folder structure
In the main.yml file of this role, we will write the following code:
---
- name: Update apt cache
apt: update_cache=yes cache_valid_time=3600
- name: Install required software
apt: name="{{ packages }}" state=present
vars:
packages:
- python-mysqldb
- mysql-server
- name: Create mysql user
mysql_user:
name={{ mysql_user }}
password={{ mysql_password }}
priv=*.*:ALL
state=present
In this code, some static information has been replaced by variables. They are as follows:
- packages: This contains a list of packages to install, and this list is defined in the following code.
- mysql_user: This contains the user admin of the MySQL database.
- mysql_password: This contains the admin password of the MySQL database.
The different tasks of this role are as follows:
- Updating packages
- Installing the MySQL server and Python MySQL packages
- Creating a MySQL user
Important Note
The complete source code for this role is available at https://github.com/PacktPublishing/Learning-DevOps-Second-Edition/tree/main/CHAP03/devopsansible/roles/mysql.
As we can see, in the user creation task, we have put the mysql_user and mysql_password variables in for the user name and password. Hence, this information may be different depending on the environment, or it may be instantiated dynamically when running Ansible.
To define the values of these variables, we will create a group_vars directory, which will contain all of the values of the variables for each group defined in our inventory.
Then, in this group_vars folder, we will create a database subdirectory corresponding to the database group defined in the inventory and a main.yml subfile.
In this main.yml file, we put the desired values of these variables, as follows:
---
mysql_user: mydbuserdef
mysql_password: mydbpassworddef
Finally, we will complete our playbook by calling the mysql role by adding the following code:
- hosts: database
become: true
roles:
- mysql
We can execute Ansible with the same command as the previous one, ansible-playbook -i inventory playbook.yml. The following output is generated:

Figure 3.13 – The Ansible playbook's MySQL execution
Here, Ansible has updated the database server with two changes: the list of packages to be installed and the MySQL admin user. We have just learned how to use variables in Ansible, but this one is clear in the code, which raises security issues.
Important Note
For more information about Ansible variables, read the complete documentation here: https://docs.ansible.com/ansible/latest/user_guide/playbooks_variables.html.
Now, let's learn how to use Ansible Vault to protect playbook variables.
Protecting sensitive data with Ansible Vault
Configuring a system often requires sensitive information that should not be in the wrong hands. In the Ansible tool, there is a sub-tool called Ansible Vault that protects the data that's transmitted to Ansible through playbooks.
In this section, we'll learn how to manipulate Ansible Vault to encrypt and decrypt the information of the MySQL user.
The first step is to encrypt the group_vars/database/main.yml file, which contains the values of the variables, by executing the following command:
ansible-vault encrypt group_vars/database/main.yml
Ansible Vault requests that you include a password that will be required to decrypt the file and then shows the execution of this command to encrypt the content of a file:

Figure 3.14 – Ansible Vault encryption
After executing this command, the content of the file is encrypted, so the values are no longer clear. The following is a sample from it:

Figure 3.15 – Encrypted file
To decrypt the file to modify it, you must execute the decrypt command:
ansible-vault decrypt group_vars/database/main.yml
Ansible Vault requests the password that was used to encrypt the file, and the file becomes readable again.
In an Ansible usage automation process, it is preferable to store the password in a file in a protected location; for example, in the ~/.vault_pass.txt file.
Then, to encrypt the variable file with this file, we must execute the ansible-vault command and add the --vault-password-file option:
ansible-vault encrypt group_vars/database/main.yml --vault-password-file ~/.vault_pass.txt
Now that the file has been encrypted and the data is protected, we will run Ansible.
In interactive mode, we will run the following command:
ansible-playbook -i inventory playbook.yml --ask-vault-pass
Ansible asks the user to enter the password shown in the following screenshot:

Figure 3.16 – Decrypted file with Ansible Vault
In automatic mode – that is, in a CI/CD pipeline – we can add the --vault-password-file parameter with the path of the file that contains the password to decrypt the data:
ansible-playbook -i inventory playbook.yml --vault-password-file ~/.vault_pass.txt
With that, we've executed Ansible with data that is no longer clear in the code and with the use of the ansible-vault command.
Important Note
The entire source code for the inventory, playbook, and roles is available here: https://github.com/PacktPublishing/Learning-DevOps-Second-Edition/tree/main/CHAP03/devopsansible.
In this section, we learned how to protect sensitive data in our playbooks using the ansible-vault utility. We encrypted and decrypted variable files to protect them, and then re-ran Ansible with these encrypted files.
In the following section, we will learn how to use Ansible with a dynamic inventory.
Using a dynamic inventory for an Azure infrastructure
When configuring an infrastructure that is composed of several VMs, along with ephemeral environments that are built on demand, the observation that's often made is that maintaining a static inventory, as we saw in the Creating an Ansible inventory section, can quickly become complicated and its maintenance takes a lot of time to complete.
To overcome this problem, Ansible allows inventories to be obtained dynamically by calling a script (for example, in Python) that is either provided by cloud providers or a script that we can develop ourselves that returns the contents of the inventory.
In this section, we will look at the different ways to use Ansible to configure VMs in Azure using a dynamic inventory. Let's get started:
- The first step is to configure Ansible to be able to access Azure resources. For this, we will create an Azure Service Principal in Azure AD, in exactly the same way as we did for Terraform (see the Configuring Terraform for Azure section of Chapter 2, Provisioning Cloud Infrastructure with Terraform). Then, we must export the information of the four service principal IDs to the following environment variables:
export AZURE_SUBSCRIPTION_ID=<subscription_id>
export AZURE_CLIENT_ID=<client ID>
export AZURE_SECRET=<client Secret>
export AZURE_TENANT=<tenant ID>
Important Note
For more information on the Azure environment variables for Ansible, please refer to the Azure documentation here: https://docs.ansible.com/ansible/latest/scenario_guides/guide_azure.html.
- Then, to be able to generate an inventory with groups and to filter VMs, it is better to add tags to the VMs. Tags can be added using Terraform, an az cli command line, or an Azure PowerShell script.
Here is an example script with az cli:
az resource tag --tags role=webserver -n VM01 -g demoAnsible --resource-type "Microsoft.Compute/virtualMachines"
The preceding script adds a role tag of the webserver value to the VM01 VM. Then, we must perform the same operation on the VM02 VM (just change the value of the -n parameter to VM02 in the preceding script).
The following screenshot shows the VM tag in the Azure portal:

Figure 3.17 – Azure role tag
Now, we must add to our VM the tag that contains the database with this script:
az resource tag --tags role=database -n VM04 -g demoAnsible --resource-type "Microsoft.Compute/virtualMachines"
This script adds a role tag to VM04, which has a value of database.
Important Note
The az cli documentation for managing Azure tags can be found here: https://docs.microsoft.com/fr-fr/cli/azure/resource?view=azure-cli-latest&viewFallbackFrom=azure-cli-latest.md#az-resource-tag.
- To use a dynamic inventory in Azure, we need to do the following actions:
- Install the Ansible Azure module on the machine with the following script.
wget -q https://raw.githubusercontent.com/ansible-collections/azure/dev/requirements-azure.txt;
pip3 install -r requirements-azure.txt;
- We can also install the Azure module using Ansible Galaxy by executing the following command:
ansible-galaxy collection install azure.azcollection
Note
For more details about the Azure collection, read the documentation at https://galaxy.ansible.com/azure/azcollection.
- Install the Ansible Azure module on the machine with the following script.
Create a new file named inv.azure_rm.yml (the name of this file must finish with azure_rm) and write in this file the following configuration:
- Use the azure_rm plugin.
- Allow the returned VM list to be grouped by role tags.
- Filter only in the demoAnsible resource group.
The contents of this file will look as follows:
plugin: azure_rm
include_vm_resource_groups:
- demoAnsible
auth_source: auto
keyed_groups:
- key: tags.role
leading_separator : false
The complete source code for the inv.azure_rm.yml file is available here: https://github.com/PacktPublishing/Learning-DevOps-Second-Edition/tree/main/CHAP03/devopsansible/inventories.
- After setting up all of the artifacts for our Ansible dynamic inventory in Azure, it is good to test its functionality, which includes doing the following:
- Ensuring there are no execution errors.
- Ensuring the connection and authentication to our Azure environment are done correctly.
- Ensuring its execution returns the Azure VMs from our infrastructure.
Important Note
As mentioned in the Technical requirements section, before running the following commands, we need to have the Azure Python module installed on the machine.
To perform this test, execute the following command:
ansible-inventory -i inv.azure_rm.yml --list
This command allows us to display as output the inventory script in list format. Here is a small sample screen from this execution:

Figure 3.18 – Dynamic Ansible inventory list of VMs
We can also display this inventory in graph mode by running the same command but with the --graph option, as follows:

Figure 3.19 – Dynamic Ansible inventory list of VMs grouped by role
With the --graph option, we get a better visualization of the VMs according to their tags.
With the test concluded, we can proceed to the final step, which is executing Ansible with a dynamic inventory.
- Once we have tested our dynamic inventory in Azure, we just have to run Ansible on it, using the tags we applied to the VMs. For this, we must run our playbook with the following command:
ansible-playbook playbook.yaml -i inv.azurerm.yml -u demobook –ask-pass
Note
In our lab we use a VM with a username and password, and it's because of this that in the preceding command, we use the -u parameter (for the VM username) and the –ask-pass parameter (to ask for the VM user password). But it's better and recommended to use SSH public/private keys instead of a password.
The following screenshot shows the execution of the Ansible playbook with the dynamic inventory:

Figure 3.20 – Dynamic Ansible inventory execution
From now on, each time a VM on our Azure infrastructure has a role=webserver tag, it will be automatically taken into account by the dynamic inventory, so no code modifications will be necessary.
Important Note
For other ways to use dynamic inventories on Azure, you can consult the Azure documentation at https://docs.microsoft.com/en-us/azure/developer/ansible/dynamic-inventory-configure?tabs=azure-cli.
By using a dynamic inventory, we can take full advantage of the scalability of the cloud with an automatic VM configuration and without having to make any code changes.
In this section, we learned how to use a dynamic inventory in Azure by implementing its configuration and doing the necessary script recovery, before executing this dynamic inventory with Ansible.
Summary
In this chapter, we saw that Ansible is a very powerful and complete tool that allows us to automate server configuration and administration. To work, it uses an inventory that contains the list of hosts to be configured and a playbook that the list of configuration actions is coded in.
Roles, modules, and variables also allow for better management and centralization of playbook code. Ansible also has a vault that protects sensitive playbook data. Finally, for dynamic environments, inventory writing can be simplified by implementing dynamic inventories.
In the next chapter, we will learn how to optimize infrastructure deployment with the use of Packer to create server templates.
Questions
- What is the role of Ansible that was detailed in this chapter?
- Can we install Ansible on a Windows OS?
- What are the two artifacts that we studied in this chapter that Ansible needs to run?
- What is the name of the option that was added to the ansible-playbook command that is used to preview the changes that will be applied?
- What is the name of the utility used to encrypt and decrypt Ansible data?
- When using a dynamic inventory in Azure, on which properties of the VMs is the inventory script used to return the list of VMs?
Further reading
If you want to know more about Ansible, here are some resources:
- The Ansible documentation: https://docs.ansible.com/ansible/latest/index.html
- Quick Start video: https://www.ansible.com/resources/videos/quick-start-video?extIdCarryOver=true&sc_cid=701f2000001OH6uAAG
- Ansible on Azure documentation: https://docs.microsoft.com/en-us/azure/ansible/
- Visual Studio Code Ansible extension: https://marketplace.visualstudio.com/items?itemName=vscoss.vscode-ansible
- Mastering Ansible: https://www.packtpub.com/virtualization-and-cloud/mastering-ansible-third-edition
- Ansible Webinars Training: https://www.ansible.com/resources/webinars-training