
Chapter 2: Provisioning Cloud Infrastructure with Terraform
In the previous chapter, we introduced the tools, practices, and benefits of Infrastructure as Code (IaC) and its impact on DevOps culture. Out of all of the IaC tools that have been mentioned, one that is particularly popular and powerful is Terraform, which is part of the HashiCorp tools suite.
In this chapter, we will explore the basics of using Terraform to provision a cloud infrastructure, using Azure as an example. We will start with an overview of its strengths compared to other IaC tools. We will learn how to install it in both manual mode and automatic mode, and then we will create our first Terraform script to provision an Azure infrastructure with the use of best practices and its automation in a Continuous Integration (CI)/Continuous Deployment (CD) process. Finally, we will go a little deeper with the implementation of a remote backend for the Terraform state file.
In this chapter, we will cover the following topics:
- Installing Terraform
- Configuring Terraform for Azure
- Writing a Terraform script to deploy an Azure infrastructure
- Running Terraform for deployment
- Understanding the Terraform life cycle with different command-line options
- Protecting the state file with a remote backend
Technical requirements
This chapter will explain how you can use Terraform to provision an Azure infrastructure as an example of cloud infrastructure. Therefore, you will need an Azure subscription, which you can get, for free, at https://azure.microsoft.com/en-us/free/.
In addition, we will require a code editor to write the Terraform code. There are several editors out there, but I will be using Visual Studio Code. It is free, lightweight, multiplatform, and has several extensions for Terraform. You can download it at https://code.visualstudio.com/. The complete source code of this chapter is available at https://github.com/PacktPublishing/Learning-DevOps-Second-Edition/tree/main/CHAP02.
Check out the following video to view the Code in Action:
Installing Terraform
Terraform is a command-line tool that, in its basic version, is open source, uses the HashiCorp Configuration Language (HCL), is declarative, and is relatively easy to read. Its main advantage is the use of the same language to deploy on a multitude of cloud providers such as Azure, AWS, and Google—the complete list is available at https://www.terraform.io/docs/providers/.
Terraform has other advantages:
- It's multiplatform, and it can be installed on Windows, Linux, and Mac.
- It allows a preview of infrastructure changes before they are implemented.
- It allows the parallelization of operations by considering resource dependencies.
- It integrates a very large number of providers.
Terraform can be installed onto your system in a number of ways. Let's begin by looking at the manual installation method.
Manual installation
To install Terraform manually, perform the following steps:
- Go to the official download page at https://www.terraform.io/downloads.html. Then, download the package corresponding to your operating system.
- After downloading, unzip and copy the binary into an execution directory (for example, inside c:Terraform).
- Then, the PATH environment variable must be completed with the path to the binary directory. For detailed instructions, please view the video at https://learn.hashicorp.com/tutorials/terraform/install-cli.
Now that we've learned how to install Terraform manually, let's take a look at the options available to us to install it using a script.
Installation by script
Script installation automates the installation or update of Terraform on a remote server that will be in charge of executing Terraform code, such as on a Jenkins slave or an Azure Pipelines agent.
Installing Terraform by script on Linux
To install the Terraform binary on Linux, we have two solutions. The first solution is to install Terraform using the following script:
TERRAFORM_VERSION="1.0.0" #Update with your desired version
curl -Os https://releases.hashicorp.com/terraform/${TERRAFORM_VERSION}/terraform_${TERRAFORM_VERSION}_linux_amd64.zip
&& curl -Os https://releases.hashicorp.com/terraform/${TERRAFORM_VERSION}/terraform_${TERRAFORM_VERSION}_SHA256SUMS
&& curl https://keybase.io/hashicorp/pgp_keys.asc | gpg --import
&& curl -Os https://releases.hashicorp.com/terraform/${TERRAFORM_VERSION}/terraform_${TERRAFORM_VERSION}_SHA256SUMS.sig
&& gpg --verify terraform_${TERRAFORM_VERSION}_SHA256SUMS.sig terraform_${TERRAFORM_VERSION}_SHA256SUMS
&& shasum -a 256 -c terraform_${TERRAFORM_VERSION}_SHA256SUMS 2>&1 | grep "${TERRAFORM_VERSION}_linux_amd64.zip:sOK"
&& unzip -o terraform_${TERRAFORM_VERSION}_linux_amd64.zip -d /usr/local/bin
This script does the following:
- It sets the TERRAFORM_VERSION parameter with the version to download.
- It downloads the Terraform package by checking the checksum.
- It unzips the package in the user's local directory.
Important Note
This script is also available in the GitHub source for this book at https://github.com/PacktPublishing/Learning-DevOps-Second-Edition/blob/main/CHAP02/Terraform_install_Linux.sh.
To execute this script, follow these steps:
- Open a command-line Terminal.
- Copy and paste the preceding script.
- Execute it by hitting Enter in the command-line Terminal.
The following screenshot displays an execution of the script to install Terraform on Linux:

Figure 2.1 – The Terraform install script on Linux
In the execution of the preceding script, we can see the download of the Terraform ZIP package (using the curl tool) and the unzip operation of this package inside the /usr/local/bin folder.
The benefit of this solution is that we can choose the Terraform installation folder and that it is applicable on the various distributions of Linux. This is because it uses common tools, including curl and unzip.
The second solution for installing Terraform on Linux is to use the apt package manager. You can do so by using the following script for the Ubuntu distribution:
sudo apt-get update && sudo apt-get install -y gnupg software-properties-common curl
&& curl -fsSL https://apt.releases.hashicorp.com/gpg | sudo apt-key add -
&& sudo apt-add-repository "deb [arch=amd64] https://apt.releases.hashicorp.com $(lsb_release -cs) main"
&& sudo apt-get update && sudo apt-get install terraform
This script does the following:
- It adds the apt HashiCorp repository.
- It updates the local repository.
- It downloads the Terraform CLI.
Important Note
For additional details about this script and the installation of Terraform on other distributions, please refer to the documentation at https://learn.hashicorp.com/tutorials/terraform/install-cli, and navigate to the Linux tab.
The benefit of this solution is that you can use Linux package management, which can be integrated into popular configuration tools (for example, Ansible, Puppet, or Docker)
We have just discussed the installation of Terraform on Linux. Now, let's take a look at its installation on Windows.
Installing Terraform by script on Windows
If we use Windows, we can use Chocolatey, which is a free public package manager, such as NuGet or npm, but dedicated to software. It is widely used for the automation of software on Windows servers or even local machines.
Important Note
The Chocolatey official website can be found at https://chocolatey.org/, and its installation documentation can be located at https://chocolatey.org/install.
Once Chocolatey has been installed, we just need to run the following command in PowerShell or the CMD tool:
choco install terraform -y
The following is a screenshot of the Terraform installation for Windows with Chocolatey:

Figure 2.2 – Terraform installation on Windows
Executing the choco install terraform command installs the latest version of Terraform from Chocolatey.
Once installed, we can check the Terraform version by running the following command:
terraform version
This command displays the installed Terraform version.
We can also check out the different commands that Terraform offers by running the following command:
terraform --help
The following screenshot lists the different commands and their functions:

Figure 2.3 – Terraform's available commands
Now, let's take a look at the installation of Terraform on macOS.
Installing Terraform by script on macOS
On macOS, we can use Homebrew, the macOS package manager (https://brew.sh/), to install Terraform by executing the following command in your Terminal:
brew install terraform
That's all for the installation of Terraform by script. Let's take a look at another solution that uses Terraform in Azure without having to install it—Azure Cloud Shell.
Integrating Terraform with Azure Cloud Shell
If we are using Terraform to deploy a piece of infrastructure in Azure, we should also know that the Azure team has integrated Terraform into Azure Cloud Shell.
Important Note
To learn more about Azure Cloud Shell, please refer to its documentation at https://azure.microsoft.com/en-us/features/cloud-shell/.
To use it from the Azure Cloud Shell, follow these steps:
- Connect to the Azure portal by opening https://portal.azure.com, and sign in with your Azure account:
Figure 2.4 – The Azure Sign in page
- Open the Cloud Shell and choose the mode you want, that is, either Bash or PowerShell.
- Then, we can run the Terraform command line in the shell.
The following is a screenshot of the execution of Terraform in Azure Cloud Shell:

Figure 2.5 – Azure Cloud Shell
The advantage of using this solution is that we don't need any software to install; we can simply upload your Terraform files to Cloud Shell and run them in Cloud Shell. Additionally, we are already connected to Azure, so no configuration is required (please refer to the Configuring Terraform for Azure section).
However, this solution is only to be used in development mode and not for the local or automatic use of Terraform. For this reason, in this chapter, we will discuss the configuration of Terraform for Azure.
Now that we have installed Terraform, we can begin using it locally to provision an Azure infrastructure. We will start with the first step, which is to configure Terraform for Azure.
Configuring Terraform for Azure
Before writing the Terraform code in which to provision a cloud infrastructure such as Azure, we must configure Terraform to allow the manipulation of resources in an Azure subscription.
To do this, first, we will create a new Azure Service Principal (SP) in Azure Active Directory (AD), which, in Azure, is an application user who has permission to manage Azure resources.
Important Note
For more details about the Azure SP, please read the documentation at https://docs.microsoft.com/en-us/azure/active-directory/develop/app-objects-and-service-principals.
For this Azure SP, we have to assign to it the contributing permissions on the subscription in which we will create resources.
Creating the Azure SP
This operation can be done either via the Azure portal (all steps are detailed within the official documentation at https://docs.microsoft.com/en-us/azure/active-directory/develop/howto-create-service-principal-portal) or via a script by executing the following az cli command (which we can launch in Azure Cloud Shell).
The following is a template az cli script that you have to run to create an SP. Here, you have to enter your SP name, role, and scope:
az ad sp create-for-rbac --name="<ServicePrincipal name>" --role="Contributor" --scopes="/subscriptions/<subscription Id>"
Take a look at the following example:
az ad sp create-for-rbac --name="SPForTerraform" --role="Contributor" --scopes="/subscriptions/8921-1444-..."
This sample script creates a new SP, named SPForTerraform, and gives it the contributor permission on the subscription ID, that is, 8921....
Important Note
For more details about the Azure CLI command to create an Azure SP, please refer to the documentation at https://docs.microsoft.com/en-us/cli/azure/create-an-azure-service-principal-azure-cli?view=azure-cli-latest.
The following screenshot shows the execution of the script that creates an Azure SP:

Figure 2.6 – Creating an Azure SP
The creation of this Azure SP returns three pieces of identification information:
- The application ID, which is also called the client ID
- The client secret
- The tenant ID
The SP is created in Azure AD. The following screenshot shows the Azure AD SP:

Figure 2.7 – The App registrations list in the Azure portal
Here, we have just discovered how to create an SP in Azure AD, and we have given it permissions to manipulate the resources of our Azure subscriptions.
Now, let's learn how to configure Terraform to use our Azure SP.
Configuring the Terraform provider
Once the Azure SP has been created, we will configure our Terraform configuration to connect to Azure using this SP. To do this, follow these steps:
- In a directory of your choice, create a new filename, provider.tf (the extension .tf file corresponds to Terraform files), which contains the following code:
provider "azurerm" {
features {}
subscription_id = "<subscription ID>"
client_id = "<Client ID>"
client_secret = "<Client Secret>"
tenant_id = "<Tenant Id>"
}
In the preceding code, we indicate that the provider we are using is azurerm. The authentication information to Azure is the SP that has been created, and we add new block features that provide the possibility that we can customize the behavior of the Azure provider resources.
However, for security reasons, it is not advisable to put identification information in plain text inside your configuration, especially if you know that this code might be accessible by other people.
- Therefore, we will improve the preceding code by replacing it with this one:
provider "azurerm" {
features {}
}
- So, we delete the credentials in the Terraform configuration, and we will pass the identification values to specific Terraform environment variables:
- ARM_SUBSCRIPTION_ID
- ARM_CLIENT_ID
- ARM_CLIENT_SECRET
- ARM_TENANT_ID
Important Note
For more information regarding the azurerm provider, please refer to the documentation at https://registry.terraform.io/providers/hashicorp/azurerm/latest/docs. We will learn how to set these environment variables later in this chapter, in the Running Terraform form deployment section.
As a result, the Terraform code no longer contains any identification information.
We have just learned how to configure Terraform for Azure authentication. Now, we will explain how to quickly configure Terraform to perform local development and testing.
The Terraform configuration for local development and testing
When you work locally and want to test the Terraform code quickly—for example, in a sandbox environment—it might be more convenient and faster to use your own Azure account instead of using an SP.
To do this, it is possible to connect to Azure beforehand using the az login command. Then, enter your identification information in the window that opens.
The following is a screenshot of the Azure login window:

Figure 2.8 – The Azure Sign in page with Azure login
If several subscriptions are accessed, the desired one can be selected using the following command:
az account set --subscription="<Subscription ID>"
Then, we configure the Terraform provider as before using the provider, "azurerm" { }.
Of course, this authentication method should not be done in the case of an execution on a remote server.
Important Note
For more information regarding the provider configuration, please refer to the documentation at https://www.terraform.io/docs/providers/azurerm/index.html.
Therefore, the Terraform configuration for Azure is defined by the configuration of the provider that uses the information from an Azure SP.
Once this configuration is complete, we can start writing the Terraform configuration to manage and provision Azure resources.
Writing a Terraform script to deploy an Azure infrastructure
To illustrate the use of Terraform to deploy resources in Azure, we will provide a simple Azure architecture with Terraform that is composed of the following components:
- There's an Azure resource group.
- There's also a network configuration that is composed of a virtual network and a subnet.
- In this subnet, we will create a virtual machine that has a public IP address in order to be publicly available.
To do this, in the same directory where we previously created the provider.tf file, we will create a main.tf file with the following code:
- Let's start with the code that provides the resource group:
resource "azurerm_resource_group" "rg" {
name = "bookRg"
location = "West Europe"
tags {
environment = "Terraform Azure"
}
}
Any piece of Terraform code is composed of the same syntax model, and the syntax of a Terraform object consists of four parts:
- A type of resource or data block
- A name of the resource to be managed (for example, azurerm_resource_group)
- An internal Terraform ID (for example, rg)
- A list of properties that correspond to the real properties of the resource (that is, name and location)
Important Note
More documentation regarding the Terraform syntax is available at https://www.terraform.io/docs/configuration-0-11/resources.html.
This code uses the azurerm_resource_group Terraform resource and will provision a resource group, named bookRg, that will be stored in the West Europe location.
- Then, we will write the code for the network part:
resource "azurerm_virtual_network" "vnet" {
name = "book-vnet"
location = "West Europe"
address_space = ["10.0.0.0/16"]
resource_group_name = azurerm_resource_group.rg.name
}
resource "azurerm_subnet" "subnet" {
name = "book-subnet"
virtual_network_name = azurerm_virtual_network.vnet.name
resource_group_name = azurerm_resource_group.rg.name
address_prefix = "10.0.10.0/24"
}
In this Terraform code for the network part, we create the code for a VNet, book-vnet, and in it, we create a subnet called book-subnet.
If we look at this code carefully, we can see that, for the dependencies between the resources, we do not put in clear IDs, but we use pointers on the Terraform resources.
The VNet and subnet are the property of the resource group with ${azurerm_resource_group.rg.name}, which tells Terraform that the VNet and subnet will be created just after the resource group. As for the subnet, it is dependent on its VNet with the use of the ${azurerm_virtual_network.vnet.name} value; it's the explicit dependence concept.
Now, let's write the Terraform provisioning code of the virtual machine, which is composed of the following:
- A network interface
- A public IP address
- An Azure Storage object for the diagnostic boot (boot information logs)
- A virtual machine
The sample code for the network interface with the IP configuration is as follows:
resource "azurerm_network_interface" "nic" {
name = "book-nic"
location = "West Europe"
resource_group_name = azurerm_resource_group.rg.name
ip_configuration {
name = "bookipconfig"
subnet_id = azurerm_subnet.subnet.id
private_ip_address_allocation = "Dynamic"
public_ip_address_id = azurerm_public_ip.pip.id
}
}
In this Terraform code, we use an azurerm_network_interface block (https://www.terraform.io/docs/providers/azurerm/r/network_interface.html). In it, we configure the name, region, resource group, and IP configuration with the dynamic IP address of the network interface.
The code for public ip address, which has an IP address in the subnet we just created, is as follows:
resource "azurerm_public_ip" "pip" {
name = "book-ip"
location = "West Europe"
resource_group_name = "${azurerm_resource_group.rg.name}"
public_ip_address_allocation = "Dynamic"
domain_name_label = "bookdevops"
}
In this Terraform code, we use an azurerm_public_ip block at https://www.terraform.io/docs/providers/azurerm/r/public_ip.html. In it, we configure the dynamic allocation of the IP address and the DNS label.
The code for storage account, which we use for the boot diagnostic logs, is as follows:
resource "azurerm_storage_account" "stor" {
name = "bookstor"
location = "West Europe"
resource_group_name = azurerm_resource_group.rg.name
account_tier = "Standard"
account_replication_type = "LRS"
}
In this Terraform code, we use an azurerm_storage_account block at https://www.terraform.io/docs/providers/azurerm/r/storage_account.html. In it, we configure the name, region, resource group, and type of storage, which, in our case, is Standard LRS.
Important Note
The documentation for the storage account can be found at https://docs.microsoft.com/en-us/azure/storage/common/storage-account-overview.
And the code for the Ubuntu virtual machine, which contains the ID of the network interface created earlier, is as follows:
resource "azurerm_linux_virtual_machine" "vm" {
name = "bookvm"
location = "West Europe"
resource_group_name = azurerm_resource_group.rg.name
vm_size = "Standard_DS1_v2"
network_interface_ids = ["${azurerm_network_interface.nic.id}"]
storage_image_reference {
publisher = "Canonical"
offer = "UbuntuServer"
sku = "16.04-LTS"
version = "latest"
}
....
}
In this Terraform code, we use an azurerm_linux_virtual_machine block at https://registry.terraform.io/providers/hashicorp/azurerm/latest/docs/resources/linux_virtual_machine. In it, we configure the name, size (Standard_DS1_V2), reference to the network_interface Terraform object, and the type of virtual machine operating system (Ubuntu).
All of these code sections are exactly like the previous ones with the use of an explicit dependency to specify the relationships between the resources.
Important Note
This complete source code is available at https://github.com/PacktPublishing/Learning-DevOps-Second-Edition/tree/main/CHAP02/terraform_simple_script.
We have just created a complete Terraform script that allows us to provision a small Azure infrastructure. However, as in any language, there are good practices regarding file separation, applying a clear and readable code, and, finally, the use of built-in functions.
Following some Terraform good practices
We have just looked at an example of Terraform code to provision an Azure infrastructure, but it is also useful to look at some good practices for writing Terraform code.
Better visibility with the separation of files
When executing Terraform code, all of the configuration files in the execution directory that have the .tf extension are automatically executed; in our example, we have provider.tf and main.tf. It is good to separate the code into several files in order to improve the readability of the code and its evolution.
Using our example script, we can do better by separating it with the following:
- Rg.tf: This contains the code for the resource group.
- Network.tf: This contains the code for the VNet and subnet.
- Compute.tf: This contains the code for the network interface, public IP, storage, and virtual machine.
Important Note
The complete code with separate files can be located at https://github.com/PacktPublishing/Learning-DevOps-Second-Edition/tree/main/CHAP02/terraform_separate_files.
The protection of sensitive data
Care must be taken with sensitive data in the Terraform configuration, such as passwords and access permissions. We have already learned that, for access authentication to Azure, it is not necessary to leave them in the code. Additionally, in our example concerning the administrator account of the virtual machine, note that the password of the admin account of the virtual machine has been clearly specified in this Terraform configuration. To remedy this, we can use a strong secret manager to store passwords, such as Azure Key Vault or HashiCorp Vault, and get them via Terraform.
Dynamizing the configuration with variables and interpolation functions
When writing the Terraform configuration, it is important to take into account—from the beginning—that the infrastructure that will host an application is very often the same for all stages. However, only some information will vary from one stage to another, such as the name of the resources and the number of instances.
To give more flexibility to the code, we must use variables in the code with the following steps:
- Declare the variables by adding the following sample code in the global Terraform code. Alternatively, we can add it within another file (such as variables.tf) for better readability of the code:
variable "resource_group_name" {
description ="Name of the resource group"
}
variable "location" {
description ="Location of the resource"
default ="West Europe"
}
variable "application_name" {
description ="Name of the application"
}
- Instantiate their values in another .tfvars file, named terraform.tfvars, with the variable_name=value syntax, similar to the following:
resource_group_name ="bookRg"
application_name ="book"
- Use these variables in code with var.<name of the variable>; for example, in the resource group Terraform code, we can write the following:
resource "azurerm_resource_group" "rg" {
name = var.resoure_group_name
location = var.location
tags {
environment = "Terraform Azure"
}
}
In addition to this, Terraform has a large list of built-in functions that can be used to manipulate data or variables. To learn more about these functions, please refer to the official documentation at https://www.terraform.io/docs/configuration/functions.html.
Of course, there are many other good practices, but these are to be applied from the first lines of code to ensure that your code is well maintained.
Important Note
The complete and final code of this example is available at https://github.com/PacktPublishing/Learning-DevOps-Second-Edition/tree/main/CHAP02/terraform_vars_interp.
We have written a Terraform configuration, using best practices, which allows us to create a simple cloud infrastructure in Azure that provides a network and a virtual machine. Now, let's take a look at how to run Terraform with our code in order to provision this infrastructure.
Running Terraform for deployment
With the Terraform configuration written, we now need to run Terraform to deploy our infrastructure.
However, before any execution, first, it is necessary to provide authentication with the Azure SP to ensure that Terraform can manage the Azure resources.
To do this, we can either set the environment variables specific to Terraform to contain the information of the SP created earlier in the Configuring Terraform for Azure section, or we can use the az cli script.
The following script exports the four Terraform environment variables in the Linux OS:
export ARM_SUBSCRIPTION_ID=xxxxx-xxxxx-xxxx-xxxx
export ARM_CLIENT_ID=xxxxx-xxxxx-xxxx-xxxx
export ARM_CLIENT_SECRET=xxxxxxxxxxxxxxxxxx
export ARM_TENANT_ID=xxxxx-xxxxx-xxxx-xxxx
Additionally, we can use the az cli script with the login command:
az login
Once authenticated, we can run the Terraform workflow.
In our scenario, we begin with an empty Azure subscription without any Azure resource groups; however, in the real world, our subscription might already contain a resource group.
Before running Terraform, in the Azure portal, check that you do not have a resource group in your subscription, as follows:

Figure 2.9 – No resource group on Azure
To run Terraform, we need to open a command-line Terminal such as CMD, PowerShell, or Bash and navigate to the directory where the Terraform configuration files we wrote earlier are located.
The Terraform configuration is executed in several steps, including initialization, the preview of changes, and the application of those changes.
Next, let's take a look, in detail, at the execution of these steps, starting with the initialization step.
Initialization
The initialization step allows Terraform to do the following:
- Initialize the Terraform context to check and make the connection between the Terraform provider and remote service—in our case, this is with Azure.
- Download the plugin(s) of the provider(s)—in our case, it will be the azurerm provider.
- Check the code variables.
To execute the initialization, run the init command:
terraform init
The following is a screenshot of terraform init:

Figure 2.10 – Executing the terraform init command
As we have gathered during its execution of the preceding command, Terraform does the following:
The following is a screenshot of the .terraform directory:

Figure 2.11 – The Terraform configuration directory
Important Note
For more information about the init command line, please refer to the documentation at https://www.terraform.io/docs/commands/init.html.
Once the initialization step is complete, we can proceed to the next step, which is previewing the changes.
Previewing the changes
The next step is to preview the changes made to the infrastructure before applying them.
To do this, run Terraform with the plan command. When executed, the plan automatically uses the terraform.tfvars file to set the variables.
To execute it, launch the plan command:
terraform plan
The following output shows the execution of the terraform plan command:
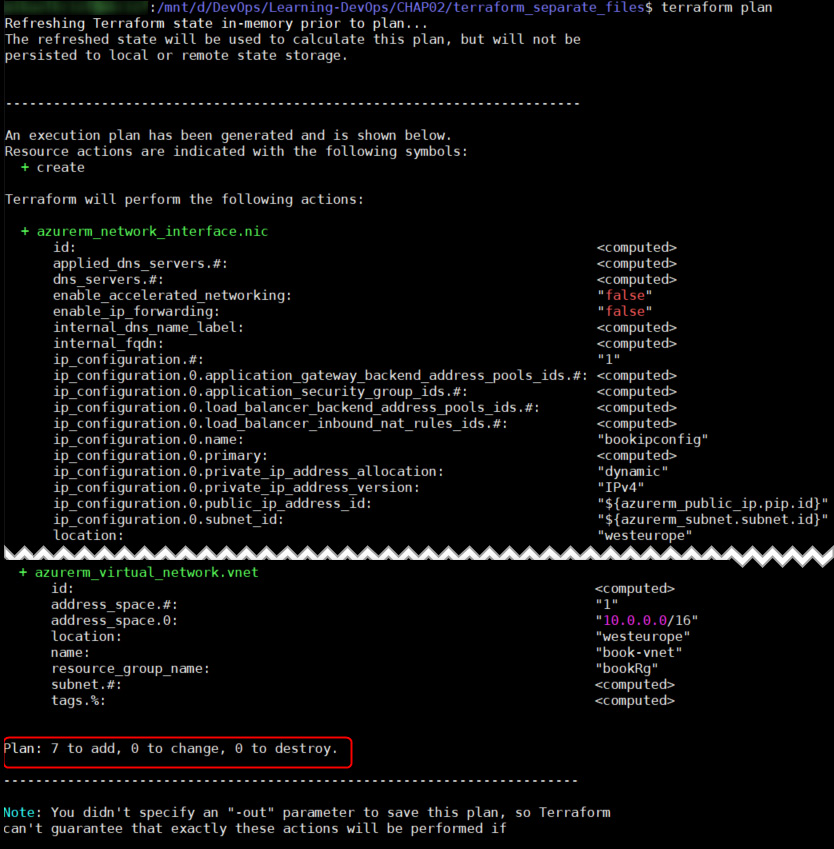
Figure 2.12 – Executing the terraform plan command
During the execution of the plan command, the command displays the name and properties of the resources that will be impacted by the change. It also displays the number of new resources and the number of resources that will be modified, along with the number of resources that will be deleted.
Important Note
For more information about the plan command line, please refer to the documentation at https://www.terraform.io/docs/commands/plan.html.
Therefore, we have just seen a prediction of the changes that will be applied to our infrastructure. Now, we will view how to apply them.
Applying the changes
After validating that the result of the plan command corresponds to our expectations, the final step is the application of the Terraform code in real time to provision and apply the changes to our infrastructure.
To do this, we will execute the apply command:
terraform apply
This command does the same operation as the plan command and interactively asks the user for confirmation that we want to implement the changes.
The following is a screenshot of the terraform apply confirmation:

Figure 2.13 – Confirmation of the changes to be applied in Terraform
The confirmation is given by inputting yes (or no to cancel), then Terraform applies the changes to the infrastructure.
The following is a screenshot of the terraform apply execution:

Figure 2.14 – Executing the terraform apply command
The output of the apply command displays all actions executed by Terraform, along with all changes and the impacted resources. It ends with a summary line that displays the sum of all added, changed, or destroyed resources.
Important Note
For more information about the apply command line, please refer to the documentation at https://www.terraform.io/docs/commands/apply.html.
Since the Terraform apply command has been executed correctly, we can check in the Azure portal whether the resources described in the Terraform code are present.
The following is a screenshot of the Azure resources by Terraform:

Figure 2.15 – A list of provisioned Azure resources
We can gather from the portal that the resources specified in the Terraform code have been provisioned successfully.
So, we have just learned how Terraform is useful for provisioning infrastructure using three main commands:
- The init command to initialize the context
- The plan command to preview the changes
- The apply command to apply the changes
In the next section, we will explore other Terraform commands and the Terraform life cycle.
Understanding the Terraform life cycle with different command-line options
We have just discovered that applying changes to a piece of infrastructure with Terraform is mainly done using three commands. They include the init, plan, and apply commands. However, Terraform has other very practical and important commands that can be used to best manage the life cycle of our infrastructure, and the question of how to execute Terraform in an automation context such as a CI/CD pipeline must also be considered.
Among the other operations that can be done on a piece of infrastructure is the cleaning up of resources by removing them. This is done to either better rebuild or remove temporary infrastructure.
Using destroy to better rebuild
One of the steps in the life cycle of infrastructure that is maintained by IaC is the removal of the infrastructure; do not forget that one of the objectives and benefits of IaC is to be able to make rapid changes to infrastructure but also create environments on demand. That is to say, we create and keep environments as long as we need them, and we will destroy them when they are no longer used, thereby allowing the company to make financial savings.
To accomplish this, it is necessary to automate the removal of the infrastructure in order to be able to rebuild it quickly.
To destroy infrastructure that has previously provisioned with Terraform, execute the following command:
terraform destroy
The execution of this command should give the following output:

Figure 2.16 – Confirmation of the terraform destroy command
This command, as with apply, requires confirmation from the user before applying the destruction:

Figure 2.17 – Executing the terraform destroy command
Once validated, wait for the confirmation message that the infrastructure has been destroyed.
The destroy command only destroys the resources configured in the current Terraform configuration. Other resources (created manually or by another Terraform code) are not affected. However, if our Terraform code provides a resource group, it will destroy all of its content.
Important Note
For more information about the destroy command line, please refer to the documentation at https://www.terraform.io/docs/commands/destroy.html.
We have just discovered that Terraform also allows you to destroy resources on the command line. Now, let's learn how to format and validate your Terraform code.
Formatting and validating the configuration
After learning how to destroy resources with Terraform, it is also important to emphasize the importance of having well-formatted code that meets Terraform's style rules and to validate that the code does not contain syntax or variable errors.
Formatting the code
Terraform has a command that allows the code to be properly aligned with Terraform's styles and conventions.
The following command automatically formats the code:
terraform fmt
The following is a screenshot of a Terraform-arranged file:

Figure 2.18 – Executing the terraform fmt command
The command reformats the code and indicates the list of arranged files.
Important Note
For more information regarding the Terraform style guide, please refer to https://www.terraform.io/docs/configuration/style.html. Additionally, for information about the terraform fmt command line, please refer to https://www.terraform.io/docs/commands/fmt.html.
Validating the code
Along the same lines, Terraform has a command that validates the code and allows us to detect possible errors before executing the plan command or the apply command.
Let's consider the example of the following code extract:
resource "azurerm_public_ip" "pip" {
name = var.ip-name
location = var.location
resource_group_name = "${azurerm_resource_group.rg.name}"
allocation_method = "Dynamic"
domain_name_label = "bookdevops"
}
In the name property, we use an ip-name variable that has not been declared or instantiated with any value.
Executing the terraform plan command should return an error:

Figure 2.19 – The terraform plan command with an error
And because of this error, in a CI/CD process, it could delay the deployment of the infrastructure.
In order to detect errors in the Terraform code as early as possible in the development cycle, execute the following command. This validates all Terraform files in the directory:
terraform validate
The following screenshot shows the execution of this command:

Figure 2.20 – Executing the terraform validate command
Here, we observe the same error as the one returned by the plan command.
We have just discovered Terraform's main command lines. Let's dive a little deeper with the integration of Terraform into a CI/CD process.
The Terraform life cycle within a CI/CD process
So far, we have seen and executed, on the local machine, the various Terraform commands that allow us to initialize, preview, apply, and destroy infrastructure and to format and validate Terraform code. When using Terraform locally, in a development context, the execution life cycle is as follows:

Figure 2.21 – The Terraform CICD process
The following steps explain the sequence in the preceding diagram:
- Code development
- Code formatting with terraform fmt
- Initialization with terraform init
- Code validation with terraform validate
- Planning with terraform plan
- Manual verification of Terraform changes on the infrastructure
However, IaC, similar to an application, must be deployed or executed in an automatic CI/CD process. This begins with the archiving of the Terraform code of the team members. Then, it triggers the CI and executes the Terraform commands that we have studied in this chapter.
The following is a screenshot of the Terraform life cycle in CI/CD automation:

Figure 2.22 – The Terraform CICD workflow
The steps of CI/CD by the CI server (in which Terraform has been installed) for Terraform are as follows:
- Retrieving the code from the SCM
- Code formatting with terraform fmt
- Initialization with terraform init
- Code validation with terraform validate
- Displaying a preview of the infrastructure changes with terraform plan -out=out.tfplan
- Applying changes in automatic mode with terraform apply --auto-approve out.tfplan
By adding the --auto-approve option to the apply and destroy commands, Terraform can also be executed in automatic mode. This is to avoid asking for confirmation from the user to validate the changes that need to be applied. With this automation, Terraform can be integrated with CI/CD tools.
In the plan command, an out option is added to specify a file with the .tfplan format that corresponds to a file that contains the output of the plan command. This out.tfplan file is then used by the apply command. The advantage of this procedure is that it is possible to execute the application on a later plan, which can be used in a rollback case.
In this section, we have gathered that, aside from the usual Terraform commands of init, plan, apply, and destroy, Terraform also has options that will allow us to improve the readability of the code and validate the code syntax. Additionally, we explained that Terraform allows a perfect integration into a CI/CD pipeline with a life cycle and automation options.
In the next section, we will examine what the tfstate file is and how to protect it with a remote backend.
Protecting the state file with a remote backend
When Terraform handles resources, it writes the state of these resources in a Terraform state file. This file is in JSON format and preserves the resources and their properties throughout the execution of Terraform.
By default, this file, called terraform.tfstate, is created locally when the first execution of the apply command is executed. Then, it will be used by Terraform each time the plan command is executed in order to compare its state (written in the state file) with that of the target infrastructure. Finally, it will return a preview of what will be applied.
When using Terraform in an enterprise, this locally stored state file poses many problems:
- Knowing that this file contains the status of the infrastructure, it should not be deleted. If deleted, Terraform might not behave as expected when it is executed.
- It must be accessible at the same time by all members of the team who are handling resources on the same infrastructure.
- This file can contain sensitive data, so it must be secure.
- When provisioning multiple environments, it is necessary to be able to use multiple state files.
With all of these points, it is not possible to keep this state file locally or even to archive it in an SCM.
To solve this problem, Terraform allows this state file to be stored in a shared and secure storage called the remote backend.
Important Note
Terraform supports several types of remote backends; the full list is available at https://www.terraform.io/docs/backends/types/remote.html.
In our case, we will use an azurerm remote backend to store our state files with a storage account and a blob for the state file.
Therefore, we will implement and use a remote backend in three steps:
- The creation of the storage account
- The Terraform configuration for the remote backend
- The execution of Terraform with the use of this remote backend
Let's take a look, in detail, at the execution of these steps:
- To create an Azure storage account and a blob container, we can use either the Azure portal (https://docs.microsoft.com/en-gb/azure/storage/common/storage-quickstart-create-account?tabs=azure-portal) or an az cli script:
# 1-Create resource group
az group create --name MyRgRemoteBackend --location westeurope
# 2-Create storage account
az storage account create --resource-group MyRgRemoteBackend --name storageremotetf --sku Standard_LRS --encryption-services blob
# 3-Get storage account key
ACCOUNT_KEY=$(az storage account keys list --resource-group MyRgRemoteBackend --account-name storageremotetf --query [0].value -o tsv)
# 4-Create blob container
az storage container create --name tfbackends --account-name storageremotetf --account-key $ACCOUNT_KEY
This script creates a MyRgRemoteBackend resource group and a storage account, called storageremotetf.
Then, the script retrieves the key account from the storage account and creates a blob container, tfbackends, inside this storage account.
This script can be run in Azure Cloud Shell, and the advantage of using a script rather than using the Azure portal is that this script can be integrated into a CI/CD process.
- Then, to configure Terraform to use the previously created remote backend, we need to add the configuration section within the Terraform.tf file:
terraform {
backend "azurerm" {
storage_account_name = "storageremotetfdemo"
container_name = "tfbackends"
key = "myappli.tfstate"
snapshot = true
}
}
The storage_account_name property contains the name of the storage account, the container_name property contains the container name, the key property contains the name of the blob state object, and the snapshot property enables a snapshot of this blog object at each edition by Terraform execution.
However, there is still one more piece of configuration information to be provided to Terraform so that it can connect and have permissions on the storage account. This information is the access key, which is a private authentication and authorization key on the storage account. To provide the storage key to Terraform, as with the Azure SP information, set an ARM_STORAGE_KEY environment variable with the storage account access key value.
The following is a screenshot of the Azure storage access key:

Figure 2.23 – The Azure storage access key
Important Note
Terraform supports other types of authentications on the storage account such as the use of a SAS token or by using an SP. For more information on how to configure Terraform for an azurerm remote backend, please refer to the documentation at https://www.terraform.io/docs/backends/types/azurerm.html.
- Finally, once the Terraform configuration is complete, Terraform can be run with this new remote backend. It is during init that Terraform initializes the context of the state file. By default, the init command remains unchanged with terraform init.
However, if multiple Terraform states are used to manage multiple environments, it's possible to create several remote backend configurations with the simplified code in the .tf file:
terraform {
backend "azurerm" {}
}
Then, create several backend.tfvars files that only contain the properties of the backends.
These backend properties are the storage account name, the name of the blob container, and the blob name of the state file:
storage_account_name = "storageremotetf"
container_name = "tfbackends"
key = "myappli.tfstate"
snapshot = true
In this scenario, when executing the init command, we can specify the backend.tfvars file to use with the following command:
terraform init -backend-config="backend.tfvars"
The -backend-config argument is the path to the backend configuration file.
Personally, I prefer this way of doing things as it allows me to decouple the code by externalizing the values of the backend properties for better readability of the code.
So, here is the execution of Terraform:

Figure 2.24 – The terraform init command with backend configuration
In this execution, we can view the export of the ARM_ACCESS_KEY environment variable, along with the Terraform init command that determines the backend configuration with the -backend-config option.
With this remote backend, the state file will no longer be stored locally but on a storage account, which is a shared space. Therefore, it can be used at the same time by several users. At the same time, this storage account offers security to protect the sensitive data of the state file and the possibility of any backups or restorations of the state files, which are both essential and critical elements of Terraform, too.
Note
The entire source code of this chapter is available at https://github.com/PacktPublishing/Learning-DevOps-Second-Edition/tree/main/CHAP02, and the final Terraform code is located inside the terraform_vars_interp folder.
Summary
In this chapter dedicated to Terraform, we learned that its installation can be done either manually or using scripts.
To apply Terraform, we detailed the different steps of its configuration to provision an Azure infrastructure using an Azure SP.
Additionally, we explained, step by step, its local execution with its main command lines, which are init, plan, apply, and destroy, along with its life cycle in a CI/CD process. Finally, we ended this chapter by looking at the protection of the state file in an Azure remote backend.
Therefore, Terraform is a tool that is in line with the principles of IaC. The Terraform code is readable and understandable to users, and its execution integrates very well into a CI/CD pipeline that allows you to automatically provision a cloud infrastructure.
Throughout this book, we will continue to discuss Terraform, with additions about its use with Packer, Azure Kubernetes Services, and downtime reduction.
In the next chapter, we will explore the next step of the IaC, which is configuration management by using Ansible. We will cover its installation, its usage for configuring our provisioned virtual machine, and how to protect secrets with Ansible Vault.
Questions
- What is the language used by Terraform?
- What is Terraform's role?
- Is Terraform a scripting tool?
- Which command allows you to display the installed version?
- When using Terraform for Azure, what is the name of the Azure object that connects Terraform to Azure?
- What are the three main commands of the Terraform workflow?
- Which Terraform command allows you to destroy resources?
- What is the option added to the apply command to automate the application of infrastructure changes?
- What is the purpose of the Terraform state file?
- Is it a good practice to leave the Terraform state file locally? If not, what should be done?
Further reading
If you want to know more about Terraform, here are some resources:
- The official Terraform documentation: https://www.terraform.io/
- Terraform download and installation information: https://www.terraform.io/downloads.html
- Terraform Azure provider: https://www.terraform.io/docs/providers/azurerm/index.html
- The official Azure documentation for Terraform: https://docs.microsoft.com/en-us/azure/terraform/terraform-overview
- Book: Terraform Cookbook: https://www.packtpub.com/product/terraform-cookbook/9781800207554
- Getting Started with Terraform, Second Edition: https://www.packtpub.com/networking-and-servers/getting-started-terraform-second-edition
- Online learning for Terraform: https://learn.hashicorp.com/terraform