
Chapter 11: Testing APIs with Postman
In the previous chapters, we talked about DevOps culture and Infrastructure as Code (IaC) with Terraform, Ansible, and Packer. Then, we saw how to use a source code manager with Git, along with the implementation of a CI/CD pipeline with Jenkins and Azure Pipelines. Finally, we showed the containerization of applications with Docker and their deployment in a Kubernetes cluster.
If you are a developer, you should realize that you use APIs every day, either for client-side use (where you consume the API) or as a provider of the API.
An API, as well as an application, must be testable, that is, it must be possible to test the different methods of this API in order to verify that it responds without error and that the response of the API is equal to the expected result.
In addition, the proper functioning of an API is much more critical to an application because this API is potentially consumed by several client applications, and if it does not work, it will have an impact on all of these applications.
The common API challenges are that we need to script or develop a dedicated application client to test each API individually or a workflow of multiple API execution.
In this chapter, we will learn how to test an API with a specialized tool called Postman. We will explore the use of collections and variables, then we will write Postman tests, and finally, we will see how to automate the execution of Postman tests with Newman in a CI/CD pipeline.
This chapter covers the following topics:
- Creating a Postman collection
- Using environments and variables
- Writing Postman tests
- Executing tests locally
- Understanding the Newman concept
- Preparing Postman collections for Newman
- Running the Newman command line
- Integration of Newman in the CI/CD pipeline process
Technical requirements
In this chapter, we will use Newman, which is a Node.js package. Therefore, we need to install Node.js and npm on our computer beforehand, which we can download at https://nodejs.org/en/.
For the demo APIs that are used in this chapter, we will use an example that is provided on the internet: https://jsonplaceholder.typicode.com/.
The GitHub repository, which contains the complete source code used in this chapter, can be found at https://github.com/PacktPublishing/Learning-DevOps-Second-Edition/tree/main/CHAP11.
Check out the following video to see the code in action: https://bit.ly/3s7239U.
Creating a Postman collection with requests
Postman is a free client tool in a graphical format that can be installed on any type of OS. Its role is to test APIs through requests, which we will organize into collections. It also allows us to dynamize API tests through the use of variables and the implementation of environments. Postman is famous for its ease of use, but also for the advanced features that it offers.
In this section, we will learn how to create and install a Postman account, then we will create a collection that will serve as a folder to organize our requests, and finally, we will create a request that will test a demo API.
Before we use Postman, we will need to create a Postman account by going to https://www.postman.com/ and clicking on the Sign Up for Free button. In the form, click on the Create Account link, as shown in the following screenshot:

Figure 11.1 – Postman signup
Now, you can either create a Postman account for yourself by filling out the form, or you can create an account using your Google account.
This account will be used to synchronize Postman data between your machine and your Postman account. This way, the data will be accessible on all of your workstations.
After creating a Postman account, we will look at how to download and install it on a local machine.
Installation of Postman
Once the Postman account has been created, those who are using Windows can download Postman from https://www.getpostman.com/downloads/ and choose the version to install. For those who want to install it on Linux or macOS, just click on the link of your OS. The following screenshot shows the download links according to your OS:

Figure 11.2 – Postman download
Once Postman is downloaded, we need to install it by clicking on the download file for Windows, or for other OSes, follow the installation documentation at https://learning.getpostman.com/docs/postman/launching_postman/installation_and_updates/.
We have just seen that the installation of Postman is very simple; the next step is to create a collection in which we will create a request.
Note
The API that we will test in this chapter is a demo API, which is provided freely on the following site: https://jsonplaceholder.typicode.com/.
Creating a collection
In Postman, any request that we test must be added to a directory called Collection, which provides storage for requests and allows for better organization.
We will, therefore, create a DemoBook collection that will contain the requests to the demo API, and for this, we will perform the following tasks:
- In Postman, in the left-hand panel, click on the Collections | + button.
- Once the tab opens, we will enter the name DemoBook. These steps for creating a new collection are illustrated in the following screenshot:
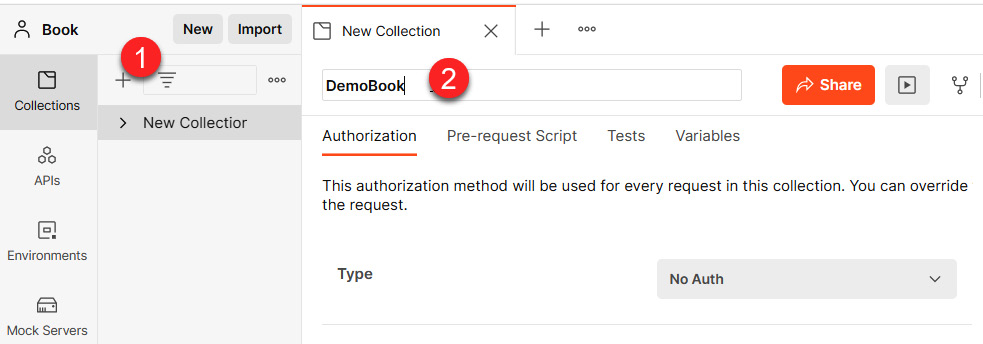
Figure 11.3 – Postman collection creation
So, we have a Demobook collection that appears in the left-hand panel of Postman.
This collection is also synchronized with our Postman web account, and we can access it at https://web.postman.co/me/collections.
This collection will allow us to organize the requests of our API tests, and it is also possible to modify its properties in order to apply a certain configuration to all the requests that will be included in this collection.
These properties include request authentication, tests to be performed before and after requests, and variables common to all requests in this collection.
To modify the settings and properties of this collection, perform the following actions:
- Click on the ... button of the context menu of the collection.
- Choose the Edit option, and the edit form appears, in which we can change all the settings that will apply to the requests in this collection.
- Switch between all configuration tabs for the edit authorization, scripts, tests, or variables options.
The following screenshot shows the steps that are taken to modify the properties of a collection:
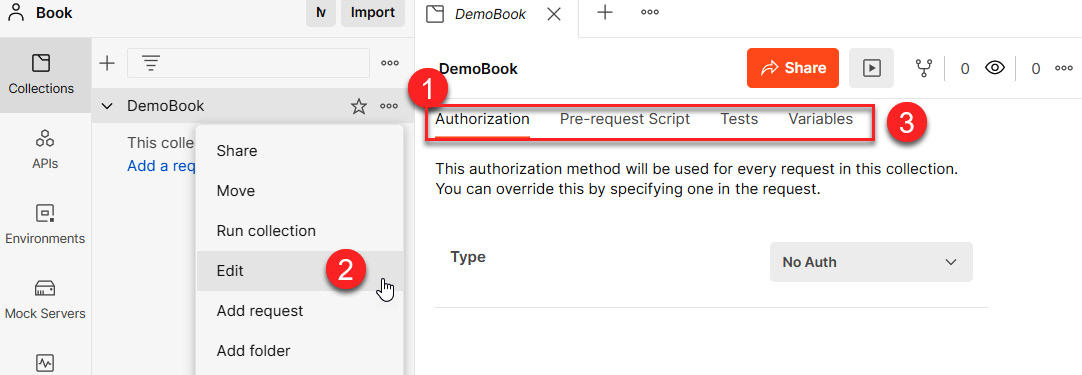
Figure 11.4 – Postman edit collection
So, we have discussed the procedure that is followed in order to create a collection that is the first Postman artifact, and this will allow us to organize our API test requests.
We will now create a request that will call and test the proper functioning of our demo API.
Creating our first request
In Postman, the object that contains the properties of the API to be tested is called a request.
This request contains the configuration of the API itself, but it also contains the tests that are to be performed to check that it is functioning properly.
The main parameters of a request are as follows:
- The URL of the API
- Its method: GET/POST/DELETE/PATCH
- Its authentication properties
- Its querystring keys and its body request
- The tests that are to be performed before or after execution of the API
The creation of a request is done in two steps – its creation in the collection, followed by its configuration.
- The creation of the request: To create the request of our API, here are the steps that need to be followed:
- We go to the context menu of the DemoBook collection and click on the Add Request option:

Figure 11.5 – Add Request in Postman
- Then, in the new tag, enter the name of the request, Get all posts, as shown in the following screenshot:

Figure 11.6 – Get all posts in Postman
- The configuration of the request: After creating the request, we will configure it by entering the URL of the API to be tested, which is https://jsonplaceholder.typicode.com/posts, in the GET method. After entering the URL, we save the request configuration by clicking on the Save button.
The following screenshot shows the parameters of this request with its URL and method:

Figure 11.7 – Postman edit request
Finally, to complete the tests, and to add more content to our lab, we will add a second request to our collection, which we will call Get a single post. It will test another method of the API, and it will also ensure that we configure it with the https://jsonplaceholder.typicode.com/posts/<ID of post> URL.
The following screenshot shows the requests of our collection:
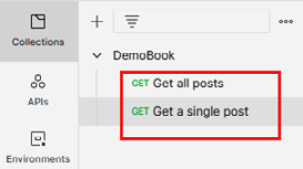
Figure 11.8 – Postman request list
Note
Note that the Postman documentation for collection creation can be found at https://learning.getpostman.com/docs/postman/collections/creating_collections/.
In this section, we have learned how to create a collection in Postman, as well as how to create requests and their configurations.
In the next section, we will learn how to dynamize our requests with the use of environments and variables.
Using environments and variables to dynamize requests
When we want to test an API, we need to test it on several environments for better results. For example, we will test it on our local machine and development environment, and then also on the QA environment. To optimize test implementation times and to avoid having a duplicate request in Postman, we will inject variables into this same request to make it testable in all environments.
So, in the following steps, we will improve our requests by creating an environment and two variables; then, we will modify our requests in order to use these variables:
- In Postman, we will start by creating an environment that we call Local, as shown in the following screenshot:

Figure 11.9 – Adding an environment in Postman
- Then, in this Local environment, we will insert a variable named PostID, which will contain the value to pass in the URL of the request. The following screenshot shows the creation of the PostID variable:
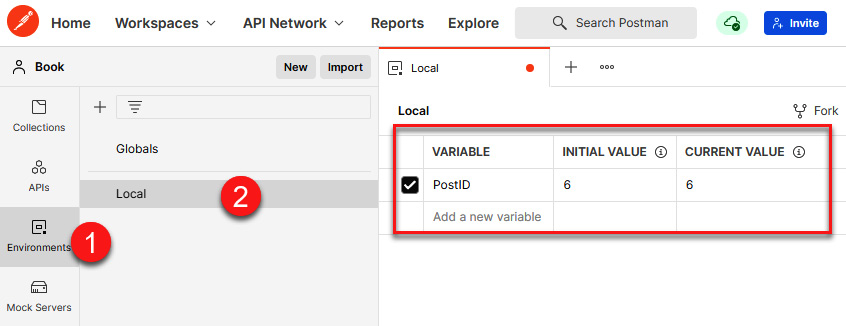
Figure 11.10 – Adding an environment variable in Postman
- Thus, for the Local environment, the value of the PostID variable is 6. To have a different value for other environments, it is necessary to create other environments using the same steps that we have just seen, and then add the same variables (with the same name) and their corresponding values. This, for example, shows the variable screen for the QA environment:
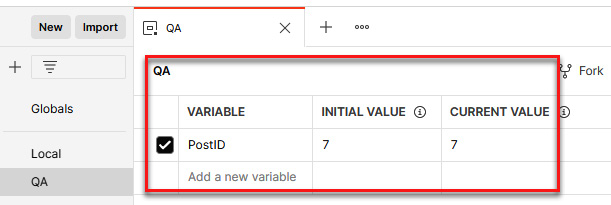
Figure 11.11 – Adding a second environment in Postman
- Finally, we will modify the request in order to use the variable that we have just declared. In Postman, the usage of a variable is done using the {{variable name }} pattern. So, first, we select the desired environment from the dropdown in the top-right corner. Then, in the request, we will replace the post's ID at the end of the URL with {{PostID}}, as shown in the following screenshot:

Figure 11.12 – Using a variable environment in Postman
Note
Note that the Postman documentation of environments and variables is available at https://learning.getpostman.com/docs/postman/environments_and_globals/intro_to_environments_and_globals/.
In this section, we created a Postman request that will allow us to test an API. Then we made its execution more flexible by creating an environment in Postman that contains variables that are also used in Postman's requests.
In the next section, we will write Postman tests to verify the API result.
Writing Postman tests
Testing an API is not only about checking that its call returns a return code of 200, that is, that the API responds well, but also that its return result corresponds to what is expected, or that its execution time is not too long.
For example, consider an API that returns a response in JSON format with several properties. In the tests of this API, it will be necessary to verify that the result returned is a JSON text that contains the expected properties, and even more so to verify the values of these properties.
In Postman, it is possible to write tests that will ensure that the response of the request corresponds to the expected result in terms of return or execution time using the JavaScript language.
Postman tests are written in the Tests tab of the request:

Figure 11.13 – Postman Tests tab
To test our request, we will write several tests, which are as follows:
- That the return code of the request is 200
- That the response time of the request is less than 400 ms
- That the answer is not an empty JSON
- That the return JSON response contains the userId property, which is equal to 1
To perform these tests, we will write the code for the following in the Tests tab.
The following code illustrates the return code of the request:
pm.test("Status code is 200", function () {
pm.response.to.have.status(200);
});
The following code illustrates a response time of less than 400 ms:
pm.test("Response time is less than 400ms", function () {
pm.expect(pm.response.responseTime).to.be.below(400);
});
The following code illustrates that the response in JSON format is not empty:
pm.test("Json response is not empty", function (){
pm.expect(pm.response).to.be.json;
});
The following code illustrates that, in the JSON response, the userId property is equal to 1:
pm.test("Json response userId eq 1", function (){
var jsonRes = pm.response.json();
pm.expect(jsonRes.userId).to.eq(1);
});
And so, finally, the Tests tab of our request, which tests our API, contains all this code, as shown in the following screenshot:

Figure 11.14 – Postman Tests code
We have completed our Postman request with test writing, which will check the proper functioning of the API according to its feedback code, performance, and response content.
Note
For more information about the Postman tests and scripts, you can read the documentation at https://learning.getpostman.com/docs/postman/scripts/intro_to_scripts.
In this section, we have just seen how, in Postman, we can write API tests to check the proper functioning of our API. We will now run our Postman request locally in order to test our API.
Executing Postman request tests locally
So far, in Postman, we have created a collection in which two requests contain the parameters and tests of our APIs that are to be tested. To test the proper functioning of the APIs with their parameters and tests, we must now execute our requests that are in Postman. Note that it will only be at the end of this execution that we will know whether our APIs correspond to our expectations.
To execute a Postman request, perform the following actions:
- You must first choose the desired environment.
- Click on the Send button of the request, as shown in the following screenshot:

Figure 11.15 – Postman signup
- In the Body tab, we can then view the content of the query response, and if we want to display it in JSON format, we can choose the display format. The following screenshot shows the response of the request displayed in JSON format:

Figure 11.16 – Postman body response
- The Test Results tab displays the results of the execution of the tests that we previously wrote, and in our case, the four tests have been executed correctly—they are all green, as shown in the following screenshot:

Figure 11.17 – Postman Test Results
In the preceding screenshot, we can see that the return code of the Postman request is equal to 200, which corresponds to the request's successful execution return code, and its execution time of 23 ms, which is below the threshold (400 ms) that I set for myself as an example.
In the event that one of the tests fails, it will be displayed in red to clearly identify it. An example of a failed test is shown in the following screenshot:

Figure 11.18 – Postman test failed
We have just seen the execution of a Postman request to test an API, but this execution is only for the current request. If we want to execute all Postman requests in a collection, we can use Postman Collection Runner.
Postman Collection Runner is a Postman feature that automatically executes all the requests in a collection in the order in which they have been organized.
You can learn more about the Collection documentation by visiting https://learning.getpostman.com/docs/postman/collection_runs/starting_a_collection_run/.
The following two screenshots show the Runner execution steps, in which we choose the collection to execute, the environment, and the number of iterations. To start its execution, we click on the Run DemoBook button:

Figure 11.19 – Postman Runner
And so, in the Runner tab, we can see the test execution result of all the requests in the collection, as shown in the following screenshot:

Figure 11.20 – Postman Runner execution
Note
The documentation for Postman Runner can be found at https://learning.getpostman.com/docs/postman/collection_runs/intro_to_collection_runs.
In this section, we have learned how to execute Postman requests in order to test an API in a unitary way, before executing all the requests in the collection using Postman Runner. In the following section, we will introduce Newman, which allows us to automate the execution of Postman tests.
Understanding the Newman concept
So far in this chapter, we have talked about using Postman locally to test the APIs that we develop or consume. But what is important in the unit, acceptance, and integration tests is that they are automated so that they can be executed within a CI/CD pipeline.
Postman, as such, is a graphical tool that does not automate itself, but there is another tool called Newman that automates tests that are written in Postman.
Note
We can also use another tool called Postman Sandbox to run the Postman API in Node.js or a browser. For more information, read the GitHub repository here: https://github.com/postmanlabs/postman-sandbox.
Newman is a free command-line tool that has the great advantage of automating tests that are already written in Postman. It allows us to integrate API test execution in CI/CD scripts or processes.
In addition, it offers the possibility of generating the test results of reports of different formats (HTML, JUnit, and JSON).
Nevertheless, Newman does not allow us to do the following:
- To create or configure Postman requests; as we will see, requests that are executed by Newman will be exported from Postman.
- To execute only one request that is in a collection—it executes all the requests in a collection.
Note
To learn more about Newman, you can visit the product page at https://www.npmjs.com/package/newman.
To use Newman, we will need—as stated in the Technical requirements section of this chapter—to have Node.js and npm installed, which are available at https://nodejs.org/en/ (this installer installs both tools).
Then, to install Newman, we must execute this command in the terminal:
npm install -g newman
The following screenshot shows the execution of the command:

Figure 11.21 – Newman installation
This command installs the npm newman package and all its dependencies globally, that is, it is accessible on the entire local machine.
Once installed, we can test its installation by running the newman --help command, which displays the arguments and options to use, as shown in the following screenshot:

Figure 11.22 – Newman help command
In this section, we introduced Newman by talking about its advantages, and we learned how to install it. In the next section, we will export Postman's collection and environment for use with Newman.
Preparing Postman collections for Newman
As we have just seen, Newman is Postman's client tool, and in order to work, it needs the configuration of the collections, requests, and environments that we have created in Postman.
That's why, before running Newman, we will have to export Postman's collection and environments, and this export will serve as Newman's arguments. So, let's start exporting the DemoBook collection that we created in Postman.
Exporting the collection
The exporting of a Postman collection consists of obtaining a JSON file that contains all the settings of this collection and the requests that are inside it.
It is from this JSON file that Newman will be able to run the same API tests as when we ran them from Postman.
To do this export, perform the following tasks:
- Go to the context menu of the collection that we want to export.
- Choose the Export action.
- Then, in the window that opens, uncheck the Collection v2.1 (recommended) checkbox.
- Finally, validate by clicking on the Export button.
These steps are shown in the following screenshot:

Figure 11.23 – Postman export collection
Clicking on the Export button exports the collection to a JSON format file, DemoBook.postman_collection.json, which we save in a folder that we create, which is dedicated to Newman.
After exporting the collection, we also need to export the environment and variable information because the requests in our collection depend on it.
Exporting the environments
We could stop there for Newman's configuration, but the problem is that our Postman requests use variables that are configured in environments.
It is for this reason, therefore, that we will also have to export the information from each environment in JSON format so that we can also pass it on as an argument to Newman.
To export the environments and their variables, perform the following tasks:
- Open ENVIRONMENTS from the left panel in Postman.
- Then, click on the Export environment button.
These steps are shown in the following screenshot:

Figure 11.24 – Postman Export environment
So, for each environment, we will export their configurations in a JSON file, which we save in the same folder where we exported the collection.
Finally, we have a folder on our machine that contains three Postman JSON files:
- One JSON file for the collection
- One JSON file for the Local environment
- One JSON file for the QA environment
The following screenshot shows the contents of the local folder that contains Postman's exports:

Figure 11.25 – Postman export file folder
We have just covered the export of all the configurations of our Postman requests, including the collection and the environments, and we will now look at the execution of the Newman command line.
Running the Newman command line
After exporting the Postman configuration that we saw earlier, we will run the Newman utility on our local machine.
To execute Newman, go to the Terminal, then to the folder where the JSON configuration files are located, and execute the following command:
newman run DemoBook.postman_collection.json -e Local.postman_environment.json
The newman run command takes the JSON file of the collection that we exported as an argument and a parameter, -e, which is the JSON file of the exported environment.
Note
For more details about all the arguments of this command, read the documentation at https://www.npmjs.com/package/newman#newman-options.
Newman will execute the Postman requests from the collection we exported. It will also use the variables of the exported environment and will also perform the tests we wrote in the request.
The result of its execution, which is quite detailed, is shown in the following screenshot:

Figure 11.26 – Newman execution
And here is another screenshot that shows the result of its execution in case there is an error in the test:

Figure 11.27 – Newman failed tests
We can see the details of the test that shows an error and what is expected in the request. In this section, we have learned how to run Newman on a local machine, and we will now learn how Newman is integrated in a CI/CD pipeline.
Integration of Newman in the CI/CD pipeline process
Newman is a tool that automates the execution of Postman requests from the command line, which will quickly allow us to integrate it into a CI/CD pipeline.
To simplify its integration in a pipeline, we go to the first step in the directory that contains the JSON files that were exported from Postman and create an npm configuration file—package.json.
This will have the following content:
{
"name": "postman",
"version": "1.0.0",
"description": "postmanrestapi",
"scripts": {
"testapilocal": "newman run
DemoBook.postman_collection.json -e
Local.postman_environment.json -r junit,cli –reporter
junit-export result-tests-local.xml",
"testapiQA": "newman run
DemoBook.postman_collection.json -e
QA.postman_environment.json -r junit,cli --reporter-junit
export result-tests-qa.xml"
},
"devDependencies": {
"newman": "^5.3.0"
}
}
In the scripts section, we put the two scripts that will be executed with the command lines that we saw in the previous section and we add to them the -r argument, which allows the output of the command with reporting in JUnit format, while, in the DevDependencies section, we indicate that we need the Newman package.
That's it; we have all the files that are necessary for integrating Newman's execution into a CI/CD pipeline.
To show Newman's integration into a CI/CD pipeline, we will use Azure Pipelines—an Azure DevOps service that we saw in Chapter 7, Continuous Integration and Continuous Delivery, and Chapter 9, Containerizing Your Application with Docker, and which has the advantage of having a graphic representation of the pipeline.
As a prerequisite for the pipeline, the directory that contains the JSON files of the Postman export, as well as the package.json file, must be committed in a source control version. In our case, we will use the GitHub repository, which contains the complete source code of this chapter: https://github.com/PacktPublishing/Learning-DevOps-Second-Edition/tree/main/CHAP11.
Build and release configuration
In Azure Pipelines, we will create a build and release configuration by following these actions:
- We create a new build definition that copies the files that are needed to run Newman into the build artifacts, as shown in the following screenshot:

Figure 11.28 – Azure Pipelines publish Newman files
We also enable the continuous integration option in the Triggers tab. Then, to run this build, we save and queue this build definition.
- Then, we create a new release definition, which will be in charge of running Newman for each environment. This release will get the artifacts of the build, and will be composed of two stages, DEV and QA, as shown in the following screenshot:
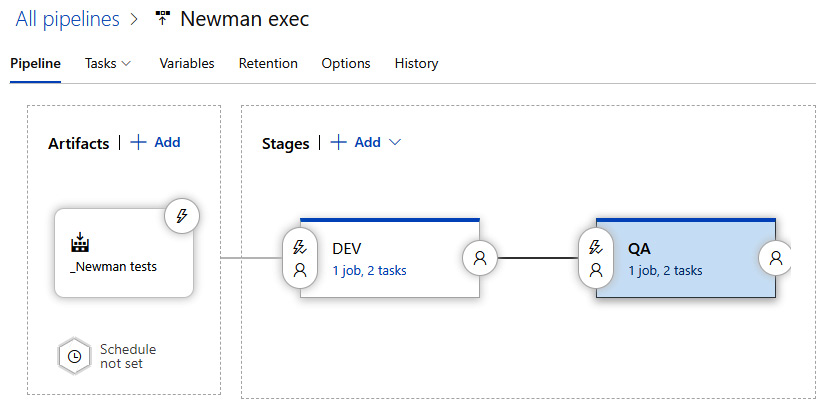
Figure 11.29 – Azure Pipelines Newman execution release
For each of these stages, we configure three tasks that go as follows, based on the package.json file:
- Install Newman.
- Run Newman.
- Publish the test results in Azure Pipelines.
The following screenshot shows the configuration of the tasks for each stage:

Figure 11.30 – Azure Pipelines Newman release steps
Let's look at the details of the parameters of these tasks in order.
npm install
The parameters of the npm install task are as follows:

Figure 11.31 – Azure Pipelines npm install
Here, the command that is to be executed in the directory containing the artifact files is npm install.
npm run newman
The parameters of the npm run newman task are as follows:
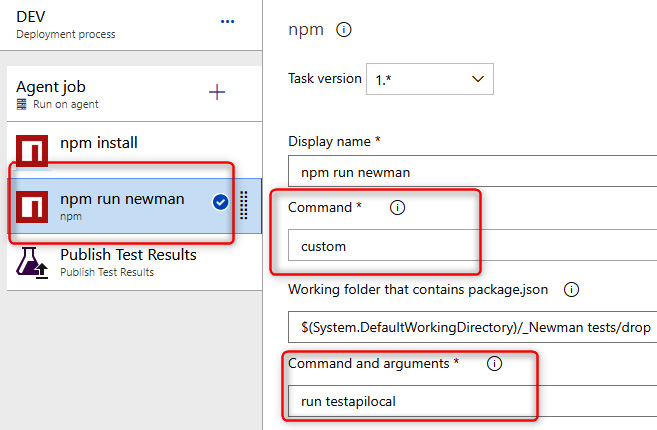
Figure 11.32 – Azure Pipelines run newman
Here, the custom command that is to be executed is npm run testapilocal in the directory that contains the artifact files, with the testapilocal command being defined in the package.json file in the script section (as seen previously), and which executes Newman's command line.
Publish Test Results
The parameters of the Publish Test Results task, which allows us to publish the results of the tests that are performed by Newman in Azure Pipelines, are as follows:

Figure 11.33 – Azure Pipelines publishing result of the Newman tests
In the parameters of this task, we indicate the JUnit XML reporting files that are generated by Newman, and in the Control Options field of this task, we select an option to execute the task, even if the npm run newman task fails.
The following screenshot shows the parameters of Control Options to run this task: Even if a previous task has failed, unless the deployment was canceled:

Figure 11.34 – Azure Pipelines publishing result of the Newman tests option
The configuration of the pipeline is complete—we will now proceed to its execution.
The pipeline execution
Once the configuration of the release is finished, we can execute this release, and at the end, we can see the reporting of the Newman tests in the Tests tab.
The following screenshot shows the reporting of the Newman tests in Azure Pipelines:

Figure 11.35 – Azure Pipelines view result of the Newman tests
All Postman tests were completed successfully.
Here is a screenshot that shows the reporting of the tests in case one of the tests fails:

Figure 11.36 – Azure Pipelines view result of the Newman failed tests
So, we integrated Newman's execution successfully, and thus we were able to automate the requests of our API, which we had configured in Postman, in a CI/CD pipeline.
Regarding the integration of Newman executions in Jenkins, read the documentation at https://learning.getpostman.com/docs/postman/collection_runs/integration_with_jenkins, and for integration with Travis CI, the documentation can be found at https://learning.getpostman.com/docs/postman/collection_runs/integration_with_travis.
In this section, we learned how to create and configure a CI/CD pipeline in Azure Pipelines, which performs Postman tests that have been exported for Newman.
Summary
In this chapter, we introduced Postman, which is an excellent tool for testing APIs. We created a Postman account and installed it locally.
Then, we created collections and environments, in which we created requests that contain the settings of our APIs that are to be tested.
We also talked about automating these tests using the Newman command-line tool, with the exporting of Postman collections and environments.
Finally, in the last part of this chapter, we created and executed a CI/CD pipeline in Azure DevOps that automates the execution of API tests in a DevOps process.
In the next chapter, we will stay on the subject of testing, and we will look at the analysis of static code with a well-known tool called SonarQube.
Questions
- What is the goal of Postman?
- What is the first element that needs to be created in Postman?
- What is the name of the element that contains the configuration of the API that is to be tested?
- Which tool in Postman allows us to execute all the requests of a collection?
- Which tool allows us to integrate Postman API tests in a CI/CD pipeline?
Further reading
If you want to know more about Postman, here are some additional resources:
- Postman Learning Center: https://learning.getpostman.com/
- Videos and tutorials about Postman: https://www.getpostman.com/resources/videos-tutorials/