
Chapter 9: Containerizing Your Application with Docker
In the last few years, one technology in particular has been making headlines on the net, on social networks, and at events—Docker.
Docker is a containerization tool that became open source in 2013. It allows you to isolate an application from its host system so that the application becomes portable, and the code tested on a developer's workstation can be deployed to production without any concerns about execution runtime dependencies. We'll talk a little about application containerization in this chapter.
A container is a system that embeds an application and its dependencies. Unlike a virtual machine (VM), a container contains only a light operating system (OS) and the elements required for the OS, such as system libraries, binaries, and code dependencies.
To learn more about the differences between VMs and containers, and why containers will replace VMs in the future, I suggest you read this blog article: https://blog.docker.com/2018/08/containers-replacing-virtual-machines/.
The principal difference between VMs and containers is that each VM that is hosted on a hypervisor contains a complete OS and is therefore completely independent of the guest OS that is on the hypervisor.
Containers, however, don't contain a complete OS—only a few binaries—but they are dependent on the guest OS, and use its resources (central processing unit (CPU), random-access memory (RAM), and network).
In this chapter, we will learn how to install Docker on different platforms, how to create a Docker image, and how to register it in Docker Hub. Then, we'll discuss an example of a continuous integration/continuous deployment (CI/CD) pipeline that deploys a Docker image in Azure Container Instances (ACI). After that, we will show how to use Docker to runn tools with command-line interfaces (CLIs).
Finally, we will also learn the basic notions about Docker Compose and how to deploy Docker Compose containers in ACI.
This chapter covers the following topics:
- Installing Docker
- Creating a Dockerfile
- Building and running a container on a local machine
- Pushing an image to Docker Hub
- Pushing a Docker image to a private registry (ACR)
- Deploying a container to ACI with a CI/CD pipeline
- Using Docker for running command-line tools
- Getting started with Docker Compose
- Deploying Docker Compose containers in ACI
Technical requirements
This chapter has the following technical requirements:
- An Azure subscription. You can get a free account here: https://azure.microsoft.com/en-us/free/.
- For some Azure commands, we will use the Azure CLI. Refer to the documentation here: https://docs.microsoft.com/en-us/cli/azure/install-azure-cli.
- In the last part of this chapter, in the Creating a CI/CD pipeline for the container section, we will discuss Terraform and the CI/CD pipeline, which were explained in Chapter 2, Provisioning Cloud Infrastructure with Terraform, and Chapter 7, Continuous Integration and Continuous Deployment.
All of the source code for the scripts included in this chapter is available here: https://github.com/PacktPublishing/Learning-DevOps-Second-Edition/tree/main/CHAP09.
Check out the following video to see the code in action:
Installing Docker
Docker's daemon is free and very well suited to developers and small teams—it's what we'll use in this book.
Docker is a cross-platform tool that can be installed on Windows, Linux, or macOS and is also natively present on some cloud providers, such as Amazon Web Services (AWS) and Azure.
To operate, Docker needs the following elements:
- The Docker client: This allows you to perform various operations on the command line.
- The Docker daemon: This is Docker's engine.
- Docker Registry: This is a public registry (Docker Hub) or private registry of Docker images.
Before installing Docker, we will first create an account on Docker Hub.
Registering on Docker Hub
Docker Hub is a public space called a registry, containing more than 2 million public Docker images that have been deposited by companies, communities, and even individual users.
To register on Docker Hub and list public Docker images, perform the following steps:
- Go to https://hub.docker.com/, where you will see the following screen:
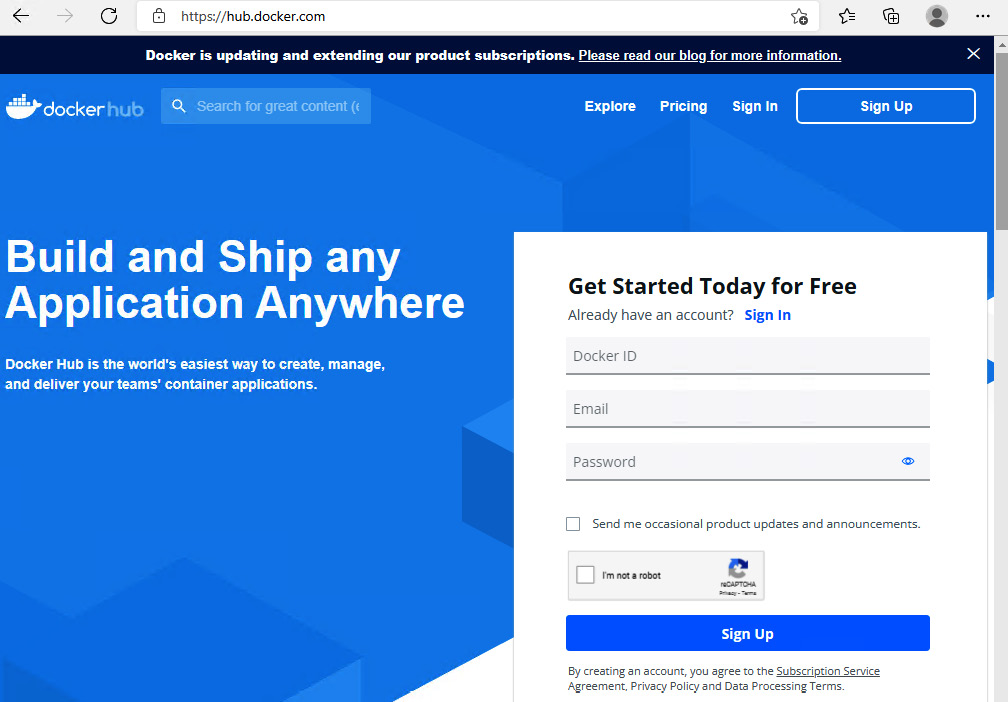
Figure 9.1 – Docker Hub login page
- Fill in the form with a unique identifier (ID), an email, and a password. Then, click on the Sign Up button.
- Once your account is created, you can then log in to the site, and this account will allow you to upload custom images and download Docker Desktop.
- To view and explore the images available from Docker Hub, go to the Explore section, as indicated in the following screenshot:
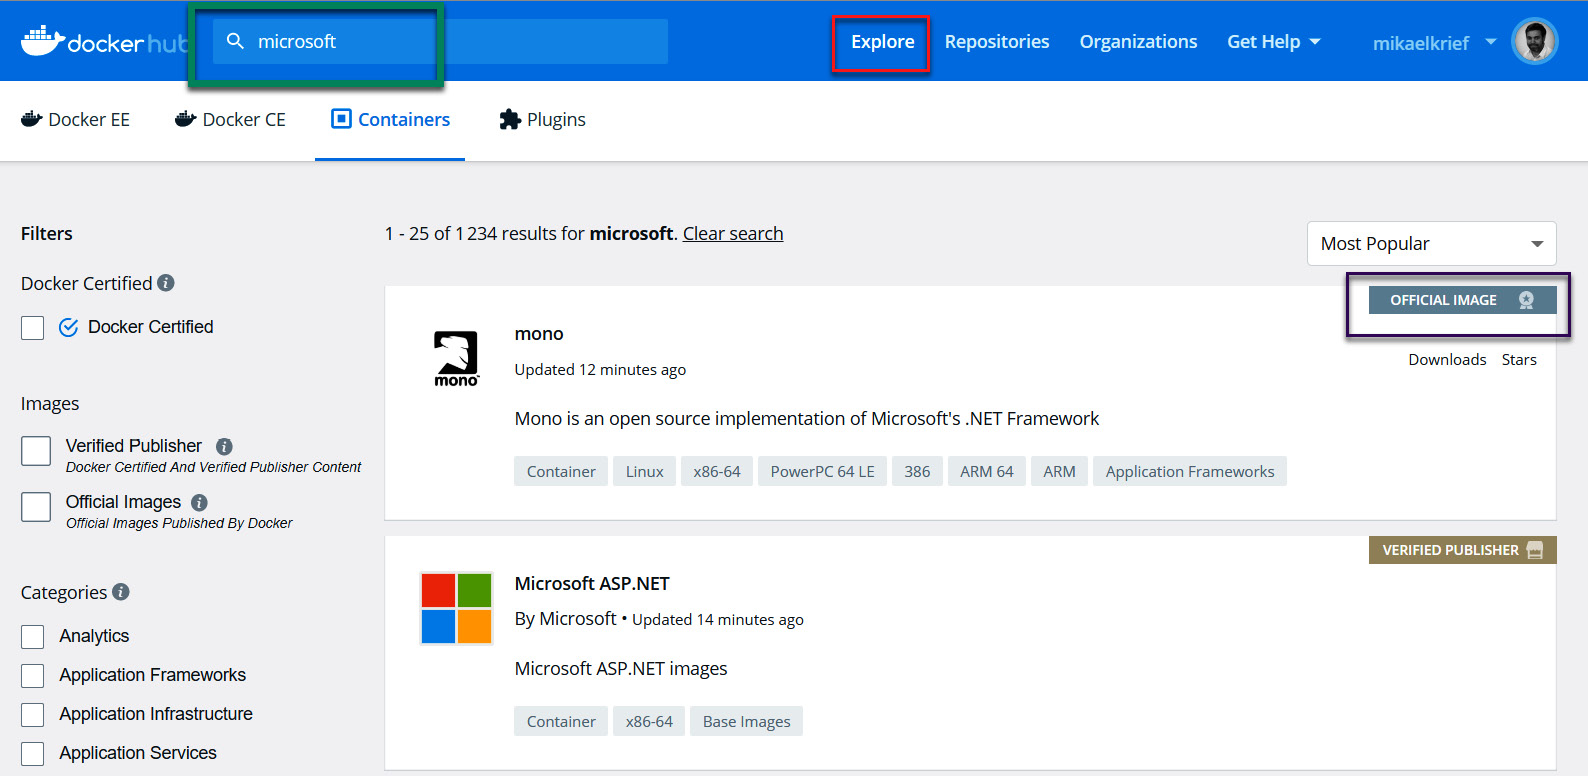
Figure 9.2 – Docker Hub Explore page
A list of Docker images is displayed with a search filter that you can use to search for official images or images from verified publishers, as well as images certified by Docker.
Having created an account on Docker Hub, we will now look at installing Docker on Windows.
Docker installation
We'll now discuss the installation of Docker on Windows in detail.
Before installing Docker Desktop on Windows or macOS, we need to check all license options. For more information about Docker Desktop licensing, read the pricing page (https://www.docker.com/pricing) and the frequently asked questions (FAQ) page (https://www.docker.com/pricing/faq).
To install Docker Desktop on a Windows machine, it is necessary to first check the hardware requirements, which are outlined here:
- Windows 10/11 64-bit with at least 4 gigabytes (GB) of RAM
- Windows Subsystem for Linux 2 (WSL 2) backend or Hyper-V enabled. You can refer to this documentation in the event of any problems: https://docs.docker.com/docker-for-windows/troubleshoot/#virtualization-must-be-enabled.
Note
For more information about WSL, read the documentation here:
https://docs.microsoft.com/en-us/windows/wsl/install
More details about Docker Desktop requirements are specified here:
To install Docker Desktop, which is the same binary as the Docker installer for Windows and macOS, follow these steps:
- First, download Docker Desktop by clicking on the Docker Desktop for Windows button on the install documentation page at https://docs.docker.com/desktop/windows/install/, as indicated in the following screenshot:

Figure 9.3 – Download link for Docker Desktop
- Once that's downloaded, click on the downloaded executable (EXE) file.
- Then, take the single configuration step, which is a possibility to install required components for the WSL 2 backend, as illustrated in the following screenshot:

Figure 9.4 – Docker Desktop configuration
In our case, we will check this option to install Windows components using WSL 2 as the backend.
- Once the installation is complete, we'll get a confirmation message and a button to close the installation, as illustrated in the following screenshot:
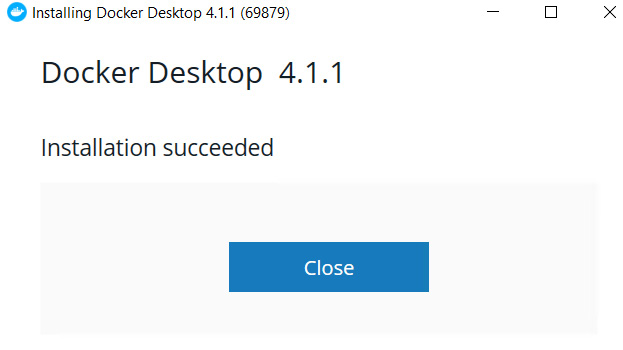
Figure 9.5 – Docker Desktop end installation
- Finally, to start Docker, launch the Docker Desktop program. An icon will appear in the notification bar indicating that Docker is starting. It will then ask you to log in to Docker Hub via a small window. The startup steps of Docker Desktop are shown in the following screenshot:

Figure 9.6 – Docker Hub sign-in from Docker Desktop
That's it! We've installed and started Docker on Windows.
To install Docker on another OS, you can read the documentation for each OS at https://docs.docker.com/get-docker/. Afterward, you can choose the desired target OS from this page, as shown in the following screenshot:
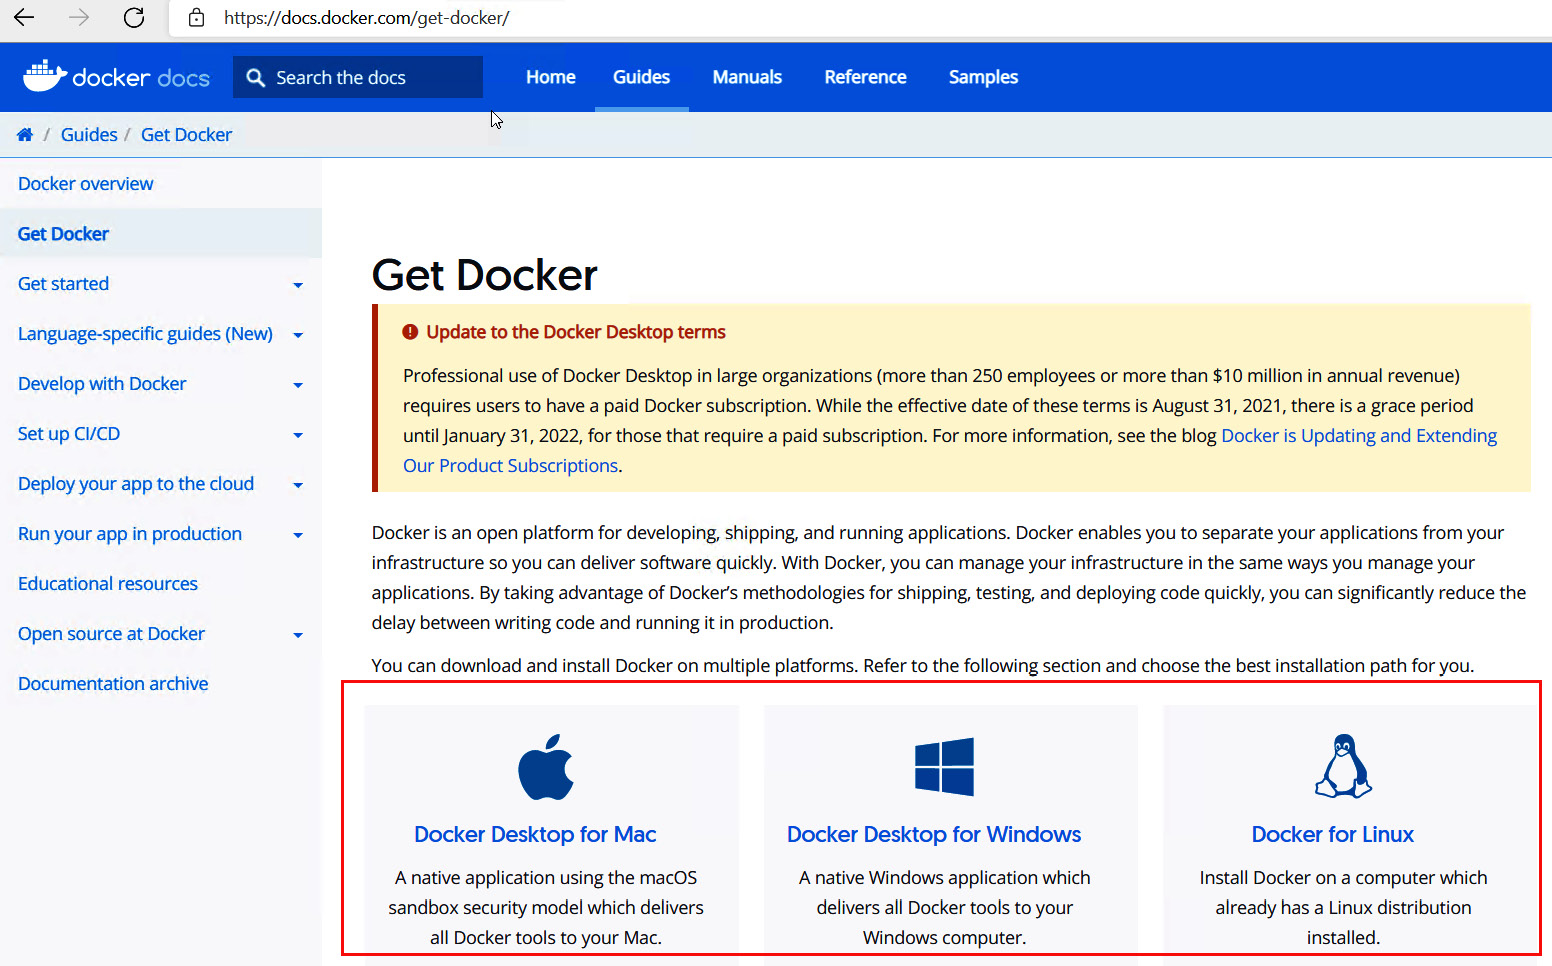
Figure 9.7 – Docker installation documentation
To check your Docker installation, open the Terminal window (it will also work on a Windows PowerShell Terminal) and execute the following command:
docker --help
You should be able to see something like this:
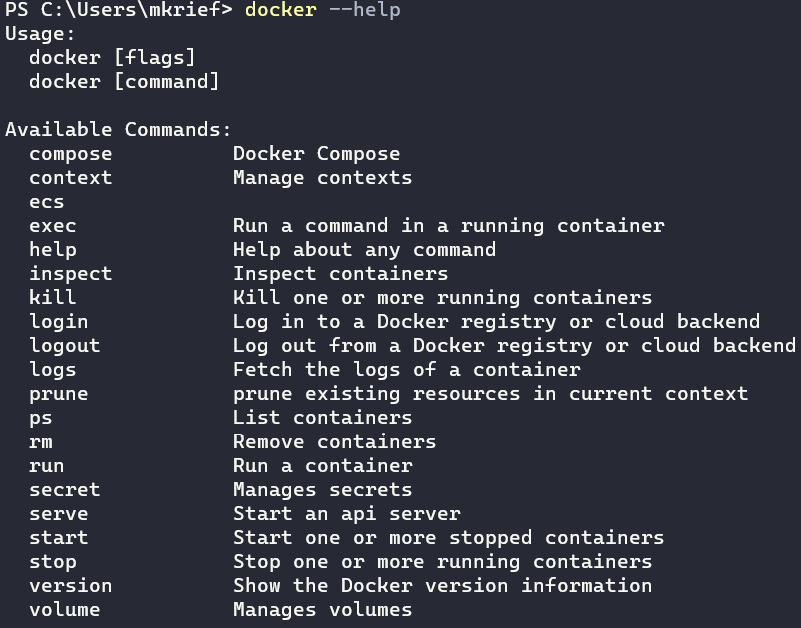
Figure 9.8 – docker --help command
As you can see in the preceding screenshot, the command displays the different operations available in the Docker client tool.
Before looking at the execution of Docker commands in detail, it is important to have an overview of Docker's concepts.
An overview of Docker's elements
Before executing Docker commands, we will discuss some of Docker's fundamental elements, which are Dockerfiles, containers, and volumes.
First of all, it is important to know that a Docker image is a basic element of Docker and consists of a text document called a Dockerfile that contains the binaries and application files we want to containerize.
A Docker registry is a centralized storage system for shared Docker images. This registry can be public—as in the case of Docker Hub—or private, such as with Azure Container Registry (ACR) or JFrog Artifactory.
A container is an instance that is executed from a Docker image. It is possible to have several instances of the same image within a container that the application will run. Finally, a volume is a storage space that is physically located on the host OS (that is, outside the container), and it can be shared across multiple containers if required. This space will allow the storage of persistent elements such as files or databases.
To manipulate these elements, we will use command lines, which will be discussed as we progress through this chapter.
In this section, we discussed Docker Hub and the different steps for creating an account. Then, we looked at the steps for installing Docker Desktop locally, and finally, we finished with an overview of Docker elements.
We will now start working with Docker, and the first operation we will look at is the creation of a Docker image from a Dockerfile.
Creating a Dockerfile
A basic Docker element is a file called a Dockerfile, which contains step-by-step instructions for building a Docker image.
To understand how to create a Dockerfile, we'll look at an example that allows us to build a Docker image that contains an Apache web server and a web application.
Let's start by writing a Dockerfile.
Writing a Dockerfile
To write a Dockerfile, we will first create a HyperText Markup Language (HTML) page that will be our web application. So, we'll create a new appdocker directory and an index.html page in it, which includes the example code that displays welcome text on a web page, as follows:
<html>
<body>
<h1>Welcome to my new app</h1>
This page is test for my demo Dockerfile.<br />
Enjoy ...
</body>
</html>
Then, in the same directory, we create a Dockerfile (without an extension) with the following content, which we will detail right after:
FROM httpd:latest
COPY index.html /usr/local/apache2/htdocs/
To create a Dockerfile, start with the FROM statement. The required FROM statement defines the base image, which we will use for our Docker image—any Docker image is built from another Docker image. This base image can be saved either in Docker Hub or in another registry, such as JFrog Artifactory, Nexus Repository, or ACR.
In our code example, we use the Apache httpd image tagged as the latest version, https://hub.docker.com/_/httpd/, and we use the FROM httpd:latest Dockerfile instruction.
Then, we use the COPY instruction to execute the image construction process. Docker copies the local index.html file that we just created into the /usr/local/apache2/htdocs/ directory of the image.
Note
The source code for this Dockerfile and the HTML page can be found here: https://github.com/PacktPublishing/Learning-DevOps-Second-Edition/tree/main/CHAP09/appdocker.
We have just looked at the FROM and COPY instructions of the Dockerfile, but there are other instructions as well that we'll cover in the following section.
Dockerfile instructions overview
We previously mentioned that a Dockerfile file is comprised of instructions, and we also looked at a concrete example with the FROM and COPY instructions. There are other instructions that will allow you to build a Docker image. Here is an overview of the principal instructions that can be used for this purpose:
- FROM: This instruction is used to define the base image for our image, as shown in the example detailed in the preceding Writing a Dockerfile section.
- COPY and ADD: These are used to copy one or more local files into an image. The ADD instruction supports an extra two functionalities, to refer to a Uniform Resource Locator (URL) and to extract compressed files.
Note
For more details about the differences between COPY and ADD, you can read this article: https://nickjanetakis.com/blog/docker-tip-2-the-difference-between-copy-and-add-in-a-dockerile.
- RUN and CMD: These instructions take a command as a parameter that will be executed during the construction of the image. The RUN instruction creates a layer so that it can be cached and versioned. The CMD instruction defines a default command to be executed during the call to run the image. The CMD instruction can be overwritten at runtime with an extra parameter provided.
You can write the following example of the RUN instruction in a Dockerfile to execute the apt-get command:
RUN apt-get update
With the preceding instruction, we update the apt packages that are already present in the image and create a layer. We can also use the CMD instruction in the following example, which will display a docker message during execution:
CMD "echo docker"
- ENV: This instruction allows you to instantiate environment variables that can be used to build an image. These environment variables will persist throughout the life of the container, as follows:
ENV myvar=mykey
The preceding command sets a myvar environment variable with the mykey value to the container.
- WORKDIR: This instruction gives the execution directory of the container, as follows:
WORKDIR usr/local/apache2
That was an overview of Dockerfile instructions. There are other instructions that are commonly used, such as EXPOSE, ENTRYPOINT, and VOLUME, which you can find in the official documentation at https://docs.docker.com/engine/reference/builder/.
We have just observed that the writing of a Dockerfile is performed with different instructions, such as FROM, COPY, and RUN, which are used to create a Docker image. Now, let's look at how to run Docker in order to build a Docker image from a Dockerfile, and run that image locally to test it.
Building and running a container on a local machine
So far in the chapter, we have discussed Docker elements and have looked at an example of a Dockerfile that is used to containerize a web application. Now, we have all the elements to run Docker.
The execution of Docker is performed by different operations, as outlined here:
- Building a Docker image from a Dockerfile
- Instantiating a new container locally from this image
- Testing our locally containerized application
Let's take a deep dive into each operation.
Building a Docker image
We'll build a Docker image from our previously created Dockerfile that contains the following instructions:
FROM httpd:latest
COPY index.html /usr/local/apache2/htdocs/
We'll go to a terminal to head into the directory that contains the Dockerfile, and then execute the docker build command with the following syntax:
docker build -t demobook:v1 .
The -t argument indicates the name of the image and its tag. Here, in our example, we call our image demobook, and the tag we've added is v1.
The . (dot) at the end of the command specifies that we will use the files in the current directory. The following screenshot shows the execution of this command:
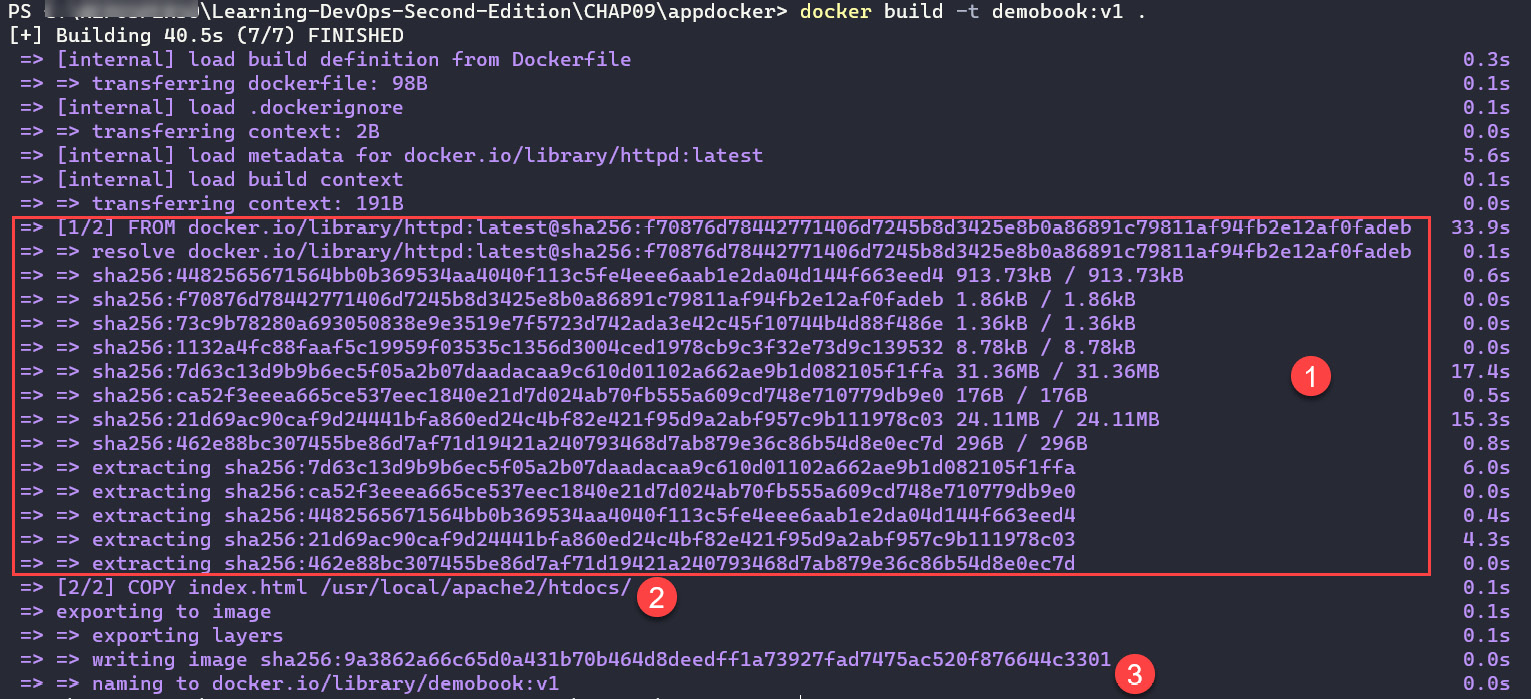
Figure 9.9 – docker build command
We can see in this preceding execution the three steps of the Docker image builder, as follows:
- Docker downloads the defined base image.
- Docker copies the index.html file in the image.
- Docker creates and tags the image.
When you execute the docker build command, it downloads the base image indicated in the Dockerfile from Docker Hub, and then Docker executes the various instructions that are mentioned in the Dockerfile.
Note
Note that if during the first execution of the docker build command you get a Get https://registry-1.docker.io/v2/library/httpd/manifests/latest: unauthorized: incorrect username or password error, then execute the docker logout command. Next, restart the docker build command, as indicated in this article: https://medium.com/@blacksourcez/fix-docker-error-unauthorized-incorrect-username-or-password-in-docker-f80c45951b6b.
At the end of the execution, we obtain a locally stored Docker demobook image.
Note
The Docker image is stored in a local folder system depending on your OS. For more information about the location of Docker images, you can read this article: http://www.scmgalaxy.com/tutorials/location-of-dockers-images-in-all-operating-systems/.
We can also check if the image is successfully created by executing the following Docker command:
docker images
Here is the output of the preceding command:

Figure 9.10 – docker images command
This command displays a list of Docker images on my local machine, and we can see the demobook image we just created. So, the next time the image is built, we will not need to download the httpd image again.
Now that we have created a Docker image of our application, we will instantiate a new container of this image.
Instantiating a new container of an image
To instantiate a new container of our Docker image, we will execute the docker run command in our Terminal, with the following syntax:
docker run -d --name demoapp -p 8080:80 demobook:v1
The -d parameter indicates that the container will run in the background. In the --name parameter, we specify the name of the container we want. In the -p parameter, we indicate the desired port translation. In our example, this would mean port 80 of the container will be translated to port 8080 on our local machine. And finally, the last parameter of the command is the name of the image and its tag.
The execution of this command is shown in the following screenshot:
Figure 9.11 – docker run command
At the end of its execution, this command displays the ID of the container, and the container runs in the background. It is also possible to display a list of containers running on the local machine by executing the following command:
docker ps
The following screenshot shows the execution with our container:

Figure 9.12 – docker ps command
After the execution of each container, we have its shortcut ID, its associated image, its name, its execution command, and its translation port information displayed.
So, we have built a Docker image and instantiated a new container of that image locally. We will now see how to run a web application that is in the local container.
Testing a container locally
Everything that runs in a container remains inside it—this is the principle of container isolation. However, in the port translation that we did previously, you can test your container on your local machine with the run command.
To do this, open a web browser and enter http://localhost:8080 with 8080, which represents the translation port indicated in the command. You should be able to see the following result:
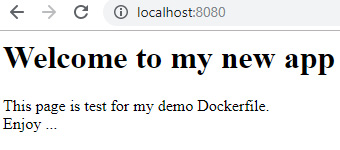
Figure 9.13 – Docker application launched
We can see the content of our index.html page displayed.
In this section, we looked at the different Docker commands that can be used to build a Docker image. Then, we instantiated a new container from that image, and finally, we tested it locally.
In the next section, we will see how to publish a Docker image in Docker Hub.
Pushing an image to Docker Hub
The goal of creating a Docker image that contains an application is to be able to use it on servers that contain Docker and host the company's applications, just as with a VM.
In order for an image to be downloaded to another computer, it must be saved in a Docker image registry. As already mentioned in this chapter, there are several Docker registries that can be installed on-premises, which is the case for JFrog Artifactory and Nexus Repository.
If you want to create a public image, you can push (or upload) it to Docker Hub, which is Docker's public (and free, depending on your license) registry. We will now see how to upload the image we created in the previous section to Docker Hub. To do this, you need to have an account on Docker Hub, which we created prior to installing Docker Desktop.
To push a Docker image to Docker Hub, perform the following steps:
- Sign in to Docker Hub: Log in to Docker Hub using the following command:
docker login -u <your dockerhub login>
When executing the command, you will be asked to enter your Docker Hub password and indicate that you are connected to the Docker registry, as shown in the following screenshot:

Figure 9.14 – The docker login command
- Retrieve the image ID: The next step consists of retrieving the ID of the image that has been created. To do so, we will execute the docker images command to display a list of images with their ID.
The following screenshot shows the retrieval of the ID of the image:

Figure 9.15 – Docker images list
- Tag the image for Docker Hub: With the ID of the image we retrieved, we will now tag the image for Docker Hub. To do so, the following command is executed:
docker tag <image ID> <dockerhub login>/demobook:v1
The following screenshot shows the execution of this command on the created image:
Figure 9.16 – docker tag
- Push the Docker image to Docker Hub: After tagging the image, the last step is to push the tagged image to Docker Hub.
For this purpose, we will execute the following command:
docker push docker.io/<dockerhub login>/demobook:v1
The following screenshot shows the execution of the preceding command:

Figure 9.17 – docker push image
We can see from this execution that the image is uploaded to Docker Hub.
To view the pushed image in Docker Hub, we connect to the Docker Hub web portal at https://hub.docker.com/ and see that the image is present, as shown in the following screenshot:
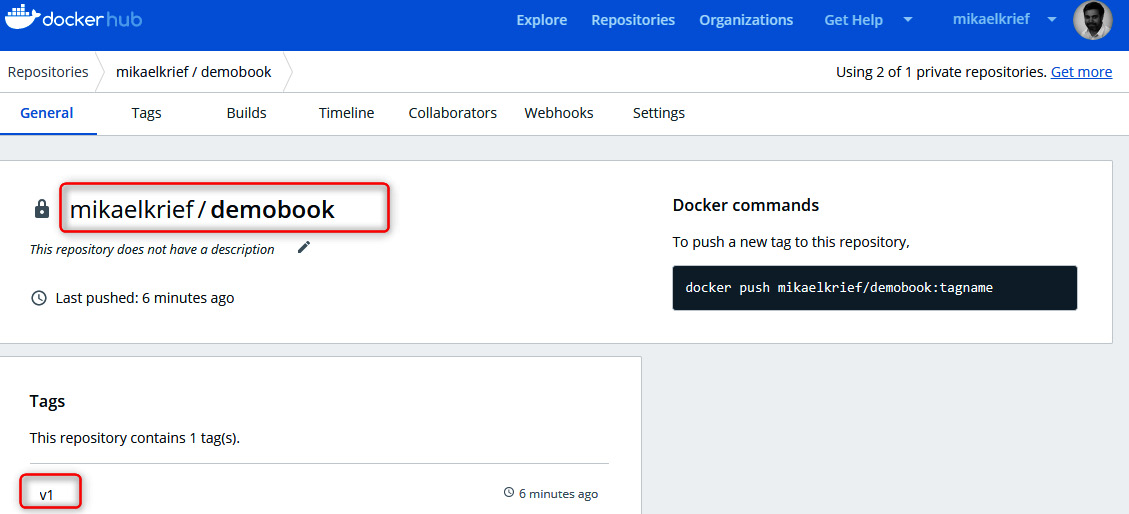
Figure 9.18 – The pushed image in Docker Hub with tag
By default, the image pushed to Docker Hub is in public mode—everybody can view it in the explorer and use it.
We can access this image in Docker Hub in the Docker Hub search engine, as shown in the following screenshot:
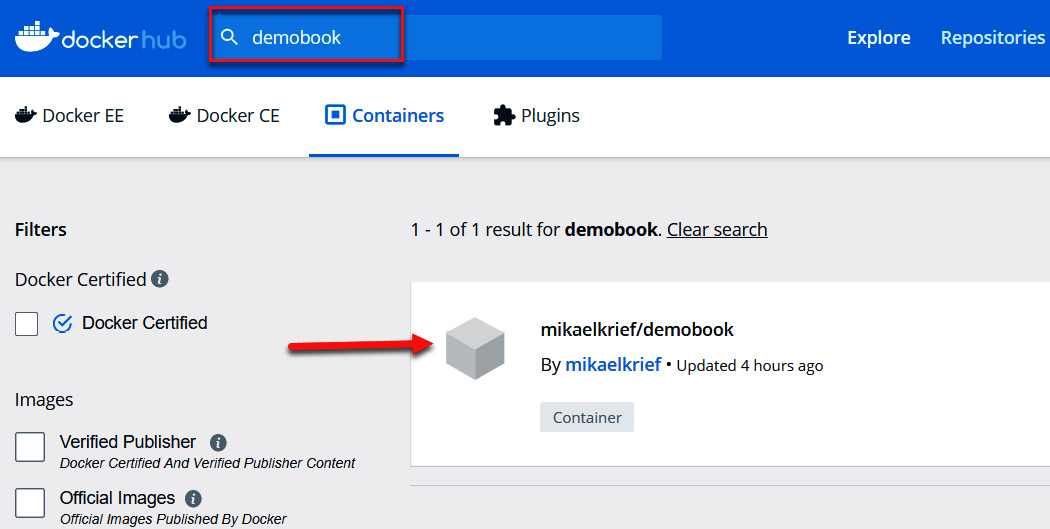
Figure 9.19 – Finding the image in Docker Hub
To make this image private—meaning only you are authenticated to use it—you must go to the Settings tab of the image and click on the Make private button, as shown in the following screenshot:
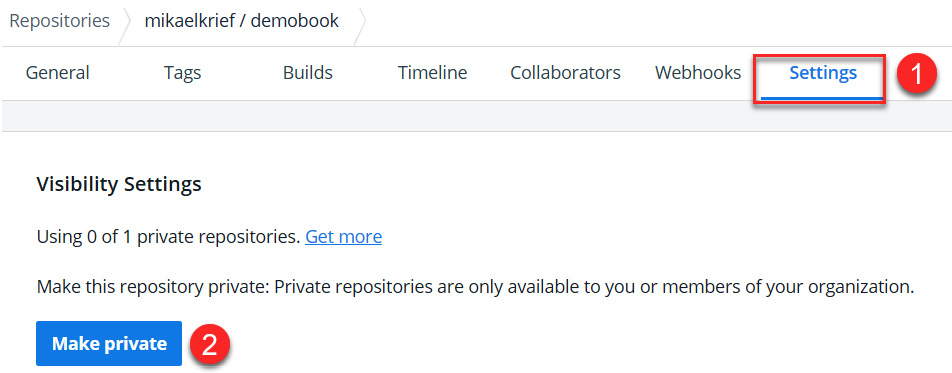
Figure 9.20 – Making a Docker image private
In this section, we looked at the steps and Docker commands for logging in to Docker Hub via the command line, and then we looked at the tag and push commands for uploading a Docker image to Docker Hub.
In the next section, we will see how to push a Docker image to a private Docker registry using an example ACR instance.
Pushing a Docker image to a private registry (ACR)
In the previous section, we learned how to push a Docker image to Docker Hub, which is a public registry. Now, we will learn how to push a Docker image to a private registry.
There are a lot of on-premises or cloud solutions that enable the Docker private registry. Here is a list of these solutions:
- Docker registry server: https://docs.docker.com/registry/deploying/
- Artifactory from JFrog: https://www.jfrog.com/confluence/display/JFROG/Docker+Registry
- Amazon Elastic Container Registry (ECR): https://aws.amazon.com/ecr/
- Google Container Registry (GCR): https://cloud.google.com/container-registry
- ACR: https://azure.microsoft.com/en-us/services/container-registry/
In this section, we will study the use of one of these solutions—ACR.
To push a Docker image into ACR, we will proceed with these steps:
- Before pushing a Docker image, we will create an ACR resource using one of the following:
- The Azure CLI (https://docs.microsoft.com/en-us/azure/container-registry/container-registry-get-started-azure-cli). The az cli script that creates a resource group and an ACR resource is shown here:
az group create --name RG-ACR --location eastus
az acr create --resource-group RG-ACR --name acrdemo --sku Basic
- PowerShell (https://docs.microsoft.com/en-us/azure/container-registry/container-registry-get-started-powershell). The PowerShell script that creates a resource group and an ACR resource is shown here:
New-AzResourceGroup -Name RG-ACR -Location EastUS
$registry = New-AzContainerRegistry -ResourceGroupName "RG-ARC" -Name "acrdemo" -EnableAdminUser -Sku Basic
- The Azure portal (https://docs.microsoft.com/en-us/azure/container-registry/container-registry-get-started-portal)
- The Azure CLI (https://docs.microsoft.com/en-us/azure/container-registry/container-registry-get-started-azure-cli). The az cli script that creates a resource group and an ACR resource is shown here:
In the next steps, we will use an ACR resource named demobookacr.
- Then, we will connect to our Azure account by running the following az cli command:
az login
- We connect to the created ACR resource (in Step 1) with the following az acr login command by passing the --name argument as the name of the ACR resource created in Step 1, as follows:
az acr login --name demobookacr
This command will connect to the Docker registry using the docker login command in the background.
- For pushing a Docker image into this ACR resource, we will execute a couple of commands.
The first command is to create a tag to the local image, as illustrated here:
docker tag demobook:v1 demobookacr.azurecr.io/demobook:v1
The second command is to push the image into the ACR resource, as illustrated here:
docker push demobookacr.azurecr.io/demobook:v1
These two commands are exactly the same as those we learned for tagging and pushing a Docker image into Docker Hub, with the difference being that the URL of the Docker registry for ACR here is <acr name>.azurecr.io.
The following screenshot shows the execution of these commands:
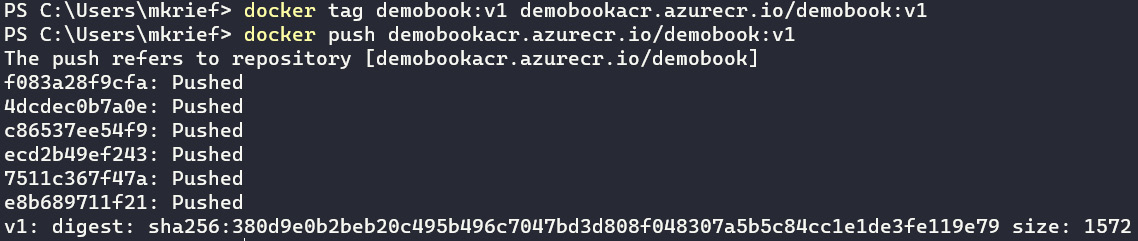
Figure 9.21 – Pushing Docker image into ACR
And the following screenshot shows the pushed Docker image in ACR:
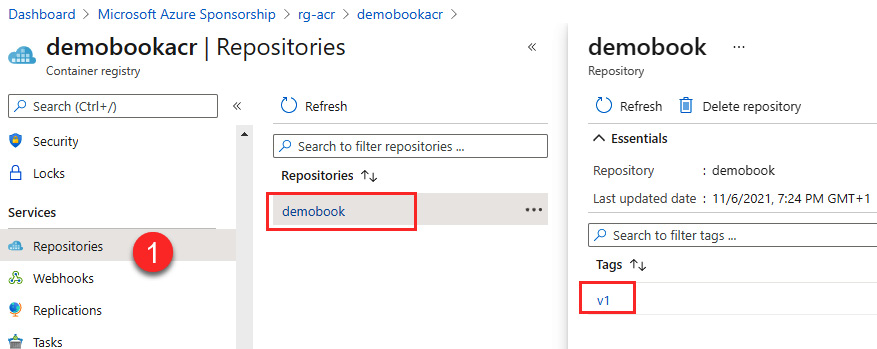
Figure 9.22 – Docker image in ACR
- Finally, to pull this Docker image, we will use the following command:
docker pull demobookacr.azurecr.io/demobook:v1
In this section, we learned how to use Docker to push and pull Docker images in a private Docker registry (that is, ACR).
In the next section, we will see how to deploy this image with a CI/CD pipeline in managed cloud container services—ACI and Terraform.
Deploying a container to ACI with a CI/CD pipeline
One of the major reasons Docker has quickly become attractive to developers and operations teams is because the deployment of Docker images and containers has made CI and CD pipelines for enterprise applications easier.
To automate the deployment of our application, we will create a CI/CD pipeline that deploys the Docker image containing our application in ACI.
ACI is a managed service by Azure that allows you to deploy containers very easily, without having to worry about the hardware architecture.
Note
To learn more about ACI, head to the official page at https://azure.microsoft.com/en-us/services/container-instances/.
In addition, we will use Terraform for infrastructure as code (IaC), which we discussed in Chapter 2, Provisioning Cloud Infrastructure with Terraform, using the Azure ACI resource and its integration with the Docker image.
We will therefore divide this section into two parts, as follows:
- The Terraform code configuration of the Azure ACI and its integration with our Docker image
- An example of a CI/CD pipeline in Azure Pipelines, which allows you to execute the Terraform code
To start, we will write the Terraform code that allows you to provision an ACI resource in Azure.
Writing the Terraform code for ACI
To provision an ACI resource with Terraform, we navigate to a new terraform-aci directory and create a Terraform file, main.tf.
In this code, we will provide Terraform code for a resource group and ACI resource using the azurerm_container_group Terraform object.
Note
Documentation for the Terraform ACI resource is available here: https://registry.terraform.io/providers/hashicorp/azurerm/latest/docs/resources/container_group.
This main.tf file contains the following Terraform code, which creates a resource group:
resource "azurerm_resource_group" "acidemobook" {
name = "demoBook"
location = "westus2"
}
In this main.tf file, we add variable declarations in the Terraform configuration, as follows:
variable "imageversion" {
description ="Tag of the image to deploy"
}
variable "dockerhub-username" {
description ="Tag of the image to deploy"
}
And we add the Terraform code for the ACI with the azurerm_container_group resource block, as follows:
resource "azurerm_container_group" "aci-myapp" {
name = "aci-agent"
location = "West Europe"
resource_group_name = azurerm_resource_group.acidemobook.name
os_type = "linux"
container {
name = "myappdemo"
image = "docker.io/mikaelkrief/${var.dockerhub-username}:${var.imageversion}"
cpu = "0.5" memory = "1.5"
ports {
port = 80
protocol = "TCP"
}
}
}
In the preceding code snippets, we do the following:
- We declare imageversion and dockerhub-username variables, which will be instantiated during the CI/CD pipeline and include the username and the tag of the image to be deployed.
- We use the azurerm_container_group resource from Terraform to manage the ACI. In its image property, we indicate the information of the image to be deployed—meaning, its full name in Docker Hub as well as its tag, which in our example is deported in the imageversion variable.
Finally, in order to protect the Terraform state file, we can use the Terraform remote backend by using Azure Blob storage, as we discussed in the Protecting the state file in the remote backend section of Chapter 2, Provisioning Cloud Infrastructure with Terraform.
Note
The complete source code of this Terraform file is available here: https://github.com/PacktPublishing/Learning-DevOps-Second-Edition/tree/main/CHAP09/terraform-aci.
We have the Terraform code that allows us to create an Azure ACI resource that will execute a container of our image. Now, we will create a CI/CD pipeline that will automatically deploy the container of the application.
Creating a CI/CD pipeline for the container
To create a CI/CD pipeline that will build our image and execute the Terraform code, we can use all the tools that we discussed in detail in Chapter 7, Continuous Integration and Continuous Delivery.
In this chapter, to visualize the pipeline, we will use Azure Pipelines, which is one of the previously detailed tools. It is advisable to carefully read the Using Azure Pipelines section of Chapter 7, Continuous Integration and Continuous Delivery. For this reason, we will not detail all the stages of the pipeline, but only those relevant to our container subject.
To implement the CI/CD pipeline in Azure Pipelines, we will proceed with these steps:
- We'll create a new build definition whose source code will point to the fork of the GitHub repository (https://github.com/PacktPublishing/Learning-DevOps-Second-Edition), and select the root folder of this repository, as shown in the following screenshot:
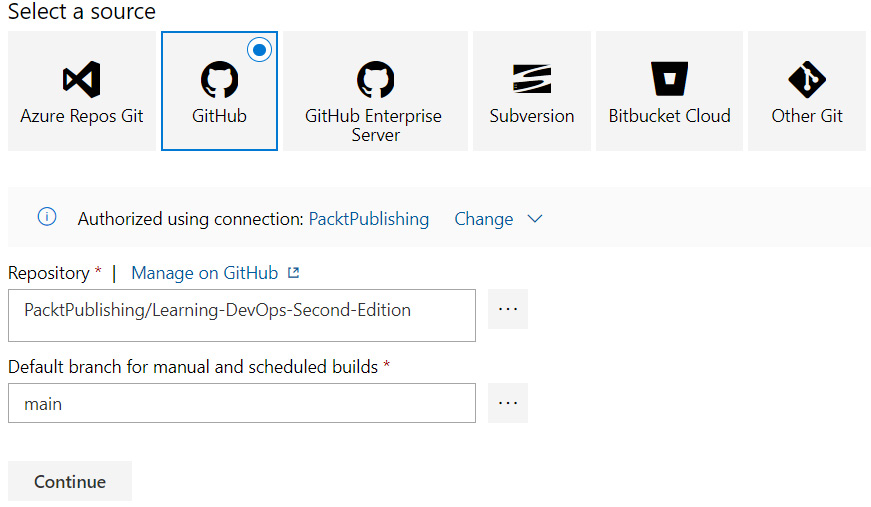
Figure 9.23 – Azure Pipelines with GitHub sources
Note
For more information about forks in GitHub, read Chapter 16, DevOps for Open Source Projects.
You are free to use any source control version available in Azure Pipelines.
- Then, on the Variables tab, we will define variables that will be used in the pipeline. The following screenshot shows the information on the Variables tab:
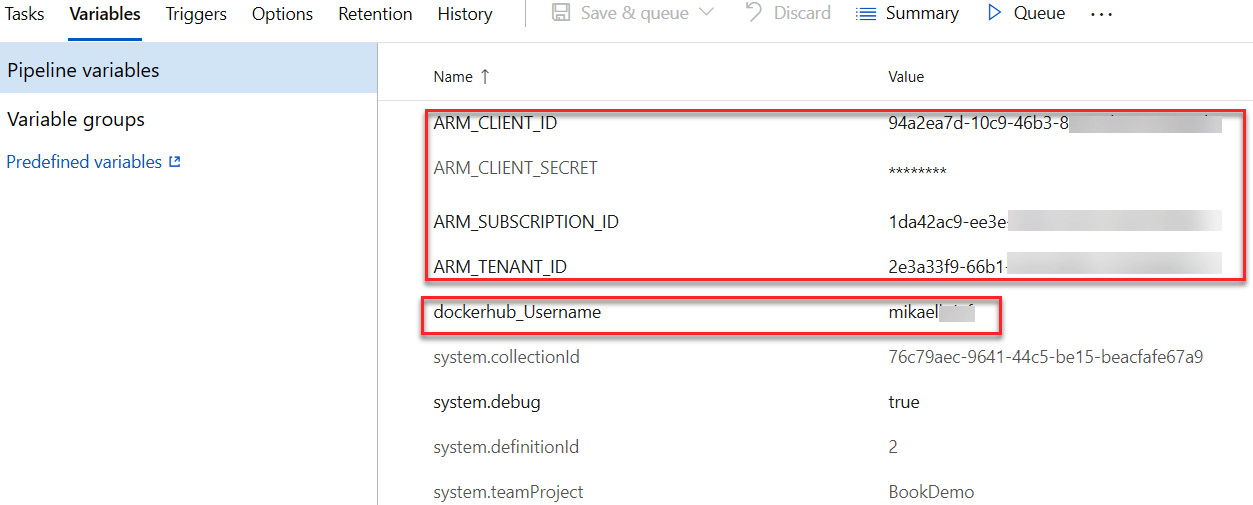
Figure 9.24 – Pipeline variables
We defined four pieces of Terraform connection information for Azure and the username of Docker Hub.
- Then, on the Tasks tab, we must take the following steps:
- Run the docker build command on the Dockerfile.
- Push the image to Docker Hub.
- Run the Terraform code to update the ACI resource with the new version of the updated image.
The following screenshot shows the configuration of the tasks:

Figure 9.25 – Pipeline steps list
We configure the tasks mentioned in Step 3 with these steps:
- The first task, Docker build and push, allows you to build the Docker image and push it to Docker Hub. Its configuration is quite simple, as we can see here:

Figure 9.26 – Docker build and push step parameters
These are the required parameters of this task:
- A connection to Docker Hub using Service Connection named DockerHub
- The tag of the image that will be pushed to Docker Hub
- The second task, Terraform Installer with the display name Use Terraform 0.14, allows you to download Terraform on the pipeline agent by specifying the version of Terraform that you want.
Note
This task is available in the Visual Studio Marketplace at https://marketplace.visualstudio.com/items?itemName=charleszipp.azure-pipelines-tasks-terraform&targetId=76c79aec-9641-44c5-be15-beacfafe67a9.
The following screenshot shows its configuration, which is very simple:
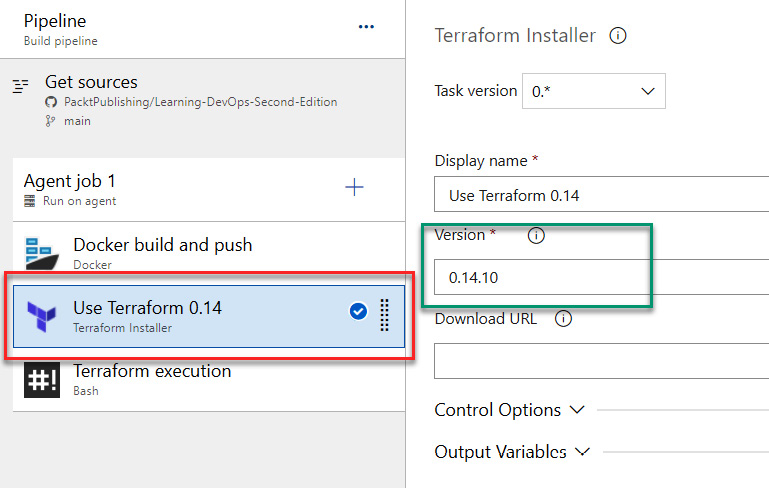
Figure 9.27 – Terraform step parameters
- The last task, Bash, allows you the Terraform execution inside a Bash script, and this screenshot shows its configuration:
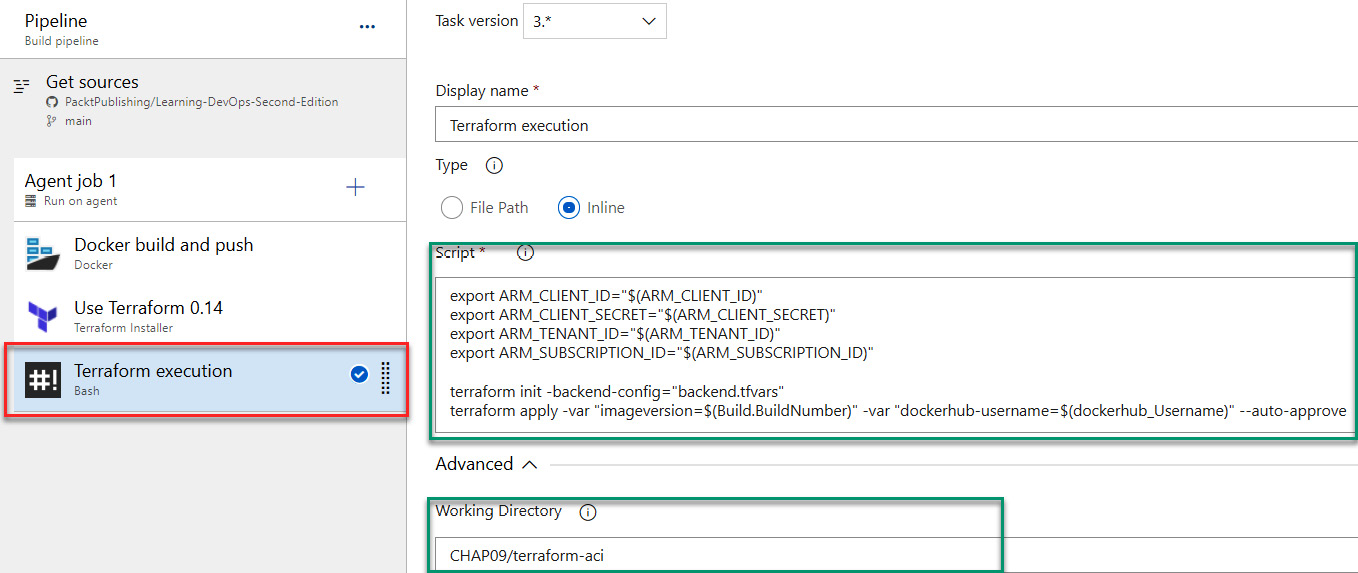
Figure 9.28 – Bash step parameters
The configured script looks like this:
export ARM_CLIENT_ID="$(ARM_CLIENT_ID)"
export ARM_CLIENT_SECRET="$(ARM_CLIENT_SECRET)"
export ARM_TENANT_ID="$(ARM_TENANT_ID)"
export ARM_SUBSCRIPTION_ID="$(ARM_SUBSCRIPTION_ID)"
terraform init -backend-config="backend.tfvars"
terraform apply -var "imageversion=$(Build.BuildNumber)" -var "dockerhub-username=$(dockerhub_Username)" --auto-approve
This script performs three actions, which are done in the following order:
- Exports the environment variables required for Terraform.
- Executes the terraform init command.
- Executes terraform apply to apply the changes, with the two -var parameters, which are our Docker Hub username as well as the tag to be applied. These parameters allow the execution of a container with the new image that has just been pushed to Docker Hub.
Then, to configure the build agent to use in the Agent job options, we use the Azure Pipelines agent-hosted Ubuntu 16.04, as shown in the following screenshot:
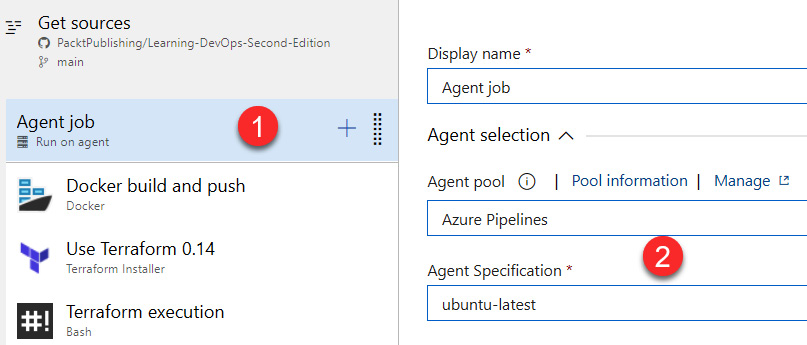
Figure 9.29 – Agent job parameters
Finally, the last configuration is the trigger configuration on the Triggers tab, which enables the CI with the trigger of this build at each commit, as shown in the following screenshot:
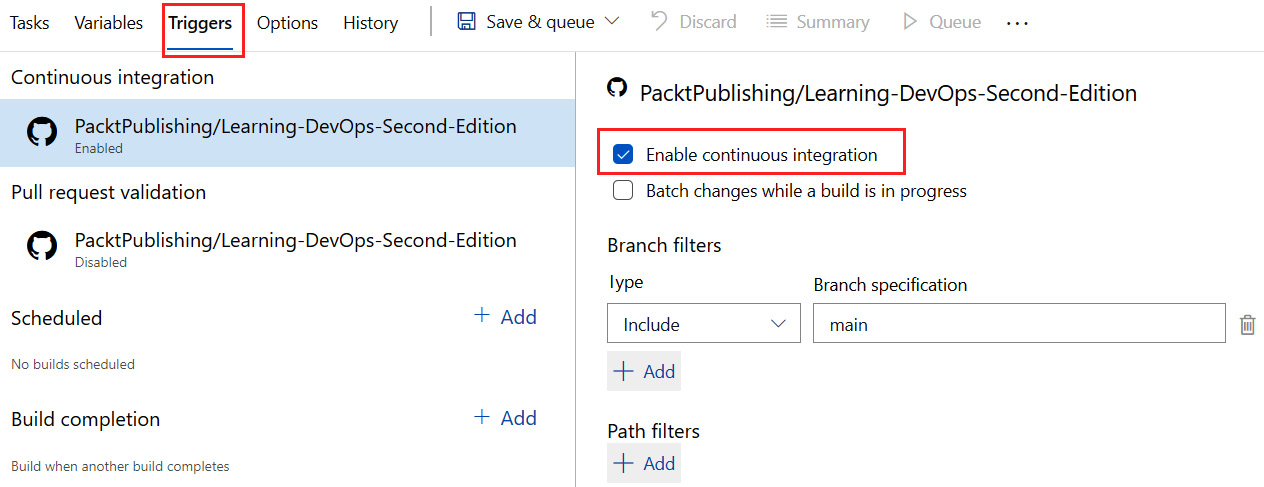
Figure 9.30 – Enabled CI
That completes the configuration of the CI/CD pipeline in Azure Pipelines.
After we trigger this build, we should be able to see a new version of the Docker image at the end of its execution, which corresponds to the number of the build that pushed the Docker image into Docker Hub, as illustrated in the following screenshot:
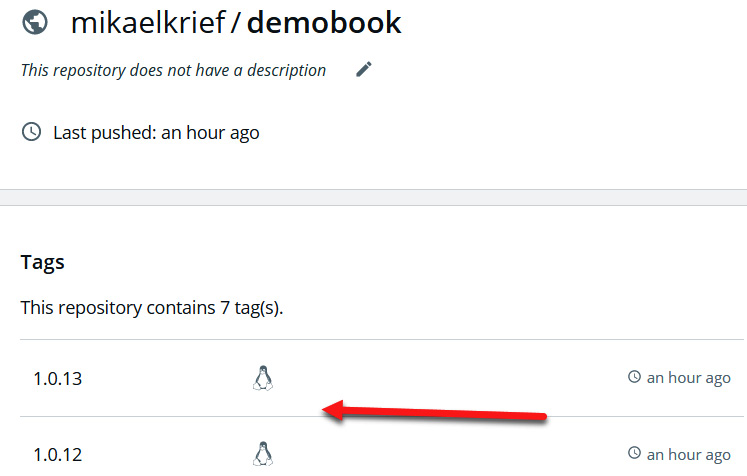
Figure 9.31 – Pushed Docker image in Docker Hub via pipeline
In the Azure portal, we have our aci-app ACI resource with our mydemoapp container, as you can see in the following screenshot:
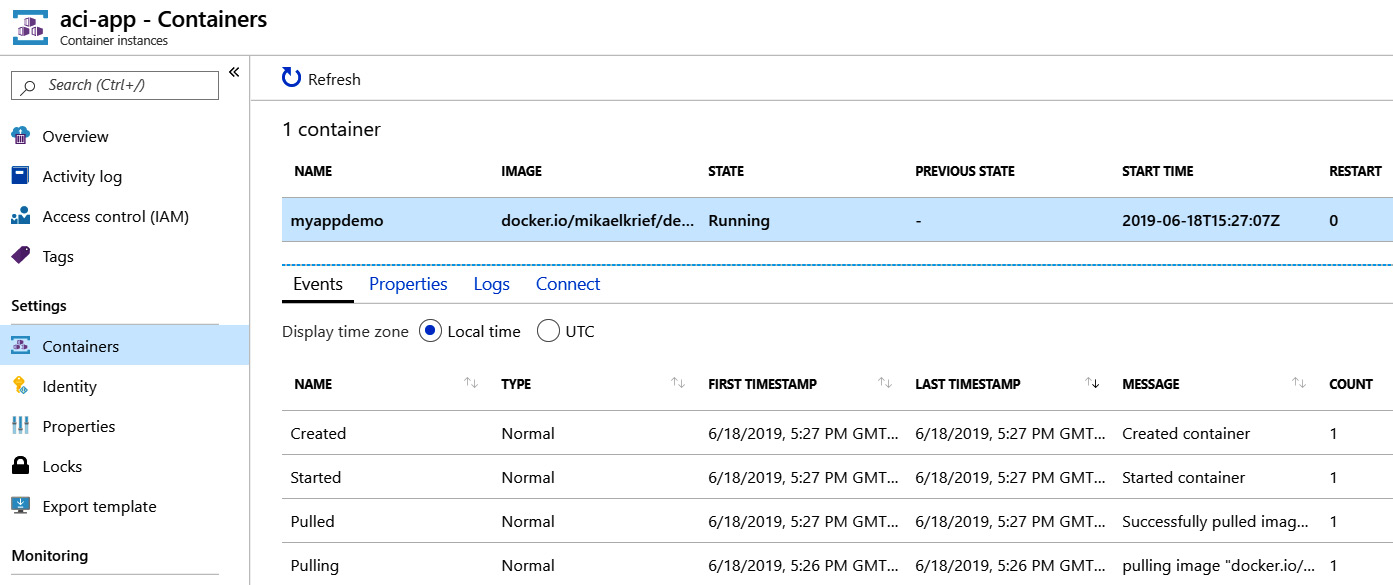
Figure 9.32 – ACI containers
Notice that the container is running well.
Now, to access our application, we need to retrieve the public fully qualified domain name (FQDN) URL of the container provided in the Azure portal. The following screenshot shows where you can find this:
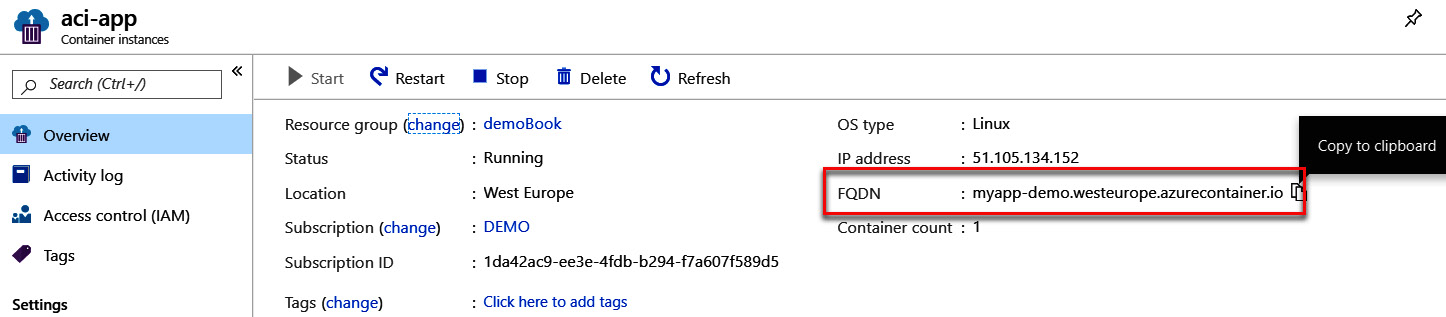
Figure 9.33 – FQDN of application container in ACI
We open a web browser with this URL:
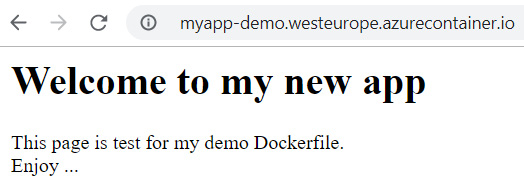
Figure 9.34 – Testing the application
Our web application is displayed correctly.
The next time the application is updated, the CI/CD build is triggered, a new version of the image will be pushed into Docker Hub, and a new container will be loaded with this new version of the image.
In this section, we have looked at writing Terraform code to manage an ACI resource and the creation of a CI/CD pipeline in Azure Pipelines, which allows you to deploy the application's image in Docker Hub and then update the ACI resource with the new version of the image.
In the next section, we will discuss another use case of Docker—that is, for running command-line tools.
Using Docker for running command-line tools
Up to now in this chapter, we have studied use cases of Docker to containerize a web application with Nginx.
Another use case of Docker is to be able to run command-line tools that are in Docker containers.
To illustrate this, we will run a sample of Terraform configuration using the Terraform binary, which is not located on a local machine but in a Docker container.
The Terraform configuration that we use in this section is the same as that in the previous section, Deploying a container to ACI with a CI/CD pipeline, and the source code is available here: https://github.com/PacktPublishing/Learning-DevOps-Second-Edition/tree/main/CHAP09/terraform-aci.
The goal of this lab is to run this Terraform configuration using the Terraform binary that is in the Docker container. To run this lab, following these steps:
- First we pull the official Terraform image from the Docker Hub with this command:
docker pull hashicorp/terraform
The following screenshot shows the execution of this command:

Figure 9.35 – docker pull command to pull Terraform image
- Then, inside the folder that contains the Terraform configuration, we will run the Terraform workflow using the following three docker run commands:
First, we run the terraform init command, as follows:
docker run -i -t -v ${PWD}:/usr/tf -w /usr/tf '
--env ARM_CLIENT_ID="<azure clientId>" '
--env ARM_CLIENT_SECRET="<azure client secret>" '
--env ARM_SUBSCRIPTION_ID="<azure subscription>" '
--env ARM_TENANT_ID="azure tenant id" '
--env ARM_ACCESS_KEY="azure access key " '
hashicorp/terraform:latest '
init -backend-config="backend.tfvars"
In this docker run command, we use the following arguments:
- -v to create a volume for mounting the current local directory that contains the Terraform code inside the /usr/tf directory on the container
- -w to specify the working directory
- --env with the environment variable necessary for Terraform to authenticate to Azure
- Hashicorp/terraform:latest, which is the name of the image
- init -backend-config="backend.tfvars", which is the argument for the Terraform command to run
Now, we run the terraform plan command, as follows:
docker run -i -t -v ${PWD}:/usr/tf -w /usr/tf '
--env ARM_CLIENT_ID="<azure clientId>" '
--env ARM_CLIENT_SECRET="<azure client secret>" '
--env ARM_SUBSCRIPTION_ID="<azure subscription>" '
--env ARM_TENANT_ID="azure tenant id" '
--env ARM_ACCESS_KEY="azure access key " '
hashicorp/terraform:latest '
plan -var dockerhub-username="<docker hub username>" -out plan.tfplan
In this preceding command, we use the same argument, with the plan command for Terraform.
Finally, we run the terraform apply command, as follows:
docker run -i -t -v ${PWD}:/usr/tf -w /usr/tf '
--env ARM_CLIENT_ID="<azure clientId>" '
--env ARM_CLIENT_SECRET="<azure client secret>" '
--env ARM_SUBSCRIPTION_ID="<azure subscription>" '
--env ARM_TENANT_ID="azure tenant id" '
--env ARM_ACCESS_KEY="azure access key " '
hashicorp/terraform:latest '
apply plan.tfplan
We have just studied a basic example of using a tool (here with Terraform) that runs in a Docker container. This use of Docker has the following advantages:
- It's not necessary to install these tools on its local machine; the installation process is done by the tool editor in the Docker image.
- You can run several versions of the same tool.
In the next section, we will discuss the use of Docker Compose, which allows us to mount several Docker images to the same group of containers.
Getting started with Docker Compose
So far in this chapter, we have studied how to write a Dockerfile, create a Docker image, and run a container of this Docker image.
Today, applications are not working in standalone mode; they need other dependencies such as a service (for example, another application; an application programming interface (API)) or a database. This implies that for these applications, the Docker workflow is more consistent. Indeed, when we work with several Docker applications, we have to execute for each of them the docker build and docker run commands, which requires some effort.
Docker Compose is a more advanced Docker tool that allows us to deploy several Docker containers at the same time in the same deployment cycle. Docker Compose also allows us to manage elements that are common to these Docker containers, such as data volumes and network configuration.
Note
For more details about Docker Compose, read the official documentation here:
https://docs.docker.com/compose
In Docker Compose, this configuration—which contains the Docker images, the volumes, and the network that constitutes the artifacts of the same application—is done simply in a configuration file in YAML Ain't Markup Language (YAML) format.
In this section, we will learn about the basic mode installation of Docker Compose. Then, we will write a simple Docker Compose configuration file to run an nginx application with a MySQL database in the same context. Finally, we will execute this Docker Compose configuration file and view the result in Docker containers.
Installing Docker Compose
On Windows or macOS, the Docker Compose binary is already installed with Docker Desktop.
Follow this documentation to install the Docker Compose binary on Linux: https://docs.docker.com/compose/install/#install-compose-on-linux-systems.
We can check if Docker Compose is correctly installed by running the following command:
docker-compose version
The following screenshot shows the result of this command:

Figure 9.36 – docker-compose version command
This command displays the version of the installed docker-compose binary.
Now that Docker Compose is installed, we will write the Docker Compose configuration YAML file.
Writing the Docker Compose configuration file
For deploying containers using Docker Compose, we will write a configuration file to run an nginx container coupled with a mysql container.
For this, we will create a new file named docker-compose.yml with the following content that is in two blocks of code.
The first code snippet, in YAML, is for creating an nginx container, as follows:
version: '3' #version of the Docker Compose YAML schema
services:
nginx:
image: nginx:latest
container_name: nginx-container
ports:
- 8080:80
In the preceding code snippet, we start with the services property, which contains a list of services (or Docker applications) to run in Docker. The first service is the nginx service. We configure the nginx docker image to use, the name of the container, and the exposed port, which is 8080, for the local access of the nginx service.
Then, we add the YAML for the MySQL service with the following code:
mysql:
image: mysql:5.7
container_name: mysql-container
environment:
MYSQL_ROOT_PASSWORD: secret
MYSQL_DATABASE: mydb
MYSQL_USER: myuser
MYSQL_PASSWORD: password
In the preceding code snippet, we configure the mysql service with the Docker image, the name of the container, and the required environment variable for configuring the database access.
Note
The complete source code of this file is available here:
We have just written the YAML file of the docker-compose configuration. Now, we will run Docker Compose to execute the containers described in this configuration.
Executing Docker Compose
For running the Docker containers described in the YAML configuration file, we will run the basic operation of Docker Compose by executing the following command in the folder that contains the docker-compose.yml file:
docker-compose up -d
Note
The -d option is added for running the containers in detached mode.
The complete documentation for the docker-compose CLI is available here:
https://docs.docker.com/compose/reference/
The following screenshot shows the execution of the docker-compose up -d command:
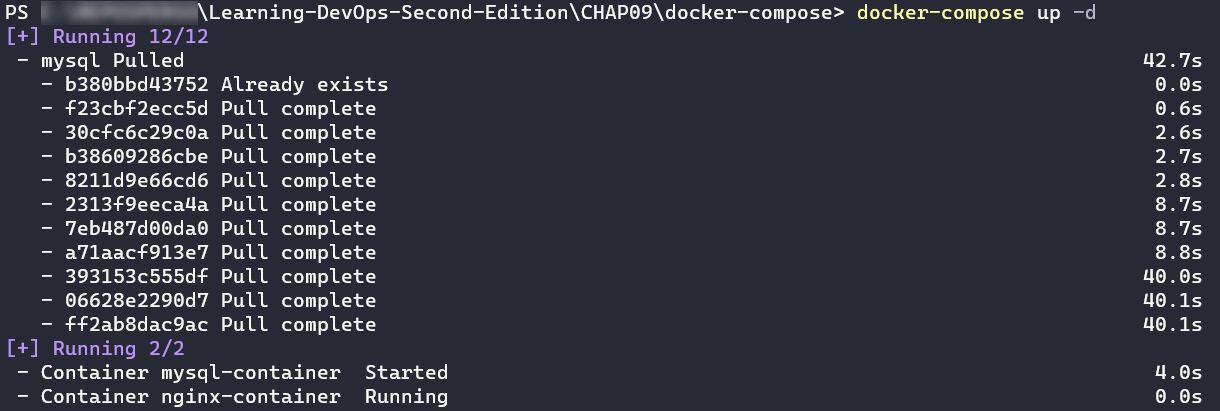
Figure 9.37 – docker-compose up -d command
At the end of this execution, Docker Compose displays a list of started containers. Here, in our example, these are nginx and mysql.
To check that the containers are running, we execute the docker ps Docker command to display a list of running containers.
The following screenshot shows the execution of the docker ps command:

Figure 9.38 – docker ps command
We can see that our two containers are running.
On Windows or macOS, we can also use Docker Desktop, which displays in the containers' list the running containers mounted by Docker Compose inside the docker-compose group, as illustrated in the following screenshot:
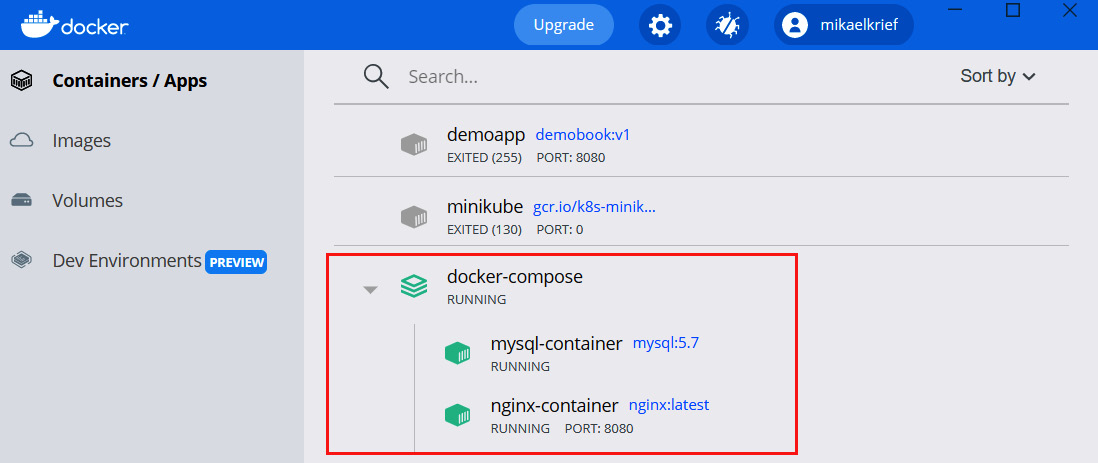
Figure 9.39 – Docker Desktop list of Docker Compose containers
In this section, we learned some basic features for writing Docker Compose configuration files and executing Docker Compose locally to run Docker containers.
In the next section, we will discuss the same execution of these containers remotely on ACI.
Deploying Docker Compose containers in ACI
We discussed ACI in the Deploying a container to ACI with a CI/CD pipeline section.
Now, we will learn how to execute containers with Docker Compose configuration in ACI to run a set of containers that are on the same application services.
For this lab, we will use the same Docker Compose configuration we learned in the Using Docker for running command-line tools section. The only difference is that the running port on the nginx service is 80 instead of 8080, which we used locally (because my port 80 is already used by another service).
For deploying containers on ACI, we will perform the following steps:
- Inside our Azure subscription, we will create a new resource group called rg-acicompose.
- Then, in the console terminal, run the following Docker command to log in to Azure:
docker login azure
The execution of this command opens a window that allows us to authenticate ourselves to our Azure subscription.
- Create a new Docker context by running the following command:
docker context create aci demobookaci
By running this command, we choose the Azure subscription and the resource group we created in Step 1, as illustrated in the following screenshot:

Figure 9.40 – Creating Docker context for ACI
- Check the new Docker context by running the following command:
docker context ls
This command displays a list of Docker contexts and indicates with a * symbol the current context, as illustrated in the following screenshot:

Figure 9.41 – List of Docker contexts
- Select the newly created demobookaci context by running the following command:
docker context use demobookaci
- Finally, to deploy the Docker Compose configuration application inside this ACI resource, run the following command:
docker compose up
The following screenshot shows the result of the execution of this command:

Figure 9.42 – docker compose up command for deployment to ACI
In our Azure subscription, we can see the created ACI resource with two containers, as indicated in the following screenshot:
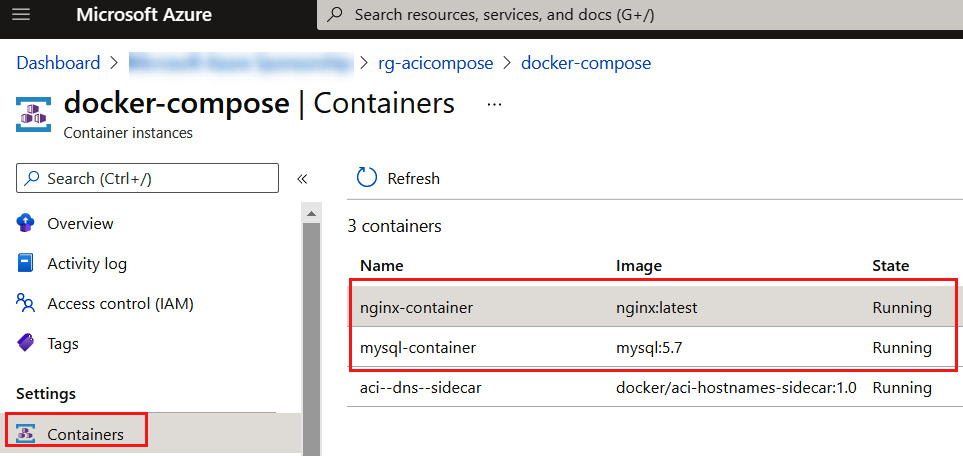
Figure 9.43 – ACI containers created by Docker Compose
Finally, to test and gain access to the deployed application, find the application FQDN in the ACI properties and launch the application in the browser. This is exactly what we learned in the Deploying a container to ACI with a CI/CD pipeline section of this chapter.
Note
For another sample of Docker Compose in ACI, read an official tutorial here:
https://docs.microsoft.com/en-us/azure/container-instances/tutorial-docker-compose
In this section, we have learned how to deploy multiple containers using Docker Compose in ACI using the docker-compose YAML file and some Docker command-line contexts.
Summary
In this chapter, we presented Docker and its essential concepts. We discussed the necessary steps to create a Docker Hub account, and then we installed Docker locally with Docker Desktop.
We created a Dockerfile that details the composition of a Docker image of a web application, and we also looked at the principal instructions that it is composed of— FROM, COPY, and RUN.
We executed the docker build and docker run commands to build an image from our Dockerfile and execute it locally, and then pushed it to Docker Hub using the push command.
In the second part of this chapter, we implemented and executed a CI/CD pipeline in Azure Pipelines to deploy our container in an ACI resource that was provisioned with Terraform. Then, we discussed the use of Docker for running command-line tools such as Terraform.
Finally, we learned to install and use Docker Compose to create multiple application containers and deploy them in ACI.
In the next chapter, we will continue with the subject of containers, and we will look at the use of Kubernetes, which is a tool to manage containers on a large scale. We will use the Azure Kubernetes Service (AKS) and Azure Pipelines to deploy an application in Kubernetes with a CI/CD pipeline.
Questions
- What is Docker Hub?
- What is the basic element that allows you to create a Docker image?
- In a Dockerfile, what is the instruction that defines a base image to use?
- Which Docker command allows you to create a Docker image?
- Which Docker command allows you to instantiate a new container?
- Which Docker command allows you to publish an image in Docker Hub?
Further reading
If you want to know more about Docker, here are some great books:
- Docker Cookbook: https://www.packtpub.com/virtualization-and-cloud/docker-cookbook-second-edition
- Beginning DevOps with Docker: https://www.packtpub.com/virtualization-and-cloud/beginning-devops-docker