
Chapter 16: DevOps for Open Source Projects
Until a few years ago, the open source practice, which consists of delivering the source code of a product to the public, was essentially only used by the Linux community. Since then, many changes have taken place regarding open source with the arrival of GitHub. Microsoft has since made a lot of its products open source and is also one of the largest contributors to GitHub.
Today, open source is a must in the development and enterprise world, regardless of whether we wish to use a project or even contribute to it.
However, open source applications are not always free. There are sometimes licensing fees for plugins, support, or enterprise features. Also, in terms of support, using open source software can sometimes present difficulties and pitfalls when it comes to product support.
Throughout this book, we have seen many instances where open source tools such as Terraform, Ansible, Packer, Vagrant, Jenkins, and SonarQube have been used. However, one of the great advantages of open source is not only the use of products but also the fact that we can contribute to them.
To contribute to an open source project, we need to participate in its evolution by discussing issues with its use or by making suggestions regarding improving it. In addition, if you are a developer, you can also modify its source code to make it evolve.
Finally, as a developer or a member of an operational team, we can share our project in open source and make it available to the community.
In this chapter, we'll discuss open source contributions and why it's important to apply DevOps practices to all open source projects.
All of these practices, such as the use of Git, a CI/CD pipeline, and security analysis, have already been discussed throughout this book. However, in this chapter, we'll focus more on how to apply them in the context of our open source project.
We will start by learning how to share the code of a project in GitHub and how to initialize a contribution to another project. We will also discuss how to manage pull requests, which is one of the most important features of the contribution. In addition, we will look at how to indicate version changes using release notes, and the topic of binary sharing in GitHub Releases. We'll explain GitHub Actions, which allows us to created CI/CD pipelines on open source projects that are hosted on GitHub. Finally, we will look at the source code analysis of open source projects. We'll do this using SonarCloud, which is used for static code analysis, and WhiteSource Bolt, which is used for analyzing package security vulnerabilities that are contained in an open source project.
In this chapter, we will cover the following topics:
- Storing source code in GitHub
- Contributing to open source projects using pull requests
- Managing the changelog file and release notes
- Sharing binaries in GitHub releases
- Getting started with GitHub Actions
- Analyzing code with SonarCloud
- Detecting security vulnerabilities with WhiteSource Bolt
Technical requirements
In this chapter, we will use GitHub as a Git repository platform to store our open source project. Therefore, you will need a GitHub account, which you can create for free at https://github.com/. To fully understand the DevOps practices that will be used in this chapter, you should be well-versed with the following chapters of this book:
- Chapter 6, Managing Your Source Code with Git
- Chapter 7, Continuous Integration and Continuous Delivery
- Chapter 12, Static Code Analysis with SonarQube
The complete code for this chapter can be found at https://github.com/PacktPublishing/Learning-DevOps-Second-Edition/tree/main/CHAP16/.
Check out the following video to see the code in action:
Storing source code in GitHub
If we want to share one of our projects in an open source fashion, we must version its code in a Git platform that allows the following elements:
- Public repositories; that is, we need to have access to the source code contained in this repository, but without necessarily being authenticated on this Git platform.
- Features and tools for code collaboration between the different members of this platform.
Two main platforms allow us to host open source tools: GitLab, which we looked at in the Using GitLab CI section of Chapter 7, Continuous Integration and Continuous Delivery, and GitHub, which is now the most used platform for open source projects.
Let's learn how to use GitHub so that we can host our project or contribute to another project.
Creating a new repository on GitHub
If we want to host our project on GitHub, we need to create a repository. Follow these steps to do so:
- First, log in to your GitHub account or create a new one if you are a new user by going to https://github.com/.
- Once connected, go to the Repositories tab inside your account. Click on the New button, as shown in the following screenshot:

Figure 16.1 – Adding a repository

Figure 16.2 – GitHub repository details
The information that needs to be filled in to create a repository is as follows:
- The name of the repository.
- A description (which is optional).
- We need to specify whether the repository is Public (accessible by everyone, even if they're not authenticated) or Private (available only to the members we give it access to).
- We can also choose to initialize the repository with an empty README.md file, as well as a .gitignore file.
Then, validate the form by clicking on the Create repository button.
- As soon as the repository is created, the home page will display the first Git instructions so that you can start archiving its code. The following screenshot shows part of the instruction page of a new GitHub repository:

Figure 16.3 – GitHub repository – first Git instructions
Everything is ready for archiving the code in GitHub. Do this by using the workflow and Git commands we looked at in Chapter 6, Managing Your Source Code with Git.
This procedure is valid for creating a repository in GitHub. Now, let's learn how to contribute to GitHub by using a project from another repository.
Contributing to a GitHub project
We have just learned how to create a repository on GitHub. However, what we need to know is that, by default, only the owner of the repository is allowed to modify the code of this repository.
Note
We can add people as collaborators to this repository so that they can make changes to the code. For more information about this procedure, please go to https://help.github.com/en/articles/inviting-collaborators-to-a-personal-repository.
With the help of this principle, we don't have the right to modify the code of another repository.
To contribute to the code of another repository, we will need to create a fork of the initial repository that we want to contribute to. A fork is a duplication of the initial repository that is performed in our GitHub account, thus creating a new repository in our account.
Follow these steps to learn how to create a fork of a repository:
- First, navigate to the initial repository that you want to contribute to. Then, click on the Fork button at the top of the page, as shown in the following screenshot:

Figure 16.4 – GitHub – forking a repository
- After a few seconds, this repository will be forked and duplicated, along with all its content, in your account. By doing this, you get a new repository in your account that is linked to the initial repository, as shown in the following screenshot:

Figure 16.5 – GitHub fork link
- Now, you have an exact copy of the repository that you want to contribute to in your GitHub account. You are free to modify the code and commit your changes, all of which will be archived in your repository.
However, even if there is a link between the initial repository and the fork, the code for each repository is completely uncorrelated and the code isn't synchronized automatically.
In this section, we learned how to create a GitHub repository or to make a fork of another repository so that we can contribute to it. Now, let's learn how to propose code changes and merge our code into another repository using a pull request.
Contributing to open source projects using pull requests
When we want to contribute to an open source project in GitHub, we need to make changes to the source code of the application that is in the repository of our GitHub account. To merge these code changes to the initial repository, we must perform a merge operation.
In GitHub, there is an element called a pull request that allows us to perform a merge operation between repositories. In addition to performing a simple and classic merge between code branches, a pull request also adds a whole new aspect of collaboration by providing features that allow different contributors to discuss code changes.
Let's learn how to carry out a pull request:
- After making changes to the code source in the repository in your account, you must archive these changes by making a commit. The changes that have been made are now ready to be merged with the remote repository. To do this, go to your repository, go to the Pull requests tab, and click the New pull request button, as shown in the following screenshot:

Figure 16.6 – GitHub – New pull request
- The page that appears specifies all of the information regarding the pull request that will be created, as shown in the following screenshot:
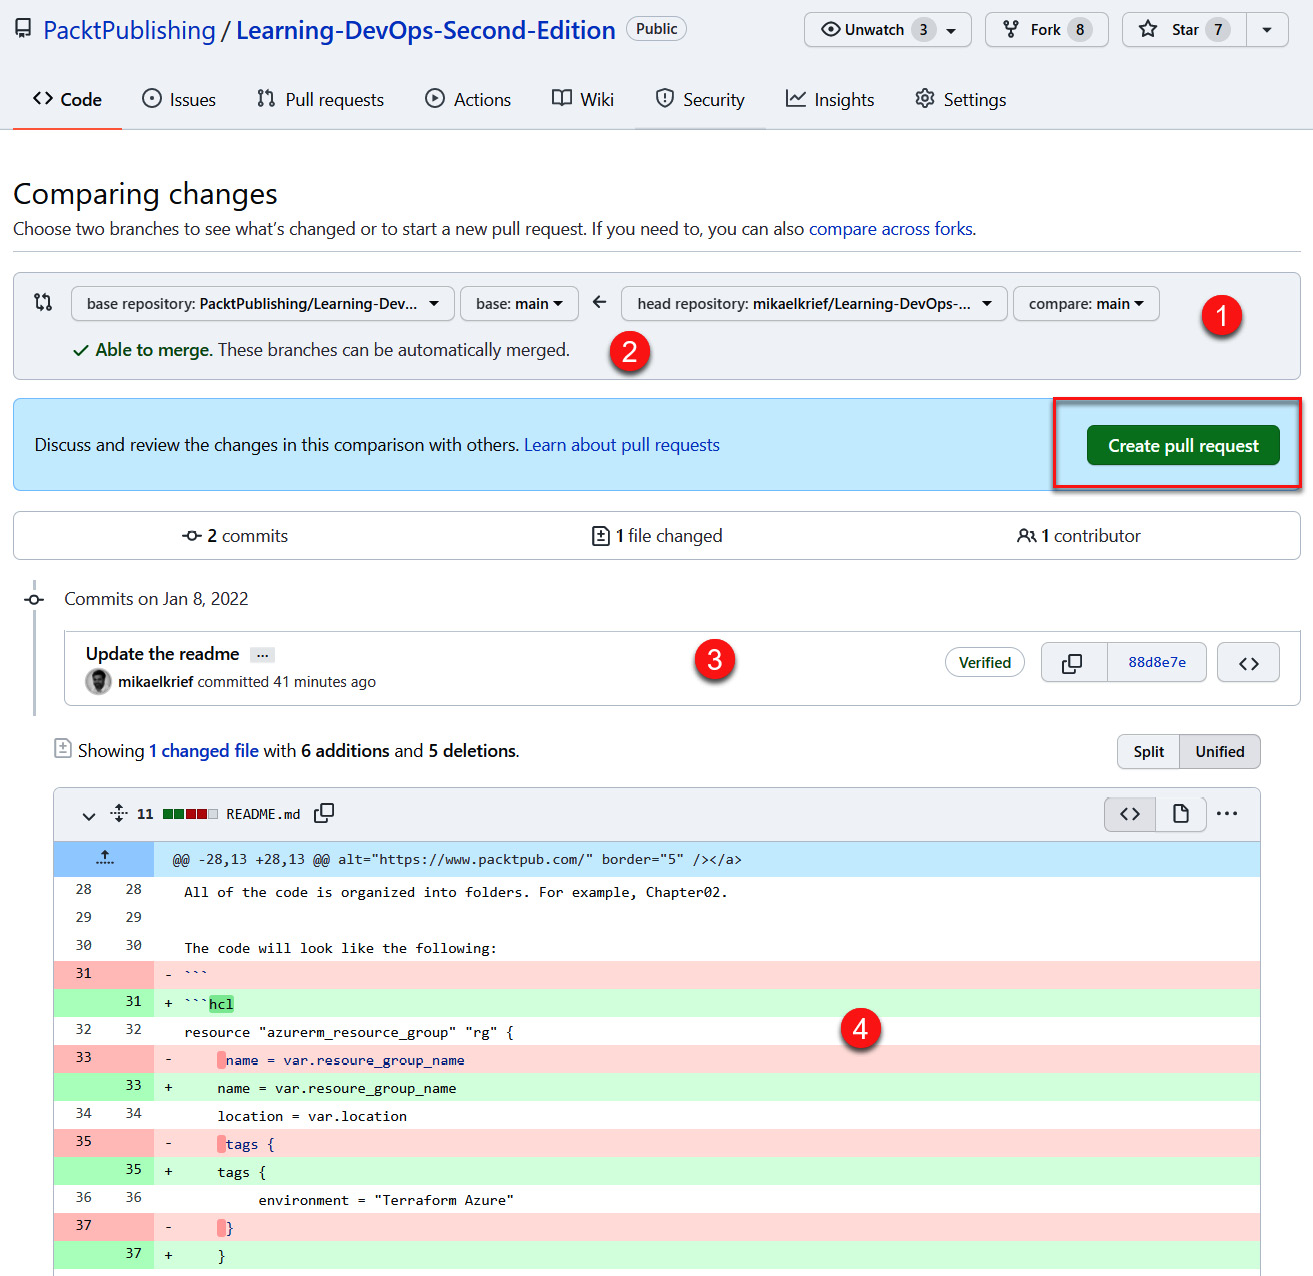
Figure 16.7 – GitHub pull request details
The following information is displayed on the screen:
- The source repository/branch and the target repository/branch
- An indicator that shows whether there are any code conflicts
- The list of commits that are included in this pull request
- The code differences of modified files
- To validate the creation of the pull request, click on the Create pull request button.
- Enter the name and description of the pull request in the form that appears, as shown in the following screenshot:

Figure 16.8 – GitHub pull request title and description
This information is important because it will help the repository's target owner quickly understand the objectives of the code changes included in this pull request. In addition, from the right-hand panel, it is possible to select reviewers who will be notified of the pull request by email. This will be done by the person who is in charge of reviewing the code changes and validating or rejecting them.
- Finally, validate the creation of the pull request by clicking on the Create pull request button.
Once the pull request has been created, the owner of the original repository will see that a fresh pull request has been opened (with the title you provided) in the Pull requests tab of their repository. They can click on the Pull requests tab to access it and check all of its details.

Figure 16.9 – GitHub pull request list
In the following screenshot, we can see the different options that have been proposed for this pull request:

Figure 16.10 – GitHub pull request validation
The following are the different operations that the repository owner can perform on this pull request:
- By clicking on the Files changed tab, the reviewer can see the changes that have been made to the code and leave notes on each of the modified lines.
- The reviewer or repository owner can initiate a discussion on code changes and click on the Comment button to validate their comments.
- If the owner is satisfied with the code changes, they can click on the Merge pull request button to perform the merge.
- On the other hand, if the owner is not satisfied and refuses the pull request, they can click on the Close pull request button, where the request is then closed.
- We can also perform some automated checks.
Once merged, the pull request will have a Merged status and the code of the original repository will be updated with the code changes we have made.
In this section, we have seen that, with a pull request, we have a simple way of contributing to an open source project in GitHub by proposing code changes. Then, the project owner can either accept this pull request and merge the code or refuse the changes. In the next section, we will learn how to manage the changes that we've made to our project using the changelog file.
Managing the changelog file and release notes
When we host a project as open source, it is good practice to provide information to users about the changes that are being applied to it as they occur. This change logging system (also called release notes) is all the more important if, in addition to the source code, our repository also publicly provides a binary of the application since the use of this binary is dependent on its different versions and code changes.
Logically, we could find the history of code changes by navigating through the history of Git commits. However, this would be too tedious and time-consuming for Git novices. For these reasons, we will indicate the change in history with the code versions in a text file that can be read by everyone. This file has no fixed nomenclature or formalism, but for simplicity, we have decided to call it CHANGELOG.md.
So, this changelog file is a text file in markdown format, which is easy to edit with simple formatting and is placed at the root of the repository. In this file, the history of the changes is provided in a list and doesn't give away too many details about each change.
For better visibility, this history of the most recent changes will be ordered from newest to oldest so that we can quickly access the latest changes. To give you an idea of the shape of the changelog file, here is a screenshot that shows an extract from the changelog file of the Terraform provider for Azure:

Figure 16.11 – GitHub changelog sample
Note
The complete content of this file is available here: https://github.com/terraform-providers/terraform-provider-azurerm/blob/master/CHANGELOG.md.
The important information to mention in this file is the version history of the changes that have been delivered in this application. For each version, we write the list of new features, improvements, and bug fixes that were delivered.
For each change, there is a very short description, and the commit number is assigned as a link that allows us to view all the details of the changes by clicking on it.
Note
For full details on the format of the changelog file, take a look at the following documentation: https://keepachangelog.com/en/1.1.0/.
Finally, for integration into a DevOps process, it is also possible to automatically generate the changelog file using Git commits and tags.
Many scripts and tools allow this changelog to be generated, such as GitHub accounts (https://github.com/conventional-changelog). However, if you are unsure of whether you should write or generate this file, then here is a very interesting article explaining the pros and cons of these two methods: https://depfu.com/blog/changelogs-to-write-or-to-generate.
In this section, we learned how to inform users and contributors about the history of code changes that are made to open source projects using a changelog file. Then, we looked at the useful information we should mention in this changelog file so that users can find out exactly what changes the application is undergoing between each version.
In the next section, we will learn how to share binaries in an open source project in GitHub releases.
Sharing binaries in GitHub releases
The purpose of an open source project is not only to make the source code of a project visible, but also to share it with public users. For each new version of the project (called a release), this share contains a release note, as well as the binary resulting from the compilation of the project.
Thus, for a user who wishes to use this application, they don't need to retrieve the entire source code and compile it – they just have to retrieve the shared binary from the desired release and use it directly.
Note that a release is linked to a Git tag, which is used to position a label at a specific point in the source code's history. A tag is often used to provide a version number to the source code; for example, the tag could be v1.0.1.
Note
To learn more about tag handling in Git, read the following documentation: https://git-scm.com/book/en/v2/Git-Basics-Tagging.
In GitHub, in each repository, it is possible to publish releases from Git tags, which will have a version number (from the Git tag), a description specifying the list of changes, and the application binaries.
Following this introduction to releases in GitHub, let's learn how to create a release in GitHub using its web interface:
- To create a GitHub release, go to the repository that contains the application code.
- Click on the Releases link in the right panel, which can be found via the Code tab, as shown in the following screenshot:

Figure 16.12 – GitHub – Releases link
- On the next page that appears, click on the Create a new release button to create a new release. The release form is displayed and the release information is filled in, as shown in the following screenshot:
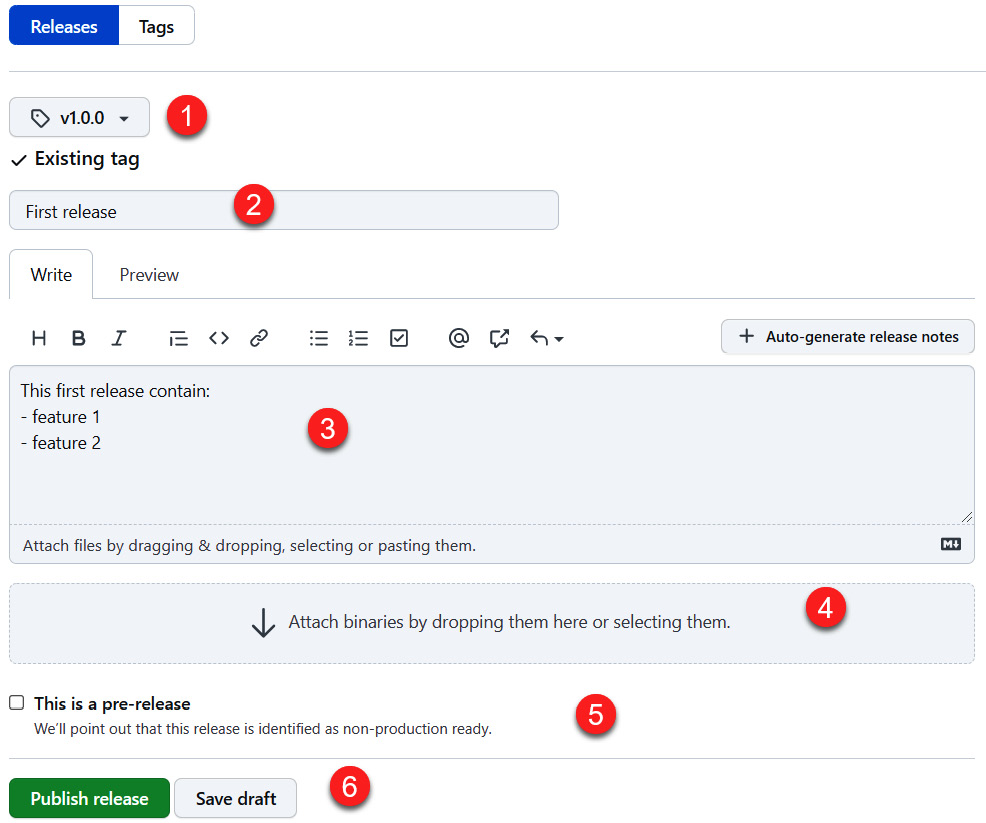
Figure 16.13 – GitHub – creating a release
In this form, we have entered the following information:
- The tag that's associated with the release.
- The title of the release.
- The description of the release, which may contain the list of changes (release notes).
- We upload the application binary in a ZIP file format that corresponds to this release.
- We also mark the checkbox regarding whether it's a pre-release.
Then, validate the new release by clicking on the Publish release button.
- Finally, we are redirected to the list of releases for the project that we have just created, as shown in the following screenshot:

Figure 16.14 – GitHub release details
In the preceding screenshot, we can observe the tag (v1.0.0) that's associated with the release, the information we entered, and the binaries.zip file we uploaded. In addition, GitHub has been automatically added to the release of other assets; that is, the package (ZIP) that contains the source code of the application that's associated with this tag.
We have just seen that, via the GitHub web interface, we can create a GitHub release that allows us to share the release notes and binary files of a project with all users.
Note
It is also possible to integrate all of these steps into the CI/CD pipeline with an automatic script using various GitHub APIs. The documentation for this can be found at https://developer.github.com/v3/repos/releases/.
In the next section, we will create this same pipeline but in GitHub using GitHub Actions.
Getting started with GitHub Actions
GitHub has been integrating several other DevOps features into its repository source platform. This allows it to be fully integrated with the repository's code.
At the time of writing, these new features are as follows:
- A GitHub Package registry, a package manager whose presentation documentation can be found at https://github.com/features/package-registry
- GitHub Actions, a CI/CD pipeline manager whose presentation documentation can be found at https://github.com/features/actions
In this section, we will provide an overview of the use of GitHub Actions, which allows you to create CI/CD pipelines directly within GitHub. This will check and deploy the source code that is hosted in your GitHub repository.
For this demonstration, we will create a CI pipeline in GitHub that will compile and run the tests for our Node.js application. The resources for this can be found at https://github.com/PacktPublishing/Learning-DevOps-Second-Edition/tree/main/CHAP16/appdemo.
Follow these steps to create a CI pipeline with GitHub Actions:
- Go to the repository that contains the source code to be deployed and click on the Actions tab, as shown in the following screenshot:

Figure 16.15 – GitHub – the Actions tab
- At this point, the GitHub interface will propose pipeline templates, called workflows, according to the different development languages and target system, such as VM or Kubernetes. We can also create a custom workflow by starting with an empty template. The following screenshot shows the choices for creating a workflow:

Figure 16.16 – GitHub Actions workflow templates
In the preceding screenshot, we can see the link called set up a workflow yourself for creating a custom workflow, as well as a textbox to search for workflow templates and suggested templates.
- For this demonstration, let's create a workflow from the workflow template that's designed for Node.js applications by searching for node and clicking on Configure in the Node.js template box:
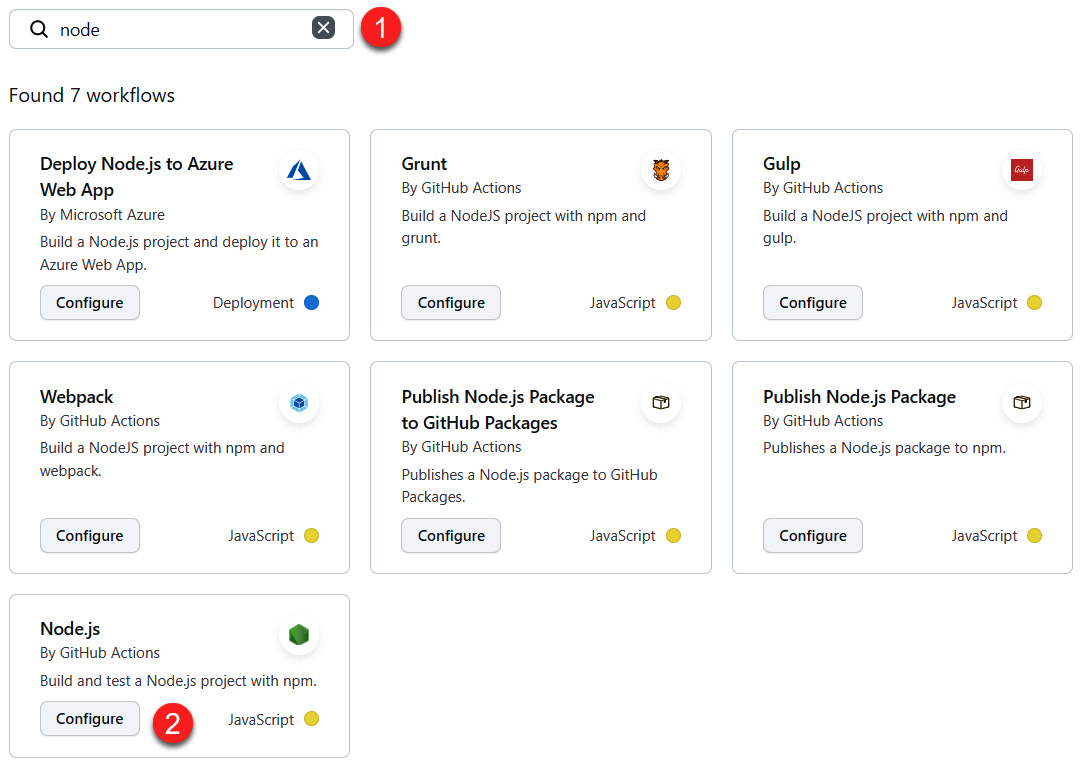
Figure 16.17 – GitHub Actions – selecting the Node.js template
- GitHub will display the YAML code of the workflow that will be commuted in a node.js.yml file, which will be automatically created in the .github/workflows folder tree. In this YAML code, which is also available at https://github.com/PacktPublishing/Learning-DevOps-Second-Edition/blob/main/.github/workflows/node.js.yml, we can see the following:
Before archiving this file, add a small piece of code to it, indicating the execution path of the scripts, as shown in the following screenshot:

Figure 16.18 – GitHub Actions workflow source code
The complete source code for this workflow is available at https://github.com/PacktPublishing/Learning-DevOps-Second-Edition/blob/main/.github/workflows/node.js.yml.
- Commit this file by clicking on the Start commit button at the top of the code editor. Once committed, the file will be present in the repository code and will trigger a new CI pipeline.
- Finally, let's return to the Actions tab. We will see that a workflow has been triggered and completed:
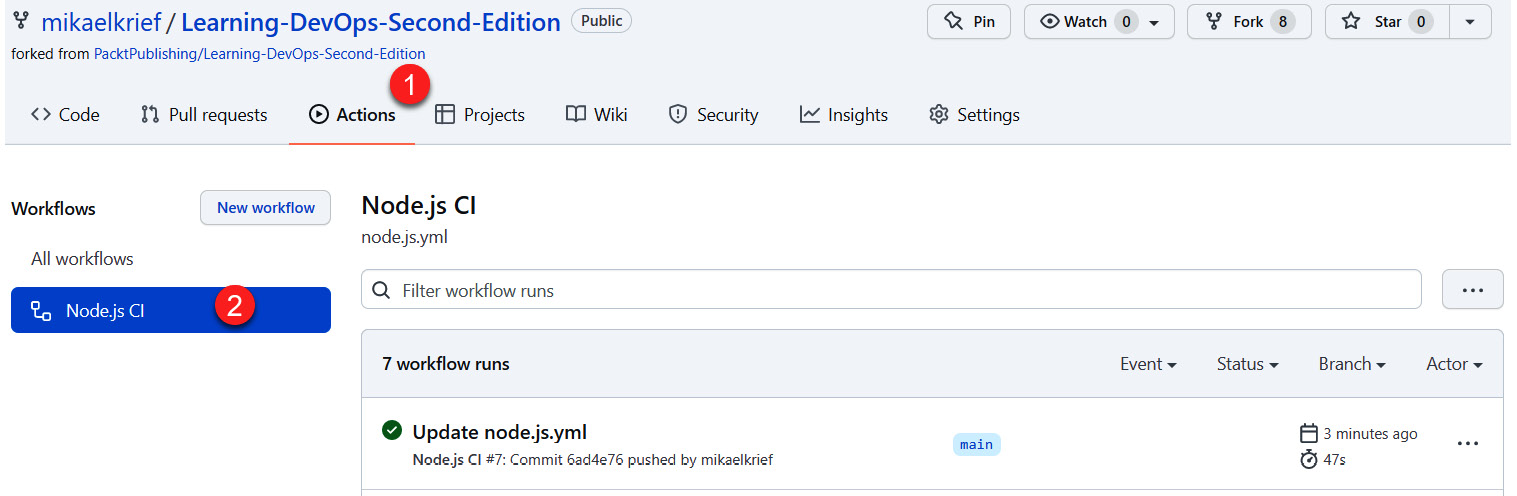
Figure 16.19 – GitHub Actions workflow being run
Here, we can see the list of run executions for this workflow. By clicking on the run line, we can view the details of the execution. The following screenshot shows the details of the execution:

Figure 16.20 – GitHub Actions workflow execution details
The great advantage of GitHub Actions is that it natively provides a very extensive catalog of actions in its GitHub Marketplace (https://github.com/marketplace?type=actions) and that it can also develop and publish actions (https://help.github.com/en/articles/development-tools-for-github-actions).
In this section, we discussed implementing a CI pipeline in GitHub using the new GitHub Actions feature, which allows you to integrate DevOps for open source projects. So far in this chapter, we have focused on code management in GitHub and implementing CI/CD pipelines for open source projects using GitHub Actions.
In the upcoming sections, we will talk about open source code security. We will start by learning how to analyze code with SonarCloud.
Analyzing code with SonarCloud
In Chapter 12, Static Code Analysis with SonarQube, we explained the importance of implementing static code analysis practices. For open source projects, code analysis is more important because the source code and its binaries are published publicly.
One of the roles of open source is to provide code and components that can be used in enterprise applications, so this code must be written correctly and without any security issues.
Previously in this book, we have discussed the fact that SonarQube, with its installations and uses, is one of the major tools that allows code analysis to take place for enterprise applications. However, it requires an on-premises infrastructure to be installed, which is more expensive for a company.
For open source project code analysis, it is possible to use SonarCloud (https://sonarcloud.io/), which is the same product as SonarQube but comes in a cloud solution that requires no installation.
SonarCloud has a free plan that allows us to analyze the code of open source public repository projects from GitHub, BitBucket, or even Azure Repos. For more information on its price plans, go to https://sonarcloud.io/pricing.
Let's look at how quick it is to set up code analysis for an open source project that's hosted on GitHub. Before implementing the analysis itself, we will connect to our GitHub repository in SonarCloud. To do this, we need to access the https://sonarcloud.io/ page by following these steps:
- From the aforementioned home page, click on the Log in button:

Figure 16.21 – SonarCloud – Log in
- Then, choose to log in with your GitHub account, as shown in the following screenshot:

Figure 16.22 – SonarCloud – logging in with GitHub
Now, we must configure SonarCloud so that we can create a project that will contain the analysis of our GitHub project, which is available at https://github.com/PacktPublishing/Learning-DevOps-Second-Edition/tree/main/CHAP16/appdemo. To do this, follow these steps:
- Once you've connected to SonarCloud with your GitHub account, click on the Analyze new project button on the home page:
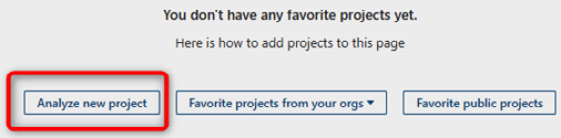
Figure 16.23 – SonarCloud – Analyze new project
- SonarCloud proposes a few steps for selecting the target GitHub repository for analysis. First, choose to Import an organization from GitHub. Then, choose the Only select repositories option and select the target repository:

Figure 16.24 – SonarCloud – selecting a repository
- Next, mark the checkbox of your repository and associate it with your organization by clicking on the Set Up button:
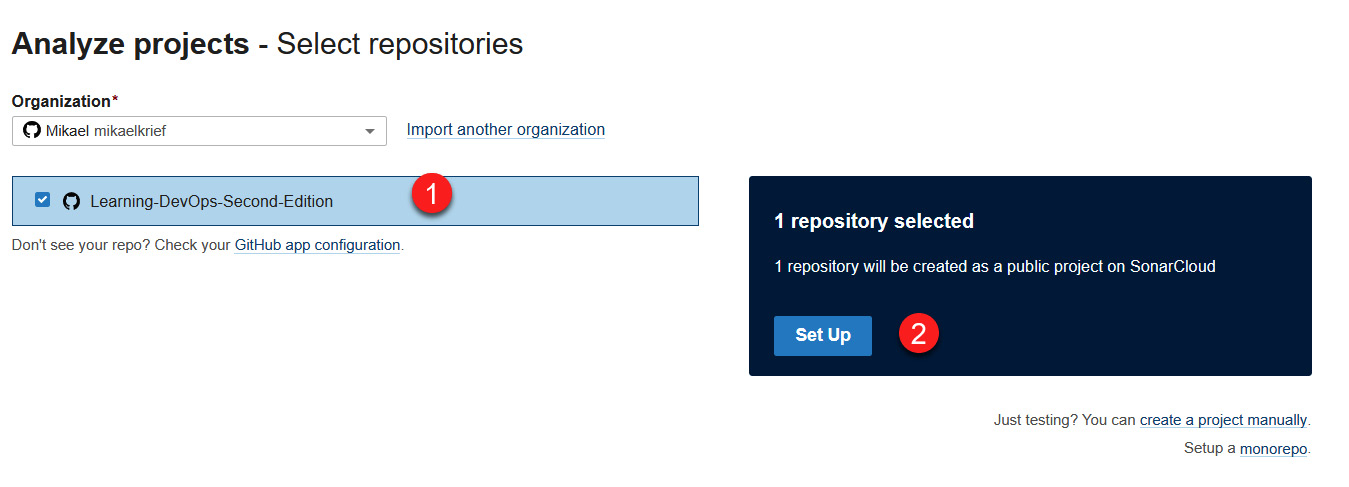
Figure 16.25 – SonarCloud – setting up a repository
- The project analysis dashboard will be displayed and indicate that the code has not been analyzed yet.
With that, we have successfully configured the SonarCloud project. Now, let's analyze the project in the most basic way by following these steps:
- In SonarCloud Project, under Configure, choose the recommended option, which is With GitHub Actions (as we learned in the previous section, Getting started with GitHub Actions):

Figure 16.26 – SonarCloud – using a GitHub Actions template
- Then, follow the indications provided by SonarCloud to create GitHub secrets (with the SONAR_TOKEN secret) inside the GitHub repository and add a new file with some Sonar configuration:

Figure 16.27 – SonarCloud GitHub Actions instructions
- Then, commit this new GitHub Actions workflow file. This will automatically trigger the SonarCloud analysis of this project.
- After a few minutes, you will see the result of two executions. First, you will see that the GitHub Actions workflow has succeeded:

Figure 16.28 – GitHub Actions Sonar analyze
Then, you will see the analysis in the SonarCloud dashboard, as shown in the following screenshot:
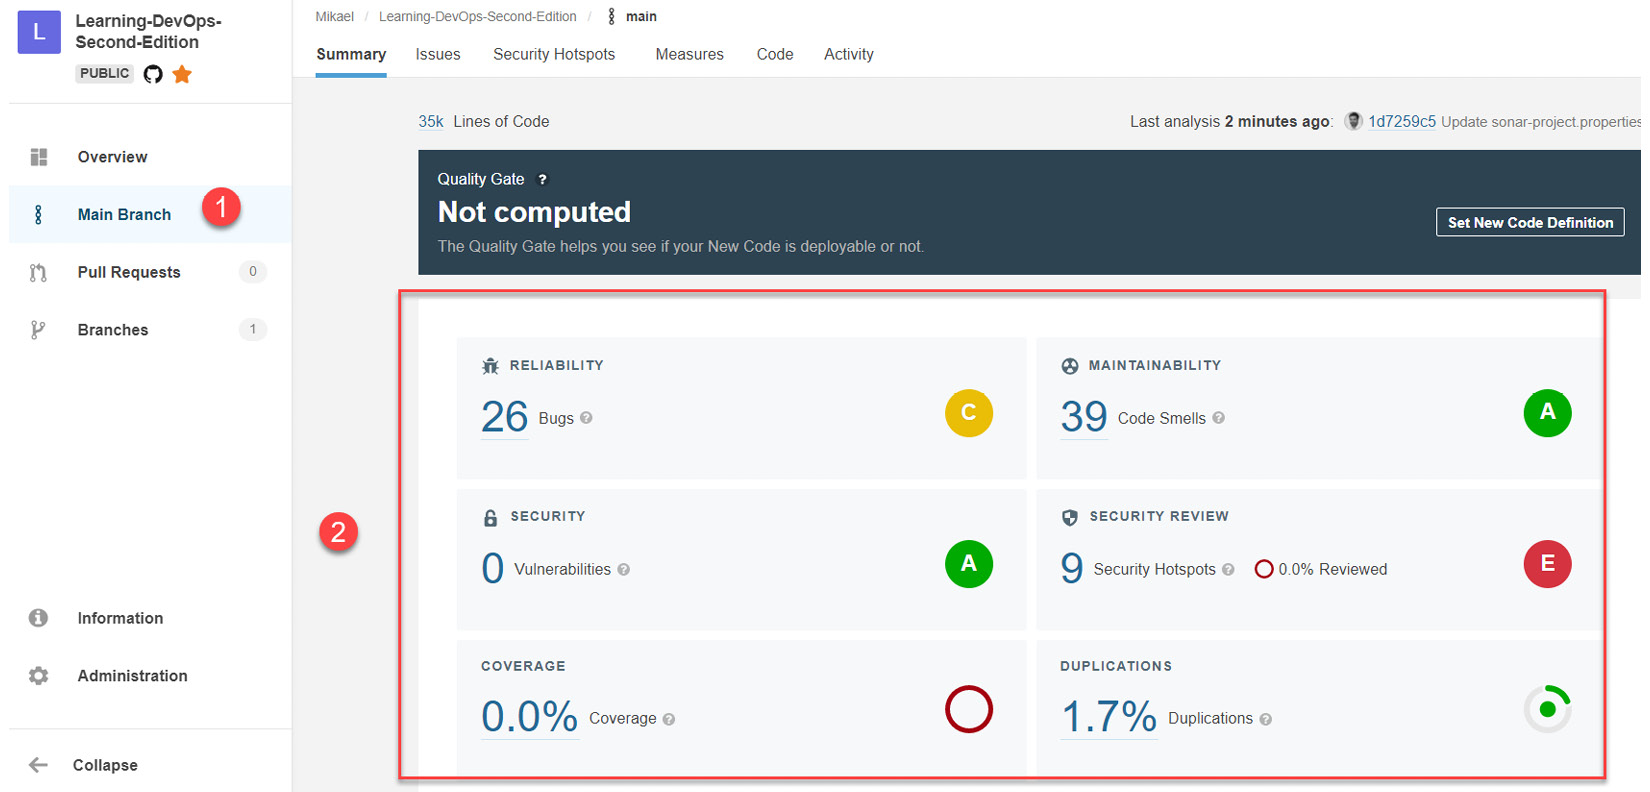
Figure 16.29 – SonarCloud analysis results
So, with each new code commit on this repository, either directly or via merging a pull request, code analysis will be triggered and the SonarCloud dashboard will be updated.
It is clear that our end goal is to integrate SonarCloud analysis into a CI/CD pipeline, so here are some resources to help us integrate it:
- If you're using Azure DevOps, here is a complete tutorial that will help you integrate SonarCloud into the pipeline: https://docs.microsoft.com/en-us/labs/devops/sonarcloudlab/.
- If you're using Travis CI, which we looked at in this chapter, take a look at the following documentation: https://docs.travis-ci.com/user/sonarcloud/.
In this section, we learned how to configure SonarCloud, a cloud platform that analyzes static code. We did this to analyze the source code of an open source project on GitHub via a continuous integration process. Then, we looked at the result of this analysis on the dashboard.
In the next section, we will look at another aspect of open source code security, which is analyzing code vulnerabilities using WhiteSource Bolt.
Detecting security vulnerabilities with WhiteSource Bolt
Due to their public visibility, open source projects or components are highly exposed to security vulnerabilities because it is easier to unintentionally inject a component (a package or one of its dependencies) containing a security vulnerability into them.
In addition to static source code analysis, it is also very important to continuously check the security of packages that are referenced or used in our open source projects.
Many tools are available that we can use to analyze the security of referenced packages in applications, such as SonaType AppScan (https://www.sonatype.com/appscan), Snyk (https://snyk.io/), and WhiteSource Bolt (https://bolt.whitesourcesoftware.com/).
Note
For more information on open source vulnerability scanning tools, take a look at the following article, which lists 13 tools that analyze the security of open source dependencies: https://techbeacon.com/app-dev-testing/13-tools-checking-security-risk-open-source-dependencies.
Among all these tools, we will look at WhiteSource Bolt (https://bolt.whitesourcesoftware.com/), which is available as a free plan, can analyze the package code of many development languages, and allows you to directly integrate with GitHub and Azure DevOps.
Note
The complete documentation on integrating White Source Bolt in GitHub is available at https://whitesource.atlassian.net/wiki/spaces/WD/pages/556007950/WhiteSource+Bolt+for+GitHub.
In our case, we will use it directly in GitHub to analyze the security of an application whose sources are available here: https://github.com/PacktPublishing/Learning-DevOps-Second-Edition/tree/main/CHAP16/appdemo.
To do this security analysis, we must install and configure WhiteSource Bolt on our GitHub account and trigger a code analysis. Follow these steps to learn how to do this:
- In a web browser, go to https://bolt.whitesourcesoftware.com/github/ and click on the GitHub APP button to install WhiteSource Bolt on your GitHub account.
- You will be redirected to the WhiteSource Bolt application, which can be found on the GitHub Marketplace (https://github.com/marketplace/whitesource-bolt). To install it using the free plan, click on the Install it for free button at the very bottom of the page, as shown in the following screenshot:

Figure 16.30 – Installing WhiteSource Bolt
- Confirm that you're purchasing the application for $0 by clicking on the Complete order and begin installation button. Then, on the next page, confirm that WhiteSource Bolt has been installed on your GitHub account.
Once the installation has finished, you'll be redirected to the WhiteSource Bolt account creation page, where you must fill in your full name and country and then validate the form.
- Now, activate the Issues features in GitHub by going to the Settings tab of the repository, which contains the code to scan, and checking the Issues checkbox, as shown in the following screenshot:
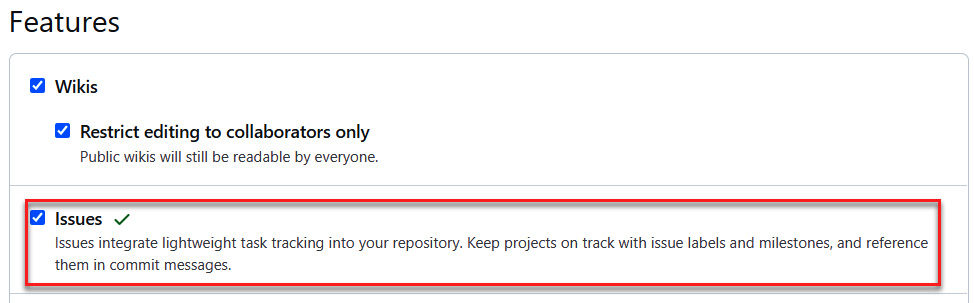
Figure 16.31 – GitHub – activating issues
- To configure the WhiteSource analysis on this repository, you must validate and merge the new pull request that was automatically created when you installed WhiteSource Bolt.

Figure 16.32 – WhiteSource Bolt issue configuration
This pull request adds a .whitesource file that is used for configuration at the root of the repository.
- Finally, perform code analysis by committing the code of this application in the GitHub repository.
- After a few minutes, you will see a list of security issues in the Issues tab of the repository.

Figure 16.33 – WhiteSource analysis issues on GitHub
- To uncover the full details of a security issue, simply click on the desired issue, read it, and take the information that's provided in the description of the issue into consideration.

Figure 16.34 – WhiteSource Bolt – analyzing the details
We will have to fix all of these problems and redo code commits to trigger new WhiteSource Bolt scans and ensure that we have a secure application for those who will use it.
In this section, we learned how to analyze the code of open source projects using WhiteSource Bolt. We installed it and triggered a code analysis that revealed security issues in our demo application.
Summary
This chapter was dedicated to the DevOps best practices that can be applied to an open source project, especially on GitHub. In this chapter, we learned how to collaborate on open source code, starting with repository creation using GitHub and forks. Then, we learned how to use pull requests and how to share binaries in GitHub Releases.
After that, we implemented continuous integration processes with GitHub Actions, which is fully integrated with GitHub.
Finally, we learned how to analyze open source code for static code analysis with SonarCloud and security vulnerability analysis with WhiteSource Bolt.
In the next chapter, we will summarize every DevOps best practice we have talked about in this book.
Questions
- In GitHub, can I modify the code of a repository of another user?
- In GitHub, which element allows us to merge code changes between two repositories?
- Which element allows us to simply display the history of code changes in an open source project?
- In GitHub, which feature that was mentioned in this chapter allows us to share binaries?
- What two tools that we have looked at in this chapter allow us to analyze the source code of an open source project?
- In which GitHub tab are the security issues that have been detected by WhiteSource Bolt listed?
Further reading
If you want to learn more about using DevOps practices on open source projects, take a look at GitHub Essentials, by Achilleas Pipinellis, published by Packt Publishing: https://www.packtpub.com/in/web-development/github-essentials-second-edition.