
Chapter 4: Optimizing Infrastructure Deployment with Packer
In the previous chapters, we learned how to provision a cloud infrastructure using Terraform and then we continued with the automated configuration of VMs with Ansible. This automation allows us to benefit from a real improvement in productivity and very visible time-saving.
However, despite this automation, we notice the following:
- Configuring a VM can be very time-consuming because it depends on its hardening as well as the middleware that will be installed and configured on this VM.
- Between each environment or application, the middleware versions are not identical because their automation script is not necessarily identical or maintained over time. Hence, for example, the production environment, being more critical, will be more likely to have the latest version of packages, which is not the case in pre-production environments. And with this situation, we often encounter issues with the behavior of applications in production.
- Configuration and security compliance is not often applied or updated.
To address these issues, all cloud providers have integrated a service that allows them to create or generate custom VM images. These images contain all of the configurations of the VMs with their security administration and middleware configurations and can then be used as a basis to create VMs for applications.
The benefits of using these images are as follows:
- The provisioning of a VM from an image is very fast.
- Each VM is uniform in configuration and, above all, is safety compliant.
Among the Infrastructure as Code (IaC) tools, there is Packer from the HashiCorp tools, which allows us to create VM images from a file (or template).
In this chapter, we will learn how to install Packer in different modes. We will discuss the syntax of Packer templates to create custom VM images in Azure that use scripts or Ansible playbooks.
We will detail the execution of Packer with these templates using JSON and HCL format. Finally, we will see how Terraform uses the images created by Packer. Through this chapter, we'll understand that Packer is a simple tool that simplifies the creation of VMs in a DevOps process and integrates very well with Terraform.
In this chapter, we will cover the following:
- An overview of Packer
- Creating Packer templates using scripts
- Creating Packer templates using Ansible
- Executing Packer
- Writing Packer templates with HCL format
- Using images created by Packer with Terraform
Technical requirements
This chapter will explain how to use Packer to create a VM image in an Azure infrastructure as an example of cloud infrastructure. So, you will need an Azure subscription, which you can get here for free: https://azure.microsoft.com/en-us/free/.
In the Using Ansible in a Packer template section, we will learn how to write Packer templates that use Ansible, so you will need to install Ansible on your machine and understand how it works, which is detailed in Chapter 3, Using Ansible for Configuring IaaS Infrastructure.
The last section of this chapter will give an example of using Terraform with a Packer image; for its application, it will be necessary to install Terraform and understand its operation, which is detailed in Chapter 2, Provisioning Cloud Infrastructure with Terraform.
The entire source code of this chapter is available at https://github.com/PacktPublishing/Learning-DevOps-Second-Edition/tree/main/CHAP04.
Check out the following video to see the Code in Action: https://bit.ly/35exxSo.
An overview of Packer
Packer is part of the HashiCorp open source suite of tools, and this is the official Packer page: https://www.packer.io/. It's an open source command-line tool that allows us to create custom VM images of any OS (these images are also called templates) on several platforms from a JSON file.
Packer's operation is simple; it is based on the basic OS provided by the different cloud providers and configures a temporary VM by executing the scripts described in the JSON or HCL template. Then, from this temporary VM, Packer generates a custom image ready to be used to provision VMs.
Apart from VM images, Packer also provides other types of images such as Docker images or Vagrant images. After this brief overview of Packer, let's look at the different installation modes.
Installing Packer
Packer, like Terraform, is a cross-platform tool and can be installed on Windows, Linux, or macOS. The installation of Packer is almost identical to the Terraform installation (see Chapter 2, Provisioning Cloud Infrastructure with Terraform) and can be done in two ways: either manually or via a script.
Installing manually
To install Packer manually, use the followings steps:
- Go to the official download page (https://www.packer.io/downloads.html) and download the package corresponding to your operating system.
- After downloading, unzip and copy the binary into an execution directory (for example, inside c:Packer).
- Then, the PATH environment variable must be set with the path to the binary directory.
Tip
For detailed instructions on how to update the PATH environment variable on Windows, refer to this article: https://www.architectryan.com/2018/03/17/add-to-the-path-on-windows-10/, and for Linux, refer to this one: https://www.techrepublic.com/article/how-to-add-directories-to-your-path-in-linux/.
Now that we've learned how to install Packer manually, let's look at the options available to us to install it using a script.
Installing by script
It is also possible to install Packer with an automatic script that can be installed on a remote server and be used on a CI/CD process. Indeed, Packer can be used locally, as we will see in this chapter, but its real goal is to be integrated into a CI/CD pipeline. This automatic DevOps pipeline will allow the construction and publication of uniform VM images that will guarantee the integrity of middleware and VM security based on these images.
Let's see the structure of these scripts for the different OSes, that is, Linux, Windows, and macOS.
Installing Packer by script on Linux
For installing the Packer binary on Linux, we have two solutions:
- The first solution is to install Packer with the following script:
PACKER_VERSION="1.7.3" #Update with your desired version
curl -Os https://releases.hashicorp.com/packer/${PACKER_VERSION}/packer_${PACKER_VERSION}_linux_amd64.zip
&& curl -Os https://releases.hashicorp.com/packer/${PACKER_VERSION}/packer_${PACKER_VERSION}_SHA256SUMS
&& curl https://keybase.io/hashicorp/pgp_keys.asc | gpg --import
&& curl -Os https://releases.hashicorp.com/packer/${PACKER_VERSION}/packer_${PACKER_VERSION}_SHA256SUMS.sig
&& gpg --verify packer_${PACKER_VERSION}_SHA256SUMS.sig packer_${PACKER_VERSION}_SHA256SUMS
&& shasum -a 256 -c packer_${PACKER_VERSION}_SHA256SUMS 2>&1 | grep "${PACKER_VERSION}_linux_amd64.zip:sOK"
&& unzip -o packer_${PACKER_VERSION}_linux_amd64.zip -d /usr/local/bin
Note
The code of this script is also available here: https://github.com/PacktPublishing/Learning-DevOps-Second-Edition/blob/main/CHAP04/install_packer.sh.
This script performs the following actions:
- Downloads the Packer version 1.7.3 package and checks the checksum
- Unzips and copies the package into a local directory, /usr/local/bin (by default, this folder is in the PATH environment variable)
The following is a screenshot of the execution of the script for installing Packer on Linux:
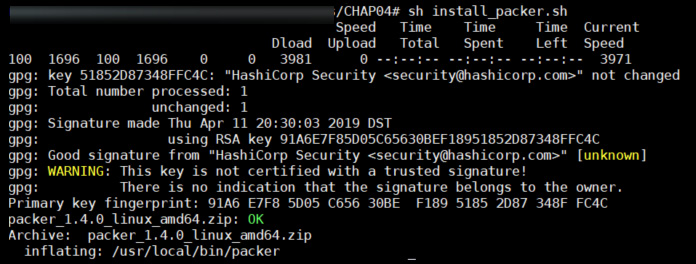
Figure 4.1 – Install Packer script execution
The benefit of this solution is that we can choose the Packer installation folder and that it is applicable on the various distributions of Linux as it uses common tools, which are curl and unzip.
- The second solution for installing Packer on Linux is to use the apt package manager by using the following script for Ubuntu distribution:
sudo apt-get update && sudo apt-get install -y gnupg software-properties-common curl
&& curl -fsSL https://apt.releases.hashicorp.com/gpg | sudo apt-key add -
&& sudo apt-add-repository "deb [arch=amd64] https://apt.releases.hashicorp.com $(lsb_release -cs) main"
&& sudo apt-get update && sudo apt-get install packer
This script does the following:
- Adds the apt HashiCorp repositor
- Updates the local repositor
- Downloads the Packer CL
Important Note
For more details about this script and the installation of Packer on other distributions, read the documentation at https://learn.hashicorp.com/tutorials/packer/get-started-install-cli?in=packer/docker-get-started, and navigate to the Linux tab.
Installing Packer by script on Windows
On Windows, we can use Chocolatey, which is a software package manager. Chocolatey is a free public package manager, like NuGet or npm, but dedicated to software. It is widely used for the automation of software on Windows servers or even local machines. Chocolatey's official website is here: https://chocolatey.org/, and its installation documentation is here: https://chocolatey.org/install.
Once Chocolatey is installed, we just need to run the following command in PowerShell or in the CMD tool:
choco install packer -y
The following is a screenshot of the Packer installation for Windows with Chocolatey:
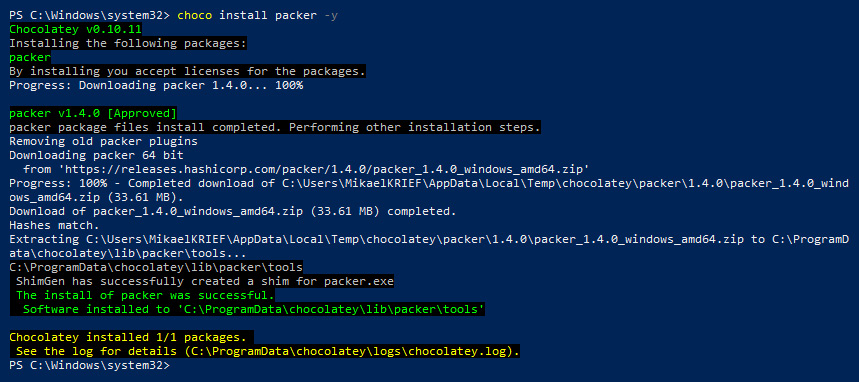
Figure 4.2 – Installing Packer using Chocolatey
The execution of choco install packer -y installs the latest version of Packer from Chocolatey.
Installing Packer by script on macOS
On macOS, we can use Homebrew, the macOS package manager (https://brew.sh/), for installing Packer by executing the following command in our Terminal:
brew install packer
Integrating Packer with Azure Cloud Shell
Just as we learned in detail for Terraform in the Integrating Terraform with Azure Cloud Shell section in Chapter 2, Provisioning Cloud Infrastructure with Terraform, Packer is also integrated with Azure Cloud Shell, as shown in the following screenshot:

Figure 4.3 – Packer on Azure Cloud Shell
Now that we have seen the installation of Packer on different operating systems and its integration with Azure Cloud Shell, we will next check its installed version.
Checking the Packer installation
Once installed, we can check the installed version of Packer by running the following command:
packer --version
This command displays the installed Packer version:

Figure 4.4 – Packer version command
To see all of the Packer command-line options, we can execute the following command:
packer --help
After executing, we will see a list of available commands, as shown in the following screenshot:
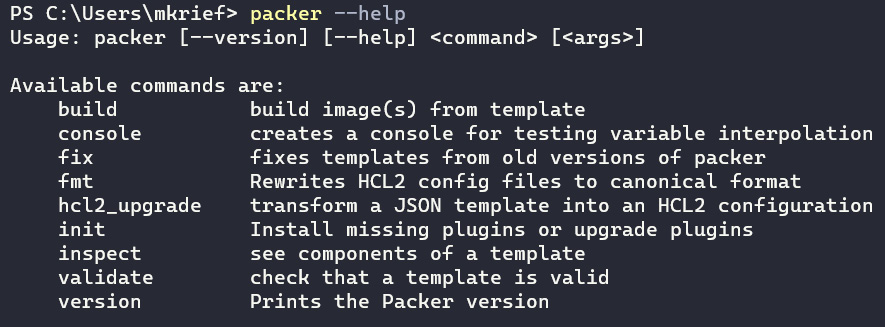
Figure 4.5 – Packer help command
We have just seen the manual installation procedure for Packer and installation with a script on different OSes, as well as its integration with Azure Cloud Shell.
We will now write a template to create a VM image in Azure with Packer using scripts.
Creating Packer templates for Azure VMs with scripts
As mentioned in the introduction, to create a VM image, Packer is based on a file (template) that is written in JSON format or in HashiCorp Configuration Language (HCL), which was introduced in Packer from version 1.5.0 (read the following blog post for more information: https://www.packer.io/guides/hcl). We will first see the structure and composition of this template, and then we will put into practice how to create a template that will create a VM image in Azure.
The structure of the Packer template
The Packer template is composed of several main sections, such as builders, provisioners, and variables. The JSON format of the template is as follows:
{
"variables": {
// list of variables
...
},
"builders": [
{
//builders properties
...
}
],
"provisioners": [
{
// list of scripts to execute for image provisionning
...
}
]
}
Let's look at the details of each section.
The builders section
The builders section is mandatory and contains all of the properties that define the image and its location, such as its name, the type of image, the cloud provider on which the image will be generated, connection information to the cloud, the base image to use, and other properties that are specific to the image type.
Here is some example code of a builders section:
{
"builders": [{
"type": "azure-rm",
"client_id": "xxxxxxxx",
"client_secret": "xxxxxxxx",
"subscription_id": "xxxxxxxxxx",
"tenant_id": "xxxxxx",
"os_type": "Linux",
"image_publisher": "Canonical",
"image_offer": "UbuntuServer",
"location": "westus"
.......
}]
}
In this sample, the builders section defines an image that will be stored in the Azure cloud and is based on the Linux Ubuntu OS. We also configure the authentication keys for the cloud.
Note
The documentation on the builders section is here: https://www.packer.io/docs/builders.
If we want to create the same image but on several providers, we can indicate in the same template file multiple block builders that will contain the provider properties. For example, see the following code sample in JSON format:
{
"builders": [
{
"type": "azure-rm",
"location": "westus",
....
},
{
"type": "docker",
"image": "alpine:latest",
...
}
]
}
To translate the same block code in HCL format, we write first two sources block that define the different provider properties. And we call these sources in the build section as follows:
build {
sources = ["sources.azure-arm.azurevm","sources.docker.docker-img"]
...
}
In this code sample, we define in the Packer template the information for an image of an Azure VM, and the information for a Docker image based on Alpine. The advantage of this is to standardize the scripts that will be detailed in the provisioning section of these two images.
Just after the details of each section, we will see a concrete example with a builders section to create an image in Azure.
Let's move on to explaining the provisioners section.
The provisioners section
The provisioners section, which is optional, contains a list of scripts that will be executed by Packer on a temporary VM base image in order to build our custom VM image according to our needs.
If the Packer template does not contain a provisioners section, no configuration will be made on the base images.
The actions defined in this section are available for Windows as well as Linux images, and the actions can be of several types, such as executing a local or remote script, executing a command, or copying a file.
Note
The provisioners type proposed natively by Packer is detailed in the documentation: https://www.packer.io/docs/provisioners/index.html.
It is also possible to extend Packer by creating custom provisioning types. To learn more about custom provisioners, refer to the documentation here: https://www.packer.io/docs/extending/custom-provisioners.html.
The following is a sample of a provisioners section for JSON format:
{
...
"provisioners": [
{
"type": "shell",
"script": "hardening-config.sh"
},
{
"type": "file",
"source": "scripts/installers",
"destination": "/tmp/scripts"
}
]
...
}
And the following is the same block code in HCL format:
provisioner "shell" {
scripts = ["hardening-config.sh"]
}
provisioner "file" {
source = "scripts/installers"
destination = "/tmp/scripts"
}
In this provisioners section, Packer will upload and execute the local script, hardening-config.sh, to apply the hardening configuration on the remote temporary VM base image, and copy the content of the scripts/installers local folder to the remote folder, /tmp/scripts, to configure the image.
So, in this section, we list all of the configuration actions for the image to be created.
However, when creating an image of a VM, it's necessary to generalize it – in other words, delete all of the personal user information that was used to create this image.
For example, for a Windows VM image, we will use the Sysprep tool as the last step of provisioners with the following code:
"provisioners": [
...
{
"type": "powershell",
"inline": ["& C:\windows\System32\Sysprep\Sysprep.exe /oobe /generalize /shutdown /quiet"]}
]
Another example of Sysprep usage in Packer templates is available here: https://www.packer.io/docs/builders/azure.html.
And for deleting the personal user information on a Linux image, we will use the following code:
"provisioners": [
.....
{
"type": "shell",
"execute_command": "sudo sh -c '{{ .Vars }} {{ .Path }}'",
"inline": [
"/usr/sbin/waagent -force -deprovision+user && export HISTSIZE=0 && sync"
]
}
]
Note
For more information about the provisioners section, refer to the documentation here: https://www.packer.io/docs/templates/provisioners.html, and the list of actions can be found here: https://www.packer.io/docs/provisioners/index.html.
After the provisioners section, let's talk about variables.
The variables section
In the Packer template, we may often need to use values that are not static in the code. This optional variables section is used to define variables that will be filled either as command-line arguments or as environment variables. These variables will then be used in the builders or provisioners sections.
Here is an example of a variables section:
{
"variables": {
"access_key": "{{env 'ACCESS_KEY'}}",
"image_folder": "/image",
"vm_size": "Standard_DS2_v2"
},
....
}
In this example, we initialize the following:
- The access_key variable with the ACCESS_KEY environment variable
- The image_folder variable with the /image value
- The value of the VM image size, which is the vm_size variable
To use these so-called user variables, we use the {{user 'variablename' }} notation, and here is an example of using these variables in the builders section:
"builders": [
{
"type": "azure-arm",
"access_key": "{{user 'access_key'}}",
"vm_size": "{{user 'vm_size'}}",
...
}
],
And in the provisioners section, we use the variables defined in the variables section, as follows:
"provisioners": [
{
"type": "shell",
"inline": [
"mkdir {{user 'image_folder'}}",
"chmod 777 {{user 'image_folder'}}",
...
],
"execute_command": "sudo sh -c '{{ .Vars }} {{ .Path }}'"
},
...
]
We, therefore, define the properties of the image with variables that will be provided when executing the Packer template. We can also use these variables in the provisioners section for centralizing these properties and not have to be redefined , here, the path of the images (/image) that will be repeated several times in the templates.
Note
Apart from the variables provided by the user, it is also possible to retrieve other variable sources, such as secrets stored in HashiCorp Vault or Consul. For more information about variables, refer to the documentation: https://www.packer.io/docs/templates/legacy_json_templates/user-variables.
We have just seen the structure of the Packer template with the principal sections that compose it, which are builders, provisioners, and variables. Now let's look at a concrete example with the writing of a Packer template to create an image in Azure.
Building an Azure image with the Packer template
With all of the elements we saw earlier, we will now be able to create a Packer template that will create a VM image in Azure.
For this, we will need to first create an Azure AD Service Principal (SP) that will have the permissions to create resources in our subscription. The creation is exactly the same as we did for Terraform; for more details, see the Configuring Terraform for Azure section in Chapter 2, Provisioning Cloud Infrastructure with Terraform. Then, on the local disk, we will create a Packer template file.
If you want to use JSON template format, create an azure_linux.json file, which will be our Packer template. We will start writing to this file with the builders section, as follows:
..."builders": [{
"type": "azure-arm",
"client_id": "{{user 'clientid'}}",
"client_secret": "{{user 'clientsecret'}}",
"subscription_id": "{{user 'subscriptionid'}}",
"tenant_id": "{{user 'tenantid'}}",
"os_type": "Linux",
"image_publisher": "Canonical",
"image_offer": "UbuntuServer",
"image_sku": "18.04-LTS",
"location": "West Europe",
"vm_size": "Standard_DS2_v3",
"managed_image_resource_group_name": "{{user 'resource_group'}}",
"managed_image_name": "{{user 'image_name'}}-{{user 'image_version'}}",
"azure_tags": {
"version": "{{user 'image_version'}}",
"role": "WebServer"
}
}],....
This section describes the following:
- It describes the azure_rm type, which indicates the provider.
- Also, it describes the client_id, secret_client, subscription_id, and tenant_id properties, which contain information from the previously created SP. For security reasons, these values are not written in plain text in the JSON template; they will be placed in variables (which we will see right after the details of the builders section).
- The managed_image_resource_group_name and managed_image_name properties indicate the resource group as well as the name of the image to be created. The name of the image is also placed into a variable with a name and a version number.
- The other properties correspond to the information of the OS type (Ubuntu 18), size (Standard_DS2_v3), region, and tag.
Now we will write the variables section that defines the elements that are not fixed:
..."variables": {
"subscriptionid": "{{env 'AZURE_SUBSCRIPTION_ID'}}",
"clientid": "{{env 'AZURE_CLIENT_ID'}}",
"clientsecret": "{{env 'AZURE_CLIENT_SECRET'}}",
"tenantid": "{{env 'AZURE_TENANT_ID'}}",
"resource_group": "rg_images",
"image_name": "linuxWeb",
"image_version": "0.0.1"
},...
We have defined the variables and their default values with the following:
- The four pieces of authentication information from the SP will be passed either in the Packer command line or as an environment variable.
- The resource group, name, size, and region of the image to be generated are also in variables.
- The image_version variable that contains the version of the image (used in the name of the image) is defined.
So, with these variables, we will be able to use the same JSON template file to generate several images with different names and sizes (we will see this when Packer is executed).
Finally, the last action is to write the steps of the provisioners image with the following code:
"provisioners": [
{
"type": "shell",
"execute_command": "sudo sh -c '{{ .Vars }} {{ .Path }}'",
"inline": [
"apt-get update",
"apt-get -y install nginx"
]
},
{
"type": "shell",
"execute_command": "sudo sh -c '{{ .Vars }} {{ .Path }}'",
"inline": [
"/usr/sbin/waagent -force -deprovision+user && export HISTSIZE=0 && sync"
]
}
]
Here is what the preceding code block is doing:
- It updates packages with apt-get update and upgrade.
- It installs NGINX.
Then, in the last step before the image is created, the VM is deprovisioned to delete the user information that was used to install everything on the temporary VM using the following command:
/usr/sbin/waagent -force -deprovision+user && export HISTSIZE=0 && sync
Note
The complete source code of this Packer template is available here: https://github.com/PacktPublishing/Learning-DevOps-Second-Edition/blob/main/CHAP04/templates/azure_linux.json.
We have just seen the structure of a Packer template, which is mainly composed of three sections, which are variables, builders, and provisioners, and from there we saw a concrete example with the writing of a Packer template to generate a custom VM image in Azure that uses scripts or provisioning commands.
We have our Packer template finished and ready to be run, but first we will see another type of provisioners using Ansible.
Using Ansible in a Packer template
We have just seen how to write a Packer template that uses command scripts (for example, apt-get), but it is also possible to use Ansible playbooks to create an image. Indeed, when we use IaC to configure VMs, we are often used to configuring the VMs directly using Ansible before thinking about making them into VM images.
What is interesting about Packer is that we can reuse the same playbook scripts that we used to configure VMs to create our VM images. So it's a huge time-saver because we don't have to rewrite the scripts.
To put this into practice, we will write the following:
- An Ansible playbook that installs NGINX
- A Packer template that uses Ansible with our playbook
Let's start with the writing of the Ansible playbook.
Writing the Ansible playbook
The playbook we are going to write is almost identical to the one we set up in Chapter 3, Using Ansible for Configuring IaaS Infrastructure, but with some changes.
The following code is the sample of the playbook:
---
- hosts: 127.0.0.1
become: true
connection: local
tasks:
- name: installing Ngnix latest version
apt:
name: nginx
state: latest
- name: starting Nginx service
service:
name: nginx
state: started
The changes made are as follows:
- There is no inventory because it is Packer that manages the remote host, which is the temporary VM that will be used to create the image.
- The value of hosts is, therefore, the local IP address.
- We only keep the installation of NGINX in this playbook and we deleted the task that installed the MySQL database.
Note
The code of this playbook is available here: https://github.com/PacktPublishing/Learning-DevOps-Second-Edition/blob/main/CHAP04/templates/ansible/playbookdemo.yml.
Now that we have written our Ansible playbook, we will see how to integrate its execution into the Packer template.
Integrating an Ansible playbook in a Packer template
In terms of the Packer template, the JSON builders and variables sections are identical to one of the templates that uses scripts that we detailed earlier in the Using Ansible in a Packer template section. What is different is the JSON provisioners section, which we will write as follows:
provisioners": [
{
"type": "shell",
"execute_command": "sudo sh -c '{{ .Vars }} {{ .Path }}'",
"inline": [
"add-apt-repository ppa:ansible/ansible", "apt-get update", "apt-get install ansible -y"
]
},
{
"type": "ansible-local",
"playbook_file": "ansible/playbookdemo.yml"
},
{
"type": "shell",
"execute_command": "sudo sh -c '{{ .Vars }} {{ .Path }}'",
"script": "clean.sh"
},
.....//Deprovision the VM
]
The actions described in this provisioners section, which Packer will execute using this template, are as follows:
- Installs Ansible on the temporary VM.
- On this temporary VM, the ansible-local provisioner runs the playbook playbookdemo.yaml that installs and starts NGINX. The documentation of this provisioner is here: https://www.packer.io/docs/provisioners/ansible/ansible-local.
- The clean.sh script deletes Ansible and its dependent packages that are no longer used.
- Deprovisions the VM to delete the local user information.
Note
The complete Packer template is available here: https://github.com/PacktPublishing/Learning-DevOps-Second-Edition/blob/main/CHAP04/templates/azure_linux_ansible.json, and the source of the clean script, clean.sh, is available here: https://github.com/PacktPublishing/Learning-DevOps-Second-Edition/blob/main/CHAP04/templates/clean.sh.
As we can see here, Packer will execute Ansible on the temporary VM that will be used to create the image, but it is also possible to use Ansible remotely by using Packer's Ansible provisioner, the documentation of which is located here: https://www.packer.io/docs/provisioners/ansible/ansible.
We have seen up to this point how a Packer template is composed of the builders, variables, and provisioners sections, and we have seen that it is possible to use Ansible within a Packer template.
We will now run Packer with these JSON templates to create a VM image in Azure.
Executing Packer
Now that we have created the Packer templates, the next step is to run Packer to generate a custom VM image, which will be used to quickly provision VMs that are already configured and ready to use for your applications.
As a reminder, to generate this image, Packer will, from our JSON template, create a temporary VM, on which it will perform all of the configuration actions described in this template, and then it will generate an image from this image. Finally, at the end of its execution, it removes the temporary VM and all of its dependencies.
To generate our VM image in Azure, follow these steps:
- Configure Packer to authenticate to Azure.
- Check our Packer template.
- Run Packer to generate our image.
Let's look in detail at the execution of each of its steps.
Configuring Packer to authenticate to Azure
To allow Packer to create resources in Azure, we will use the Azure AD SP that we created earlier in this chapter in the Building an Azure image with the Packer template section. To execute Packer in Azure, we will use the four pieces of authentication information (subscription_id, client_id, client_secret, and tenant_id) of this SP in the environment variables provided in our Packer template in the variables section.
In our following template, we have four variables (client_id, client_secret, subscription_id, and tenant_id), which take as their values four environment variables (ARM_CLIENT_ID, ARM_CLIENT_SECRET, ARM_SUBSCRIPTION_ID, and ARM_TENANT_ID):
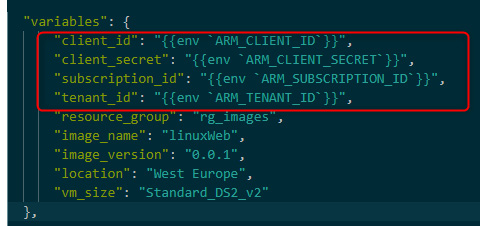
Figure 4.6 – Packer template variables
So we can set these environment variables as follows (this is a Linux example):
export ARM_SUBSCRIPTION_ID=<subscription_id>export ARM_CLIENT_ID=<client ID>export ARM_SECRET_SECRET=<client Secret>export ARM_TENANT_ID=<tenant ID>
Note
For Windows, we can use the PowerShell $env command to set an environment variable.
The first step of authentication is done, and we will now check the Packer template we wrote.
Checking the validity of the Packer template
Before executing Packer to generate the image, we will execute the packer validate command to check that our template is correct.
So, inside the folder that contains the Packer template, we execute the following command on the template:
packer validate azure_linux.json
The output of the execution of this command returns the status of the check for whether the template is valid, as shown in the following screenshot:

Figure 4.7 – Packer validate command
Our Packer template is correct in its syntax, so we can launch Packer to generate our image.
Running Packer to generate our VM image
To generate our image with Packer, we will execute Packer with the build command on the template file as follows:
packer build azure_linux.json
In the output of the Packer execution, we can see the different actions being performed by Packer. First is the creation of the temporary VM, as shown in the following screenshot:
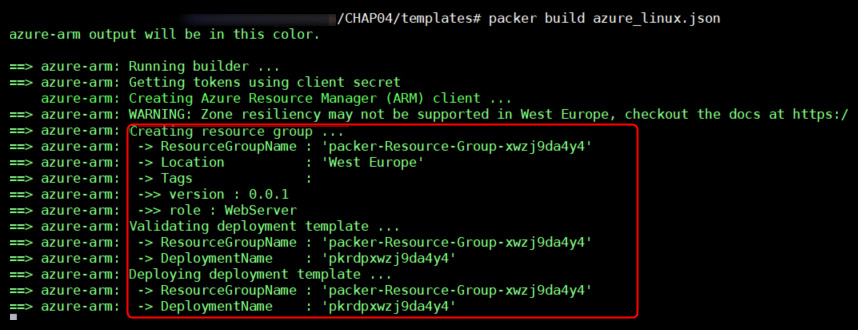
Figure 4.8 – Packer creating temporary VM output
In the Azure portal, we see a temporary resource group and its resources created by Packer, as shown in the following screenshot:
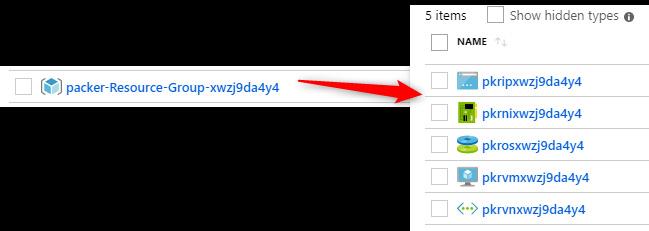
Figure 4.9 – Packer temporary resource group in the Azure portal
The execution time of Packer depends on the actions to be performed on the temporary VM. At the end of its execution, Packer indicates that it has generated the image and deletes the temporary resources.
The following screenshot is the end of the output of the Packer execution, which displays the deletion of the temporary resource group and the generation of the image:
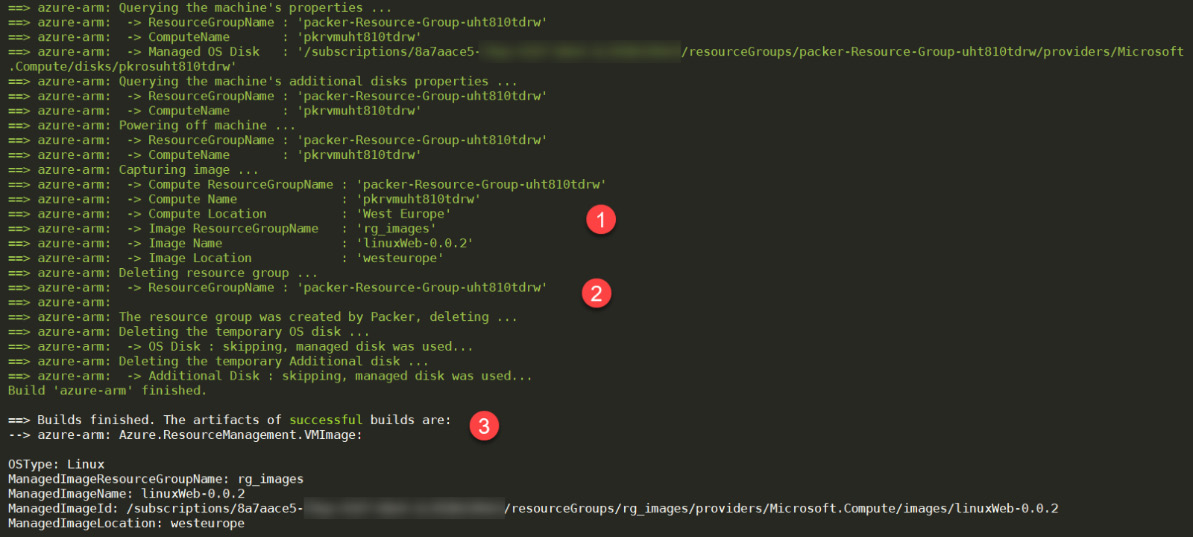
Figure 4.10 – Packer execution output
After the Packer execution, in the Azure portal, we check that the image is present. The following screenshot shows our generated image:
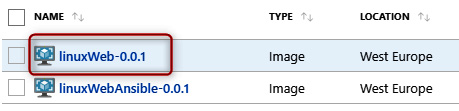
Figure 4.11 – Azure VM image created by Packer
In this screen, we can see our image and the images that we generated with the Packer template, which uses Ansible.
It is also interesting to know that we can override the variables of our template when executing the packer build command, as in the following example:
packer build -var 'image_version=0.0.2' azure_linux.json
We can pass all variables with the -var options to the build command.
So, with this option, we can change the name of the image without changing the content of the template, and we can do this for all of the variables that are defined in our template.
Note
The complete documentation of the Packer build command is available here: https://www.packer.io/docs/commands/build.html.
We have just seen the Packer command lines to check the syntax of the JSON Packer template and then to run Packer on a template that generates a VM image in Azure.
Now we will learn about the basic elements for writing Packer templates using HCL format.
Writing Packer templates with HCL format
Since the release of version 1.5.0 of Packer, it's possible to write Packer templates using HCL format, which we learned in detail in Chapter 2, Provisioning Cloud Infrastructure with Terraform.
Note
The HCL integration in Packer is currently in Beta, and will be preferred by HashiCorp from version 1.7.0.
The HCL format of the template is very similar to the JSON format and it's composed of variable, source, build, and provisioner blocks. The following code shows the structure of the HCL Packer template.
For writing an HCL template, create a file, .pkr.hcl, that contains all the following code:
packer {
required_plugins
{
azure =
{
version = ">= 1.0.0"
source = "github.com/hashicorp/azure"
}
}
}
Variable "var name"{
...
}
Source "name" {
...
}
Build {
Source = []
Provisionner "" {}
}
First, we start with the Packer plugin configuration that has been introduced from version 1.7.0. In this block, we list all plugins that will be used in the code.
Note
For more information about Packer plugins, read the documentation at https://www.packer.io/docs/plugins.
Then, in the variable block, we declare the user variables, for example Azure credentials, VM name, VM size, or other variables. The following code shows a sample variable block:
variable "image_folder" {
default = "/image"
}
variable "vm_size" {
default = "Standard_DS2_v2"
}
Note
For more information and details about HCL variables, read the documentation at https://www.packer.io/guides/hcl/variables.
The source block contains the properties of the target image to build an Azure image or Docker image. The following code show examples of two source blocks:
- The first source declaration is for an Azure VM:
source "azure-arm" "azurevm" {
os_type = "Linux"
location = "West Europe"
vm_size = "Standard_DS2_V2"
....
}
- The second source declaration is for the Docker image:
source "docker" "docker-img"
{
image = "ubuntu"
export_path = "imagedocker.tar"
}
The build block contains the source list to use and the provisioner scripts for configuring the images. The following code show a sample build block:
build {
sources = ["sources.azure-arm.azurevm","sources.docker.docker-img"]
provisioner "shell" {
inline = [
"apt-get update",
"apt-get -y install nginx"
]
execute_command = "chmod +x {{ .Path }}; {{ .Vars }} sudo -E sh '{{ .Path }}'"
inline_shebang = "/bin/sh -x"
}
provisioner "shell" {
inline = [
"sleep 30",
"/usr/sbin/waagent -force -deprovision+user && export HISTSIZE=0 && sync"
]
execute_command = "chmod +x {{ .Path }}; {{ .Vars }} sudo -E sh '{{ .Path }}'"
inline_shebang = "/bin/sh -x"
}
}
In the preceding code, the source property contains the list of sources declared just before in the source block details.
Then we use a list of provisioner blocks of shell type to install the NGINX package and clean the image with personal information – exactly the same operations that we did with the JSON format.
Note
The code source of this HCL template format is available at https://github.com/PacktPublishing/Learning-DevOps-Second-Edition/blob/main/CHAP04/templates/.pkr.hcl.
Finally, to execute Packer using an HCL template, we execute the following command to download plugins:
packer init .pkr.hcl
Then we check the template syntax by running the validate command:
packer validate .pkr.hcl
Finally, we build the desired image by running this following command:
packer build .pkr.hcl
After the execution of the preceding command, the image will be created, exactly as we have already seen with the JSON format.
Note
To migrate Packer templates from JSON format to HCL format, read this documentation: https://learn.hashicorp.com/tutorials/packer/hcl2-upgrade.
We have discussed how to write and execute Packer templates using the HCL format that will become the preferred format for HashiCorp. We will now learn how to provision, with Terraform, a VM based on this image that we have just generated.
Using a Packer image with Terraform
Now that we have generated a custom VM image, we will provision a new VM based on this new image. For the provisioning of this VM, we will continue to use IaC practices using Terraform from HashiCorp.
To do this, we will take the Terraform script created in Chapter 2, Provisioning Cloud Infrastructure with Terraform,, and modify it to use the custom image.
In the compute.tf script, add the following block of data, which will point to the VM image that we generated with Packer in the last section:
## GET THE CUSTOM IMAGE CREATED BY PACKER
data "azurerm_image" "customngnix" {
name = "linuxWeb-0.0.1"
resource_group_name = "rg_images"
}
In this code, we add a block of azurerm_image Terraform data that allows us to retrieve the properties of a VM image in Azure, in which we specify the name property with name of the custom image, and the resource_group_name property with the resource group of the image.
For more information about this azurerm_image data block and its properties, refer to the documentation: https://www.terraform.io/docs/providers/azurerm/d/image.html.
Then, in the VM Terraform code in the azurerm_virtual_machine resource code (still in the compute.tf file), the storage_image_reference section is modified with the following code:
resource "azurerm_virtual_machine" "vm" {
...
## USE THE CUSTOM IMAGE
storage_image_reference {
id = "${data.azurerm_image.customngnix.id}"
}
...
}
In this code, the ID property uses the id of the image from the block data that we added earlier.
Note
The entire code for the compute.tf script is available here: https://github.com/PacktPublishing/Learning-DevOps-Second-Edition/blob/main/CHAP04/terraform/compute.tf and the full Terraform code is here: https://github.com/PacktPublishing/Learning-DevOps-Second-Edition/tree/main/CHAP04/terraform.
When executing this Terraform code, which is identical to a classic Terraform execution, as seen in Chapter 2, Provisioning Cloud Infrastructure with Terraform, the provisioned VM will be based on the custom image generated by Packer.
We have seen that by changing a little bit of our previous Terraform code, adding a data block that retrieves information from a VM image, and using the ID of that image, we can, in Terraform, use custom VM images generated by Packer.
Summary
In this chapter, we have seen how to install Packer and use it to create custom VM images. The VM image was made from two Packer templates: the first one using scripts and the second one using Ansible.
Then, we saw how to write Packer templates with HCL format. Finally, we modified our Terraform code to use our VM image.
This chapter ends the implementation of IaC practices, starting with Terraform to provision a cloud infrastructure, then using Ansible for server configuration, and, finally, finishing with Packer for VM image creation.
With these VM images created by Packer, we will be able to improve infrastructure provisioning times with faster deployment, ready-to-use VMs, and, therefore, a reduction in downtime.
Obviously, these are not the only IaC tools; there are many others on the marketplace, and you will have to do technology monitoring to find the ones that best suit your needs.
In the next chapter, we will start a new part, which is the implementation of CI/CD, and we will learn how to use Git for sourcing your code.
Questions
- What are the two ways to install Packer?
- What are the mandatory sections of a Packer template that are used to create a VM image in Azure?
- Which command is used to validate a Packer template?
- Which command is used to generate a Packer image?
Further reading
If you want to know more about Packer, here are some resources:
- Packer documentation: https://www.packer.io/docs/
- Packer Learning: https://learn.hashicorp.com/packer
- Using Packer in Azure: https://docs.microsoft.com/en-us/azure/virtual-machines/linux/build-image-with-packer
- Designing Immutable Infrastructure with Packer (Pluralsight Video): https://www.pluralsight.com/courses/packer-designing-immutable-infrastructure