
Appendix A
Microsoft Access as Database Management System
Microsoft Office Access, previously known as Microsoft Access is a relational database management system that lets you manage your database efficiently by offering a variety of features. It facilitates creation of database in several ways, manage database structures, export and import databases to/from various data sources and file formats, backup, restore, and perform other operations in easy-to-use graphical user interface. Access can use data stored in Microsoft SQL Server, Oracle, or any ODBC-compliant container including MySQL and PostgreSQL. It supports some object-oriented features but cannot be considered as a fully object-oriented development tool. Access also integrates well with other office packages, and data transfer between Access and other Office components is relatively easy. Almost all users can use it. Beginners can learn to use the wizards and the easy-to-understand interface while developers can push it to its limits and do some extraordinary things with it. This appendix discusses the basics of designing and creating an efficient and productive database using Access.
A.1 COMPONENTS OF ACCESS
Using an Access database, one can store and manage large quantity of data for a wide variety of business and personal activities. Before learning to work with Access, let us first discuss the components that make up the Access.
- Database engine: The database engine is the software that stores, retrieves, and indexes data. When you create a standalone database, Access uses the jet engine to manage data.
- Database objects: Database objects provide the interface to view, enter, and extract information from a database. Access provides many types of objects such as tables, forms, queries, reports, pages, macros, and modules.
- Design tools: Access includes a set of design tools to create objects. For example, report designer allows sorting data, group by fields, and adding headers and footers to each page as well as the entire report.
- Programming tools: Access includes a rich set of programming tools to automate repetitive and routine tasks. For example, an object type called macro is used to do tasks that require multiple menu selections and mouse clicks.
Database objects are the basic building blocks of Access database. Access provides many types of objects. The most common database objects are tables, forms, queries, and reports. Learning how to work with these data objects is the main aim of this appendix.
A.2 STARTING ACCESS
To start Access, click on Start, select Programs, and then select Microsoft Access. The Microsoft Access dialog box appears with the following options:
- Blank Access database: To create a new blank database to which tables, forms, and other objects can be added.
- Access database wizards, pages, and projects: To create a new database based on wizards you choose or to create a database access page or Microsoft Access project.
- Open an existing database: To open an already existing database or project.
Choose the Blank Access database option to create a new database, and click OK. Access will prompt you to specify a location and a name for the database. Enter the desired name of the database in the Filename textbox. For instance, we can give the database name as Online Book. Then click the Create button. This displays the Database window as a sub window within the Microsoft Access Application window.
NOTE In Microsoft Access, it is essential to first save the database and then create it. By default, Microsoft Access saves a database with .mdb extension.
In the Database window, the name of the database is displayed on the title bar (see Figure A.1). In addition, it contains an Object pane that displays different objects that can be created in Microsoft Access.

Fig. A.1 Database window
A.3 WORKING WITH TABLES
A table is the basic unit for storing and organizing data in an Access database. A table consists of fields, each of which stores a distinct data for a single record. Data within a table is arranged in a basic grid, with each row containing a single record and each column representing a field. A database can contain any number of tables as well as links to tables stored in other location and other formats.
Choosing a Data Type
The fields that make up a table can be defined in several ways. However, each field definition includes a data type. You can choose from the data types listed in Table A.1 for defining a field.
Table A.1 Access data types
| Data Type | Description |
|---|---|
| Text | It is used for field values that contain letters, digits, spaces, and special characters. The default size of text field is 50 and it can contain up to 255 characters. |
| Memo | It is used for long text comments and can contain up to 64,000 characters. |
| Number | It is used for numeric values. |
| Date/Time | It is used for date and time. |
| Currency | It is used for currency values. Currency fields are similar to the number data type, except that the decimal places and field size are pre-determined, and calculations performed using the currency data type is not subject to round-off error. |
| AutoNumber | It is used when you want integers or a value automatically inserted in the field as each new record is created. |
| Yes/No | It is used for yes/no, true/false, or on/off values. |
| OLE Object | It is used to embed or provide links to objects like graphics, spreadsheets, sound files, etc. |
| Hyperlink | It is used to enter clickable links to web addresses, folders, files, and other objects. Each item in a field of this data type can contain up to 64,000 characters. |
| Lookup Wizard | This is not a data type, but this option will create a field that lets you to select a value from another table or from a pre-defined list of values. Once the list is created, Access will then set the data type for you. |
NOTE By default, every new field you create uses the Text data type, with a maximum length of 50 characters.
Tables form the basis for all objects within an Access database including queries, forms, and reports. In this section, we will discuss how to create tables and establish relationships among them, and to add, modify, and delete records from tables.
A.3.1 Creating Tables
Access allows creating tables in three different ways: using Design view, using Table Wizard, and using Datasheet view. The easiest approach to create a table is to use the Table Wizard. This wizard assists in creating tables by suggesting one of the pre-defined tables appropriate for business or personal use. However, it is preferred to create table in Design view. Since, it gives you greater flexibility to design a table that meets your exact requirements.
To create a table in Design view, follow these steps.
- Click the Tables button in the database window on the Objects pane.
- Double-click the Create table in Design view. The Design view of a new table will be displayed where you can type the field names, data types, and descriptions.
- Type in the first field name and press Tab or Enter to move to the Data Type. Note that field names can contain letters, numbers, and/or spaces.
- Choose the data type from the drop-down list and press Tab or Enter again to move to the Description field.
- The Description field, while optional, is good to use for documentation purposes as well as for providing directions to the person inputting the data.
- Continue steps 3–5 until all the desired fields are created in the table.
- While not mandatory, every table should have a primary key, a field whose value uniquely identifies each of the records of the table. For example, in our table [see Figure A. 2(a)]
ISBNis set as the primary key of the table. To create a primary key, place the cursor in the field row and right-click it. Now select the Primary Key option from the pop-up menu. Similarly, multiple fields can be defined as primary key.
NOTE If no primary key is specified by the user, Access creates a primary key of AutoNumber data type automatically under some circumstances.
The BOOK table in Design view is shown in Figure A.2(a). After designing the table, we can save the table with a desired name. For instance, we have saved our example table as BOOK. Once, it is saved, it will be displayed in Database window as shown in Figure A.2(b). Similarly, other tables of Online Book database can be created.
NOTE Creating a new table by entering records directly in Datasheet view is a least used approach.
Once a table is created, one can change its structure at any time, even if data is added to the table. New fields can be added, and existing fields can be deleted, reordered, or renamed in the Design as well as Datasheet view. However, to change field’s data type and properties that validated data entries, one must switch to Design view.
Using Advanced Options
Access creates some indexes automatically. If naming conventions are followed carefully, it is guaranteed that right fields are indexed. By default, any field name that begins or ends with ID, key, code or num will be indexed. Use field names such as AID and RollNum as the primary key when possible. When same field name is used in related tables where another field is the primary key, Access automatically indexes these fields, making queries that use these fields as fast as possible.

Fig. A.2 Table BOOK in MS Access
A.3.2 Creating Relationships
As we know, a well-designed database contains multiple interrelated tables to ensure referential integrity. To work with multiple tables, one has to define relationship between the tables. Establishing a relationship between two tables requires that each table have a field in common with the other.
To create relationships between two or more tables of a database, follow these steps.
- Click Tools menu and then click Relationships. A Relationships window appears.
- Right-click anywhere in the Relationships window. A pop-up menu appears [see Figure A.3(a)].
- Click Show Table option. A Show Table dialog box appears [see Figure A.3(b)].
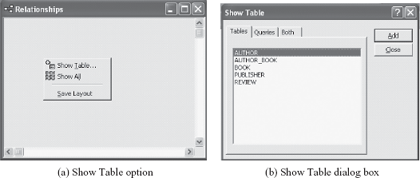
Fig. A.3 Showing tables in Relationships window
- Double-click the names of the tables that you want to relate, and then close the Show Table dialog box. The tables are added in the Relationships window as shown in Figure A.4.

Fig. A.4 After adding tables in the Relationships window
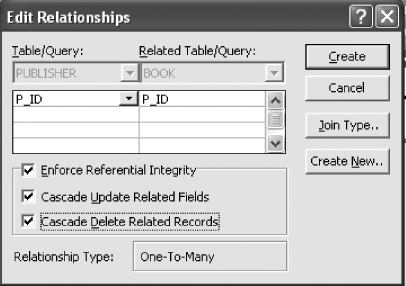
- Drag the field that you want to relate from one table to the related field in the other table. To drag multiple fields, press the CTRL key and click each field before dragging them. In most cases, the primary key field (which is displayed in bold text) is dragged from one table to the foreign key in the other table. For example, to create a relationship between the
PUBLISHERandBOOKtable, theP_IDattribute inPUBLISHERtable is dragged toP_IDattribute in theBOOKtable. An Edit Relationships dialog box appears as shown in Figure A.5.Fig. A.5 Edit Relationships dialog box
- Click the Enforce Referential Integrity, Cascade Update Related Fields, and Cascade Delete Related Records checkboxes. Click Create button. A relationship is established between the two tables.
- Repeat steps 5 and 6 for each pair of tables you want to relate. When you close the Relationships window, Microsoft Access asks if you want to save the layout. Whether you save the layout or not, the relationships you create are saved in the database.
Figure A.6 shows the relationships between all the tables of Online Book database.

Fig. A.6 Relationships among various tables of Online Book database
A.3.3 Entering and Editing Records
After the structural design of the table is completed, it is required to enter, view, or edit data in the table. Datasheet view offers a quick and easy way to work directly with data. One can add or delete records at any position within the table. One can also change the look of a particular table in the Datasheet view by changing fonts, hiding columns, and freezing columns so that they remain visible on scroll.
To enter or edit records, open the desired table in the Datasheet view by double-clicking the table from the table list in the Database window.
- Add a new record: To add a new record to the table in Datasheet view, place the insertion point in the row having asterisk (*) symbol (marks the new record) at its left and enter data. One can also click the New Record button from the Table Datasheet toolbar to add a record.
- Edit an existing record: To edit record, simply place the cursor in the record that is to be edited and make the required changes.
- Delete a record: To delete a record, select the entire record, press the Delete key. One can also delete record by placing the cursor in any field of the record and select Delete Record from the Edit menu or Delete Record button on the Table Datasheet toolbar.
The BOOK table of Online Book database with a sample data is shown in Figure A.7.
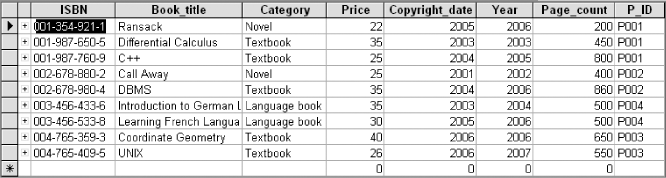
Fig. A.7 Datasheet view of BOOK table with some sample data
A.4 WORKING WITH QUERIES
Queries are the database objects that enable you to retrieve information from the database. It allows retrieving a subset of data from a single table, from a group of related tables, or from other queries using criteria you define. In addition to fields drawn from the table, a query may also contain calculated fields, which display the results based on the contents of the other fields. The query is saved as a database object and can, therefore, be run at any time. The query will be updated whenever the original tables are updated.
Using Advanced Options
Filters provide a quick way to create simple queries. Like queries, filters also allow you to work with a subset of records in a database. Using filters, you can limit the display of records in Datasheet or form views. To create a filter in a table, open the table in the Datasheet view, and then follow these steps.
1. Select one instance value (say, Textbook in the Category field) you want records to contain in order to be included in the filter’s result.
2. Click Records menu, then click Filters and choose Filter By Selection option. This will display the records with the selected value in the particular field. For example, Figure A.8 shows only those records that have Textbook value in the Category field.
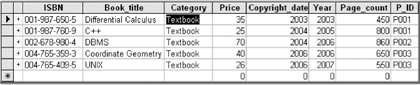
Fig. A.8 Applying filter to the BOOK table
To remove filter from the table, click the Records menu, and then click Remove Filter/Sort option.
A.4.1 QBE in Microsoft Access
Query By Example (QBE) is a feature that provides a user-friendly interface for running database queries. QBE is included with various database applications. Access also has a QBE interface known as Query Design View. A query can be created from scratch in Design view to build one of several specific types of queries. When design view is used to create a new query from the scratch, select query is created by default.
To create a select query in Design view, follow these steps.
- Click the Queries button in the database window on the Objects pane.
- Double-click the Create query in Design view. This will open the query in Design view along with the Show Table dialog box that allows to select the tables and queries on which new query will be based [see Figure A.9(a)].
- From the Show Table dialog box, select the tables that are to be used to create query and close the dialog box.
- The Design view of query includes two panes: the top pane contains field lists for each table and query you chose as data source; this pane also shows relationships between the data sources. The lower pane contains a grid with one column for each field that makes up the query. To design the query, select the desired fields from the Field drop-down lists in the lower pane, or simply drag and drop the field name from the lists in the upper pane to the Field box in the lower pane. Below each field name, there are some rows that explicitly determine the content of the query.
- Table: This row shows the source of each field. The values in this row are visible by default.
- Total: This row allows you to specify the operations to be performed on that field. The default selection is Group By. By default, the Total option is not visible. To display the Total option, click the View menu, and then click Totals option.
- Sort: It allows you to sort a particular column.
- Show: It contains a check for each field that will be displayed as a part of the query results.
- Criteria: It allows you to specify one or more criterion expressions to determine which records will be included in the query.
Figure A.9(b) shows a select query that displays the detail of a book along with the name of its publisher. You can save this query by any name say, BOOK query, so that it can be executed any time.
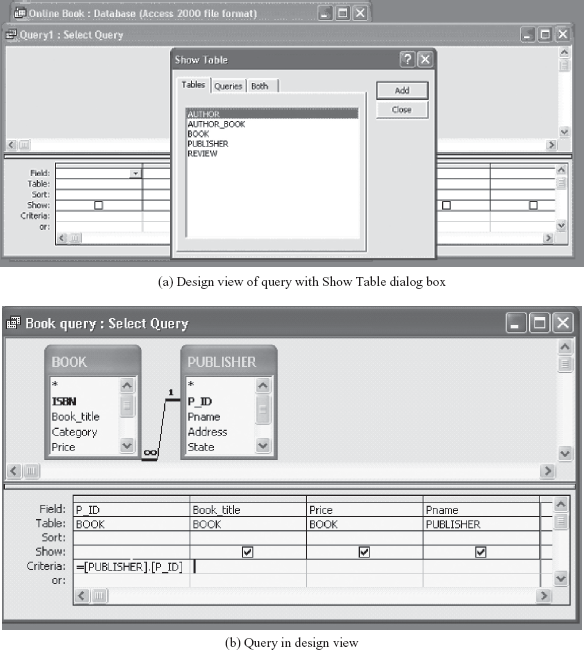
Fig. A.9 Creating query in design view
Access also allows you to create the queries that can change the data in the tables based on the criteria. These types of queries are known as action queries. Access allows creating four types of action queries, namely, make-table, update, append, and delete query.
- Make-Table: A make-table query creates a new table from the result of the query itself. This type of query does not affect the underlying data.
- Update: An update query replaces the existing data with the new data.
- Append: An append query adds new records to an existing table from a source query.
- Delete: A delete query deletes the records that match specified selection criteria for an existing table.
To create make-table query in Design view, follow these steps.
- Create any query in Design view like retrieve the details of the book having price less than 50.
- From the Query menu, select the Make-Table Query option. A dialog box that prompts for the table name appears (see Figure A.10). Type the table name and click OK button.
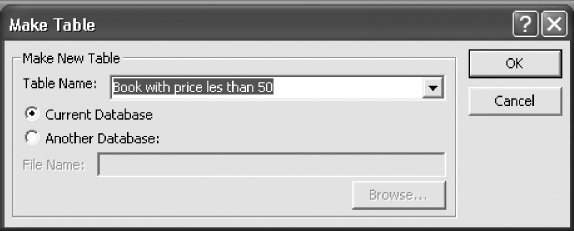
Fig. A.10 Creating a make-table query
To create an update query in Design view, follow these steps.
- Click the Queries button in the Database window on the Objects pane.
- Double-click the Create query in Design view (see Figure A.11).
- From the Show Table dialog box, select the tables that are to be included in the query and close it.
- From the Query menu, select the Update Query option. The design of an update query will be displayed.
- Specify the selection criteria in the Criteria box under the desired field name. Also enter the new data in the Update To box under the desired field name.
Figure A.11 shows an update query to increase the price of the book by 10. Similarly, you can create, append, and delete query.
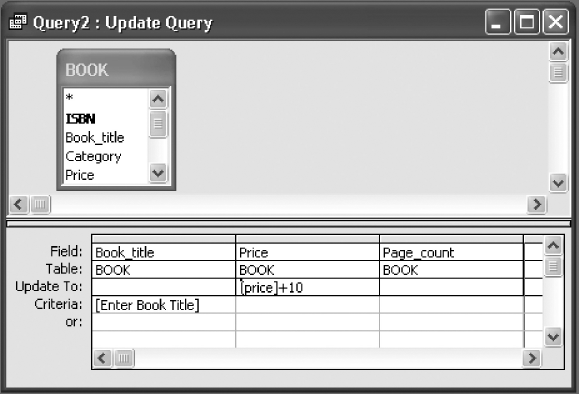
Fig. A.11 Creating an Update Query
Running a Query
Running a query means viewing the result of the query. Access displays the result of the query in a datasheet view. To run a query, follow these steps.
- Select Queries from the Objects pane in the Database window.
- Double-click the query you want to run say
Book query. MS Access runs the query and displays the results in Datasheet view as shown in Figure A.12. Alternatively, query can be run by opening it in design view and clicking the Run button on Query Design toolbar.
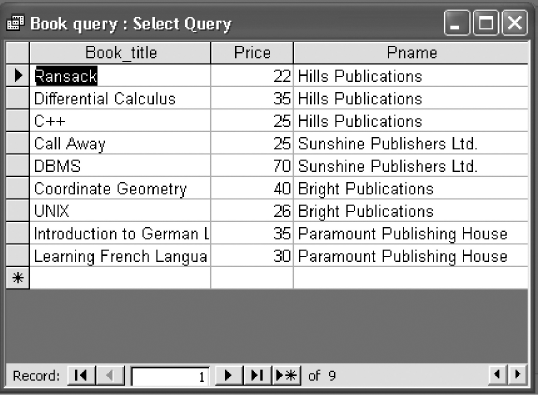
Fig. A.12 Result of Book query
Using Advanced Options
By default, Access creates an inner join between tables that are added to a query regardless of whether a relationship has been established between the tables. It happens automatically if the two tables contain a common field of the same name and data type, and if this field is the primary key in one of the tables. This autojoin feature can be turned off. To turn off this feature, follow these steps.
1. Click the Tools menu on the Database toolbar and then click Options. The Options dialog box appears.
2. Select Tables/Queries tab, remove the check mark from the Enable Autojoin option, and click OK.
A.4.2 Using SQL in Microsoft Access
As stated earlier, a query can be created using Wizards or Query Designer. In general, there is no need to deal with SQL. However, each query created in Microsoft Access (created using a wizard or designed in Design view) has an associated SQL statement. You can view the SQL statement behind the existing queries as well as create a new query using SQL. SQL is useful when you want to create a complex query.
Viewing and Modifying Existing Queries in SQL
To view or modify existing queries in SQL, follow these steps.
- Select the desired query name (say
Book query) in the query list and click the Design button from the Database Window toolbar to open the query in Design view. - From the View menu, choose SQL View to display the query in SQL view. This displays the corresponding SQL statement of the query (see Figure A.13).
- If you want to make changes, enter the changes into the SQL statement.
- To return to the Design view, choose Design View from the View menu.

Fig. A.13 SQL view of the query
Creating SQL Queries
To create an SQL query, follow these steps.
- Double-click Create query in Design view in the Database window. It will display the Show Table dialog box.
- Select the table on which you want to create the SQL query from the table list and click the Add button. This will add the table in the Design View. For example, to create a join query on
BOOK,AUTHOR, andAUTHOR_BOOKtables, select these tables. - Click the Close button to close the Show Table dialog box.
- From the View menu, choose SQL View to display the query in SQL view.
- Type the desired query as shown in Figure A.14(a) and save it by clicking the Save button on the Query Design toolbar.
- Type the desired name of the query (say
AUTHOR query) in the Query Name textbox of the Save As dialog box and press OK.
The result of this query is shown in Figure A.14(b).
A.5 WORKING WITH FORMS
Forms provide a quick way to insert, update, and delete records in the table. They offer an intuitive, graphical environment easily navigated by anyone. They are generally used to display one record at a time in an onscreen window. A form can be customized by having all or only some of the fields from a table.
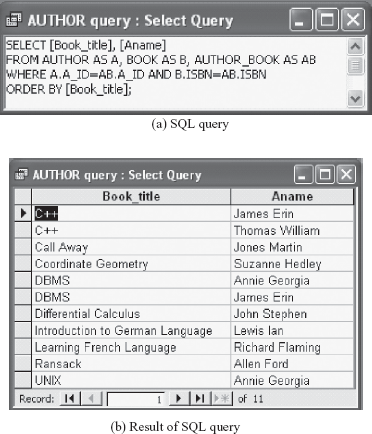
Fig. A.14 Creating query in SQL view
The easiest way to build a form is by using the Form Wizard. The wizard allows the user to choose the layout of records in the form and the background color, and format of the display. The wizard also allows preview of the layout and style options when a form is created. To create a form using the wizard, follow these steps.
- Choose Forms under Objects pane and double-click the Create form by using wizard option in the Database window. This will initiate the Form Wizard.
- From the Tables/Queries drop-down list, select the desired table or query (say
Rating Query). Then, select the fields that are to be included in the form by highlighting each one in the Available Fields list and clicking the single right arrow (>) button to move the field to the Selected Fields list [see Figure A.15(a)]. To move all of the fields to Selected Fields list, click the double right arrow (>>) button. If you make a mistake and would like to remove a field or all of the fields from the Selected Fields list, click the left arrow (<) or left double arrow (<<) button. After the proper fields have been selected, click the Next > button to move on to the next screen. - On the second screen, select the layout of the form.
- Columnar: A single record is displayed at one time with labels and form fields listed side-by-side in columns.
- Justified: A single record is displayed with labels and form fields are listed across the screen.
- Tabular: Multiple records are listed on the page at a time with fields in columns and records in rows.
- Datasheet: Multiple records are displayed in Datasheet view.
- Select a visual style for the form from the next set of options.
- On the final screen, name the form in the space provided (say
REVIEW form). Select Open the form to view or enter information to open the form in Form View or Modify the form’s design to open it in Design view. - Click Finish to create the form. The form will be displayed as shown in Figure A.15(b). Now you can enter the data in the table through the form.
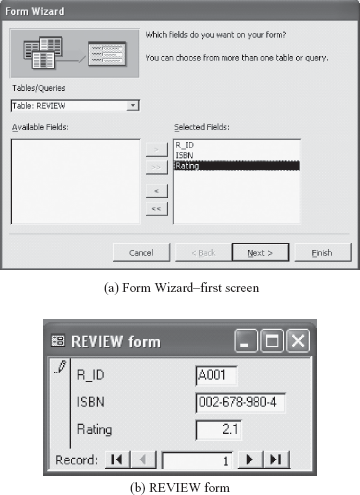
Fig. A.15 Creating form using Form Wizard
A.6 WORKING WITH REPORTS
An Access report organizes data in a format ideally suited for printing. Reports can be made by combining data, images, charts, and even audio/video elements. You can add headers, footers, and page numbers, group the information, and change the background colors, among other things. A report provides total control of the presentation of the data. One can add colors, put in summaries and calculations, add in appropriate titles, only show certain fields, and perform many other formatting details.
An Access report can be created from the scratch in Design view. However, it is better to use report Wizard to create the basic structure of a report. This is the quickest way of creating a report. The Report Wizard asks you a series of questions to help you design the data exactly as you need. Once the basic structure of a report is created, it can be opened in Design view to make detailed changes to its contents and appearance.
To create a report using the wizard, follow these steps.
- Choose Reports under Objects pane and double-click the Create report by using wizard option in the Database window. This will initiate the Report Wizard.
- From the Tables/Queries drop-down list, select the desired table or query (say
Rating Query). Then, select the fields that will be included on the form by highlighting each one in the Available Fields list and clicking the single right arrow (>) button to move the field to the Selected Fields list [see Figure A.16(a)]. After the proper fields have been selected, click the Next > button to move on to the next screen. - Select the fields from the list that the records should be grouped by as shown in Figure A.16(b). Use the Priority buttons to change the order of the grouped fields if more than one field is selected. Then click Next > button to move on to the next screen.
- If the records are to be sorted, identify a sort order. Select the first field that records should be sorted by and click the Sort button to choose from ascending or descending order as shown in Figure A.16(c). Click Next > button to move on to the next screen.
- Choose a Layout and an Orientation for the report.
- Select a color and graphics style for the report.
- On the final screen, name the report (say
Rating report) and select to open it in either print preview or design view mode. Click the Finish button to create the report. The report will be displayed as shown in Figure A.16(d).
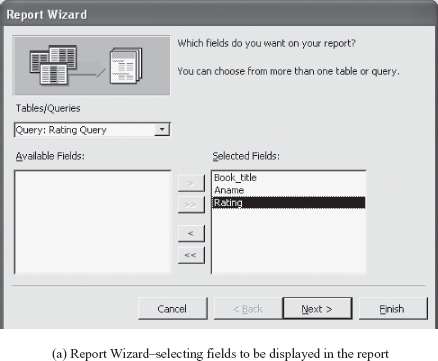
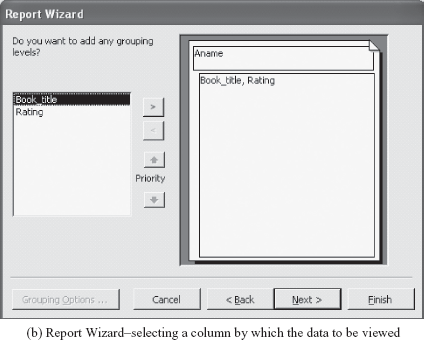

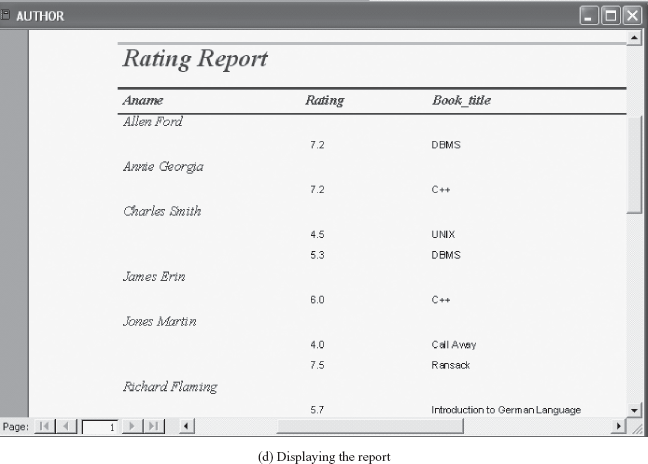
Fig. A.16 Creating report using Report Wizard