
Chapter 16. Raspberry Pi Portable Webcam
In this chapter you learn how to take still pictures and record video with your Raspberry Pi. Perhaps you want to investigate time lapse photography, install a baby monitor, set up a security camera, deploy a bird feeder cam, or simply snap interesting images.
Prior to May 2013, when the Raspberry Pi Foundation introduced the Raspberry Pi Camera Board, enthusiasts did their best to use their USB webcams with their Raspberry Pi units. To be sure, this chapter teaches you how to use the Pi with third-party cameras. However, I must tell you that the Raspberry Pi Camera Board is pretty slick!
I conclude this lesson with step-by-step instructions and best practice advice for putting your Raspberry Pi on battery and therefore freeing you up to take your new webcam wherever you need to take it. Let’s get started!
About the Raspberry Pi Camera Board
As you know, the Model A and Model B boards include a Camera Serial Interface 2 (CSI-2) camera connector, shown in Figure 16.1. The interface is labeled S5 and is located between the USB and HDMI ports on the Pi PCB.

Initially the Foundation said nothing as to whether it would create a camera to connect to this interface, leaving Raspberry Pi enthusiasts to speculate as to how they could access the CSI-2 interface through hardware hacking. Other Pi users simply plugged in their USB-connected cameras; we cover that idea later in this chapter.
This situation cleared up in May 2013 when the Raspberry Pi Foundation announced a $25 accessory called the Raspberry Pi Camera Board, which does in fact connect to the Pi through the CSI-2 interface.
The Raspberry Pi camera board is available through the typical channels:
![]() RS Components: http://is.gd/6ol2Gq
RS Components: http://is.gd/6ol2Gq
![]() Premier Farnell/Element 14: http://is.gd/xJSkbQ
Premier Farnell/Element 14: http://is.gd/xJSkbQ
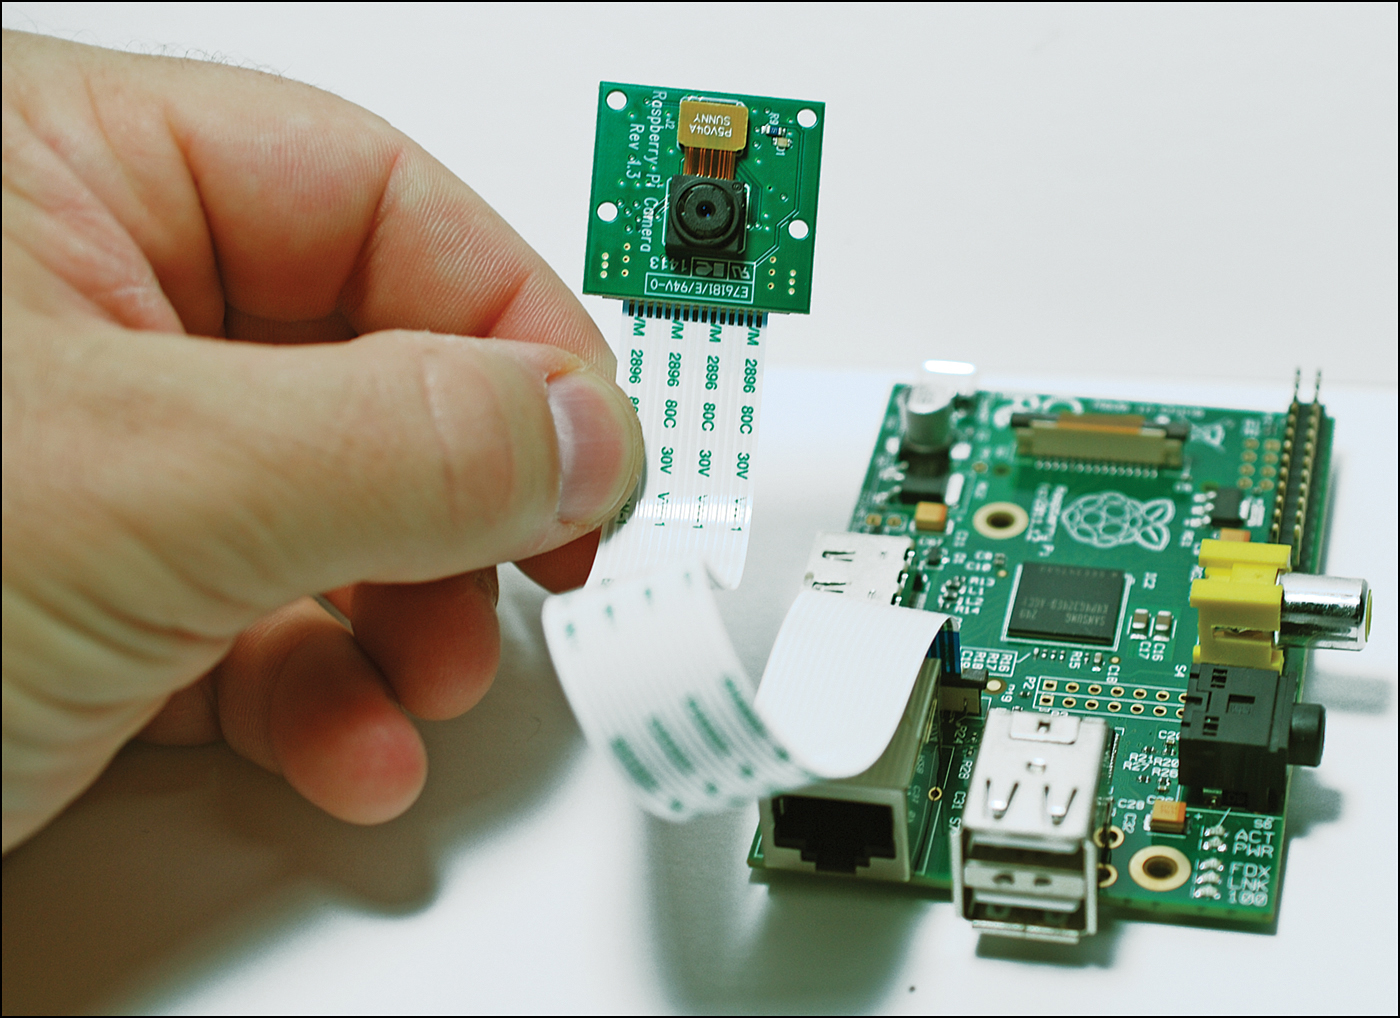
Physically, the CSI connector (the one shown in Figure 16.1) implements a 15-pin flex ribbon cable. One end connects to the CSI-2 interface on the Raspberry Pi PCB. The other end of that cable is soldered directly to the Raspberry Pi Camera Board, as shown in Figure 16.2.

The specs for this board (also called Camera Module) are listed in Table 16.1.
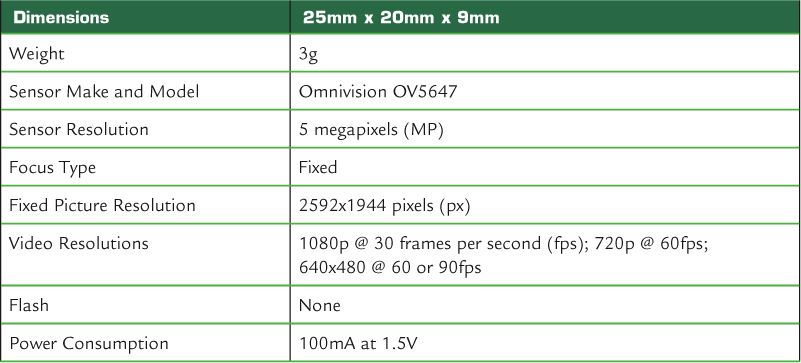
I think you’ll find that the Raspberry Pi camera board specs compare favorably with those of, say, the iPhone 4 from summer 2010. Not too shabby! Actually, I found that the Camera Board shoots better video than many entry-level webcams I’ve used in the past.
The Camera Board ships in an anti-static bag enclosed by a minimalist paper box. When you handle the Camera Board, be careful not to kink the ribbon cable—it is on the delicate side. You also want to avoid touching the camera lens to avoid fingerprint smudges.
With no further ado, let’s get your new Raspberry Pi Camera Board set up and start snapping some pictures and recording some video!
Installing and Configuring the Raspberry Pi Camera Board
Getting the Raspberry Pi Camera Board up and running consists of two phases:
![]() Preparing the Pi and installing the camera driver
Preparing the Pi and installing the camera driver
![]() Physically installing the camera
Physically installing the camera
As usual, in this chapter I assume you’re using the official Raspbian Linux distribution.
Task: Preparing the Raspberry Pi for the Camera Board
1. Do not plug in the Camera Board yet. Power on the Pi, access a Terminal prompt, and update your software (including Raspi-Config):
sudo apt-get update && sudo apt-get upgrade
2. Let’s go into Raspi-Config:
sudo raspi-config
3. In Raspi-Config, arrow down to the Camera option and press Enter.
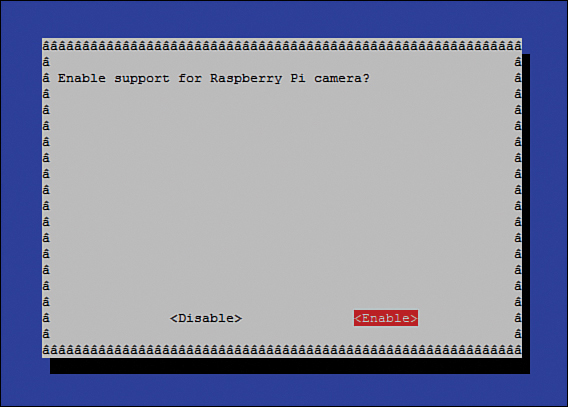
4. In the Enable support for Raspberry Pi camera? dialog box, shown in Figure 16.3, select Enable and press Enter.
5. Exit the Raspi-Config utility and reboot your Pi. When you are back from the reboot, shut down the system to prepare for the Camera Board installation. Remember that the shutdown command uses two primary switches: -h for shutdown (halt), and -r for reboot.
sudo shutdown -h now
Now that you have installed the necessary device drivers and readied the Raspberry Pi to use the Camera Board, let’s connect the add-on to the Pi’s PCB.
Task: Installing the Raspberry Pi Camera Board
1. Make sure that your Raspberry Pi is powered off. Unplug all cables from the PCB.
2. Using your fingers, grasp the edges of the CSI-2 connector and gently lift up the retaining clip. Note that the clip remains attached to the interface; it lifts approximately 1–2mm.
3. Insert the Camera Board ribbon cable into the CSI-2 interface with the copper traces facing away from the USB ports. You can see the correct orientation in Figure 16.4.
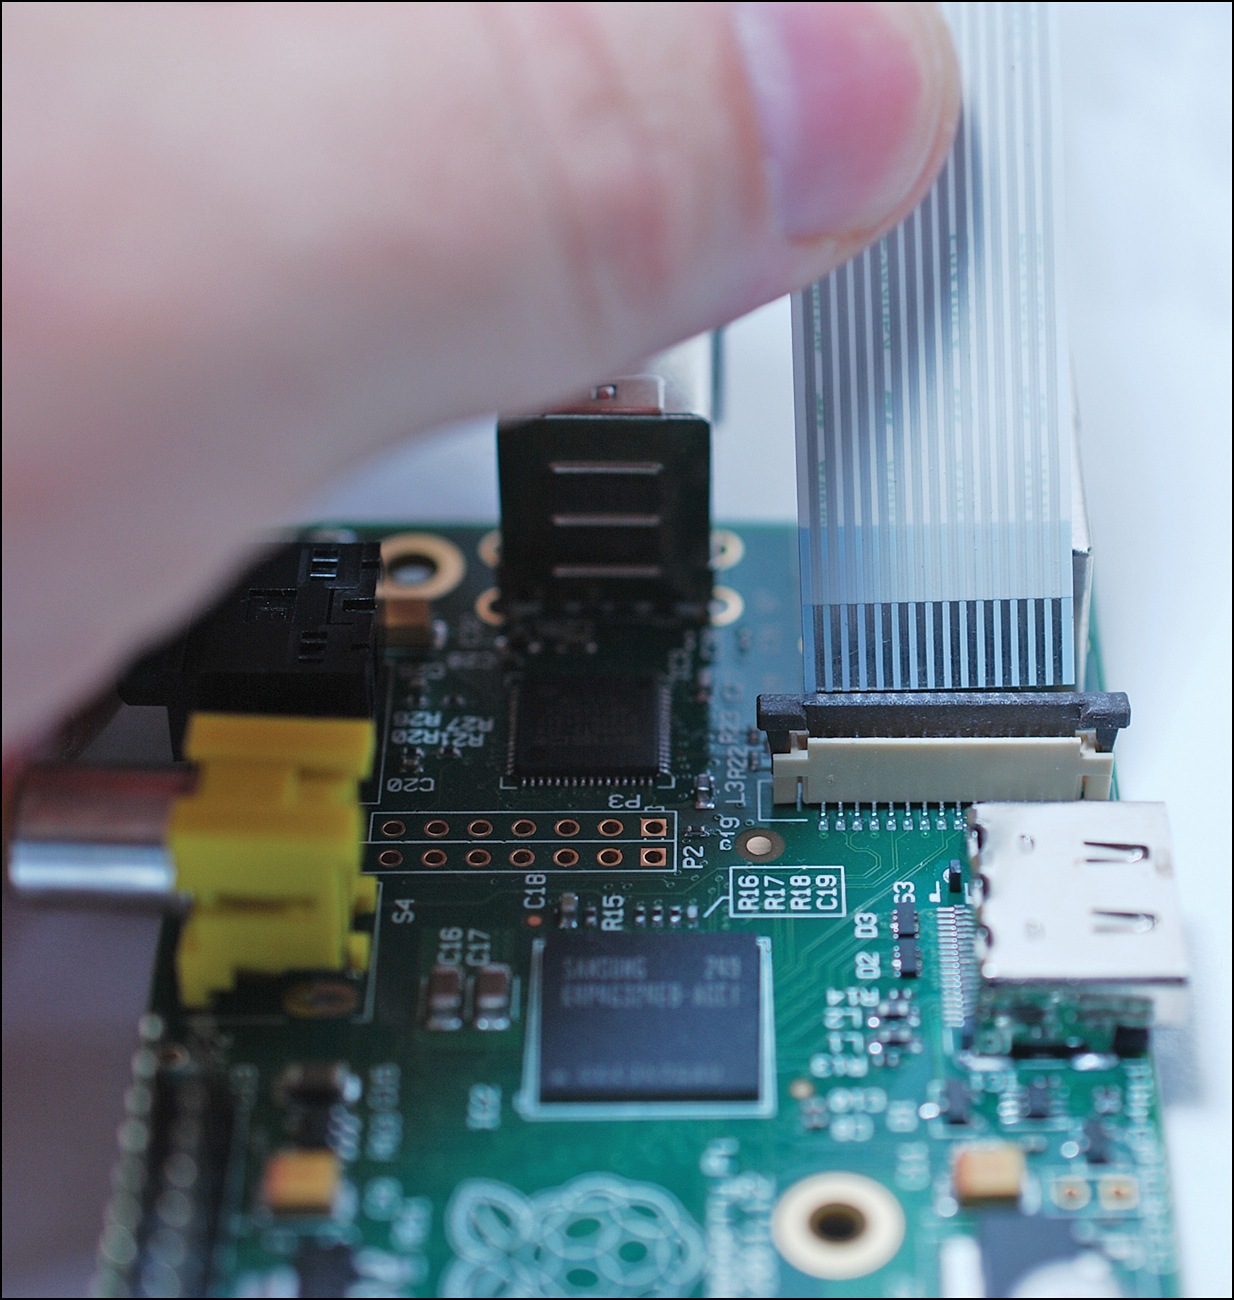
FIGURE 16.4 The Camera Board installation procedure is a bit tedious, and the components are certainly delicate.
4. When the ribbon cable is seated in the interface, grasp the retaining clip with your fingers and gently press down to lock the cable and the interface together securely.
Alrighty then! As you can see in Figure 16.5, the Raspberry Pi and the Camera Board are now (hopefully) a functional unit.
Using the Camera Board
The Raspberry Pi Foundation provides two command-line utilities for using the Camera Board:
![]() raspistill: Used to take still images in both JPEG and RAW formats
raspistill: Used to take still images in both JPEG and RAW formats
![]() raspivid: Used to record video by using the H.264 codec
raspivid: Used to record video by using the H.264 codec
In the next section I cover how to use raspistill to take still pictures. In the section that follows I turn your attention to shooting full-motion video (FMV) using raspivid.
Capturing Still Pictures
Let’s begin by obtaining some command-line syntax help:
raspistill | less
Figure 16.6 shows you the screen output for raspistill; this should serve as a nice reference for you.
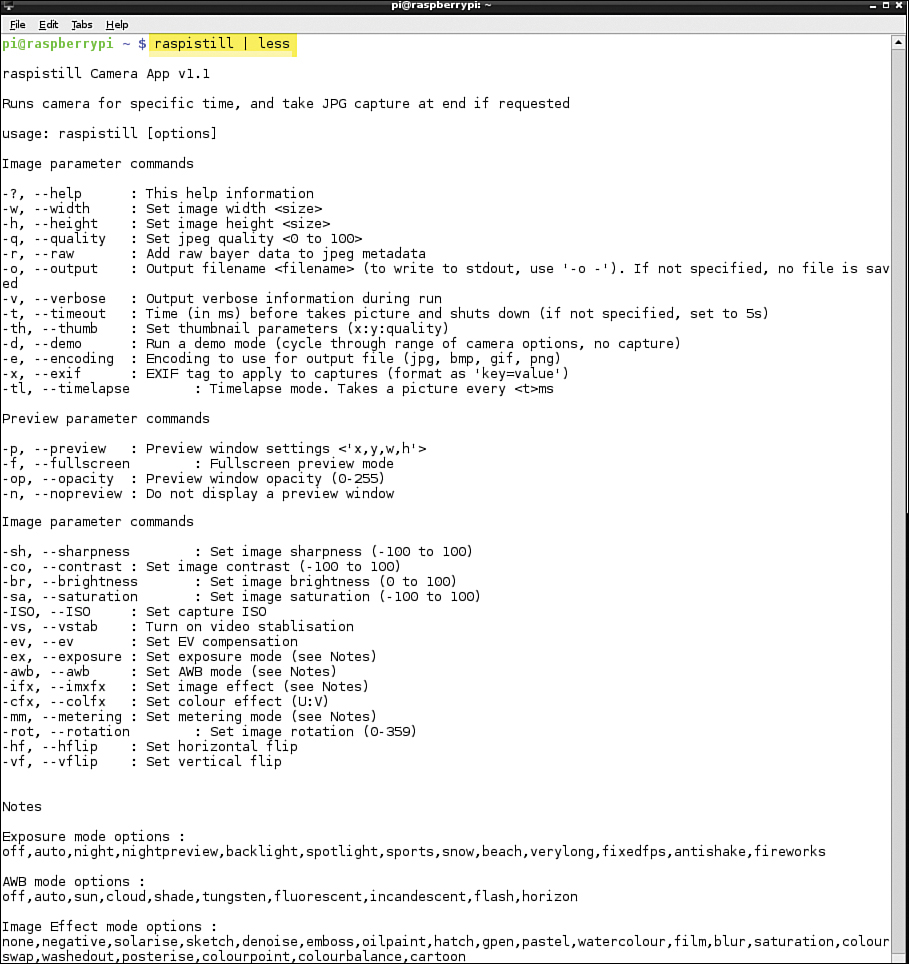
You can also download the full documentation for the Camera Board commands from http://is.gd/18PvNf.
To tell your Pi to snap a picture, enter the following command:
raspistill -o myimage.jpg
When you run raspistill, you see an LED light up on the Camera Board for approximately four seconds; the image is exposed just before the LED goes out.
Any photographs you capture are stored in your present working directory. Thus, if you execute the raspistill command in the context of your home directory, that’s where your files reside by default.
The -o switch enables you to name the images using whatever file name you input after the switch, myimage.jpg in this example.
From LXDE, you can double-click the image files to open them in your default web browser. Alternatively, you can right-click them and select ImageMagick (display) to open them in the ImageMagick open source image viewer.
Despite the lack of a flash or manual focus override, the picture quality is actually pretty good. Take a look at Figure 16.7 to see yours truly posing for your viewing (and laughing) pleasure:

FIGURE 16.7 Despite the poor subject, you can see that the Raspberry Pi Camera Board takes a pretty good picture.
Let’s buzz through some more sample syntax to give you a better idea as to what raspistill can do for you. You can, for example, tell your Pi’s camera to take a picture at a set delay or image quality.
Take an image with a quality of 50% and a “shutter” delay of 10 seconds:
raspistill -o image3.jpg -q 50 -t 10000
The -q parameter goes from 0 (lowest quality) to 100 (highest quality). Quality, in this case, refers to the degree of JPEG compression that is applied to captured images. JPEG is a lossy compression algorithm, so even images taken at quality 100 will have some pixel loss due to the file format.
The timer value adds an exposure delay and works in thousands of seconds (milliseconds). Thus, a value of 5000 represents a 5 second delay.
Take an image with custom dimensions, verbose command output, a quality of 80%, and a one-second delay:
raspistill -v -w 1024 -h 768 -q 80 -o image4.jpg -t 1000
The verbose (-v) parameter is useful for educational and troubleshooting purposes. In fact, let me show you the output of the previous raspistill command example:
pi@raspberrypi ~ $ raspistill -v -w 1024 -h 768 -q 80 -o image4.jpg -t 1000 >
output.txt
raspistill Camera App v1.2
Width 1024, Height 768, quality 80, filename image4.jpg
Time delay 1000, Raw no
Thumbnail enabled Yes, width 64, height 48, quality 35
Full resolution preview No
Preview Yes, Full screen Yes
Preview window 0,0,1024,768
Opacity 255
Sharpness 0, Contrast 0, Brightness 50
Saturation 0, ISO 400, Video Stabilisation No, Exposure compensation 0
Exposure Mode 'auto', AWB Mode 'auto', Image Effect 'none'
Metering Mode 'average', Colour Effect Enabled No with U = 128, V = 128
Rotation 0, hflip No, vflip No
ROI x 0.000000, y 0.000000, w 1.000000 h 1.000000
Camera component done
Encoder component done
Starting component connection stage
Connecting camera stills port to encoder input port
Opening output file image4.jpg
Enabling encoder output port
Starting capture 1
Finished capture 1
Closing down
Close down completed, all components disconnected, disabled and destroyed
Although the previous verbose output looks like so much gobbledygook at first glance, given experience and practice you’ll come to appreciate the degree of detail that raspistill gives you. The verbose output leaves nothing to the imagination, so you can figure out the source of any unexpected behavior you see in taking still pictures with your Raspberry Pi.
Because neither the Raspberry Pi Camera Board nor any webcam I’ve ever used includes a built-in flash, you need to pay attention to ambient light when you capture still pictures or video. If you visit the Raspberry Pi forums (check out these threads: http://is.gd/LaKy6m; http://is.gd/d1SoH5) you’ll find some enthusiastic debate regarding the relative difficulty of accessing the Pi’s GPIO pins to attach and sync a flash bulb with the camera sensor.
The consensus among Pi developers at the time of this writing is that the Omnivision Camera Board firmware does include support for a flash, but digging into that firmware source code isn’t something that the Raspberry Pi Foundation has addressed yet.
Recording Video with the Camera Board
As I mentioned earlier, the Raspberry Pi Foundation gives you the raspivid command-line utility to capture full-motion video on your Pi.
Let’s get right into the thick of things by learning the raspivid command syntax:
raspivid | less
For those of you who want to see the raspivid syntax right now (nothing like instant gratification, right?), let me give you the results of raspivid --help.
pi@raspberrypi ~ $ raspivid --help
Display camera output to display, and optionally saves an H264 capture at requested bitrate
usage: raspivid [options]
Image parameter commands
-?, --help : This help information
-w, --width : Set image width <size>. Default 1920
-h, --height : Set image height <size>. Default 1080
-b, --bitrate : Set bitrate. Use bits per second (e.g. 10MBits/s would be -b
10000000)
-o, --output : Output filename <filename> (to write to stdout, use '-o -')
-v, --verbose : Output verbose information during run
-t, --timeout : Time (in ms) to capture for. If not specified, set to 5s. Zero
to disable
-d, --demo : Run a demo mode (cycle through range of camera options, no capture)
-fps, --framerate : Specify the frames per second to record
-e, --penc : Display preview image *after* encoding (shows compression
artifacts)
-g, --intra : Specify the intra refresh period (key frame rate/GoP size)
Preview parameter commands
-p, --preview : Preview window settings <'x,y,w,h'>
-f, --fullscreen : Fullscreen preview mode
-op, --opacity : Preview window opacity (0-255)
-n, --nopreview : Do not display a preview window
Image parameter commands
-sh, --sharpness : Set image sharpness (-100 to 100)
-co, --contrast : Set image contrast (-100 to 100)
-br, --brightness : Set image brightness (0 to 100)
-sa, --saturation : Set image saturation (-100 to 100)
-ISO, --ISO : Set capture ISO
-vs, --vstab : Turn on video stablisation
-ev, --ev : Set EV compensation
-ex, --exposure : Set exposure mode (see Notes)
-awb, --awb : Set AWB mode (see Notes)
-ifx, --imxfx : Set image effect (see Notes)
-cfx, --colfx : Set colour effect (U:V)
-mm, --metering : Set metering mode (see Notes)
-rot, --rotation : Set image rotation (0-359)
-hf, --hflip : Set horizontal flip
-vf, --vflip : Set vertical flip
-roi, --roi : Set region of interest (x,y,w,d as normalised coordinates [0.0-1.0])
Notes
Exposure mode options :
off,auto,night,nightpreview,backlight,spotlight,sports,snow,beach,verylong,fixedfps,antishake,fireworks
AWB mode options :
off,auto,sun,cloud,shade,tungsten,fluorescent,incandescent,flash,horizon
Image Effect mode options :
none,negative,solarise,sketch,denoise,emboss,oilpaint,hatch,gpen,pastel,
watercolour,film,blur,saturation,colourswap,washedout,posterise,colourpoint,
colourbalance,cartoon
Metering Mode options :
average,spot,backlit,matrix
You probably noticed that the raspivid command syntax is almost identical to that of raspistill. This behavior, of course, is by design.
Now let’s record a quick five-second video:
raspivid -o fiveseconds.h264
By default, the camera’s video capture is full 1080p HD at 1920x1080 pixels. Of course, you can make a smaller capture; let’s make a 15-second clip:
raspivid -o smallvid.h264 -t 15000 -w 1024 -h 768
Note: Perhaps a Larger SD Card Is in Order...
Recording at 1080p equates to a disk storage footprint of 17 megabytes (MB) per second, or 115MB per minute of video. Thus if you plan on capturing a significant amount of video with your Pi, you might want to purchase a higher capacity SD card.
Of course, the Raspberry Pi Camera Board has no microphone, so your videos won’t have any audio. Actually, adding an audio feed to your video captures is a good Raspberry Pi project idea!
You can get full documentation on Omxplayer, including keyboard controls, by visiting the Embedded Linux Wiki at http://is.gd/PNC7Mf.
If you have trouble with Omxplayer, you can try my personal favorite media player on any platform—VLC (http://is.gd/kfwzk5):
sudo apt-get install -y vlc
vlc smallvid.mp4
From LXDE, you can also right-click your MP4 file and select VLC media player from the shortcut menu.
Using a Third-Party USB Webcam
If you already have a Raspberry Pi-compatible USB webcam, feel free to use that piece of hardware instead of purchasing the Camera Board. You can check your webcam against the list of verified peripherals here at http://is.gd/ZJA79A.
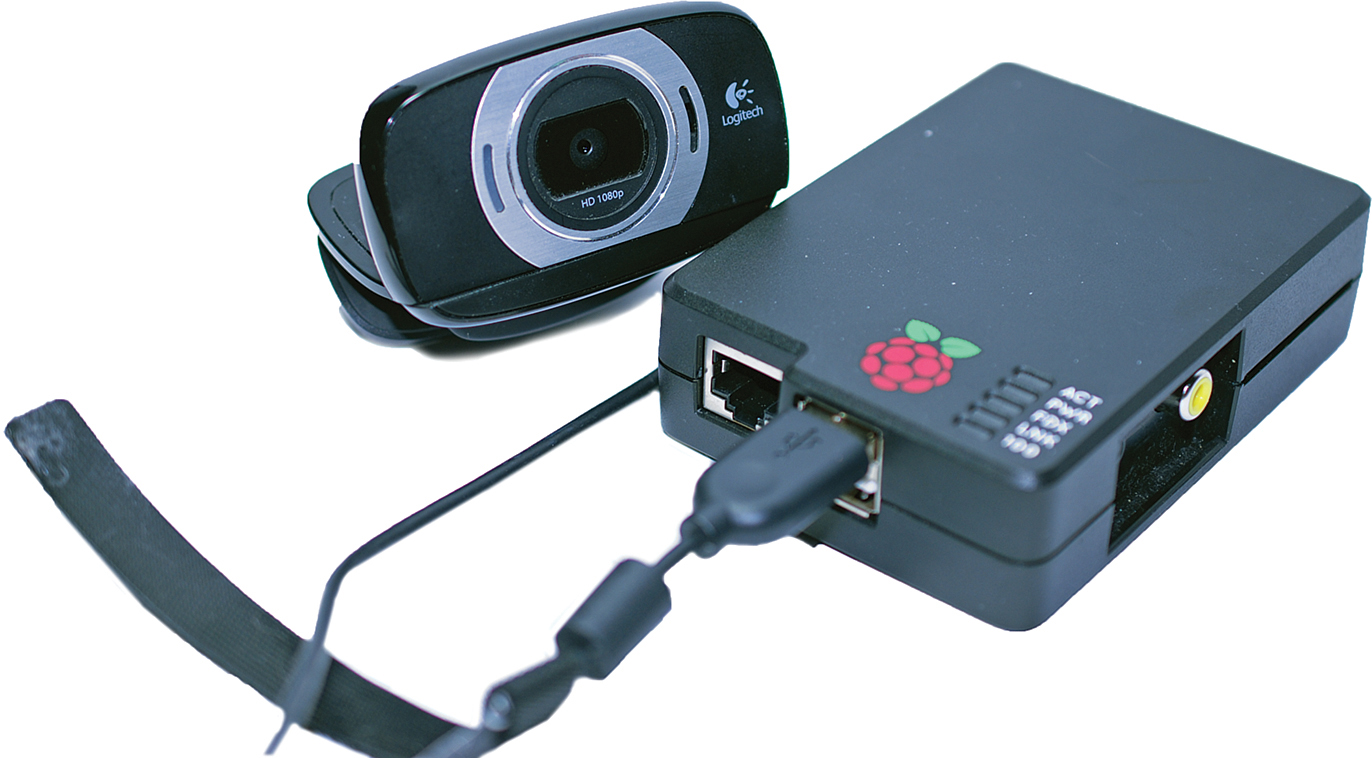
For my part, I have a nifty Logitech HD Webcam C615, shown in Figure 16.8, that works on my Pi like a champ even without a powered hub!
For this exercise we use an awesome piece of open source software called Motion.
Task: Configuring a Third-Party USB Webcam
1. Plug in your webcam, preferably into a powered USB hub.
2. From a Terminal shell prompt, make sure your Raspberry Pi recognizes your device:
lsusb
As you can see in Figure 16.9, my Logitech C615 is detected.

FIGURE 16.9 The lsusb command is used to enumerate USB devices in Linux. Here you can see both my Logitech webcam (device 004) as well as my Scosche portable battery (device 001).
3. To get the camera working properly with your Pi, you also need to edit two Motion configuration files a bit. To edit the first file, enter the following command:
sudo nano /etc/default/motion
In this configuration file, change the value
start_motion_daemon=no
to
start_motion_daemon=yes
Make sure to save your changes before you exit nano.
Note: Smile—You Are on the World Wide Web
If you are interested in making your Raspberry Pi webcam accessible from the public Internet, look no further than Chapter 15, “Raspberry Pi Web Server,” in which I give you instructions on using the lovely No-IP service.
4. Now for the second configuration file tweak:
sudo nano /etc/motion/motion.conf
Change the Daemon option from Off to On.
Change the webcam_localhost parameter from On to Off.
Again, save and exit.
5. Start the video stream:
sudo service motion start
To view your live video stream, open a web browser (I suggest Iceweasel or Netsurf [http://is.gd/6AfWdc]) and navigate to the following URL:
http://localhost:8081
If you want to access your webcam remotely on your LAN, substitute your Pi’s IP address for localhost.
You can tweak detailed parameters of the stream including stuff like the following:
![]() Video dimensions
Video dimensions
![]() Frame rate
Frame rate
![]() Video quality
Video quality
![]() Capture storage directory
Capture storage directory
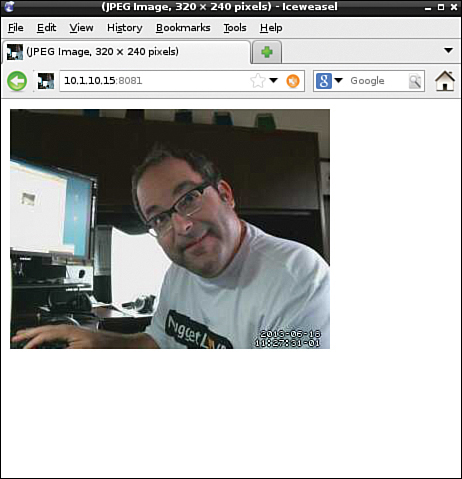
by editing /etc/motion/motion.conf. You can see my goofy mug (again) in Figure 16.10.
When you want to stop the stream, issue the following Terminal command:
sudo service motion stop
The Pale Blue Dot blog (http://is.gd/XS6fY8) has good instructions for setting up Motion to run as a service and auto-start each time your Pi boots up. For security reasons, though, I advise you to be careful about this, especially if your Pi is publicly accessible.
You’re probably wondering if the raspistill and raspivid commands that were written to function with the official Raspberry Pi Camera Board work with a third-party webcam. I’ve tested this out for you, and the answer is no. If you try to run raspistill or raspivid against a third-party webcam, you will receive an error message that says in part:
Camera is not detected. Please check carefully the camera module is installed
correctly.
Setting Up Your Webcam
As you just saw, Motion provides you with a video stream and a web browser in one fell swoop. But what if you wanted your Raspberry Pi cam to monitor a particular area (be it your front door, your back yard, your fish tank, whatever) and snap a picture at regular intervals?
Our current Motion setup feeds a live stream to a tiny web server on port 8080 (configurable through montion.conf, naturally).
Task: Setting Up a Time-Lapse Webcam
1. Install fswebcam:
sudo apt-get install fswebcam
2. You can get a run of the tool’s command-line help:
fswebcam --help
3. Now let’s snap a decent-sized image. Note that fswebcam uses the default ID /dev/video0 for the first webcam it sees; assuming you have only one webcam installed, this ID should work fine for your purposes.
fswebcam -r 1024 x 768 -d /dev/video0 picname.jpg
4. Create a configuration file for fswebcam so you can set your preferred defaults, especially your output directory:
cd
sudo nano .fswebcam.conf
5. When you are in the file, add these lines, customizing the values to your liking (I’m showing you my own setup here for illustrative purposes):
device /dev/video0
input 0
loop 15
skip 20
background
resolution 320x240
set brightness=60%
set contrast=13%
top-banner
title "Warner Webcam"
timestamp "%d-%m-%Y %H:%M:%S (%Z)"
jpeg 95
save /home/pi/webcam/viewcam.jpg
palette MJPEG
Pay particular attention to the timestamp parameter; this is where you can differentiate your captured image files as well as make them easier to browse. Note also all the options you have to customize the webcam’s default behavior.
6. To start fswebcam using your new configuration file (assuming that the config file resides in the root of your home directory), type
fswebcam -c ~/.fswebcam.conf
In case you were wondering, the dot before the .fswebcam.conf makes the file hidden. This is normally the attribute that is attached to system and configuration files to keep novices from accidentally messing with them.
7. To stop the fswebcam process, issue this command:
pkill fswebcam
8. To create a repeating operating system-level job that snaps a picture every minute, turn to Bash shell scripting and the age-old Linux command cron. First you must create a shell script:
sudo nano camscript.sh
Note: About cron
The cron (pronounced krahn) utility has been around since the earliest days of Unix and Linux. Use cron to schedule tasks to run once or on a schedule. In fact the name cron derives from the Greek word chronos, which means time. Specifically, the tasks that cron runs are typically binary commands or shell scripts.
9. Enter the following contents into the script file:
#!/bin/sh
filename=$(date +”%m-%d-%y|||%H%M%S”)
fswebcam -r 356x292 -d /dev/video0 $filename.jpg
cp $filename.jpg /home/pi/webcam
I’ll explain each of those four lines for you:
1: This is called a “shebang” line and points Linux to the location of the sh command interpreter.
2: This creates a variable named filename that gives a date and time stamp as its value.
3: This invokes fswebcam; in this example we aren’t using a configuration file.
4: This copies the captured image (stored in the filename variable) to a subfolder. We could add additional code here to perform an upload to Dropbox, FTP transfer, and so forth.
10. Mark your new shell script as executable:
sudo chmod +x camscript.sh
11. Start the crontab editor for the pi user:
crontab -e
12. The nano editor opens. Move your insertion point to the bottom of the file and create a cron job to run the camscript.sh shell script every minute:
*/1 * * * * /home/pi/camscript.sh
The previous syntax looks strange with all the asterisks, doesn’t it? In a nutshell, the Cron format uses six fields, with an asterisk representing the entire range of possible values for that field. Moving from left to right, the fields are:
![]() Minute (range 0-59)
Minute (range 0-59)
![]() Hour (range 0-23)
Hour (range 0-23)
![]() Day of the Month (range 1-31)
Day of the Month (range 1-31)
![]() Month of the Year (range 1-12)
Month of the Year (range 1-12)
![]() Day of the Week (range 1-7, with 1 signifying Monday)
Day of the Week (range 1-7, with 1 signifying Monday)
![]() Year (range 1900-3000)
Year (range 1900-3000)
Thus, a Cron statement of * /1 * * * * denotes an interval of one minute with no other limitations, be they day, month, or year.
I found an outstanding article on Cron format that you’ll want to have a look at if you want more information: http://is.gd/bCCmOm.
Check out Figure 16.11 to see what my setup looks like. It works like a charm!

FIGURE 16.11 This is my time-lapse webcam. At left in the browser window you can see the live video feed. At right you can see my output folder superimposed; this is where the .jpg image snapshots are stored.
Adding a Rechargeable Battery Pack to Your Pi Camera
Attaching a rechargeable battery pack to your Raspberry Pi (especially when combined with a Wi-Fi dongle) makes your Pi eminently flexible. In this scenario, you could feasibly place your Pi webcam anywhere, either indoors or outdoors, and happily snap pictures, record video, or both. You can even program the Pi to send the capture files to a desktop computer by using FTP!
Raspberry Pi enthusiasts around the world have developed novel ways to provide 5-volt battery power to their Pis. Some of these ideas involve car batteries, 12V vehicle power sockets, and the like. However, we have much more basic and reliable methods available to us.
I suggest you look into a Lithium-Ion (Lion) battery pack that includes a Micro-B USB plug and regulated 5V output. This option means that (a) you can plug the Lion portable battery into your desktop computer or a powered USB hub to charge the battery; and (b) you can simply plug the Micro-B plug into your Pi’s power port to give it portable juice on the go!
As usual, the Embedded Linux wiki (http://is.gd/ETvw9J) has a list of external battery packs that have been verified to work with the Raspberry Pi.
Remember that the standard power draw of the Model B board is 500mA. The amount of energy in a battery pack is ordinarily given in milliampere hours (mAh). This means that a 1,000mAh battery pack can deliver 1000mA of power for one hour, or 500mA for two hours.
Adafruit sells a Lion battery pack (http://is.gd/7ID1JP) for $59.95 that contains 3300mAh worth of power. This equates to over six hours of continuous power to a normally operating Raspberry Pi unit. Pretty cool, eh?
Some Lion portable batteries, like my own Scosche IPDBAT2 shown in Figure 16.12, have two 5V USB ports with different current supplies: 1A and 2.1A. This difference is normally intended to allow the battery pack to supply power to either the iPhone (1A current) or iPad (2.1A current). For the Pi, I suggest you go with the 2.1A port.

Python and Your Webcam
A good choice for blending the power of Python programming with your webcam is the SimpleCV vision library (http://is.gd/Db2osA). One aspect of SimpleCV that you might want to investigate is the motion and face detection capabilities built into the library.
1. Install the SimpleCV libraries:
sudo apt-get install python-opencv python-scipy python-numpy python-pip
sudo pip install https://github.com/ingenuitas/SimpleCV/zipball/master
2. Verify that the SimpleCV Python 2 library loads correctly in the Python interpreter:
python
import SimpleCV
print dir(SimpleCV)
3. Press Ctrl+D to exit Python.
4. You should create a very, very simple Python 2 script to test SimpleCV’s functionality. Begin by creating the script file:
cd
sudo nano hellocamera.py
5. Add the following code to the new script file:
#!/usr/bin/env python
from SimpleCV import Image, Display
from time import sleep
myWindow = Display()
myImage = Image("webcam.jpg")
myImage.save(myWindow)
while not myWindow.isDone():
sleep(0.1)
In a nutshell, this Python 2 script performs the following actions:
![]() Imports relevant functions (methods) from the SimpleCV and sleep modules
Imports relevant functions (methods) from the SimpleCV and sleep modules
![]() Creates a display window
Creates a display window
![]() Loads a webcam snapshot to the newly created window and saves the file to the current working directory
Loads a webcam snapshot to the newly created window and saves the file to the current working directory
![]() Prevents the script from terminating immediately after the webcam snapshot is taken
Prevents the script from terminating immediately after the webcam snapshot is taken
Save your work and close the file when you’re finished.
6. Now let’s run the Python script file from a shell prompt:
python hellocamera.py
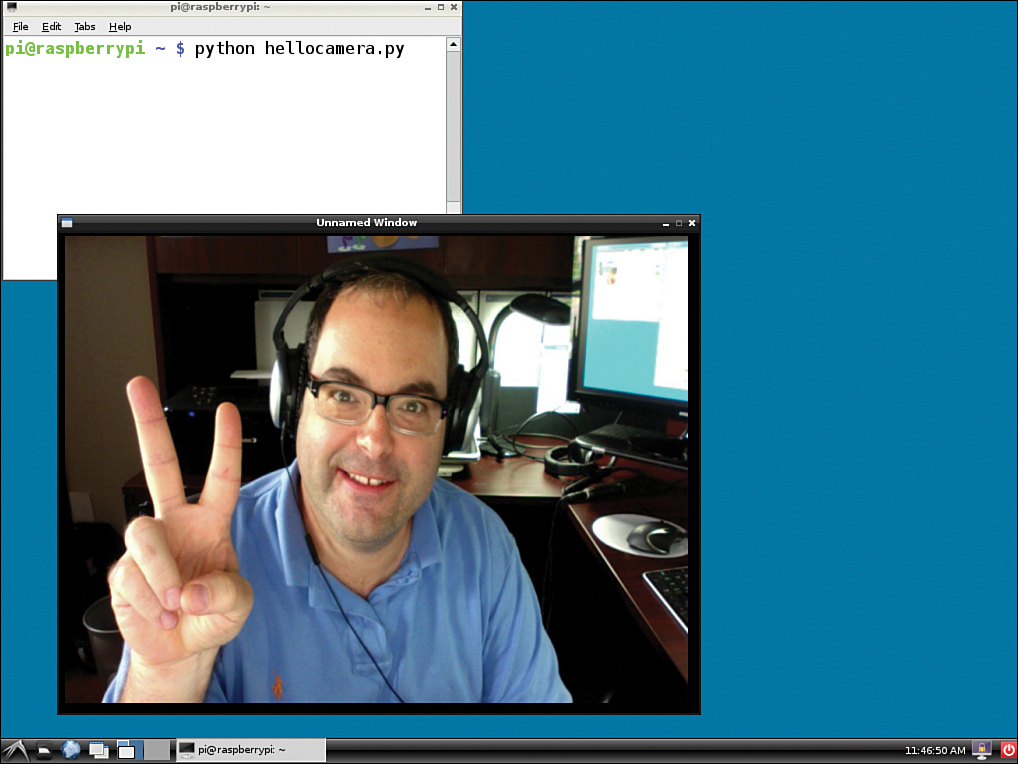
FIGURE 16.13 Using SimpleCV to access a third-party webcam. The goofy subject is yours truly, and the bit of artwork partially visible above his head is courtesy of the author’s three-year-old daughter Zoey.