
Chapter 15. Raspberry Pi Web Server
A web server is a computer that serves content by using standard Internet protocols. The word standard is key here because web communications are shared seamlessly across any kind of device, from desktop computers to video game consoles to tablets and mobile phones.
Any device that can (a) connect to a local area network or the Internet, and (b) has a web browser or web-aware application installed makes use of these standard protocols. The content that is served by a web server consists of the following media types at the very least:
![]() Web pages: Text that is formatted with hyperlinks, pointers to other content on the same page, the same website, or a different website (representative file types: .htm, .html, .php, .aspx).
Web pages: Text that is formatted with hyperlinks, pointers to other content on the same page, the same website, or a different website (representative file types: .htm, .html, .php, .aspx).
![]() Images: These can be static or animated pictures of the bitmap or vector variety (representative file types: .gif, .jpg, .png, .svg).
Images: These can be static or animated pictures of the bitmap or vector variety (representative file types: .gif, .jpg, .png, .svg).
![]() Audio: These can be background clips or full songs (representative file types: .mp3, .wav, .m4a).
Audio: These can be background clips or full songs (representative file types: .mp3, .wav, .m4a).
![]() Movies: Video segments of any length, displayed in either standard or high definition (representative file types: .mov, .mp4).
Movies: Video segments of any length, displayed in either standard or high definition (representative file types: .mov, .mp4).
![]() Interactions: These can be games, tutorials, simulations, and so forth (representative file types: .swf, .xap).
Interactions: These can be games, tutorials, simulations, and so forth (representative file types: .swf, .xap).
I mentioned that the universality of web servers lies in their use of standard web protocols. What are these? Well, the first thing to know is that a network protocol is essentially a set of rules or conventions that allows two computer systems to recognize each other and to meaningfully exchange data.
Specifically, web servers are called HTTP servers because they use the Hypertext Transfer Protocol (HTTP) as their base network protocol. Many other protocols are involved in delivering web content, of course, including Internet Protocol (IP), Transmission Control Protocol (TCP), and Address Resolution Protocol (ARP).
Note: Learn More About Protocols
The subject of networking protocols is far too broad and deep to cover thoroughly in this book. For more information, please check out How the Internet Works by my Que Publishing colleague Preston Gralla (http://is.gd/WZyOnb). In contrast to the rapid rate of change with most technologies, the Internet, for the most part, works the same way today as it did when this book was published in 2006.
Okay, then. Now that we understand a bit about what web servers are, why are they so important to us as Raspberry Pi hackers?
To answer that question, think to yourself how often you turn to a web browser to get any particular electronic task done. You can use a fully-fledged browser such as Internet Explorer or Google Chrome, or you can use a line-of-business (LOB) application that makes use of web standards to retrieve content from a web server.
For instance, you can make your Raspberry Pi a web server to accomplish any of the following goals:
![]() WordPress blog
WordPress blog
![]() Joomla content management server
Joomla content management server
![]() Webcam control center
Webcam control center
![]() Minecraft server
Minecraft server
The list of potential projects that take advantage of an HTTP server goes on and on. The bottom line is that HTTP is a lightweight and convenient way to present online content, so why not make use of this wonderful, extensible platform on your Raspberry Pi devices?
What Is the LAMP Stack?
In web development terminology, a protocol stack is a suite of related networking protocols and technologies that fit together like finger in glove to accomplish particular kinds of work. There was a time, not too many years ago, when websites were simply static collections of manually created HTML web pages.
On the off chance this escaped your notice, I’m here to tell you that static websites have largely gone the way of the dodo. Nowadays, any web developer or designer worth his or her salt needs dynamically generated web pages that pull data from a database such as MySQL, Oracle, or Microsoft SQL Server. These dynamic websites are called data-driven web applications.
I whipped up a schematic diagram of web communications in Figure 15.1 that I hope makes this situation clearer.

In Linux, the reference standard for an open source web development protocol stack is LAMP. LAMP in this context is an acronym for
![]() Linux: This is the base operating system for the web server.
Linux: This is the base operating system for the web server.
![]() Apache: This is the world-standard open source HTTP server software.
Apache: This is the world-standard open source HTTP server software.
![]() MySQL: This is the world-standard semi-open source Structured Query Language (SQL) relational database management system (RDBMS).
MySQL: This is the world-standard semi-open source Structured Query Language (SQL) relational database management system (RDBMS).
![]() PHP: This is the world-standard open source web development programming language. Incidentally, PHP is a strange acronym that stands for Hypertext Pre Processor.
PHP: This is the world-standard open source web development programming language. Incidentally, PHP is a strange acronym that stands for Hypertext Pre Processor.
If all this sounds like Greek to you, don’t get too stressed out, now—I know I am throwing a lot of technologies and acronyms at you. Let’s just take things one step at a time, and more will become clear, including how all this relates to your use of the Pi.
Installing Your Web Server
In terms of HTTP Server software, these are the major players in the world as of spring 2013 according to Netcraft (http://is.gd/uIbG30):
![]() Apache, by the Apache Software Foundation: http://is.gd/x3xZvH
Apache, by the Apache Software Foundation: http://is.gd/x3xZvH
![]() Internet Information Services (IIS), by Microsoft: http://is.gd/ILyw06
Internet Information Services (IIS), by Microsoft: http://is.gd/ILyw06
![]() nginx (pronounced engine ex), by Igor Sysoev: http://is.gd/ydUSGd
nginx (pronounced engine ex), by Igor Sysoev: http://is.gd/ydUSGd
Of the preceding software, only IIS is proprietary. In addition, IIS is the only web server software that is platform-dependent. By contrast, Apache and nginx have software variants that run on Windows, OS X, and Linux.
Note: Etymology of Apache
Officially, the name Apache in Apache HTTP Server was chosen out of respect for the Native American tribe of the same name. Unofficially, some people submit that Apache stands for “A Patchy,” as in “Apache is continually patched and updated; therefore, it is a patchy server.”
In this book, we standardize on Apache 2 as our web server of choice for the Raspberry Pi. To that point, if you’re concerned that Apache might be a bit too heavy for your Raspberry Pi, lighter-weight Apache distributions are available. For instance, check out the Cherokee project (http://is.gd/IpGFx3). Frankly, I was going to use Cherokee for this chapter, but I don’t feel the software is quite stable enough to recommend to you yet.
Lighttpd (pronounced lightly) is another example of a quality, lightweight web server. Visit the project home page at http://is.gd/pVbk3P.
Task: Installing the LAMP Stack on Raspberry Pi
1. Open up a Terminal session and install Apache, PHP, and the library that links the two technologies together under Linux:
sudo apt-get install apache2 php5 libapache2-mod-php5
2. After the installation completes, restart the Apache service (also called daemon, pronounced dee-mun):
sudo service apache2 restart
3. Make sure that the default Home page was created. You can use cat to display text file contents directly onscreen:
cat /var/www/index.html
If you see some HTML tags show up (for instance, <h1>It works!</h1>, you are good to go so far.
4. Type startx to get into LXDE (alternatively, run a remote VNC section as you learned in Chapter 7, “Networking Raspberry Pi”).
5. Open the Midori browser and navigate to the following URL:
http://localhost

Task: Verifying PHP Configuration
1. Navigate to the default content directory in Apache 2:
cd /var/www
2. Create a new text file with an appropriate name:
sudo nano phpinformation.php
3. In nano, add the following line:
<?php phpinfo();?>
4. Press Ctrl+X, Y, and Enter to save the file and exit nano.
5. Log into LXDE if you aren’t already there.
6. Open Midori and navigate to the following URL:
http://localhost/phpinformation.php
If you see the phpinfo() function output shown in Figure 15.3, you can rest assured that you successfully installed PHP.

7. Now let’s turn our attention to installing MySQL, the lone remaining member of the LAMP stack:
sudo apt-get install mysql-server mysql-client php5-mysql
MySQL (pronounced my ess-cue-el) is a client-server application (hence the necessity to install the server and client components) that is known for being fast, lightweight, and reasonably secure and extensible.
During the MySQL installation, you are prompted to set a strong password for the MySQL root user. Please do this! In my opinion, a strong password consists of the following attributes:
![]() Length of at least eight characters
Length of at least eight characters
![]() Mixture of uppercase and lowercase letters
Mixture of uppercase and lowercase letters
![]() Mixture of letters, numbers, and non-alphanumeric character
Mixture of letters, numbers, and non-alphanumeric character
![]() Doesn’t appear in a dictionary in any language
Doesn’t appear in a dictionary in any language
Task: Verifying MySQL Installation
1. From a Terminal session, run the following statement:
sudo /etc/init.d/mysql status
In Linux, init.d is a directory, not a file, that contains startup and shutdown scripts for installed services on your system.
2. If you see output that resembles what’s shown in Figure 15.4, you know you have a fully functioning instance of MySQL.

If you don’t see the output shown in Figure 15.4, don’t panic. In a worst possible case scenario, you can re-flash your SD card with Raspbian and start over from scratch. Failing that extreme measure, you can turn to the good folks at the Raspberry Pi Forums for assistance. Here is a link to a discussion thread that covers just this topic: http://is.gd/C6iONe.
Tweaking Up Your Web Server Settings
Awesome—you have your LAMP stack installed, albeit with from the factory defaults. Next, you need to get in there and make sure that the software is configured to your liking.
Apache is considered by many to be the world’s best web server for many reasons, but not the least of which is that the server ships with strong and secure default values. Nonetheless, some of the most common Apache tweaks that some admins make to their default installations include
![]() Changing the location where web content files are stored
Changing the location where web content files are stored
![]() Changing the default TCP port
Changing the default TCP port
![]() Modifying security and performance settings
Modifying security and performance settings
![]() Adding module packages to extend the capabilities of the server
Adding module packages to extend the capabilities of the server
As it happens, Apache 2 stores its configuration files in the directory /etc/apache2. Specifically, the primary Apache2 configuration file is named apache2.conf, and stores general configuration parameters. Another key Apache 2 configuration file is ports.conf, located in the same directory. The ports.conf file stores TCP/IP connection settings.
You can use any text editor you want (for instance, nano from the Terminal or Leafpad from LXDE) to edit the files.
MySQL stores its configuration settings in /etc/mysql/my.cnf.
PHP stores its settings in /etc/php5/apache2/php.ini.
Transferring Content to Your Web Server
When it comes to actually authoring your website, workflows vary among developers. For static websites, all you truly need at minimum is a plain text editor to create your HTML files. For data-driven applications, such as PHP apps that read from and write to a MySQL database, a more comprehensive web authoring tool (or tools) might be more relevant.
Certainly, the subject of web development and design in itself is far outside the scope of this book. For now, let’s focus on the easiest way to transfer web content from your development workstation (which I presume for now is not your Raspberry Pi) to the Pi itself.
Recall that Secure Shell (SSH) is enabled by default in Raspbian. Therefore, you can make use of the remote file-copy functionality, called Secure File Transfer Protocol (SFTP), that is part of the SSH standard to transfer your content to the Pi. This method is admirable because of its security; all session data over SSH is encrypted and consequently safe from malicious individuals.
Back in Chapter 7, I recommended FileZilla (http://is.gd/etsJLy) as a stable, reliable (and free) SFTP client. Recall that FileZilla is available on Windows, OS X, and Linux. Let’s learn how to use FileZilla to move web files from a remote host to your Raspberry Pi web server.
Task: Using SFTP to Transfer Content to Your Pi
1. Open FileZilla and click File, Site Manager to open the Site Manager tool.
2. In Site Manager, click New Site and give the connection an appropriate name.
3. On the General tab (shown in Figure 15.5), fill in the relevant connection details, like so:
![]() Host: This is the IP address of your Pi.
Host: This is the IP address of your Pi.
![]() Protocol: Select SFTP–SSH File Transfer Protocol.
Protocol: Select SFTP–SSH File Transfer Protocol.
![]() Logon Type: Set to Normal.
Logon Type: Set to Normal.
![]() User: Specify the user (pi, or another Raspberry Pi user if you have one).
User: Specify the user (pi, or another Raspberry Pi user if you have one).
![]() Password: Specify the current password for the chosen account.
Password: Specify the current password for the chosen account.
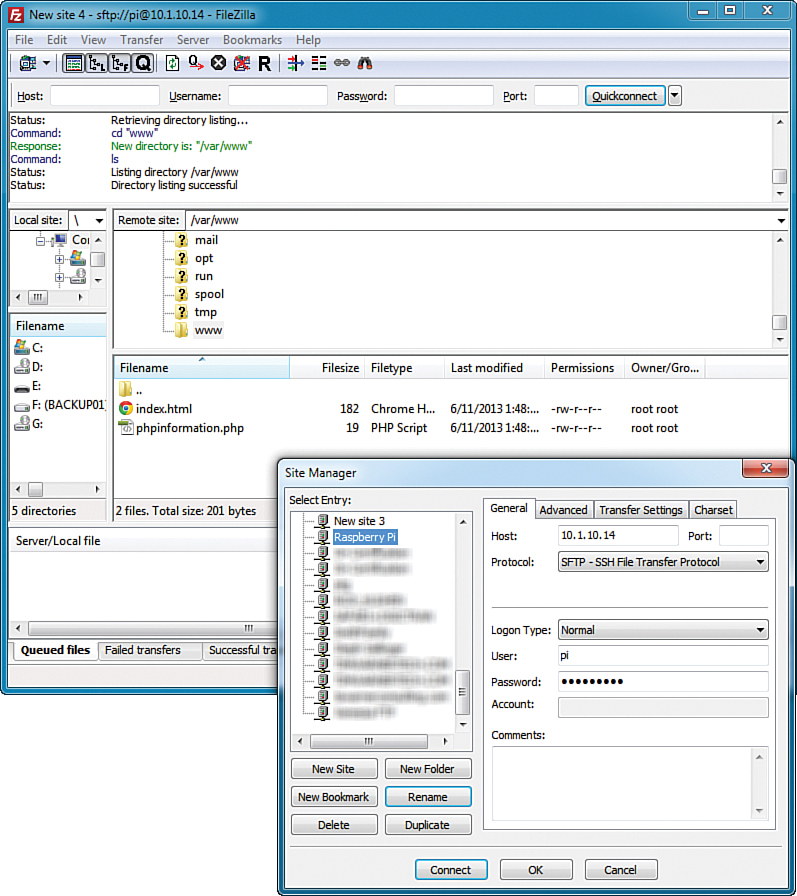
4. Click Connect to save your connection and attempt to reach your Raspberry Pi. In the future you can use your stored Site Manager entry to make it convenient to reconnect to your Pi.
5. Navigate to the /var/www directory on your Pi as shown in Figure 15.5.
6. Drag and drop any content into the target Pi directory in FileZilla.
7. Click the Disconnect button on the toolbar to end your session.
Some long-time web users insist on using traditional FTP for transferring web content. FTP is cool because it is ubiquitous, but it has a nasty downfall: All data transmitted between the FTP server and the FTP client is clear text. That includes passwords and any other sensitive data!
Therefore, I strongly suggest you stick to using SFTP, as it employs the same command set as unencrypted FTP, has no noticeable performance penalty, and is already enabled on the Pi.
If you insist on investigating an FTP solution for your Pi, I recommend you go with vsftpd (http://is.gd/9RCFch).
Alrighty then! Now that you have verified your Raspberry Pi web server is fully functional and you understand how to manually populate content, let’s use a couple representative example web apps as a case study in discerning what a Raspberry Pi web server is capable of.
Setting Up phpMyAdmin
If you’ve had a chance to play with MySQL at all to this point, you’ve discovered that MySQL does not include any graphical management tools by default. As it happens, Oracle does provide a GUI toolkit called MySQL Workbench (http://is.gd/PIQrpJ). However, these Java-based tools are considered by most to be too resource-intensive for the Raspberry Pi.
Thus, kind and gentle reader, I introduce you to phpMyAdmin. phpMyAdmin (http://is.gd/T17bRC) is an open source PHP web application that provides you with a graphical front-end interface to MySQL (see Figure 15.6). Because phpMyAdmin is a web browser–based tool, you can run it on the Raspberry Pi with little to no performance impact.

Note: For Further Learning
Packt Publishing has released a series of books on how to use phpMyAdmin; check them out at http://is.gd/OyFw0J.
You know, as much as I like the idea behind Midori as a minimalist web browser, I haven’t had much luck running anything but the most bare-bones of web apps from this tool. For instance, phpMyAdmin displays all these distressing artifacts on screen.
As an alternative, you might want to consider installing Iceweasel (http://is.gd/cfmCHP), the Debian port of the Mozilla Firefox web browser. Run sudo apt-get install iceweasel, confirm the installation, and check the Internet folder in LXPanel menu—you might love it!
Setting Up Joomla
Joomla (http://is.gd/Xl2hSu) is a leading content management system (CMS) platform. Many businesses build their corporate websites on Joomla because Joomla is open source, free, and eminently flexible. Under the hood, Joomla is a PHP/MySQL-based web application, so it functions perfectly well in a LAMP stack environment. I show you the Joomla default Home page in Figure 15.7.

You can also use Joomla as a blog or as an online photo/video gallery...the list is almost limitless.
For step-by-step instructions on how to use Joomla to build dynamic websites, please read The Official Joomla! Book by Jennifer Marriott and Elin Waring (http://is.gd/BA3jtO).
Despite its richness and robustness, Joomla runs reasonably well on the Raspberry Pi. Let’s learn how to install the platform.
Task: Installing Joomla on Your Raspberry Pi
1. From LXDE, fire up your favorite web browser, visit http://is.gd/spdPUN, and download the latest version of Joomla. The installer will come down as a ZIP archive to your home directory by default.
2. Open a Terminal session and unpack the Joomla contents to your default Apache content directory.
cd
sudo unzip joomla.zip -d /var/www
In the previous code, replace joomla.zip with the actual name of the Joomla ZIP you downloaded from the Joomla website.
3. You need to tweak the PHP configuration file a bit, so open it up in nano:
sudo nano /etc/php5/apache2/php.ini
4. In nano, press Ctrl+W to search for the string output_buffering.
5. Set the Development Value and Production Value parameters to 0.
6. Press Ctrl+O, ENTER, and then Ctrl+X to save the file and exit the nano editor.
7. Reboot the Pi.
sudo reboot
8. When you’re back from the reboot and in LXDE again, open another Terminal session, create the Joomla configuration file, and make sure that the new file is writable.
cd /var/www
sudo touch configuration.php
sudo chmod 777 configuration.php
The touch command is used to create a new empty file. The chmod (pronounced see aich mod) is used to edit permissions on files. You can learn more about the Linux file system permissions, including the octal numeric and symbolic methods, by visiting good ol’ Wikipedia at http://is.gd/5hFhgO.
9. It’s time to complete the installation via a web browser. Open Midori, Iceweasel, or your preferred web browser and open your Apache installation’s default content page:
http://localhost
10. If you see the default Apache page instead of a Joomla page, delete the old index.html page:
sudo rm index.html
11. You are prompted to walk through a three-step initial configuration wizard, the first screen of which is shown to you in Figure 15.8.

Here’s a brief discussion of the information you need to supply to Joomla:
![]() Main Configuration: Site name and description; Joomla administrator login and contact details
Main Configuration: Site name and description; Joomla administrator login and contact details
![]() Database: Connection details to MySQL
Database: Connection details to MySQL
![]() Finalization: Install sample data, email data, confirm installation defaults
Finalization: Install sample data, email data, confirm installation defaults
12. For security purposes, you are prompted to delete the installation folder before you can begin using Joomla on your Pi. If you receive an error when you try to do this from a browser, you can perform the action through Terminal:
cd /var/www
sudo rm -rf installation/
Putting Your Web Server on the Public Internet
The final subject I cover in this chapter is how to put your Raspberry Pi web server on the global Internet. Inside the vast majority of private homes and businesses, computers use private, nonroutable IP addresses dispensed by a DHCP server. These internal IP addresses are fine for communications within the home or organization, but they don’t allow people on the Internet to connect directly to those hosts.
Why would you want to expose your Raspberry Pi to the wild and wooly jungle called the World Wide Web? Here are some valid reasons:
![]() You can consume public web services such as Dropbox and Spotify.
You can consume public web services such as Dropbox and Spotify.
![]() You can communicate with other Internet users.
You can communicate with other Internet users.
![]() You can test out location services and other Internet-dependent applications.
You can test out location services and other Internet-dependent applications.
On the other hand, you need to be mindful of some clear and present dangers associated with placing any computer within reach of systems located around the globe:
![]() A malicious user or application can infiltrate your Raspberry Pi.
A malicious user or application can infiltrate your Raspberry Pi.
![]() You may unintentionally expose private data.
You may unintentionally expose private data.
![]() You may unknowingly consume network bandwidth (relevant for users with metered Internet connections).
You may unknowingly consume network bandwidth (relevant for users with metered Internet connections).
Thus, my suggested workflow for putting your Pi on the Internet is to
![]() Configure your Pi with a static IP address. (I showed you how to do this in Chapter 7).
Configure your Pi with a static IP address. (I showed you how to do this in Chapter 7).
![]() Use a dynamic DNS service.
Use a dynamic DNS service.
Dynamic DNS services are necessary because DHCP is a lease-based protocol. In other words, your host computers periodically receive new and different IP addresses from their servers, which makes reliable connections to computers unreliable.
Configuring your Raspberry Pi with a static private IP address is fine; this means you’ll always be able to connect to the device from within your LAN by using that IP address. Dynamic DNS services come into play because they allow you to map an internal network device with a public Domain Name System (DNS) name.
In my experience, the two major players in the dynamic DNS space are
![]() No-IP (http://is.gd/hhmpFu)
No-IP (http://is.gd/hhmpFu)
![]() DynDNS (http://is.gd/nKysbj)
DynDNS (http://is.gd/nKysbj)
Both of these services offer entry-level features for free and more advanced capabilities for a subscription fee.
First, you need to visit the No-IP website and create a free account. After you’ve done that, you can manage your host/domain name mappings. By default, your DNS host names will use the suffix no-ip.biz. If you own a domain of your own, you can become a paying subscriber to access those additional features.
Second, you need to determine whether your Pi connects directly to your ISP and has a public IP address or if the device resides behind your router and receives a private IP.
The former case is the easiest; you see your ISP-given public IP and associated default hostname in your No-IP control panel as shown in Figure 15.9.

If your Pi is one of several hosts behind your single Internet connection, don’t sweat it because the No-IP client that you’ll install on your Pi is intelligent enough to sort it all out.
If your Raspberry Pi exists as a DHCP client on your internet network, you have one more step to do. You need to log into your router and set up port forwarding to allow traffic on TCP port 80 (HTTP) to transit to your Raspberry Pi’s internal IP address. The setup on my Comcast IP Business Gateway is shown in Figure 15.10.

To test that the public IP works, fire up a web browser on another computer, preferably on a remote network, and see if you can load the Joomla site you just created. For instance, my No-IP DNS name is timwarner.no-ip.biz, so in my browser I type
http://timwarner.no-ip.biz
You will be unpleasantly surprised, I’m sure, to learn that the No-IP dynamic update client does not run automatically at startup by default. Never fear, however. You can find an excellent, step-by-step tutorial for doing this at the Stuff About Code website (http://is.gd/VVolQr).