
Chapter 17. Raspberry Pi Security and Privacy Device
When it comes to electronics and computing, the words security and privacy could mean a lot of different things. In this case I’m talking about using your Pi to maximize your security and privacy when online. Even more specifically, I’m referring to securing your personal and financial details.
I want to lead off this chapter by presenting to you three unfortunate scenarios that can be prevented by configuring your Raspberry Pi as a security and privacy device.
Scenario #1: You live in the United States, and you enjoy your subscription to Netflix very much. However, you find that whenever you visit other countries, especially in Europe and the Far East, that you are unable to access the Netflix services you pay for due to international licensing laws.
Scenario #2: You enjoy taking your laptop computer to the neighborhood coffee house and working while sipping espresso and munching scones. The free, public Wi-Fi service gives you adequate Internet access speed. Nonetheless, you discover three months later that your bank accounts have been compromised because a hacker captured your logon credentials over the air during one of your coffee house web browsing sessions.
Scenario #3: You are a traveling salesperson who spends much of your time doing your work and browsing the Web from hotel rooms. You’ve become increasingly irritated at how much of the Web is blocked by hotel access restrictions.
This chapter is all about leveraging your $25 or $35 Raspberry Pi computer to provide yourself with secure and potentially anonymous Internet access. Your first order of business, of course, is to define your terms. Let’s start off with the concept of the virtual private network and why it’s important.
Encrypting Your Internet Connection with a VPN
A virtual private network, or VPN, is a secure, point-to-point network connection that is tunneled through an unsecure medium. You can certainly agree that the public Internet represents an unsecure medium; a wild jungle is more like it.
A VPN involves the construction of a temporary or permanent data communications channel that takes advantage of the Internet’s speed and reliability, but offers security in that all traffic tunneled through the VPN connection is encrypted.
VPNs are the de facto method that businesses use to offer remote employees access to confidential, internal network resources such as shared files, intranet websites, and so forth.
If there is a downside to VPNs, it is their lack of speed. Due to the heavy overhead of data encryption and decryption, network access over a VPN pipe is noticeably, and sometimes unbearably, slower than over an unencrypted link.
That brings up the delicate balancing act between increased security on one hand and user convenience on the other. Where are you comfortable drawing the line?
From the perspective of the corporate IT manager, setting up a VPN server can be pretty tough. You ordinarily have to provision dedicated hardware and software in order to manage the myriad network protocols that constitute VPN circuits.
What many people don’t know is that it is relatively easy to create your own VPN environment, even at home, by using hosted VPN services. Two major players in the hosted VPN arena are
![]() LogMeIn Hamachi: http://is.gd/PtTdkV
LogMeIn Hamachi: http://is.gd/PtTdkV
![]() OpenVPN: http://is.gd/uSoYCp
OpenVPN: http://is.gd/uSoYCp
What is cool about both of these services is that because they operate over standard web protocols, you don’t have to forward any ports on your router or worry about your Internet access provider blocking traditional VPN ports.
For instance, I’ve stayed at hotels that charge guests two different prices for Internet access depending on whether the guest needs VPN access or not.
However, in my experience Hamachi is much more of a turnkey solution than OpenVPN, so I focus on this product in this chapter.
Okay...so you understand that a VPN connection gives you security and privacy by protecting all data between your computer and the Internet. What does that have to do with the Raspberry Pi? Moreover, how does a VPN enable you to cloak your geographic location?
The truth of the matter is, a VPN alone cannot give you true web browsing freedom. For that purpose we need a proxy server.
Browsing Where You Want via a Proxy Server
A proxy server is a networking device that connects to Internet resources on behalf of another computer. For instance, you may find that network broadcasting agreements prevent your favorite sports game from being broadcast in your current location. Wouldn’t it be cool to have your computer appear as if it were connecting from another location so you could watch your game?
Note: Public Proxies and the Network Administrators
Many network administrators detest public proxies because they allow users to bypass corporate web browsing filters. Businesses oftentimes set up what’s called a transparent proxy that forces all internal network traffic through the device before it hits the Internet. To that point, many transparent proxies periodically download blacklists of known public proxies to thwart unauthorized use of the network.
Pipelining your network traffic through a proxy server offers you privacy because as far as your Internet access provider is concerned, you are making an ordinary, run-of-the-mill web browsing request to a particular server.
In actuality, that particular server is a proxy server that is capable of redirecting your web browsing to wherever you need or want to go (see Figure 17.1). It’s common for citizens of certain countries to use web proxies to bypass their government’s Internet access filters.

Let me explain what you’re seeing in Figure 17.1. Your computer is unable to connect to a target website due to filtering from your Internet access provider. This “Internet access provider” could be your residential Internet Service Provider (ISP), a corporate Internet connection, or a public Wi-Fi hotspot.
By contrast, when you configure your web browser to route web traffic through a proxy server, then access to the otherwise blocked website is unrestricted. Why? Because from the perspective of your ISP or Internet access provider, you are connecting to a “safe” server. The proxy server masks your true web browsing targets from your ISP.
Now for the good news: You can configure your Raspberry Pi as both a VPN endpoint as well as a proxy server! Take a look at Figure 17.2.
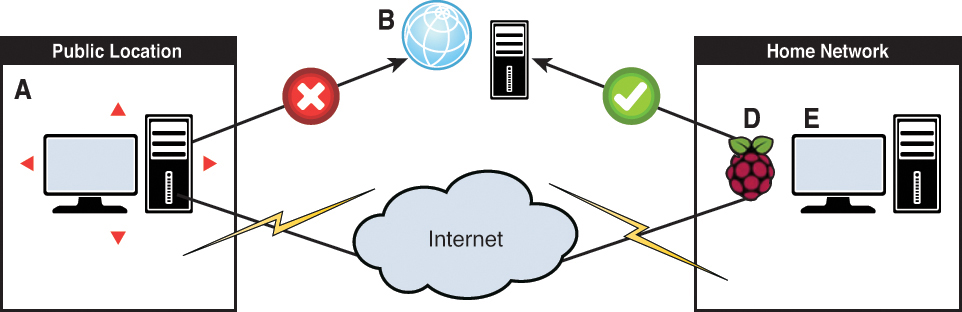
Let’s step through each point in this process:
A. This is your laptop, smartphone, or other Internet-connected device that connects to the Internet over a public, unsecure medium. This is most likely a public Wi-Fi hotspot.
B. Let’s imagine that this icon represents your target website. Your concern may be that you don’t want your logon credentials sent over your network connection in an unsecure fashion, or maybe you simply cannot connect to the target site because your Internet access provider blocks it.
C. The solution to this problem is connecting your Internet-connected device to both your configured Hamachi VPN, of which your Raspberry Pi is a member; as well as your Raspberry Pi proxy server. (I don’t show C in Figure 17.2.)
D. The Raspberry Pi, because it is a member of your internal LAN as well as your Hamachi VPN, gives you remote access to internal network resources (E) in a completely protected manner. The Pi also cloaks your point of origin on the Internet because from the perspective of your public Internet access provider, you’re not connecting to your target website, but instead to your Raspberry Pi in your home location.
Building Your Raspberry Pi VPN Gateway
Let’s get this party started, shall we? First, some good news: The good folks at LogMeIn offer Hamachi VPN for free for up to five hosts. For this test configuration, you need just two members: one is your Raspberry Pi, and the other is your desktop computer.
Before you go any further, go to the Hamachi website and register a free user account: http://is.gd/Njxokw. Your credentials will consist of an email address and a password.
In this chapter I use Hamachi as a means to an end, in other words, as a secure platform for web proxy services. However, you should be aware that Hamachi also gives you an excellent way to connect to your home network securely from anywhere in the world. Remember that all the VPN traffic is tunneled over standard web ports, so you don’t have to worry about firewall exceptions or other Internet access filters. LogMeIn has some awesome technologies!
Next, you need to download and install the Hamachi client on your desktop workstation. Visit http://is.gd/ruIvfl and get the software; LogMeIn has all the major platforms covered:
![]() Windows
Windows
![]() OS X
OS X
![]() iOS
iOS
![]() Android
Android
You can use the Hamachi desktop client to create VPNs, but you get much more flexibility by doing so from the web portal.
Task: Creating Your Hamachi VPN
1. Visit https://secure.logmein.com and log in with your account email address and your password.
2. From the left-hand navigation menu in the management console, click Networks.
3. In the Networks area, click Add Network. Add a name and optional description for your new VPN. As you see in Figure 17.3, Hamachi supports three different network topologies, each with its own characteristics.

I suggest that unless you have a compelling reason to do so that you select the Mesh network type. This configuration allows you to connect to and interact with all devices on your home or personal network. For additional details, LogMeIn publishes a wonderful Hamachi user guide; the document is available for free download at http://is.gd/tbNsMs.
4. There are two pages to the Add Network screen (though I’ve combined them in Figure 17.3). Click Continue when you’re ready to proceed to the second page.
5. The final step in creating your new network is specifying security options. I suggest you leave the default, which requires that you (the administrator) approve any requests to join your new VPN. You can add a password as well to increase security even further.
6. Finally, leave the Free subscription level as is and click Continue to proceed.
Now that you’ve reserved a VPN in the Hamachi infrastructure, let’s get your desktop client connected to it.
Task: Connecting to Your Hamachi VPN from Your Desktop Computer
1. Start up your Hamachi client and click the Power On button. I show you the interface screens for my Windows 7 computer in Figure 17.4.
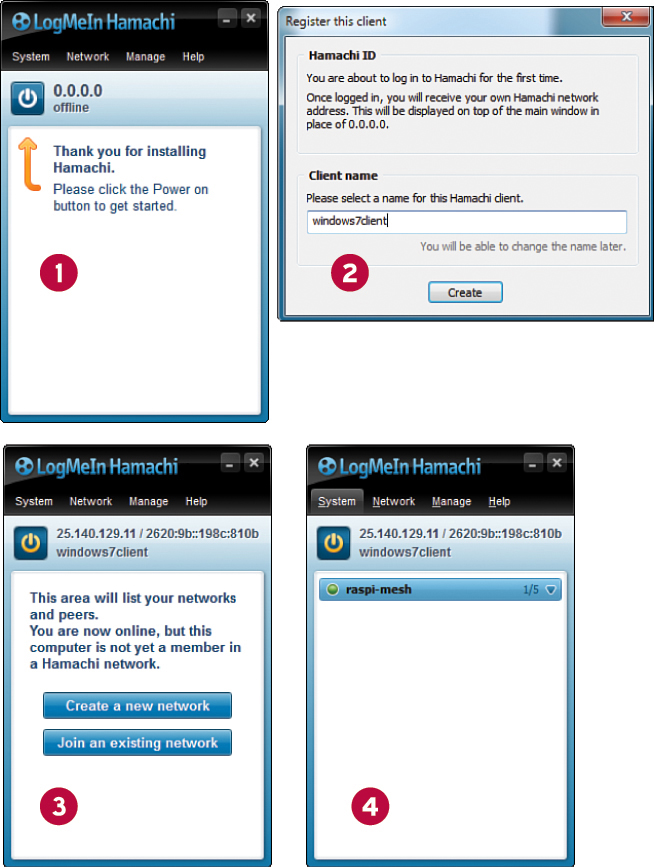
2. Provide a name (Hamachi ID) for your client computer. Make it meaningful so you’ll know instantly which computer is which when you view your VPN.
3. You now see your computer’s name and an IP address in the 25.x.y.z range in your Hamachi Control Panel. Click Join an existing network and then provide the nine-digit Network ID and optional password. You can fetch the Network ID from the web portal when you click your VPN. Next, click Join to join the network.
If you created your Hamachi VPN with the defaults, you get a message informing you that the network requires manual approval for new members. Click Yes to submit a request for membership.
4. Log in to the web portal, where you see a join request for the desktop client. Accept the request and click Save to approve. You see the Hamachi desktop client update immediately.
I help you work with your new configuration a bit later in the chapter. It’s time to install the Hamachi client on your Raspberry Pi.
Task: Installing Hamachi Client on Your Raspberry Pi
1. Establish an SSH session to your Raspberry Pi. To allow you to execute root commands without having to type sudo before every command, run the Bash shell as root:
sudo bash
2. The Hamachi client for Linux has a prerequisite: the Linux Standard Base (LSB) core libraries. Install them in the usual manner:
apt-get install -y --fix-missing lsb-core
3. Install the Hamachi Client for Linux. You should substitute the package I supply in the sample syntax with the latest version on the Hamachi Labs home page at http://is.gd/Lays35. Note that LogMeIn provides Intel 32-bit, Intel 64-bit, and ARM versions of the software. You do remember that the Raspberry Pi is an ARM device, correct?
wget https://secure.logmein.com/labs/logmein-hamachi-2.1.0.101-armel.tgz
tar -zxvf logmein-hamachi-2.1.0.101-armel.tgz
cd logmein-hamachi-2.1.0.101-armel
./install.sh
4. Start the Hamachi service (daemon):
/etc/init.d/logmein-hamachi start
5. The next three commands perform the following actions:
![]() Logging the Pi into the Hamachi network
Logging the Pi into the Hamachi network
![]() Binding the Pi to your LogMeIn account
Binding the Pi to your LogMeIn account
![]() Specifying an ID for the Pi
Specifying an ID for the Pi
hamachi login
hamachi attach <your_email_address>
hamachi set-nick raspi-proxy
6. From your desktop workstation, approve the network join request from the web console. You can see the interface in Figure 17.5.

7. Navigate to the My Networks page and add your Raspberry Pi to the Hamachi VPN you created earlier. Note that approving a connection request and joining a particular network are two separate steps.
Hamachi’s ability to allow easy peer-to-peer networks is one reason why the service is so popular among gamers. Many first-person-shooter and Minecraft players, for instance, leverage Hamachi to allow for easy LAN gaming sessions.
Building Your Raspberry Pi Proxy Server
As I said earlier, a proxy server is a computer that stands in place of another computer in terms of making web requests. Actually, that’s what the noun proxy means in the first place.
Besides providing confidentiality to hosts located behind the proxy server, the other benefit of the proxy service is that of caching. In other words, proxy servers can boost your browsing speed by serving up web pages cached locally instead of having to fetch the content from the source every time.
Nowadays you don’t need specialized hardware and software to set up a proxy server. In this chapter we use the free and open source Privoxy (pronounced prih-VOX-ee from http://privoxy.org). Privoxy is fast, easy to configure, and flexible. However, you should be aware that Privoxy is a non-caching HTTP proxy, which is fine because the goal here is confidential, restriction-free web browsing, not necessarily a performance boost.
Before you undertake the following procedure, make a note of the 25.x.y.z IP address that Hamachi reserved for your Raspberry Pi. You use that IP address as the proxy server endpoint address.
Note: What Does 25.x.y.z Mean?
As it happens, LogMeIn owns at least a portion of the 25.0.0.0/8 IPv4 address space. Thus, the Hamachi service can dish out globally unique IP addresses to its customers within this range. You might recall that all hosts on the same IP subnet can communicate directly with each other.
Testing the Configuration
Alrighty then! You have your VPN and proxy all set up and ready to test. Sit down at your desktop computer and turn on your Hamachi network. Verify that your Raspberry Pi also shows up in your Hamachi Control Panel.
Open your web browser and navigate to the following website:
http://privoxy.org/config
The resulting configuration page should say Privoxy is not being used. This is an expected result because you haven’t configured your desktop PC to route HTTP web traffic through your Raspberry Pi proxy. You can see what this page looks like in Figure 17.6.
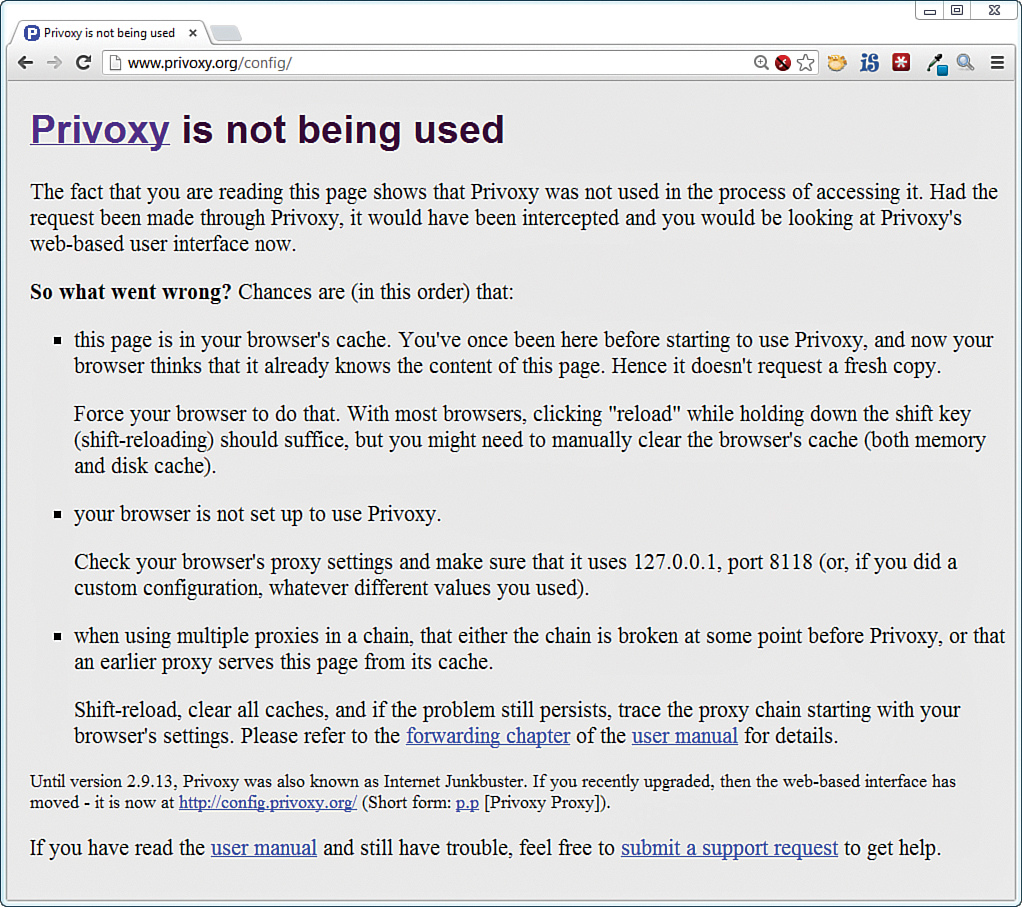
FIGURE 17.6 The Privoxy config page tells you instantly whether or not your browser session is being proxied.
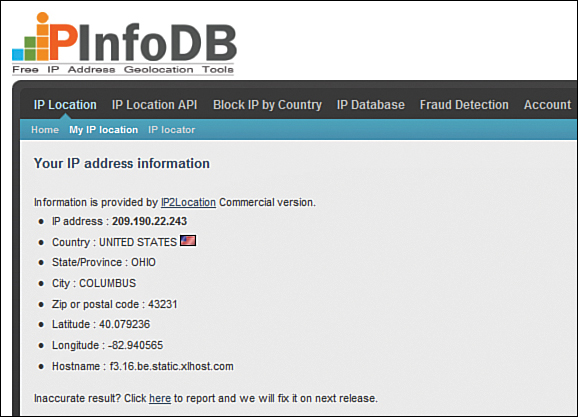
Now point your browser to the IP Info Database (http://is.gd/23sxDf) or an equivalent site and verify your system’s public IP address and geolocation. Of course, you need to do this from an IP address/location different from where your Raspberry Pi is located.
Fortunately, I have some computers located in different areas of the United States. To that point, I show you the before proxy information for my Windows 7 workstation, located in Columbus, Ohio, in Figure 17.7.
Now you need to configure your web browser to use a proxy server. For this example I’ve used Internet Explorer, but here are some references to online tutorials to perform this action on other popular browsers:
![]() Chrome (Windows, OS X): http://is.gd/RB2WYa
Chrome (Windows, OS X): http://is.gd/RB2WYa
![]() Chrome (Android): http://is.gd/XRoYeS
Chrome (Android): http://is.gd/XRoYeS
![]() Firefox: http://is.gd/oTyHmD
Firefox: http://is.gd/oTyHmD
![]() Safari (OS X): http://is.gd/9cZgje
Safari (OS X): http://is.gd/9cZgje
![]() Safari (iOS): http://is.gd/znmAwg
Safari (iOS): http://is.gd/znmAwg
![]() Opera: http://is.gd/XI3KJ9
Opera: http://is.gd/XI3KJ9
Task: Pointing Your Workstation Computer at Your Pi Proxy
1. Open up the Internet Explorer web browser and open the gear menu in the upper right of the window. Next, click Internet Options.
2. In the Internet Properties dialog box, open the Connections tab and then find and click the LAN Settings button. I show you both dialog boxes in Figure 17.8.

FIGURE 17.8 The process of configuring a web browser to tunnel traffic through a proxy is about the same regardless of the application or OS platform.
3. Under Proxy Server, select the option Use a proxy server for your LAN and enter your Raspberry Pi’s Hamachi IP address. Make sure to use 8118 as the port number.
4. Click OK out of all dialog boxes and restart your browser.
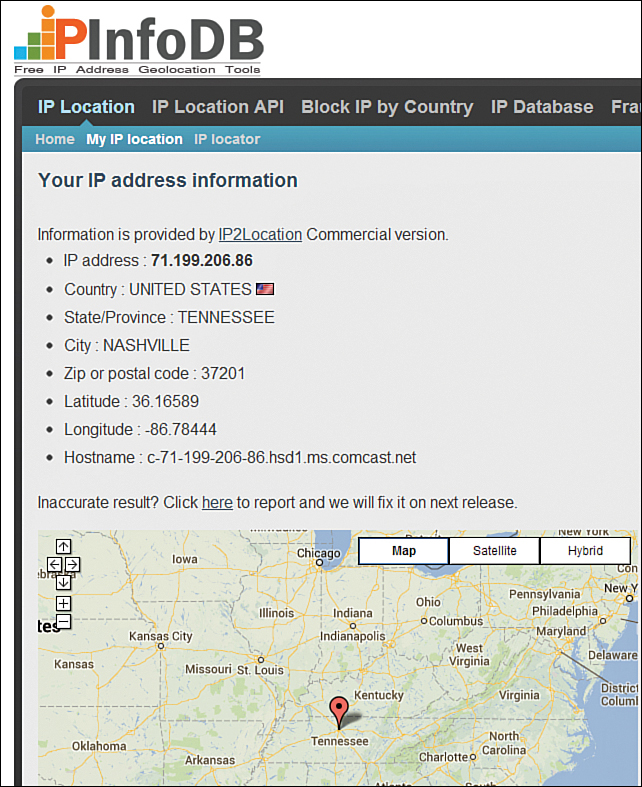
FIGURE 17.9 My workstation’s “post Proxy” address shows it as originating in Nashville, Tennessee, where my Raspberry Pi resides.
For the duration of your web browsing session, you not only mask your workstation’s IP address location, but you also provide for data confidentiality because all traffic flowing within the Hamachi VPN is fully encrypted.
Just for grins, I figured that you would be interested in the “What’s My IP” type websites. To that end, here are a few more for you to try out and experiment with (some expose an API that is scriptable!):
![]() What is My IP?: http://is.gd/uIhmYK
What is My IP?: http://is.gd/uIhmYK
![]() IP Chicken: http://is.gd/WRPm0J
IP Chicken: http://is.gd/WRPm0J
![]() WTF is My IP?: http://is.gd/a6ARdP
WTF is My IP?: http://is.gd/a6ARdP
![]() IP2Location: http://is.gd/S1cd19
IP2Location: http://is.gd/S1cd19
Speaking of Geolocation...
Do you remember in Chapter 4, “Installing and Configuring an Operating System,” when I briefly mentioned the Rastrack website? Let’s spend just a couple minutes discussing it now, as its operation relates somewhat to privacy and security issues.
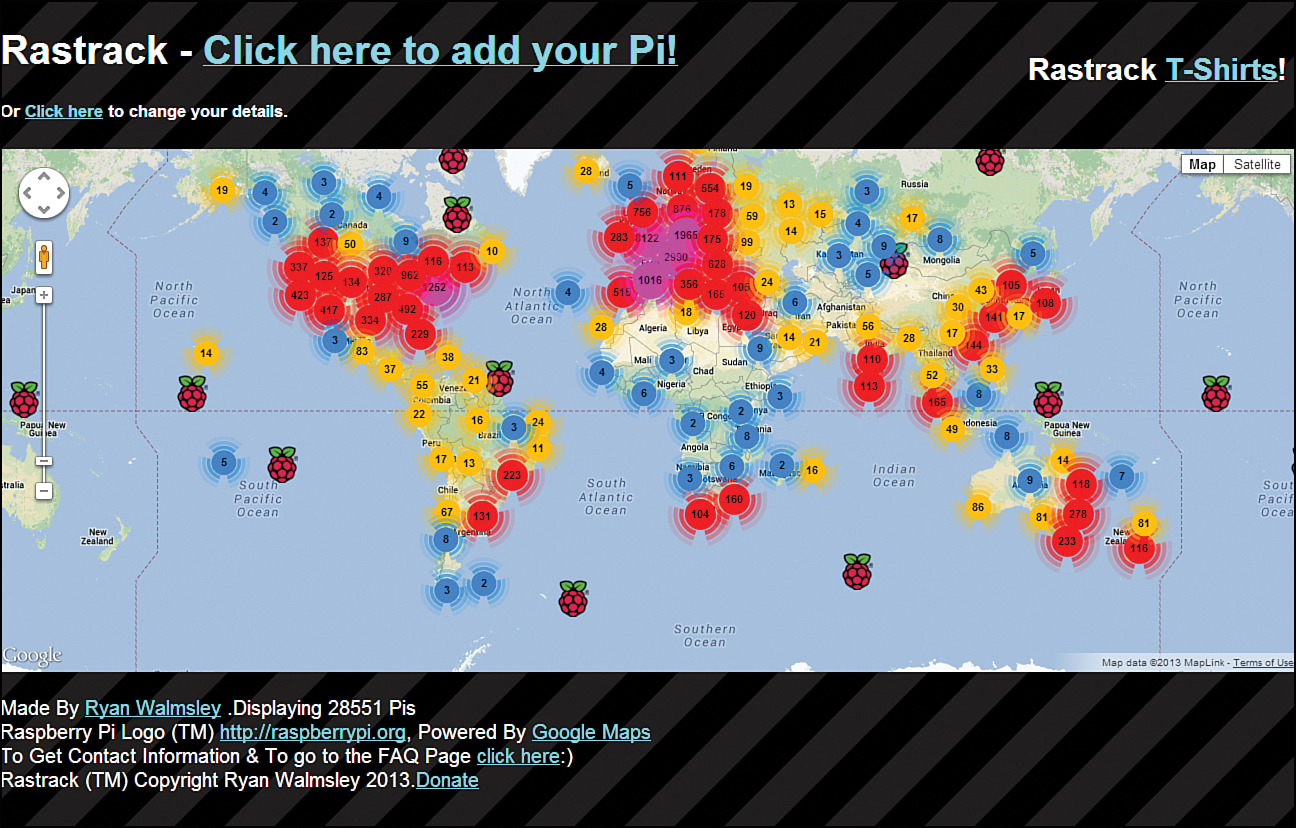
Rastrack (http://is.gd/sGStJL) is a map that shows the general location of Raspberry Pis throughout the world. Of course, only Pi owners who volunteer this information contribute to the map. Also Ryan Walmsley (http://is.gd/lUb70X), a British high-school student who created the site, has no verification scheme in place to prove that registrations come from actual Raspberry Pis. You can see what the Rastrack map looks like as of this writing in Figure 17.10.
Given the context of this chapter, you might wonder if Rastrack uses IP address geolocation to determine the physical location of your Pi. The answer is no and yes.
Ryan has not specifically coded any geolocation into Rastrack. Instead, he plots user-provided data through the Google Maps API, which gives a general location based on a combination of your ISP’s IP addressing metadata and the address information you provide to the site.
For instance, check out Figure 17.11. My Zip code 37221, and the map result places my Pi directly in the middle of that Zip code zone, not necessarily anywhere near the Pi’s actual location on the globe.
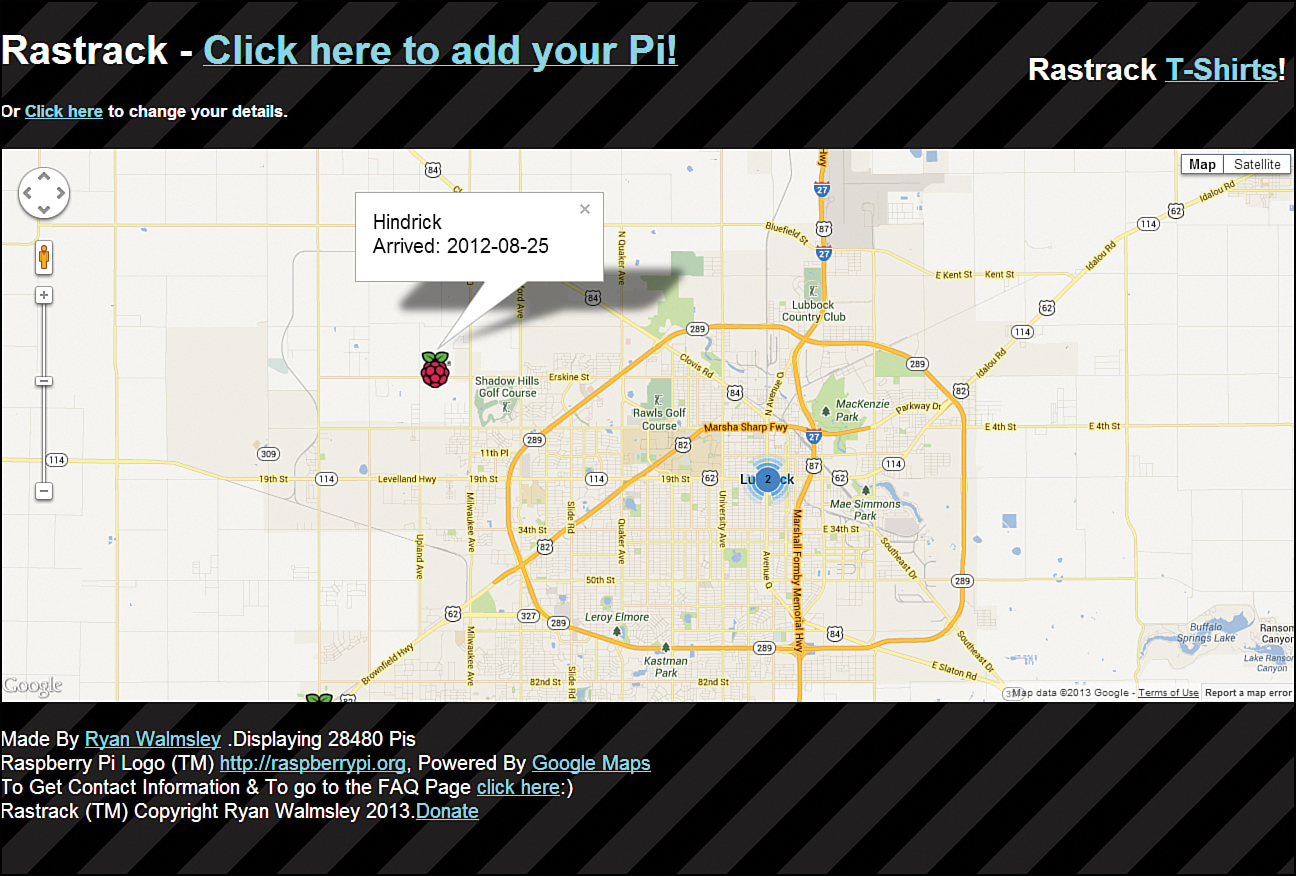
FIGURE 17.11 The Rastrack map plots location based on user-specified information and Google Maps metadata.
Why would you want to add your Raspberry Pi to Rastrack? Well, I’ve found that the Raspberry Pi community is a passionate one and folks are eager to share information with each other. It’s pretty cool to see all the Raspberry Pi devices registered in most countries in the world.
By contrast, any time you expose computer system details to the public, that opens the door for a malicious user to think, “Aha! There are four Raspberry Pis in my neighborhood. Maybe I’ll try some reconnaissance and see if I can penetrate their networks!” Sad to say, this kind of activity is much more common than you might think.
Task: Adding Your Raspberry Pi to the Rastrack Database
1. From LXDE on your Pi, open up Midori or your favorite web browser and browse to the Rastrack website:
http://rastrack.co.uk/
2. Click Click here to add your Pi and fill out the form by providing the following details:
![]() Name or Nickname: Required.
Name or Nickname: Required.
![]() Twitter Username: Optional.
Twitter Username: Optional.
![]() Date of Arrival: Required. Use format YYYY-MM-DD.
Date of Arrival: Required. Use format YYYY-MM-DD.
![]() Email: Required. This field is important because it serves as your ID if you ever want to edit or remove your Pi location registration.
Email: Required. This field is important because it serves as your ID if you ever want to edit or remove your Pi location registration.
![]() Location: Required. I had the best luck by providing a postal (Zip) code here.
Location: Required. I had the best luck by providing a postal (Zip) code here.
![]() Human Verification: Required. This field is meant to prevent spam bots from submitting erroneous registrations. The technology used here and in many websites is called Completely Automated Public Turing Test to tell Computers and Humans Apart (CAPTCHA, and no, I’m not kidding). You can learn more about CAPTCHA by visiting http://is.gd/zsKPcW.
Human Verification: Required. This field is meant to prevent spam bots from submitting erroneous registrations. The technology used here and in many websites is called Completely Automated Public Turing Test to tell Computers and Humans Apart (CAPTCHA, and no, I’m not kidding). You can learn more about CAPTCHA by visiting http://is.gd/zsKPcW.
Building a Raspberry Pi Tor Proxy
Have you heard of The Onion Router (Tor) network? Tor (http://is.gd/tQul4e) is free software as well as an open network that provides users with excellent privacy by routing network traffic through a series of distributed Tor routers, none of which has knowledge of the complete end-to-end path of the communications.
Take a look at Figure 17.12, and I’ll walk you through the basic mechanics of Tor.
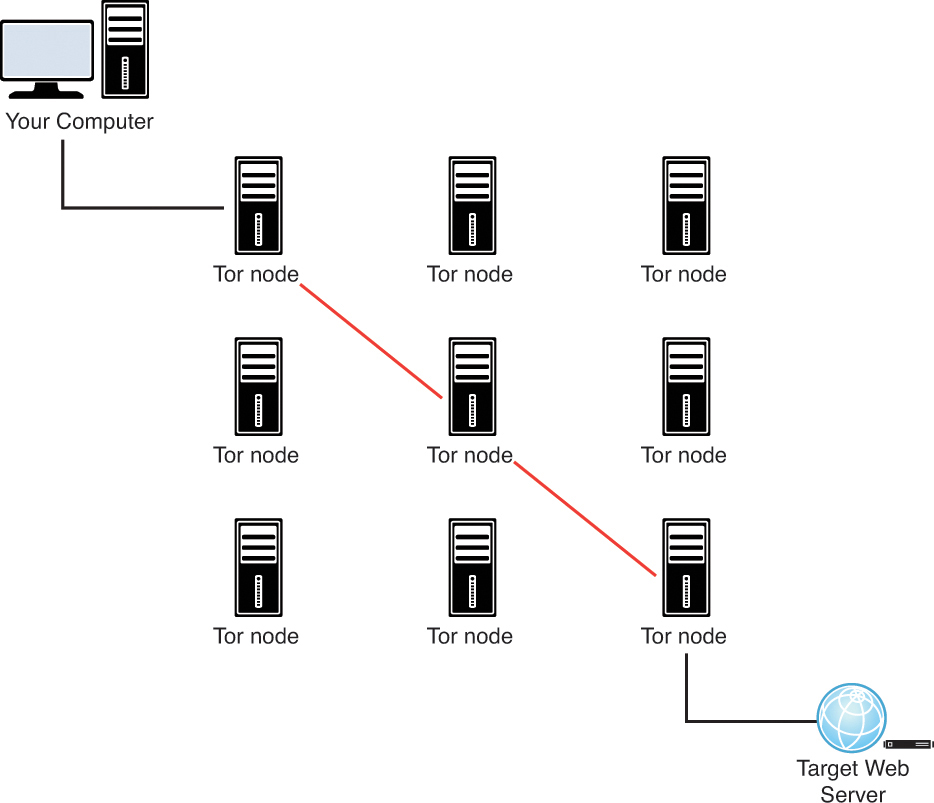
The client software running on your computer selects a random path through the Tor network for every data packet that is transmitted. The intermediate Tor routers, which are formally called nodes, have no knowledge of the full routing path; they basically forward each packet to a randomly selected next hop address and forget about the transmission.
As I said earlier, the exit node is the vulnerable point in the Tor network because it is possible for a malicious individual to configure his computer as a Tor exit node, sniff unencrypted traffic from the Tor network, and glean potentially privacy-busting data about the data transmission originator.
The good news is that you have to take deliberate configuration steps to become a Tor exit node. For the vast majority of Tor users, their data is safe so long as they practice good web browsing hygiene such as enabling SSL and not leaking any personal information via web forms.
Routing select web traffic through the Tor network gives you the following advantages:
![]() Your source IP address and geolocation are completely obfuscated to anybody who tries to execute a man-in-the-middle attack on your computer.
Your source IP address and geolocation are completely obfuscated to anybody who tries to execute a man-in-the-middle attack on your computer.
![]() All data transmitted within the Tor network is encrypted. However, unless you are using HTTPS or another encryption technology, your unencrypted data that enters the Tor network emerges from that network equally unencrypted.
All data transmitted within the Tor network is encrypted. However, unless you are using HTTPS or another encryption technology, your unencrypted data that enters the Tor network emerges from that network equally unencrypted.
The main disadvantage to Tor is the same as what we see with some corporate VPNs; namely, tremendously slow speeds. You do not want to use Tor for ordinary web browsing, trust me. Network traffic through the Tor network moves slower than I remember browsing with a 14.4Kbps analog modem in the mid-1990s. Don’t even think of sending or receiving binary files over the Tor connection. Doing so is disrespectful to the people who make up the Tor community. Instead, use the Tor network only when privacy is your principal concern.
In this section I want to give you the high-level overview for configuring your Raspberry Pi as a Tor proxy. Due to space constraints (the actual step-by-step is fairly involved), I’m going to turn you over to Adafruit, which worked up a couple wonderful tutorials on how to enact this configuration:
![]() Adafruit Raspberry Pi Wireless Access Point Tutorial: http://is.gd/MlMNEP
Adafruit Raspberry Pi Wireless Access Point Tutorial: http://is.gd/MlMNEP
![]() Onion Pi Tutorial: http://is.gd/7EHgqx
Onion Pi Tutorial: http://is.gd/7EHgqx
Note: What Does an Onion Have to Do with an Anonymous Network?
The onion is not only the logo icon for the Tor project, but also represents the network itself and a non-public DNS top-level domain. As it happens, you can build your own web server that exists entirely within the Tor (onion) network. These so-called hidden service sites use special DNS addresses called onion URLs that end with the .onion domain.
You can view a schematic of the Raspberry Pi Tor proxy in Figure 17.13.

FIGURE 17.13 Schematic showing how you can set up your Raspberry Pi Tor proxy and wireless access point
As you can see, you can install open source software to configure your Raspberry Pi as a wireless access point. Because the Pi is multi-homed (that is to say, it has more than one network interface), you can use the Wi-Fi connection as your entry point for Tor communications and the wired Ethernet connection as your gateway to the Internet.
Therefore, the workflow for using this special Pi is as follows:
![]() You bring your Onion Pi device to a hotel, conference, or other location and plug the Ethernet interface into a live Internet connection.
You bring your Onion Pi device to a hotel, conference, or other location and plug the Ethernet interface into a live Internet connection.
![]() You then use your laptop or mobile device to join your personal Onion Pi Wi-Fi network whenever you need Tor-protected browsing.
You then use your laptop or mobile device to join your personal Onion Pi Wi-Fi network whenever you need Tor-protected browsing.