
Lesson 7. How to Chat with Friends Online
Time
This lesson takes approximately 15 minutes to complete.
Goals
To set up your Mac to use text, audio, and even video chatting using Apple’s iChat software, then to converse with friends and co-workers via the Internet using iChat.
Text chatting (the ability to have an online conversation by typing messages between computers) has been around for years now, and Mac OS X Tiger comes with one of the best-designed, best-implemented, and most fun interfaces for text chatting that’s available today. But if you just text chat, you’re missing one of the coolest experiences you can have on your Mac—video chatting. iChat AV lets you text chat, audio chat (which is kind of like an internet-based phone), and, of course, video chat. You only need two extra things to start video chatting: a video camera and a high-speed Internet connection. Apple makes a brilliant camera called iSight that’s custom designed to work with iChat and your Mac. It’s really an engineering marvel, in that it requires no configuration—you just plug it in, launch iChat, and it works. It’s a beautiful thing. If you don’t have an iSight camera (they’re available at either Apple.com or your local Apple Store), you can even hook up your own personal digital video camcorder and use it instead (but trust me, if you’re going to be doing a reasonable amount of video chatting, you’ll want an iSight camera). In this chapter, you’re going to learn how to text chat, audio chat, and video chat, all using the slickest chatting software available anywhere. Best of all, it comes free with Mac OS X Tiger.

STEP ONE (Launching iChat):
To start chatting with your friends, your first step is to launch iChat by clicking on the iChat icon in the Dock at the bottom of your screen (its icon looks like a blue cartoon conversation bubble with a white movie camera icon in the middle). The first time you launch iChat, a window will appear to help you configure it. When it appears, click the Continue button.
STEP TWO (Creating Accounts So You Can Chat):
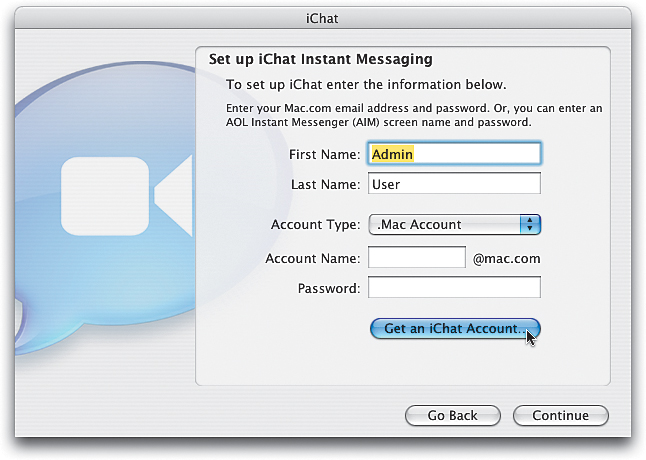
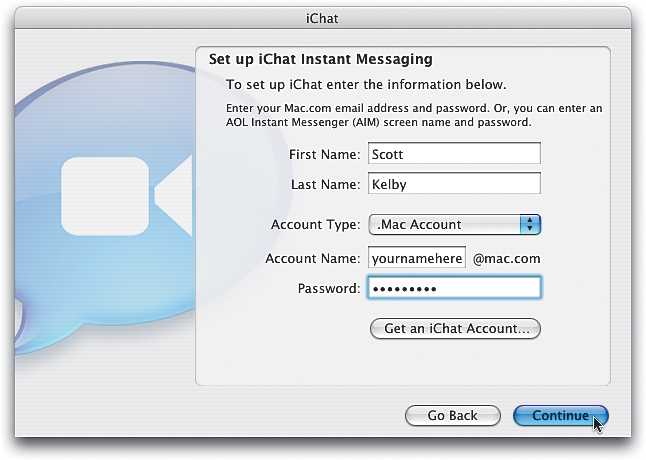
To use iChat, you will need either an America Online Instant Messenger account (called an AIM account, which is an acronym for AOL Instant Messenger) or a .Mac account with Apple (which I strongly urge you to sign up for, but email and chatting is just a small part of why you should have a .Mac account—more on this later). If you have a .Mac account, you can enter your Account Name and Password in the fields provided. If you don’t have a .Mac account yet, you can get an iChat account and a 60-day free .Mac trial by clicking on the Get an iChat Account button that appears just below the Password field in the iChat setup window. This takes you to a website where you can sign up for the free trial (it also tells you some of the benefits of getting a .Mac account, so take a minute or two to check it out). Otherwise, you can create an AIM account (by visiting www.aim.com and downloading the AIM software). The website will have an online form in which you create an AIM account (and it’s free).
STEP THREE (Preparing iChat):
Once you sign up and get a screen name and password (be it .Mac or AIM), enter that info into the iChat setup window. Then, click the blue Continue button. In fact, keep hitting the Continue button until it turns into the Done button. Once it shows the Done button, click it—it’s time to chat!
STEP FOUR (Asking for Your Friends’ Screen Names):
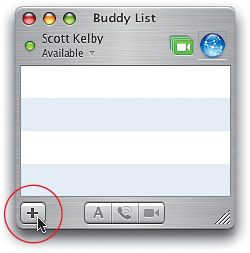
Alright, now that you’ve configured your iChat, the Buddy List window will appear onscreen. This is where you put the screen names of your friends and co-workers who either have .Mac or AIM accounts. So how do you find your friends’ screen names? It’s simple. You ask them. Drop them an email, mention that you want to add them to your Buddy List, and if they like you, there’s a reasonable chance they’ll give you their screen names. Once you have those, you’ll want to enter them into your Buddy List, so anytime they’re online and available for a chat, you’ll be able to simply double-click on their name in your iChat Buddy List and invite them to chat. You enter their screen name by going under iChat’s Buddies menu (at the very top of your screen) and choosing Add Buddy (or click on the plus sign [+] button in the bottom-left corner of the Buddy List window).
STEP FIVE (Searching for Friends’ Screen Names):
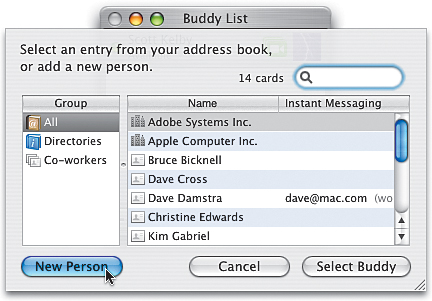
If you have their information already entered in your Address Book (including their screen name), you can just enter their name the Search field in the top-right corner of the window to find their screen name and iChat will do the rest. However, if you haven’t had a chance to enter their screen name into your Address Book yet, just click on the New Person button in the bottom-left corner of the window.
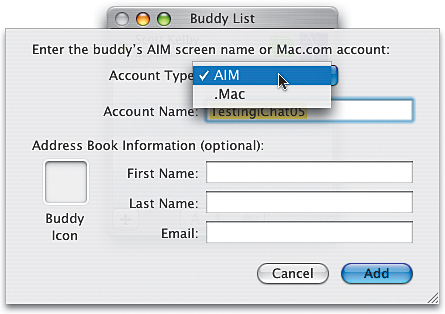
STEP SIX (Adding Screen Names):
A new window will pop down in which you can choose the type of account the person has (either .Mac or AIM), and then their Account Name (screen name). If you want, you can enter a first and last name and email address, which will then be added to your Address Book, but adding them is optional. Once the info is entered, click the Add button, and you have your first buddy.
STEP SEVEN (Seeing Who Is Available to Chat):
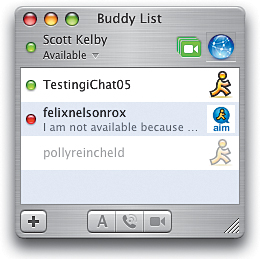
Once you’ve entered one or more friends to your Buddy List, their screen names will appear in the Buddy List window. If they’re offline, their names will be “grayed out,” and double-clicking on them won’t do anything because they’re not online—you can only chat with people who are both online and have iChat open. However, if they’re available online, their name will appear in black. If they’re available to chat now, you’ll see a green dot appear before their name. If you see a red dot before their name, it means that they’re online, they have iChat open, but for some reason they’re not available to chat right now (maybe they’ve stepped away from their computer, they’re on a phone call, etc.). If you see a yellow dot before their name, that shows their computer is idle, meaning they haven’t used their computer for a while, so there’s a good chance they stepped away from their computer while still logged into iChat. Glancing at these colored buttons instantly lets you know whether the person you’re about to contact is available for chat.

STEP EIGHT (Inviting Someone to Chat):
So let’s say you see a buddy is online (their name appears in black and they’re available to chat now because there’s a green button before their name). If you want to invite them to a text chat, just double-click on their name and a chat window will open. You’ll see the icon representing you (hopefully it’s not a soccer ball) in the top of the window and at the bottom is a text field where you type your invitation. You can type in anything you like here (it can be as simple as “Hi!”). Once you’re done typing, press the Return key and you’ll see your “Hi!” appear in a conversation bubble beside your name and image icon.
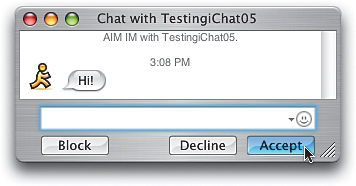
STEP NINE (What Your Buddy Sees):
At the same time, a tiny window will pop up on your buddy’s screen indicating there’s a chat message waiting. (For example, if I were inviting you to a chat, it would say “Chat with Scott Kelby.”) When your buddy clicks anywhere on the window (that is, if they’re using iChat too), it expands into an instant chat window with buttons from which your buddy can choose: (1) Decline: This simply makes your message disappear from their screen without any explanation required, meaning they simply aren’t going to respond to you. (2) Block: They’ll only choose this if they’re mad at you, because this blocks you from ever inviting them to chat again. This was designed for iStalkers. (3) Accept: If your buddy chooses to accept your invitation, they can type something in their text field, press the Return key, and reply back to you (and you’ll see their responses on the left side of your chat window).

STEP TEN (Ending Your Chat):
Once your buddy responds, the chat is on—so start typin’! To end your chat, first be sure to tell the person goodbye (hey, it’s only polite), then click on the red button in the top-left corner of your chat window. This closes the window and ends your chat.
STEP ELEVEN (Adding Your Photo Icon):
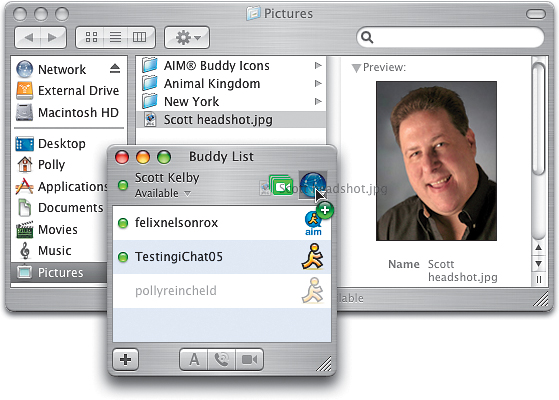
When you talk in a text chat, you’re likely represented by either a blue globe icon or a soccer ball icon by default. That’s great if you indeed look like a soccer ball or a blue globe, but the whole experience will feel much more natural (and more conversational) if you use your photo instead, rather than Apple’s blue globe icon, which is kind of worldly, yet somewhat impersonal. First, you’ll need to import a photo of yourself (preferably a head shot) into your Mac (you can go to Lesson 4 “Importing Photos” if you don’t know how). Your photo will wind up in the Pictures folder on your hard disk, so open that folder, find your head shot, click-and-hold on it, then drag-and-drop it onto the blue globe (or ball) icon in iChat.

STEP TWELVE (Adjusting Your Photo Icon):
Once you drag-and-drop your picture on the iChat icon, the Buddy Picture editing window will appear. The clear rectangle in the middle of the dialog shows what area of your photo will appear—the shaded areas will be cropped away. To reposition your photo so it better fits in that clear rectangle, you can click-and-hold directly on your photo, then drag your photo around to where you want it. You can also change the size of your photo by dragging the slider directly under the photo editing area. When the position and sizing look good to you, click the Set button (in the bottom right of the window), and you’re set (sorry, that was lame).

STEP THIRTEEN (Audio Chats):
If both you and the person you want to chat with have built-in microphones (you both have a PowerBook, iBook, iMac, or eMac), you can choose to audio chat. If they’re available for an audio chat, a green telephone icon will appear to the immediate left of their photo (or globe icon, etc.) on the right side of the Buddy List window. To invite them to an audio chat, just click directly on that green telephone button, and a little audio chat invitation window will appear on your buddy’s screen, with an audible ringing sound (kind of like a phone). It will continue to ring until your buddy clicks on the window. At that point, your buddy has the same answering options as with a text chat: They can Decline (in which case, you’ll see the message “Your Buddy has declined your invitation,” which will usually initiate a call to your therapist); they can send a Text Reply (in case they’re on the phone); or they can Accept, in which case it will take just a few seconds to connect, then you can start talking. Note: To quit the audio chat, click the small red button in the top left-hand corner of the window.

STEP FOURTEEN (Muting Your Audio Chat):
If you need to mute your audio (you need to sneeze or make other unpleasant audible sounds), click on the Mute button (it looks like a microphone with a line through it) in the audio chat window. The green voice level meter will turn orange to let you know you’re muted. To resume speaking, click the Mute button again. If you want to add other people to your audio chat (you want an audio conference), just click on the plus sign (+) button to the left of the Mute button, and you can then invite additional buddies to the audio chat.

STEP FIFTEEN (Preparing for a Video Chat):
If you have one of Apple’s iSight cameras, you can use iChat to do live realtime video chats. (If you don’t have an Apple iSight, you can buy one at Apple.com or your local Apple Store. I have to say, they’re brilliantly designed and require no configuration at all—you just plug them into the FireWire port on your Mac and they work—first time!) Okay, so basically the first part is doing just that—plugging the FireWire cable that comes with your iSight camera into the FireWire port on your Mac. Then, place the camera on the top of your monitor (a mounting bracket comes with the camera) and launch iChat. You’ll see a little green camera button appear to the left of your photo (or icon) in the top-right corner of the iChat window, which lets you know your camera is hooked up and ready to go (also, now your buddies will see that your camera is hooked up and ready to go).
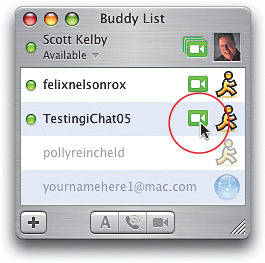
STEP SIXTEEN (Inviting a Buddy to a Video Chat):
To invite one of your buddies to a video chat, all you need to do is click on the green camera icon that appears to the left of their photo in the Buddy List window (if you don’t see a camera icon to the right of their screen name next to their icon, they don’t have their camera hooked up). When you do this, a new window appears, and it shows a preview of the view from your camera, so you can reposition it, comb your hair, etc., and while it’s previewing, it’s contacting your buddy. If your buddy accepts your invitation, they will appear full size in your preview window, and your preview image will shrink down to the right-hand corner (kind of like picture-in-picture on a TV set). That’s it—you’re video chatting.

STEP SEVENTEEN (Video Chatting with More Than One Person):
If you’ve got a pretty fast Mac (like a Dual 1-GHz G4 or any G5), you can have a video conference with up to three of your buddies (provided, of course, they all have iSight cameras connected to their computers). Here’s how it works: Just click on the first person you want in your video conference, then hold the Command key on your keyboard (that’s the one with the Apple logo on it, just to the left of the Spacebar on your keyboard) and click on the other people in your Buddy List that you want in your video conference to select them. Now, click on the Start a Video Chat button (it looks like a video camera) at the bottom of your Buddy List window to invite them to your video conference. The ones that accept will join in and will be displayed in separate windows within the iChat window. To end your video chat, wave goodbye (just kidding), then click the red button in the upper left-hand corner of your iChat camera window.