
Lesson 4. Getting Photos into Your Mac (Viewing, Editing, and Printing)
Time
This lesson takes approximately 30 minutes to complete.
Goals
To import photos from your digital camera, then view, edit, crop, and print them using Apple’s iPhoto application.
Digital photography has changed the way we use our cameras, and important as the digital camera is, without a computer to view and edit those photos, the digital photography revolution never would’ve happened. Luckily, Mac OS X Tiger was built with digital photographers in mind, and it comes with an amazing application called iPhoto that lets you import, organize, print, and share your photos, all in a very intuitive, fun way. Also, because of the way Macs are designed, getting your digital photos into your computer is a breeze. That’s because most of today’s digital cameras come with a USB cable that lets you connect your camera directly to your Mac (if yours didn’t come with that cable, or you can’t find your cable, you can buy a digital memory card reader for as little as ten bucks online or from your local camera store). That’s all you need to enter the world of sorting, editing, and printing your digital camera photos on your Mac. In this lesson, we’ll look at how to import photos, create a slide show using your photos, edit and crop your photos, share them, print them, and just about anything else you want to do with photos—and we’re going to do all that within one brilliant little application called iPhoto.

STEP ONE (Connecting Your Camera to Your Mac):
When you bought your digital camera, chances are it came with a USB connector cable so you can transfer photos from your camera to your computer. If for some reason you can’t find your cable (or your camera didn’t have one from the start), you could buy a replacement cable. However, I recommend that you instead buy an inexpensive memory card reader (you can find digital camera memory card readers at Apple.com, the Apple Store, or wherever digital cameras are sold). Here’s how they work: You turn off your digital camera, eject your memory card from your camera, and then slide your memory card into your card reader. You then take the card’s USB connector and insert it into your Mac’s USB port. Once you do this, your Mac will instantly recognize that you’ve connected a digital camera (or memory card reader). Automatically, iPhoto will launch (the application we use to import, organize, edit, and print photos) so you can begin importing your photos. Likely, this is your first time launching iPhoto, so you’ll see a Welcome screen pop up asking if you want to use iPhoto as your default image editor. Click the Use iPhoto button, and the iPhoto interface will appear.

STEP TWO (Importing Photos from Your Digital Camera):
When iPhoto appears, it knows you have a digital camera connected, so it’s ready to import your photos, and to let you know that it displays a large icon of a digital camera in the center of its main window (as shown above). It will also let you know how many photos it finds on your camera’s memory card by telling you it’s ready to import X number of photos. All you have to do to import those photos (from your digital camera into iPhoto) is click on the Import button in the bottom right-hand corner of iPhoto’s window (see, I told you this was easy), but don’t click it just yet.
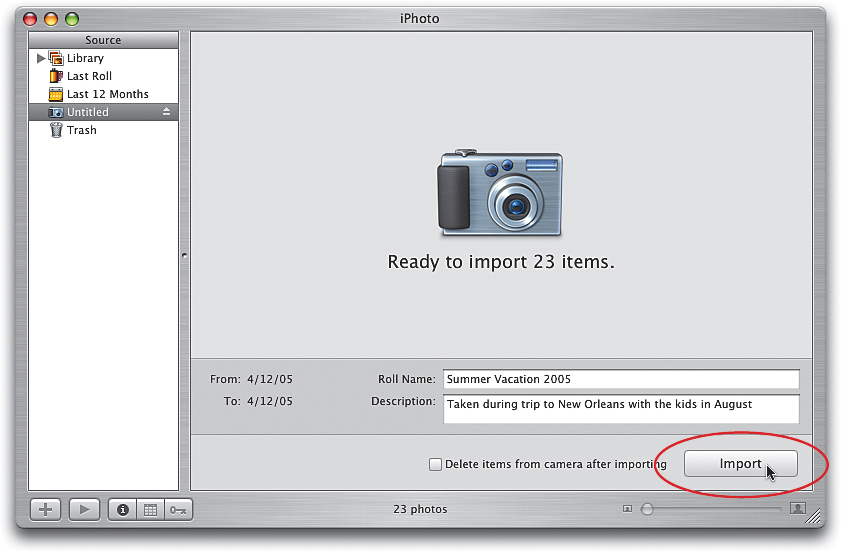
STEP THREE (Organizing Your Photos Before You Import):
Before you click the Import button, to help you keep things organized, I recommend clicking in the Roll Name field near the bottom of iPhoto’s window and typing a name for this roll of “digital film” (for example, you might name this roll “Summer Vacation 2005”). Then, click in the Description field directly below it and type a brief description (for example, “Taken during trip to New Orleans with the kids in August”). Now, click the Import button to bring your photos into iPhoto.
©SCOTT KELBY
STEP FOUR (Disconnecting Your Camera or Memory Card Reader):
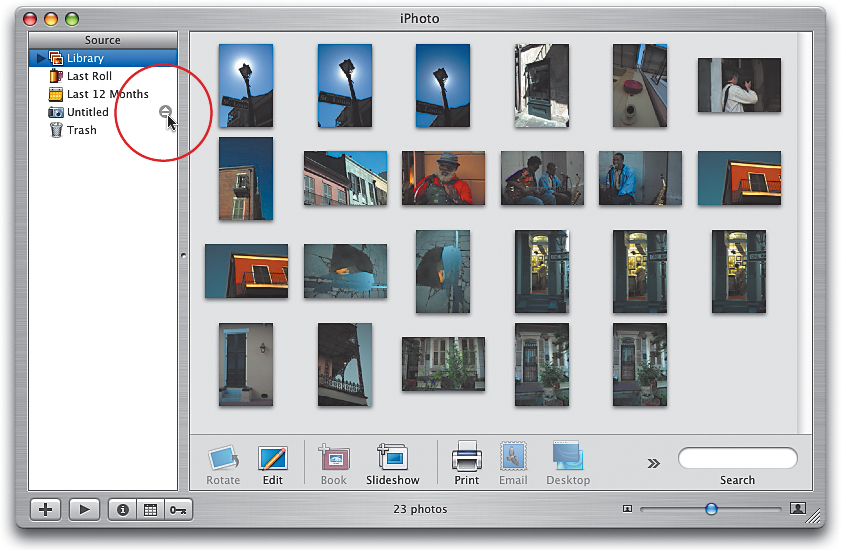
Once you’ve imported your photos, you no longer need to have your digital camera or memory card reader attached to your computer. If you look in the Source list on the left side of iPhoto, you’ll see your camera listed by name (if iPhoto doesn’t recognize your camera’s name, it appears as “Untitled”). To eject your camera (or card reader), just click on the little Eject icon that appears to the far right of its name (it’s circled above). It’s now safe to remove the USB connector cable from your Mac.

STEP FIVE (Viewing Your Imported Photos):
Once your photos are imported, you’ll see small versions of photos displayed in iPhoto’s main window (these small versions of your photos are called “thumbnails”). You can change the size of these thumbnails by clicking-and-dragging on the slider in the bottom right-hand corner of iPhoto’s window (shown circled above). Click-and-drag the slider to the right to make the thumbnails larger; drag to the left to make them smaller (making them smaller makes more of them visible, since they take up less space onscreen). Depending on how many photos you import, all of them may not be visible onscreen at once. If that’s the case, a scroll bar will appear on the right side of the iPhoto window (it looks like a blue pill-shaped bar). With your mouse, click-and-drag that blue bar up or down to display the rest of your photos.

STEP SIX (Editing Your Photos for Contrast and Color):
One of the most amazing things about iPhoto is the power it has to let you fix problem photos (i.e., photos that are too light, too dark, slightly blurry, lacking contrast, have “red eye,” etc.) and enhance photos (by adding sepia tone effects, converting them to black and white for dramatic effect, cropping your images for maximum impact, and a host of other things that take your photos from flat to fabulous). The process of enhancing or fixing your photos is called “editing.” This editing is done in a separate window that displays your photos at a larger size (helpful when editing). To edit a photo, just double-click directly on its thumbnail and it will open in iPhoto’s editing window. At the bottom of this editing window is a row of buttons, and each performs a different photo fix. Perhaps the most popular is the Enhance button. By clicking this button once, iPhoto adjusts the color and contrast of your photo, often with amazingly good results. So double-click on one of your photos that looks kind of flat and lifeless, and then click this Enhance button to see for yourself (as I did here). Note: After you’ve clicked Enhance, you can see a before-and-after preview by pressing the Control key (it’s on the far left on your keyboard) a few times.

STEP SEVEN (Removing Red Eye):
One of the other digital photography problems you’re likely to face is the dreaded “red eye” (where the person’s eyes appear red in the photo, which is caused by the flash being too close to the lens, among other things). If you have a photo where the subject has red eye, double-click on the photo’s thumbnail to open it in the editing window. Zoom into your image by clicking-and-dragging the slider (in the bottom-right corner of the editing window) to the right. Then, click on the Red-Eye button in the bottom center of the editing window. (Note: If you don’t see the tool in the bottom of the window, click-and-hold on the double right-facing arrows until a menu appears, and then choose Red-Eye from the list.) Your cursor will change to a crosshair, so click with your mouse over each eye, and in seconds the red eye will be gone. Once you’re finished, click on the X in the top-left corner of the red-eye box along the bottom of your photo.
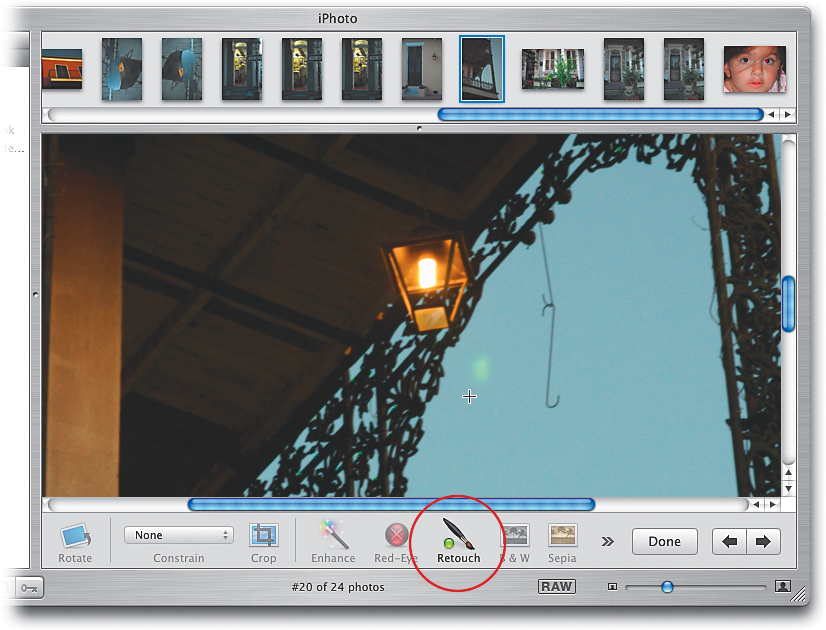
STEP EIGHT (Retouching a Photo):
There are other changes you can apply in this editing window, including one-click buttons for converting your photo to black and white or to a sepia tone (which applies an orangey tint to your photo). There’s also a retouching brush, which lets you remove spots, specks, blemishes, acne, and other little stuff that needs removing. To use the retouching brush, click on the Retouch button, and once your cursor changes to a crosshair, click on the blemish, mole, wart, speck, etc., that you want to retouch. It may actually take a few clicks before it’s gone. Note: You may need to zoom into your image, so click-and-drag on the slider in the bottom-right corner of the editing window. Then, position your image onscreen using the scroll bars that appear along the bottom and to the right of your image.

STEP NINE (Creating an Album):
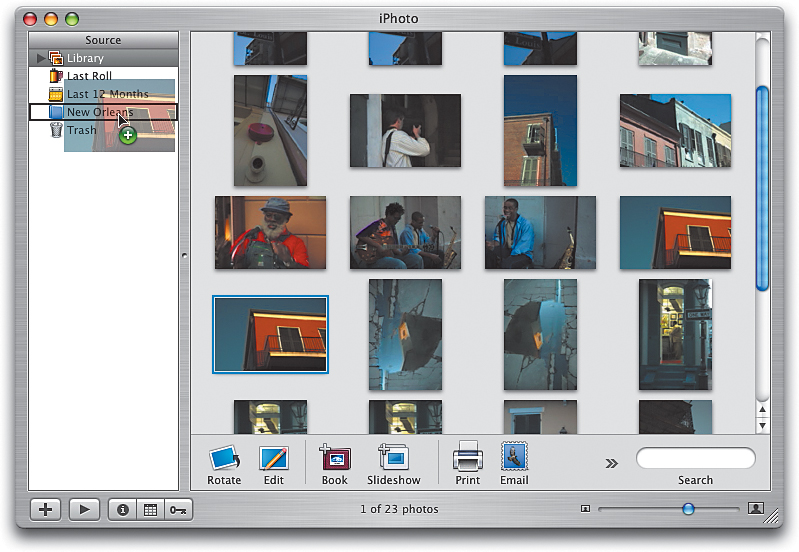
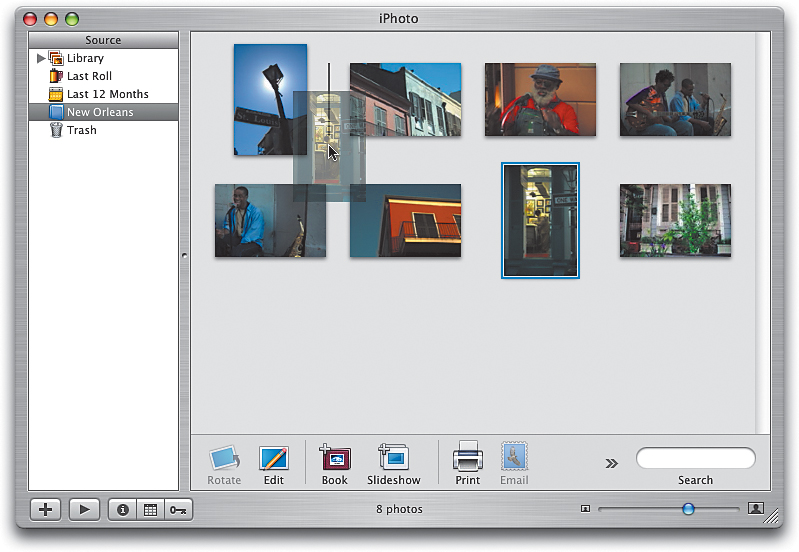
When your photos are first imported into iPhoto, they’re imported into your main Library with all your other photos (in other words, all your photos are stored in one big list, which is somewhat similar to throwing all your prints into one big shoebox—it makes finding the photos you want quite a chore). Luckily, iPhoto lets you sort and organize your photos using “albums” (just like you would with regular prints). For example, let’s look at what we used to do before digital: You’d return from your vacation, get your prints developed, sort the good shots from the bad ones, and then you’d put the good ones in a photo album. Well, you’re going to do the same thing in iPhoto—you’re just doing it all on your computer. To create an album, click on the plus sign (+) button that appears in the bottom-left corner of the iPhoto window (it’s circled above). A little window will pop down from the top of iPhoto asking you to name your new album, so just type a name (let’s say you went on that New Orleans vacation we mentioned earlier, and now you’re going to use this album to separate the good shots from the bad, so name this album “New Orleans”) and click on the Create button. This new album will appear in the Source list on the left side of iPhoto.
STEP TEN (Using Albums):
In the Source list on the left side of iPhoto, click on the word “Library” to display all your imported photos. It’s now time to start sorting. When you find a photo you like (one that you might put in a traditional photo album), click on it, then drag-and-drop it right onto your New Orleans album (that appears in the Source list on the left). As you move your mouse over the New Orleans album, you’ll see that familiar little green icon with a plus sign beneath your arrow cursor letting you know you’re about to add something to that album (and that’s exactly what you want to do). Also, the album will have a black highlight bar around it to let you know that it’s selected. When you release your mouse button, you won’t see anything happen onscreen, but as long as you saw that little green plus sign icon appear at the bottom of your arrow cursor, you can rest assured that the photo you just dragged is really in that album. If you want to be sure, just click once on the New Orleans album and you’ll see this album only contains that one photo you just dragged. (By the way, to get back to your Library, just click on the word “Library” in the Source list on the left side of iPhoto.) Well, believe it or not, that’s how easy creating albums is—you just drag-and-drop your favorite photos from your Library right into your album, and when you’re done, click on the album to see what’s inside (just your best photos). So go ahead and do this for your new album.
STEP ELEVEN (Putting Your Photos in Order):
Okay, so now the best photos (your “keepers”) are in their own album. That’s good, but they’re probably not in the exact order you’d like them, right? Well, don’t worry, because now that they’re in an album, you can put them in the exact order you want by simply clicking on a photo and dragging it into the position you want. That’s it—drag ’em where you want ’em. As you drag a photo, you’ll see a little “ghost” version of the photo so you know exactly where it’s going as you drag it. Also, as you drag your “ghosted” photo between two existing photo thumbnails, you’ll see a thin vertical bar appear, letting you know that if you release the mouse button now, that’s where your photo will appear (positioned between those two photos). Try it once and you’ll instantly see what I mean.

STEP TWELVE (Creating Slide Shows):
Want to see a full-screen slide show of the photos in your New Orleans album? Start by ensuring that no photos are selected in the iPhoto window (meaning none of your photos have a blue outline around them). Now click on the Slideshow button at the bottom of the iPhoto window (its icon looks like two slides stacked on top of each other). This takes you to a window where you can decide how your slide show will look, what kind of music will accompany your slide show, and how it will appear as it transitions between photos. To take a quick peek at how your slide show will look using Apple’s default settings, just click the Play button on the left side of the iPhoto window. Your screen will go black for a moment, then your first photo will fill your entire screen, while acoustic guitar music plays in the background. Your photo will be panning slowly across your screen, and in a few seconds, your second photo will softly dissolve into view and pan in a different direction (perhaps it will slowly zoom toward you). This slow dissolving and panning will continue through all the photos in your New Orleans album, and it will repeat over and over until you press the Escape (Esc) key on your keyboard.

STEP THIRTEEN (Editing Your Slide Show):
Once you click the Slideshow button, thumbnails of the photos in your album appear across the top of the iPhoto window. These are there so you can sort the photos that appear in your slide show. You sort them here the same way you do in the regular thumbnail window—click on thumbnails, then drag-and-drop them into the order you want them. Also, if you click the Settings button at the bottom of the iPhoto window, a pop-down window will appear, in which you have an assortment of options. At the top of the window, you can choose how many seconds each photo will display onscreen before the next photo appears. To change the number of seconds, either type a number in the field or click on the little arrow buttons (circled above)—click the Up Arrow to add seconds or the Down Arrow to lessen the time they’re onscreen. Just below that, you can decide how the photos will appear as one photo gives way to the next by selecting an effect from the Transition pop-up menu. You can also choose how long that transition will take using the Speed slider that appears just below the Transition pop-up menu.
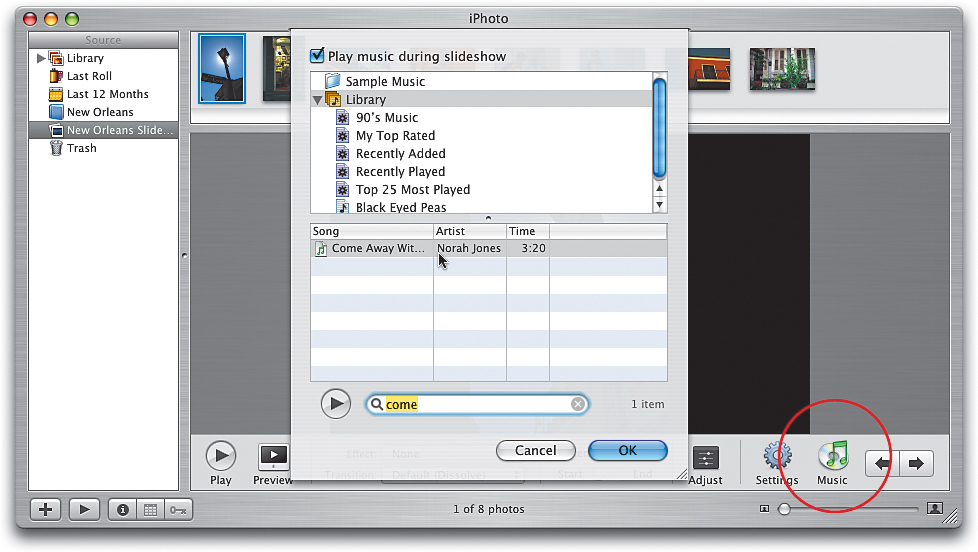
STEP FOURTEEN (Adding Music to Your Slide Show):
As I mentioned earlier, Apple has already picked some background music for you that will play with your slide show when you click the Play button (that’s a good thing, because background music makes a world of difference in photo slide shows). However, if you’ve imported music into your Mac (from CDs or downloaded from the iTunes Music Store), you can use one of those songs as your background music instead. Here’s how: First, click the Music button (it’s circled above), which brings up a window onscreen showing all the playlists of music you have in your iTunes Library. You can click on any playlist, and the songs in that playlist will play, in order, as your background music. However, if there’s just one song you want to use, and you know the name of the song, you can instead use the Search field located along the bottom center of the window. Just click on Library in the top list in the window, and then click inside the Search field. Start typing the name of the song in the field, and if it’s in your iTunes Library, it will appear in the Song list. You can just click on the song to select it, and then click the OK button.
STEP FIFTEEN (Emailing a Photo, Part 1):
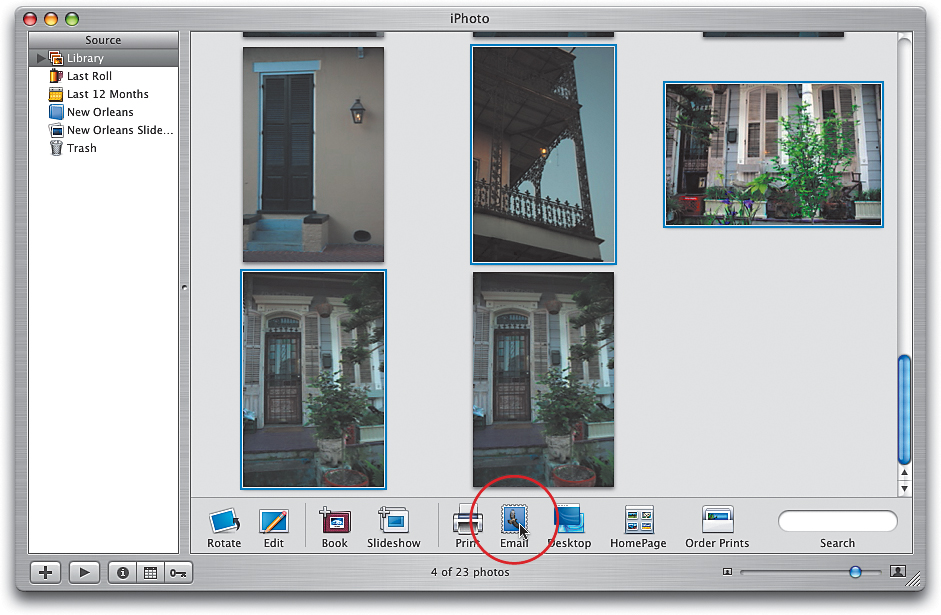
If you have a particular photo you want to email (or even a group of photos), you can start the process right within iPhoto. First, click on the Library in the Source list along the left side of the iPhoto window. Then, click on the photo that you want to email (or if there’s more than one photo you want to email, click on the first photo, then hold the Command key [the key with the Apple logo on it], and click on the other photos you want to email). With your photo(s) selected, click the Email button in the bottom of the iPhoto window (its icon looks like a postage stamp).
STEP SIXTEEN (Emailing a Photo, Part 2):
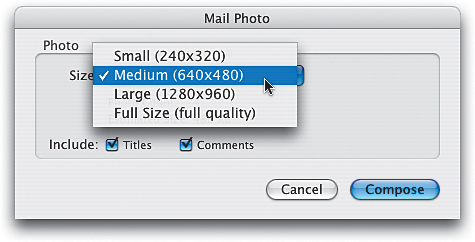
The Mail Photo dialog will appear asking how large you want your photos to be. The default size is Medium, which is 640 pixels wide by 480 pixels deep (that’s a standard size for viewing photos onscreen, so that size is almost ideal for emailing). You can choose a larger size if you’re just emailing one or two photos, but if you’re emailing more than that, it’s best to keep the Size set to Medium (640x480). Now, click the blue Compose button, and iPhoto will compress your photos (for fast emailing).

STEP SEVENTEEN (Emailing a Photo, Part 3):
Once the photos are compressed, Apple’s Mail program will launch automatically and attach the photo(s) you choose to an email document. All you have to do is type the email address of the person you’re sending the photos to, then press the Tab key on your keyboard twice so the Subject field is highlighted (iPhoto will already have inserted a generic subject line). Now you can type a subject line (maybe something like “Here are the shots we took in New Orleans,” provided, of course, that you did take these photos in New Orleans. If these are shots you took in Utah, you should probably type that instead). If you want to add a message, click in the message area, press the Return key a few times, then press the Up Arrow key on your keyboard a few times to add a some space between your photos and your message. Type your message, and when you’re finished, click the Send button in the top-left corner of the message window to email your photos.

STEP EIGHTEEN (Printing Your Photos, Part 1):
Before you begin to print, you first must select the images you want to print. You can click on an album in the Source list (meaning you want to print the entire album). However, if you want to print specific photos, you can press the Command key (it has the Apple logo on it) and click on the individual photos in the main window that you want to print. You can select photos from your Library or from an album; it’s up to you. With your images selected, you now have three choices when it comes to printing your photos. We’ll discuss these in the next few steps.

STEP NINETEEN (Printing Your Photos, Part 2):
Your first choice is printing to your color printer. Of course, you need to have a color printer connected to your Mac to do this. If you do, click the Print button at the bottom center of iPhoto’s window. When the print options appear, choose your printer (by its name) from the top pop-up menu, choose what size prints you want (Full Page, Greeting Card, etc.) from the Style popup menu, how many copies you want of each photo, and then click the blue Print button.

STEP TWENTY (Printing Your Photos, Part 3):
You can send your photos directly to Kodak’s Print Service, right from iPhoto, and they’ll print and mail them directly to you (just like a regular photo lab). To do this, ensure you’ve selected the photos you want to print (which we did in Step 18), and then click the Order Prints button near the bottom-right corner of iPhoto’s window. This will take you to an order window, in which you can choose sizes, quantities, etc. But first, you’ll need to click on the Set Up Account button and go through the steps it provides to set up an account with Kodak Print Service (which uses your Apple .Mac account, if you have one). Once your account is active, you can make your selections for each photo you want to print.
STEP TWENTY-ONE (Printing Your Photos, Part 4):
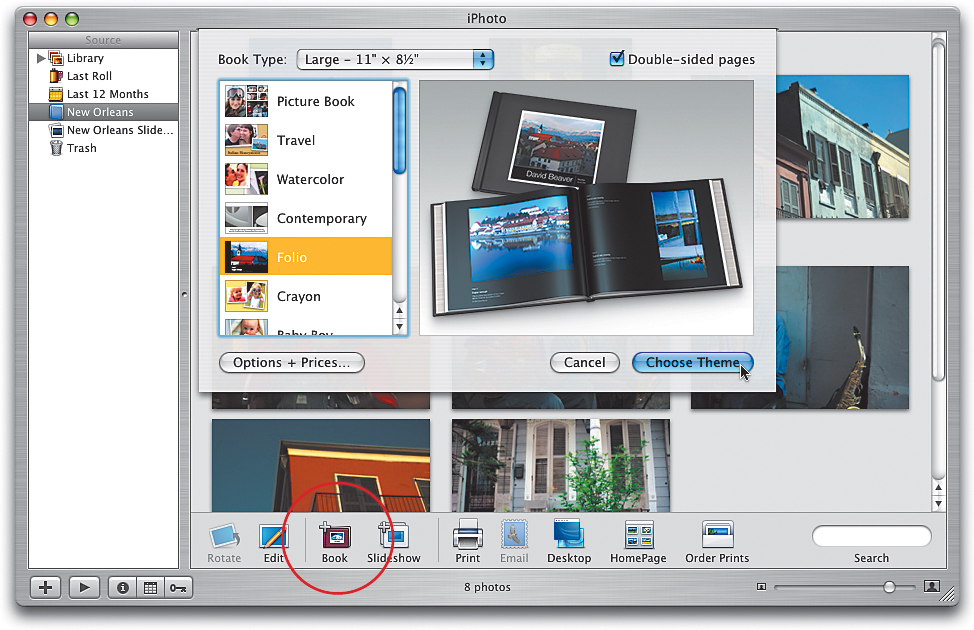
You can send your photos to Apple to have a hardcover photo book made just for you. These books are absolutely amazing, and surprisingly affordable. To get an idea of how amazing, click on your New Orleans album in the Source list (this selects those photos, though nothing happens onscreen), then click the Book button near the bottom-left side of the iPhoto window. This brings up options with a list of styles on the left. Click on the style you want, choose the book size you want from the pop-up menu at the top of the window, and then click the Choose Theme button. When the iPhoto window shows your book layout options, click the Autoflow button in the bottom of the iPhoto window (if you can’t see it, click on the double right-facing arrows and choose Autoflow from the menu that appears). Now, sit back and prepare to be amazed.