
Lesson 8. Finding Things on Your Mac
Time
This lesson takes approximately 10 minutes to complete.
Goals
To learn how to locate different types of documents on your Mac, including photos, movies, text documents, and more, using Mac OS X Tiger’s Spotlight search feature.
Okay, you’re downloading songs, you’re creating text documents, you’re downloading and importing movie clips, you’re doing all kinds of cool stuff, and all the while you’re saving these documents in different places on your Mac. Saving stuff is easy. Finding the exact file you want three weeks later has been kind of tough over the years. In fact, although Apple called the feature “Find,” it was really more like “Scour,” because you spent a lot of time searching before you could actually find the file you wanted. But Mac OS X Tiger changes all of that with a new feature called Spotlight. I have to say Spotlight is somewhat of a mini-miracle unto itself. What makes it so amazing—besides the sheer lightning-fast speed with which it finds files—is that it’s designed to help you find files that you don’t actually know the exact name of. In fact, if you even have a close stab at what the file name could be or can even remember a word that might be in the document (or if you can’t remember either of those things, just that you created the file about a week ago), Spotlight will not only find it for you in seconds, it will actually launch the application you created the file with. Then, it will open the document so you can see if it’s the right one. And it does all of this with incredible ease and speed. It actually takes the act of finding files and transforms it from a frustrating, time-intensive task into a quick, fun experience. It’s hard to think of a search feature that’s cool enough to actually make you smile the first time you use it, but I’ll bet you this—Spotlight will do just that. It’s one of those things that makes you nod your head and say, “Isn’t technology amazing?”

STEP ONE (Where to Look First):
Okay, so you’ve been working on your Mac for a while—you’ve been downloading songs, importing photos, creating text documents, sending and receiving emails, etc.—and so far everything has basically been one big love fest. But at some point, you’re going to say to yourself, “Hey, where did I save that file with my ideas for next summer’s family reunion?” If you saved it fairly recently (maybe earlier today or within the last day or so), you might be able to get right to it. Start by clicking once on the Apple menu (found in the upper-left corner of your screen), and then with your cursor arrow, move down to Recent Items and a flyout menu will appear. Your most recently used applications are at the top of the list, but directly below that (in the Documents section) are the last 10 documents you opened. If the one you’re looking for is in that menu, just slide your mouse over, move down to that document, click the mouse once on it in the list, and the document will open. Hey, it’s worth a try.

STEP TWO (Where to Look Next: Spotlight):
So what if the file you saved a couple of days ago (let’s say it was a list of people you’re inviting to your next party) wasn’t in that Recent Items menu? Now what do you do? You reach for Spotlight (Mac OS X Tiger’s built-in search feature). Luckily, you don’t have to go far, because no matter what you’re doing (or which application you’re working in), you can always access Spotlight. It’s located at the top-right corner of your screen (its icon is a blue circle with a magnifying glass in it). When you want to search for something, click once on that icon, and the Spotlight Search field will appear.
STEP THREE (Using Spotlight):
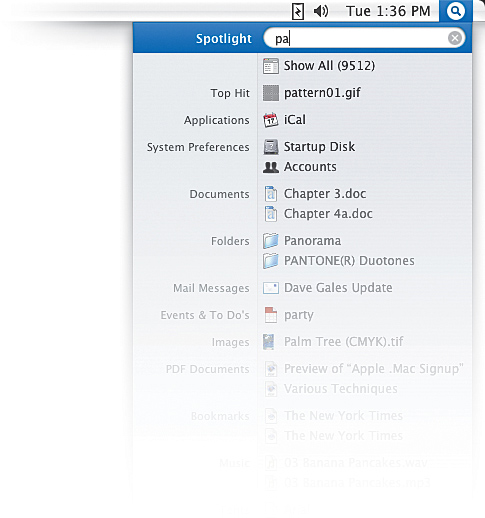
Now that you know where Spotlight lives (in the upper right-hand corner of your screen), let’s give it a whirl. Click on the blue Spotlight icon and the Spotlight Search field will pop down. If you were looking for that party invitation list you created a few days ago (let’s say you named that file “Party People” or “Party List” or “Invite List”), you’d just start typing in the word “party,” and as soon as you type just the “pa” in “party,” Spotlight starts bringing up results. It’s amazingly fast and complete; it instantly displays everything on your computer that contains the word “party.” Not just files named “party”—we’re talking everything. It searches your email (both your email inbox and emails you’ve sent), it searches your Address Book, it searches your iCal calendars—everything—and displays it in a window just below the Search field.
STEP FOUR (Working with the Results):
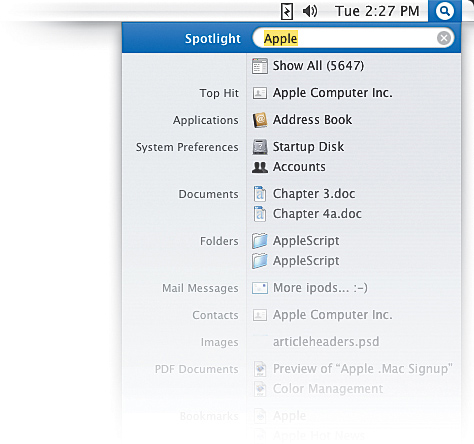
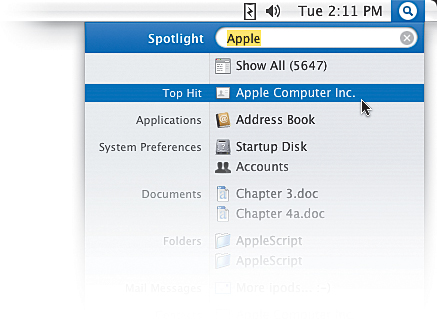
The files Spotlight finds are listed in order by what it thinks you’re most likely looking for. How does it know? Well, if it finds a file with the exact word or phrase you entered, it puts that file at the top of the list. So, for example, let’s do a Spotlight search for Apple Computer’s customer service number. You know you have their phone number somewhere on your Mac, but you can’t quite remember where (just so you know, Apple puts their customer service number in your Address Book by default, but let’s pretend I didn’t just tell you that). To find that information, you’d go to Spotlight and type “Apple” in the Search field. When the results appear, you’ll see that Apple Computer winds up at the top of the list in the Top Hit section. It figures that’s probably what you were looking for.
STEP FIVE (Seeing Instant Results):
Although Spotlight will easily identify hundreds of different files on your Mac that contain the word “Apple,” it thankfully only displays the most likely matches in the results list. Because it separates them by type of document, it helps you quickly see if a particular file is the one you want. (For example, if one of the results came from your iCal calendar, and you’re looking for a phone number, you can probably ignore the calendar result.) Now, let’s look at that Top Hit—it shows Apple Computer, right? But we’re not 100% sure that’s the file we want until we open it, so just click directly on that result in the list, and Spotlight will actually launch the Address Book application, opening it to the contact page for Apple Computer (where you’ll find Apple’s phone number). How slick is that? So that’s how it works—when you find a result that you think is the file you’re looking for, click on it, and in just a few seconds, you’ll know for sure because it will open for you.
STEP SIX (Seeing More Results):
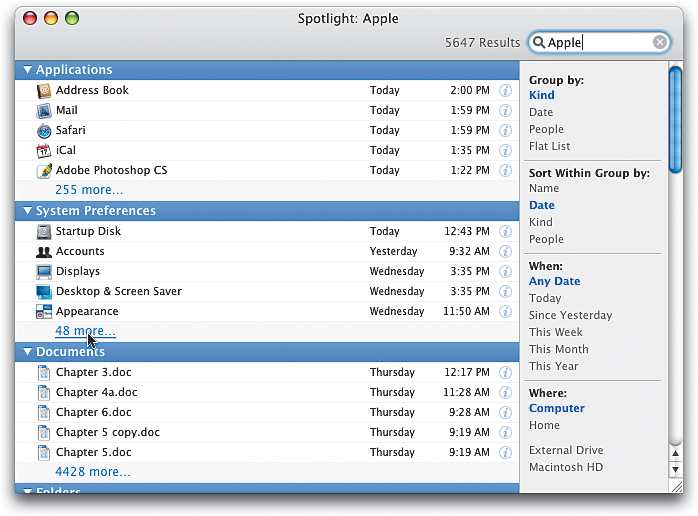
Now, although the results list only displays the top two matches in each category for your search of the word “Apple,” how many total results did Spotlight find? It displays that number at the top of the list (on my iMac, it came up with 5,647 total results). To see all the results, move your mouse cursor over Show All at the top and click. Spotlight will open in its own separate window, displaying all 5,647 results sorted by category (well, it shows the top five results in each category. If you really want to see all the results in each category, after the five that are listed, you’ll see a line that reads something like “225 more...” or “48 more...” or however many files are left to view. Click directly on that line of text and you’ll see the rest). If you double-click on any of the results in this window, that file will open. If Spotlight has to launch an application for you to see the file—don’t worry—it’ll do it for you. It’s like a file-finding concierge.
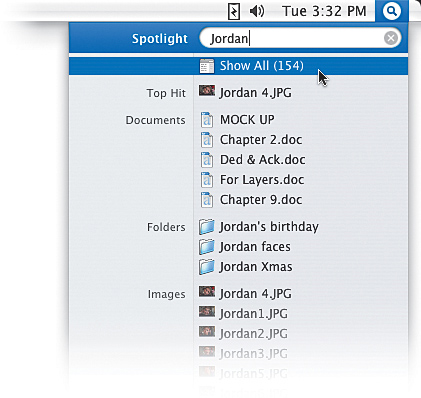
STEP SEVEN (Finding the Right Photo, Part 1):
Spotlight does its finest work when you’re searching for things like photos, movies, and music. For example, let’s say you want to find a particular photo you took at your kid’s birthday party. You’re not sure of the photo’s exact file name, but you do remember you named those photos with your kid’s name (“Jordan” in this case). Well, here’s where Spotlight pitches in to help. Start by going to the Spotlight Search field and typing “Jordan.” Instantly, the results list will appear, and you’ll see your Top Hit at the top of the list. Below that you’ll see all the images that have the name “Jordan” in their file name. So how can you tell which photo is the right one? Go on to the next step.
STEP EIGHT (Finding the Right Photo, Part 2):
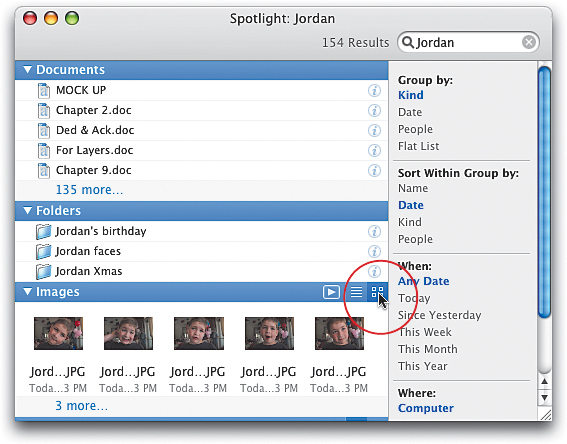
Well, here’s where it gets fun. Click on the Show All button at the top of the results list, so Spotlight opens in its own separate window. You see how your photos (under the Images section) are shown as tiny thumbnail icons? I know—they’re too small to discern which photo is the one you’re looking for. Well, there are two ways Spotlight can help: (1) In the blue Images section divider, click directly on the little four-square button on the right (it’s circled above), and your photos will be displayed with much larger icons so you can see which one is which. If that’s still not big enough for ya, (2) click on the Play button on the right in the blue Images section divider and all those photos will be displayed one-by-one in a full-screen slide show. When you see the one you want, just press the Escape (Esc) key on your keyboard to stop the slide show. You can now access that photo by double-clicking directly on its icon. I told you this was gonna be fun. But we’re not done yet....

STEP NINE (Finding Movies and Music):
If you’re searching for QuickTime movies that you’ve downloaded from the Web or music files that you’ve imported or downloaded, Spotlight makes finding the right one easy by giving you previews from right within the main results window. For example, let’s say you’re searching for a song by The Beatles, but you’re not sure of the song’s name. Just type “Beatles,” and when the results list appears, click on Show All. Once Spotlight opens in a separate window, you’ll see all of your Beatles songs listed under the Music section. To hear one of the songs, click on it to select it, then to the far right of that song’s listing, you’ll see a tiny info button (it’s a circle with a lowercase “i”). Click on that button, and Spotlight will instantly display all the info on that song. But there’s more....
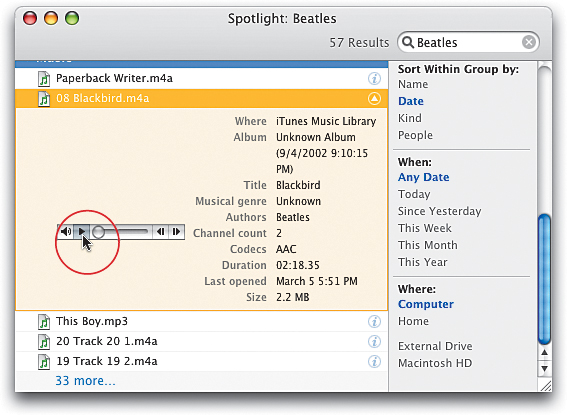
STEP TEN (Playing Music or Movies within Spotlight):
It gets better. There’s a built-in music player so you can hear the song right within Spotlight. The music player appears as a thin, horizontal, silver-and-black bar to the left of the song’s info (after you’ve clicked on the tiny info button). In the music player on the left side, you’ll see a small right-facing arrow, which is the Play button. Click on it and your music will start playing. (Note: If for some reason you don’t hear the music, make sure your Mac’s volume is turned up by going to the top-right side of your Mac’s screen and clicking once on the little speaker icon. A volume slider will appear. To increase the volume, click-and-hold on the little slider button and drag upward. When you release your mouse button, the little slider goes away. There’s also a volume slider in the Spotlight music player—just click-and-hold on the little speaker icon in the left of the music player and a slider will appear.) So that’s how you preview music. Movies work pretty much the same way—if you see a movie result and want to see a quick clip of it (to see if it’s the one you’re searching for), you’ll do the same thing you did for music—click on a movie, click the little “i” button, then click the Play button in the movie player that appears. (Note: To stop either a movie or a song from playing, click on the Pause button, which had been the Play button.)
STEP ELEVEN (Sorting Your Results):
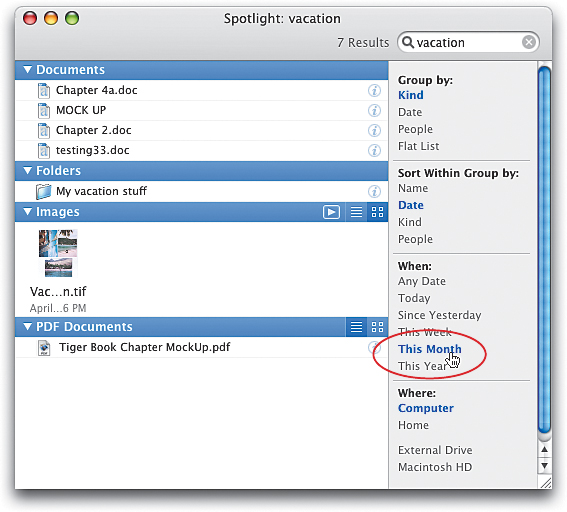
Alright, by now you’re getting pretty good at searching. You know how to use the results to find just what you’re looking for (thanks to them being categorized and with help from the photo, movie, and audio previews), and you even know how to open the documents Spotlight finds. But did you know that you can tweak how the results are displayed to make finding things easier for you, based on what you’re looking for, and how you think? For example, let’s look at the main Spotlight window (the separate window you get when you click on Show All). By default, all the results are grouped by the kind of document they are (so all the email results appear grouped in one section, all the photos in another, etc.). In the top-right corner of the Spotlight window (just under the Search field), there’s a list named “Group By,” and you can see the word “Kind” is blue. If you’re not exactly sure of the name of the file, but you think you remember when you created it, try grouping by Date, or go down a little further on the right side of Spotlight and try some of the choices under When. If you know approximately when you created the file, it can really help you zero-in on where that file is, even if you don’t know the full name of the file. For example, let’s say you created a file earlier this month, and you think part of the name might include the word “vacation.” Just search for the word “vacation,” and when the results appear in the main Spotlight window, go to the When list on the right side and click on This Month. Now only the documents you created this month will be visible, helping you narrow the search even more. This is pretty handy stuff.