
If you want to access these settings from the command line, you
can use the raspi-cong tool (see “Configuring Your Pi” on page 17).
Type the following at the command line if you want to try that out:
sudo raspi-cong
Figure 1-10. The raspi-config tool when run from the command line
Getting Up and Running 21
GSW_RASPI_4ED_FIN.indd 21GSW_RASPI_4ED_FIN.indd 21 10/28/21 10:53 AM10/28/21 10:53 AM
Getting Online
You’ve got a few different ways to connect to the internet. If you’ve
got easy access to a router, switch, or Ethernet jack connected to
a router, just plug in using a standard Ethernet cable. If you have a
Wi-Fi USB dongle or you’re using a Raspberry Pi 3 or later, you can
connect wirelessly; there’s an icon on the task-bar to setup your
wireless connection (see Figure 1-10).
If you’ve got a laptop nearby, or if you’re running the Pi in a head-
less configuration, you can share the Wi-Fi on your laptop with the
Pi (Figure 1-11). It is super simple on the Mac: just enable internet
Sharing in your Sharing settings, then use an Ethernet cable to con-
nect the Pi and your Mac. In Windows, enable “Allow other network
users to connect through this computer’s internet connection” in
your internet Connection Sharing properties. The Pi should auto-
matically get an IP address when connected and be online.
You will probably need a cross-over cable for a Windows-based PC,
but you can use any Ethernet cable on Apple hardware, as it will
autodetect the type of cable. (A cross-over cable is a spe cially-wired
type of Ethernet cable —CAT5 or CAT6—that has the “receive” pin
on one end connected to the “transmit” pin on the other. This allows
two computers to be wired together via their Ethernet ports and
be able to talk to each other without having to use an intervening
switch or hub in the middle.)
22 Getting Started with Raspberry Pi
GSW_RASPI_4ED_FIN.indd 22GSW_RASPI_4ED_FIN.indd 22 10/28/21 10:53 AM10/28/21 10:53 AM
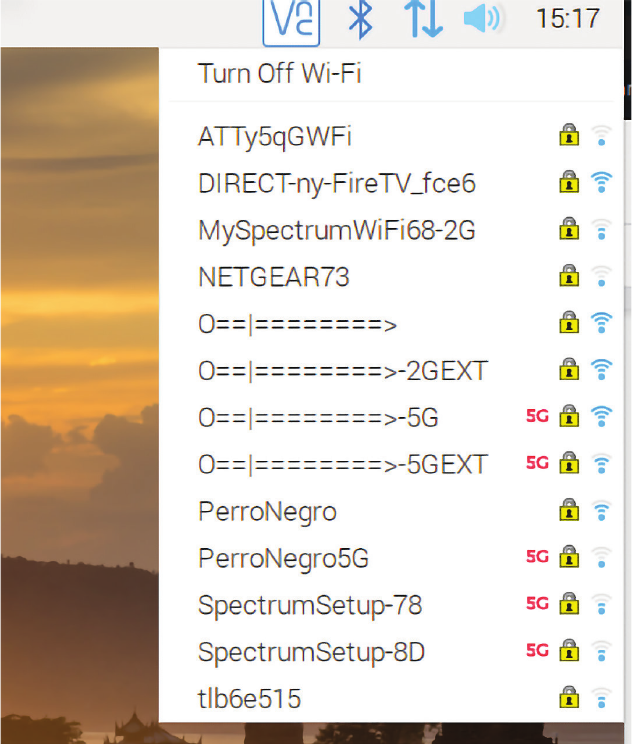
Figure 1-11. Click on the network icon on the right side of the task
bar to select a Wi-Fi network to connect to.
Getting Up and Running 23
GSW_RASPI_4ED_FIN.indd 23GSW_RASPI_4ED_FIN.indd 23 10/28/21 10:53 AM10/28/21 10:53 AM
Shutting Down
There’s no power button on the Raspberry Pi (although there is
a header for a reset switch on newer boards). The proper way to
shut down is through the Shut down command under the taskbar
menu with in the desktop environment.
You can also shut down from the command line by typing:
pi@raspberrypi: ~ $ sudo shutdown now
If you want to restart, you can type
pi@raspberrypi: ~ $ sudo shutdown -r now
Be sure to do a clean shutdown whenever possible (and don’t just
pull the plug). In some cases, you can corrupt the SD card if you
turn off the power without halting the system.
Running Headless
If you want to work on the Raspberry Pi without plugging in a mon-
itor, keyboard, and mouse, there are some ways to set it up to run
headless
. If all you require is to get into the command line, you can
simply hook the Raspberry Pi up to the network and use an SSH
client to connect to it (username: pi, password: raspber-
ry). The SSH utility on Mac or Linux will do; use PuTTY (bit.ly/
1sfuf4X) on Windows (or Linux). The SSH server on the Raspberry
Pi is enabled by default (run the Raspberry Pi configuration utility
again if for some reason it doesn’t launch at startup).
Another way to connect to the Pi over a network connection is to
start the Virtual Network Computing (VNC) server on the Pi and
connect to it using a VNC client. The benefit of this is that you can
run a complete working graphical desktop environment in a window
on your laptop or desktop. This is a great solution for a portable
development environment. The VNC server comes preinstalled on
the latest versions of the Raspberry Pi OS; to start and configure
it, click the VNC server icon on the top right of the taskbar (Figure
1-12).
24 Getting Started with Raspberry Pi
GSW_RASPI_4ED_FIN.indd 24GSW_RASPI_4ED_FIN.indd 24 10/28/21 10:53 AM10/28/21 10:53 AM

Figure 1-12. Starting the VNC server
A third way of logging in to the Pi without a keyboard or monitor
is via some pins on the GPIO header. You can use a special cable
from FTDI that allows you to connect to that serial port via USB.
The FTDI cable has three wires that connect to ground (pin 6),
TX (pin 8), and RX (pin 10) on the header. This allows you to login
via the serial port, an artifact from olden times when programmers
would log into their VAXes and ENIACs via serial cables. Nowadays
this type of login is almost never used, as telnet and SSH are avail-
able on the vast majority of machines and are much faster commu-
nication protocols.
Alternatively, you could use the BUB I from Modern Device, which
is a breakout board for the FTDI chip with a prototyping area that
allows you to reroute the signals.
Getting Up and Running 25
GSW_RASPI_4ED_FIN.indd 25GSW_RASPI_4ED_FIN.indd 25 10/28/21 10:53 AM10/28/21 10:53 AM
..................Content has been hidden....................
You can't read the all page of ebook, please click here login for view all page.