img = cv2.imread('faces.jpeg')
gray = cv2.cvtColor(img, cv2.COLOR_BGR2GRAY)
faces = face_cascade.detectMultiScale(gray, 1.1, 4)
for (x, y, w, h) in faces:
cv2.rectangle(img, (x, y),(x+w, y+h),(255, 0, 0),2)
cv2.imshow('Faces', img)
cv2.waitKey(0)
Load the Haar cascades classifier.
Convert the image to grayscale, as Haar cascades do not work
on color images
Detect faces according to the detectMultiScale function, which
takes the image, the relative size of the included faces, and
a parameter specifying how sensitive the algorithm should be to
“face-like” structures.
Draw a rectangle around each detected face in the image.
If your picture has faces in it but they’re not being detected,
try tweaking the last parameter of detectMultiScale() until you
have some good results. You can also experiment with different
images. As you can see, in the image I’m using for this test, there’s
a misidentified face in the middle of the photo. Playing around
with that last parameter may help to avoid that misidentification.
Also, this particular Haar cascade is meant to find faces that are
in their normal orientation. If the faces in your photo are tilted
or not fully facing the camera, this will affect the algorithm’s ability
to find them.
Working with Cameras 159
GSW_RASPI_4ED_FIN.indd 159GSW_RASPI_4ED_FIN.indd 159 10/28/21 10:54 AM10/28/21 10:54 AM

Figure 9-11.
Finding faces (mostly) in an image
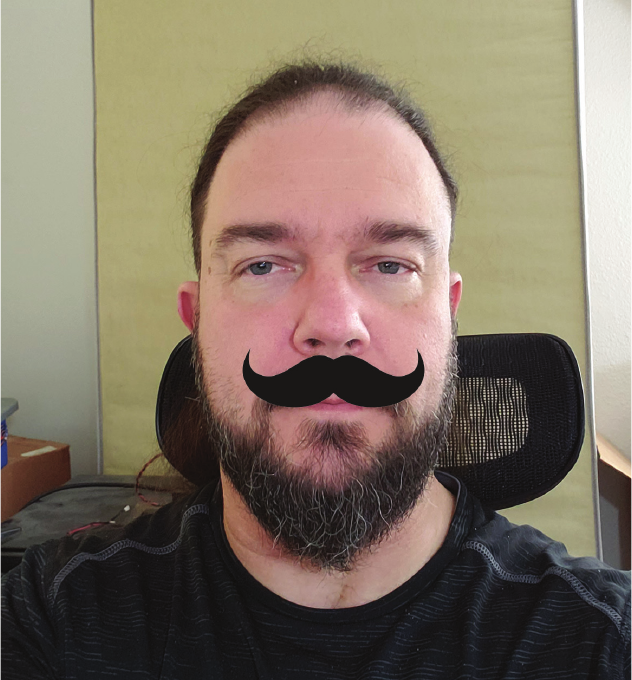
Project: Raspberry Pi Photobooth
You can combine different libraries to make Python a powerful tool
to do some fairly complex projects. With the GPIO library you learned
about in Chapter 7 and OpenCV, you can make your own Raspberry
Pi-based photo booth that’s sure to be a big hit at your next party (see
Figure 9-12). And with the CascadeClassier() function in OpenCV,
you can enhance your photobooth with a special extra feature: the
ability to automatically superimpose fun virtual props like hats,
monocles, beards, and mustaches on the people in the photobooth.
The code in this project is based on the code in the original editions
of this book, which in turn is based on the Mustacheinator project
in
Practical Computer Vision with SimpleCV
by Kurt Demaagd,
Anthony Oliver, Nathan Oostendorp, and Katherine Scott (O’Reilly).
160 Getting Started with Raspberry Pi
GSW_RASPI_4ED_FIN.indd 160GSW_RASPI_4ED_FIN.indd 160 10/28/21 10:54 AM10/28/21 10:54 AM
erineScott(O’Reilly).
Figure 9-12.
Output of the Raspberry Pi Photobooth
Here’s what you’ll need to turn your Raspberry Pi into a
photobooth:
• A USB webcam or Raspberry Pi Camera Module
• A monitor
• A pushbutton, any kind you like
• Hook up wire, cut to size
Working with Cameras 161
GSW_RASPI_4ED_FIN.indd 161GSW_RASPI_4ED_FIN.indd 161 10/28/21 10:54 AM10/28/21 10:54 AM

Before you get started, make sure that both the gpiozero and
OpenCV Python libraries are installed and working properly on
your Raspberry Pi.
1. As you did in Chapter 7, connect pin 24 to the pushbutton.
One side of the button should be connected to ground, the other
to pin 24. (Remember, we’re talking about BCM numbers here,
not physical pins. You’re actually connecting to physical pin #18
on the Pi.)
2. Find or create a small image of a black mustache on a white
background and save it as
moustache.png
in a new folder called
photobooth
on your Raspberry Pi. You can also download a pre-
made mustache file from the
images
subdirectory of the Github
repository for this book: github.com/wdonat/gsw_raspi_4e.
3. From the same repository, grab the haarcascade_mcs_mouth.
xml file and place it into the
photobooth
directory. (If you
download the file from Github’s web interface, the best way
to do it is to get the raw version of the file, copy all of the text,
and then paste it into a blank text document on your computer.
Then save as haarcascade_mcs_mouth.xml.)
4. In the
photobooth
directory, create a new file called
photo-booth.py
, type in the code listed in Example 9-6, and save
the file.
Example 9-6. Source code for photobooth.py
import cv2
from picamera.array import PiRGB Array
from picamera import PiCamera
from gpiozero import Button
import time
button = Button(24)
camera = PiCamera()
camera.resolution = (800, 608)
rawCapture = PiRGBArray (camera)
mouth_cascade =
cv2.CascadeClassier(‘'haarcascade_mcs_mouth.xml')
162 Getting Started with Raspberry Pi
GSW_RASPI_4ED_FIN.indd 162GSW_RASPI_4ED_FIN.indd 162 10/28/21 10:54 AM10/28/21 10:54 AM
moustache = cv2.imread(‘moustache.png’)
rows,cols,_ = moustache.shape
moustache2gray = cv2.cvtColor(moustache,cv2.COLOR_
BGR2GRAY)
ret, mask = cv2.threshold(moustache2gray,10,255,cv2.
THRESH_BINARY)
mask_inv = cv2.bitwise_not(mask)
whileTrue:
button.wait_for_press()
camera.capture(rawCapture,format= 'bgr')
cap = rawCapture.array
cv2.imwrite('face.jpg', cap)
image = cv2.imread('face.jpg')
gray = cv2.cvtColor(image, cv2.COLOR_BGR2GRAY)
mouths = mouth_cascade.detectMultiScale(gray, 1.5, 15)
for(x, y, w, h)inmouths:
roi = image[y-rows+10:y+10, x-5:x+cols-5]
face_bg = cv2.bitwise_and(roi, roi, mask = mask)
moustache_fg = cv2.bitwise_and(moustache, mous-
tache, mask = mask_inv)
dst = cv2.add(face_bg, moustache_fg)
image[y-rows+10:y+10, x-5:x+cols-5] = dst
cv2.imshow('Photobooth', image)
cv2.waitKey(0)
cv2.destroyAllWindows()
time.sleep(0.1)
Set the camera resolution. It’s not
exactly
800×600—hence
the 608 value. If you force the camera to use 600px, the image
often gets a strange blue cast, and we’re not going for the An-
dorian or the
Avatar
look here.
This is the Haar cascade that will search the image for a mouth.
This line and the previous one remove everything but the black
Working with Cameras 163
GSW_RASPI_4ED_FIN.indd 163GSW_RASPI_4ED_FIN.indd 163 10/28/21 10:54 AM10/28/21 10:54 AM
..................Content has been hidden....................
You can't read the all page of ebook, please click here login for view all page.