
Figure 7-1.
Using a text editor and LXTerminal to edit and launch
Python scripts.
Try modifying the script to make the LED blink faster by using dec-
imals in the time.sleep() functions. You can also try adding a few
more LEDs and getting them to blink in a pattern. You can use any
of the dedicated GPIO pins that are shown in Figure 6-2.
Reading a Button
If you want something to happen when you press a button, one way
to do that is to use a technique called
polling
. Polling means contin-
ually checking over and over again for some condition. In this case,
your program will be polling whether the button is connecting the
input pin to 3.3V or to ground. To learn about polling, you’ll create a
new Python script that will display text on the screen when the user
pushes a button:
1. Connect a push button between pin 24 and ground.
(Remember, you’re using BCM numbers to refer to the pins,
so here we’re actually referring to physical pin #18!) gpio-
zero’s Button.wait_for_press() function checks for a pin going to
114 Getting Started with Raspberry Pi
GSW_RASPI_4ED_FIN.indd 114GSW_RASPI_4ED_FIN.indd 114 10/28/21 10:54 AM10/28/21 10:54 AM

ground. The logic behind doing it this way is that you don’t need
to connect a pulldown resistor between the switch and GND.
2. Create a file in your home directory called
button.py
and open
it in the editor.
3. Enter the following code:
from gpiozero import Button
import time
button = Button(24)
count = 0
while True:
button.wait_for_press()
count += 1
print("Buttonpressed" + str(count) + "times.")
time.sleep(0.1)
Set pin 24 as an input.
Create a variable called count and store 0 in it.
Poll the button for presses.
Add to count if the button has been pressed.
Print the text to the terminal
Wait briefly, but let other programs have a chance to run by
not hogging the processor’s time.
4. Go back to LXTerminal and execute the script:
$ python3 button.py
5. Now press the button. If you’ve got everything right, you’ll see
a few lines of “The button has been pressed” for each time you
press the button.
The preceding code checks for the status of the button 10 times
per second, which is why you’ll see more than one sentence printed
(unless you have incredibly fast fingers). The Python statement
time.sleep(0.1) is what controls how often the button is checked.
But why not continually check the button? If you were to remove
the time.sleep(0.1) statement from the program, the loop would
indeed run incredibly fast, so you’d know much more quickly when
Programming Inputs and Outputs with Python 115
GSW_RASPI_4ED_FIN.indd 115GSW_RASPI_4ED_FIN.indd 115 10/28/21 10:54 AM10/28/21 10:54 AM
the button was pressed. This comes with a few drawbacks: you’d
be using the processor on the board constantly, which will make
it difficult for other programs to function, and it would increase
the Raspberry Pi’s power consumption. Because
button.py
has to
share resources with other programs, you have to be careful that
it doesn’t hog them all up.
These are challenges that you’ll face when you’re using polling to
check the status of a digital input. One way to get around these
challenges is to use an
interrupt
, which is a way of setting a
specified block of code to run when the hardware senses a change
in the state of the pin. gpiozero supports interrupts—specifically,
detecting and responding to an edge
state change
(when the pin
changes from HIGH to LOW, or vice versa) and you can read about
how to use that feature in the library’s documentation (gpiozero.
readthedocs.io/en/stable/api_pins.html).
Note that edge detection only works on pins that support it,
and the library documents state that depending on the hardware,
the information read from the state at any given time is not guaran-
teed to be accurate.
Project: Simple Soundboard
Now that you know how to read the inputs on the Raspberry Pi,
you can use the sound functions of the Python module Pygame
to make a soundboard. A soundboard lets you play small sound
recordings when you push its buttons. To make your own sound-
board, you’ll need the following in addition to your Raspberry Pi:
• Three push button switches
• Female-to-male jumper wires
• Standard jumper wires or hookup wire, cut to size
• Solderless breadboard
• Computer speakers, or an HDMI monitor that has built-in speak-
ers. You can also use a simple pair of headphones—anything
that will plug into the Pi’s audio analog OUT port.
116 Getting Started with Raspberry Pi
GSW_RASPI_4ED_FIN.indd 116GSW_RASPI_4ED_FIN.indd 116 10/28/21 10:54 AM10/28/21 10:54 AM
You’ll also need a few uncompressed sound files, in
.wav
format.
For purposes of testing, there are a few sound files preloaded on
the Raspberry Pi that you can use. Once you get the soundboard
working, it’s easy to replace those files with any sounds you want,
though you may have to convert them to
.wav
from other formats.
Start by building the circuit:
1. Using a female-to-male jumper wire, connect the Raspberry
Pi’s ground pin to the negative rail on the breadboard.
2. Insert the three push button switches in the breadboard,
all straddling the center trench.
3. Using standard jumper wires or small pieces of hookup wire,
connect the groundrail of the breadboard to the top pin of each
button.
4. Using female-to-male jumper wires, connect each button’s
bottom pin to the Raspberry Pi’s GPIO pins. For this project,
we used pins 4, 14, and 25.
Figure 7-2 shows the completed circuit. We created this diagram
with Fritzing (fritzing.org), an open-source tool for creating hard-
ware designs.
Programming Inputs and Outputs with Python 117
GSW_RASPI_4ED_FIN.indd 117GSW_RASPI_4ED_FIN.indd 117 10/28/21 10:54 AM10/28/21 10:54 AM
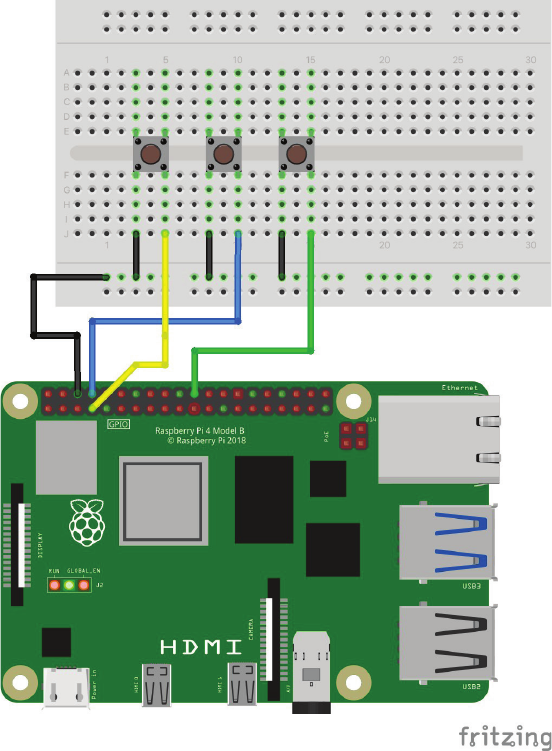
Figure 7-2.
Completed circuit for the soundboard project
118 Getting Started with Raspberry Pi
GSW_RASPI_4ED_FIN.indd 118GSW_RASPI_4ED_FIN.indd 118 10/28/21 10:54 AM10/28/21 10:54 AM
..................Content has been hidden....................
You can't read the all page of ebook, please click here login for view all page.