
07
Making It Real
Summary: Nested reverbs and prioritization, distance falloff algorithms, occlusion effects, moving sounds and sounds for moving systems, physics-based audio, sound for animations, cameras and the listener position
Project: DemoCh07Warfare01 Level: Warfare01
Introduction
Many game environments are imitations or at least hyperreal versions of environments that might be found in the real world. Therefore a player will have pretty clear expectations of what they might sound like, having experienced them in some form before. Even if the game is set in a fantasy world, we will still have expectations about the way sound will behave that have been developed through our lifetime of experience in the physical world. Although we shouldn’t necessarily always focus on realism (see Chapter 08), the soundscape needs to be consistent and believable in order to support the verisimilitude (the appearance or semblance of truth or reality) of the experience.
You can skip between areas of the level in game by using the keys 1–9.
Sound Propagation
Summary: Nested Reverbs, spatialization, revealing detail over distance, ambient zones for occlusion, obstruction and exclusion
The way sound travels through air (and other substances) and reflects around an environment is generally approximated and fudged in various ways for games. This is in part due to the unrealistic dimensions in game worlds, but mostly due to the massive resources it would take to calculate it accurately in real time.
Reverb: Advanced
We looked briefly at adding {Reverb Effects} to areas of the game through the [Audio Volumes] in Chapter 01, but we will now return to look at a few more advanced techniques.
Sound emanates from a source and travels through matter in waves. Your ears either receive the sound directly (dry) or indirectly (wet) after it has bounced off the various materials it comes into contact with. We refer to this as reverb (short for reverberation). Typically you’d receive both these types of sound, and this gives you important audio-based information about the environment you are in. Non-technical people might sometimes use the word echo to describe this effect, but unlike an echo, which is a distinct separate version of the sound being reflected, reverberation is a much more dense collection of reflections.

You can create and edit your own reverb effects in the ![]() Content Browser. If there don’t happen to be any preset {Reverb Effects} in your game already, you can change the View Options (bottom right) of the
Content Browser. If there don’t happen to be any preset {Reverb Effects} in your game already, you can change the View Options (bottom right) of the ![]() Content Browser to Show Engine Content and see some in the engine content folder you can use (enabling this will also allow you to choose these {Reverb Effects} from the drop down menu of the [Audio Volume]). Double-click the {Reverb Effect} to open the
Content Browser to Show Engine Content and see some in the engine content folder you can use (enabling this will also allow you to choose these {Reverb Effects} from the drop down menu of the [Audio Volume]). Double-click the {Reverb Effect} to open the ![]() Generic Asset Editor and see the pop-up tips for an explanation of each parameter.
Generic Asset Editor and see the pop-up tips for an explanation of each parameter.

Constructing a reverb that sounds good is a hugely complex task in itself. Trying to model the way sound would actually reflect around a specific space in a game would require a significant amount of computing power, so in most games we usually use these kinds of precalculated reverb effects to apply to sounds in a given area.
As you’ll remember from Chapter 01, reverb is controlled using [AudioVolume]s in the game level (you can also apply reverb as an effect via the <Activate Reverb Effect> node in the [Level Blueprint]). With these you can set the reverb effect, the volume of the reverb effect, and the amount of time it takes to be applied once the player enters the [AudioVolume]. This fade time is important since a sudden change between the reverb of two rooms can sound unnatural and jarring.
Nested Reverbs and Prioritization
When you start the level you are in the *Sewer Pipe* (Bookmark 1), which leads into a basement room in a bank. From here you can make your way up across the debris into the bank lobby.

The sewer pipe and basement room are straightforward [AudioVolume] s, but the lobby and back room in the lobby are more problematic. We could make a series of volumes, but the main L-shape of the lobby is clearly the same space, and the crossover of the [AudioVolume]s could lead to some audio artifacts.

Sometimes it is useful to enter geometry edit mode (Shift + 5, and then Shift + 1 to return to place mode) to see the [AudioVolume]s more clearly, and we can use this mode to edit the shape of the volumes to better suit the environment (hold shift while selecting a corner of the volume to move it). You can also choose different brush shapes as starting points when creating your reverbs.

In this case (as is often the case), the lobby room sits within (or is nested within) the larger volume that covers the whole of the ground floor of the bank, and so another thing we can do is to set its Priority to override the large one that it sits within.

The audio volume [Small_Back_Room] of the lobby has a priority setting of 3.0 (in its ![]() Details panel) whereas the main lobby [Lobby] Audio Volume has a priority of 2.0.
Details panel) whereas the main lobby [Lobby] Audio Volume has a priority of 2.0.

In fact the reverbs of both of these large rooms and the smaller back room actually already sit within a larger reverb that covers the entire street. There’s a hierarchy of priorities: street reverb priority 1.0, lobby reverb priority 2.0, and small back room reverb priority 3.0.

In order to more clearly hear the effect your reverb settings have, you can use a Console command when playing the game. Go to Bookmark 1 and start the game from the *Sewer Pipe*. Call up the Console with the ¬ (PC) or ~ (Mac) key and type “IsolateReverb” (type “ResetSoundState” to turn this off). This removes the dry audio to isolate the reverb (you can also type “IsolateDryAudio” to remove the reverb to isolate the dry audio). Now play through this area up to the street and listen to the reverb changes. You can also see which reverb effect is currently active by using the Console command “Stat Reverb” (see Appendix A: Core Concepts/Console Commands for more on Console commands).
Exercise 07_01: Nested Reverbs
In this exercise we will implement a nested Reverb system for *Cave 01* of the exercise map.
Reverb prioritization
- If you didn’t do so already in Chapter 01, create a large [Audio Volume] that encompasses *Cave 01*. From the
 Modes panel find the [Audio Volume] and drag and drop it into the level. Use the move/scale/rotate widgets (Spacebar to cycle) to position and resize it appropriately. Assign a {Reverb Effect} to it and set its Priority to be 1.0.
 - Now create another [Audio Volume] for the smaller cave area in the corner of *Cave 01–Side Cave*. Again apply a {Reverb Effect}, but this time one more appropriate for this smaller space. Set its Priority to be 2.0.
- Rebuild the level geometry to hear the effects of the reverb volumes from the Toolbar /Build /Build Geometry.
- Play the game and you should hear the appropriate reverb effects when inside the larger and smaller caves. Even though the smaller cave sits within the larger [Reverb Volume], its Priority setting means that it will override the larger volume. Check the active reverbs while playing by using the Console command “Stat Reverb”.
- Remember that in order for sounds to be affected by reverb, they must belong to a Sound Class that has the Reverb option ticked. See Chapter 08 for more on Sound Classes.
Reverb: Prebake
Sometimes you’ll want greater control over the quality of the reverb applied since real time reverb isn’t always the best quality. You can prebake your reverbs into the sounds and then use volumes to decide which sample to play or layer to apply. We’ll go into more detail on this when looking at weapons in Chapter 09.
Spatialization
Sound spatialization in-game is literally a matter of life and death. The field of view for a typical first person shooter is between 65 and 85 degrees, so the majority of things in the world are actually off-screen. Sound plays a vital role in describing this off-screen space for the player and providing information about the direction and source of other characters or objects in the game. Sound sources might be stereo, mono, or multichannel. They might originate from a single point source or come from a large area. Deciding what is appropriate for each sound and faking the physics of how sound behaves in the natural world is an important task in building a convincing and effective audio environment.
Unlike some types of music and stereo ambiences, the majority of sounds within the kind of 3D game environment we’ve been dealing with emanate from specific points within the 3D world. We provide mono assets, and the game system uses the position of these to decide how to pan the sound depending on your playback system. If you have a 5.1 or 7.1 speaker setup, then you will hear the sound come from all directions as you rotate around in the game world. If you have a stereo setup, then this information needs to be folded down into a meaningful stereo panning arrangement. Some engines and sound cards also implement HRTF systems for headphone listening. HRTF stands for head-related transfer function and attempts to describe the spatialization cues we get from the way that sounds reaching our ears arrive at slightly different times and are filtered and attenuated by the presence of our head. By applying the same changes to the left and right versions of a sound reaching our ears through headphones, a convincing recreation of a sense of location for the sound can sometimes be achieved (as our heads are all different sizes, the effect is based on an average and so not as successful as it could be).
Sound Source Types
Mono
Generally used for spatialized point sources such as the diesel generator in the street outside the bank.

Stereo
These sources play back directly to the player’s ears and are not spatialized in the game world. They are typically used for music (such as the music stinger that plays as you exit the bank, or for distant ambient backgrounds (Area Loops from Chapter 01)).
Multichannel Audio: Quad, 5.1, and 7.1
Multichannel sound sources are sometimes used for music but are increasingly becoming the norm for long ambient area loops. Quad, or 4-channel, loops are common since they leave the center speaker free for dialogue.

By using a specific naming convention, you can import multichannel files into a multichannel asset to use in the game. In the *Warehouse* (Bookmark 3) at the end of the street, there are two quad files: a warehouse ambience on the ground floor ([Quad-Warehouse]) and a quad music file on the first floor ([Quad-Music]).


Since both of these are quad, the source files were renamed according to the convention below:
| Front-left: | Factory_Amb_fl.wav |
| Front-right: | Factory_Amb_fr.wav |
| Side-left: | Factory_Amb_sl.wav |
| Side-right: | Factory_Amb_sr.wav |

All these multichannel files play back directly to the speakers and so do not spatialize, which is what you’d generally want for looping ambiences or music.
There may be specific circumstances where you want to use a multichannel file for sources that are located in game (for example if you had a group of musicians or musical sources in game). You could of course simply implement these as separate ambient sounds, but then they would not be in sync. On the roof of the warehouse is an example using our <GAB_Quad_Sounds> macro. (You can press ‘T’ to toggle the background ambience off/on.)

Four [Notes] have been created that are used for the location of each sound (which now need to be imported as separate mono files). By using the <GAB_Quad_Sounds> (from the right-click ![]() Graph Action Menu), you can assign 4 targets for the sounds and define their fall off distances. Once you trigger the node to start (when the player enters the area), the sounds will be spatially located but will stay in sync. This macro is installed here when you install the levels:
Graph Action Menu), you can assign 4 targets for the sounds and define their fall off distances. Once you trigger the node to start (when the player enters the area), the sounds will be spatially located but will stay in sync. This macro is installed here when you install the levels:
- PC: C:Program FilesEpic GamesEngine VersionEngineContentGAB_Resources
- Mac: /Users/Shared/Epic Games/Engine Version/Engine/Content/GAB_Resources
In order to spatialize the Sound Waves must have an {Attenuation} defined with its Spatialize checked. You can assign an {Attenuation} through the Sound Wave’s ![]() Generic Asset Editor.
Generic Asset Editor.

Directional and Diffuse Sources
Directional Sources
Although we’ve looked at the spatialized properties of mono sounds in the game, sounds often have a particular direction in which they are loudest/unfiltered rather than simply attenuating evenly in all directions from a central point. Many sound sources have a front where the sound is clear and back where the sound may be attenuated or filtered. Think of your voice, for example, or a megaphone. Using these controls can greatly support the reality of your soundscape.
In the street outside the bank, there is a public address system spouting propaganda (Bookmark 2). As you move around it, you can hear that this source is directional since the [Ambient Sound] is using a Cone attenuation shape.

Within the inside cone the sound is at its maximum volume, then it attenuates to 0.0 at the outer cone position.

Diffuse Sources
In some cases a sound source will not come from a very specific point but from a larger source of sound, for example a large piece of machinery or a waterfall. In these cases you would then want to spatialize the sound when heard from quite a distance, but as you get closer you want the sounds to be more enveloping and the panning of the sound as a point source begins to sound wrong.
For the Tank 01 [Tank_Diesel] in the street, we’ve made use of the non-spatialized radius function of the ambient sound’s attenuation settings. When the player is within this radius, the sound will no longer pan. This feels a lot more convincing for larger sound sources.

Exercise 07_02: Quad, Directional, and Diffuse Sound Sources
In this exercise we are going to explore adding sound with different source and spatialization properties to your exercise level.
- Try the following:
- Add a quad ambience as an area loop to one of the areas of your level. There are two ambiences (cave and oasis) supplied in the exercise folder.
- These are set up already with the correct file naming convention, and so when you import them they will form a single quad Sound Wave asset that you can treat in the same way you would when setting up a normal area loop.
- If you want to import your own quad assets, then be sure to follow the naming convention outlined above.
- Try using the Cone attenuation shape on an [Ambient Sound] for some more directional sound sources.
- Add an [Ambient Sound] that uses a non-spatialized radius. For example you could edit one of the music sources in the *Mountain Village* area so that when you approached the house, the music would become less directional and pan less wildly.
Distance Attenuation and Detail over Distance
You may be asking yourself at this point why we don’t simply replicate the way sound attenuates in air. We know that in normal outside conditions the sound pressure level is inversely proportional to the square of the distance from the sound source. In audio terms a basic rule of thumb is that sounds halve in volume (approximately 6dB) for every doubling of distance from the sound source. ‘Normal’ conditions are actually very rare, and the way sound attenuates is also affected by air pressure, temperature, and humidity.
In addition to the numerous aesthetic reasons why we might not want to have a “realistic” approach, there are a number of factors that impact on why this doesn’t work for games:
- The recording, storage, and playback of sound cannot replicate the dynamic range of the physical world. Typically we record and store sound in 16-bit format. The range of numbers this allows for does not come anywhere near being able to represent the huge dynamic range of the physical world (the oft quoted comparison being the difference between a pin drop and a jet engine).
- Game distances are not the same as real world distances. Partly because operating a game character is a lot more clumsy than you might think, so they need additional space to avoid getting stuck in furniture all the time, and partly because this would make many games an endlessly boring trudge.
- If we were to imitate the natural attenuation curve of sound, then we would have a lot of very quiet, very distant sounds playing almost all the time, as the fall off distance would be very large. This would have negative implications both for the mix (the addition of all these quiet sounds would add up to take up headroom, a significant chunk of our available 65,536 numbers at 16 bits) and for the number of voices (simultaneous sounds) it uses, which is quite limited (as we’ll discuss below in the section Prioritization: Number of Voices Control).
Most audio engines provide you with a range of options to tweak by hand how the sound will attenuate over distance for each source. When deciding which attenuation curve, or distance algorithm, to use for which sound, there is no substitute for actually previewing it in the game engine itself. Depending on the nature of the sound source and the specifics of what’s going on at the time, you may find it more appropriate to use your ears rather than the starting points outlined below. The following distance algorithms in the Unreal Engine are used to determine how the sound is attenuated from the inner radius to the outer falloff distance.
Attenuation Linear
This is useful for area loops since it’s highly predictable and straightforward to evenly crossfade between areas. The combination of two overlapping sounds dropping off to their Falloff Distance should produce a result that does not significantly drop in volume as you pass across the two, as the addition of the two always produces an equal value.

Attenuation Logarithmic
This is good for sounds that you only want to hear within a relatively short distance from their source. Depending on the exact circumstances, this may be good for enemy weapon sounds where you have multiple enemies within a relatively small area. The curve will give you a precise idea of the position of the sound source without allowing sounds to be heard too far from the source, which might muddy the mix.

Attenuation Inverse
As you can see, this can be heard from a significant distance away, but the amplitude only really ramps up when very close. This is good for very loud and distant objects. They will feel really loud up close and be heard from a distance as you would expect, but won’t completely dominate the mix as they might otherwise do.

Attenuation Log Reverse
These sounds will be loud right up to their Radius Max and then suddenly drop off. Good for stopping sounds up against walls when other solutions are not practical.

Attenuation Natural Sound
This is an attempt at a more realistic attenuation curve that may be appropriate for certain sounds, particularly those with lots of high frequency content.

Filter over Distance
Applying a low-pass filter over distance is very effective for creating a sense of distance, making sounds appear far away or close by through an imitation of the way that high frequency elements of sound are absorbed by air over distance (although obviously in reality it is a lot more complicated than this!) We already looked at implementing this filter over distance in Chapter 01, but you can hear another example of this effect here by listening to the fire blazing around the Tank 02 [Tank_02_Detail_Distance].

In some other game engines, you may need to fake the way that sound is filtered by the air over distance. You might do this by applying filtering in your DAW and then crossfading between the normal (dry) sound and the filtered (wet) one over distance using different attenuation settings for each Sound Wave in your Sound Cue. If you were going to get slightly obsessive about it, you could even have different versions of Sound Cues (using the same Sound Wave but with different low-pass filter settings) played depending on atmospheric conditions such as hot sunshine or dense fog (you can dynamically adjust the attenuation settings of an [Ambient Sound] by using the <Adjust Attenuation> node in a Blueprint).
Detail over Distance
While effective, the application of a simple low-pass filter over distance does not really capture the subtleties of how the different sound elements of some sources attenuate over distance. You can add a lot of depth and character to your objects in the game by applying different attenuations over distance to the different elements of the sound. You may have noticed in the above example that the attenuation settings for the fire are not defined in the ambient sound itself. They are actually defined by an -Attenuation- node in the Sound Cue {Tank_02_Detail_Distance}.
In addition to this, there are the three other layers that make up the complete tank source sound, each part of which has a different attenuation setting so that as the player approaches the vehicle, more details of the sound are revealed. Typically you’d be adding smaller, higher frequency elements the closer you get to the source. This approach is also good for weapons, although we need to implement it in a slightly different way—see Chapter 09.

In theory you could use the -Crossfade by Distance- node in the Sound Cue for this, but since this, at the time of writing, actually retriggers the sounds as you cross the cut-off points, it is only really useful for short one-shot sounds, not loops, and even then you need to use with caution!
Exercise 07_03: Distance Algorithms, Filter, and Detail over Distance
In this exercise we will use a Sound Cue that contains Sound Waves with different attenuation settings in order to reveal further details of the sound source as you get closer.
- In the center of the final *Inner Sanctum* area of the exercise level is a blazing *Fire Pit*.
- Create an [Ambient Sound] in the center of the fire.
- Create a Sound Cue that contains several Sound Waves, each with their own -Attenuation- nodes leading to the -Mixer-.
- Set up the Distance Algorithm, Radius, and Falloff Distance for each so that as the player approaches the pit, different details of the fire sound are revealed (for example, layering up low rumble, low crackling, high crackling, and hiss sounds).
- Add further detail to your level by applying this idea elsewhere as well.
Occlusion, Obstruction, and Exclusions
We’ve looked at how sound describes the characteristics of a space as it is reflected around (reverb) and how the effect of sound traveling through air (attenuation and filtering) gives a sense of distance and localization. Other aspects of the acoustics of sound we have to engage with when designing and implementing sound for games are occlusion, obstruction, and exclusion. By default many engines do not take account of walls/windows to apply the natural changes in volume and filtering that would occur within the real world:
- Occlusion—both the direct and reflected sound are muffled;
- Obstruction—only the direct sound is muffled;
- Exclusion—only the reflected sound is muffled.
Occlusion
When we enter the *Offices and Factory* (Bookmark 4) building at the end of the street, we would naturally expect the outside sounds to be attenuated and filtered as these sounds are occluded by the brick walls.

The extent to which the sound is attenuated in volume and altered in frequency content will be dependent on the material of the obstacle. Brick has a pretty significant effect as you can imagine, whereas if the sound were occluded by the paper walls of a traditional Japanese house, the effect would be rather different. As an illustration of the problem, consider a city block in the rain. With no occlusion implemented, you would hear the rain sound inside all the buildings.

If you carefully placed a number of rain instances using ambient sounds, you might be able to arrange these so that they were only heard outside, but this would be quite a lot of work and also would be liable to phasing issues as multiple instances of the same sound overlapped.

We would also have the same issue of ambient sounds overlapping into areas they should not be in terms of the different vertical floors of a building.

Toggle for Occlusion
The way we’ve dealt with this up until now has been to either carefully construct our ambient sounds’ Falloff Distances or to toggle on or off the inside and outside ambience with [Trigger]s as we cross a threshold.

We have seen this triggered switching approach in Chapter 01 but have included another example here. As we enter the office ground floor, a [Box Trigger] toggles off the outside ambient sounds and switches on the sounds inside the lobby.


Of course there are a number of drawbacks with this approach:
- Unless you’re going to make your own filtered/attenuated versions of the inside and outside sounds, then you will either hear only the inside ones or only the outside ones, which is not very realistic. This can be fine for some environments where due to the noise levels, or the degree of occlusion, you wouldn’t hear these anyway.
- If the player is quickly entering and exiting rooms, then they can become aware of this trickery and this can affect their immersion in the game.
- The nature of a switch is that it is either one or the other—there is no midpoint. So a player hovering in the doorway is going to have a pretty odd experience of constantly switching between the two states.
Many modern game audio engines use what is called ray tracing for detecting occlusion. A simple path is traced between the sound emitters and the listener. If any geometry or objects interrupt this path, then a filtered version of the sound is played (either by filtering in real time or by playing a prerendered filtered version of the sound). Other engines, such as the Unreal Engine, require us to define the geometry for them.
Ambient Zones
It is often the case that the game engine does not have any awareness of the positions of walls in regard to occluding sound, so even if you do have a built-in occlusion system, you will have to do some work to define rooms for this system to work. The Unreal Engine provides a system for occlusion called Ambient Zones, a functionality available as a subsection within the [Audio Volume]s that we’ve already come across. In the case of our city block rain example, we could box out the buildings with ambient zones so that the rain was no longer heard inside.

An important note to remember is that the effects of the ambient zones will only be heard if the sounds belong to a Sound Class that has Apply Ambient Volumes enabled.
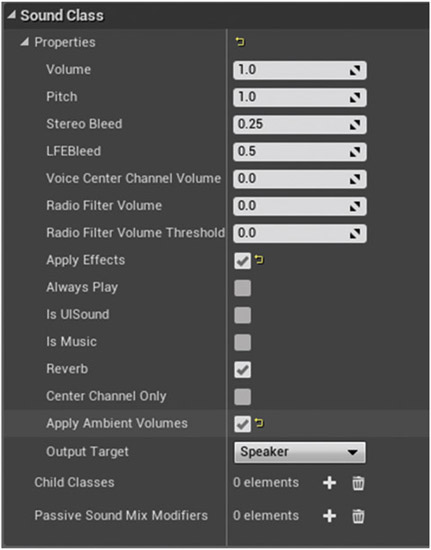
In this level the affected sounds are set to belong to the {Ambient}sound Class (in the ![]() Details panel of a Sound Wave or through the -Output- node of a Sound Cue). We will be looking at Sound Classes in more detail in the next chapter.
Details panel of a Sound Wave or through the -Output- node of a Sound Cue). We will be looking at Sound Classes in more detail in the next chapter.
The settings of the ambient zones work as follows:

Interior Volume
The volume of things inside when heard from the outside
Interior LPF
The amount of filtering to apply to things inside when heard from the outside
Exterior volume
The volume of things outside when heard from the inside
Exterior LPF
The amount of filtering to apply to things outside when heard from the inside
The first room on the left (*Room 01*) has an [Audio Volume] around it with its ambient zone set to attenuate any sounds outside of the room by 0.5. As you enter this room, you can hear the generator in the main lobby getting quieter as the zone’s Exterior Volume is set to 0.5. (Given the toggling of exterior ambience method we used when first entering the building you will need to start outside the building (Bookmark ‘4’) in order to accurately preview all of the following Ambient Zone examples on the ground floor.)
Prioritization of Zones
Like the reverb, [Ambient Zone]s also have a priority system so you can nest zones inside one another. In *Room 02* there is an [Ambient Zone] for the room, and then another smaller [Ambient Zone] for the inner vault room. The inner vault has a higher priority, and so it will override the general room zone when you enter it (it is also set to attenuate the outside sounds further as you might expect).
Internal and External Sounds
*Room 03* has some music playing inside. You can just hear this outside well, as the zone’s interior volume is set to 0.2.
Filtering
*Room 04* has a window looking onto the lobby, and this room has two zones in it. When you are by the window, the outside sounds are filtered less than when you are hearing them through the wall.

Obstructions and Exclusions
In addition to occlusion (where both the direct and reflected sounds are blocked), we must also consider two other scenarios. Obstructions are where there is an obstacle between the listener and the sound object, but the reflected sound emanating from the object and bouncing off the walls still reaches the listener. This obviously has a different sound from when all the sounds are on the other side of a wall for instance.
In this instance pillars are obviously blocking the direct path of the sound, so an [Ambient Zone] is created behind the wall with a filter applied to exterior sounds. This produces a very rough approximation of an obstruction effect.

Exclusions are where the sound reaches the listener directly from the sound source, but the reflections hit the obstacle. This would be typical of a sound and listener lined up through a doorway for example. You can hear this as you enter the elevator lobby at the back of the room.

Dynamic Occlusion
Having destructible buildings is quite common in games, and obviously when the geometry and nature of a space changes like this, we need to update the reverb and occlusion settings. In the room to the left of the elevator lobby is a button that you can use to blow up the outer wall—which is fun!

We could simply create a reference to the [Audio Volume] in the [Level Blueprint] to disable it using the <Set Enabled> node (shown top right in the image below, but unused), but a better approach is to give it some new settings for both its reverb and ambient zone properties. In the “Destructible Wall” section of the [Level Blueprint], you can see this in action.

When the game starts, the audio volume has a {BunkerHall} reverb setting, and its ambient zones settings are set to attenuate any exterior sounds to 0.05 (since they are outside of this brick building). When the player uses the button to explode the wall, the ambient zone settings are changed to 0.8 (since now the external sounds will be heard through the hole in the wall). The reverberant nature of the space will also change with this wall missing, so we have applied a different reverb setting: {City}.
The elevators nearby also apply a similar system to change the occlusion operating when you are inside the elevator depending on whether the doors are open or closed.
Exercise 07_04: Occlusions and Dynamic Ambient Zones
In this exercise we are going to apply ambient zones to the *Cave Tunnel* area of the exercise map.
Ambient zones, <Make Interior Settings>
- Go to the *Cave 02 Upper* area of the exercise map and create an [Audio Volume] (from the Modes panel).
- Use the move/scale/rotate widgets to make the [Audio Volume] encompass this upper part of the cave, ending up against the rock wall that you created the explosion sounds for in Exercise 02_04.
- Add a {Reverb Effect} to the [Audio Volume] and set its Exterior Volume to 0.2. This means that when you are on the *Cave 02 Upper*side of the rock wall, you won’t hear the fans and ventilation shaft sounds that are in the *Cave Tunnel*.
- Select the Sound Waves or Sound Cues you used for the fans and vent shafts and make sure they are assigned to the {Ambient}soundClass. Do this through the Generic Asset Editor for Sound Waves and in the Details panel of the -Output- node for Sound Cues.
- Rebuild the level geometry from the Toolbar /Build/Level Geometry.
- Go and stand next to the rock wall. You should hear the fans and ventilation shafts, but only very quietly.
- When the player explodes the rock wall, we want to change the ambient zone settings of the [Audio Volume]since the wall that was occluding the sounds is no longer there!
- With the [Audio Volume]selected in the Viewport, right-click in the [Level Blueprint] near to the Cave Tunnel/Blockage 01section and Create a Reference to—.
- Drag out from this and create a <Set Ambient Node Settings> node. Trigger this from the <Play Sound> that plays the explosion Sound Cue you created in Exercise 02_04.
- Drag out from the Ambient Zone Settings input to create a <Make Interior Settings> node.
- Change the Interior Volume properties of this to 1.0.
- Play the game again. You should hear the tunnel sounds initially occluded, then when you blow up the wall they will come up in volume.
Moving Objects and Moving Sounds
Summary: Sounds that move and sounds for objects that move using Matinee.
Whether the source is visible or not, making sounds move creates a more realistic and believable audio environment.
Sounds That Move
Take the elevator to the *Rooftop: Offices and Factory* building (Bookmark 6). As you step out, you will notice some flies buzzing around the trash. Listening in stereo, or even better on a surround setup, you’ll notice that the sound of the flies is actually moving around you.

Moving Sound Sources with Matinee
Matinee is the system in the Unreal Engine for getting things to move, and in this case we’ve just created a flies Sound Cue and then used a Matinee to animate its movement. If you select the Matinee Actor that’s near to the trash [Flies] and open it (Open Matinee in the ![]() Details panel), you can see the
Details panel), you can see the ![]() Matinee Editor. The sound’s movement is animated by setting up a number of keys. These are the locations for the ambient sound at different points in time.
Matinee Editor. The sound’s movement is animated by setting up a number of keys. These are the locations for the ambient sound at different points in time.

Try playing or looping the Matinee, and you can see the sound moving around in the Viewport.

You’ll also hear some hawks flying around this rooftop, and this [Ambient Sound] is being animated by the Matinee [Hawks]. Both these Matinees are set to Play on Level Load and to be Looping.
Exercise 07_05: Moving Sounds with Matinee
In this exercise we are going to create some sounds that move around in the exercise level.
Matinee
- Go to the *Canyon* area of your exercise map (Bookmark 6). Here we are going to create some bird sounds that circle around the player as they attempt to make their way across the canyon.
- Create a randomized one-shot Sound Cue (using -Looping-, - Delay-, and -Random- nodes; see Exercise 01_04). Assign this to an [Ambient Sound] in the *Canyon* area.
- Create a [Matinee] from the Modes panel and place it next to your Sound Cue.
- In the Details panel of this [Matinee], set it to Play on Level Load and to be Looping.
- Open the Matinee Editor by clicking on Open Matinee in its Details panel, and right-click in the left hand column of the Tracks tab to create a New Empty Group.
- With your [Ambient Sound]selected in the Viewport, right-click on the name of your New Empty Group and choose Actors/Add Selected Actors.
- Now right-click again on your New Empty Group and choose Add Movement Track. You should see a red, triangular key point appear. This is the starting position of your sound.
- Click on the timeline at the bottom a few seconds in and press the Return key. This will create a new key point.
- Now back in the Viewport, move the [Ambient Sound] to the position you want it to be at this time. You should see a yellow line appear that represents the movement of your sound over time between these points.
- Double-click the Stop button in the Matinee to reset it to the start and press Play. You will see the sound move to this new key point.
- Set up a few more key points using the same method of selecting your point in time in the Matinee, pressing Return to create a key point, and then moving the [Ambient Sound] to a new position.
- The green triangles on the timeline represent the looping part of your Matinee, so drag these to set them to the length of the timeline. If you want to extend the timeline, then drag the right-hand red triangle that represents its end.
- Play the game and listen in wonder as your sound moves around you.
- Make sure that the Attenuation of your Sound Cue (set in the -Output- node) is such that it won’t move out of hearing range of the player.
- Try adding some other moving sounds to your level.
Creating Movement
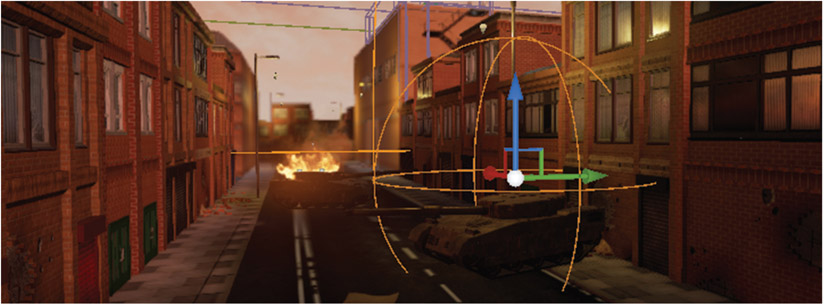
Given that this is an urban warfare environment and explosions are pretty important elements, we’ve created a Blueprint [GAB_ExplosionMovingSound] to add a bit of life and movement to these. This is particularly effective on a surround sound system.

While on the roof (Bookmark 6), try pressing M and you will see an explosion based around the public address system. No matter how good your explosions sounds might be, if they are just spatialized mono or stereo assets, they are going to lack the dynamic impact of explosions in the real world because in the real world sound moves!
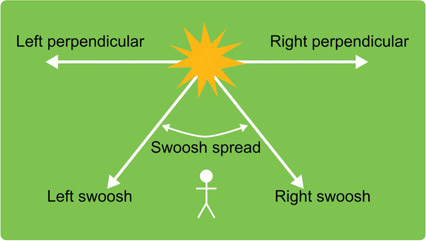
If you select the [GAB_ExplosionMovingSound] Blueprint, you’ll see in the ![]() Details panel that you can add explosion core, right perpendicular, left perpendicular, left swoosh, and right swoosh sounds. This is triggered in the Level Blueprint by setting it the <Activate>—see the “Moving explosions” section.
Details panel that you can add explosion core, right perpendicular, left perpendicular, left swoosh, and right swoosh sounds. This is triggered in the Level Blueprint by setting it the <Activate>—see the “Moving explosions” section.
The core is your basic explosion sound, the perpendicular sounds shoot off right and left from the explosion source (suited to explosion bloom type sounds), and the swooshes whizz towards and then past and behind you (suited to tails). As you can hopefully hear, this movement makes the experience a lot more impressive than a simple static sound and is an idea you could develop for a number of other applications (edit the Blueprint, from the ![]() Details panel, to see how it works).
Details panel, to see how it works).
Exercise 07_06: Sounds with Movement
In this exercise we are going to add some moving explosion sounds to the level.
[GAB_ExplosionMovingSound], Blueprint
- Find the [GAB_ExplosionMovingSound] Blueprint in the Content Browser and drag and drop it into your level, perhaps in the *Canyon* or *Bridges*section.
- With the Blueprint selected in the Viewport, right-click in the [Level Blueprint] and create an <Activate> node. Since you had the Blueprint selected, this should automatically create a reference for it as well.
- Pick a spare key input (e.g., J) and create a <Key Event> for it that triggers the <Activate> node (see Appendix A: Core Concepts/Key and Gamepad Inputs).
- Add sounds to the Blueprint by selecting it in the Viewport and using the Details panel.
- If you are using Sound Waves, remember that these will need attenuation settings so that they don’t simply play back straight to the player. Create a {Sound Attenuation} asset in the Content Browser and assign it to each Sound Wave you are using with the Generic Asset Editor (double-click on the Sound Waves to open this).
- Now try replacing the *Mountain Pass* explosion sound with this Blueprint.
Moving Objects That Make Sound
Most of the implementation of objects in your game that move, and create sound through their movement, will likely be set up by the animators that you work with, but it is worth having an understanding of how they work so that you can better implement their sounds.
Rotating Doors
Go back down the elevator to the *1st Floor* (Bookmark 5) and open (by pressing E) the door at the end.

Like the moving ambient sounds above, this door is controlled by a Matinee, and it is from this Matinee that we can get timed events to sync the sound to the movement. We could just create one sound that is timed to match the full opening (creak) and opened (clunk), but animations often change, so breaking up your audio into smaller events that can be triggered is a good habit to get into.
In this instance the E command that starts the Matinee immediately plays the creak of the gate movement, and then we get a Finished event from a <Matinee Controller> to trigger the clunk.

It is important to note that the Finished event derives from the red end marker in the Matinee (the small red triangle). Sometimes you may find that an animation has finished but your sound has not triggered. An incorrectly placed end marker is most likely the cause. See the “Rotating Door” section of the Level Blueprint.

Exercise 07_07: Moving Object Sounds
In this exercise we are going to add some sounds to the doors in the *Outer Wall Vaults* area of the exercise level.
<Matinee Controller>
- Go to the *Outer Wall Vaults* area (Bookmark 8) of the exercise level and find the “Outer Wall Vaults” /“Doors” area of the [Level Blueprint].
- First find Door_01 and Door_02 in the [Level Blueprint]. You can see that these have been set up with Matinees, and there is an E <Key Event> to open them and a <Matinee Controller> to let us know when the movement has finished.
- Create two <Play Sound Attached> nodes and assign appropriate opening (creak) and opened (clang) sounds to them.
- Select Door_01 in the Viewport and create a <Get Root Component> in the [Level Blueprint]. Attach this to the Attach to Component input of your <Play Sound Attached> nodes.
- Test this in the game and then make the same setup for Door_02.
- You might note that the end of Door_02 is not quite in time. Find the [Matinee] Actor in the Viewport and open the Matinee Editor using the Open Matinee button in its Details panel. Adjust the red track endpoint marker until it coincides with the final key event.
- Find Door_03. This one you are going to Matinee yourself. In the same way that you moved the moving sounds in Exercise 07_05, make this door move (either move it or rotate it).
- With the [Matinee]selected in the Viewport, right-click in the [Level Blueprint] and Create a reference to Matinee Actor—.
- Drag out from this to create a <Play> node (in the cinematic list). Create a use system around the door to trigger this <Play> event. From the output of the <Play> node, connect a <Play Sound Attached> to play your opening (creak) sound.
- Again with your [Matinee]selected in the Viewport, right-click in the [Level Blueprint] and this time Create a Matinee Controller for MatineeActor—. Use the Finished output of this to trigger your door opened (clunk) sound.
- With the door selected in the level right click in the Event Graph to create a <Get Root Component> and attach this to your <Play Sound Attached> Attach to Component input.
- Make sure that the red endpoint marker of the Matinee coincides with your final key point position. You can do this automatically by right-clicking on it and selecting Move to Longest Track Endpoint.
Open/Opening Loops
The metal grill in this first warehouse room (after Bookmark 5) is operated by the control panel on the wall. Pressing E starts the grill opening, but releasing E will pause it.

Because the opening of the grill might last an indefinite amount of time, we cannot just prerender a wave. Instead we use a looping wave that plays for as long as the grill is still moving (i.e., for as long as the Matinee is still playing). The <Gate>s are just to make sure that the player is in proximity to the control panel. E starts the Matinee then plays an open sound and the opening loop. This loop continues until either the player releases E (then it plays a stopped sound and stops the opening loop) or the Matinee finishes. See the “Grill—Button Held” section of the Level Blueprint.

Matinee Events for Mechanical Systems
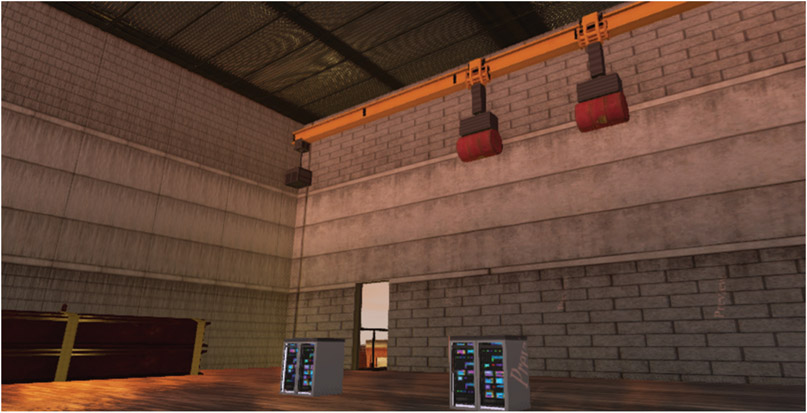
Often there are events within a Matinee that you want to sync sound to, but so far we’ve only been getting notifications when a Matinee plays or finishes. The [Crane] Matinee in the *Warehouse Room* contains an Event Track.

This Matinee will pick up the metal girders that block the entrance to this side of the roof and move them out of the way. This time the movements are more complex, so we have added an Event Track to trigger our sounds. These are created in the same way you create movement keys, only this time you give each event a unique name.

Then when you create a <Matinee Controller>, you don’t just get the Finished event from which to trigger your sounds, but also a list of the other events.

Compared to embedding the sounds in the Matinee itself, as we will see below with the Matinee Sound Track, this may seem like a hassle, but the advantage of this approach is that you can use looping sounds like we have here for the {Crane_Moving} cue. This means that with any in-game animation from a Matinee, it does not matter if the designers decide to change the speed of it (the Play Rate of the Matinee)—our sounds will remain in sync.
Matinee Sound Track
You can start the final machine, to the rear of the next room, with E as usual, but then speed it up or slow it down using the + or − keys. Here it is crucial that the audio remains synced, and so we have used the Sound Track functionality of the Matinee to embed our sounds.


As you can see, the Sound Track in the Matinee is very useful for closely synchronizing sounds to movement events; however as we have noted above, you can’t use loops in these tracks, so depending on your needs you may want to use a combination of Sound Tracks and Event Tracks as outlined above.
Exercise 07_08: Matinee Sound Tracks
In this exercise we are going to add sounds to the moving platform system on *Cave 02* of the exercise level using a Matinee Sound Track.
[Matinee] Sound Tracks
- Go to the *Cave 02*section (Bookmark 3) of the exercise map and find the Matinee [Cave02MovingPlatform01].
- Open this Matinee then press play and watch its movement in the Viewport, thinking carefully about the type and timing of sounds that you might need.
- In the Tracks tab of the Matinee, right-click on Platform_01 and choose to Add New Sound Track.
- Select the Sound Wave or Sound Cue you want for a particular event in the Content Browser.
- With your new Sound Trackselected, move the playhead to the appropriate point and press Return to add a reference to your sound.
- Add further sounds to your Sound Track until you have a complete system for the moving platforms.
- Experiment with changing the Play Rate of the Matinee from its Details panel. Your sound events should stay in sync with the movement.
- You may also want to add some events on an Event Track to cue any looping sounds you might want externally via a <Matinee controller> in Blueprint. Now do the same for the Matinee [Cave02MovingPlatform02].
- Don’t forget that any sounds added to the Matinee Sound Track will need their attenuation defining so that you don’t hear them throughout the entire level.
Physics
Summary: Imitating aspects of audio physics in game such as the speed of sound, Doppler, and physics collisions
Speed of Sound
We’ve already talked about how sound in games does not always stick to what is acoustically accurate for a number of reasons. Once you’ve moved the steel girders with the crane, you can make your way up to the corner of the *Rooftop* (Bookmark 7), where using the control panel will give you a number of explosions at different distances to the player.

In some circumstances you might want the sound to reflect the physics of the real world more accurately (for example in more simulation type games), and here we have demonstrated how you could produce a more realistic relationship between sound and light. As we know light travels faster than sound, so when you see a distant event (an explosion for instance), you will hear it a little later. We’re taking the distance from the player to the explosion source and dividing this distance (in Unreal Units—approximately 1UU to 1cm) by 100 to get the distance in meters. This distance is divided by 343 (the speed of sound roughly being 343 meters per second at 20° C in dry air) to obtain the time to delay the sound by (we’ve also added a speed of sound scale factor, so you can control the strength of the effect).

Doppler
Another physics-based effect we can implement is the Doppler effect, which is the apparent shift in pitch produced by the relative movement of an observer and a sound source. You will probably be most familiar with this as the shift in pitch as a police siren passes.
The implementation is to simply add a -Doppler- node to your Sound Cue

If you stand on the roof by the *Flyby Doppler* location marker and press K, you’ll hear the ambient sound containing the Doppler Sound Cue {Plane_Doppler_Cue} being moved across the level with a Matinee (it is actually attached to the mesh [EuroFighter_Doppler], and it is this that is being moved by the Matinee [Plane_Doppler_M ]).

Although this might work alright for slow moving objects, it is very abrupt and unusable on really fast sources (like planes or bullets). One of the many challenges with which some game engines present the sound designer is that processes are done and variables are changed at the frame rate of the game. Frame rates vary and, in terms of audio, are very slow. We can hear this issue in action when we have a fast moving sound source with a Doppler effect applied. Try finding the [Plane_Doppler_M] Matinee and changing its Play Rate to 2.0 for example.
Due to the variable for the Doppler effect only being updated per frame, the pitch of the sound jumps suddenly from high to low since the plane moves past you faster than the frame rate can handle in terms of producing a nice incremental pitch change.
Doppler: Faking It
Pressing L gives you an alternative approach using prerecorded flyby sounds. As we discussed in Chapter 02, the best results are often from a combination of system approaches and just using great recordings where appropriate.

The cube in the illustration above is attached to the plane [EuroFighter_Doppler_Fake] and has a tag (![]() Details /Tags) with the name “PlaneSound”. Whenever anything overlaps with a box we have set up around the player (see it in the
Details /Tags) with the name “PlaneSound”. Whenever anything overlaps with a box we have set up around the player (see it in the ![]() Viewport of [MyCharacter]), the [MyCharacter] Blueprint checks whether it carries this tag. If it does then it triggers the <CallFakeDoppler> event, which is picked up in our case in the [Level Blueprint] (in the “Doppler” section).
Viewport of [MyCharacter]), the [MyCharacter] Blueprint checks whether it carries this tag. If it does then it triggers the <CallFakeDoppler> event, which is picked up in our case in the [Level Blueprint] (in the “Doppler” section).


Since our flyby sound peaks at 3.0 seconds and we want this to coincide exactly with the moment when the plane flies past the player, we have set the box around the player that triggers this sound to be 500UU large. With the speed that the plane is traveling, this will trigger the sound to start at the right time.

Collisions
The sounds of collisions between materials present many challenges in games since the possible number of permutations is huge.
Simple Object Collisions
In the *Physics Room* (Bookmark 9), there are some objects that produce a sound when the player collides with them. These are implemented using simple trigger on overlap (collision) events, and since these objects are likely to be reused, we’ve made them into Blueprints that have the collision triggers and sounds embedded.

Select the [WarehousePipes01_Blueprint] and click on Edit Blueprint/Open Blueprint Editor in the Blueprint section of its ![]() Details panel. Here you can see that we have created an <Event Hit> event that triggers a collision sound. Because you can sometimes get a very quick series of triggers from these kinds of collisions, we have blocked this temporarily with a <DoOnce> node that is only reset after a given <Delay>.
Details panel. Here you can see that we have created an <Event Hit> event that triggers a collision sound. Because you can sometimes get a very quick series of triggers from these kinds of collisions, we have blocked this temporarily with a <DoOnce> node that is only reset after a given <Delay>.

Since we have made the variables for the Sound and the Retrigger Delay time public (indicated by the highlighted eye icon below), these are editable in the ![]() Details panel of the Blueprint in level.
Details panel of the Blueprint in level.

Exercise 07_09: Simple Collisions
In this exercise we are going to construct some Blueprints that have collision sound effects built in.
<Event Hit>
- Search the Content Browser for a {Static Mesh} that you might want to add a collision sound to, for example the {Warehouse_Girders}. Drag and drop this mesh into your Viewportsomewhere in your exercise level.
- In its Details panel click on Blueprint/Add Script and assign it to a folder (the Blueprints folder is probably a safe bet).
- Double click on the new Blueprint you have created to open the Blueprint editor, go to the Event Graph, and create <Event Hit>, <Play Sound Attached>, and <Get Root Component> nodes.
- Attach the <Event Hit> to the <Play Sound Attached> exec input and the <Get Root Component> to the Attach to Component Input of the <Play Sound Attached>.
- Create a new variable in the MyBlueprint panel (+), edit its Details panel to make it of type Sound Base, and assign your sound (after compiling the Blueprint). Drag this variable into the Event Graph and attach it to the sound input of the <Play Sound Attached>.
- Since you will no doubt get multiple rapid hit events when you collide with this, you might want to implement a blocking system using a <DoOnce> and <Delay> like we did in the level example.
- If you want to make the sound and retrigger delay time editable from the Blueprints Details panel, then you will need to make these public by clicking on their eye icon.
Velocity to Collision Sounds
What the game system is attempting to do here is to somehow replicate the interactions of different materials that produce sound. There is a great deal of research available on the physical processes that create sounds, and there is an increasingly important branch of game audio research that looks at how these can be implemented in games without the vast processing overheads of truly accurate simulations. The details of this subject, sometimes termed procedural audio, are for another book (see the further reading section of the website for a good one!) The reality is that within the processing power currently available for game audio, we are at the early stages of this brave new world and so often there is still the need to fake it.
The most important thing when dealing with variables arising from games physics is to be able to scale these variables into a useful and meaningful range of numbers for your audio. In addition to scaling the variables from physics events, it’s also often useful to set thresholds (to clamp or cap the numbers) so that the sometimes extreme numbers that might appear unpredictably do not result in an extreme audio event.
Velocity to Volume
The first control panel in the *Physics Room* controls the height of the first barrel (use + and − to control the height and E to release the barrel).
The first barrel is the Blueprint [Barrels_Vol] and has a simple relationship between the velocity at which the barrel impacts with the floor and the volume of the collision sound played. When this Actor collides with something, the <Hit Event> in the Blueprint is triggered and this causes a sound to be played, but instead of the simple collision above, we now get a Normal Impulse from the hit event that gives the velocity of the impact (this is converted from a vector to a float) and is then normalized (to a 0.0–1.0 range) to set the <Volume Multiplier> for the sound. Select the [Barrels_Vol] Blueprint or the barrel in game and Edit Blueprint to see the system.

Velocity Reading through Curves
Since the sound of a collision will differ significantly with the velocity of the impact, the second barrel ([Barrel_Curves]) uses the velocity to read through a set of curves. We could have used switches within a Sound Cue to change the sounds, but this would have been a little binary with abrupt changes on the thresholds, so using curves gives us more flexibility.
The velocity of the impact (taken from Normal Impulse) is normalized then used to read out the curve values at that point. The figure below illustrates the velocity (X) to volume (Y) relationships for the three different metal impact sounds: light, medium, and heavy.

These are then used to modulate the volume of the different elements (you could also send the curve output to <Set Float Parameter>s and -Continuous Modulator-s in the Sound Cue to achieve the same effect). We looked at this concept of reading through curves in the Parameterization = Interactivitysection of Chapter 02 and in the Curves to Volumesection of Chapter 04. Go back and read Appendix A: Core Concepts/Transforming and Constraining Variables and Parameters/Reading through Curves if you’d like to refresh your memory.

Sliding, Rolling, and Scraping
In order to work out if an object is rolling or scraping, we need to analyze the pattern of hit events received. If it’s above a given threshold, then we’ll treat it as a normal impact, but if we’re getting lots of low velocity impacts within a given time frame (in this case 4 low impacts within 0.2 seconds), then we can assume that it’s continuously in contact with a surface while still moving (i.e., sliding, scraping, or rolling).
For the blue barrels [Barrels_Roll], press + or − to increment or decrement the angle of the ramp, and E to release. You can also push the freestanding barrels in this area with R and hold the RMB while focused on them to implement a gravity gun type system to pick them up.

If we get the required number of low impact hits, we trigger a different sound and use the impact velocity to change the Volume Multiplier. A <DoOnce> node is used so that we only trigger one instance of this sound at a time (an <OnAudioFinished> event is used to reset the <DoOnce>).

You will notice that you need to build in lots of belt and braces systems (i.e., double checking and limiting systems just to be sure, like the <DoOnce> above) for physics events since they can occasionally send out some extreme values outside of their normal range. See Appendix A: Core Concepts/Transforming and Constraining Variables and Parameters.
Exercise 07_10: Physics Collisions: Volume and Curves
In this exercise we are going to create some barrels in our level with collision sounds that respond to their impact velocity.
<Vector Length>
- In the *Mountain Pass* area of the exercise level, there are a number of barrels up on ledges along the pass.
- Select one of these barrel static meshes, and in the Details panel choose Blueprint/Add Script and assign it a folder. (You need to keep the text ‘Barrel’ at the start of the Blueprint name as the ‘Grav Gun’ on the right mouse button is set to only interact with objects containing this text string.)
- Double click the new Blueprint to open the Blueprint Editor. In the Event Graph create an <Event Hit> to trigger a <Play Sound Attached> and a <Get Root Component> node that goes into the Attach to Component input.
- Create a Sound Base variable (or audio component) to reference your sound, drag this into the Blueprint to create a <Get>, and connect this to the <Play Sound Attached>.
- Drag out from the <Play Sound Attached> and create a <Set Volume Multiplier>.
- Now drag out from the Normal Impulse of the <Event Hit> to connect a <Vector Length> node.
- Create a <Print String> node and trigger it from the output of the <Set Volume Multiplier>.
- Connect the Return Value of the <Vector Length> to the <Print String>.
- Play the game and take a look at the range of impact velocities that you might get from the barrel (from the numbers printed to screen). You can push the barrels off the ledge using the R’ key or use a ‘Grav Gun’ by holding the right mouse button.
- Remove the <Print String> and link the Return Value of the Vector Length to the value input of a <Normalize to Range> node. Set the Range Max to be the highest velocity you saw.
- Connect the Return Value of the <Normalize to Range> to the New Volume Multiplier of the <Set Volume Multiplier>.
- Play the game and you should hear the volume of the barrel collision sound being modified depending on the velocity at which it hits the ground. Try placing several instances of your barrel Blueprint on different height ledges.
- Like the previous exercise, you may wish to implement a system to block multiple rapid hits using a <DoOnce> that is reset by a <Delay>.
- By creating a couple of <Play Sound Attached> nodes with recordings of impacts at different velocities and reading through curves to determine their volume, we can create a more realistic effect.
- Set up two <Play Sound Attached> nodes with associated <Set Volume Multiplier>s.
- Create two variables of type Curve Float and <Get> them in the Blueprint. After compiling the Blueprint, create two Curve Float assets in the content browser (under Miscellaneous) and assign these to your Curve Float variables in the Blueprint.
- Drag from them to create a <Get Float Value> for each.
- Use the Return Value from the <Normalize to Range> node this time to set the In Time at which we read through the curves, and send the Return Value of this to the New Volume Multipliers for each sound’s <Set Volume Multiplier>. See the game example referred to above, the exercise screenshots from the website, and Appendix A: Core Concepts/Transforming and Constraining Variables and Parameters/Reading through Curves for more guidance if required.
Physics-based Collisions: Cascading Physics
You’d imagine that if you take the sound of one rock falling or one pane of glass breaking and applied it to 20 rocks or 20 panes of glass that when multiplied this might produce the appropriate sound for a group of these objects, but this isn’t the case. The complex interference of Sound Waves when many collisions are occurring simultaneously means that any attempts to recreate 20 rocks falling or 20 shards of glass by playing back 20 individual impact sounds is doomed to failure.
When responding to physics, it’s also very easy for your sound system to get overwhelmed with the number of events. Simply reusing the same sound for each individual collision does not work beyond a certain density of events because it can lead to too many voices being used, it can lead to phasing, and it just doesn’t sound right. You could limit the number of occurrences of this sound to stop it taking up too many channels (using the {SoundCue} Voice Instance Limiting discussed later in the Prioritization: Number of Voices Controlsection), but this would not improve the sound beyond perhaps eliminating some of the phasing.
Go over to the window in the *Physics Room* (Bookmark 9) and shoot it, first as spaced single shots and then with a burst of fire. You will hear that after a certain rate of fire, the sound changes from single small glass breaking sounds to a larger glass breaking sound.
What we have done here is to set up a cascading physics system. If more than a certain number of events are happening within a given time frame, then change the sound to a recording of a larger event. This helps to keep the number of simultaneous sounds to a minimum as well as producing a more realistic effect. Consider this approach to any circumstance where you have a potentially large number of sound events (e.g., glass breaking, bricks falling, etc.)
For each hit event, we increment the Window Shot Count variable, and if this reaches more than 5, then we <Branch> to play the larger sound. This is reset after 0.3 seconds to set the timeframe.

In theory this is how the -Group Control- node in a Sound Cue should work. You can assign sizes for each of the inputs, and as soon as the number of active sounds exceeds that size, it will choose to play a sound from the next input down so you can set up a series of prerecorded small to large sound events. At the time of writing, this node doesn’t actually work, so this is why we thought we would build our own!

Exercise 07_011: Cascading Physics
In this exercise we are going to implement the sounds for a cascading physics system.
- Go to the *Outer Walls*section of the map and find the windows that look out over the valley (*Cascading Physics Windows* near Bookmark 8).
- In the “ Outer Walls/Windows” section of the [Level Blueprint], we have set up a cascading physics system for you.
- Create appropriate Sound Cues for the small single shot glass break elements and for the larger glass break events, and assign them to the appropriate <Play Sound Attached> nodes.
- Experiment with both the count number and the delay time until you are satisfied with the effect.
- This is a good example where a reusable Blueprint would be better that making systems for each instance in the Level Blueprint. Create a New Actor Blueprint (Add New /Blueprint Class /Actor). Find the {Factory_Window}static mesh and add this as a component. With this component selected create an <OnActorHit> event in the event graph and reproduce the system from the exercise Level Blueprint.
- Remember you’ll also need to create and use a new Window_Shot_Count integer variable within this blueprint. Once you’ve created the BP drag it into the level and try replacing all the windows with instances of your BP.
Prioritization: Number of Voices Control
Summary: Controlling the number of voices/channels of audio used in game
The number of simultaneous sounds (the number of voices, channels, or polyphony of the system) you can have in games is limited and dependent on the specifications of the console you are working on, the software system, and the other demands being made on the CPU.
In the early days of consoles, the maximum number of voices might have been limited to perhaps 6–8, and even now this is often very limited on mobile devices (the default number of channels in Unreal for Android devices is 12!) Even if you are working on a modern console or PC and have many voices available, you will be amazed at how quickly these can get used up, and if the voice count gets too high, then new sounds simply won’t play—a problem we want to avoid.
One way to avoid this is to set up systems like the cascading physics one above that track the number of sound instances and swap out to different single sounds if a group gets beyond a certain number. The other thing to remember here is that perceptually we tend to consider things as a group when there are more than two of them, so it may be appropriate sometimes to simply use a sound effect that represents the group rather than specific instances. For example if there were a platoon of NPCs marching, it would be better to use the sound {Platoon_Marching} than trying to create this effect through each NPC’s individual Foley sounds.
The considerations about channel count may also affect your decisions regarding attenuation falloff distances. As we noted above, a realistic attenuation fall off over distance would leave many sounds playing very quietly.
In order to avoid the worst outcome (important audio simply not playing), you need to consider grouping your sounds into different categories and devising some general rules as to the number of voices you will allow for each, depending on their importance to the game or the particular scenario. You can set up a number of rules to govern this in the Playbacksettings of Sound Waves (in the ![]() Generic Asset Browser) and Sound Cues (in the -Output- node).
Generic Asset Browser) and Sound Cues (in the -Output- node).

Here we can set the maximum number of instances of a sound we are going to allow (Max Concurrent Play Count) and the rule to apply should we go over this number:
- Prevent new
- Stop oldest
- Stop farthest (in terms of distance), then prevent new
- Stop farthest then oldest
Generally stop farthest then oldest and stop oldest will be the least obvious to the player, but there may be instances where the other rules are more appropriate. The Console command “Stat Sounds” will give you a read out of the number of sound instances dropped (see Appendix A: Core Concepts/Console Commands).
The good thing about this restriction is that it forces us to think carefully about the priority of sounds and to start thinking about the mix, which we will be coming onto in the next chapter.
Animations
Summary: Synchronizing sounds to animations
We’re going to focus on tying sounds to footstep animations in this section, but the principles are applicable to any other type of animation you might have in your game. Repetitive footstep sounds do seem to irritate people more than most aspects of game audio. The first thing to do is to stop thinking of them as footstep sounds. Unless you have a particularly unusual anatomy, you do not take steps in isolation from the rest of your body. Therefore we should consider them movement sounds or Foley sounds (that include cloth movement as well), not just footstep sounds.

Footsteps 01: Anim Notifies
Find the [HeroFPP_AnimBlueprint01] in the ![]() Content Browser and double-click it to open up the
Content Browser and double-click it to open up the ![]() Animation Editor (officially called the Persona Editor). Switch to
Animation Editor (officially called the Persona Editor). Switch to ![]() Animation Editing Mode from the options on the top right and then double-click on the {FPP_IdleRun01} Blend Space in the
Animation Editing Mode from the options on the top right and then double-click on the {FPP_IdleRun01} Blend Space in the ![]() Asset Browser bottom right. In the center window FPP_IdleRun/Samples, you can see that this Blend Space refers to the animation {FPP_RifleRun01}.
Asset Browser bottom right. In the center window FPP_IdleRun/Samples, you can see that this Blend Space refers to the animation {FPP_RifleRun01}.
Double-click on this in the ![]() Asset Browser, and you can see on the timeline at the bottom that this has a Sound Cue added directly as a notify in the animation itself. This enables you to very precisely align sounds with animation events. In this instance there are two notifies using the same footstep Sound Cue that have been synchronized with the landing of the character’s feet.
Asset Browser, and you can see on the timeline at the bottom that this has a Sound Cue added directly as a notify in the animation itself. This enables you to very precisely align sounds with animation events. In this instance there are two notifies using the same footstep Sound Cue that have been synchronized with the landing of the character’s feet.

This simply plays back the randomized {Footsteps_Generic_Cue}sound Cue.

This approach works fine for many animations, but for footsteps of course we want to be able to swap in different sounds depending on what surface the player is on.
Exercise 07_12: Embedding Sounds in Animations
In this exercise we are going to look at a simple method for embedding sounds in animations.
- Go to the *Footstep Surfaces*section of the exercise level.
- Find the [HeroFPP_AnimBlueprint_01] in the Content Browser, double-click to open the Animation Editor and select the Animation Editing Mode.
- After double-clicking on the {FPP_RifleRun02} animation, you can see that this animation currently has no sounds or events attached so when you switch to it in game (by pressing the L key), you will not hear any footsteps.
- Create a basic footstep Sound Cue in the Content Browser and keep this selected.
- Return to the Animation Editor and right-click on the notifies timeline to select New Notify/Play Sound. This will add the cue you have selected to the timeline.
- Play the game again, and again press L to swap to the new animation, and you should now hear the footstep sound being triggered.
- Go back to the Animation Editor and add a further Play Sound notify event for the other foot and tweak the timings of these until it feels right.
- Don’t forget to apply some of the non-repetitive design principles discussion in Chapter 02 such as volume variation via a -Modulator- and -Enveloper-, or try concatenating some heel/toe samples for greater variation.
Footsteps 02: Surfaces
Part of the problem with repetitive footsteps is not actually about the footsteps themselves—it is about the variety of surface types and how often they change. Distances are not the same in games as in the real world. I can walk around my living room in 5 paces (and that’s not just because of my salary). For various reasons (not least of which is the relative clumsiness of the control mechanisms), the spaces between objects in games need to be much larger than in reality—hence more footsteps. This already puts us at a disadvantage when it comes to repetition, but we also very rarely have continuous surface types in the real world. If you recorded yourself walking at the same speed on a continuous surface (if you can find one) then you would probably find the sounds very repetitive! Work with your artists to create and define a large number of surface types and change them frequently.
In order to play different footstep sounds for different surfaces or materials in the game, we need to set up our animation to trigger an Event Notify that we can pick up elsewhere, rather than embedding sounds into the animation itself. In the *Physics Room* (Bookmark 9), there is a concrete floor throughout, along with one strip of wood flooring and one of metal.
You can change the animation that the character uses by pressing thekey. Now walk around the room again, and you will hear that the footsteps change depending on the surface you are walking on. If you open the [HeroFPP_AnimBlueprint02] Blueprint and again go to the ![]() Animation Editing Mode, you can see that this one now uses the {FPP_IdleRun02} Blend Space that references the {FPP_RifleRun02} animation.
Animation Editing Mode, you can see that this one now uses the {FPP_IdleRun02} Blend Space that references the {FPP_RifleRun02} animation.

Instead of a Sound Notify embedded in the track, this now has an Event Notify (or two). Go to the ![]() Graph Mode of the
Graph Mode of the ![]() Animation Editor (top right) and select the
Animation Editor (top right) and select the ![]() Event Graph tab. Here you can see how this AnimNotify is used to <Cast> the player pawn to the [MyCharacter] Blueprint. This will allow us to pick up the events in this Blueprint and use them to trigger our footstep system.
Event Graph tab. Here you can see how this AnimNotify is used to <Cast> the player pawn to the [MyCharacter] Blueprint. This will allow us to pick up the events in this Blueprint and use them to trigger our footstep system.

When this event is received in the [MyCharacter] Blueprint, a trace is then performed with a line straight down from the character to find out what surface it is currently on, or more specifically the physical material of the surface that the character is on. The physical material (or Phys Material) is a parameter you can set within the ![]() Material Editor.
Material Editor.
We break the result to expose all the variables, and then the resulting Phys Material (physical material) is used to control the switch that sets the variable Footstep Surface.

This integer variable is used to control the -Switch- inside the {Footsteps}sound Cue to play the correct footstep sounds for that material. The sound is played back at the point of contact for the footstep from the Hit Component parameter.

So now we get a different set of footstep sounds depending on the surface type the player is walking on.

For landscapes you set the Phys Material in the {Layer Infos} used by the landscape. You can see these in the ![]() Modes panel /Landscape/Paint/Target Layers.
Modes panel /Landscape/Paint/Target Layers.
Exercise 07_13: Footstep Surface Types
In this exercise we are going to implement some surface changes and set the character to pick appropriate footsteps sounds for each.
Physical materials, <Switch on EPhysicalSurface>, <Break Hit Result>
- Go to the *Footstep Surfaces*section of the exercise level. You can see that the floor is comprised of some different surface types: metal and wood.
- First we are going to create the Sound Cue, so source three different sets of footstep sounds—default, wood, and metal.
- Add each sound type to its own -Randomize- node and connect them to a -Switch- with the default going to the parameter unset and 0 input, wood to 1, and metal to 2. Select the -Switch- parameter, name it Surface_Switch in its Details panel, and connect it to the -Output- node.
- Go to the surfaces in the game and select the wood one first. In the Details panel, you can see the Materials it references. Use the magnifying glass icon to find this material in the Content Browser.
- Double-click it to open the Material Editor. In the Details panel on the left, you can see its Physical Material. Set this to {PhysMat_Wood}.
- Now do the same for the metal floor material, setting this (surprisingly enough) to {PhysMat_Metal}.
- Open the [MyCharacter] Blueprint, and you can see in the “Footsteps” section that the <Line Trace By Channel> node is just set to trigger a default footstep Sound Cue {Cave_Footsteps_Concat}.
- Drag out from the Out Hit to create a <Get Surface Type> node. When the line trace goes down from the player this will allow us to track the surface type that the players feet are colliding with. Drag out from the Return Value of this node and create a <ESwitch on EPhysical Surface Node>.
- Delete the output from the <Branch> node that is triggering the <Play Sound Attached> and send this to trigger the <ESwitch on EPhysicalSurface> instead.
- You can see that the <ESwitch on EPhysical Surface> displays the possible physical materials as defined in the project settings. You can also define and use your own Physical Materials. In the Menu Bar choose Edit /Project Settings /Physics. Here you can add additional materials and any that you add will show up in the <Switch on EPhysicalSurface>switch when you create this node. You then just need to create the {Physical Material} asset itself and choose your material from the Surface Type drop down menu in its Generic Asset Editor, and assign this to your material. If you create new ones you will need to recreate the <Switch on EPhysicalSurface> to update it with the new materials.
- We’re going to use the output of the <ESwitch on EPhysicalsurface> to control the Surface_Switch parameter in the Sound Cue you just created. Create a new integer variable named Surface_Type and drag this into the Event Graph to create three <Set> nodes. Connect these to the default (set the value to 0), Wood (set the value to 1) and metal (Set the value to 2).
- Assign your sound cue to the <Play Sound Attached>then drag out from its Return Value to create a <Set Integer Parameter with the In Name Surface_Switch, and trigger this from the output of the<Play Sound Attached>. <Get> the variable Surface type and connect it to the In Int input. As the <ESwitch on EPhysicalSurface> received the surface type it will change the variable and therefore will change the position of the switch within your Sound Cue to call the appropriate footstep sound for this surface.
- If that works then well done! It’s quite tricky.
- You can also define and use your own physical materials. In the Menu Bar choose Edit/Project Settings/Physics. Here you can add additional materials, and any that you add will show up in the <Switch on EPhysicalSurface>switch when you create this node by dragging out from the Phys Material output of the <Break Hit Result> node. You then just need to create the {Physical Material} asset itself and choose your material from the Surface Type drop down menu in its Generic Asset Editor, and assign this to your material.
Footsteps 03: Creep/Walk/Run
Of course it is not just about surface types. In most games you can walk at different speeds, and with a gamepad the divisions between these are blurred, as the analogue controls interpolate between these states. In the Blueprint [MyCharacter], “Footsteps and Foley” section you can see that we’ve taken the input axis from the controller (Axis Value giving us between 0.0 and 1.0) to read through some curves that control the volume of our different states. The Keyboard Axis value gives us values between 0.0 and 0.5, so these are scaled by the modifier keys—Shift (run) by 2.0 and Ctrl (creep) by 0.3. Again see Appendix A: Core Concepts/Transforming and Constraining Variables and Parameters/Reading through Curves for a reminder if required.

So actually our {Footsteps_Cue}sound Cue is more complex than above since the -Mixer- is actually mixing together three footstep elements, the volume of which is being controlled by the <Set Float Parameter>s that target the three -Continuous Modulator-s.


Exercise 07_14: Footstep Speeds
In this exercise you can extend your system to include different elements for creeping, walking or running.
- We have already set most of this system up for you in the [MyCharacter] Blueprint.
- Connect the output of the <Set Integer Parameter> node you created in the last exercise to the first of the <Set Float Parameter> nodes we have provided.
- In your Sound Cue set up three -Continuous Modulators- with the parameter names creep, walk, and run. The volume of the elements you connect to these will be determined by the speed of the player as fed through the curves. Ideally you’d have these elements for each of the surface types in your game.
- To run hold the Shift key, to creep hold the Ctrl key.
- We have put in some default Curve assets, so you can edit these or replace them with your own.
Footsteps 04: Foley or Weapon Carrying Layers
To make a complete Foley system, we need to think about the whole sound that a player makes when they move. You can layer in other sounds depending on the players clothing, the weapons they’re carrying, or other items. Using the blue pickup in this room, you can add a jangly armored vest to your character (the red pickup drops the vest).
The [VestPickup] Blueprint has a box component in it that generates an event when overlapped in its ![]() Event Graph. We check this against the player class to make sure that it is the player that has triggered this event, not anything else, and if True we set the Boolean Has Vest within the [MyCharacter] Blueprint. (There is also an illustration here in the [MyCharacter] Blueprint of how you might implement foley layers for carrying different weapons.)
Event Graph. We check this against the player class to make sure that it is the player that has triggered this event, not anything else, and if True we set the Boolean Has Vest within the [MyCharacter] Blueprint. (There is also an illustration here in the [MyCharacter] Blueprint of how you might implement foley layers for carrying different weapons.)

During a footstep event, the [MyCharacter] Blueprint queries this condition with a <Branch> node and if the condition is True, it plays the extra Foley layer.

Exercise 07_15: Pickups and Booleans
In this exercise you will extend your footsteps system to include Foley layers that vary depending on what the player character is carrying.
- In the *Footstep Surfaces*section of the map, there are a number of pickups named firewood, armour, and keys.
- These set an appropriately named Boolean variable in the [MyCharacter] Blueprint “Foley” section.
- Extend your footsteps system so that if their condition is True, they add an appropriate Foley layer to the footsteps sound.
- You could neaten this system up by adding the Foley layers to your footstep Sound Cue itself by using the <Set Boolean Parameter> node to target the Return Value of the footstep’s <Play Sound Attached>. You can then use -Branch- nodes inside the Sound Cue.
Footsteps 05: Other Notes
Think about when footsteps should and shouldn’t be heard. If there is a firefight, you won’t hear them anyway and they are just taking up valuable headroom and channels (voices), so you could think about changing the mix to take these out in such circumstances. See the discussion of passive sound mixes in the Passive/Automatic Mix Changessection in the next chapter.
NPC Footsteps
Any repetition in footstep sounds will be particularly acute if you have multiple NPCs all referencing the same Sound Cue within a confined area. Consider having a priority system for NPC footsteps. Limit the number of footsteps that can play at any given time (see the earlier discussion in this chapter about voice instance limiting in the Prioritization: Number of Voices Controlsection).

If you’re going to have lots of NPCs referencing the same footsteps, then you could try using adaptive distance attenuation curves, swapping out their attenuation over distance to be tighter around the center of origin. You can either control a -Branch- node in the Sound Cue or <Set Attenuation Override>s in Blueprints.

As we also mentioned earlier in the prioritization section, in terms of our perception of most things we usually class things as one, two, or many, if there are more than two things, we consider them to be a group rather than individual units. So in addition to perhaps prioritizing the nearest NPC footsteps, you (and your programmer) could develop a system where if there are more than X number of NPCs within a given area, you will not actually play their individual footstep (movement) sounds anymore, but will instead play the Sound Cue {ManyNPCsMovement}. This will not work under all circumstances (as the player will often need to locate individuals), but could save on the number of voices used and make them more convincing than the tat, tat, tat of repetition that you sometimes get.
Cameras and Cutscenes
Summary: Game cameras, the listener position and the implications for audio
Cutscenes and cinematic sequences in games use either prerendered video files or are created in real time within the game engine itself using scripted animation and movements. The ability to sound design a linear sequence such as a prerendered cut scene remains an important skill for the game sound designer. The skills are the same as film or animation sound design so we are not going to dwell on them here, but if you are doing an in-engine cutscene, there are some things you need to consider from an audio perspective
Go up to the rooftop on this side of the building (Bookmark 8) and use (E) the switch on the left. This will launch a cinematic fly through to show you the positions of several snipers in this area. (You can switch to a scoped weapon by pressing 2—right mouse button to zoom, F to hold breath.)
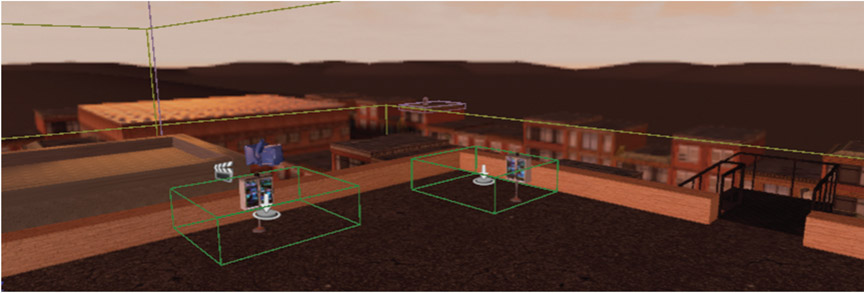
In the [Level Blueprint] “Camera Fly-round” section, you can see that the E key input triggers a <Set View Target with Blend> node that deactivates the [MyCharacter] player controller camera and sets it to the new camera placed in the level [Fly_Round_Camera]. The camera movements are controlled in the Matinee via movement within a camera group in the same way as other moving objects, with the additional option of cutting between cameras with a director track.

In the Unreal Engine the listener position for the sound defaults to the position of the camera. For this kind of level fly through this works fine, but if your scenes are more cinematic, perhaps dialogue between two characters, then this becomes an issue. Dialogue scenes typically use what is called a two-shot where we see both characters in the frame, but we switch views to behind the character who is listening. Even if we set the dialogue to the center speaker every time we go back and forth between these two shots, the rest of the soundscape would flip left/right/left, etc. (see Chapter 08 for how to put dialogue in the center speaker). Obviously this is going to feel pretty strange, so the best approach during cutscenes is to mute the in-game ambience using a Sound Mix and actually trigger any sounds that are required from a Matinee Sound Track or Event Track as discussed above. You could record your in-game ambience from a stable position and then import this to playback on a Sound Track. Frame rates can affect the rate of play of a Matinee, so although ambience is probably alright, you should embed any specific synced sounds into the Matinee itself.
Exercise 07_16: Cameras and Cutscenes
In this exercise you are going to create a fly through sequence for a part of the exercise level and then a more cinematic cutscene.
<Get Player Controller>, <Set View Target With Blend>, [Camera]
- Create a [Trigger] in the exercise level where you want a fly through sequence to start. This could be to show the player what is coming up, along with some instructions as to what to do. This might suit the *Mountain Pass*, *Canyon*, or *Bridges* areas (Bookmark 6).
- Create a [Matinee] (by dragging and dropping from Modes panel) and place it next to your trigger. Name it “Flythrough” in its Details tab. Then in the Cinematicsection, check Disable Movement Input, Disable Look at Input, and Hide Player.
- Create a [Camera] Actor (again by dragging and dropping from the Modes tab) and place it in a position in the level where you want your fly through to start. With the camera Actor selected, you will see a small box out on the bottom right of the screen which shows you the camera view.
- Click on Open Matinee in the Matinee Details panel and with the camera selected in the Viewport, right-click in the Tracks tab and select New Camera Group.
- Now set up your camera movements in exactly the same way as you have done with other Matinee movement tracks, selecting the movement track then creating key events (pressing Return when focused on the timeline) and then moving your camera to a new position (see Appendix A: Core Concepts/Matinee for more). You can also create zoom effects by setting values on the FOVAngle track.
- In your [Level Blueprint] create a <Get Player Controller> node, then drag out of its Return Value to create a <Set View Target With Blend> node.
- With your Camera selected in the Viewport, right-click in the Event Graph and Create a Reference to Camera Actor. Now connect this to the New View Target of the <Set View Target With Blend>. The blend functions act like a crossfade between the player camera and this new camera.
- Connect an <OnActorBeginOverlap> event from your [Trigger] to the <Set View Target With Blend> and then connect its output to a <Play> node that targets a reference to your Matinee.
- To switch back to the player camera view when the Matinee has finished, create a <Matinee Controller> for your Matinee and connect the Finished output to a second <Set View Target With Blend> that uses the <Get Player Controller> as Target and a <Get player character> as the New Target.
- See the illustration of our system above for further guidance.
- So far you have a fly through where you will hear the in-game ambience from the point of audition of the camera. Now try setting up a more cinematic cutscene approach.
- Open your Matinee and create a New Director Group. Put another [Camera] in your level and a New Camera Group in your Matinee. Setting key events in the director group will now allow you to swap cameras.
- You will notice as you cut between cameras that the panning of the ambient audio is quite disconcerting. Try using a {Sound Mix} to mute the ambience at the start of the Matinee and use Sound Tracks in the Matinee itself for your cutscene sounds. See Chapter 08 for how to push and pop Sound Mixes.
- A New Audio Master Track in your director group will also allow you to control the overall volume of any sounds played by the Sound Tracks in Matinee.
Cameras and the Listener
The second button on the *Rooftop* area (Bookmark 8) puts you in control of one of the tanks in the street below (W, A, S, and D to move and right mouse button to fire).

While in the tank, you can change the camera viewpoint in the way that you might in a racing game from the default camera to bumper cam or heli-cam by pressing E.


In the “Tank” section of the [Level Blueprint], you can see how we <Set View to Target with Blend> to switch to the tank’s camera.


Then in the [Tank] Blueprint, the <Key Event> E is used to change which cameras are active. You can see how the cameras and their positions are set up in the ![]() Viewport of the Blueprint.
Viewport of the Blueprint.
Exercise 07_17: Changing Cameras (and Listener Positions)
In this exercise you are going to explore the system for setting up and swapping between first and third person cameras.
<Set World Location>
Go to the
Viewport of the [MyCharacter] Blueprint. In turn select the TPSCameraPos, and the FPSCameraPos. These are scene components that represent the third person and first person camera positions. Try moving them to a new position.
- The # key swaps between these positions when playing the game.
- Now look in the [MyCharacter]Event Graph. This uses the system below to <Set World Location> of the camera component to the world location of the camera position scene components.

- Try creating a new Scene Component (in the Viewportpanel) and positioning this as a ‘Heli-Cam’. Go the Event Graph and with the Hel-cam scene component selected in the components tab right click to create a <Get world location> node. Copy and paste one of the existing <Set world location> and <Set visibility>systems and attach your <Get world location> to the new location input. Set up the visibility states of the first and third person meshes depending which one you want to see. Replace the <FlipFlop> with a <MultiGate> (Set to loop) to cycle between your three perspectives.
Separating the Camera and Listener Position
One thing that will take careful consideration among your team is where the player will hear the sound from. For a first person game, this is obvious—you will hear the world from the location of the player’s head (i.e., the camera’s location as set in the ![]() Viewport of the [MyCharacter] Blueprint).
Viewport of the [MyCharacter] Blueprint).

For 2D, third person, or fixed isometric view games, this is less clear. In some instances the sound remains attached to the player, but more often it is heard from a location in space somewhere offset from the player (i.e., the camera’s position). When using a third person camera, we get a wider perspective than in first person view. We may see things that are out of sight of the player character. Sound from the camera’s point of view can lead to you hearing things that you cannot actually see or to hearing the indoor ambience when the player character is still outdoors and vice versa. If you use the # key in the *Urban Warfare* level, you can switch between first and third person views and hear what we mean (the street at Bookmark 2 is a good place to hear this). This just sets the World Location of the camera, and consequently that of the listener position, to that of the different camera locations as defined in the Viewport of the MyCharacter Blueprint. See the “Cameras” section of the [MyCharacter] Blueprint.
When playing a 2D game, if we hear from the camera’s perspective then we will hear everything on screen all the time, irrespective of whether the player character is actually close to the sound sources. However if we listen from the player character’s perspective, this also sounds strange, as we will have sounds panning across quickly as the player passes them.
For the *Cave* level (Chapter 02), we have set the listener position to be between the camera and player, as this gives the best compromise between the two extremes. When the level starts, a <Set Audio Listener Override> is triggered. The [AudioListenerPosition] that is now set as the new listener position is an in-game Actor that we have attached to the player with an offset in the X-axis so it is further towards the camera (for more on attaching Actors to each other, see Appendix A: Core Concepts/Attaching: Attaching Game Actors to Other Game Actors).


These are all tricky problems to solve, and the choices will mainly be down to the character of the game you are working on and what feels appropriate. You will also need to consider the falloff distances, whether or not to spatialize, and the radius within which spatialization stops (the non-spatialized radius), and experiment with these until you find an approach that works for your particular set up. (The Console command “Stat Sounds” will print the current audio listener position to screen—See Appendix A: Core Concepts/Console Commands).
Exercise 07_18: Listener Position for Listening Device
In this exercise you are going to set an alternative listener position for your player. Behind a large door in the *Outer Walls* area of the exercise level (*Guard Room*), some guards are having a heated discussion about the state of the security procedures around the city. You have a listening device that you can sneak under the door.
<Set Audio Listener Position Override>
- Put a [Trigger] close to the door and set up a trigger use system.
- In your [Level Blueprint] create a <Set Audio Listener Position Override> node (you might need to turn off Context Sensitive in the graph action menu).
- The guardroom has an audio volume around it with ambient zone settings to muffle the dialogue. You need to find the XYZ location of a position inside the *Guard room*. The easiest way to do this is to place an object at the position you want (for instance a [Note] from the Modes panel) and then make a note of its XYZ location settings (in the Transformsection of its Details panel).
- Create a <Get Player Controller> node and connect this to the target input of the <Set Audio Listener Position Override>. Enter the coordinates you just noted in the <Set Audio Listener Position Override> node.
- Link your trigger use system to a <Flip/Flop> that outputs to trigger the <Set Audio Listener Position Override> node or a <Clear Audio Listener Position Override>.
- Play the game and you should now be able to use your listening device to better overhear the conversation.
Exercise 07_19: Offset Listener Positions
There may be instances where you want to separate the listener position from the camera, for example in a third person view where you want the player to hear the world more from the character’s perspective. In this exercise we will look at creating a dummy component within the player character that can serve as a listener position. This is slightly different to the 2D example used in the Chapter 02 *Cave* level referred to above since this will rotate with the player rather than be fixed at an X-axis offset.
- Open the {MyCharacter} Blueprint and go to the Viewport tab.
- In the Components Panel choose Add Component /Scene, and name it ListenerPos. Move it to the location relative to the player you want to hear the sound from.
- In the [Level Blueprint] create a <Get Player Character>, then turn offthe context sensitive option to find a <Get Child Component> node. Connect the Return Value of the <Get Player Character> to the Target of the <Get Child Component. (It will automatically create a conversion node).
- Create a <Get Player Controller> and connect this to the Target input of a <Set Audio Listener Override> (again you may need to turn of Context Sensitive to find this), then connect the Return Value of your <Get Child Component> to the Attach to Component.
- You then need to tell the <Get Child Component> node which Child Index to reference. If you look back in the [MyCharacter] Components panel you can see that your ListenerPos is a child of the Capsule component. Count down through the components (0, 1, 2, 3, etc) to find the Index number for your component (probably 9).
- In the [Level Blueprint]set up a Key Press to <Flip/Flop> between triggering the <Set Audio Listener Override> and a <Clear Audio Listener Override> to test your system.
Conclusion
The ever-increasing power of game consoles gives us the opportunity to replicate real world physics as never before with proprietary systems that enable ray tracing for occlusion, real time delayed reflections, and filtering and convolution reverbs. Although this power can be important in enabling us to create a convincing sense of reality in games, next we need to consider when and how to use audio beyond the real in support of gameplay or narrative.
For further reading please see the up-to-date list of books and links on the book website.
Recap:
After working through this chapter you should now be able to:
- Use nested reverbs and prioritize these;
- Use appropriate distance algorithms for a variety of sources;
- Create obstruction, occlusion, and exclusion systems using ambient zones;
- Move sounds and objects using Matinee;
- Implement physics-based audio systems such as the speed of sound, Doppler, and collisions;
- Add sounds to animations and implement footstep and Foley systems;
- Use cameras for cutscenes and control the listener position.