
4
Music Part B: Basics and Parallel Forms
Summary: Adjusting parallel music layers in response to game parameters
Project: DemoCh04Desert Level: Desert01
Introduction
Hopefully through composing and editing music and swapping your tracks into the racer level, you’re starting to get a good appreciation of the principles involved in interactive music. In this chapter we’re going to look at how you can start implementing music yourself, beginning with some basic uses before moving on to look in depth at some examples of what you can do with parallel forms. To keep it simple in this chapter, we’ll mainly be treating each Sound Cue as one piece of music or track, but don’t forget that you can build variation into your cues by swapping out multiple versions of the same piece.
As a composer you may find some of what follows a bit tricky at first. Many composers make a very good living simply writing their music and then handing it over to other people for implementation. If that is your aim, then you should have gained a reasonable understanding of the concepts from putting your music into the racer. If, however, you want to be able to have more control over how your music is used and be able to innovate in this field, then you’ll want to develop your understanding of what’s going on under the hood. Having this understanding will mean you can be more involved in the design process—better for your music and better for the game.
Music Basics
Summary: Source music, one-shots, timed events, stingers
You can use the keys 1–9 to skip to different locations within the game. If you’re jumping into the level, you can press G to get the weapon.
Source Music
One type of music you can use in your games is source music, which is music that’s coming from sources within the game world itself. This is good at defining the time period, location, or culture in which we hear it. For example if you heard dubstep on the radio, it would give you the distinct impression that you weren’t walking into a Kindergarten. As well as defining the place where you hear it, you can use sources of music in your games to draw the player towards or away from certain areas. The sound of a radio or other sources playing would usually indicate that there are some people nearby. Depending on your intentions, this could serve as a warning, but players may also be drawn toward sources of music out of curiosity. In the *Mountain Village* (Bookmark 1), there is a bit of a shindig going down in one of the houses—best to avoid!

This is simply an ambient sound Actor. If your music is playing in a certain space, you can apply some effects in your DAW to help create this impression. In this case we’ve filtered the music so it sounds like it’s coming from inside the house.
Exercise 04_01: Source Music
In this exercise you will look at adding some source music tracks to the *Village* area (Bookmark 5) of your exercise level.
- Open up your exercise level.
- Add some music sources to this area using [Ambient Sound] s. Think about how to make these loop nicely (see the Level Music, Loops, and Decay Tails section in the previous chapter) and try to apply different types of FX to the music in your DAW according to its location or playback device (for example you could “radio-ize” one of the sources coming from the radio asset in the level).
- Don’t forget you can set your Sound Wave to loop after import by double-clicking on the Sound Wave and checking the Looping option in the
 Generic Asset Editor.
One-shots
As the level starts, a quiet ambient music cue is started. This forms a backdrop to the one-shot music cue that plays as you come over the horizon just outside the village (Bookmark 2). We’re using the <Play Sound Attached> node throughout this level, and for music it makes sense to attach it to the player so it will play directly to their ears. Since we’ll be using this a lot, we’ve set up a variable Player Component that we can reference each time we need it. We’ll look at how to do this in the exercise below.

For one-shots such as this, it is important that they don’t play each time the player goes through the [Trigger] since this just sounds silly. A <DoOnce> node only allows the first trigger through for our {Epic View} cue in the “Epic View One-Shot” section of the Level Blueprint.

Exercise 04_02: One-shot
In this exercise we will add a musical one-shot to your level that is triggered as you leave the village.
<Get Player Character>, <Get Root Component>, <DoOnce>, Player location variable
- First create a variable to which you can attach the music for reuse throughout the level. (There is one already in place for our placeholder systems, PlayerComponentPlaceholder, but it’s good to practice this for yourself).
- Open the [Level Blueprint]. In the My Blueprint panel on the left, click on the + Variables icon to create a variable. In its Details panel, name it PlayerComponent and choose the variable type Scene Component from the drop-down menu. The quickest way to find it is to start typing the name in the search box.
- An <Event Begin Play> node already exists in the [Level Blueprint], so locate it (in the Initialize section) and create the following nodes nearby: <Get Player Character> and <Get Root Component>.
- Drag your new variable PlayerComponent into the Event Graph and choose to create a <Set> node from the options that appear.
Connect this up to the spare output of the <Sequence> node as shown below.

- Create a [Trigger] in your level in a position where you want to play the one-shot (from the Modes panel). Adjust its scaling (using the scaling widget—Spacebar) so that the player will definitely overlap it while walking out of the village.
- With this [Trigger] still selected in the Viewport, right-click in the [Level Blueprint] and choose Add Event for Trigger—/Collision/Add On Actor Begin Overlap.
- Connect this event via a <DoOnce> to the execute input of a <Play Sound Attached> and link up your variable Player Component to the Attach to Component input of the <Play Sound Attached>.
- Reference your Sound Wave or Sound Cue in the <Play Sound Attached>. Play and test.
Music for Timed Events
Often the most effective, and least complex, way of using music in games is to use it only for particular scenarios or events that last a set amount of time. This way you can use a linear piece of music that builds naturally and musically to a climax. Although it appears that the player is in control, the scenario is set to last for an exact amount of time, whether they achieve the objective or not.
In *Desert Area 03* (Bookmark 3) there is a timed mini-game. You need to light the flares (by pressing E), then move the device next to the wall (E) and use it (E) to smash your way into the temple to throw the switch inside. All these events are timed to take place so that the musical climax will arrive at the same time as the completion (or failure) of the task.

At the end of the sequence, there’s a camera tracking shot up to the flare on the tower, and we want this to coincide with the music. Although you can have events trigger when a sound file has finished playing (<Bind Event to OnAudioFinished>), this isn’t always appropriate since the climax of the music occurs earlier than the end of the sound file (followed by decay tails, etc.).
In this case we’ve set a timer to trigger the event from the musical climax (125 seconds in), rather than the actual end of the sound file. The <Set Timer> creates an event of the given name that we can then reference elsewhere in the Blueprint from a <Custom Event> node (see the “Timed Event” section of the [Level Blueprint]).

Exercise 04_03: Event Sync
In this exercise we will look at how to synchronize game events with music for the “Mountain Pass” area of the level.
<Timer>, <Custom Event>
- The mountain pass into the desert has been blocked. You need to light the fuse to blow up the obstacle. This system has been implemented for you in the “Mountain Pass” section of the [Level Blueprint] (E to light the fuse).
- Write a piece of music that builds up to hit a climax at exactly 16 seconds in. Import it.
- Take a link off the <Sequence> node and use this to start a <Play Sound Attached>. Don’t forget to attach the Player Component variable you made earlier to your <Play Sound Attached>, and of course reference the new music you just imported in this node as well.
- Create a <Set Timer> node and set its Time to be 16 seconds. Link to this from the output of your <Play Sound Attached> to start it. In the Function Name of the timer, give it a name such as Trigger_Explosion.
- Create a <Custom Event> and name it the same as the Function Name you just gave. This will now output an event after 16 seconds.
- Connect this <Custom Event> up to the explosion system provided in the “Mountain Pass” section of the Blueprint.
- Play. Bang!
Ornamental Forms/Stingers
As we noted above, musical stingers can be effective in acknowledging a player action or event without requiring significant changes in the music.

In *Desert Paths* (Bookmark 4) the path downward splits into multiple routes. The force won’t guide you, but our stingers will. Again there’s a background ambient music layer for this to sit against, but this time with the addition of some drums ({Con_Layers_L1_V01_22} and {Drums_fast_22}).

There are two types of stingers: the percussion stinger indicating a wrong turn {Percussion_ Stinger_1_22}, and an ocarina flurry that indicates that the player is on the right path {Ocarina_ Stinger_3_22}. These both fit over the background music since it is quite ambiguous in nature. Sometimes we will want stingers to be in tune or in time with a changing accompaniment, but we’ll look at these more advanced systems in Chapter 12.

For the moment we are just triggering the stingers with some [Trigger] s placed along the desert paths.
Exercise 04_04: Stingers
In this exercise the player needs to cross the dangerous *Chasm* that they come across after exiting the mountain pass. As they successfully jump to each platform, we are going to reward them with a stinger.
<Trigger>, <Do Once>, <Play Sound Attached>.
- Write a piece of music that can serve as a background loop, then several short stingers that can play over the top of this.
- Import your files and add all your stingers to a -Random- node in a new Sound Cue {Stingers}.
- There is an <OnActor BeginOverlap> node that comes from a [Trigger] placed toward the edge of the chasm in the “Stingers” section of the [Level Blueprint]. Connect a <DoOnce> node to this and then a <Play Sound Attached> with your background loop in it (remember to set it to loop!)
- In the same section there are several other <OnActor BeginOverlap> nodes. Connect these to another <Play Sound Attached> that references your {Stinger} Sound Cue. Remember to connect both the <Play Sound Attached> nodes to your Player Component variable.
- At the end of the stingers section of the level, add another [Trigger] in the level and use this to fade out your background loop. Create an <OnActor BeginOverlap> event from this [Trigger] and connect this to a <FadeOut> node, created by dragging out a wire from the Return Value of the <Play Sound Attached> and searching.
- Play, and be careful! You could also add some stingers that play if the player falls off by adding some [Trigger] s below.
- Some of the rock platforms are a little unstable. You could extend the system by using an alternative stinger for these as a warning.
Parallel Forms
Summary: Fading music layers in/out, controlling music layers with in-game parameters
By writing and exporting music as separate tracks or stems that are synchronized, we can then vary the volume of each stem to produce different musical arrangements.

Switching or Fading Layers (Parallel Forms for Orientation)
In the *Desert Floor* (Bookmark 5) area you need to navigate your way across the desert floor to find the items dropped by your comrades. Given the shifting dunes it is hard to see them, so you need to rely on the music to guide you.

Each of the pickups (2 X Ammo, 1 X Weapon) has two sphere [Trigger] s that form concentric circles around them and control the volume of our musical layers. On entry to the desert floor area, a [Trigger Sphere] starts off all our layers.
- Layer 01 remains on throughout the area {Con_Layers_L1_V02_22}.
- Layer 02 comes in when the player hits the outer sphere around a pickup {Con_Layers_L2_V01_22}.
- Layer 03 comes in when the player is very close to the pickup, triggered by the inner sphere {Con_Layers_L3_V01_22}.


As you can see from the figure above (in the “Desert Path Stingers” section of the Level Blueprint), the volume of both Layer 02 and Layer 03 are immediately adjusted to 0.0, then (below) brought up in volume as the player enters their respective [Trigger Spheres] and back down again when they leave.

Exercise 04_05: Adjust Volume to Bring in/out Parallel Layers
In this exercise we are going to change the mix of our parallel music layers in response to the player operating a series of *Bridges* that lead across to the *City Walls*.
<Adjust Volume>
- In the *Bridges* section of the exercise [Level Blueprint], there is an event from the [Trigger] at the start of this area and several E <Key Event> s passing through <Gate> s that come from the switches that the player will use at each bridge intersection. We are going to use these to bring in the layers of music as the player progresses.
- Write some music that will work as 4 layers or stems. The first will serve as a background layer when we start the crossing, then the other three will get switched on as each section of the bridge is opened. Test this out in your DAW by muting and unmuting the stems to make sure they will work effectively. Import them and change their names to {Layer_01}, {Layer_02}, {Layer_03}, and {Layer_04}.
- Create 4 <Play Sound Attached> nodes and reference the 4 layers of music you just imported. From the first <OnActorBeginOverlap> (Start Music), connect a <DoOnce> leading to a <Sequence> and add output pins to trigger your 4 <Play Sound Attached> nodes. Remember to attach your <Player Component> to their Attach to Component inputs.
- For the latter three <Play Sound Attached> nodes, drag out from their Return Value outputs to create an <Adjust Volume> for each. Set these to Adjust Volume Level to 0.0 immediately. This will set up your 4 layers in sync but will immediately mute layers 02, 03 and 04.
- Now create three additional <Adjust Volume> nodes, again by dragging out from the <Play Sound Attached> nodes of layers 02, 03, and 04. Set these <Adjust Volume> nodes to bring up the volume of the layers to 1.0 over a duration of 1.0 (or whatever time period sounds best for your music).
- We will trigger these from the outputs of the <Play> matinees already in the system so that each time a bridge section is opened, the volume of one of the layers is adjusted so that it fades in.
- At the end of this section, add a [Trigger] to the level to <Fade Out> all of the layers (this actually stops the sound rather than just adjusting its volume to 0.0). You could leave the background track on and integrate it into the next exercise if you would prefer.
- Don’t forget to watch what is happening in your Blueprint while you play to troubleshoot any problems. See Appendix C: Testing, Troubleshooting, and Good Practice/Watching Blueprints.
Using Variables to Determine Volume (Parallel Forms for Proximity)
We’ve noted above how parallel forms can be highly effective in representing game variables, and since the tracks or stems are always synchronized, we can bring them up or down in volume and the overall effect will still remain musically coherent. In the last example, we looked at how to switch layers on or off(or <Adjust Volume> to fade in/out) in response to [Trigger] Actors placed in the game world (we don’t use the actual <FadeIn>/<FadeOut> nodes since these actually act like play and stop).
To be able to fade in and fade out parallel layers actually gives you a lot of scope for implementing your music, and it may be that you want to pause here and play around with these techniques for a while. The following sections get quite a bit trickier, so take it slowly.
Now we’re going to control the volume of our layers directly with variables from the game. If you can master the following techniques of tying game variables to the music, it will open up a lot of creative possibilities.
Linear Variables to Volume
As the player enters the [Trigger Sphere] at the bottom of the ramp leading up the fort in the *Desert Area 06* (Bookmark 6), the background layer of our music is started {Proximity_Background_ V01_22}. An additional layer {Proximity_Layer_01_V01_22} then gradually gets louder the closer they get to the entrance to the fort. (See the “Ramp to Gate” section of the Level Blueprint.)

Controlling Audio Components with Variables
Previously we’ve applied changes to our audio by applying nodes directly to the Return Value of the <Play Sound Attached>, for example with the <Fade Out>, <Adjust Volume>, and <Set Float Parameter> nodes.
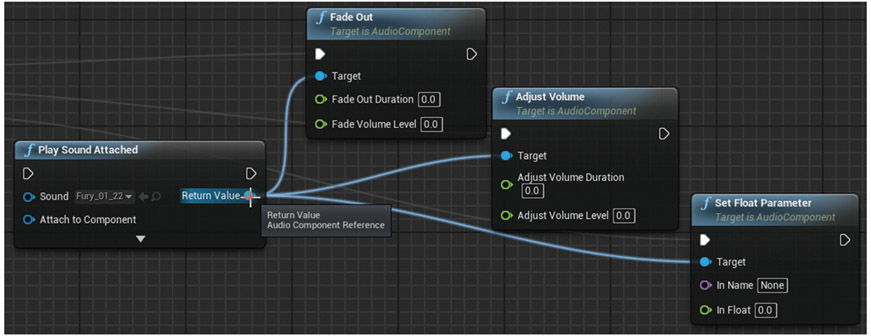
As the systems get more complex, we’re going to keep things a little neater by using an AudioComponent variable in Blueprint to hold our cue. When a sound plays, it creates what is called an audio component. This is a programming function, the details of which we don’t need to worry about too much. What it does mean is that we can store this in a variable and then act on it in various ways elsewhere in the Blueprint, keeping things a bit tidier than linking to the Return Value all the time. The <Set> node in the illustration below is taking the audio component produced by the <Play Sound Attached> and storing it in our Proximity Component variable (like we did earlier for our Player Component to attach <Play Sound Attached> nodes to).

We can then <Get> this variable anywhere in our Blueprint to act on it in the same way.

In this case we’re going to get the distance between the player and a [Target] that is located at the entrance to the fort and use this to control the volume of a second layer within the Sound Cue.
The Get Distance System
We want to convert the distance between the player and the fort into a value between 0.0–1.0 to set the volume of the second layer. When the system is triggered, we use a <Get Distance To> node to capture the current distance (in Unreal Units) between the player (<Get Player Character>) and the target ([TargetPoint2]), and set the float variable DistanceToMax to this value. The <Normalize to Range> node takes this DistanceToMax value as its Range Max value. Having set this it will now scale the value input from 0.0–1.0. Since we want the value to go up to 1.0 (to make the second track louder) while the distance actually goes down to 0.0, we’ve inverted this value by subtracting it from 1.0.
The original [Trigger Sphere] opens a <Gate> that lets through an <Event Tick>. An <Event Tick> gives an output every frame and so is useful to use when you want to keep values constantly updated.

The outcome of our distance calculations is drawn in by the <Set Float Parameter> node (that is also being updated every frame by the <Event Tick>). The <Set Float Parameter> is targeting our audio component variable Proximity Component and is using this value to change the value of a float inside the Sound Cue {Prox_Layer_All}.

Inside the Sound Cue is a -Continuous Modulator- node, and as you might remember from Chapter 02, this allows us to use a named parameter (in this case Prox_Layer_01) to vary either the pitch or volume of a sound.

We’ve set the Min values of the -Continuous Modulator- to 0.01 so that it always plays even though you won’t hear it. This ensures that the layers stay in time since if it did drop to 0.0, it would not play. When it did start to play again, it would do so from the start—thus putting it out of time with the other layer.
Exercise 04_06: Linear Variables to Layers
Having crossed the bridges, you are now on a path leading to the *City Gates*. We want to increase the musical tension as you approach, so we are going to gradually bring in an additional music layer the closer you get.
-Continuous Modulator-, get distance
- Write two looping tracks of the same length. The second track is going to gradually fade in to increase the tension, so you can preview this effect in your DAW by using volume automation curves (or just by hand using the volume of this track).
- Create a new Sound Cue with a two input -Mixer- and connect it to the- -Output- node. Add your first track directly to the mixer, and send the one that is going to fade in through a -Continuous Modulator- before going into the mixer. Remember to make them both -Looping Wave Players-.
- Select the -Continuous Modulator- and give it the Parameter Name DistanceToGate. Set its Default, Min Input, and Min Output to 0.01 and its Max Input and Max Output to 1.0.
- Find the “Distance to Gate” section of the [Level Blueprint]. Add your Sound Cue to the <Play Sound Attached> and set the In Name of the <Set Float Parameter> to match the Parameter Name of your -Continuous Modulator- (DistaceToGate).
- Play the game, and you should hear your first track start as you pass through the [Trigger] and then your second track fade in as you approach the city gate.
- Now create a [Trigger] just inside the city gate. Use this to play a stinger and <Fade Out> of the music tracks, then close the <Gate> after the <Event Tick> to stop the system.
Curves to Volume
Being able to link any parameter or variable in the game to your music will give you lots of ideas for how the music can be used to relay information to, or evoke emotion in, the player. But we don’t always necessarily want a direct relationship between the parameter value and the musical volume. In the example above, for instance, the distance to the gate (0.0–1.0) directly relates to the volume of the layer(0.0–1.0). Remember that 0.0–1.0 in the Unreal Engine is not the same as 0.0–1.0 in your DAW, since the system doesn’t take account of the logarithmic nature of perceived loudness so there are lots of good reasons for having greater control through using curves. For example what if we wanted the music to fade up gradually over distance, but then get quite a bit louder when we are right towards the end?
In order to have this greater control of the relationships between game parameters and music, we can use curves. As we seek the different values of the curve using the game variable, we can change the value that corresponds to it by changing the curve shape. We have looked at this concept already in the Parameterization = Interactivity section of Chapter 02 and in Appendix A: Core Concepts/Transforming and Constraining Variables and Parameters/Reading through Curves. It might be a good idea to go back and have a read of this again to refresh your memory.
As you enter the desert fort in *Desert Sneak* (Bookmark 7), the first and second courtyards have guards. You need to sneak up behind them to take them out (E) without alerting the others.

The distance from each guard is linked to the volume of the second layer in our Sound Cue {Proximity_All}, Sound Wave {Proximity_Layer_02_V01_22}. This time, however, we don’t want a linear fade over distance, but instead want to bring the volume up sharply when you get close to heighten the tension. We’re still getting the distance from the player to the bot and normalizing this (0.0–1.0), but now the value is used to read through a volume curve {DistancetoBotVolume}.

As you can see below, the system is just the same as for the linear parameter leading up the gate, the only difference being that we’re now reading through the curve instead of applying this parameter directly.

We’ve also added a little stinger to accompany their tragic demise.
Exercise 04_07: Variables to Music Layers (Curves)
In this exercise we are going to tweak the previous system for the music approaching the gate to read through a volume curve instead of applying the distance to the gate directly to the volume of the second music track.
{Curve}s
- Return to the “Distance to Gate” section of the [Level Blueprint] you constructed for Exercise 04_06.
- In the Content Browser create a new curve asset (Add New/Miscellaneous/Curve) and choose a Float Curve.
- Double-click it to open the Curve Editor. Edit the curve to represent how you want the music track 02 to fade in over distance. Create a new point with Shift and click, click and drag points to move, and use the mouse wheel to zoom in/out. Click and hold RMB to move the view around, and right-click on points to change the curve type (see Appendix A: Core Concepts/Transforming and Constraining Variables and Parameters/Reading through Curves).
- The X-axis represents the distance 0.0–1.0 and the Y-axis represents the volume of your track 0–1.0.
- In the [Level Blueprint]/ MyBlueprint panel, create a new variable (+) and set its Variable Type to Curve Float in its Details panel.
- Compile the Blueprint (top left icon) so that you can add a Default Value to this variable. With your {Curve} asset selected in the Content Browser, add this to the Curve Variable using the arrow icon.
- Drag and drop your curve variable into the [Level Blueprint] to <Get> it. Drag out from it to create a <Get Float Value> node and feed the Return Value from this into your <Set Float Parameter> that controls the volume of the -Continuous Modulator-.
- Use the inverted <Normalize to Range> value to go into the In Time of this <Get Float Value>.
- Experiment with the shape of your curve until you get the musical effect that you are happy with. (Remember you can download images of the complete exercise systems to help you out from the website).
Mix Automation for Parallel Layers
Once you’re into the main courtyard in *Desert Courtyard* (Bookmark 8), it all kicks off! Unfortunately it appears your stealthy approach hasn’t worked. Here we have a number of game variables (number of bots killed and player health) that are linked to the music, as well as an automated music mix change when a special state (called fury mode) is activated. There’s quite a lot going on here, so we’ll cover each aspect individually. See the “Desert Courtyard” section of the Level Blueprint.
The two background layers are controlled through the -Continuous Modulators- marked “Drums” and “Background”.

The EnemiesLayer ratchets up in volume as you dispatch one, two, and three enemies, again using a -Continuous Modulator- (first enemy = 0.5 vol, second enemy = 1.0 vol, third enemy = 1.4 vol).

As the player’s health decreases, the {HealthChoirMain_ED_22_Cue} gets louder.

When the player has killed three guards a special mode is unlocked—“Fury!!!”. This puts the game into slow motion and increases the amount of damage from the player’s weapon.
Although we want to leave the health choir unaffected during fury mode, we want to fade out the other parts and then bring them back in once fury has timed out. We could use <Adjust Volume> nodes to do this, but we want more control over the fade curves, so we have used a <Timeline> with Float Tracks that are going to automate the volume changes over time.

When the player triggers fury mode, the {Fury_01_22} Sound Wave is played and the <TimeLine> started. As the <Timeline> plays through, the Float Tracks set the different float parameters of the -Continuous Modulators- within the {Health_Fury_Main_Stems} Sound Cue.

The combination of parallel music layers controlled via continuous modulators, along with the kind of mix automation that <Timeline> Float Tracks can give you, should allow you to do some pretty funky stuff!
Exercise 04_08: Automated Music Mixes
Having come through the city gate, you are now in the *Outer Walls* section of the map. To your left are some stairs leading down to the *Outer Wall Vaults*. In this exercise we are going to create some automated mix changes in your music in response to player actions.
<Timeline>
- The player needs to search the *Outer Wall Vaults* (Bookmark 8) to locate two pieces of the door mechanism to fix *Handle 01*. Once *Handle 01* has been used, they can operate *Handle 02* to open the *City Gates*. As they collect the pieces, fit them to the mechanism, and operate the handles, we will change the mix of the music in response to the task completion.
- Most of the system is in place in the [Level Blueprint], you just need to compose the music and set up the Sound Cue.
- Write three layers of music. The background is going to play all the time. When Item 01 to fix Handle 01 has been picked up, Layer01 will fade in, and when it’s been successfully attached, it will fade out. This will happen again with Layer02 for picking up and attaching Item 02. When Handle 01 is used (E), Layer03 will come in, alongside quiet versions of Layer01 and Layer02. When Handle 02 is used, a stinger will be played and the three layers faded out.
- Write the stinger and keep it as a separate Sound Wave. Add it to the <Play Sound Attached> named “Stinger”.
Set up your other tracks in a Sound Cue as below, and name the Parameter Names of the -Continuous Modulators- as indicated.

- Reference this Sound Cue in the <Play Sound Attached> named “Auto”.
- In the system, this <Play Sound Attached> sets its Return Value to a variable Auto_Cue that the various <Set Float Parameter> nodes target using the named continuous modulator parameters.
- Play through the game sequence and note how the layers come in and out to different degrees as the <Timeline> Float Tracks automate the volume levels.
- Experiment with changing the shape of the Float Track fades.
Conclusion
You can do a lot with parallel forms, but sometimes we want the music to transition to a completely new piece, or to change at a musical point for a greater emotional impact. You may have noticed, for example, how the stingers we have used so far to finish off our pieces are not really that satisfying since they just play at an arbitrary point alongside the fade out of the other musical parts. In order to give the music more impact, we need to look at how to handle musical transitions.
For further reading please see the up-to-date list of books and links on the book website.
Recap:
After working through this chapter you should now be able to:
- Create looping parallel layers or stems of music, and fade these in and out in response to game events or triggers using the <Adjust Volume> node;
- Use parameters/variables from the game to set the volume of particular stems using -Continuous Modulators- in their Sound Cue;
- Control the relationship between the game parameters and the volume of the music using curves, and instigate automated mix changes between the layers by feeding these -Continuous Modulators- values from Float Tracks of a <Timeline>.