
09
Advanced: Weapons
Summary: Handling inputs, one-shot, retriggered and looping weapon systems, environment and distance layers, bullet impacts, casings and whizzbys
Project: DemoCh09Weapons01 Level: Weapons01
Introduction
Since this section is advanced, we are going to presume that you are pretty familiar with all the core techniques we have covered so far and are at the stage where you can have a good poke around the demo systems to see how they work and try things out. With this being said, there are no exercises in the following chapters, and we will just give an overview of the principles at work and a general guide to how the systems are operating.
Alongside vehicles, the weapons in your game will require some of the most complex systems for effective implementation, and you’ll also need to work closely with your animators. The real impact of a weapon sound is highly dependent on the environment it is in, so alongside the mechanics of the weapon itself, you’ll also need to consider systems for the reflection and tail elements as well as the character of the sound when heard over distance.
It is of course crucial that players can locate enemies through the source of their weapon sound, so NPCs will retain strong spatialized mono elements, but given the importance and impact of the player weapons, you’ll typically be using high quality stereo or even quad sources for these. Like vehicles, the weapon systems for games remain an area of real specialization often making use of advanced proprietary tools, but we’ll attempt to introduce you to some of the basic principles here to get you started.
In the map you can switch to the different weapons using the following shortcut keys:
- —Pistol
- —Assault rifle retriggered
- —Assault rifle tail
- —Machine gun
- —Sci-fi beam weapon
- —Grenade launcher
- —Assault rifle feedback
- —Rifle
- —Assault rifle shells
System
Before we go on to look at the specific weapons themselves, we’ll give a brief overview of the system. The Edit/Project Settings/Input/Bindings allow us to set up inputs from the gamepad or keyboard.

We can then receive these events in our Blueprints.

At the start of the game, all the weapons are attached to the player and set to be hidden in the [MyCharacter] Blueprint, apart from the default pistol. The weapon Actors are also set to their respective variables (e.g., class Blueprint [WP_Pistol] here is set to Weapon_01).

The number keys 1–8 show/hide the weapons and set the variable Active Weapon.

When the player fires (i.e., we receive <Input Action Fire>), this is cast to the appropriate Blueprint so that we can pick it up there and trigger the weapon system.
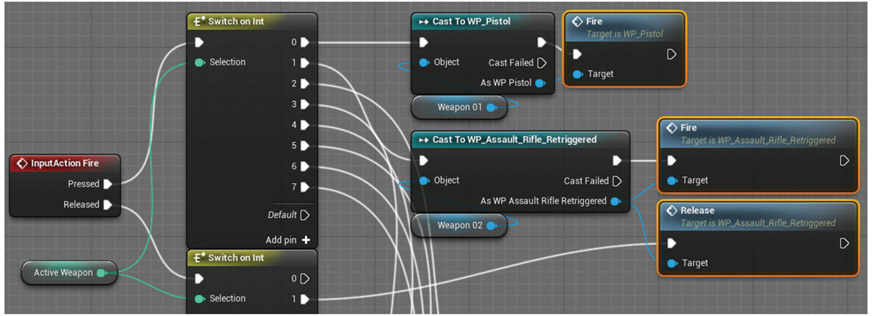
The image below shows the input action fire received in the [WP_Pistol] Blueprint.

One-Shot, Retriggered, or Loop?
The rate of fire for your weapon will determine the system that you use for playback.

One-shot
Go to the *Target Range 01* (Bookmark 1) and press 1 to select the [WP_Pistol].

This weapon fires only once when the trigger or LMB is clicked.

In the [WP_Pistol] Blueprint, you can see that it first checks the ammo count before playing the sound. The <DoOnce>stops any further input until reset by the <Delay>, which has the effect of limiting the possible fire rate of the weapon.

As many weapons are based on the repetition of a mechanical process, you will find that they do not vary a great deal from shot to shot. Variation in weapon sounds tends to come from the reflections around the environment they are in, which we’ll be looking at shortly. However, some very subtle pitch modulation can work to create some variation and also to alleviate the phasing that can occur with multiple instances of the same weapon sound.

Retriggered
Press 2 to select the [WP_Assault_Rifle_Retriggered].

This weapon will fire for as long as you hold down the LMB, or until you run out of ammo.

The [WP_Assault_Rifle_Retriggered] Blueprint has a <Release> event that will close the <Gate> and stop the weapon firing. While the <Gate> is open, the <Delay> feeds back through the <Gate> to keep the weapon firing (until you run out of ammo).

You can set the <Delay> or fire interval according to how many rounds per minute you want the weapons to fire. The fire interval is equal to 60 divided by rounds per minute.
Retriggered weapon sounds usually work well for mechanical-based weaponry, however there are two issues. The first is that as the sounds are overlapping, this can use up your voice count very quickly (see the discussion below). The second is that if your sample is relatively long, and you are retriggering frequently, you can produce phasing caused by the interference between the waveforms (you can alleviate phasing to some extent by using a -Modulator- node within your Sound Cue to make subtle pitch variations).
For the current RPM of 600 (delay of 0.1), you can see that this produces up to 10 simultaneous versions of the gunshot produced by their overlap (use the Console command “Stat Sounds” to see a total of the number of sounds currently playing). If there are a number of enemies using this weapon, then you’ll run out of channels pretty quickly, and if they are for the player’s weapon, then they will likely be in stereo—so double the problem. See below for an alternative approach.

Retriggered with Tail
Press 3 to select the [WP_Assault_Rifle_Tail].

Another solution to both phasing and voice issues is to use a short fire sound that retriggers but then to add the longer tail element when the input trigger is released.

The [WP_Assault_Rifle_Tail] has a FireInterval of 0.075 seconds, which is equivalent to 800 rounds per minute. This time the firing sound that’s retriggered is only the very short initial crack of the weapon. Only when you release the key (or run out of ammo) do you hear the longer tail section.

The system is similar to the [WP_Assault_Rifle_Retriggered], but this time the <Release> event (when your key or button is released) triggers the tail part of the sound. We’ve added another <Branch> condition here as well so that you don’t just hear the tail in isolation if you have already run out of ammo.
By using relatively short fire samples and leaving the tail until the release of the button or trigger, we can avoid some of the worst effects of phasing and limit the voice count. But sometimes we want to go even faster!
Loop with Tail
Press 3 to select the [WP_Machine_Gun].

The issues mentioned above with retriggered weapons become acute with weapons such as miniguns, which have very high fire rates. These weapons can achieve fire rates as high as 6,000 rounds per minute (this is why they are most often vehicle mounted, as you need the vehicle to carry the weight of all the ammo!)
Let’s take a slightly less extreme example of a weapon that fires 3,000 rounds per minute (i.e., one round every 0.02 seconds). In the first 0.4 seconds after the player has pressed the fire button, the sound has been triggered 20 times and is therefore taking up 20 of our voices already. If this firing sound sample is actually one second long, before it has finished playing you will have 49 voices being used! With such extreme rates of fire, the retriggered approach breaks down, and we need to look at a looping solution. By editing out a looping portion of the weapon fire sound into a separate file, we can loop this element and then add the tail on the trigger or button release.

The [WP_Machine_Gun] Blueprint implements the system described above. Another difference now is that we need to set up an ammo counting down system independent of the firing event (since nothing is being retriggered). This is done with a looping [Delay] node that decrements the ammo count every 0.05 seconds.

Looping Beam Weapons
Press 5 to select the [WP_SciFi_Beam].
Unlike the looping of a mechanical-based weapon, many sci-fi type weapons have loops for more of a constant beam-like quality.

For this weapon there is a startup sound, then the loop holds while the LMB is pressed, and on release there is an end fire sound.

As you can see the [WP_SciFi_Beam] Blueprint implementation is similar to the looped machine gun above.

Projectiles
Press key 6 for the [WP_Grenade_Launcher].

Try it out on the barrels in the target range area (Bookmark 2).
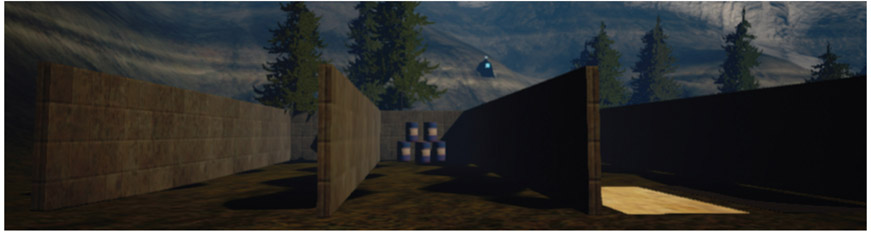
The actual firing system in the [WP_Grenade_Launcher] Blueprint is just the same as our one-shot pistol.

But now we need to also attach an explosion sound to the projectile itself. This takes place in the [GrenadeProj] Blueprint.

Feedback
Press key 7 for the [WP_Assault_Rifle_Feedback].

We wrote in Chapter 08 about how audio can give important feedback to the player. You can add this mechanism to any of your weapons to notify the player when they are running low on ammo.
In the [WP_Assault_Rifle_Feedback] Blueprint, you can see how we swap out the firing sound for an alternate one when the ammo count goes below 20.

Environment and Distance Elements
Most of the sounds of the mechanics of a real weapon are actually pretty dull and repetitive. What gives them such an impact is the sound produced by the loud burst of sound energy reflecting around an environment.
Environment Layers
The reverbs you can enable in-game are often a bit of a blunt instrument and really can’t match the rich quality of good recordings, so it may be that you want to exclude many weapons from this system (through their Sound Class settings) and implement your own system to add appropriate reverberant or ‘reflection’ layers to your weapon sound (such as indoor, urban, urban distant, forest, open field, canyon, etc.)
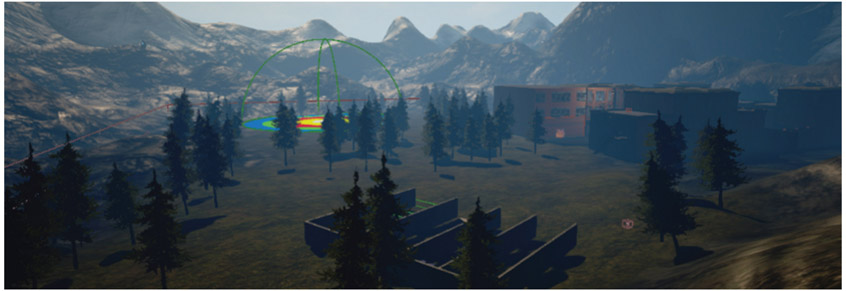
Press key 8 for the [WP_Rifle] and go to the street area of the map (Bookmark 3). (This weapon also has a scoped view RMB and hold breath function H that you can examine in the MyCharacter Blueprint.)


As you move from the street to inside the building and outside to the grassy area, you will hear that your weapon sounds change accordingly. We are monitoring the type of space the player is in and then swapping out different reverberant tails in the weapon fire Sound Cue.

We’ve created our own [GAB_WeaponTailsVolume] Blueprint in order to enable this functionality. These have been placed around the level in the same way that you would place [Audio Volume]s. When the player is inside a [GAB_WeaponTailsVolume], we can get the designated name of that volume and its priority. This is set in the [GAB_WeaponTailsVolume] itself, and the priority is so that we can nest volumes like we do with reverb.

In the [WP_Rifle] Blueprint, we <Get> these values and compare the string that carries the name of the volume in order to <Set> the variable Reverb_Tails. This is used to set the -Switch- inside the Sound Cue {UrbanRifleTails}.
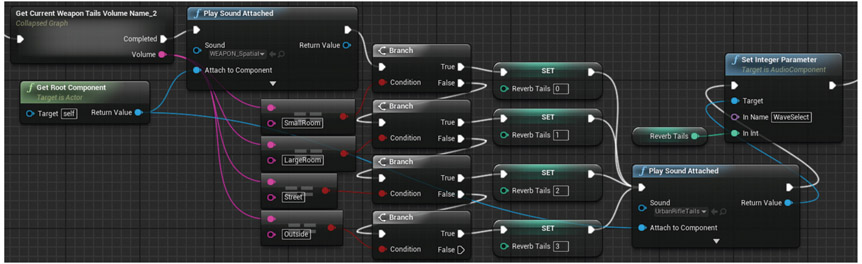

In theory we could swap out the entire weapon sound, but it’s often important for gameplay that players know what weapons people are using, so it’s good to keep at least one element of the weapon sound with a consistent characteristic for that weapon type. This would also be possible to do for looped weapons, although you’d need your programmer to be on the ball to manage a perfect sample level synchronization with the dry loop and the looping layers. The current mechanisms for audio timing in the Unreal Engine are not up to this yet. You could also implement the same system for the retriggered with tail or machine gun weapons so that the tails swapped out depending on the environment.
Distance Layers
We talked in Chapter 08 about how the simple implementation of low-pass filtering and attenuation curves don’t really come close to the way that sound changes depending on your distance from the source. Changing the character over distance is vital for weapons sounds. The difference from the Details over Distance approach of Chapter 07 using multiple attenuations is that this time we want some elements to die away as we get closer, not just stack up.
In the *Open Field* area of the weapons map (Bookmark 4), there is a bot just randomly shooting in the air, as is their want sometimes. As you approach the bot, you can hear the different elements of the weapon sound being revealed.

In the [Bot_DistanceFrom] Blueprint you can see that this system derives from an idea we have come across several times—using a linear variable from the game engine to read through curves that define the volume of each element. In this case we take the distance from the player to the bot and set out our curves to represent the volume of the different elements of the weapon’s sound over distance (this is just a section of the Blueprint showing two of the weapons elements).


We could of course also do this within a single Sound Cue by using <Set Float Parameter> nodes that target -Continuous Modulators- within the cue, and we could have used the -Crossfade by Param- node, but using curves give us more control.
Bullets
Weapon firing sounds do not work in isolation. They are part of a system that includes the whizzbys, impacts, and ricochets.
Impacts
Press key 9 for the [WP_Assault_Rifle_Shells] weapon and go to the targets in the *Target Range* area (Bookmark 5).

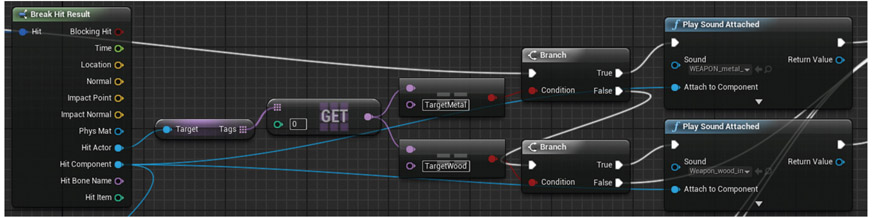
As you fire at these, you’ll hear the bullet impact sounds for the wood target and ricochets for the metal target. Like we did for footsteps, we are tracing the material type that we are impacting with, only this time we’re doing it for the bullet projectile.
Our weapon [WP_Assault_Rifle_Shells] references the [ImpactProjectile] Blueprint (all the others are referencing the [BasicUrbanProjectile]). The [ImpactProjectile] Blueprint gets the physical material of the surface it has impacted with, and this is used to control the <Switch on EPhysicalSurface> that then executes the appropriate <Play Sound Attached>.

You may not always want to base the impact or ricochet sound on the physical material of an object since sometimes assets can share materials and you might not want the same impact sound for all of them, so we’ve also provided an alternative system where you can add tags to meshes in the game and pick up on these instead. Tags can be set in the ![]() Details panel of a mesh.
Details panel of a mesh.

The alternative system can be set up in the [ImpactProjectile] Blueprint as below.
With impact sounds that are heard frequently (from a machine gun for instance), it’s obviously important that you try to avoid repetition. Within your Sound Cues for impacts, you should consider applying some of the techniques covered in Chapter 02 such as modulation of pitch and volume and the randomized recombination of sounds. Bear in mind that, like footsteps, any sounds with a particularly memorable character will stand out, so you should weight them within the -Random- object to appear less often. For example you might want the frequency of a ricochet element within your Sound Cue to be significantly less for a machine gun that fires 2,000 rounds per minute than for a one-shot pistol. You may really like ricochets, but remember that, as well as perhaps getting tiresome after the 700th listening, these relatively long sounds can also contribute significantly to your voice count.
Casings
You’ll also notice two different surface types on the floor in this target range and when you fire the [WP_Assault_Rifle_Shells] (9), you can hear the bullet shells rattle to the ground. You may consider this to be the product of an OCSD (obsessive compulsive sound designer), but we think it’s a nice touch that these actually vary according to the surface that the player is standing on.

This works in just the same way as the targets above by getting the physical material properties of the surface and using this to control a switch for the sounds, only this time we’re tracing a line directly down from the player (the Z-axis) rather than in front.

Whizzbys
Go to the final target range (Bookmark 6), and duck!

If you’re hearing a bullet whizz by your head, then the good news is that you’re still alive. As most bullets travel faster than the speed of sound, the usual order of things would be to be hit by the bullet first, then hear the actual shot, and in your dying moments reflect on how you really wish it were easier to get that convincing outdoor tail to the sound that you’ve been trying to achieve for weeks. Fortunately most games aren’t that cruel and usually give you plenty of opportunity to realize that the distant twinkle you’ve just been admiring is the reflection off a sniper’s sight.
These are handled in the [MyCharacter] Blueprint. If you look in the ![]() Viewport of the Blueprint, you’ll see that your character is actually carrying around the box component WhizzbyVolume.
Viewport of the Blueprint, you’ll see that your character is actually carrying around the box component WhizzbyVolume.

When this is hit by another Actor, it checks that it is the [BotProjectile], and if so it plays the {WEAPON_Bulletbys}sound Cue.

You might wonder if you can use the -Doppler- node on the whizzby sounds. Unfortunately this isn’t very effective. As we noted in Chapter 07, because the whole system updates in frames, this is too slow to handle the speed at which bullets tend to move. Rather than a smooth pitch change, it would just jump immediately from high to low.
Conclusion
As with all these advanced areas, weapon sound design and implementation is a highly specialized field and we have just touched on some of the basic concepts here. Most modern engines combine the ideas above with proprietary tools that allow for material-based reflections and in sample accurate audio engines that avoid the issues you can get with drifting frame rates.
For further reading please see the up-to-date list of books and links on the book website.