
02
Sound Part B: Procedural Sound Design
Summary: Sound Cue systems, sequential variation, layered variation, modulation-based variation, parameterization
Project: DemoCh02Cave01 Level: Cave01
Introduction
You can jump forward or backward between the series of caves in this level by using the] or [key. Move left or right using A and D, with Space to jump.
In the immortal words of industry veteran Brian Schmidt, “Anyone who still thinks there is a one-to-one relationship between a game event and a wave file just doesn’t understand game audio.” Procedural sound design is about sound design as a system, an algorithm, or a procedure that re-arranges, combines, or manipulates sound assets so they might:
- produce a greater variety of outcomes (variation or non-repetitive design)
- be more responsive to interaction (parameterization).
This approach to sound design exists on a spectrum from procedural sound design, where we tend to be manipulating pre-existing assets, to procedural audio, a term more frequently used when systems of synthesis are used to generate the sounds themselves (with much in between that combine both approaches). Procedural audio is an increasingly important field, but one that requires its own tools and is worthy of its own study. We will refer you to some further reading on the website, but for the purposes of this book, we will concern ourselves with systematized approaches to sound that are easy to implement in most game engines or middleware.
Procedural sound design is a key facet of audio for games. When we interact with objects in the real world, the physical processes that produce sound are never repeated in exactly the same way. Even a repeated mechanical action is subject to slight changes because the materials have changed since the last action (through change in temperature or the loss of a few atoms!), and of course the sound is travelling through air and reflecting around an environment, both of which add their own variations to the sound. For some elements of game audio, repetition is important—indeed the presence of sounds encoded with meaning (that need to be the same in order to be understood) is part of the audio aesthetic of what makes games sound like games. Other types of audio are more about immersion than gameplay (or “ludic”) function, and for these to convincingly represent some kind of reality, simply repeating exactly the same Sound Wave or failing to respond appropriately to a variety of interactions is not going to cut it.
The ever-increasing amount of interactivity we have in games has an impact on the number of potential audio outcomes. Look around you, and find a small object:
- Place it on the table = 1 sound
- Do it again a few times = 3 more sounds
- Drop it from a short height onto the table = 1 sound
- Drop it from a short height a few more times = 3 sounds
- Drop it from a different height a few times = 4 sounds
- Now place it on a different surface, say the floor, a few times = 4 sounds
- Drop it from two heights a few times = 8
So far we’d have to record, edit, import, and implement 24 sounds for this object. Now look around the room for all the other surfaces it could potentially collide with and repeat the process above. Then choose the next object in the room, and repeat the process, then the next …
Do you see the problem? The idea that we can prerecord the whole range of potential audio outcomes is simply impossible.
Historically these issues have always been brought into sharp focus by the restricted memory (RAM) that was available for audio. With the previous generation of games, you had to pull audio from the game disk and hold many sounds (ones that required instantaneous playback) in RAM, while streaming other, less time-sensitive ones (such as music, long ambient loops, and dialogue) from the disk itself. The amount of RAM was highly variable, but you might hope in a best-case scenario for anything between 25–35 MB and typically 12 streams. We have a lot more RAM to play with in the latest generation of consoles (260MB as an example) and since the advent of internal hard drives as standard, we’re now able to play sounds directly from these rather than having to load sounds into RAM from the game disk. Despite these advances and continued increasing resources for audio in the future, we hope you can see from the principles discussed above that this does not mean that a procedural approach to sound design has become any less relevant—indeed given the scale of some modern games you could say that it’s more important than ever. (And don’t forget that the majority of people play the majority of their games on cell phones!)
Before you start work on a game, you need to be fully informed about the capabilities of your platform and the approach to RAM and streaming that the programmers have decided to take (and ideally you should be part of this debate).
The first two caves of this map (Bookmarks 1 and 2) provide an example of how we can bring an environment to life with some very simple procedural sound design approaches and how this simultaneously has the advantage of a lower memory requirement.
*Cave 01* and *Cave 02* share exactly the same layout, and as you walk through them you should notice that they sound very similar. The ambience for *Cave 01* consists of a three-minute long stereo loop around 30MB in size. For many platforms or download restrictions, this would have blown the entire memory budget already, and if you were to spend any length of time in here, you would probably start to notice its repetitive nature.

We will go through *Cave 02* more thoroughly in the Sequenced Variation section below, but for the moment just note that we have produced an ambient environment very similar to *Cave 01* (and arguably better since it is more alive with variation) through a series of very simple sound systems that allow us to do this using 14 individual sound samples with a total size of 1.7 MB (and we probably could have gone significantly lower with some more complex approaches!) Procedural sound design by its nature implies a more modular approach to sound design, constructing a final sound event from elements of sound rather than playing back one complete sound.

Sample Rates and Audio Compression
Summary: Sample rates and audio compression
Given that this chapter is in part about creating variation within restricted memory situations, we should recap some basic principles before moving on.
Sample Rates Revisited
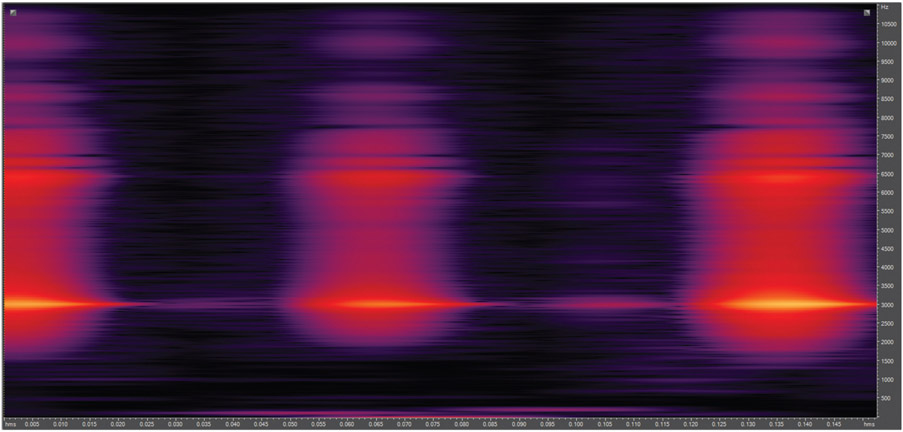
After cleanly editing the sounds, you will remember from Chapter 00 to also look at the sample rate since high sample rates mean high memory requirements. You should always use your ears when trying out different sample rates, but if your DAW has a frequency spectrum view, this can be very useful when you’re first starting. Looking at the frequency spectrum of both the {Gieger_01} and {Liquid_Water_Drips} Sound Waves used in *Cave 02*, we can see that they have quite a bit of energy all the way up to around 11kHz, so remembering the Nyquist-Shannon theorem (that you need to sample at a rate at least twice that of your highest frequency), these have been resampled to 22kHz before import.
{Gieger_01}:

The low cave tone that forms a backdrop for the entire level, on the other hand, has little sound energy above around 2.3kHz. In theory we could have resampled this at 5kHz, but it started to sound a little crunchy so, deciding to live life on the edge, we went for a sample rate of 8kHz. As we said—always use your ears as the final judge.
{Cave_Tone_LP}:

In addition to looking at the frequency content of the sound itself, you should also consider the playback medium that you’re developing for to inform your decision on what sample rates to use. Speakers for portable consoles do not have a great frequency range, so there would be no point in using some sample rates for your audio. If you get the opportunity, you should try running some white noise through the speakers of your platform and looking at the results. You may be unpleasantly surprised! These decisions are of course complicated by the fact that people can also switch to headphones, but when you look at the frequency response of most consumer headphones, they are typically not great either.
In addition to using a frequency spectrum view (and your ears) to decide on the most appropriate sample rate for your sounds, you should also consider each particular sound’s importance within the game and/or how often it will be heard by the player. For example the sound of glass smashing during each of 10 climactic boss fights might be preserved at a high sample rate. In order to achieve this, you may choose to lower the sample rate, and thus sacrifice the quality, of the distant background sound you hear only once in level 17d.
Audio File Compression
We know that high quality audio takes up a significant amount of memory and, although the latest generation of consoles might have rendered this less of an issue than it once was, the restrictions around file size for downloadable games and the memory available on portable platforms mean that it is still going to be a very important consideration for many projects.
In order to deal with this, almost all platforms use some kind of audio file compression (not to be confused with audio compression effects). The best known of these audio file compression methods of course is the MP3. This lossy format works on the principle of perceptual redundancy, using knowledge of psychoacoustic principles to remove sounds (and therefore data) that are hard to hear, such as high frequency sounds or sounds that are masked by other, louder, simultaneous sounds. The problem with some audio file compression formats, MP3 included, is that they take processing time and power to decode and are therefore rarely suitable for the kind of instantaneous playback required in games.
The Unreal Engine allows you to set a different Compression Quality for each of your sound files via the ![]() Generic Asset Editor and will then automatically apply the appropriate compression codec for each platform when you package out your project. Open the
Generic Asset Editor and will then automatically apply the appropriate compression codec for each platform when you package out your project. Open the ![]() Generic Asset Editor by either double-clicking on the {Sound Wave} or by right-click/Edit.
Generic Asset Editor by either double-clicking on the {Sound Wave} or by right-click/Edit.

If you float the mouse over the Sound Wave after adjusting the Compression Quality, you can see the predicted Ogg Size (Ogg Vorbis compression format).

Depending of the nature of the sound, you can achieve audio file compression of up to 10:1 (but you will more typically be using 3:1–8:1), which is pretty essential for most scenarios considering that CD-quality audio takes up around 10MB per minute.
Unfortunately this compression does come at a cost elsewhere since the processor needs to decompress these sounds in real time and this is competing with all the other game processing demands. So now in modern consoles, the challenge becomes less about RAM memory for audio and more about restricting the demands you are placing on the processor by trying to decompress all of your now available sounds. This becomes an issue of mixing, which we will be looking at in Chapter 08.
Sequenced Variation
Summary: Asynchronous loops, random timings, controlling random events for clusters of activity, concatenation for variation
Sequenced variation is all about changing the time relationships between, or order of, sounds to generate variety.
Time-based Variation
Asynchronous Loops
Loops sound loopy, which is sometimes alright for electrical or mechanical sources but is more often not alright for immersing your player in a convincing environment. One thing that can break up this sense of repetition is to have simultaneous loops of differing lengths so that they create variation as they come in and out of phase with each other.

Asynchronous Loops through File Length
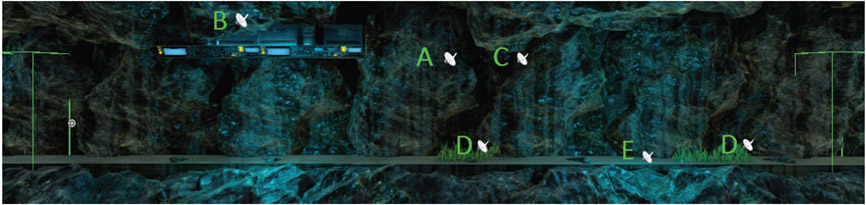
In *Cave 02* (Bookmark 2) you should hear some water dripping sounds (A in the illustration above) that hopefully avoid feeling too loopy. Go to the ![]() Content Browser and find the Sound Cue {Asynchronous_Drips_01_CUE}.
Content Browser and find the Sound Cue {Asynchronous_Drips_01_CUE}.
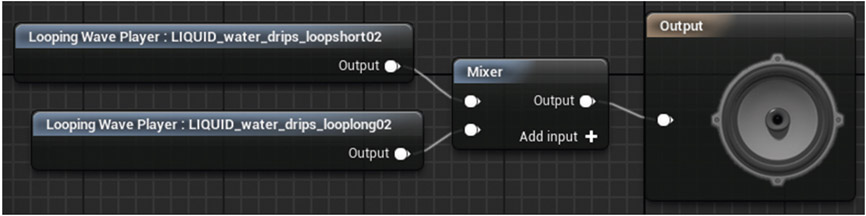
What’s important to generating variation in this cue is that although both the sounds are looping (the -Wave Player- has its Looping option selected), they are of different lengths. This means that each time one loops around it will be playing in combination with a different section of the other. Given that the two water dripping samples are uneven lengths, they won’t come back into synchronization for some time, and therefore you won’t hear the same sound combination repeated.

Asynchronous Loops through Pitch Shift
Now have a look at the Sound Cue around the machine (B) in *Cave 02*. Look in the ![]() Details panel /Sound and use the magnifying glass icon to browse and find the cue {Asynchronous_ Machine_Pitch} in the
Details panel /Sound and use the magnifying glass icon to browse and find the cue {Asynchronous_ Machine_Pitch} in the ![]() Content Browser. Double-click the cue to open the
Content Browser. Double-click the cue to open the ![]() Sound Cue Editor. Here we’ve saved even more memory by actually using the same sound twice, but playing back a second version that is at a different pitch (via a -Modulator- node). This will affect the length of the sound, putting it out of phase with the original version. In this case one version is playing back at 0.8 of the original pitch and the other at 0.72.
Sound Cue Editor. Here we’ve saved even more memory by actually using the same sound twice, but playing back a second version that is at a different pitch (via a -Modulator- node). This will affect the length of the sound, putting it out of phase with the original version. In this case one version is playing back at 0.8 of the original pitch and the other at 0.72.

You could also use a random -Delay-. At the start of the game, a random offset for the two sounds would be selected, making the resulting sound different each time. Although, as we’ve said above, machines and electrical sources tend to be loopy by nature, this variation can add a bit more life and character.

Random Time: Blocks
This again relies on the principle of changing the time relationship between sounds in order to generate variation.

In the ![]() World Outliner find the ambient sound [Wind_Rand_01] (C) then locate and open the Sound Cue {Wind_Rand_01}.
World Outliner find the ambient sound [Wind_Rand_01] (C) then locate and open the Sound Cue {Wind_Rand_01}.

This uses -Delay- nodes to randomly offset two wind samples (the first one is actually used twice, one with a -Modulator- also varying the pitch). As the sounds themselves are about 6.5 seconds long, the random delays of anything between 1 and 6 seconds will lead to a fairly constant but always changing overlap between the wind sounds.

Random Time: Fragments
Using individual one-shot elements is much more effective than long loops in saving memory and providing the variation to make your game world feel real and alive. We have seen examples of this already in Chapter 01, ‘Source One-shots’ .

There are two creatures of the same type in the grass patches of *Cave 02* (D). The sound for these {Creature_01_Rand_Fragments} is generated by a number of one-shot sounds, none of which are longer than 2–3 seconds (these are actually recordings of a stomach after a particularly potent chili!) Just as we did in the jungle area of Chapter 01, we’re playing back these one-shots with a -Looping--Delay- (and adding some volume modulation for additional variance).

Remember, as we discussed in Chapter 01, these internal delays within a Sound Cue will not generate overlapping sounds since the -Delay- only starts once the current sound has finished playing. It works here because these are short sounds with short tails. If your sounds are longer and it doesn’t suit to hear them one at a time, then you’ll need to look back at using the -Mixer- node as we did in the Chapter 01 Polyphonic or overlapping One-Shots section.

Controlling Random Events: Clusters of Activity
The nature of randomizing events tends to generate a similar texture over time, but living things often produce sounds in clusters of activity with longer pauses in between, so for these we need some additional control over the random process.

The last element in this Cave (E) is a clicky type creature {Creature_02_Gieger_01_Cue}. This is broken into clusters of activity, as the looping delay triggers not just one sound, but a cluster of 4 events (with randomized timing via the -Delay-) using the -Concatenator- node (which we will be looking at in more detail shortly).

Exercise 02_01: Time-based Variation
In this exercise we will be adding further variation to the *Cave* and *Oasis* areas of your level.
As we continue to add more variety to the level through procedural approaches, you might want to revisit your area loops and scale back the amount of activity in them since we will now be replacing some of these loops with more variable versions.
- Using some of the Sound Cue techniques described above, add some more life and variation to your map. Focus on the *Cave 01* and *Oasis* areas. For example:
- Asynchronous loops for water dripping in *Cave 01*;
- Overlapping randomly timed blocks for a wind effect in either the *Cave 01* or *Oasis*;
- A random fragments approach to animal sounds in the *Oasis* and a clustering approach to some of these (you can also set a loop count in the -Looping Node- to set a sound to loop a given number of times—after a randomized -Delay-, you could randomly choose between several -Loop- nodes with different counts to achieve a clustering effect.)
- There are some sounds provided in the exercise folder, or import your own.
- Reminders:
- Edit files and resample appropriately before importing;
- Import your files by dragging and dropping files into a folder in the
 Content Browser;
 - Create a new [Sound Cue] either from the Content Browser’s Add New menu, or by right-clicking in an empty space in the Content Browser;
- Open the Sound Cue Editor by either double-clicking on your Sound Cue or right-click/Edit;
- To add sounds to your Sound Cue Editor, either just drag and drop from the Content Browser or select the waves in the browser then right-click to add to the cue preconnected to a node;
- Preview your cue in the Sound Cue Editor by either playing the whole cue or a specific node.
Concatenation
Concatenation is a process of seamlessly stitching together a series of individual sounds. Unlike the delays and randomization used so far, concatenation places the sounds immediately up against each other in time, recreating the sense of a continuous sound.

Many types of sound can be edited successfully into individual chunks (taking care to split at zero crossing points). Then these chunks can be concatenated, or stitched back together but in a random order.

Edited into chunks:

Randomly re-ordered for variation at runtime:

Concatenation for Variation in Loops
The first example in *Cave 03* (Bookmark 3) is the background room tone (A). This is a filtered recording of a train that has been edited into short chunks.

Find the Sound Cue {Room_Tone_Train_Concat}. Note that we’re not actually using the -Concatenate- node within the Sound Cue since this has a specific function we don’t need yet.
A looping -Random- node will wait until the previous sound has finished before choosing the next and so will perform the stitching perfectly well.

You won’t hear the second item, the machine (B), until you turn it on in the game by getting close to it and pressing the use key (E). This starts the slightly rickety machine that powers the elevator. This uses a [Trigger] around the machine to ensure the player is within a certain distance before they can use the machine (with <KeyPress> E) before playing the [Ambient Sound] (for which the Auto Activate has been disabled).

In the Sound Cue {Machine_Concat_01}, select the Sound Waves in turn and listen to them individually using the Play Node icon from the top toolbar (or by double clicking on the–Wave Player- nodes themselves). Then listen to the Sound Cue as a whole (Play Cue) to hear them being stitched back together to form the continuous noise of the machine.

The sound for the stream of water in the center of the cave (C), and that of the elevator when it moves (D) are also Sound Cue examples of concatenation ({Water_Stream_Concat} and {Elevator_ Concat}). See also the {Poison_gieger} Sound Cue for the radioactive gas on the floor of *Cave 04*.
The final sound in this room is probably the one you noticed first: the broken public address message repeating: “Emergency containment breach, please exit through the gift shop” (E). This does actually use a -Concatenate- node (at last!) since we want to stitch the speech back in a particular order. See the Sound Cue {PA_Concat}.

Here we’ve split the sentence up into chunks and applied a variety of modulations and delays to each chunk to give the impression of the system breaking down. The -Concatenator- node will play each of its inputs sequentially and so will stitch our sentence back together in the right order. There is also another -Concatenator- on the “E” of “Emergency” to provide a stuttering effect. We’ll be returning to this kind of sequenced concatenation for dialogue in a lot more depth in the advanced dialogue sections in Chapter 11.
Layered Concatenation
Concatenation really comes into its own when you layer up a couple of audio systems since we’re not only getting the randomized order, but we’re also getting a randomized combination of sounds as well. The big wheels in *Cave 04* (Bookmark 4) consist of three layers of concatenated sounds (and one looping sound), Sound Cue {Wheel_Platform_Concat}.

The first layer is the rubbing element,


and finally the twisting.

Since the wheels are different sizes, we’ve also applied a pitch shift via the ambient sound ![]() Details panel. The smaller wheel is played back at 1.2 of the original pitch and the larger at 0.9. Listen to it again in-game, then open up the Sound Cue to listen back to the different sections via the Play Node icon in the
Details panel. The smaller wheel is played back at 1.2 of the original pitch and the larger at 0.9. Listen to it again in-game, then open up the Sound Cue to listen back to the different sections via the Play Node icon in the ![]() Sound Cue Editor.
Sound Cue Editor.
Concatenation for a Chain of Events
Like we saw with the public address system above, the -Concatenate- node allows us to sequence a chain of sounds to play one after another. This has allowed us to alleviate repetition and save memory throughout the level in every cave we’ve been in through the one sound that has always been there—the player’s footsteps. Normal walking-pace footsteps are ripe for concatenation since they naturally consist of two parts: the heel and the toe.

By editing these into separate elements, we can then randomly recombine them using the -Concatenate- node.

In this illustration there were 4 original samples of a footstep on a cave floor-like surface. These were edited into heel and toe sections (a and b). Each time the Sound Cue {Cave_Footsteps_Concat} is called, it will randomly choose one of the heel sounds, and then randomly choose one of the toe sounds. Instead of playing back the 4 original heel and toe sounds, this system will give us more variation.
Original sounds:
- 1 (a+b), 2 (a+b), 3 (a+b), 4 (a+b)
- = 4 possible footstep sounds
After concatenation:
- 1a—1b, 1a—2b, 1a—3b, 1a—4b
- 2a—1b, 2a—2b, 2a—3b, 2a—4b
- 3a—1b, 3a—2b, 3a—3b, 3a—4b
- 4a—1b, 4a—2b, 4a—3b, 4a—4b
- = 16 possible footstep sounds

You need to shoot your way through the electrical orb to get to the next cave (stand on the platform next to the cannon and press E). When you score a hit, the orb plays a short hit sound followed by a series of sparks. Here we’ve used the -Concatenate- node to chain a series of sound types since we want larger sparks first then progressively smaller ones.

You’ll also find -Concatenate- in action for the crackles preceding the radio dialogue in the desert Chapter 04.
Concatenate Sample Rates
Sometimes you may find yourself designing sound for games that have ultra-low memory budgets, perhaps for a portable toy or game. Here’s a cunning use of concatenation that can allow you to preserve some of the high quality elements of the sound that are important.
Have a listen to the Sound Cue for the cannon fire in *Cave 04*, {Cannon_Fire_Concat}. Now have a listen to an alternative version {Cannon_Fire_Orig}. Can you hear the difference? Hopefully not, but there’s a significant difference in the file sizes.
If we look at the original sample for the cannon fire sound, we can see that there’s an initial burst of high frequency content for the crack of the weapon fire, but then it’s mostly low frequencies for the final two-second rumble.

What we’ve done for the version used in the game is to split the file, retaining a high sample rate for the crack chunk, but then choosing a lower sample rate (and consequently a smaller file size) for the rumble.
These files are in the ![]() Content Browser:
Content Browser:
- {Cave_Cannon_All} — The original file at 44.1kHz = 234kb
- {Cave_Cannon_Trans} — The edited crack at 44.1kHz = 44kb
- {Cave_Cannon_Tail} — The edited rumble at 16kHz = 70kb
When we -Concatenate- these two elements back together, we get a sound that is virtually indistinguishable from the original, but now the total size is 114kB—a savings of 120kB that we can now put to good use somewhere else (we did say it was pretty cunning).

Exercise 02_02: Concatenation for Variation
In this exercise we will focus on concatenation techniques for implementing the sound in the *Cave 02* area of your level.
-Concatenate
- Using some of Sound Cue techniques described above, add even more life and variation to your map. Focus on the *Cave 02* area. For example:
- Make an atmospheric background tone for your *Cave 02* by splitting up a loop into concatenated chunks;
- Experiment with concatenated loops for the machines or water features;
- Create layers of different concatenated elements for the moving platforms that take you up the rock face;
- Replace the elements within the footsteps Sound Cue {Cave_Footsteps_Concat} with your own heel/toe sounds;
- Create a Sound Cue for the broken door mechanism in the *Cave 02: Upper* area that concatenates a randomized chain of sound events. The Blueprint system is already made for you in the “Broken Door” section of the [Level Blueprint].
Multiple Start Points
You can reuse parts of a longer file without the need to edit since we can start playing back the file at any point.

The cave floor crumbles into *Cave 05* (Bookmark 5), then you again hear rock debris as you cross the two bridges. All these sounds are actually playing back using different sections of the same sound file.

Open the [Level Blueprint] and look at the “Cave 05b/Rock Falls” section. The top <Play> node is triggered from the initial rock fall and plays the entire file. Then the [Trigger]s placed on each bridge again play the sound but now with different start times, so they play different parts of the audio file (as indicated by the red markers in the waveform image below).


If you have a system like this available to you, then you will usually be asked to add the markers to your audio files in your audio editor. Wave files contain a header that programmers can access to retrieve the marker position information.
Exercise 02_03: Start Points
In this exercise we will be adding a changing rock fall effect to *Cave 02* in your level.
<Multigate>, start time
- As you walk to the right of the door in the *Cave 02: Upper* area, a [Trigger] has been placed near the rocks ([Rockfalls_Trigger]). Create the impression that this wall is unstable with some random rock falls. A system has been set up in the [Level Blueprint] for you (Cave 02—Rockfalls), but you will need to add your {Rockfalls} Sound Cue to the level as an [Ambient Sound].
- Disable Auto Activate using its Details panel.
- Now create a reference to it in the [Level Blueprint]. With the ambient sound selected in the Viewport, right-click in the [Level Blueprint] and choose Create a Reference to—. (See Appendix A: Core Concepts/Referencing In-game Actors within Blueprint)
- Replace the <AmbientSound_Placeholder> reference with yours to link this up to the <Play> objects that are triggered from the randomized <MultiGate> and specify an appropriate Start Time for each depending on where in the file you want it to play from.
- Try recreating this system to add further rock fall areas to your cave.
Layered Variation
Summary: Random combinations of elements for variation, deconstructing sound events, scalability
You don’t need thousands of sounds in memory to get thousands of different sounds out of your system. We’ve looked at how you can use a modular approach to sequence your sound elements to create new combinations for non-repetitive variation. Another technique is to vary the layers of sound elements that are heard, for example by randomly choosing one of three possible sounds for each element.

Randomizing the combination of layers of sound elements can vastly increase the number of potential outcomes with only a few additional sounds. For example if you had three sounds in memory that had the potential for being layered in any combination, you could hear the following:
- Sound 1
- Sound 1
- Sound 2
- Sound 3
- Sound 1 + Sound 2
- Sound 1 + Sound 3
- Sound 2 + Sound 3
- Sound 1 + Sound 2 + Sound 3
This will give us 7 different combinations and 7 different sound possibilities.
- 1, 2, 3, 4, 5,
- 1+2, 1+3, 1+4, 1+5,
- 2+3, 2+4, 2+5,
- 3+4, 3+5, 4+5,
- 1+2+3, 1+3+4, 1+3+5, 1+4+5, 2+3+4, 2+3+5, 2+4+5, 3+4+5, 5+1+2, 5+1+3
- 1+2+3+4, 1+3+4+5, 2+3+4+5, 4+5+1+2, 5+1+2+3,
- 1+2+3+4+5
This would give us 31 different combinations. 7 sounds would give us 127, and 10 would result in a possible 1,023 combinations!
Don’t forget that while this greatly increases the variation and possibilities for parameterization (as we’ll see later), the dynamic range of such systems is a lot less predictable.
Simple Random Combinations
Impacts are good candidates for layered variation and in *Cave 06* (Bookmark 6)—you can trigger a set of spikes to rise up from the floor to incapacitate the hapless guard who’s patrolling this area.

The spikes have a [Trigger] attached to them. When the player triggers the spikes, this opens the <Gate>. If the [Trigger]s collide (<OnActorBeginOverlap>) with the bot, then it was in the wrong place at the wrong time and our impact [Ambient Sound] is played.

The Sound Cue {Spike_Impact} randomly combines one of each of the following elements:
- Swish X 3
- Thump X 3
- Flesh impact X 3

Random Combinations with Individualized Pitch and Delays
The bot in the next *Cave 07* (Bookmark 7) is unfortunately patrolling an area where explosive barrels sometimes fall from the ceiling. If you get the timing right, you can put him out of action too.
This time the {Barrel} Sound Cue adds further variation to the elements being combined through the use of a -Modulator- that randomizes the pitch and volume and through a varied -Delay- on the wood impacts and wood debris elements.

You can see how we are now starting to think about our sounds not as one-off Sound Waves but as modular sound systems that layer up the separate components of the event. So a wooden barrel explosion is not just a Wooden_Barrel_Explosion Sound Wave, but procedurally combines the elements of explosion, wood impact, wood break, and wood debris.
Deconstructing a Sound for Procedural Use
This modular approach demands that you really start to think about the individual elements that are present within a final sound event in order to deconstruct it into its different sound-producing components.
In *Cave 08* (Bookmark 8) the retreating forces have blocked the way with a series of large rocks. Fortunately you are armed with explosives that allow you to clear the route by pressing E when in proximity of the rocks.
We’ve split the event across two Sound Cues simply for ease of viewing.
At the top of the hierarchy we have the sound event—rocks exploding. This is separated into two broad events—{Rocks_Destroy} and {Explosion_Elements}—and within these are the component parts (or modules) that make up the sound.
- The {Explosion_Elements} Sound Cue procedurally combines:
- Crack — the sharp initial transient of an explosion
- Thump — the low-end thump
- Bloom — the explosive force pushing through the air and into the environment
- Tail—the final dissipation of the sound energy

Each time the Sound Cue is played, one of each of these element groups is chosen and then combined to form the final explosion sound. We may take up a little more memory than just using 4 complete explosion sounds, but now we’ll have a huge variety through the different combination of these elements, not just the same 4 sounds used repeatedly (you can think about explosion sounds as consisting of many different elements—this is just one).

The {Rocks_Destroy} Sound Cue takes a similar approach, combining the elements of large rock impact, medium rock impact, debris, and dust debris (along with the usual variations produced through the -Delay- and -Modulator- nodes).

When the player is in proximity to a rock (i.e., within the [Trigger]), this opens the <Gate> to allow the <KeyEvent> to spawn the explosion emitter <Destroy>, the rock Actor, and <Play> the ambient sounds.

As we get further into Blueprints, you’ll find it invaluable to watch their operation as you play. Try this now by opening the [Level Blueprint] and locating the “Rocks” section. If you have one available, then move this panel onto a second screen and watch it while you play this section of the game. You can also free up your mouse to move around within the Blueprint by holding the Shift key and pressing F1. Click back in the game Viewport to regain in-game control (see Appendix C: Testing, Troubleshooting, and Good Practice/Watching Blueprints).
Scalability
So far we’ve looked at approaches to non-repetitive design that utilize either variations in time or order, which you could think of as sequenced variation or in terms of the variation produced through combining different layers (layered combinations).
The useful thing about both of these approaches is that they also allow us to set up systems that are very scalable to different platforms. Multiplatform development is very common these days (being pretty much the norm for AAA titles), but for a variety of reasons your memory budget for audio will likely be different for each one. All of the sequenced or layered systems make use of the -Random- node, and this has an additional function that can allow us to automatically scale our assets for different platforms. The Preselect at Level Load option allows us to set the number of inputs to a -Random- that should be active. When the level loads, it will randomly choose your designated number of inputs and, importantly, will not load those that have not been selected.

So for platform X with lots of memory available, you could leave this at 0 so all random sounds will be available; however, for platform Y you could set this to 8 (as below). On level load, 8 inputs would be randomly chosen and only those sounds loaded into memory, and since these 8 would be different every time, you’d still have some further variation each time the player starts the level.

Exercise 02_04: Layered Variation
In this exercise we will be adding a modular explosion system to the *Cave Tunnel* area of your level.
-Modulator
- On the right of the doorway in *Cave 02: Upper* in your exercise map, there is a loose rock wall that you can blast your way through by setting an explosive charge (E). After this first wall, there are several more as you make your way through the *Cave Tunnel* that is revealed.
- Using the assets provided or your own, create a Sound Cue that uses a modular procedural approach to vary the layers of the explosion sound effect.
- The Blueprint system is already set up in the [Level Blueprint] “ Cave Tunnel—Rock Explosions” section, so just add your Sound Cue to the ambient sounds in the level. You can find these using the World Outliner—[Rock_Explosion_01], [Rock_Explosion_02], etc.
- Using the Sound Cues above as a guide, layer together groups of different elements using a -Mixer- node.
- Introduce -Modulator- nodes to vary the volume and pitch and -Delay- nodes to change the time relationships between the elements. You might also want to experiment with the -Enveloper- node that we will be looking at in the next section.
Modulation/Modifiers for Variation
Summary: Pitch and volume modifiers, envelopes, oscillation, wavetables
Of course the theoretically best solutions for procedural or modular approaches to sound design are to modulate or process the sounds themselves for variation without needing to load additional alternative sounds at all. This takes some processing power to achieve (usually vanishingly small for simple modulations) but doesn’t require any more memory in addition to that taken up by the basic sound itself. So use whatever DSP (digital signal processing) is available to create variations on the sounds you have rather than simply putting more sounds in memory.
Pitch
From simple variation to radical change and envelopes, varying the pitch of a sound is one of the simplest and most effective methods of generating variation in your sounds.
Reuse Sounds for Different Sized Sources
In the physical production of sound, pitch is related to the size of the object. The larger or longer the pipe, the longer the string, or the bigger the surface, then the lower the pitch of the sound it produces. Given this fact, the most obvious application of using pitch shift to vary your sound file is when you have different sized versions of the same object. Pitch in this case is generally best modulated around the center (i.e., 0.8 min to 1.2 max rather than 1.0 min to 1.4 max) so that the source’s character doesn’t change too dramatically.
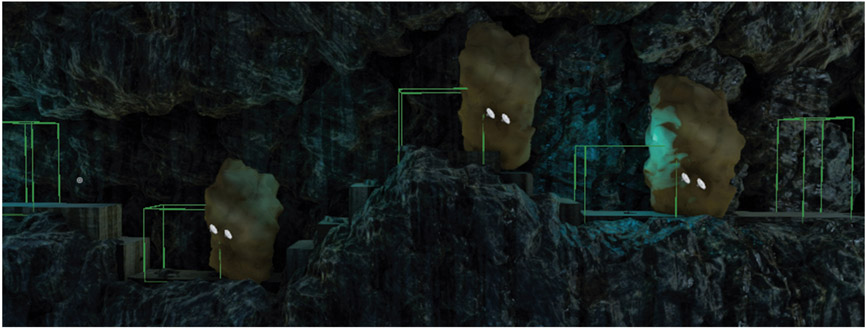
In *Cave 09* (Bookmark 9) there are three stone blocks that regularly pound down onto the cave floor (you must time your movements to get through unscathed). Given that each of these is essentially the same material but a different size, we’ve used the same Sound Cue ({Pounder_ Impact_01}) but with different pitch settings for each one.

The [Ambient Sound] that’s triggered for the smallest ({Pounder_Impact_01_Cue_3]) has a pitch multiplier of 1.25, the largest block 0.4, and the medium 1.0.
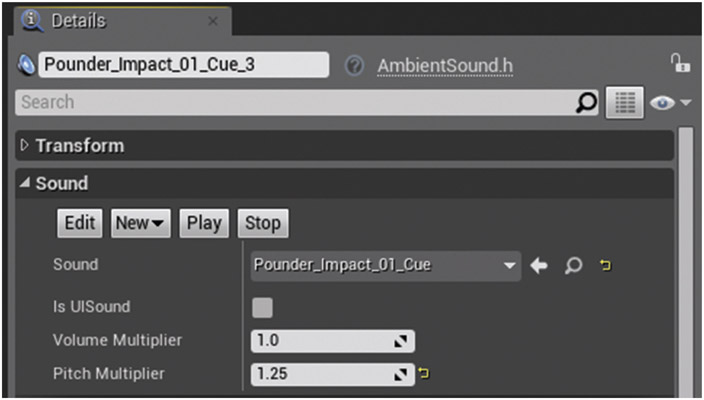
If you find in a game level that you have objects of similar materials but different sizes, it’s worth seeing if you can represent them through different pitches of a sound first before using additional sounds (see also the moving platforms referred to previously in *Cave 04*).
Transformative Reuse
In addition to changing the pitch for similar objects of a different size, sometimes a change in pitch can alter the sound’s character more significantly. If you’ve ever tried extreme changes of pitch in your audio editor, you will know what a huge impact this can have on the nature of the sound itself.
*Cave 10* (Bookmark 10) illustrates how you can use pitch shifting to radically change sounds for different uses. There are two types of creatures located in the grass patches of the cave, one sounding like some loose chickens and the other like some rats. These both use exactly the same samples, only at different pitches (see {Chickens_01_Cue} and {Rats_01_Cue}). One of the elevator concatenation sounds is also reused in this room, this time pitched down to 0.2 to form a looping room tone. In *Cave 12* the {Machine_Concat} from *Cave 03* has been reused in a pitched-up form for the sound of the moving platforms.

Pitch Envelopes
In addition to simply playing back sounds at different times, we can apply pitch changes over time through the use of an envelope. In *Cave 11* (we’ve run out of bookmarks!), there are three pits of lava that squirt out the occasional bubble of deadly gas—avoid them!

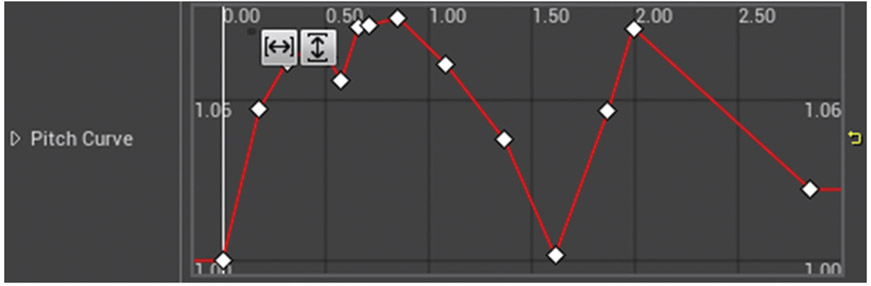
In this cave you’ll hear an irritating mosquito. This only uses two samples that are held in memory but generates variation in the sounds by applying different pitch curves via the -Enveloper- node.

This mosquito is played as randomly delayed one-shots, and each time it randomly picks a different envelope curve. Open the {Mosquito_001_Cue}, select one of the -Enveloper- nodes, and double-click on the Pitch Curve to open the ![]() Curve Editor.
Curve Editor.

The bubbling lava in the cave ({Bubbling_Lava}) is given variety through pitch envelopes as well, but this time they are set to loop.

Taking care that the pitch at the start of the loop and end of the loop are the same (to avoid any sudden jumps as it loops around), the two envelopes are set to loop indefinitely. As the two envelopes are different and the two loop lengths are different, this gives us a constantly changing relationship between the two.

Exercise 02_05: Pitch Reuse
In this exercise we will be making use of pitch variation to add sounds for the fans and ventilation units in the *Cave 02* tunnel area.
-Enveloper-, curve editor
- Along the walls of the *Cave Tunnel* are a number of fans and ventilation units. Add ambient sound source loops to these, making appropriate use of Pitch to represent their size. You can adjust the pitch either in a -Modulator- of the Sound Cue, in the -Output- of a Sound Cue, or in the Details panel of the ambient sound itself.
As you emerge out of the *Final Cave* (Upper Section), there are some animal remains lying around. Add some flies around these remains using a random choice of pitch envelopes for variation.
- Edit the curves of an -Enveloper- node—double-click the envelope in the Details panel to open the Curve Editor.
- Create a new curve point with Shift and click, click and drag points to move, and use the mouse wheel zoom in/out.
- Click and hold RMB to move the view around, and right-click on points to change the curve type.

Also see Appendix A: Core Concepts/Transforming and Constraining Variables and Parameters/Reading through Curves
- Edit the curves of an -Enveloper- node—double-click the envelope in the
- Try adding -Modulators- to some of your other sounds in the level. Although a Sound Cue with a -Looping Wave Player- will not modulate each time it loops, it will pick a different pitch each time the player starts the game.
Volume
We’ve used a fair amount of volume modulation throughout the level already through randomizing values within the -Modulator- node, but by changing the volume envelope on a sound we can also generate the impression of different sounds while only holding one set of sound data in memory.
One-shot Volume Envelopes
The pipes in *Cave 12* emit random steam bursts that you must avoid in order to cross the lava pit successfully. Every time a steam burst plays, it is playing back the same Sound Wave {SteamBlast}, but via a Sound Cue {Steam_Blast_Env} that randomly chooses one of three different volume envelopes to apply.


In addition to changing the attack envelope for the steam, we can of course also change the length of the sound by bringing the envelope down to 0.0 before it has finished. The -Enveloper- also has modulation options (in its ![]() Details panel) so that you can randomly vary the overall volume as well between defined Min/Max ranges.
Details panel) so that you can randomly vary the overall volume as well between defined Min/Max ranges.


Although we’re randomly choosing between envelopes, the envelopes themselves are of course preset. If you wanted a more random range of attack or decay settings, you could use the <Fade In> and <Fade Out> nodes in Blueprint and feed them with random float values. You can hear this in operation for the second steam vent [Steam_Blast_02], in the “Cave 12”/“Steam Blasts” section of the Level Blueprint.

Looping Volume Envelopes
If you listen to the wind in *Cave 12*, you should hear that this varies in intensity. Here we have taken a relatively short wind sample (7 Seconds), set it to loop, and then applied a long envelope to it (32 seconds) that is also set to loop {Wind_Looping_Env}. Since it is not easily divisible within the length of the envelope, the loop of the sound itself will remain out of phase with the envelope, creating further variation.


There’s also an additional -Enveloper- that applies a short fade in (over two seconds) when the sound first starts. Since the sample itself is designed to loop, the start of the sound is at full volume (to match with the end of the sound), so if we just started it without an envelope, this would be very abrupt.

Exercise 02_06: Volume Envelopes
In this exercise you will be adding a varying wind tone to the *Cave 02* tunnel section of your level making use of volume envelopes for variation.
-Enveloper
- Go back to the *Cave Tunnel* and add a varying hollow wind sound to this section.
- Use a relatively short wind sample in a -Wave Player- that is set to loop (in its Details panel).
- Connect this to two -Enveloper- nodes, the first of which will create a smooth start to the sound, and the second one set to Loop Indefinitely.
Oscillation
An oscillator produces a continuously changing variable around a central value. In the case of the -Oscillator- Sound Cue node, it uses a sine wave shape to determine the changes in values over time, and we can vary the amplitude and frequency of this oscillation. *Cave 13* is full of oscillations!

Volume Oscillation
Open up the Sound Cue {Machine_Osc_A} for the first machine (A) and select the Wave Player. Play just the -Wave Player- node to hear the original sound unaffected, and then play the whole Sound Cue, and you’ll hear that the sound is being processed quite radically by the -Oscillator- node.

The oscillator has a fixed amplitude of 1.0 and is centered around 1.0, so we will get volume ranges oscillating between 0.0 and 2.0 with a frequency of 5Hz (in other words, 5 times a second since the frequency setting in the Unreal Engine actually represents twice the frequency of the sine wave’s modulation for some mysterious reason).

In the next example (B), different frequencies of volume modulation have been used to represent the different sized cogs and platforms, with the smaller ones moving faster than the larger ones ({Platforms_Osc_01-03}). The -Oscillator- takes the relatively continuous wave sound and breaks it into pulses of activity, setting these pulses to different speeds (frequency min/max 1, 2, 6, and 16, respectively) to match the size of the moving cogs.
Pitch Oscillation
Machine (C) actually reuses the same Sound Wave as (A), but this time the pitch is oscillated ({Machine_ Osc_C}). Note that this time the center of the sine wave value that’s oscillating the pitch is 1.2, meaning that with an amplitude 0.4 we’ll get a version of the original sound that ranges from 0.8 to 1.6 of the original pitch.

Pitch + Volume Oscillation
The wind {Wind_Osc_01} (D) is oscillating both the pitch and the volume of the source sound, and since we want these to be different values, we’ve used two separate -Oscillator- nodes (there’s also an -Enveloper- to give the wind a slight fade in/out each time it is triggered from the randomized -Delay-).
Sounds with lots of high frequencies are particularly good candidates for envelopes or oscillations since our perception of frequencies changes with volume. Although this is just a volume change, we perceive the frequency characteristics of the sound to be changing too.
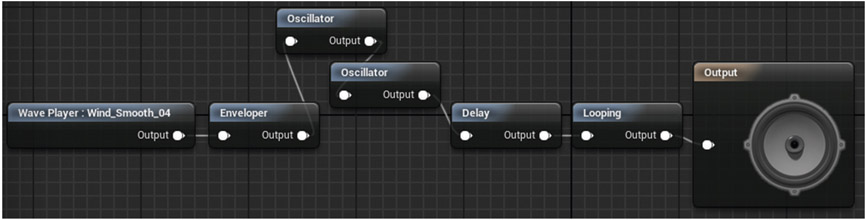
Since the wind is an occasional one-shot that we want to vary (rather than the looping machines or cogs), there is some more variation in the effect derived from differences in the min/max ranges. For example the amplitude and frequency of both the volume and pitch oscillators will vary each time, as will the offset. The offset represents where we start along the trajectory of the sine wave and can be a useful variant to avoid an otherwise predictable movement.

Before moving on, also have a look at the Sound Cue {Wind_Whistle} (E) that is used in the top right-hand side of this cave that again makes use of oscillators along with volume envelopes and randomization to bring some variation to the wind sounds in the cave.

At the time of writing, in the Unreal Engine we don’t have the ability to access the -Oscillator- parameters for real time changes, but you could have several versions of a sound with different oscillation settings and crossfade between them in response to game parameters. For crossfading between sounds based on game parameters see the Parameterization = Interactivity section below.
Exercise 02_07: Oscillators
In this exercise we will be using oscillators to generate the sounds for the machines in the *Final Cave* section of your level.
-Oscillator
- Open the exercise map and go to the *Final Cave* section.
- Create some source loop [Ambient Sound] Actors for *Oscillating Machine 01* and *Oscillating Machine 02* in this area.
- See the amount of different sounds you can get from one sound source by using various Pitch and Modulation settings of an -Oscillator- node in your Sound Cues.
- The function of the -Oscillator- node requires a little more explanation than most. See Appendix A: Core Concepts/Sound Cue Nodes for details.
Wavetables
Taking memory saving techniques to their (il)logical extreme, the computer in *Cave 14* plays a well-known tune (badly). The total file size required to play this tune (or any other you can think of) is a little bigger than the size of the wave file used to produce it: 3.9 kB (which as you will appreciate by now is tiny!)
We’ve included this example as a slightly perverse homage to the history of game audio, when all of the sounds and music in a game might have been produced from a few very small samples (and a bit of FM synthesis if you were lucky!) Although such lengths would not be necessary today, the principles behind this (controller data manipulating individual notes) will in fact never be obsolete with regard to interactive music, and we’ll be returning to this discussion later in the Chapter 12.
The method here is analogous to wavetable synthesis. The sound source is just 10 cycles of a sine wave (just 45 milliseconds of sample memory) in a -Looping Wave Player- that produces a tone (as any repeating wave cycle would). By using different Pitch Multipliers (playing the sample back at different rates), we can get all of the different notes we need.

In this instance a <TimeLine> node is used like a musical sequencer. When this starts to play, it sets pitch using a Float Track and fades notes out when needed via an Event Track.

The original sample tone was generated at 220Hz (pitch A3). To get the other notes, their Pitch Multipliers were scaled accordingly.

Exercise 02_08: Wavetables
In this exercise you will be creating a wonderful piece of haunting music using the wavetable machine in the *Final Cave* section of your level (or not).
- We have set up a musical machine in the *Final Cave* section of the exercise map.
- Find the “Wavetable Machine” section of the [Level Blueprint] and edit the <Timeline> to make a tune (see Appendix A: Core Concepts/Others/Timeline).
- In the float track Pitch, you can define a series of pitches by creating points on the track with Shift + click and defining their values.
- C3 (130.81Hz)—the pitch multiplier would be 130.81/220 = 0.595
- D3 (146.83Hz)—the pitch multiplier would be 146.83/220 = 0.667
- E3 (164.81Hz)—the pitch multiplier would be 164.81/220 = 0.749
- F3 (174.61Hz)—the pitch multiplier would be 174.61/220 = 0.793
- G3 (196.00Hz)—the pitch multiplier would be 196.00/220 = 0.890
- A3 (220.00Hz)—the pitch multiplier would be 220.00/220 = 1.0
- B3 (246.94Hz)—the pitch multiplier would be 246.94/220 = 1.222
- C4 (261.63Hz)—the pitch multiplier would be 261.63/220 = 1.189
- In the Event Track Fades, you can define events that will fade out notes when required.
- Move the event on the End Event Track to the end of your piece.
Parameterization = Interactivity
Summary: Using conditions and in-game parameters to affect changes in sound.
The best way to avoid repetition is to have your sounds be truly reactive, not passively sitting there but responding to game events. The ability to change the asset, the pitch, and especially the volume in response to game parameters opens up a world of interactive possibilities, and hence a world of variation.
Many of the procedural sound design approaches above lend themselves to being driven by game variables/parameters since the more modular our sound system, the more we can affect individual elements of it in response to game events.
Of course, the greatest integration between game parameters and sound could be achieved if we were actually creating and manipulating the sounds themselves through synthesis, not just basic aspects of the sound like volume and pitch, but that really falls within the bounds of procedural audio, which is beyond the remit of this book. If you are interested in this area, then see the Further Reading section of the website, which includes a link to the UE4OSC project. This allows you to communicate parameters and events from the game in real time to other applications such as Max or PD, which are more suitable for developing procedural audio systems.
There is going to be a bit of a jump in complexity now, but these are core concepts that we will be returning to several times in the rest of the book, so if you can grasp them now, then things will be a lot easier later on. Have a quick scan through Appendix A: Core Concepts/Controlling Audio Components before proceeding.
Take a deep breath …
Swapping out Sounds with -Branch-
We have set up some procedural approaches to constructing sound out of modular elements through both sequencing and layering approaches and some methods of further modulating the sounds for variation, but so far this has all been on a randomized basis. Now we are going to look at how you can use game events or parameters to decide which elements of the system are played.
The final area *Cave 14* provides a possible escape route out of the caves, but you need to fix the machines that operate the fans first.

Use button A (by pressing E), and you will hear the grinding whimper that tells you that things are not really working properly. However, if you walk further along you can find a wrench that will enable you to fix it.
Our Sound Cue {Fixable_Machine} has two Sound Waves in it and a -Branch- node that will allow us to determine which one is chosen to be played depending on a condition set through gameplay.

You can also do this control specific elements within a more complex Sound Cue.

In the Blueprint we have created a variable named Wrench. This variable has a default value of False, as the player does not have the wrench. When the player picks up the wrench (by overlapping the [Trigger] around it), this variable is set to True. When the player interacts with the machine, the <Set Boolean Parameter> node checks this variable to find its state (since it’s a Boolean variable, it only has two—True or False). It looks in the Sound Cue to find the parameter that matches its name Wrench, in this case finding the -Branch- node parameter and setting this to the current variable state. So if the player has not picked up the wrench (False), the Sound Cue will play the {Machine_ Still_Broken} Sound Wave, but if the player has the wrench (True), it will play the {Machine_Fixed} looping Sound Wave. See the “Wrench” section of the [Level Blueprint].

This is a very simple example of how we can begin to use game parameters and conditions to influence the audio. You can perhaps imagine how we might use this technique to swap out different layers of a modular procedural Sound Cue such as the explosions in *Cave 08* /Exercise 02_04. We could have one core explosion Sound Cue that is used for many different objects, but we swap out some elements of it depending on whether they are present in the object exploding—a flammable whoosh for example.
You should have already taken a look at Appendix A: Core Concepts/Controlling Audio Components. Now also read Appendix A: Core Concepts/Variables, Parameters, and Numbers.
Exercise 02_09: Boolean Conditions to Sound Choice
In this exercise we are going to go back and extend the Sound Cue we created for exploding the rock blockages in the *Cave Tunnel*. This exercise is quite tricky—but you’ll learn a lot!
<Set Boolean Parameter>, -Branch-, <Play>, variables <Get> and <Set>, print string
- Go to the *Cave Tunnel* area of the exercise map (Bookmark 4).
- In front of a couple of the rock blockages in the tunnel (e.g., *Blockage_03*), there are some gas pipes that you can turn on (press E). We are going to use this as a variable to control whether a flammable element is added to the explosion sound or not.
- Locate the ambient sound next to the second rock blockage in the tunnel. [Rock_Explosion_03]. Select it and then right-click /Level/Find in Level Blueprint (it’s in the “Cave Tunnel”/“Blockage 03” section of the Level Blueprint).
- From this reference to the ambient sound, drag out and create a <Set Boolean Parameter> node. Set its In Name to Gas. Then connect this so that this node is triggered from the output of the existing <Play> node.
- Locate your Sound Cue to which this ambient sound refers (look in the Details panel of the ambient sound and use the magnifying glass icon to locate it in the Content Browser).
- Double-click the Sound Cue to open the Sound Cue Editor. Add another input to the -Mixer- and create a -Branch- node to attach to this. Now select the -Branch- node, and in the Details panel set the Bool Parameter Name to be Gas.
- Find or create a flammable whoosh type sound that can accompany the explosion if the gas is on. Attach this as a -Wave Player- to the True input of the -Branch-.
- In your [Level Blueprint], check the In Bool of the <Set Boolean Parameter> and play this section of the map. Since your Boolean variable is set to true, you should hear your additional flammable layer in the explosion here. Go back to the [Level Blueprint] and uncheck it then play again. Now it should be absent.
- We now need to set up the system so that your variable is changed when the player interacts by switching on the gas pipe in the level.
- Create a Boolean variable in the [Level Blueprint] by clicking on the + Variables icon in the My Blueprint panel. Name it Gas_Switch. Compile the Blueprint using the Compile icon on the top left and then make sure that this Boolean’s Default Value is False (unchecked) in its Details panel.
- Drag and drop it onto the Blueprint Event Graph to create a <Get>, and connect this up to the In Bool input of your <Set Boolean Parameter> node.
- We can now set the condition of this Gas_Switch Boolean dynamically in Blueprints. Look at the “Gas Switch 01” section in the [Level Blueprint] nearby. An event will come out of the <Gate> here when the player uses the switch in-game. Drag and drop your Boolean variable Gas_Switch again into the Event Graph, but this time create a <Set> node. Check the Boolean value of this node to be True and connect it to the output of the <Gate>.
- Drag out from the <Set Boolean Paramter> to create a <Print String>, then connect the <Get> of the Gas_Switch variable to the In String input of this <Print String> (this will automatically create a convertor from the Boolean value to a string variable). You can now see the changing conditions (False/True) printed to the screen as you play (also see Appendix C: Testing, Troubleshooting, and Good Practice/Watching Blueprints/Print String).
- Now if you explode the rock blockage without the gas switch on, it will play your standard explosion sound, but if you play it again with the gas on, you should then hear your additional flammable layer. You can now try setting up a similar system for the [Rock_Explosion_04].
- If this all works the first time, then well done! You got lucky. To check how things are working, it’s good to watch the Blueprint while you play. See Appendix C: Testing, Troubleshooting, and Good Practice/Watching Blueprints.
- If you’re struggling then take a look at the exercise screenshot for this system, which is downloadable from the website.
Parameters to Pitch with <Set Pitch Multiplier>
You now need to power up the two fans that will allow you to float up to the upper cave. Button B (in the illustration above) starts the lower fan and C the upper one. Hold down E to increase the speed of each fan to maximum before you jump!
While the player is holding E, the system starts a <Timeline> containing a Float Track. This can store a set of values over time. In this case it is set to output numbers from 0.0 to 1.0 over 8 seconds, increasing the speed of the fan. Remember a float is just a floating point number—in other words a number that contains a fractional part, not a whole number or an int (integer).
If the player releases the key having reached the max fan speed, then it is held for 10 seconds (using a <Delay>) and then the <Timeline> is reversed so the numbers ramp down again. As we want to represent these changing conditions to the player (so they know when the max speed has been reached), we’re taking this 0.0 to 1.0 value and passing it to the <Set Pitch Multiplier> node that targets the ambient sound for the fan [Fan_01] (referencing the Sound Cue {Fan_01}). Obviously the values 0.0–1.0 aren’t particularly useful ones for the pitch of the fan, so we have mapped (or scaled) these numbers onto a more suitable range (e.g., 0.0–1.0 becoming 0.6–1.2). See Appendix A: Core Concepts/Transforming and Constraining Variables and Parameters.

In this example we are using the <Timeline> to give us a ramp up in pitch over time, but you could use any parameter in game to set the pitch of your sound. If you want it to only update its pitch when played, then just trigger the <Set Pitch Multiplier> from the output of a <Play> or <Play Sound Attached> node. If you want it to continuously update, then you need to trigger it from an <Event Tick>, or as we have done here, from the Update output of a <Timeline>.
Exercise 02_10: Read <Timeline> for Pitch Control
In this exercise we will look at how we can set the pitch of sounds in response to game events.
<Set Pitch Multiplier>, <Key Events>, <Set Volume Multiplier>
- In your exercise level find one of the machines that you added a looping oscillating Sound Cue to in the *Final Cave*. See Exercise 02_07 (e.g., *Oscillating Machine 02*).
- With this ambient sound selected in the Viewport, right-click in the [Level Blueprint] Event Graph and Create a reference to—.
- Drag out from this to create a <Set Pitch Multiplier>. Set the New Pitch Multiplier to 0.5.
- Do this again to create another one, and this time set this New Pitch Multiplier to 1.5.
- Set up a couple of <Key Events> to test this. Right-click and search for “T” to create a T <Key Event>, link this to your first <Set Pitch Multiplier>, then create a <Key Event> “Y” to trigger the second (see Appendix A: Core Concepts/Key and Gamepad Inputs).
- Play the game in this area, and when you’re near your oscillating machine, press T and then Y to hear its pitch change.
- Now let’s apply some timed pitch changes. Create a <Timeline> node. Right-click for the Graph Action Menu and select Add Timeline. Double-click this to open the Timeline Editor.
- Click on the f+ icon to create a new Float Track, name it Pitch_Track, and create some points on this track to represent your pitch change over time. For example you might want to go from 0.5 to 1.5 over 3 seconds. Press Shift and click on the line to create key points on the line. Click and select and drag to move them (see Appendix A: Core Concepts/Others/Timeline for more on the <Timeline> Node). Set the length of the timeline to be 3 seconds. Select the ambient sound in the level and set its initial Pitch Multiplier to 0.5 so that it matches the start of your <Timeline> track and doesn’t suddenly jump to it.
- Once you have set up your Float Track values, return to the Event Graph tab at the top.
- Reconfigure your graph so that the T <Key Event> goes to the Play from Start input of the <Timeline>. Send the Update output to now trigger your <Set Pitch Multiplier> and link the Pitch_Track output to set the New Pitch Multiplier.
- Play the game and test your Float Track to pitch system.
- Now set up a trigger use system (see Appendix A: Core Concepts/Trigger Use) so that the player can go up the machine and use it (E), triggering a pitch change instead of the <Key Event>.
- You could link this up to the spotlight [Final_Cave_Spotlight] so that it acts like a generator that is powered on for the light. In the lights Details panel, set its Rendering/Visible to False, create a reference to it in the [Level Blueprint], and then drag out from this to create a <Set Visibility> node. Trigger this from the Finished output of the timeline.
- You could also add a <Set Volume Multiplier> to automate its volume as well.
Parameter-based Crossfades with -Crossfade by Param-
For the second fan (Button C), we want to add a little more interest, so as the fan gets faster, new sound elements are introduced representing the increasing speed and strain. We’re changing the pitch again (with the <Set Pitch Multiplier>), but this time we are also changing the volume of various sound elements.
The value of the Float Track from the <Timeline> is now being scaled from 0.0–1.0 to 0–100 by setting a Float Parameter within the Sound Cue {Fan_02} named Fan_Speed.

Inside the Sound Cue this named parameter is picked up by a -Crossfade by Param- node, which has a parameter of the same name.

The image below illustrates how the 0–100 parameter range is used to control the volume of the three fan sound elements.

As the parameter Fan_Speed increases from 0.0 to 100.0, the three sound elements will gradually fade in, starting with the {Fan_Element_01} (in red), then {Fan_Element_02} (in blue), and finally {Fan_Element_03} (in orange). So as the parameter coming from the timeline increases, each sound is going to gradually come in and ramp up in volume until at the maximum fan speed all three are playing. You can see these volume changes as well as hear them by using the Stat Sounds Console command (see Appendix A: Core Concepts/Console Commands).
In the -Crossfade by Param- node you can set the value at which the parameter will start to fade in each input, where this fade in will end (i.e. reach maximum volume), and where it will start and end its fade out. For example the first element (0) will start playing when the parameter is 0.0, and as the parameter increases to 25.0, it will gradually fade up. The second element will start fading in at this point until it reaches its maximum volume when the parameter is at 50. In this instance we want all the sounds to remain playing when the parameter is at its maximum so the Fade Out Start and End values are the same.

Again we are using the Float Track of a <Timeline> to control our crossfades here, but you could control them with any parameter or variable you have within the game.
Exercise 02_11: Controlling Crossfades with -Crossfade Param-
In this exercise we will explore how you can use the -Crossfade by Param- node in the Sound Cue to control the volume of various elements of a sound in response to game parameters.
-Crossfade by Param-, <Set Float Parameter>
- In the *Final Cave* you will have noticed a platform up against the rock face that will allow you to progress to the next section. Unfortunately they are not yet working. First you need to power up the generator.
- Go to the *Lift Generator* on the left and add an ambient sound to the level.
- Now create a Sound Cue for this ambient sound. It should comprise three elements that will gradually fade in as the machine powers up over time. Connect these three elements as -Looping Wave Player- s to a -Crossfade by Param- node then connect this to the output of the Sound Cue. You’ll need to add a third input to the -Crossfade by Param- node by clicking on the Add Input button.
- Select the -Crossfade by Param- node, and in its Details panel set the Param Name to be Generator_Power. Set all the Fade Out Param Value Starts and Ends to 1.0, and then adjust the Fade In Param Value Starts and Ends so that they fade in at different times up to 1.0 (see the image in the demo above for a reminder).
- Assign this cue to your ambient sound and create a reference to this in the [Level Blueprint].
- We have created a trigger use and release system around the generator machine and connected this to a <Timeline> node for you -see the “Final Cave”/“Lift Generator” section of the Level Blueprint.
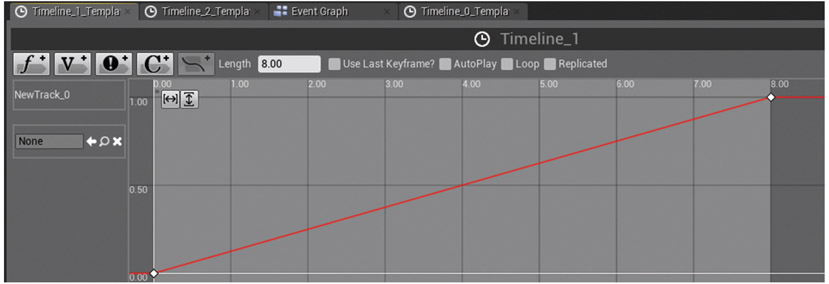
- Create a new float track in the <Timeline>. Set it to go from 0.0 to 1.0 over 8 seconds and change the Length of the <Timeline> to 8.0. Then return to the Event Graph and drag out from the reference to your ambient sound to create a <Set Float Parameter> node. Connect the output of the <Timeline> Float Track to the In Float of this <Set Float Parameter> node. Also connect the Update output of the <Timeline> to trigger the <Set Float Parameter>.
- Set the In Name of the <Set Float Parameter> node to Generator_Power.
- This time the system is set to Play the <Timeline>, not to Play from Start, so the player may stop their interaction before it has reached the end. We have used the Released output from the <Key Event> to Stop the <Timeline>, which will stop it at its current position from where it will continue when the player interacts again.
- Play the game and you should be able to hear the layers build up as you hold down the use key E. If you release it, they will hold at their current levels until you use it again (you could also Reverse this <Timeline> with another key).
- We have already set up a Boolean parameter to track whether the generator is on. Connect the Finished output of your <Timeline> to this <Set Generator On> node.
Using User-defined Curves
The ability to take parameters or variables from the game system and map them onto user-defined curves is a core technique that we will be returning to many times in the book, for example in Chapter 04 to control layers of music and in Chapter 07 to control the audio response to impacts or player speed for footsteps. It’s worth having a quick read of Appendix A: Core Concepts/Transforming and Constraining Variables and Parameters/Reading through Curves before moving on.
Once you have been blown up to the upper cave by the fans, you need to operate the generator (D) to get it to the correct setting before the elevator will work (using E to speed up and R to slow down). The correct setting is indicated through the audio.
There are three elements in the Sound Cue:
The first rises linearly in volume and has a pitch curve.

The second has a different volume curve, and its pitch curve has a sharp definition halfway along to indicate the optimum setting for the generator.

The third element has a sharp volume rise towards the end to indicate that the player is overstressing the generator.

By adding just a little more complexity, we can get a system that allows us to define our own curves to read through rather than the linear movement between two values we have had up until now. Of course we could use curves in the Float Track of a <Timeline>, but the approach below is infinitely more adaptable and useful.
Since we are now using some non-linear values, the -Crossfade by Param- is no longer useful. Instead we are using the -Continuous Modulator- that allows us to change the volume or pitch of the sound in response to named parameters. As you can see from the image below in the Sound Cue {Final_Elevator_Generator}, there are three -Continuous Modulator- s that will control the volume for each element, and an additional two for the pitch.

The controls for the <Timeline> are slightly different this time since we’re using E to increment the values and R to decrement. This means the player can adjust them until the generator is ready (when the generator value is in the right range, it uses a <Branch> node that allows the lift to function).
Rather than directly apply the value of our <Timeline> Float Track to our parameters, now we are using this value (0.0–1.0) to read through curves. The X-axis in a curve is referred to as Time, and the Float Track parameter is used to read through this and output the value of the curve at that position via the <Get Float Value> node. Although it’s called time, we can treat this simply as an X value to read out the curve’s Y setting at this position (note that if you just want a linear relationship between your game variables and pitch/volume, you can use the Min Input/Max Input/Min Output/Max Output settings of the -Continuous Modulator- to clamp and map them to an appropriate range).

The curves are set using curve assets that have been created in the ![]() Content Browser (for example {Elevator_Pitch_01}), and we have used curve variables to hold these in the [Level Blueprint]. As you can see above, the Elevator_Element_01_VCurve variable (containing the {Elevator_Pitch_01} curve) is read by the <Get Float Value> node, and the Return Value of this sets the float parameter Elevator_Pitch_01. This corresponds to the name of the parameter of the -Continuous Modulator- in the Sound Cue.
Content Browser (for example {Elevator_Pitch_01}), and we have used curve variables to hold these in the [Level Blueprint]. As you can see above, the Elevator_Element_01_VCurve variable (containing the {Elevator_Pitch_01} curve) is read by the <Get Float Value> node, and the Return Value of this sets the float parameter Elevator_Pitch_01. This corresponds to the name of the parameter of the -Continuous Modulator- in the Sound Cue.

Curves have many applications in game audio. Don’t worry if this all seems a little overwhelming for the moment—we will be revisiting them on numerous occasions throughout the book.
Exercise 02_12: Using User-defined Curves
In this exercise you will explore the system for the moving platforms in the cave which uses curves to vary the volume and pitch of different sound elements in response to the speed the player sets.
-Continuous Modulator-, <Set Float Parameter>, {Curves}
Note: This machine will not start unless you have <Set> the Generator On Boolean to True in the last exercise. If you are starting directly from here, you will need to change its default value to True in the ![]() My Blueprint Tab.
My Blueprint Tab.
- Now that the generator is on (Exercise 02_11) you can use the machine on the right-hand side of the rock face (*Speed Control*) to start the moving platforms that will take you up to the next section.
- When next to the machine press E to start it and O to speed it up/P to slow it down.
- Setting this whole system up from scratch would take quite a bit of time, so we have already put it in the level with some placeholder sounds in the “Moving Cave Platform” area of the [Level Blueprint]. What you should do for this exercise is to replace these with some of your own and generally poke around to get familiar with the concepts being applied here.
- Our <Timeline> float track is being used to read through curves to set various float parameters via the <Set Float Parameter> nodes. The In Name parameter names of these relate to the parameter names of the -Continuous Modulator- s inside the Sound Cue {Final_Cave_Platforms}.
- The curves we are using are referenced by the curve variables in the [Level Blueprint]. You can find these and see (and edit) their curves by selecting the curve variables in the [Level Blueprint] and looking at their Default Value.
- Note how we have made sure that the Volume and Pitch multipliers of the ambient sound objects in the level match the values at the start of their respective curves so that we do not get a sudden jump when the curve values start to be applied.
- Swap out the sounds with your own and experiment with changing the shape of the curves (see Appendix A: Core Concepts/Transforming and Constraining Variables and Parameters/Reading through Curves). You could also adapt this to read through curves created on float tracks of the <Timeline> itself rather than using separate curves.
- You have made it to the penultimate exercise in Chapter 02, so sit back and have a nice cup of tea! We appreciate that the last few exercises have been pretty tricky, so if you’ve made it through then well done, but if you’re struggling a little then that’s fine as well. We will be revisiting these kinds or parameterized approaches at numerous times, so you can have another go later on.
- The final exercise and next chapter are a lot easier—we promise!
Exercise 02_13: First Pass
Using everything you have learned about ambience and procedural approaches to sound design, go around and implement sounds for the other areas in the exercise level. Next we will be adding music and then dialogue before returning for a second pass to make things real in Chapter 07 and good in Chapter 08!
Monitoring Memory and Level Streaming Approaches
As we’ve said there are many reasons for adopting a procedural, modular, or parameterized design approach, but in many cases the critical issue is the RAM available. If you go over then your sounds simply won’t work or you’ll be taking memory away from other systems—and they won’t be happy! Whatever your platform and whatever its specifications, you need to monitor your audio memory.
Asset Checking
The first thing to do is to have a look through the files themselves to see if there’s anything you’ve overlooked. Firstly you can right click on your audio folder in the Content Browser and select Size Map to get a graphical representation of the file sizes. Then in the ![]() Content Browser, select View Options/View Type/Columns to see some additional information about your files. Check the following:
Content Browser, select View Options/View Type/Columns to see some additional information about your files. Check the following:
- NumChannels— If your sounds are spatialized and playing back from a point source in the game, then it makes no sense for them to be stereo files (in fact stereo files will not spatialize but will be played back directly to the players ears).
- Sample Rate— Check for any anomalies such as that 96kHz sample that slipped through the net!
- Compression/Ogg Size— When you import a sound the compression setting is set to 40 by default, but it might be appropriate to have some less prominent sounds at a lower value, and the very important sounds you want at high quality to be a higher value. These settings will obviously impact on the Ogg Size.

Memory Checking
All game systems have a range of debug tools for the developers to use to get information about what’s going on in the game system. In the Unreal Engine you can see some of the audio ones by going to the drop down arrow for your Viewport and selecting Show Stats or by using the Console commands (see Appendix A: Core Concepts/Console Commands).

If you go to the Stat menu below the Show Stats option and choose Advanced/Audio, the Audio Memory Used will give you the running total size of the sounds that have played.

The Console command “ListSounds” will also give you a list of these sounds to the output log (Window/Developer Tools/Output Log).

And the Console command “Stat Sounds” gives you a list of the currently active sounds and their size.

These are all very useful methods of seeing what is going on in your level, but none of them are actually useful for tracking the overall audio memory requirements for your level. Given that many Sound Cues pick from a random selection of sounds, a play-through of the level with stat audio will only give you the total size of the ones that actually played during that particular play-through. For the next play-through this could be different because different sounds may play. This means that unfortunately the only way of accurately tracking your potential memory footprint is that fun utility loved by everyone throughout the world—the spreadsheet. Remember if all else fails, a good way of tracking your success in audio memory management is by the number and intensity of angry looking programmers marching towards you.
Level Streaming
Open the Map: Cave_Streaming then open the ![]() Levels panel from the Window menu. You can see here that there is one persistent level, but also two audio levels.
Levels panel from the Window menu. You can see here that there is one persistent level, but also two audio levels.

It is often useful when there are several people working on a map for them to actually put their content into different levels. These can all be loaded and you can switch their visibility using the ![]() Levels panel (the eye icon). This means that you can make alterations to your audio level, and whenever someone else loads in the persistent level, it will load in the latest version of your level as well. The other useful thing about this is that we can stream in different levels as we play through the game.
Levels panel (the eye icon). This means that you can make alterations to your audio level, and whenever someone else loads in the persistent level, it will load in the latest version of your level as well. The other useful thing about this is that we can stream in different levels as we play through the game.
For example with all levels loaded we see this:

This is actually a composite of the persistent level (the master level) containing the graphics:

Together with Audio_Level_01, which contains the audio for the first half of the level:

And Audio_Level_02, which contains the audio for the second half of the level:
Given that this audio is for different parts of the level, we don’t actually need to load both audio levels in at the start of the same. We can load Audio_Level_01 when the game starts, and then at a point where we get close to the audio for the second half we can unload Audio_Level_01 from memory and load in Audio_Level_02.

Another approach that is widely used is to hold the music for different areas in separate levels that are streamed in when required. You will need to work closely with your programmer and the rest of the team to decide on the best approach to this for your game, but it can be very useful for dealing with memory issues and implementing your audio in your own audio levels is a good working practice to get into. See Appendix C: Testing, Troubleshooting, and Good Practice/Working in Separate Audio-only Levels for more.
Sound Streaming
At the time of writing, the streaming options remain experimental so investigate with caution!
You can switch on the audio streaming options from the Edit/Editor Preferences/Experimental/Show Audio Streaming options.
Each {Sound Wave} now has an additional option to allow streaming and the priority for that wave.

In the Edit/Project Settings/Audio menu, you also can now determine the number of streaming sounds that will play at once. Talk to your programmer about the options for streaming audio on the particular platform you are developing for.
Conclusion
A procedural approach to sound design should become an integral part of your game audio toolkit. With this approach asset creation and implementation can no longer be considered as separate activities—you need to design sounds with their interactive use in mind. Through considering sounds as the product of separate components with a modular approach, you can begin to consider your collection of Sound Waves, or your Sound Bank, as a palette from which you can take and reuse elements in different combinations for different things. This not only allows you to keep the resource requirements lower than having unique sounds for everything, but can also help to unify groups of sounds by sharing some common characteristics.
This being said, however, do not forget the importance of great sound design! Once you are familiar with some procedural approaches, it is easy to get carried away and start trying to build everything this way, but sometimes just using a great sound that has been lovingly crafted in your DAW is just the best way to go for some circumstances. Use procedural sound design when appropriate, but use it in combination with great sound design.
For further reading please see the up-to-date list of books and links on the book website.
Recap:
After working through this chapter you should now be able to:
- Choose appropriate sample rates and audio file compression settings;
- Use sequenced and layered variation techniques in Sound Cues;
- Use envelopes and oscillators for pitch and volume variation;
- Create parameterized audio systems using conditional branches (True/False Boolean variables);
- Control the volume and pitch of audio components with in-game parameters;
- Track audio memory usage.