

What you'll cover in this chapter:
Files used in this chapter:
None
Because working with Catalyst involves passing files between multiple programs (Illustrator or Photoshop to Catalyst to Flash Builder) and between team members (designer to developer), keeping files organized and clear makes projects move much more smoothly. Looking at the way the files are structured is especially important as you prepare them to move from one application to the next. In this chapter, you look at some of the ways to do this.
The golden rule is to name everything. Elements that aren't named are given generic names in Catalyst, and those names don't help you understand the elements' relationship to other aspects of the project. This is true for states (as you saw in Chapter 4) as well as layers and components. Names given to layers in Illustrator or Photoshop are carried over into Catalyst, so it's a good idea to start your naming process there.
As you prepare to move your artwork from Illustrator to Catalyst, take some time to organize your layers so they make logical sense in Catalyst. First, place all the states and functional parts into separate layers. This allows you to easily make visible or invisible whole sections of the interface as you create project states in Catalyst.
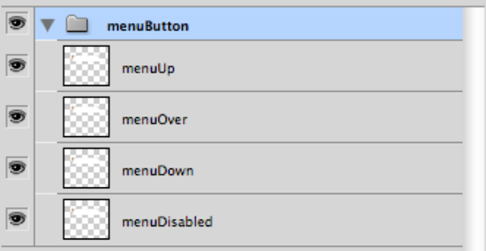
Layers should be logically grouped using descriptive names. For example, if you're creating a button, you should have a folder called Button, and inside it should be layers with the Up, Over, Down, and Disabled states, as shown in Figure 6-1.
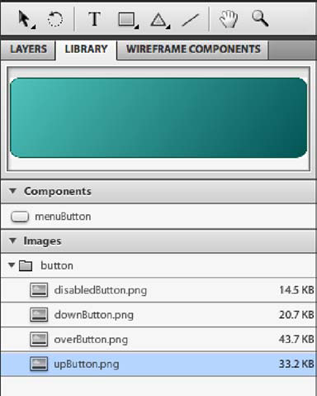
To keep things clear and understandable, it's a good idea to follow the same naming conventions as in the wireframe components. For example, when you're creating a button, follow the naming convention used for a button's states, as shown in Figure 6-2.

When you're naming layers that contain entire components, it's a good idea to follow a naming convention that's easy for developers to understand. This involves descriptive names that follow camelCase naming conventions. For instances of a component, camelCase naming involves starting with a lowercase letter and then capitalizing the first letter of every new word in the name, without using any spaces. Examples include menuButton, formButton, and nameInputText. This method is clear to read while also defining what the component is used for. This is a standard method, although if you prefer, you and your team can agree on a different naming convention.
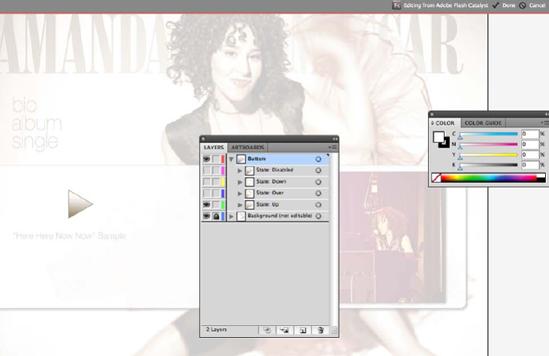
While in Flash Catalyst, you can look in the code view to see how the names you assign to your layers are used in the code generated in the background. To do this, select Code from in the view pull-down in the top-right corner of the interface (see Figure 6-3).

This view shows all the files created for the project. Each component is given its own file in the Components folder (see Figure 6-4).

Double-clicking a file opens the code that has been generated. Figure 6-5 shows the code that is generated for simple custom buttons.

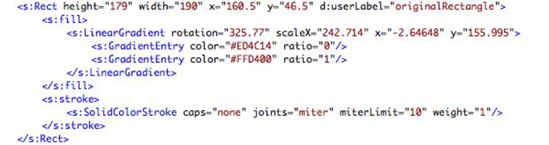
A developer can easily read this code largely because the naming used is clear and consistent. Looking at the first line in the design layer (line 11), for example, it's obvious that this represents the button's disabled state, because the code brings in an image file named disabledButton.png, and which has been given the user label disabledButton. The name for the image file comes from the name you give it in the Library panel (see Figure 6-6), and the user label is the layer name.
It's a good idea to scan through the code view, looking for generic names. When you find one, it's much easier for you to change the name in Catalyst than it is for a developer to guess what it the component is.
Although Catalyst can't import Fireworks files directly, this doesn't prevent people who design in Fireworks from getting in on the action. But bringing in a file from Fireworks involves the additional step of exporting to FXG format first. FXG is an XML-based file format that lets you transfer files across programs in the Flash platform. The Illustrator and Photoshop files you've been bringing into Catalyst are also converted to FXG. The main difference is that Catalyst can convert these files when they're imported into Catalyst, whereas Fireworks files need to be exported into the format.
The advantage of Fireworks over the other primary graphics programs is that it can create pages. These pages are retained in the FXG format and become states/pages in Catalyst.
To export to FXG from Fireworks, follow these steps:
Create a design using the graphics tools in Fireworks, making sure you use clear and consistent naming for the layers and pages.
From the main menu, select File


Note that use of components in Fireworks' common libraries isn't supported. They're brought into Catalyst as optimized graphics rather than as functioning components.
One of the main advantages of working with Adobe Illustrator to create your original comp is its emphasis on vector graphics. Because vector information can be represented with the FXG format, it remains editable in Catalyst. Vectors can also be scaled without pixelating.
There are some things to consider when using Illustrator. In order to keep your files simple and make them easier to transport, you should embed all images into the files rather than having them linked. When you're passing files to other team members, it's easier to lose track of linked images than embedded images.
If you use special fonts, evaluate when the fonts used in your design could be outlined. This avoids bloating the project by embedding too many fonts and makes the representation of your fonts more consistent. This is particularly true for type that has filters and effects applied to it—Catalyst can usually represent it consistently, but not always. Keep in mind that text that has been outlined isn't editable.
Complex artwork should be grouped and flattened onto as few layers as possible. Because most of the art you create is made up of multiple layers that aren't modified in Catalyst, a single flattened layer is easier for you to work with in Catalyst and much easier for the developer afterward. The exception is when you plan to modify parts of that artwork—for example, if a text box changes depending on the use or state of the component to be built from the artwork.
The following Illustrator filters and effects are supported in Catalyst:
Drop Shadow
Inner Glow
Outer Glow
Gaussian Blur
All other filters and effects are flattened or rasterized during the import process.
Assets in Photoshop are frequently created by combining several layers with different blend modes and effects. To keep the layers in Catalyst organized, it's useful to flatten layers in Photoshop when possible, leaving a single layer with a rasterized image. Flash Catalyst also rasterizes all layer effects for image, shape, and text layers from Photoshop during import.
When you're working with text layers that have effects or masks, you can use vector outlines or flatten the bitmap image to maintain a consistent appearance in Catalyst. When masks are applied onto a layer group, you need to flatten the bitmap image. Opacity changes on a layer group can be flattened to create a bitmap image.
Many blend modes don't transfer during the import into Catalyst and so need to be flattened to a raster image in Photoshop. These include the following:
Vivid Light
Linear Light
Pin Light
Hard Mix
Lighter Color
Linear Burn
Darker Color
Dissolve
Divide
Regardless of which graphics program you choose to start your project in, you may find yourself creating identical graphic elements throughout your design. For example, your design may involve multiple instances of the same button. Because it's more efficient and easier to modify one version of a button that is used multiple times than it is to manage multiple versions, it's useful to mark these with a _copy suffix (see Figure 6-10). This way, in Flash Catalyst, you can easily delete these layers and reuse the same asset.

Whenever you create a repeating set of items that will use live data in the final project, such as a gallery or product list, it's important to use a Data List component rather than create the items individually. It's much easier to replace the items in a Data List with live data, while maintaining the animations and behaviors you create for it in Catalyst, than it is to replace individual items.
Data List components, as you see in greater detail in Chapter 7 and again in Chapter 10, duplicate assets multiple times to create a set. Because Data Lists duplicate a similar set of assets (although modified), it's useful to create just one instance of the assets. Any others in the Illustrator or Photoshop file can be marked with the _copy suffix and then deleted in Catalyst. The parts of a Data List that change as the assets are duplicated (for instance, if you're creating thumbnails that involve different images for each thumbnail) should be included in layers nested in the assets for the Data List.
In Catalyst, you have the opportunity to affect your graphics after they're imported by using the Optimize Artwork commands in the Heads-Up Display (HUD) when an image or vector is selected (see Figure 6-11). Let's walk through each of your options.

The Optimize Vector Graphics option allows you to select a variety of vectors and makes them into a single vector graphic that is then easier to manage. Vector graphics are seen as code in the MXML that is created in the background. This code can become complicated and difficult for the developer to work with. Figure 6-12, for example, shows how a rectangle with a gradient appears in the code.
Optimize Vector Graphics simplifies the main code file (main.mxml) for the developer by moving this complicated code into a separate file in the Assets/Graphics folder and putting a simplified placeholder in its place (see Figure 6-13). This is especially useful if the artwork is made up of multiple vector shapes.

The Rasterize option in the Optimize Artwork pull-down takes whatever is selected and rasterizes it at screen resolution in its current size. This is particularly useful when you're working with graphics that are considerably smaller than the original size you imported.
To see an example, look at the images used in Chapter 4 (see Figure 6-14). The surfBoard.jpg image is 313KB and 790 × 1200 pixels but is only used as a thumbnail image that's 159 × 235 pixels. After the image is scaled down to the size at which it's used, you can rasterize it using the Rasterize command. Doing so creates a new image in the library (named surf_1.jpg) that is 51KB. You can also use this option to convert vector graphics to bitmap images.

The next Optimize Artwork option, Compress, allows you to further reduce an image's size, as shown in Figure 6-15.

Using the default compression setting of 70% compresses this image to 8KB. Again, a new image is created, this one named image1.jpg. It's a good idea to rename these images right away, using a clearer name.
At 100% scale, the differences between the three images are fairly slight, as shown in Figure 6-16. But of course you have to balance the relative importance of image quality and file size for your individual project.

The final Optimize Artwork option, Convert to Linked Image, lets you make the selected image externally linked. Instead of placing the image into the SWF, this command saves the image into a folder called Assets/Images/ that is passed along with the project when it's opened in Flash Builder. This is particularly useful for large images such as galleries that you want to load externally and for which you want to include a preloader: when you select this command, it's much easier for the developer to add the preloader and for the images to be updated in the future.
From the design side, all you need to do is run this command. The file is automatically saved externally and kept associated with the project. The main difference that you notice in Catalyst is the addition of the folder icon to the listing in the Library. This is shown in Figure 6-17, next to the file size.
Round-trip editing allows you to bring images, vectors, and components into Illustrator or Photoshop so that you can use the tools in those programs to edit them easily and then quickly return to Catalyst. To round-trip between Catalyst and Illustrator, follow these steps:
In Catalyst, select the object you want to edit in Illustrator. This can be a single object, a mixed group of objects, or a component. You can only round-trip one component at a time, and custom/generic components can't be round-trip edited. Graphics that have been optimized by using the Optimize Vector Graphic command also can't be round-trip edited.
Select Modify
You can edit the selected items in Illustrator, along with their layer structure. The rest of the design appears as a faded image in the background and can't be edited (see Figure 6-19). Filters that are added in Catalyst can be edited in Illustrator, but filters that you add in Illustrator are converted to vectors or bitmaps on return to Catalyst.
When you've completed your edits, you can return to Catalyst by clicking Done at upper right on the artboard (see Figure 6-20).
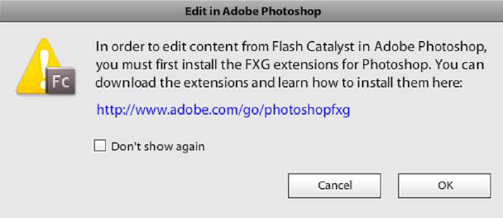
In a similar way, you can round-trip edit an image or a set of images in Photoshop. The difference is that Photoshop requires the FXG extensions. You can find them, along with installation instructions, at
www.adobe.com/go/photoshopfxg.To edit an image or a set of images in Photoshop, follow these steps:
Select the image. In the main menu, select Modify
Catalyst reminds you that the FXG extensions for Photoshop need to be installed (see Figure 6-22).
Click OK to open the image in Photoshop, again with the rest of the design faded in the background. From here, you can modify the image (see Figure 6-23).
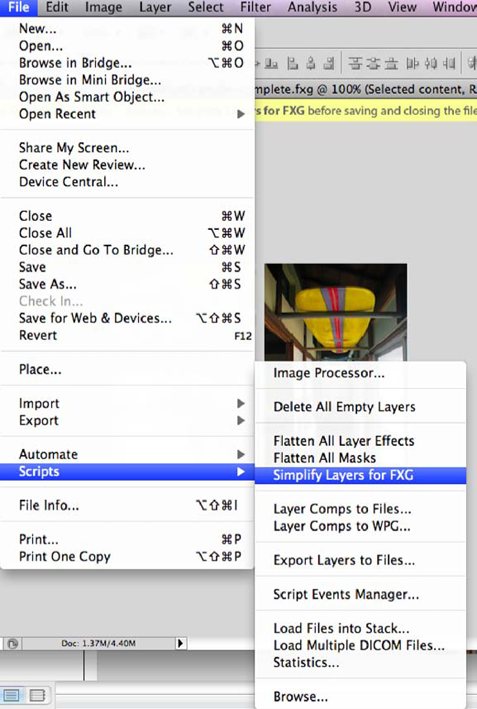
When you're finished with the edits, it's important to run the Simplify Layers script. This script simplifies some of the elements that Catalyst can't understand. For example, 3D layers and smart objects are rasterized and flattened by the Simplify Layers script. To run this script, select File


It's difficult for a developer to take over a Catalyst project. Not only do they have to get up to speed with your design, but they must also manage a good deal of MXML that is automatically generated. You can see the MXML by switching to code view.
This code, because it's automatically generated, often requires a lot of manipulation to make it efficient and reusable. So, think beyond your needs in organizing the project, and be good to your developers: name everything descriptively, use camelCase, compress your images, keep the structure hierarchically organized, and, while you're at it, buy them a beer—they work hard.
It's a good idea to meet with one of your developers and go through the project while it's still in Catalyst. They can look at the code view and see areas where naming or structure can be changed to have a significant impact on their workload down the line.
The next chapter looks at how to use Data Lists and design-time data to create the impression of live data.