

What we'll cover in this chapter:
Controlling SWFs
Using sound effects
Controlling video
Files used in this chapter:
weatherApp-start.fxpweatherApp-complete.fxpweather.swfFolder:
weatherIcons
Although Catalyst has the ability to create some fairly sophisticated animated transitions, Flash's use of the timeline, guide paths, and scripted animation make it a much more powerful and flexible animation tool. Thankfully, as part of the Flash platform, Catalyst works very efficiently with files created in Flash. This allows you to create elaborate animations that involve numerous elements in Flash and then bring them into Catalyst. This lets you not only use the advanced animation tools of Flash, but also use your existing Flash skills in your Catalyst projects.
It's also possible to control Flash SWFs in Catalyst by using the Play, Stop and Go to Frame and Play, and Go to Frame and Stop action commands. These let you use user interactions to control which part of the SWF is playing. In this chapter's example, you bring in two sets of SWF files that represent two different ways of using files created with Flash in Catalyst projects. First, you use animated icons: simple files with looping animation that don't need to be controlled by user interaction. Second, you add an animated background that has greater complexity and is controlled by the user's actions.
Along with importing and controlling SWFs, this chapter looks at working with video and audio. You can bring in and control video and audio files similarly to the way you control SWFs via action sequences. (This is the main reason these topics appear in the same chapter.) They also add significant life to an interactive project. You looked quickly at adding audio in the project for the singer Amanda Moscar in Chapter 2, where you played an audio clip. This time, you use audio to add to the interaction design in the form of audio feedback for rollovers and clicks. The chapter looks at the audio elements included in Catalyst as well as including video in a Catalyst project.
To look at the use of SWFs, audio, and video, you create a weather app prototype showing weather information for multiple cities. The weather conditions are presented through the use of animated icons created in Flash. A more elaborate Flash animation serves as the background, as shown in Figure 8-1. Changes in the background animation are triggered by the user rolling over one of the icons. Because this is a prototype, all the information is static. The goal of this prototype is to give the impression of what the final application will feel like rather than to create a functioning application that uses real data.

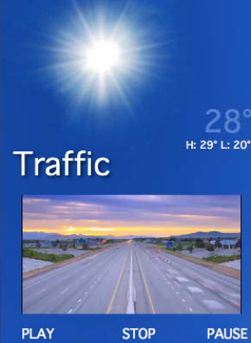
Clicking one of the cities transitions to the second state, which plays a traffic video for that city, as shown in Figure 8-2. This second state gives you an opportunity to play with Catalyst's video controls. You can see this prototype working at http://greggoralski.com/weatherApp.
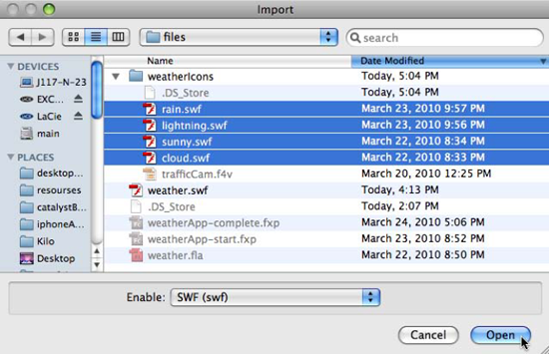
To stay focused on the main purpose of the chapter—working with SWFs, video, and audio—much of the grunt work of building this app has been done for you. All the animations in the SWFs have been created, because this book assumes you either know Flash or work with an animator who does. You can find these SWFs on the book's download page at www.friendsofed.com. They include a set of four animated weather icons (sunny.swf, rain.swf, cloud.swf, and lightning.swf) as well as the background animation (weather.swf), as shown in Figure 8-3. The FLA file for weather.swf is also included because it's useful to see the structure of the original file, in order to see how it's being animated.

Along with the SWFs, this project has a Catalyst file to get you started more quickly; it's named weatherApp-start.fxp. The completed file is named weatherApp-complete.fxp.
Begin by opening weatherApp-start.fxp, which has all the elements for the weather app prototype except the SWFs, video, audio, and interactions. The first state (cities) includes the static text Current and 28°, and a Data List with four cites and their temperatures (see Figure 8-4). This Data List was created in the same way you created Data Lists in the previous chapter.

The first thing you want to do in this project is import the animated icons that are provided with the chapter. You import SWFs using a method similar to that you use to import images. You don't need to do anything in particular to the SWFs to prepare them for use in Catalyst; SWFs with AS2 or AS3 will work fine.
Follow these steps:
In
weatherApp-start.fxp, import the set of SWFs in theweatherIconsfolder. To import a SWF, select File
As with images, if you import a single SWF, it's included in the Library, and an instance of it is automatically placed on the stage. But if multiple SWFs are imported together, they're included in the Library without an instance being placed on the stage. You can see the four SWFs in the Library, as shown in Figure 8-7. The SWFs are placed in the Images section of the Library because Catalyst treats SWFs in much the same way it does images.
Just like images, to add the SWF files to the stage, you select the file name in the Library and drag onto the stage. Drag these SWFs onto the stage, and position them on top of the Data List as shown in Figure 8-8. The SWFs also need to be scaled to better fit with the design; to do this, use the bounding-box handles.


Notice that when you scale the SWF, it maintains its aspect ratio and doesn't distort that actual SWF. This is because the scaling changes the bounding box in which the SWF is imported.
Test the project (File
Looking at the Layers panel, you can see that each SWF has been added to a layer named SWF Asset (see Figure 8-9).

This is hardly a useful name; and as discussed in Chapter 6, naming is of great importance in helping the developers understand your files down the production path. Rename the SWFs sunIcon, cloudIcon, rainIcon, and lightningIcon. To keep things neat, you can also place them in their own folder (see Figure 8-10) called weatherIcons.

A quick look, for the courageous, at the code created when you placed the SWFs on the stage gives you more insight into how Catalyst handles SWFs (see Figure 8-11). To see it in Catalyst, switch from design to code view (upper right of the stage), and scroll down. This piece of code shows that the SWF file isn't actually brought into Catalyst but rather is copied to a folder in the project (assets/images/) and linked to from there. This means that if you need to change the animated icon in the future, you don't have to reimport the SWF and recreate the placement/scaling; rather, you can replace the SWF in the assets/images/ folder.
Because the weather icons don't need to be controlled by user interaction but are instead allowed to loop, they're easy to deal with, and you don't have to be concerned about how they're constructed. This is the FLAs aren't included for those files—it's enough for you to know that they play their animations.
But if you want to gain more control over a SWF and have the user interaction control it, you need to better understand how the SWF was built. Catalyst gives you control over a SWF file through the commands Play, Stop, Go to Frame and Play, and Go to Frame and Stop. Play and Stop commands control the SWF from the current frame it's in, whereas Go to Frame and Play and Go to Frame and Stop allow you to select the frame number to begin at in the SWF's main timeline.
This control is limited, because you can't use frame labels, control nested movie clips, or pass variable information. But, creatively used, it's generally enough to let you create sophisticated prototypes. More advanced manipulation of a SWF needs to take place in Flash Builder.
In this section of the example, you bring in a background animation that animates when the user rolls over one of the weather icons. To better understand this, it may be useful to look at the completed example, http://greggoralski.com/weatherApp.
Notice that as you roll over a weather icon, the background animates and shows a photorealistic representation of the weather on the icon. Let's first look at the Flash file that contains the animation:
Open
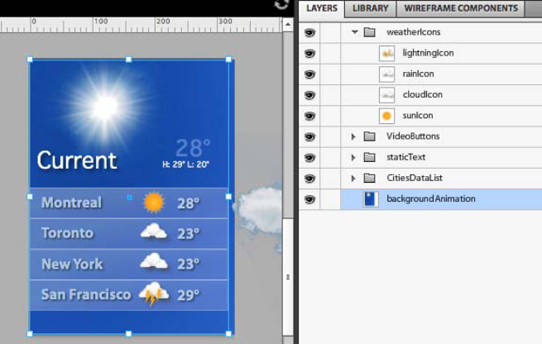
weather.flain Adobe Flash. This file is structured as one long animation in the main timeline, because the main timeline is the only part of a SWF that you can control in Catalyst. Figure 8-12 shows the structure of the Flash file.This Flash file has the same stage size as the Catalyst file and is made up of a series of movie clips representing the weather conditions of the weather icons. Each weather condition has an animation of 15 frames followed by a
stop()command. Thestop()is the only code in this file. There is no real limit to how complicated and layered the animation is in the main timeline; it can also include nested animations. The lightning animation, for example, is nested in a movie clip. Continue as follows:Import
weather.swfinto the Catalyst project using the same technique you used to import the weather icons (FileDrag the layer with this SWF to the bottom in the Layers panel, and rename it backgroundAnimation, as shown in Figure 8-14.
You control a SWF using the Add Action button in the Timelines panel that you first saw in Chapter 5. The Add Action button gives you access to a variety of controls for SWFs, audio, and video and can be triggered by either a state change or an action sequence. Action sequences differ from state changes because they're series of actions in the current state. Because it's more direct and efficient in this case to use action sequences rather than create a new state for each weather condition, you use action sequences for this example.
To create an action sequence, you begin by creating the interaction that triggers the sequence. In the case, the interaction is the user rolling over the weather icons:
Select the first weather icon, sunIcon. In the Interactions panel, click Add Interaction. In the resulting dialog box, set the Interaction to be On Roll Over
The action sequence is ready to have actions added to it. To do so, with the action sequence selected in the Timelines panel, select the object that is affected by the action (in this case, backgroundAnimation) and click Add Action (see Figure 8-17).
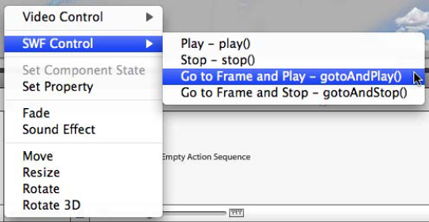
The Add Action command gives you a variety of options for the control of SWFs, video, and audio. To control SWFs, as mentioned earlier, the options are Play, Stop, Go to Frame and Play, and Go to Frame and Stop. In this example, each weather icon triggers a Go to Frame and Play action. Specifically, each icon goes to the frame in which its associated animation exists in the
weather.swffile (these are staggered every 15 frames):Add the action SWF Control
After you add the action, you can control the frame at which to begin the animation via the Properties panel for the action. For the animation associated with sunIcon, the animation begins at frame number 1:
Set the start frame for the action to 1 in the Properties panel (see Figure 8-19).
Test the effect of this action sequence by running the project (File
Select the weather icon for which you want to create an action sequence, and click Add Interaction. In the Timelines panel, select the action sequence. On the stage, select backgroundAnimation, add the action SWF Control


Each icon starts the animation on a different frame: cloudIcon's start frame is 16, rainIcon's start frame is 31, and lightningIcon's start frame is 46. These numbers are based on where in the main timeline of the Flash file the animations begin. Because of this, it's important that you have access to original Flash file when working with a more complicated animation. Where the animation stops is controlled by the stop commands in the Flash file.
You also use the Add Action command to trigger audio effects in a project. You've looked at how the Add Action command adds actions to an action sequence, but you can also use it to add actions to a state transition. To see this, you can add a sound effect to the transition from the cities state you've been working in to the cam state that holds the video example. The cam state has been created for you in this project, so all you need to do is add the audio effect to the transition and trigger the transition through an interaction. Let's add the audio effect first:
Select the cities
In the Add Action command, select Sound Effect (see Figure 8-21).
This option brings up an Import dialog box that allows you to select an audio asset to be played at this transition (see Figure 8-22). This dialog box shows all the audio files in your Library. If you want to bring in a custom MP3 to include, you can choose File
Select Import
The sound file is added to the transition in the Timelines panel (see Figure 8-24). By default, the sound file is given 1 second, which is generally plenty of time. You can lengthen or shorten it by changing the Length property of the sound effect in the Properties panel.
While you're here, click the Smooth Transitions button to make the transition between the cities state and the cam state animate.
To add sound effects to the rollover action sequences you created for the weather icons, follow a similar process—with the exception that, instead of adding an action on a transition, you add it to the action sequence associated with the weather icon, as shown in Figure 8-25.
To hear the sound effect on the transition, you need to have some sort of interaction trigger the transition. The most appropriate way to do this in this example is to have the Data List (the one that holds the name of each city and its temperature) trigger the transition to the cam state:
In the cities state, select the Data List. In the Interactions panel, add the interaction On Select


Adding video follows the same straightforward process you've seen for adding the SWFs. You can largely follow the same kind of process to control the video, except you can also add actions directly in the Interactions panel.
To bring video into the cam state, select this state, and then follow these steps:
In the cam state, select Import
Scale the video so it fits with the design, as shown in Figure 8-27.
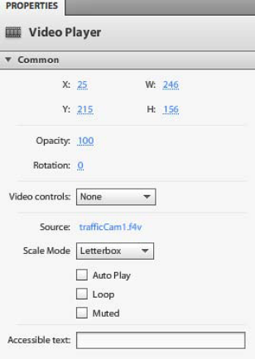
The controls along the bottom of the video are automatically added. These can take the form of the default wireframe skins, which are shown in Figure 8-27, or standard skins that appear similar to the video player in Flash. You can also remove the video controls by setting Video Controls to None. You do so in the Properties panel for the video. You can control the video using these controls or using actions, similar to how you control SWFs:
Select the video and in the Properties panel, select None in the Video Controls drop-down (see Figure 8-28).
Looking over the Properties panel, you can see the kinds of changes that are possible for the video. You can change the opacity, rotation, and scale mode; you can also set the video to Auto Play (by default, the video pauses on the first frame), Loop, or Muted (see Figure 8-29).
To show how custom video controls work, the project has a series of buttons along the bottom of this state. The buttons are Play, Pause, and Stop; they're used to control the video. You can add an action to a video the same way you added the backgroundAnimation SWF, but you can also add it directly in the Interactions panel:
Select the Play button. In the Interactions panel, set the interaction to On Click


You can use the same kind of direct method to pause and stop the video.