
AutoCAD software is very precise and the correct application of these auxiliary tools is a key factor for good projects. All users should be familiar with at least Ortho and Osnap tools. Following is the application of auxiliary tools in 3D projects complemented with the first exercise.
Let's start with object snapping, probably the most frequently used tool for precision. Every time AutoCAD prompts for a point, we can access predefined object snaps (also known as osnaps) if the OSNAP button on the status bar is on. To change it, we only have to click on the OSNAP button or press F3. If we want an individual osnap, we can, among other ways, digitize the first three letters (for instance, MID for midpoint) or use the osnap menu (CTRL + right-click). Osnaps work everywhere in 3D (which is great) and is especially useful is the Extension osnap mode, which allows you to specify a point with a distance in the direction of any edge.
But what if we want to specify the projection of 3D points onto the working XY plane? Easy! If the OSNAPZ variable is set to 1, all specified points are projected onto the plane. This variable is not saved and 0 is assigned as the initial value.

More great news is that ORTHO (F8) and POLAR (F10) work in 3D. That is, we can specify points by directing the cursor along the Z axis and assign distances. Lots of @ spared, no?
OTRACK (F11), used to derive points from predefined osnaps, also works along the Z-axis direction. We pause over an osnap and can assign a distance along a specific direction or just obtain a crossing:
Starting with Version 2011, AutoCAD allows you to specify 3D object snaps. Also, here we can access predefined 3D osnaps keeping 3DOSNAP (F4) on, or we can access them individually. There are osnaps for vertices, midpoints on edges, centers of faces, knots (spline points), points perpendicular to faces, and points nearest to faces.
Using the LINE command, coordinates, and auxiliary tools, let's create a cabinet skeleton. All dimensions are in meters and we start from the lower-left corner. The ORTHO or POLAR button must be on and the OTRACK and OSNAP buttons with Endpoint and Midpoint predefined.
Note
As in 2D, rotating the wheel mouse forward, we zoom in; rotating the wheel backward, we zoom out; all related to cursor position. To automatically orbit around the model, we hold down SHIFT and the wheel simultaneously. The cursor changes to two small ellipses and then we drag the mouse to orbit around the model. Visualization is the subject of the next chapter.

- We run the
LINEcommand at any point, block direction X (POLAR or ORTHO) and assign the distance:Command: LINE Specify first point: any point Specify next point or [Undo]: 0.6
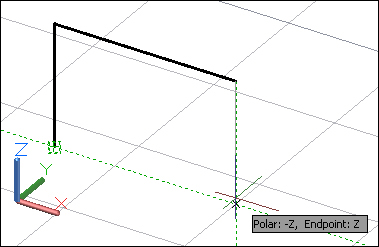
- We block the Z direction and assign the distance:
Specify next point or [Undo]: 0.7 - The best way to specify this point is with relative coordinates:
Specify next point or [Close/Undo]: @-0.3,0,0.4 - We block the Z direction and assign the distance:
Specify next point or [Close/Undo]: 0.7 - The best way to close the left polygon is to pause over the first point, move the cursor up to find the crossing, with Polar or Ortho coming from the last point, and apply Close option to close the polygon:
Specify next point or [Close/Undo]: point with OTRACK
Specify next point or [Close/Undo]: C
- We copy all lines 1 meter in the Y direction:
Command: COPY
Select objects: Specify opposite corner: 6 found
Select objects: Enter
Current settings: Copy mode = Multiple
Specify base point or [Displacement/mOde] <Displacement>: point
Specify second point or [Array] <use first point as displacement>: 1
Specify second point or [Array/Exit/Undo] <Exit>: Enter
- We complete the cabinet skeleton by drawing lines between endpoints and midpoints:
Command: LINE