
In this recipe, we will illustrate how to define the custom functions in Java and how to import them into JDeveloper for the XSLT mapper.
The following text will cover the steps needed to define the custom functions and import them into JDeveloper:
- We start by opening an empty Java project in JDeveloper.
- In the Java project, we create the Java class (
ValueWithUnit.java) that is used as a placeholder for the function logic. What we do is concatenate the value of the field with its corresponding unit as follows:public class ValueWithUnit { public static String formatValueWithUnit(String value, String unit) { return value + " " + unit; } } - Next, we prepare the configuration file. We create a new directory named
xmlin the project and prepare the XML file namedext-mapper-xpath-functions-config.xml.
- In the configuration file, we define the function name, class name, and input and output parameters. We also add the description of the function.
<?xml version = "1.0" encoding = "utf-8" ?> <soa-xpath-functions xmlns = "http://xmlns.oracle.com/soa/config/xpath" xmlns:ud = "http://www.oracle.com/XSL/Transform/java/org.packt.user.defined.ValueWithUnit"> <function name = "ud:formatValueWithUnit"> <className>org.packt.user.defined.ValueWithUnit</className> <return type = "string"/> <params> <param name = "value" type = "string"/> <param name = "unit" type = "string"/> </params> <desc/> <detail> <![CDATA[Function concatenates the value and unit.]]> </detail> </function> </soa-xpath-functions> - We are now ready to pack the class file along with the configuration file into the JAR archive for the deployment. For that purpose, we create a new deployment profile for the JAR archive as shown in the following screenshot:

- In the deployment profile dialog, we enter
UserDefinedFunctionas the name of the deployment profile and click on the OK button. - We get the dialog to configure the deployment profile. From the tree, we select Filters from Project Output and deselect the
xmlpart from the Files tab as shown in the following screenshot: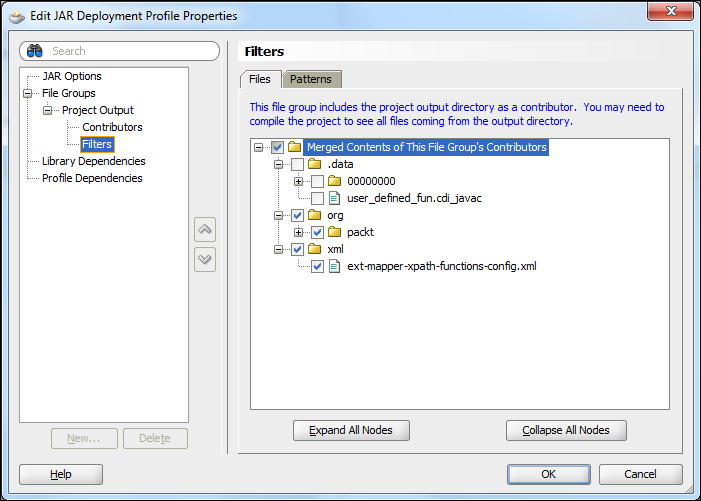
- In the file group, we create a new group and name it
config. We define the packaging type of the file group. To configure the file group, we perform the following actions on the following tabs:- config: In the target directory, we enter
META-INF - Filters: In this tab, we deselect everything except for the
xmldirectory
- config: In the target directory, we enter
- We confirm the deployment profile configuration by clicking on the OK button.
Now we are ready to build the package and deploy it for usage in JDeveloper. At the project root, we right-click and select Deploy and UserDefined Functions…. The deployment action wizard appears and we confirm the dialog by clicking on Finish. We find the created JAR file in the deploy directory of the project.
We install the extension to JDeveloper by selecting the Tools menu and then selecting Preferences.
Under the SOA tab, we select the generated JAR file and click on the OK button as shown in the following screenshot:

The user-defined functions are composed of the Java class and the XML configuration file. The composition packed into the JAR file can be used as an extension function in JDeveloper and Oracle SOA Suite.
Depending on where we want to use the user-defined functions, we define the XML configuration file. The structure of the XML configuration is the same; however, the names differ depending on the area we want to use the functions in as follows:
|
Purpose of usage |
XML configuration file name |
|---|---|
|
Oracle BPEL engine |
|
|
Oracle Mediator |
|
|
XSLT Mapper |
|
|
Human workflow |
|
|
All of above |
|
The configuration file we used in this recipe is highlighted in the preceding table.
After the restart, we can see that our user-defined function appears in JDeveloper. It can be picked up from the Component Palette and User Defined Extension Functions tab.

Next, we will show you how to use the user-defined function in JDeveloper:
- In JDeveloper, we open the XSLT mapper. From the Component Palette tab, we pick the user-defined function and put it on the mapper pane.
- By right-clicking on the new function and selecting Properties, we can enter the desired data as shown in the following screenshot:

- An excerpt of the code from the transformation file is as follows:
<client:milleage>
  <xsl:value-of select = "ud:formatValueWithUnit(/ns0:TempElement/ns0:pieces[3], /ns0:TempElement/ns0:pieces[4])"/>
</client:milleage>
- We see that our function will be called with two parameters to be concatenated.
Oracle SOA Suite provides a placeholder where we put the extensions. We can put the extension in place by executing the following steps:
- Open the command prompt.
- Change the directory to
<Oracle_SOA_home>Oracle_SOA1soamodulesoracle.soa.ext_11.1.1and copy the extension JAR file into this directory. - We execute the ant command to rebuild the extension registry.
C:ProgramsOracleMiddlewareOracle_SOA1soamodulesoracle.soa.ext_11.1.1>ant
Buildfile: build.xml
create-manifest-jar: [echo] Creating oracle.soa.ext at C:ProgramsOracleMiddlewareOracle_SOA1soamodulesoracle.soa.ext_11.1.1/oracle.soa.ext.jar;
C:ProgramsOracleMiddlewareOracle_SOA1soamodulesoracle.soa.ext_11.1.1UserDefinedFunctions.jar;
C:ProgramsOracleMiddlewareOracle_SOA1soamodulesoracle.soa.ext_11.1.1classes [jar] Updating jar;
C:ProgramsOracleMiddlewareOracle_SOA1soamodulesoracle.soa.ext_11.1.1oracle.soa.ext.jar
BUILD SUCCESSFUL
Total time: 0 seconds
C:ProgramsOracleMiddlewareOracle_SOA1soamodulesoracle.soa.ext_11.1.1>
- Finally, we start Oracle SOA Suite.