
Horizon is the web component of OpenStack. It is an extensible component, which means new views can be added without losing consistency in its look and feel, as it provides the necessary core classes and templates for developers to use. In this chapter, we will look at the architecture of Horizon and install it in our environment. After completing this, we will have our cloud ready and take it for a spin in the next chapter.
In this chapter, we will cover the following topics:
- Working with Horizon
- Installing and configuring Horizon
- Troubleshooting Horizon
Horizon is a component of OpenStack that is slightly different from the others. This is a Django web application, and its sole purpose is to provide a user interface for other components of OpenStack services such as Nova and Swift.
One more thing about Horizon is that it does not actually use a database like other services, as all the information that it needs is pulled out from the other components using their respective APIs. In order to use Horizon, the use of Keystone is a must, which means we cannot use the individual authentication modules that the services themselves provide.
If you have followed the book to this point, all our services have been already authenticated using Keystone, so we can proceed. However, if we have anything that is locally authenticated, then that needs to be changed.
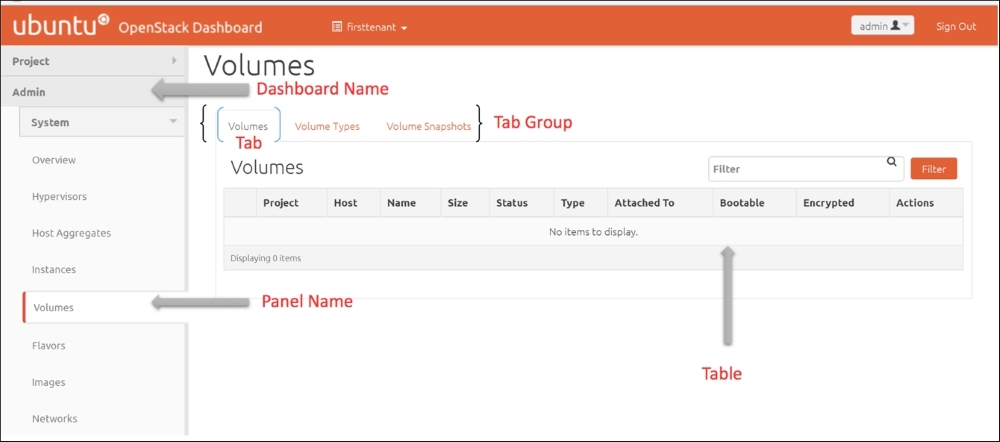
Let's discuss some terminologies used in the context of Horizon; this will help us in the remaining part of the chapter and also when we are either creating or modifying Horizon dashboards:
- Panel: This is the main UI component. Every panel has its own directory and a standardized directory structure. The panels are configured in the
<Dashboard Name>/<Panel Name>/panel.pyfile. - Panel groups: These are used to organize similar panels together and provide a top-level drop-down. These are configured using the
dashboard.pyfile. - Dashboard: This is a top-level UI component. A dashboard contains panel groups and panels. They are configured using the
dashboard.pyfile. Some of the dashboards installed by default areadmin,identity,project, and so on. - Tab groups: A tab group contains one or more tabs. A tab group can be configured per panel using the
tabs.pyfile. - Tabs: Tabs are units within a tab group. They represent a view of the data.
- Workflows: A workflow is a series of steps that allow the collection of user inputs. Workflows are created under
<Dashboard Name>/<Panel Name>/workflows/workflow.py. - Workflow steps: A workflow consists of one or more steps. A step is a wrapper around an action that understands its context within a workflow. Using workflows and steps, we can build multiple input forms that guide a user through a complex configuration process or a multistep input in order to accomplish something.
- Actions: An action allows us to spawn a workflow step. Actions are typically called from within a data table. Two of the most common actions are
DeleteActionandLinkAction. - Tables: Horizon includes a componentized API to dynamically create tables in the UI. Data tables are used to display information to the user. Tables are configured per panel in the
tables.pyfile. - URLs: URLs are needed to track context. URLs are configured in the
urls.pyfile. - Views: A view displays a data table and encompasses the main panel frame. Views are configured per panel in the
views.pyfile.
Examining some of these components on the UI, as shown in the following screenshot, will give us a better understanding:
Some system requirements need to be kept in mind while installing the Horizon dashboard:
- Since Horizon is going to use the memory cache, the amount of RAM in the server will have to be planned based on the number of concurrent users that are planned.
- The system needs Python 2.6 or 2.7 with Django installed. Please check the versions using the following commands:
python -c "import sys; print(sys.version)"
python -c "import django; print(django.get_version())"
You should be able to see the versions of Python and Django as shown here:

As you can see in our case, Python version 2.7.6 and Django version 1.6.1 are being used.
- A routable IP is required because this system needs to be accessible to all the users.
- If this machine is set behind a load balancer, some form of persistence needs to be enabled. The persistence methods in the order of preference are cookie persistence and source hash persistence. If the load balancer doesn't support either, then we should enable a source address persistence on the load balancer as the last resort.
- This machine should be able to reach all the endpoints that have been configured in Keystone.
- You can use the same features as any web application including proxy pass, reverse proxying, and so on.
The installation is very simple; we will install the dashboard and memory cache. Let's fill in our familiar check list:
|
Name |
Info |
|---|---|
|
Access to Internet |
Yes |
|
Proxy needed |
No |
|
Proxy IP and port |
Not applicable |
|
Node name |
|
|
Node IP address |
172.22.6.95 |
|
Node OS |
Ubuntu 14.04.1 LTS |
|
Keystone installed on |
172.22.6.95 |
|
Admin username |
|
|
Admin password |
|
Now run the following command:
sudo apt-get install openstack-dashboard apache2 libapache2-mod-wsgi memcached python-memcache
Ensure that the command is successful and the packages are installed successfully. This will install Horizon on our controller node.
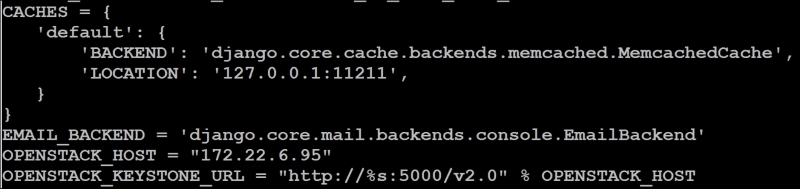
The initial configuration of Horizon is simple as well, we need to modify a single /etc/openstack-dashboard/local_settings.py file and configure three aspects:
- The location of the Keystone server
- The hosts that are allowed to access Horizon (the source IP addresses)
- The location of Memcache Daemon
Edit the previously mentioned file and set the values as:
OPENSTACK_HOST = "172.22.6.95": This will setOSControllerNodefor the Keystone servicesALLOWED_HOSTS = ['*']: We are allowing all the hosts to access the Horizon dashboardCACHES: This sets the location to 127.0.0.1 (or to localhost)
You should see something like the following screenshot:
In order to finalize the installation, we restart the apache and memcached services using these commands:
sudo service apache2 restart
sudo service memcached restart
This concludes the installation of the Horizon dashboard.
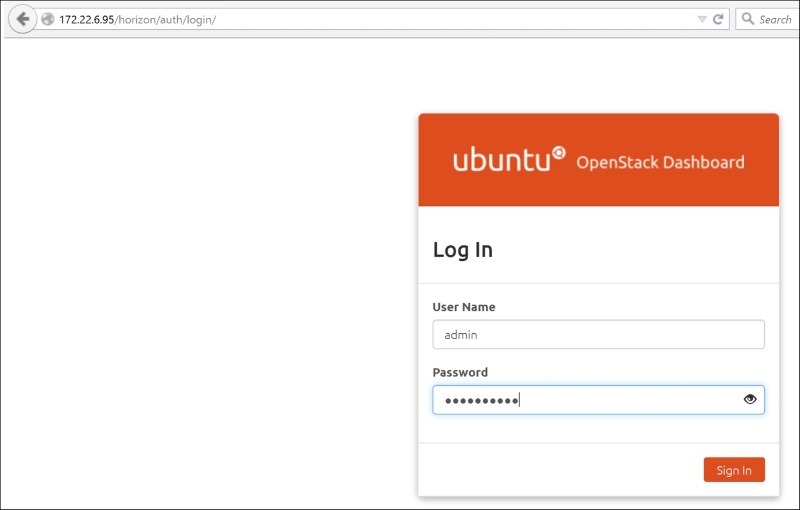
Once the installation has been completed, open a browser (which is HTML5-compatible and has JavaScript and cookies turned on). You can use Firefox, Google Chrome, or any up-to-date browser.
The dashboard will be available at (replace the IP with your controller node's IP address)
http://172.22.6.95/horizon/
You will need to authenticate with the admin credentials, and you should be able to log in to the dashboard:
After you've logged in, the page will look as follows:

While it is not necessary to know this, it is good to know about the structure. This helps us to make connections with the terminologies that we discussed previously, as an example. Let's see the structure of the dashboard.
You can view this yourself after you have installed Horizon, with the following instructions:
- Install a program called tree:
sudo apt-get install tree - Navigate to the directory where the dashboards are installed:
cd /usr/share/openstack-dashboard/openstack_dashboard/dashboards - In order to see the structure of any dashboard, just type
tree <dashboard name>, so take a look at the settings of the dashboard:tree settings - You will see the directory structure of the dashboard, as shown in the following screenshot:

In the preceding screenshot, you can see that we have dashboard settings and multiple panels such as user and password, and that each of them has URLs, views, and so on.