
We will install most of the components on the controller node and the core components on the compute node. The communication is controlled by the AMQP message bus and all the subcomponents talk to each other using RabbitMQ, which we set up initially.
The controller node follows the same installation procedure that we have seen in the previous services. On the controller node, we will perform the following:
- Creating a database
- Installing the services
And after this, we will configure the system by following these steps:
- Creating a Keystone user, service, and endpoints
- Modifying the configuration files
As usual, let's create our checklist to ensure we have all the pre-requisites before hand:
|
Name |
Info |
|---|---|
|
Access to the Internet |
Yes |
|
Proxy needed |
No |
|
Proxy IP and port |
Not applicable |
|
Node name |
|
|
Node IP address |
172.22.6.95 |
|
Node OS |
Ubuntu 14.04.1 LTS |
|
Nova DB password |
|
|
Nova Keystone password |
|
|
Nova port |
8774 |
We create a blank database after logging in to the MySQL server by typing the following command:
mysql –u root –p
Enter the dbr00tpassword. password.
Once in the database, execute the following command:
create database nova;
This will create an empty database called Nova. Let's now set up the nova database user credentials as discussed before:
GRANT ALL PRIVILEGES ON nova.* TO 'nova'@'localhost' IDENTIFIED BY 'n0vapwd';
GRANT ALL PRIVILEGES ON nova.* TO 'nova'@'%' IDENTIFIED BY 'n0vapwd';
All this does is allow the username called nova using our password to be able to access the database called nova.
The Nova control components are installed using the aptitude package manager with the following command:
apt-get install nova-api nova-cert nova-consoleauth nova-novncproxy nova-scheduler python-novaclient nova-conductor
Let's talk about these components:
nova-api: The Nova API accepts the API calls made to the Nova service; we can have multiple instances of this load balanced in a larger deployment.nova-cert: This is one of the support services of Nova. This is used to manage the x509 certificates that are generated and managed to secure the communications between the components.nova-consoleauth: This is a part of the Nova console subsystem; it provides authentication for users who want to use the Nova console.nova-novncproxy: Being a part of the Nova Console subsystem, this provides access to the compute using browser-basednovncclients.nova-scheduler: This component makes the decision regarding the compute node on which the virtual machine will reside. This service balances the load between multiple compute nodes. However, since in our setup we have a single compute node, all our VM's will reside here.nova-conductor: This proxies the connection to the Nova database.python-novaclient: This provides the Nova command-line tools. We can install the other proxy components such as the XVPN VNC proxy or the Spice HTML 5 proxy; since they are not needed for now, however, we will ignore them for the moment. If you do have to install them, then the controller node will be the ideal place to install these components.
Once the command is executed, let's wait for the packages to be downloaded and installed, which might take some time depending on the Internet connection speed.
Let's now look at the initial configuration steps you need to keep in mind.
We will create the user in Keystone using the following command; by now, you are familiar with exporting credentials in order to use the different OpenStack command-line utilities:
keystone user-create --name nova --pass n0vakeypwd
You should be able to see the following output:

We then add the user to the admin role by the following command:
keystone user-role-add --user nova --tenant service --role admin
The Nova service is created using the following command:
keystone service-create --name nova --type compute --description "OpenStack Compute"
The following screenshot demonstrates the output:
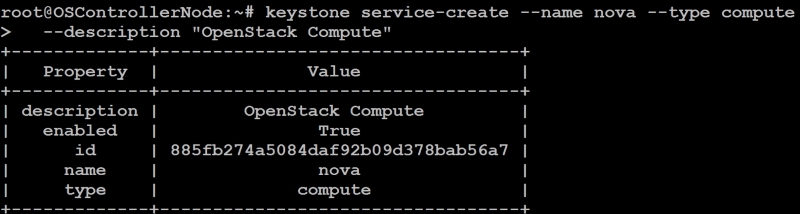
We will have to note the ID of the service, which we will use in the next section. In our case, this is 885fb274a5084daf92b09d378bab56a7.
The endpoint is created using the following command; you have to replace the ID with the ID you got during your service creation:
keystone endpoint-create
  --service-id 885fb274a5084daf92b09d378bab56a7
  --publicurl http://OSControllerNode:8774/v2/%(tenant_id)s
  --internalurl http://OSControllerNode:8774/v2/%(tenant_id)s
  --adminurl http://OSControllerNode:8774/v2/%(tenant_id)s
  --region dataCenterOne
This will create the Nova endpoint in Keystone.
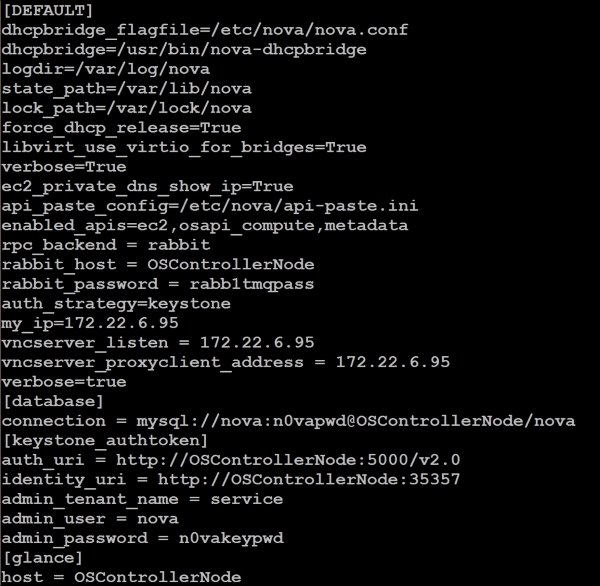
We will now be modifying a single configuration file, /etc/nova/nova.conf. The following changes are done to this file:
- In the
[database]section, do the following:- We will set the database connection string in the file, as this:
connection = mysql://nova:n0vapwd@OSControllerNode/nova
- We will set the database connection string in the file, as this:
- In the
[default]section, these changes are done:- Configure the Rabbit MQ access, as shown here:
rpc_backend = rabbitrabbit_host = OSControllerNoderabbit_password = rabb1tmqpass - Set the authentication strategy to Keystone, as follows:
auth_strategy = keystone - Set the management IP address:
my_ip = 172.22.6.95 - Set the VNC configuration:
vncserver_listen = 172.22.6.95vncserver_proxyclient_address = 172.22.6.95
- Configure the Rabbit MQ access, as shown here:
- In the
[keystone_authtoken]section, do the following:- Set the Keystone configuration as:
auth_uri = http://OSControllerNode:5000/v2.0identity_uri = http://OSControllerNode:35357admin_tenant_name = serviceadmin_user = novaadmin_password = n0vakeypwd
- Set the Keystone configuration as:
- In the
[glance]section, do as follows:- Set the Glance Host:
host = OSControllerNode
- Set the Glance Host:
The file will look like the following screenshot:
We can populate the database using the following command (under root):
/bin/sh -c "nova-manage db sync" nova
Ensure that the database is created and we don't have any errors.
We will delete the SQLite database file and restart all the services by the following command:
rm -rf /var/lib/nova/nova.sqlite
service nova-api restart
service nova-cert restart
service nova-consoleauth restart
service nova-scheduler restart
service nova-conductor restart
service nova-novncproxy restart
If you have installed any other services such as html5 proxy, please restart them as well. This concludes the installation on the controller node.
The compute virtualization is so prevalent that all the hardware components, especially the CPUs, are virtualization-enabled, which in essence is the CPU being virtually split and supporting additional command sets that let the virtual machine manager control the CPUs more effectively and offer a better performance.
These flags are masked when we install a hypervisor on an already virtualized machine, hence hardware support is not present. This doesn't actually mean that you cannot do this, but just means that now the second-level guests will be a little slower in their performance, as they have to do this virtualization in software rather than in hardware.
It should also be noted that some virtualization platforms don't work when they are nested (as an example, KVM), and hence Qemu needs to be used. However, modern hypervisors such as VMware also allow these CPU flags to be passed down to the guest OS as well so that the guest can run a hypervisor if it so chooses. Since virtualization is beyond the purview of this book, we will park this topic for now.
On the compute node, we will install the hypervisor, which in our case is KVM. If you are also using, for example, VMware to run this node in a virtualized environment, you will have to expose the AT-V flags and hardware acceleration so that you can run KVM.
In order to test whether we can run KVM, execute the following command:
egrep -c '(vmx|svm)' /proc/cpuinfo
If this returns 1, which means that it can see the VT flags in the CPU and it will be able to use the CPU virtualization instruction set, in this case we are okay to proceed with KVM; otherwise, we have to use Qemu. Another way to test is to install the cpu-checker package and execute the kvm-ok command):
sudo apt-get install cpu-checker
kvm-ok
If the output is KVM acceleration can be used, we can go ahead and use KVM; otherwise, we have to use Qemu.
Let's install the packages that are needed for KVM using aptitude:
sudo apt-get install qemu-kvm libvirt-bin ubuntu-vm-builder bridge-utils
Optionally, if we intend to install a GUI to manage the KVM instances, install the Ubuntu GUI (or the stripped down version of it):
sudo apt-get install --no-install-recommends ubuntu-desktop
Once this is installed, we can install the virtualization manager:
sudo apt-get install virt-manager
The optional steps can be ignored if we don't want the GUI. Most people working with KVM will not be interested in the GUI; in our case, we will not be installing it.
Nova compute components are installed by executing the following command:
sudo apt-get install nova-compute sysfsutils
Let's talk about the following components that we are installing:
nova-compute: This component is responsible for communicating with the hypervisor locally in order to create and manage the guest operating systemsysfsutils: We also install the system's filesystem utilities that are used to see the different storages available; this will be used by the Nova volume, (installed as a part ofnova-compute) in order to create the ephemeral storage
We have to ensure that the preceding components are installed without any errors.
On the controller nodes and the storage nodes, we need to modify the host entries to include the compute node and vice versa on the compute node so that they can resolve each other.
We will now modify the configuration file at /etc/nova/nova.conf; there are very subtle differences between what we changed in the controller node; for example, we don't need the database section and there are some changes in the VNC configuration. The variables are taken from the checklist that we prepared previously:
- In the
[default]section, do this:- Configure the RabbitMQ access:
rpc_backend = rabbit
rabbit_host = OSControllerNode
rabbit_password = rabb1tmqpass
- Set the authentication strategy to Keystone:
auth_strategy = keystone
- Set the management IP address:
my_ip = 172.22.6.97
- Set the VNC configuration:
vncserver_listen = 0.0.0.0
vnc_enabled = True
vncserver_proxyclient_address = 172.22.6.97
novncproxy_base_url = http://OSControllerNode:6080/vnc_auto.html
- Configure the RabbitMQ access:
- In the
[keystone_authtoken]section, do the following:- Set the Keystone configuration:
auth_uri = http://OSControllerNode:5000/v2.0
identity_uri = http://OSControllerNode:35357
admin_tenant_name = service
admin_user = nova
admin_password = n0vakeypwd
- Set the Keystone configuration:
- In the
[glance]section, do as follows: