
With Neutron FWaaS now installed, we can use this service through the Neutron API and command line. This allows us to create perimeter firewall policies between our routed Neutron networks.
With a Neutron firewall in place on the L3 router, any traffic traversing that router will be inspected there before it is allowed to continue. This allows us to have a firewall between layers of an application. For example, you may have a standard multi-tiered web application where a web server communicates with a database server. With Neutron firewalls in place, we can allow only database traffic to traverse between the database and the web server. Policies at the router level can be seen as traditional edge perimeter firewall policies, whereas security groups can be seen as similar to host-based security. Policy driven security also fits well with traditional network security teams moving to an OpenStack environment and allows standards to be controlled at the network level, rather than the compute level.
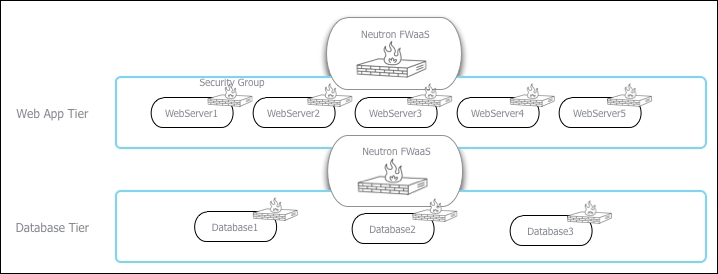
The following diagram explains this logical view with a clear separation of services provided by Neutron FWaaS. In this example, the Web App Tier is on a different subnet to the Database Tier and the Neutron L3 router and FWaaS is routing traffic between the two. The policy applied here will allow the traffic to communicate between the database and web servers—for example, only allowing TCP port 3306 from the Web App Tier subnet to the Database Tier subnet:
Ensure that you are logged into a Ubuntu host that has access to our OpenStack environment on the 192.168.100.0/24 public network. This host will be used to run client tools against the OpenStack environment created. If you are using the accompanying Vagrant environment, as described in the Preface, you can use the controller node. This has the python-neutronclient package that provides the neutron command-line client.
If you created this node with Vagrant, you can execute the following command:
vagrant ssh controller
Ensure that you have set the following credentials (adjust the path to your certificates and key file to match your environment if not using the Vagrant environment):
export OS_TENANT_NAME=cookbook
export OS_USERNAME=admin
export OS_PASSWORD=openstack
export OS_AUTH_URL=https://192.168.100.200:5000/v2.0/
export OS_NO_CACHE=1
export OS_KEY=/vagrant/cakey.pem
export OS_CACERT=/vagrant/ca.pem
vagrant ssh controller
In this section, we will create a firewall with a policy that has a rule to allow TCP port 80 connections and demonstrate its effect on the environment. The steps are as follows:
- We first create the rule:
neutron firewall-rule-create
    --protocol tcp
    --destination-port 80
    --action allow
You will get the following output:

- We then create a policy with the rules created:
neutron firewall-policy-create
    --firewall-rules "e43bade8-f50d-4655-bbf3-0030b7aa3dc8"
    allow-http-policy
This gives the following output:

- With the policy in place, we can now create the firewall by specifying the policy ID we just created:
neutron firewall-create
    --name cookbook-firewall
    b12d0be0-9645-448a-b010-a8a8f47580d8
You will get the following output:

- We can list the available firewalls with the following command:
neutron firewall-listThe preceding command produces output similar to this:

- We can show the details of the firewall, policy, and rules with the following set of commands. We begin with this command:
neutron firewall-show 1e0c0c8f-f8cf-46e2-bfd2-2b97f39d6adaYou will get the following output:

neutron firewall-policy-show b12d0be0-9645-448a-b010-a8a8f47580d8This gives the following output:

We execute this command:
neutron firewall-rule-show e43bade8-f50d-4655-bbf3-0030b7aa3dc8This gives the following output:

- We will now spin up two instances on two different networks that are routed via our L3 routers:
# Create another network neutron net-create anotherNet SUBNET_ID=$(neutron subnet-create anotherNet --name anotherSubnet 10.201.0.0/24 | awk '/ id / {print $4}') # Connect to cookbook_router_1 neutron router-interface-add cookbook_router_1 ${SUBNET_ID} # Get Network IDs NET1=$(neutron net-list | awk '/network_1/ {print $2}') NET2=$(neutron net-list | awk '/anotherNet/ {print $2}') # Boot 2 instances nova boot --flavor 1 --image cirros-image --nic net-id=${NET1} net1-instance nova boot --flavor 1 --image cirros-image --nic net-id=${NET2} net2-instance - With a Neutron firewall policy in place on the L3 router between these two instances and networks, all other traffic is denied by default. This means we are unable to ping or SSH despite our default security group having this enabled. The policy rule we created allowed TCP port 80 traffic between our instances (source and destination were blank, meaning that the TCP port 80 would work in both directions). With a web server, say Apache, running on port 80 on either of the instances, we can execute the following command to test our firewall policy rule:
wget http://10.200.0.2/This will return the following output if the test was successful:

- Now we will try to use Secure Shell (SSH) to connect the same instance:
This
sshcommand will timeout because our firewall policy only allows TCP port 80 at present. - To add a rule to our Neutron firewall, we carry out the following steps. We first create a new firewall rule, specifying TCP port 22:
neutron firewall-rule-create
    --protocol tcp
    --destination-port 22
    --action allow
- We can either update an existing policy, or create a new one specifically for this rule. We will create a new policy in this example:
neutron firewall-policy-create
    --firewall-rules "451e65e0-a1c2-4cc1-8a5d-1ef0608ec1f6"
    allow-ssh-policy
You will get an output similar to this:

- We then update the firewall with this new policy:
neutron firewall-update
    --policy e78ba041-d1f3-4f9f-93c2-c6f0fc680e86
    cookbook-firewall
You will get a message saying that the firewall has been updated.
- We can now test whether we can use SSH between our instances again:
This will now connect to our instance (although a failure might occur because of incorrect credentials, the fact we got a message about the authentication failure proves TCP port 22 is open).
Neutron firewalls are policy-driven firewall rules that exist on the router between different subnets. This allows a network administrator of our OpenStack cloud to create policies at a network level, instead of relying on users to maintain security group rules.
To create a Neutron firewall, carry out the following steps:
- Create the firewall rule with
neutron firewall-rule-create. - Create the policy with
neutron firewall-policy-create $RULE_ID. - Create the firewall with the policy using
neutron firewall-create $POLICY_ID.
The order of priority of rules when using Neutron firewalls is as follows:
- Neutron firewall policy.
- Security group rules.
- Any host-based rules inside the running instance (for example,
iptables).
It is important to ensure that we allow correct access to services running on the instances; security group rules exist to allow access for these running service. In other words, a network administrator might have a policy to allow TCP port 80 through the L3 router between subnets, but there needs to be a security group rule applied to the instance to allow TCP port 80 too.