
With Neutron LBaaS now installed, we can use this through the Neutron API and command line. This allows us to create simple HA Proxy Load Balance services for our instances. We do this by creating Load Balance pools and adding the running instances to those pools. Optionally, we can add in monitoring to help the Load Balancer decide whether to send traffic to an instance or not.
In this section, we will configure a basic HTTP Load Balancer pool with two instances running Apache. The result will be the ability to use the HTTP Load Balancer pool address to send traffic to two instances running Apache.
Ensure you are logged into a Ubuntu host that has access to our OpenStack environment on the 192.168.100.0/24 public network. This host will be used to run client tools against the OpenStack environment created. If you are using the accompanying Vagrant environment, as described in the Preface, you can use the controller node. This node has the python-neutronclient package that provides the neutron command-line client.
If you created this node with Vagrant, you can execute the following command:
vagrant ssh controller
Ensure you have set the following credentials (adjust the path to your certificates and key file to match your environment if not using the Vagrant environment):
export OS_TENANT_NAME=cookbook
export OS_USERNAME=admin
export OS_PASSWORD=openstack
export OS_AUTH_URL=https://192.168.100.200:5000/v2.0/
export OS_NO_CACHE=1
export OS_KEY=/vagrant/cakey.pem
export OS_CACERT=/vagrant/ca.pem
We will first create the Load Balancer pool then add in members (instances) running Apache to this pool. The steps are as follows:
- We first list the subnets available in our environment and choose the subnet on which the Load Balancer will be created:
neutron subnet-listThe preceding command will give an output similar to this:

- We take the
subnet-idvalue of the subnet we want and use this to create the Load Balance pool as follows. Here we're using one of the private subnets,cookbook_subnet_1:neutron lb-pool-create --description "Web Load Balancer" --lb-method ROUND_ROBIN --name Web-Load-Balancer --protocol HTTP --subnet-id 11c11dca-479b-435d-889d-fc29479b0a24
This creates output similar to this:

- We now add the members to this Load Balancer pool. To do this, ensure two instances are running Apache. We can follow the Using cloud-config to run the post-installation configuration recipe in this chapter to create appropriate servers on the same network as the subnet used:
nova boot
    --flavor m1.tiny
    --image trusty-image
    --nic net-id=25153759-994f-4835-9b13-bf0ec77fb336
    --user-data ./webserver.yaml
    --max-count 2
    webServer
- With two web servers running, we can take assigned IPs and assign them to the created Load Balancer pool,
Web-Load-Balancer:nova listYou will get an output similar to this:

- We take the first IP,
10.200.0.4, and add it to the pool:neutron lb-member-create --address 10.200.0.4 --protocol-port 80 Web-Load-Balancer
You will get the following output:

- We repeat this for the IP of the second web server:
neutron lb-member-create
    --address 10.200.0.5
    --protocol-port 80
    Web-Load-Balancer
- We can view the status of pool members by issuing the following command:
neutron lb-member-listThe preceding command will give an output similar to this:

- We now need to create the Virtual IP (VIP) to access the Load Balance pool and the instances sitting behind it. We will create this VIP on the public network:
neutron subnet-listThe preceding command will give an output similar to this:
- We take the floating/external subnet ID to create our publically accessible VIP:
neutron lb-vip-create
    --name WebserverVIF
    --protocol-port 80
    --protocol HTTP
    --subnet-id 11c11dca-479b-435d-889d-fc29479b0a24
    Web-Load-Balancer
You will get output similar to this:
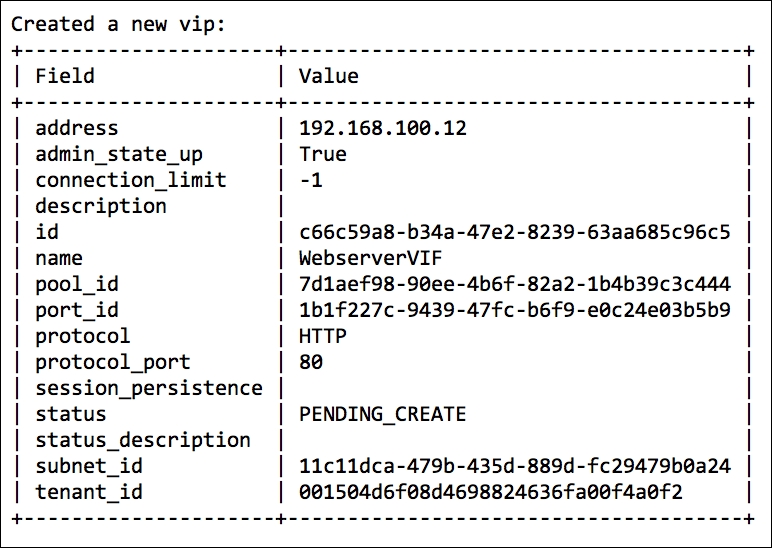
We can see it has an IP of 192.168.100.12. We can use a web browser and point it to that address; it will be balancing the traffic between our two web servers.
We create a Load Balancer pool with two instances as members, and then assign a VIP to the pool to be used to access the instances. To do this, we perform the following steps:
- Create the Load Balance pool with
neutron lb-pool-create. - Add the member instances to the pool with
neutron lb-member-createby adding the IPs of the subnet used. - Create a VIP on the external floating IP range so the pool is accessible from the network using
neutron lb-vip-create. - When creating the Load Balance pool, we use the following syntax:
neutron lb-pool-create
    --description $DESCRIPTION
    --lb-method $LB_METHOD
    --name $LB_NAME
    --protocol $PROTOCOL
    --subnet-id $SUBNET_ID