
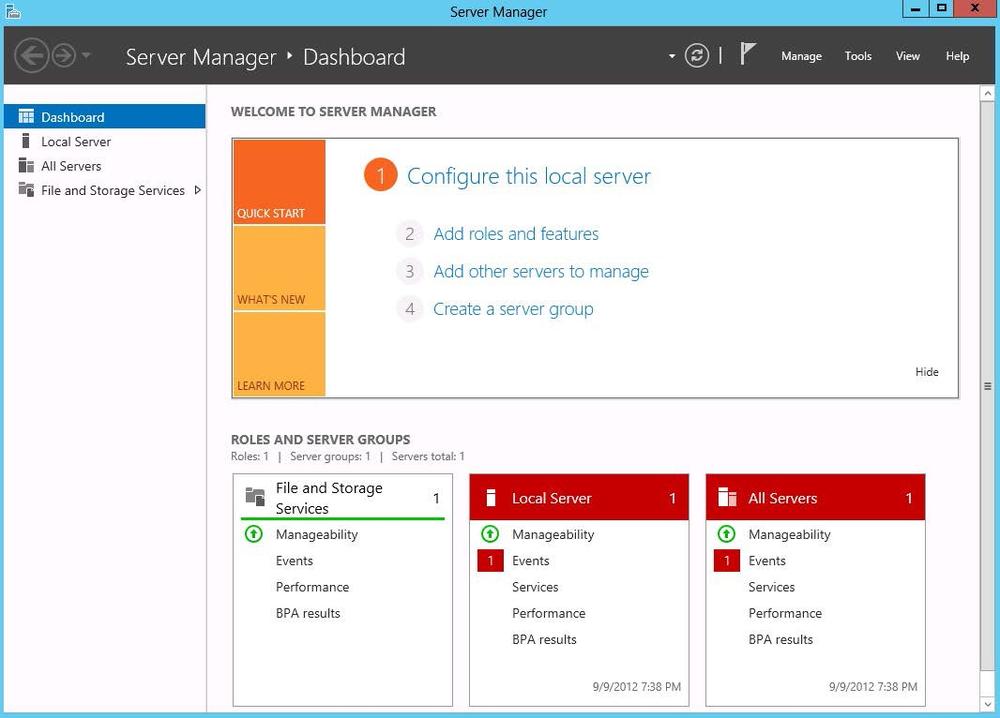
Chapter 9. Domain Controllers
This chapter focuses on the infrastructure cornerstone of Active Directory—the domain controller. Domain controllers are the component that hosts all of the Active Directory functionality and protocols. In this chapter, we’ll dig into the steps necessary to deploy (promote) new domain controllers as well as operational concerns around physical security and hardware virtualization.
Ensuring the physical security of Active Directory domain controllers is an incredibly important part of a successful, secure deployment of AD. As AD administrators are well aware, in many organizations—especially large global enterprises—the locations that host servers in branch offices are often far from secure. The read-only domain controller (RODC) is the Active Directory solution to this problem.
Hardware virtualization is nothing new, and in Windows Server 2012, Microsoft addressed many of the technical challenges and also simultaneously introduced the ability to rapidly clone domain controllers to scale out or meet disaster recovery requirements.
9.1. Building Domain Controllers
One of the first steps you’re going to take when you deploy Active Directory is building domain controllers. Depending on the type of domain controller you’re deploying and how you go about it, the process may vary quite a bit. You might want to deploy an RODC, or perhaps you want to use Install from Media (IFM) to lessen the replication load on the network and rapidly promote domain controllers. The process of converting a member server to a domain controller is known as promotion.
Deploying with Server Manager
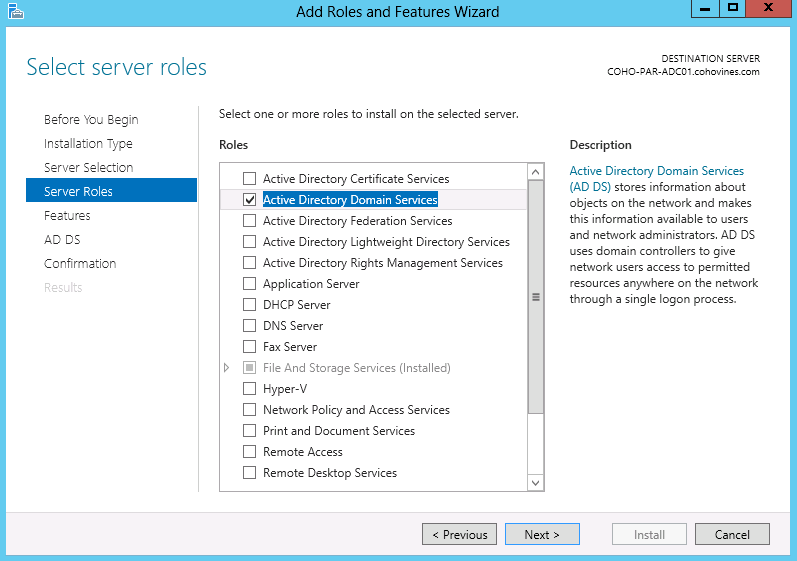
The first step is to install the Active Directory binaries on the server being promoted to a domain controller. You can do this in Server Manager by clicking “Add roles and features” on the Dashboard, as shown in Figure 9-1. Continue through the wizard and select the server on which you want to install the Active Directory binaries, as shown in Figure 9-2.
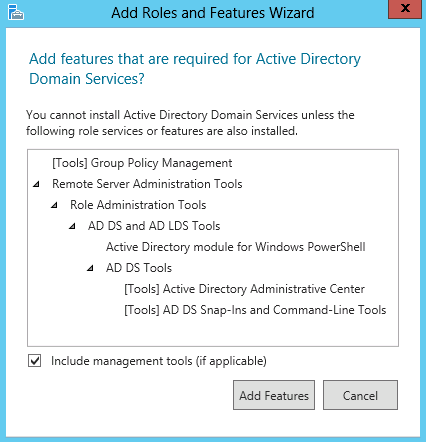
On the “Select server roles” screen, select Active Directory Domain Services, as shown in Figure 9-3. Server Manager automatically locates the dependencies of the selected role and prompts you to confirm that you want to install the dependencies, as shown in Figure 9-4. Proceed through the rest of the wizard and click Install to complete the process.

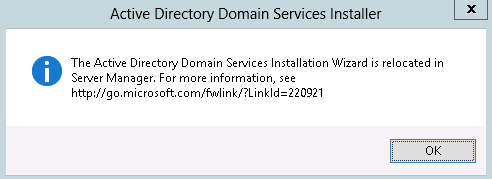
Once the installation completes, click the “Promote this server to a domain controller” link in the status box of the Results window. This will launch the Active Directory Domain Services Configuration Wizard. If you’re familiar with promoting domain controllers in versions of Windows prior to Windows Server 2012, this wizard replaces dcpromo. If you launch dcpromo on Windows Server 2012, you’ll get the error shown in Figure 9-5.
In this example, we’ll add an additional domain controller to an existing domain, as shown in Figure 9-6. If you were creating a new forest (or domain) from scratch, you’d select the relevant option in Figure 9-6 in lieu of the default “Add a domain controller to an existing domain.” All of the steps are the same, apart from a couple of additional questions that the wizard will ask.
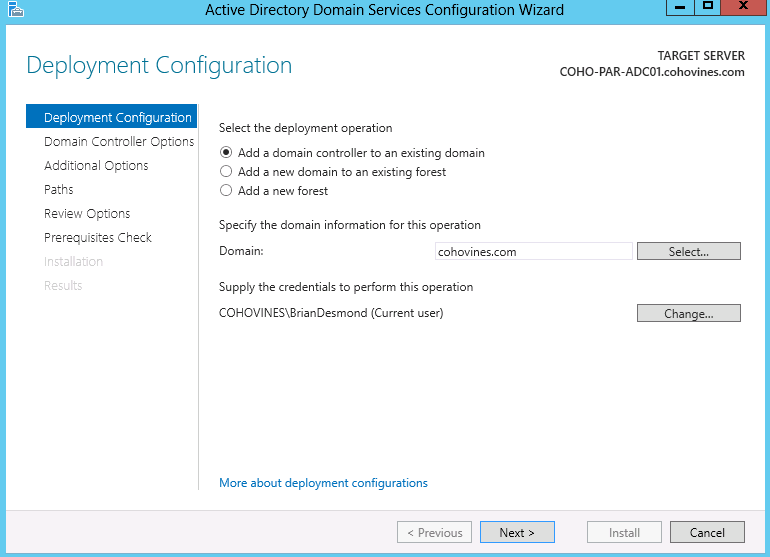
At the screen shown in Figure 9-6, you’ll need to provide credentials with enough access to promote the new domain controller. Generally speaking, this is a domain admin account in the target domain. If you’re going to deploy an RODC, though, you can use the credentials that were used to prestage the RODC’s computer account in Active Directory.
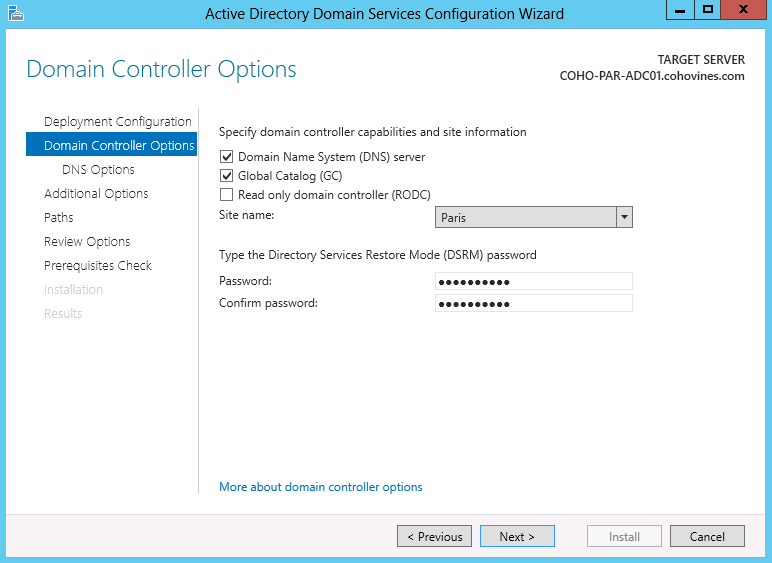
Next, the wizard will allow you to define key characteristics of the domain controller. These include the Active Directory site the DC will service and the Directory Services Restore Mode password (discussed in Chapter 18). Of particular interest (as shown in Figure 9-7) are whether or not this DC will host DNS, if it will be a Global Catalog, and whether or not it will be an RODC. In this example, we’ll promote a Global Catalog into the Paris site.
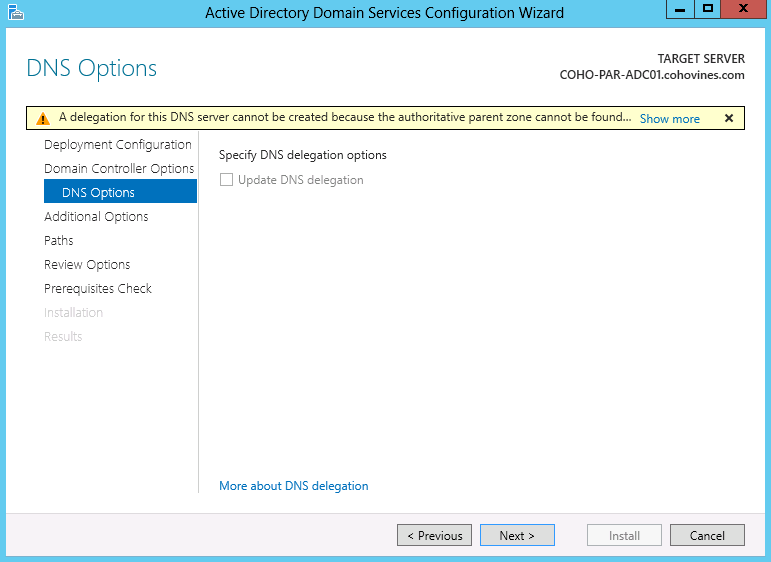
In the DNS Options step, you may be warned that a delegation for the DNS zone cannot be created, as shown in Figure 9-8. In general, this is safe to ignore. If you are creating a new domain or forest, this step can help you set up DNS by creating a delegation in the parent DNS zone for you. We discussed DNS delegations in Chapter 8. If you skip this step for a new domain or forest, you’ll simply need to create a new delegation if it becomes necessary.
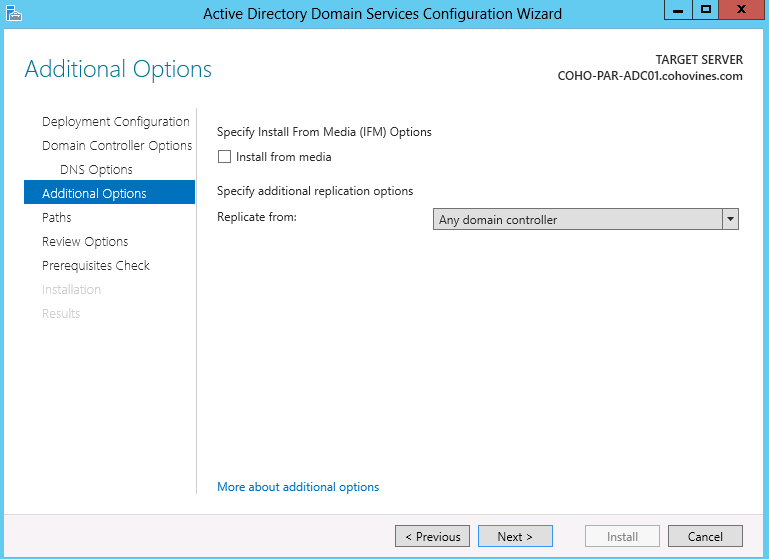
Next, the Additional Options screen shown in Figure 9-9 lets you choose the source domain controller for initial replication. This can be useful if you need to control network impact or load on other domain controllers as part of the initial replication process. You can also opt to use Install from Media to speed up promotion. We discuss IFM in depth in Chapter 18.
On the next screen (Figure 9-10), you will be able to specify the paths to the Active Directory database, transaction logs, and Sysvol share. In this example, we’ll keep the defaults, but this is a topic of much debate. In general, unless you are running a large, complex Active Directory environment, you’ll probably be fine sticking with the defaults or simply placing all of the paths on an alternate drive if your policy is not to use the system drive for data.

If you’re running a larger environment, you may want to separate these three items. The Active Directory database is primarily a read-intensive workload. In general, with 64-bit domain controllers, if you can cache the entire database file in RAM you will really only incur a large read impact on your storage when the domain controller starts up and hasn’t cached any data. If you are planning storage for the database, make sure to account for both the size of the database and whether or not the Redundant Array of Inexpensive Disks (RAID) array can accommodate the read workload. RAID types such as RAID-5 and RAID-10 are usually well suited for this type of workload.
Most Active Directory environments don’t incur a proportionally high degree of changes to the directory. When changes are made, however, they are first written to the transaction logs. The transaction logs will never take much space, but in a very busy environment they will demand storage that can keep pace with write requests. RAID types such as RAID-1 and RAID-10 are generally well suited for the transaction logs.
Finally, the Sysvol share is primarily a read-intensive volume. The Sysvol share can take quite a bit of space in environments that use Group Policy heavily. The advent of the central store feature for ADMX files has helped mitigate this quite a bit, but you should still plan storage accordingly. The larger question to consider is what the impact of the Sysvol share could be on the overall availability of your Active Directory domain.
When you delegate control of a GPO, you are also giving that administrator rights to store data in Sysvol in the GPO’s share. If the delegated administrator were to place so much data in Sysvol that it filled up the drive hosting Sysvol, you could be in for trouble. The scenario where you might have an issue is if Sysvol is on the same drive as your OS installation, or the Active Directory database or transaction logs. If you’re going to delegate access to edit group policies, consider putting Sysvol onto a separate partition or volume.
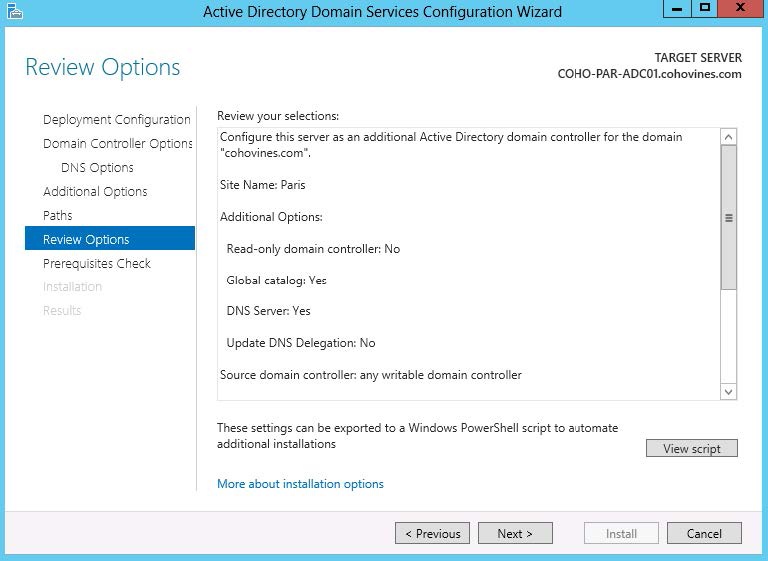
On the Review Options screen shown in Figure 9-11, the wizard summarizes your choices in an easy-to-read format. Perhaps substantially more interesting, though, is the “View script” button at the lower-right corner of the screen. This button provides you with the PowerShell command necessary to promote the domain controller using the options you selected in the wizard. Instead of trying to figure out all of the options to promote DCs with PowerShell, you can run through the wizard once, gather the script, and then use it to build multiple DCs quickly and easily.
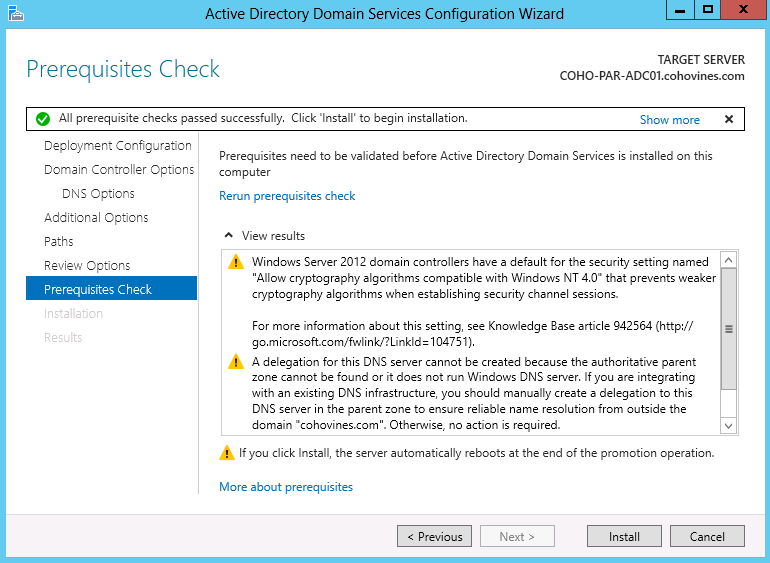
The wizard will check prerequisites, and if your server passes (as shown in Figure 9-12), you can click Install. Once you click Install, Active Directory will configure the server to be a domain controller, perform initial replication, and then reboot automatically. After the server reboots, you will have a fully functional domain controller.
Using DCPromo on Earlier Versions of Windows
If you’re promoting a domain controller that’s running a version
of Windows prior to Windows Server 2012, the Server Manager and
PowerShell approaches we’ve discussed so far won’t apply. Prior versions
of Windows (dating back to Windows 2000) use a tool called
dcpromo to install Active Directory. You can launch
dcpromo by going to Start→Run and typing in
dcpromo. If you review the
screenshots and information in the previous section, Deploying with Server Manager, you’ll find that the
questions you get asked by dcpromo are nearly
identical to the questions Server Manager asks.
One tip we can offer for dcpromo is that in some versions of Windows, options for things like Install from Media are hidden unless you run dcpromo in advanced mode. To do that, run dcpromo /adv.
Automating the DC Build Process
If you’re installing lots of domain controllers or you just want to be consistent, you can automate the build process using Windows PowerShell starting with Windows Server 2012. Both the installation of the Active Directory server role as well and the promotion process can be easily automated.
The first thing you’ll want to do is install the AD Domain Services server role if it’s not already installed. You can do that with this PowerShell command:
Add-WindowsFeature-NameAD-Domain-Services-IncludeManagementTools
Next, you can promote the domain controller. In the following PowerShell command we promote the domain controller according to the same parameters chosen in the earlier section Deploying with Server Manager:
Install-ADDSDomainController`-NoGlobalCatalog:$false`-CreateDnsDelegation:$false`-CriticalReplicationOnly:$false`-DatabasePath"C:WindowsNTDS"`-DomainName"cohovines.com"`-InstallDns:$true`-LogPath"C:WindowsNTDS"`-NoRebootOnCompletion:$false`-SiteName"Paris"`-SysvolPath"C:WindowsSYSVOL"`-SafeModeAdministratorPassword((Get-Credential).Password)
Note
In this sample, you’ll be prompted for the DSRM password. If you want to embed the password in your script, replace (Get-Credential).Password with ConvertTo-SecureString -AsPlainText -Force -String “password”.
If you want to demote a domain controller with PowerShell, you can use the Uninstall-ADDSDomainController cmdlet, as shown in the following sample:
Uninstall-ADDSDomainController-LocalAdministratorPassword`(ConvertTo-SecureString-AsPlainText-Force-String"password")`-Credential(Get-Credential)
The -LocalAdministratorPassword
parameter specifies the local administrator password to set once the
domain controller reboots as a member server. The -Credential parameter provides domain
administrative credentials for the domain to complete the
demotion.
If you’re running an earlier version of Windows (prior to Windows Server 2012), automating the DC build process is more involved. You can make use of unattended answer files or the command-line interface for dcpromo. We generally recommend the answer file approach, as the command-line interface for dcpromo is not especially friendly. For details on the answer file format, review Microsoft Knowledge Base article 947034. For more information on using dcpromo from the command line, check out this link.
9.2. Virtualization
Server virtualization was never a consideration when Microsoft designed Active Directory, but over the course of Active Directory’s evolution there have been various issues that have been identified as virtualization has come into play. The primary issue is that hardware virtualization typically offers the capability to roll a virtual machine back in time through the use of snapshots and similar technologies. When you consider the nature of tasks such as replication or issuing a relative identifier (RID) Active Directory expects that domain controllers should always be moving forward in time.
As these issues came to light, Microsoft made changes to Active Directory (starting in the Windows Server 2003 time frame) to detect scenarios where a snapshot might have been restored and in turn the domain controller’s replication state rolled back. The term USN rollback, which describes this scenario, became well known among Active Directory administrators, and along with it came the fear of virtualizing domain controllers.
Fortunately, there is no reason domain controllers cannot be virtualized. There are best practices and security policies to take into account, but there’s no reason that AD cannot run on a virtual hardware platform. In fact, Windows Server 2012 domain controllers can be notified of many rollback situations by the underlying virtualization host, and in turn they will insulate themselves from the rollback and get caught back up to the present state without any impact to the overall health of the environment.
When to Virtualize
There are a few risks that you should take into consideration when determining whether or not to virtualize some or all of the domain controllers in your forest. These risks revolve around security, redundancy, and the stability and operational practices of the host platform (hypervisor). Regardless of the version of Windows you’re running Active Directory on, or the flavor of hypervisor, you will ultimately need to evaluate and plan in the same way.
First and foremost, it is extremely important that you ensure that your hypervisor of choice is listed in Microsoft’s Server Virtualization Validation Program, or SVVP. Participation in the SVVP ensures that in the event you need to engage Microsoft support, you will be supported regardless of whether or not the server in question is virtualized or running on physical hardware.
When thinking about security, keep in mind the importance of physical security when discussing Active Directory domain controllers. Typically, you would think of whether or not the location where the domain controller is stored is secure (locked doors, video monitoring, etc.), but when a domain controller is virtualized, this question becomes more ambiguous. If the domain controller is virtualized, anyone who has access to the hypervisor storage where the virtual hard disks (VHDs) are stored effectively has physical access to the domain controller. Some organizations opt to operate a dedicated virtualization infrastructure for Active Directory, while others accept this risk. Also keep in mind that many major hypervisors can ship virtual hard disk files to alternative locations over the network for disaster recovery and high availability purposes. This feature could be considered a positive or a negative; a virtual disk file you can copy for disaster recovery purposes can also be copied for more nefarious purposes. It is much easier to copy a file across the network than to physically remove a domain controller.
In large organizations, the team that runs Active Directory is often a small group of senior administrators who have years of experience and are very focused on delivering a narrow set of critical services (such as Active Directory). Simultaneously, large organizations often have separate teams that may not understand Active Directory that are responsible for operating the virtualization platform across the organization. In these situations, it is important to consider whether or not the team running the virtualization platform can consistently deliver the level of service required by the Active Directory team to maintain the service-level commitments for AD. You must also consider whether or not virtualization administrators can be trusted to follow special procedures for the treatment of domain controllers, such as not taking snapshots of the domain controller virtual machines. If these types of assurances are not possible, then it may be necessary to continue operating Active Directory on physical hardware.
Finally, factor in the level of redundancy that you will be able to achieve when virtualizing domain controllers. With physical hardware, it is relatively easy to ensure that multiple pieces of hardware are located properly within datacenters and networks to tolerate outages both at the domain controller level and other levels (such as power or network outages). When domain controllers are virtualized, it becomes much harder to understand these risks, given the layers of abstraction added by the virtualization host platform. At a minimum, you should ensure that multiple virtual domain controllers are configured such that they are hosted across multiple physical hosts and data storage devices within the environment. This is often referred to as antiaffinity. Also consider where restoring Active Directory lies in a datacenter or organization-level disaster recovery sequence. If you need to have Active Directory available before the virtualization host platform would be available, you will need to maintain physical domain controllers so that they can be brought online more rapidly.
Impact of Virtualization
Two key scenarios typically come into play when discussing the impacts of virtualization on a domain controller. The first is the concept of USN rollback. When we discussed virtualization in Chapter 6, we discussed the update sequence number (USN). The USN is what Active Directory uses to keep track of each change to the local database. The second scenario—RID reuse or duplication—is not as well known, but is still a risk. Any time a security principal is created, a unique relative identifier is issued to construct a unique security identifier (SID) for the security principal. Both of these scenarios manifest themselves when unique numbers (USNs or RIDs) get reused due to a snapshot of a virtual machine being restored or rolled back.
USN rollback
USN rollback occurs because domain controllers keep track of the changes that they have replicated from another domain controller based on the highest USN corresponding to the changes that have replicated. Domain controllers do this in order to limit the number of objects that must be evaluated during each replication cycle, as well as to prevent unnecessary replication when changes may be received from multiple source domain controllers. These values are tracked in a table on each domain controller known as the up-to-dateness vector (UTDV). Every domain controller’s database file (ntds.dit) is identified by a GUID called an invocation ID. Within the UTDV, domain controllers are identified by their invocation ID. For more information on the UTDV and invocation IDs, refer to Chapter 6.
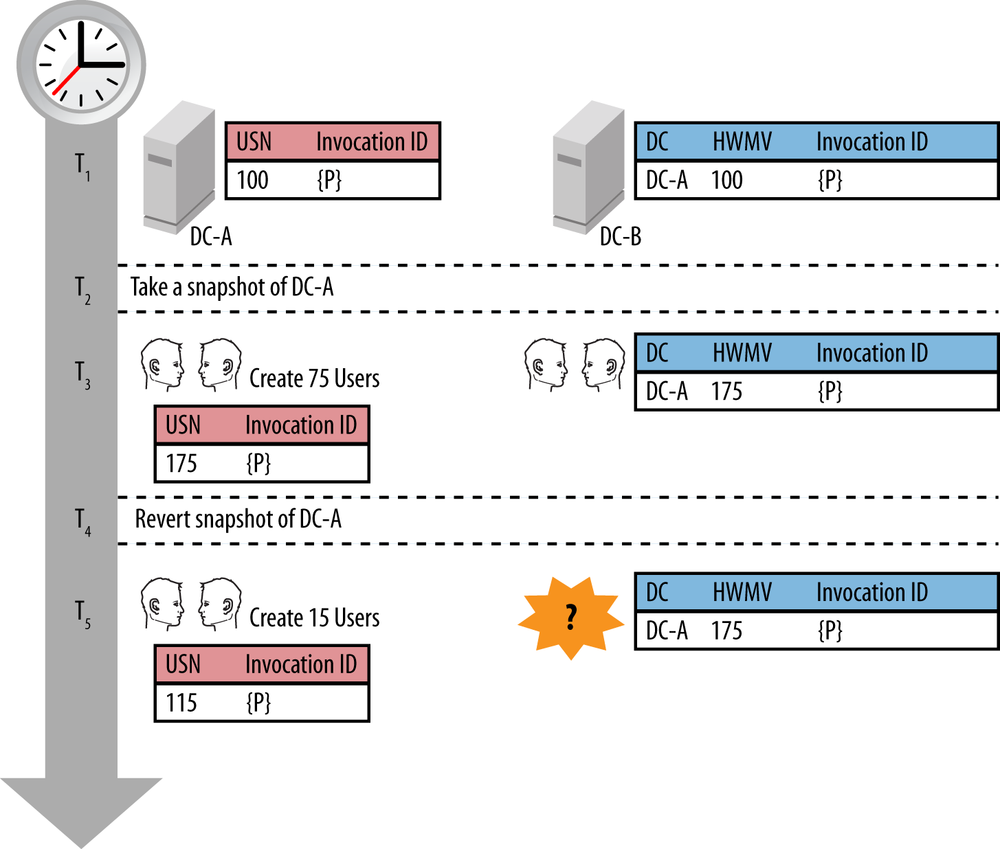
Take the scenario in Figure 9-13. In this case, we have two domain controllers: DC-A and DC-B. DC-A is virtualized. Consider the events in the following timeline:
At T1, DC-A’s
highestCommittedUSNis100and its invocation ID is{P}. DC-B has an entry in its UTDV for DC-A that reflects this data. The domain controllers are both synchronized at this time.At T2, the virtualization administrator takes a snapshot of DC-A.
Next, at T3, the Active Directory administrator creates 75 users on DC-A. DC-A’s
highestCommittedUSNis now 175 (as 75 changes have been made to the database).At T4, the virtualization administrator reverts the snapshot of DC-A. DC-A is now at T2.
At T5, the Active Directory administrator creates 15 users on DC-A. DC-A’s
highestCommittedUSNis now 115. When DC-B replicates with DC-A, DC-B presents its UTDV to DC-A and DC-A sees that DC-B is in sync with DC-A through change 175. Thus, DC-A sends no changes to DC-B.
The scenario outlined here is exactly what comprises USN rollback. There is now an island of at least 15 changes on DC-A that will never replicate into the rest of the forest.
Active Directory has some protections built in for detecting USN rollback, starting with Windows Server 2003. These protections catch some but not all scenarios, thus making this an issue that can impact a forest. When AD does detect a rollback scenario, it isolates the domain controller by disabling inbound and outbound replication and pausing the NetLogon service. These actions aim to limit the damage to the environment and allow the administrator to demote the domain controller and repromote it. When this happens, AD will log an event (ID 2095, source NTDS Replication) similar to the following in the event log:
During an Active Directory Domain Services replication request, the local domain controller (DC) identified a remote DC which has received replication data from the local DC using already-acknowledged USN tracking numbers.
Because the remote DC believes it is has a more up-to-date Active Directory Domain Services database than the local DC, the remote DC will not apply future changes to its copy of the Active Directory Domain Services database or replicate them to its direct and transitive replication partners that originate from this local DC.
If not resolved immediately, this scenario will result in inconsistencies in the Active Directory Domain Services databases of this source DC and one or more direct and transitive replication partners. Specifically the consistency of users, computers and trust relationships, their passwords, security groups, security group memberships and other Active Directory Domain Services configuration data may vary, affecting the ability to log on, find objects of interest and perform other critical operations.
To determine if this misconfiguration exists, query this event ID using http://support.microsoft.com or contact your Microsoft product support.
The most probable cause of this situation is the improper restore of Active Directory Domain Services on the local domain controller.
User Actions:
If this situation occurred because of an improper or unintended restore, forcibly demote the DC.
Remote DC: a2c53d4a-0018-4641-b277-eaecd25ec279
Partition: DC=contoso, DC=com
USN reported by Remote DC: 1000
USN reported by Local DC: 900
For more information on the USN rollback detection mechanism in AD, refer to Microsoft Knowledge Base article 875495.
RID pool reuse
Similar to the scenario illustrated in Figure 9-13 is the impact of reusing RIDs. As we discussed in Chapter 2, RIDs are unique numbers that are used to construct a unique SID for each security principal (user, group, or computer) in the domain. Once a RID is used, it can never be reused. If you consider that at T3 in Figure 9-13, RIDs 100–175 were used, when the domain controller is rolled back and users are created at T5, RIDs 100–115 will be reused. This presents a security challenge since multiple users have the same unique identifier that corresponds to access control lists across the forest. To mitigate this problem, when Active Directory encounters more than one object with the same RID, it immediately deletes both objects from the database.
System clock changes
Virtual machines are dependent on the host platform to provide accurate time information during boot up, at a minimum. By default, most virtualization platforms also configure guests to synchronize their clocks with the underlying host’s clock. Both of these scenarios lead to challenges when the virtualization host’s clock is not accurate.
Active Directory includes the current time in a number of
places. These locations include replication metadata as well as
attribute-level timestamps such as lastLogonTimeStamp. If the DC’s clock jumps
forward, invalid timestamps will start appearing in Active Directory.
In the case of lastLogonTimeStamp,
the invalid future timestamp will remain in place until it is
superseded. If your clock jumps forward years at a time, for example,
you will have users and computers with invalid lastLogonTimeStamp values, among other
things.
Virtualization Safe Restore
As virtualization became iteratively more mainstream, it became clear that Active Directory could not be a product facing significant challenges in common virtualization scenarios. To aid with virtualization, Windows Server 2012 domain controllers support the notion of a virtual machine generation identifier (VM Gen ID). The VM Gen ID is a unique identifier for the virtual machine’s state that is projected into the virtual machine by the underlying virtualization host platform.
Note
At the time of writing, only Microsoft’s Hyper-V platform supports VM Gen IDs, but we expect that this will expand to other major virtualization host platforms over time.
The goal of the VM Gen ID is to detect scenarios where the domain controller could be reverted in time, such as by applying a snapshot or copying a VHD file. In general, the underlying principle of when a VM Gen ID is updated relates to when a time interval will reoccur. If you think of Active Directory’s USN as a logical clock—a number that always ticks forward—then any scenario at the virtualization level where the guest’s USN could tick backward would require the VM Gen ID to be updated. Any time Active Directory detects the VM Gen ID has rolled back, AD will report the following event:
Event ID: 2170
Task Category: Internal Configuration
Level: Warning
Description:
A Generation ID change has been detected.
Generation ID cached in DS (old value): 4614786344935980275
Generation ID currently in VM (new value): 10595675270371099562
The Generation ID change occurs after the application of a virtual machine snapshot, after a virtual machine import operation or after a live migration operation. Active Directory Domain Services will create a new invocation ID to recover the domain controller. Virtualized domain controllers should not be restored using virtual machine snapshots. The supported method to restore or rollback the content of an Active Directory Domain Services database is to restore a system state backup made with an Active Directory Domain Services aware backup application.
Active Directory keeps the current VM Gen ID in memory (and in a
nonreplicated attribute in the AD database, msDS-GenerationID) and compares that value to
the current VM Gen ID reported by the virtualization host platform prior
to a change being committed to the Active Directory database, as well as
during boot up. If the VM Gen ID has changed, the domain controller
first takes the following steps:
Reset the domain controller’s invocation ID.
Release the domain controller’s RID pool.
Nonauthoritatively restore the Sysvol share on the domain controller.
If the domain controller is a FSMO role holder, Active Directory will also pause handling of the functions related to the FSMO roles until a replication cycle can be completed.
These steps collectively ensure that the domain controller will become consistent with the forest as a whole and that there will be no bubbles in time, duplication, or data that is not consistent across the forest.
Cloning Domain Controllers
One of the interesting new scenarios that the virtualization safe restore functionality introduces is the ability to rapidly clone virtual domain controllers. This scenario enables you to rapidly scale out to meet demand (such as in a cloud scenario), to deploy new virtual domain controllers (perhaps as part of an upgrade project), or to rapidly deploy domain controllers in a disaster recovery scenario. Fundamentally, you can duplicate a Windows Server 2012 domain controller’s virtual hard disk file and create as many additional unique domain controllers as you need to.
In order to leverage this functionality, there are two prerequisites. The first is that your domain’s PDC emulator FSMO role holder is running Windows Server 2012. The second prerequisite is that the virtualization host platform supports the VM Gen ID functionality. Once you have met these two prerequisites, you can start creating clones.
When you clone a domain controller, Active Directory needs a way to know that you’re creating a clone rather than rolling a snapshot back, for example. To signify this to Active Directory, you need to create a cloning configuration file that has the cloning configuration and make it available to the cloned VHD at boot up. The easiest way to create a cloning configuration file is with the New-ADDCCloneConfigFile PowerShell cmdlet.
The cloning configuration file contains unique identifying elements that will be applied to the clone, such as computer name, IP address, and other network information. Any information not supplied in the configuration file will be dynamically generated during the first boot of the clone. For example, if IP information is not specified, DHCP will be used. If the computer name is not specified, a name will be dynamically generated.
Note
The format for a dynamically generated computer name is the first eight characters of the source DC’s name followed by –CL####. The final four numbers are from 0001 to 9999. During cloning authorization, the PDC emulator will pick an available number to uniquely name the clone.
If you provide a blank configuration file like this, then AD will dynamically generate all of the necessary parameters at startup:
<?xml version="1.0"?><d3c:DCCloneConfigxmlns:d3c="uri:microsoft.com:schemas:DCCloneConfig"></d3c:DCCloneConfig>
Table 9-1 shows the parameters that you can specify to New-ADDCCloneConfigFile.
Name | Description |
| The path indicating where to create the DCCloneConfig.xml file. If you don’t specify this parameter, it will be created in the DSA Working Directory folder (generally where the ntds.dit file is stored). |
| The name of the cloned domain controller. |
| The AD site to place the cloned domain controller in. |
| The static IPv4 address to assign to the clone. |
| The static IPv4 subnet mask to assign to the clone. |
| The static IPv4 default gateway to assign to the clone. |
| The IPv4 DNS server(s) to assign to the clone. Use array syntax to specify more than one DNS server—for example:
|
| The primary WINS server to assign to the clone. |
| The secondary WINS server to assign to the clone. |
| The IPv6 DNS server(s) to
assign to the clone. Use array syntax, as shown in the
|
| If you are specifying static IP address or DNS server information, you must include this switch. |
| Include this switch to bypass validation checks before creating the cloning configuration file. |
There are three locations where you can place the DC cloning configuration file (DCCloneConfig.xml). Which location you choose will depend on your use of the cloning feature as well as your deployment strategy. These locations, in order, are:
The DSA Working Directory folder (where the ntds.dit file is stored)
The %windir% tds folder
The root of some mounted removable media (such as a virtual floppy disk), in alphabetical order of the drive letter
If you will be cloning DCs on an ad hoc basis or if you want to simply use a blank or generic cloning configuration file, chances are you’ll want to use either the first or second option listed. If you’ll be cloning numerous DCs from the same source and you want to have a specific configuration for each DC, you’ll probably want to look at the third option. This will allow you to create custom virtual floppy disk (VFD) files for each clone DC that contains the clone’s specific configuration settings in the DCCloneConfig.xml file and then mount that VFD file during the first boot. Alternately, you could mount the cloned VHD file prior to the first boot (with the Mount-VHD Hyper-V PowerShell cmdlet, for example) and inject the DCCloneConfig.xml file into locations one or two.
Note
You can also manually mount and unmount a VHD file from Windows Explorer. Select the VHD file and then click “Mount” on the Disc Image Tools contextual ribbon tab, as shown in Figure 9-14. Once you are done, select the mounted drive and click Eject on the ribbon.

In addition to the DCCloneConfig.xml file, Microsoft has added another important safeguard—a cloning allow list. One of the risks of implementing cloning that Microsoft identified is that applications or services (such as backup agents or antivirus software) on the DC to be cloned might not support cloning. To mitigate this, you must explicitly tell Active Directory that a DC with applications and services installed outside of the basics of Windows can be cloned by specifying those applications and services in the CustomDCCloneAllowList.xml file.
Note
You’re probably wondering about the impacts of cloning on Windows itself. When a DC is cloned, during the first boot, it will run an abbreviated version of the sysprep process that is used when cloning a traditional server or workstation in order to remove identifying details specific to the source DC.
You can find a list of sysprep providers that are run as well as the default allowed applications and services list by reviewing the file DefaultDCCloneAllowList.xml in %windir%system32.
First, run Get-ADDCCloningExcludedApplicationList on the domain controller that you will be cloning. This PowerShell cmdlet will check all of the services against an approved list, as well as all of the installed applications. If any custom applications are found, they will be printed to the PowerShell window. Once you have removed any applications that do not support cloning from the source DC, rerun Get-ADDCCloningExcludedApplicationList with the -GenerateXml switch and the -Path argument. PowerShell will create an allow list XML file.
Note
While it is possible to edit both the DCCloneConfig.xml and CustomDCCloneAllowList.xml files by hand, you will need to be extremely careful that you do not invalidate the XML. If you do, the cloning process will fail.
The final step is that you must add the source DC’s computer account to the Cloneable Domain Controllers group in Active Directory. This grants the source DC the rights to clone itself.
The DC cloning process
Once you’ve completed the prerequisite steps, duplicated the virtual hard disk file, created the configuration files, and started the cloned virtual machine for the first time, Active Directory’s cloning process will begin. There are a number of steps involved in this process. Many steps have fail-safe processes that ensure that in the event of a failure, the domain controller reboots into Directory Services Restore Mode (DSRM) so that the failure will not negatively impact the environment.
During boot, Active Directory will first check if the VM Gen ID has changed. If the VM Gen ID has changed, then Active Directory knows that something has happened. Based on the presence of the DCCloneConfig.xml file, Active Directory knows that it needs to begin the cloning process.
Note
If Active Directory finds that the VM Gen ID is not present, but a DCCloneConfig.xml file is present, the domain controller renames the DCCloneConfig.xml file and reboots into DS Restore Mode. This ensures that a clone is not introduced into the network that is not running a VM Gen ID-aware virtualization host platform.
First, Active Directory completes all of the steps described in the section Virtualization Safe Restore. Next, the cloning process begins. Active Directory takes the following steps to complete the cloning process:
The server processes the DCCloneConfig.xml file. If a static IP specified in the configuration file will cause an IP address conflict, the clone boots into DS Restore Mode.
DNS registration is disabled on all NICs and the NetLogon service is stopped to ensure that the clone will not be contacted.
The list of installed applications and services is validated against the built-in allow list as well as the CustomDCCloneAllowList.xml file. If there are applications or services that are not listed, the clone boots into DS Restore Mode.
The PDC emulator FSMO is contacted via RPC to begin the cloning process.
The PDC emulator ensures that the source VM for the clone is permitted to clone itself. If the necessary permissions are not in place, the clone boots into DS Restore Mode.
The clone’s computer name is changed and then the necessary server and NTDS Settings objects are created in the clone’s Active Directory site.
The clone promotes itself as a domain controller using the Install from Media promotion process. This enables the clone to be promoted without replicating anything other than changes to AD or Sysvol since the virtual hard disk was cloned.
The clone runs sysprep and reboots itself. A registry flag is set in
HKLMSystemCurrentControlSetServicesNTDSParametersVdcCloningDoneto indicate that the DC is a cloned domain controller.
If the source DC that is being cloned was the PDC emulator, there is an extra reboot in between steps six and seven. While the preceding list provides a high-level overview of the key steps involved in a cloned domain controller coming online, there is a far more extensive description of all of the details available.
Cloning a domain controller
To wrap up our discussion of cloning, we’ll clone a DC called COHO-SFO-ADC01 and create a new DC called COHO-PAR-ADC01. To do this, we’ll duplicate COHO-SFO-ADC01’s virtual hard disk file, mount the virtual hard disk, and then inject the DCCloneConfig.xml file. Finally, we’ll boot the new VM (COHO-PAR-ADC01) and observe the cloning process as it proceeds. Our clone will have the properties shown in Table 9-2.
Property | Value |
Name | COHO-PAR-ADC01 |
Active Directory Site | Paris |
IPv4 Address | 172.16.4.1 |
IPv4 Subnet Mask | 255.255.255.0 |
IPv4 Default Gateway | 172.16.4.1 |
IPv4 DNS Servers | 172.16.1.21 172.16.1.22 |
Here are the steps you’ll take to accomplish this:
On COHO-SFO-ADC01, run Get-ADDCCloningExcludedApplicationList. If any applications that do not support cloning are listed, uninstall them.
On COHO-SFO-ADC01, run Get-ADDCCloningExcludedApplicationList -GenerateXML to generate a custom cloning allow list.
Add COHO-SFO-ADC01 to the Cloneable Domain Controllers group. You can do this with PowerShell by running this command:
Add-ADGroupMember"Cloneable Domain Controllers"-MembersCOHO-SFO-ADC01$Shut down COHO-SFO-ADC01 and duplicate the VM to create a VM for COHO-PAR-ADC01.
Create a cloning configuration file for COHO-PAR-ADC01. You can do this on any machine with the Active Directory RSAT tools installed by running the following PowerShell command:
New-ADDCCloneConfigFile-CloneComputerNameCOHO-PAR-ADC01`-SiteNameParis`-IPv4Address172.16.4.21`-IPv4SubnetMask255.255.255.0`-IPv4DefaultGateway172.16.4.1`-IPv4DNSResolver@("172.16.1.21","172.16.1.22")`-Static`-Offline`-Path.Mount the virtual hard disk file and copy the new DCCloneConfig.xml file to %windir% tds in the mounted virtual hard disk. To do this with Hyper-V, follow these steps:
Mount-VHD-Path`'E:Hyper-VVirtual MachinesCOHO-PAR-ADC01COHO-PAR-ADC01.vhdx'Dismount-VHD-Path`'E:Hyper-VVirtual MachinesCOHO-PAR-ADC01COHO-PAR-ADC01.vhdx'Boot COHO-PAR-ADC01. If you watch the boot process, you will see the cloning take place, similar to what’s shown in Figures 9-15 and 9-16.
Once the boot process completes, you will have a fully functional cloned domain controller that is ready to service client requests.
9.3. Read-Only Domain Controllers
One of the most significant Active Directory features introduced in Windows Server 2008 was the read-only domain controller. Deploying domain controllers into untrusted locations has always been a substantial security risk for Active Directory deployments. The risk of a domain controller being physically compromised and having password hashes for that domain stolen and the risk of the database (ntds.dit) being modified offline and placed back on the network are both important ones to consider. The RODC brings the ability to mitigate both of these risks.
By default, RODCs do not store any passwords locally in their database. If a user authenticates to an RODC, the RODC will need to contact a writable domain controller (sometimes called an RWDC) upstream in order to validate that user’s password. This, of course, also applies to other objects with passwords, such as computer and trust accounts. Through the use of password replication policies discussed later in this section, you can define what passwords are allowed to be cached locally on an RODC. You can also examine a real-time view of what passwords are currently cached on an RODC.
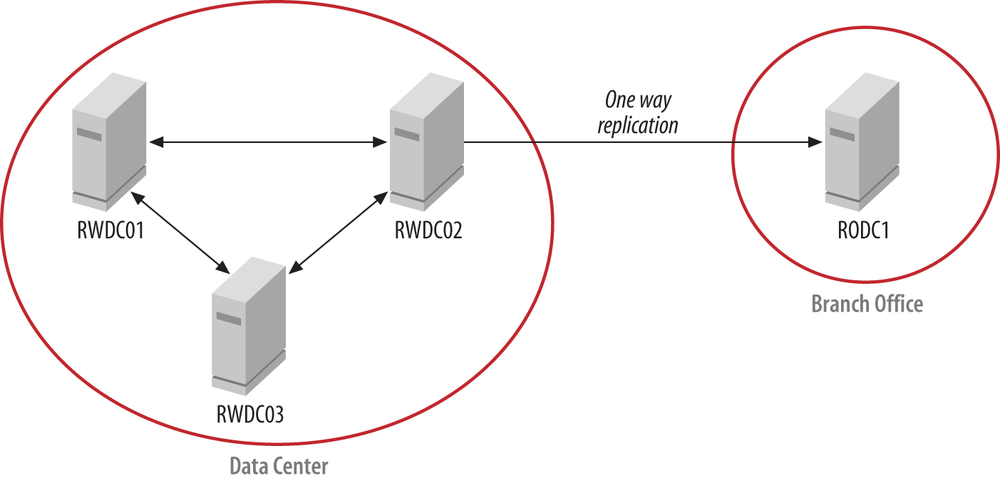
In order to ensure that an RODC cannot impact the integrity of an Active Directory forest, all replication to RODCs is one-way. This means that if someone manages to make a change on an RODC, Active Directory will not replicate that change to other Domain Controllers. Figure 9-17 shows the replication paths in a network with RODCs deployed.
Generally speaking, there are a couple of scenarios where we see RODCs being deployed. The first is in the branch office. Branch offices are typically smaller facilities that are connected by a WAN link to a datacenter or other central site. These WAN links vary greatly in speed and reliability. The second key characteristic of the branch office is the inability for the physical security of a domain controller to be guaranteed. Oftentimes, server rooms in branch offices are merely closets or other repurposed spaces that have limited provisions for managing who has access to the space. The majority of our discussion about RODCs in this book will be focused on the branch office.
The second scenario is the concept of the RODC in the perimeter network. The perimeter network is a section of a network that is considered untrusted relative to the rest of the network. Many organizations place their servers that are Internet-facing in a perimeter network. In order for these servers to be joined to the domain, numerous ports must be opened through the firewall, to the point that the firewall is often (accurately) compared to Swiss cheese. Some organizations may elect to deploy RODCs into their perimeter network to serve as domain controllers for the servers alongside them in the perimeter network. Using an RODC allows local network authentication while mitigating the risk of someone compromising the domain controller and making changes that replicate back to the domain controllers on the internal network. You still run the risk of internal information disclosure, however (e.g., phone numbers, corporate reporting structure, and any other internal information).
As you read this section, keep in mind the guiding design principle behind the RODC. That principle is the core assumption that the RODC is compromised by default. If you’re wondering why a feature of the RODC behaves in a certain way, take a moment to consider the scenario where the RODC is compromised.
Prerequisites
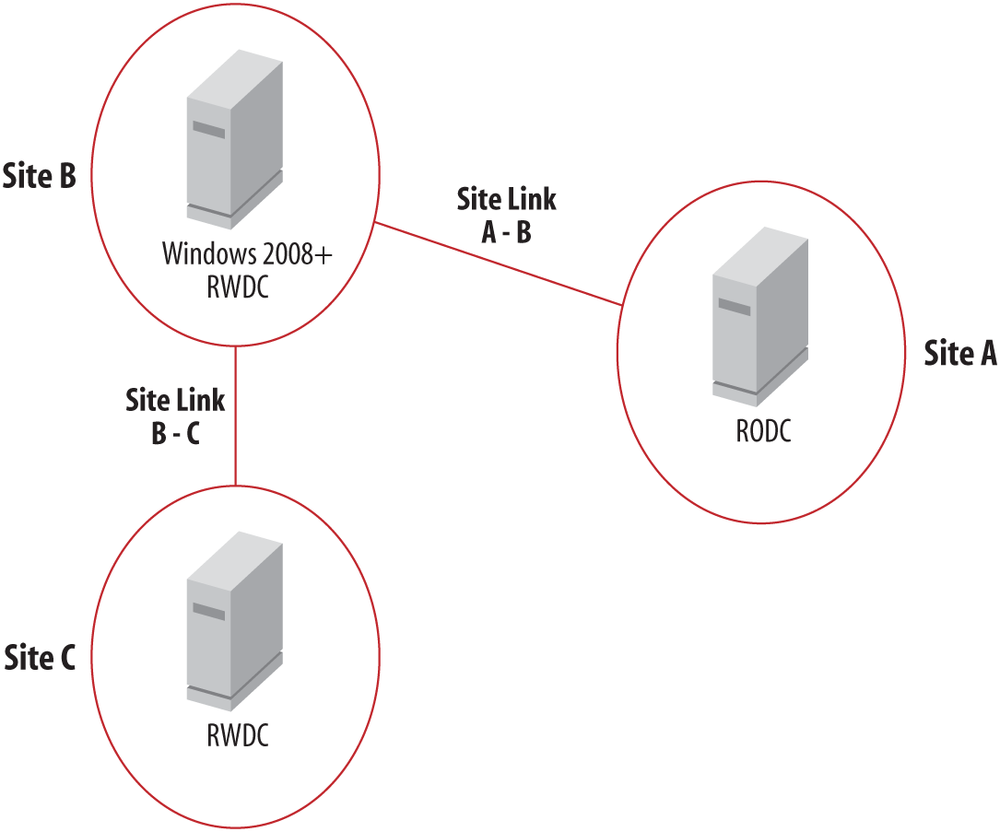
There are a few major prerequisites to deploying RODCs into your Active Directory installation that you should take into consideration before proceeding any further. The first is that your forest must at a minimum be at the Windows Server 2003 forest functional level. Next, you’ll need to have a writable Windows Server 2008 domain controller in a site that your RODC is connected to, as determined by the Active Directory site-link topology.
Consider Figure 9-18. If you have “Bridge all site links” enabled in Active Directory Sites and Services, RODCs can be more than one hop away from a Windows Server 2008 or newer RWDC, and thus the RODC in Site A will be able to communicate with the Windows Server 2008 RWDC in Site C. If, however, you do not have “Bridge all site links” enabled, you will either need to create a site link bridge that includes site links A - B and B - C, or deploy a Windows Server 2008 or newer RWDC in Site B.
In addition to these Active Directory requirements, you should investigate deploying the RODC compatibility pack to your clients. This package is available for download via (and described in) Microsoft Knowledge Base article 944043. There are a number of compatibility issues and bugs with Windows XP and Windows Server 2003 clients and domain controllers that you are likely to encounter, and this package solves many of them. We will make reference to situations where this package may be required throughout this chapter when appropriate.
Note
In this chapter, we will often reference situations where an
RODC can request replication of a specific object. This functionality
is known as Replicatesingleobject (RSO). The
replicate-single-object operation is initiated via a modification to
the replicateSingleObject
operational attribute of the RootDSE LDAP entry. For more information on
this attribute, reference this
site.
Password Replication Policies
As we discussed briefly, RODCs don’t cache passwords by default. This means that if an attacker were to get a copy of the Active Directory database from an RODC, she would not be able to compromise any passwords since there are none stored there. The downside of not storing any passwords is that the RODC will need to make a call to an RWDC, usually over the WAN, to authenticate a client. The value of the RODC diminishes when the WAN is down and clients cannot be authenticated even though there is a local domain controller.
The solution to this problem is the use of password replication policies (PRPs). Password replication policies allow you to define what user (and computer) passwords are cached locally on the RODC, as well as which passwords can never be cached. PRPs are defined through a series of four linked multivalued attributes on the RODC’s computer account in Active Directory. Those attributes are:
msDS-RevealOnDemandGroupThis is the list of principals for which the RODC can cache the password. This list is often referred to as the allowed list.
msDS-NeverRevealGroupThis is the list of principals for which the RODC is never allowed to cache the password. This list is often referred to as the denied list.
msDS-RevealedListThis is a list of principals whose passwords are currently cached on the RODC. It is often referred to as the revealed list.
msDS-AuthenticatedAtDCThis is a list of principals who have authenticated to the RODC. This list is often referred to as the authenticated to or Auth-2 list.
In addition to these attributes, there are two new built-in groups
that are added to Active Directory when you introduce the first RODC in
the domain. These are the Allowed RODC Password Replication
Group and the Denied RODC Password Replication
Group. The allowed group is added to the msDS-RevealOnDemandGroup attribute by default,
and the denied group is added to the msDS-NeverRevealGroup attribute by default.
The allowed group has no members by default but the denied group has
several:
Cert Publishers
Domain Admins
Enterprise Admins
Enterprise Domain Controllers
Enterprise Read-Only Domain Controllers
Schema Admins
krbtgt account
In addition to these groups and accounts, there are a few groups
that are added to the msDS-NeverRevealGroup attribute by
default:
Account Operators
Administrators
Backup Operators
Denied RODC Password Replication Group
Server Operators
All of these groups generally contain highly trusted user
accounts, so you would not want to risk compromising those passwords by
caching them on an RODC. Thus, we don’t recommend that you remove these
groups from the default denied replication group, or the msDS-NeverRevealGroup attribute.
In order for an RODC to issue a Kerberos service ticket without communicating with a writable domain controller, the RODC will need to have the passwords cached locally for both the user account and the computer account involved. This is important to remember, as you will need to plan for both user and computer account password caching. In addition to your users, you need to take into consideration any service accounts that are being used on servers or other machines at the site where the RODC is located.
As you plan your RODC deployment, you’ll need to think carefully about how you set up your password replication policies. Depending on the route you take, you may need to invest in updating your user provisioning process to keep the password replication policies updated. There are three strategies we expect most organizations will take when planning their password replication policies:
- No caching of passwords
In this scenario, RODCs will not cache any passwords and will instead simply serve as read-only directories that are proxies in the authentication process. If you are considering deploying an RODC in the perimeter network scenario, this is likely the route you will take when defining password replication policies for those RODCs. This is the most secure configuration and is the default. No management of policies or groups are required.
- Caching of almost all passwords
If you are looking to reduce management overhead and provide the most tolerance for WAN failures, this is likely the scenario for your password replication policies. If you have physical security concerns about an RODC, we do not recommend that you opt for this strategy. Passwords will only be cached on a given RODC once the user or computer has logged on via that specific RODC or the password is manually replicated to the RODC.
- Limited caching of passwords
In this scenario, you will define on a per-RODC basis which passwords can be cached by the RODC. This list will generally reflect the list of users and computers that are located at the site the RODC is servicing. You will need to devise a process to manage the lists for each of your RODCs in this situation. We recommend that you integrate this process with your user-provisioning process. In addition to your user-provisioning process, you will need to link into a mechanism that manages your computer accounts. Don’t forget to consider users who move between sites when you plan for this scenario.
Managing the password replication policy
The Active Directory Users and Computers (ADUC) tool includes a property page for managing an RODC’s PRP, as well as for inspecting the revealed and authenticated to lists. Figure 9-19 shows the default settings for a new RODC. The list shown here is accessible via right-clicking the domain controller’s computer account in ADUC and selecting Properties.
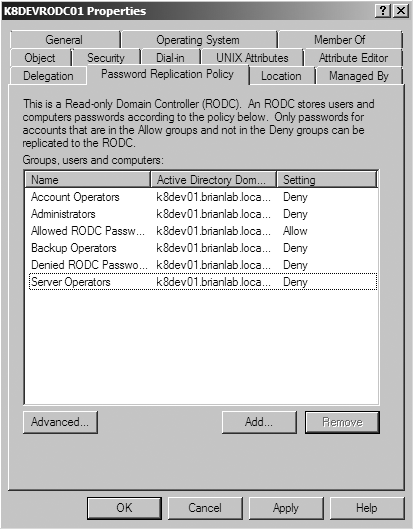
You can add users, groups, and computers to the list here by clicking Add. When you click Add, ADUC will prompt you to allow or deny replication for the selection, as shown in Figure 9-20.

Clicking the Advanced button in Figure 9-19 yields a dialog that
allows you to inspect the msDS-RevealedList and msDS-AuthenticatedAtDC attributes. The
drop-down list at the top of Figure 9-21 allows you to toggle between
which attributes you want to display. “Accounts whose passwords are
stored on this Read-only Domain Controller” displays the msDS-RevealedList attribute, and “Accounts
that have been authenticated to this Read-only Domain Controller”
displays the msDS-AuthenticatedAtDC
attribute. If you click the Export button at the lower-left of the
dialog shown in Figure 9-21, you can
save a CSV (comma-separated values) listing of the data shown.
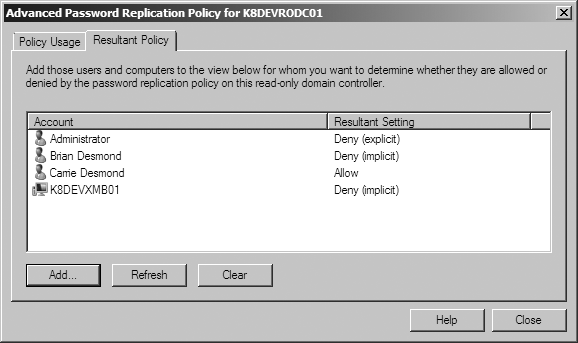
The Advanced dialog shown in Figure 9-21 also allows you to determine what accounts can have their passwords cached by an RODC. This is a useful feature when you’re troubleshooting an account whose password caching behavior is unexpected. Figure 9-22 shows the Resultant Policy tab for a number of users.

There are a few different resultant policy settings that can be
displayed for an account. An account that shows “Allow” is defined on
the msDS-RevealOnDemandGroup list.
An account that shows “Deny (explicit)” is defined on the msDS-NeverRevealGroup list. Finally, an
account showing “Deny (implicit)” is not defined on either list and
thus is not allowed to cache its password, since the default behavior
for an RODC is not to cache a given account’s password. Notice that,
as shown in Figure 9-22,
you can calculate resultant policies for both users and
computers.
Managing the loss of an RODC
In the event that an RODC is stolen—or, more specifically, the drives holding the database are physically compromised or stolen—you should as a matter of best practice immediately reset the passwords that were cached on that RODC.
The ADUC user interface for performing this task is accessed by deleting the RODC’s computer account from the Domain Controllers OU. If you attempt to delete the computer account, you’ll be presented with the dialog shown in Figure 9-23. From this dialog, you can elect to reset the passwords for users, computers, or both. While the dialog only resets user passwords by default, keep in mind that computers are a special type of user account and they have passwords, too. An attacker could use a computer’s account and password to authenticate to your domain.
Warning
Be certain that you heed the warnings in Figure 9-23. Not resetting passwords is a security risk, so we don’t recommend that you elect not to reset passwords in the name of convenience. We do, however, recommend that you pause to consider the implications of resetting all of the cached user passwords in a site. This will cause service desk calls for users who can’t log in and, in the case of service accounts, services that can’t start.
When you reset computer passwords, the computers will be unable to authenticate to the domain. You will need to physically visit each workstation or script a solution using tools like netdom or nltest if you have the local administrator credentials for each machine available centrally.
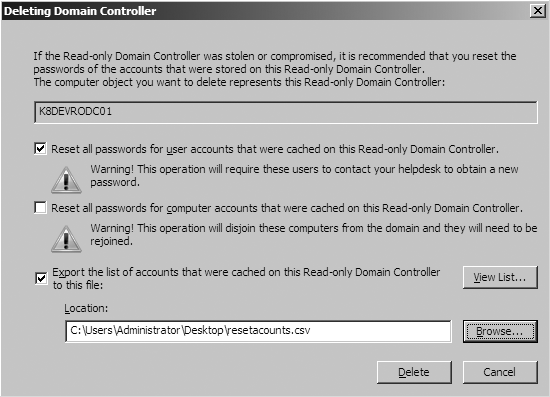
While it’s not required, we highly recommend that you export a CSV list of the affected accounts so that you can follow up with your service desk and other support teams. Resetting user and computer passwords will undoubtedly cause substantial pain, so this is a scenario you should plan for as you plan your overall RODC deployment.
The Client Logon Process
So far we’ve discussed the caching of passwords on RODCs and how to control the caching, but we have not looked at how the RODC actually gets passwords from a writable domain controller and caches them locally. In this section, we’ll take a look not only at how passwords get cached locally, but also at the overall flow of communications between domain controllers and clients when an RODC is involved.
One key difference between RODCs and their writable counterparts that you should keep in mind throughout this section (and that we will frequently point out) is that each RODC has its own krbtgt account. The domain krbtgt account is the credential that is used by domain controllers to encrypt Kerberos tickets, and if you have access to these credentials, you have an endless degree of power over the forest. Consequently, each RODC maintains a separate krbtgt account that is named in the format krbtgt_<number>, where <number> is a unique number. The RODC stores only the password for its personal krbtgt account locally. Writable domain controllers, however, store the passwords for each krbtgt account in their databases.
In order to determine what krbtgt account is
associated with a given RODC, you can inspect the msDS-KrbTgtLink attribute on an RODC’s
computer account, or the msDS-krbTgtLinkBL attribute on the
krbtgt account.
Let’s consider the situation depicted in Figure 9-24 as our baseline for the rest of this discussion. Figure 9-24 has four players:
- RWDC01
This is our writable domain controller in the datacenter.
- RODC01
This is our read-only domain controller in the branch office.
- User Brian
This is our user who will be logging on and accessing services.
- Machine PC01
This is the workstation for user Brian.
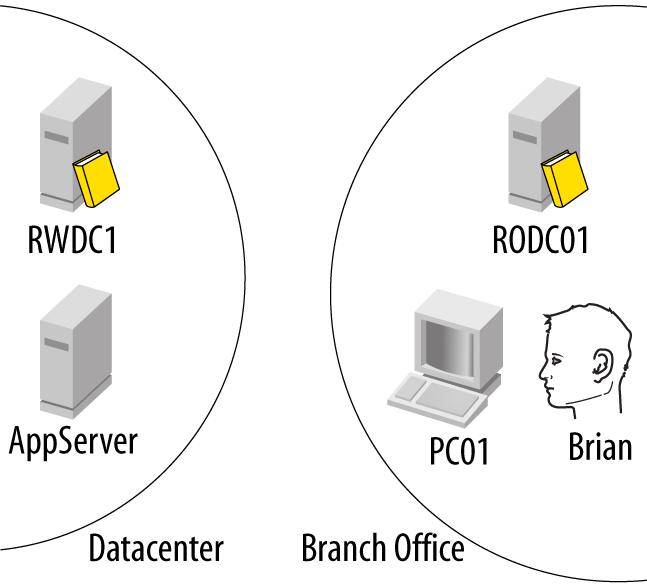
Let’s assume that the first step is for our machine, PC01, to authenticate to the domain. The following are the steps that will take place:
First, PC01 will contact RODC01 and provide a Kerberos authentication service request (a KRB_AS_REQ packet).
When RODC01 receives the KRB_AS_REQ, it will check its local database to see if it already has PC01’s password cached locally. For this example, we’ll assume that this is, in fact, not the case.
Since RODC01 does not have the password cached locally, it must contact RWDC01 and provide the KRB_AS_REQ it received.
RWDC01 will generate a KRB_AS_REP (a Kerberos authentication service reply) and forward it back to RODC01.
RODC01 will in turn provide this reply to PC01, completing the authentication request. RWDC01 will also update RODC01’s Auth-2 list (
msDS-AuthenticatedAtDC) to include PC01 in that list.At this point, PC01 has a valid Kerberos ticket-granting ticket (TGT) signed with the domain krbtgt account. Following step 5, RODC01 will initiate two additional steps to attempt to cache the password locally:
RODC01 will submit a request to RWDC01 to have PC01’s credentials replicated to RODC01.
RWDC01 will verify that the password replication policy permits RODC01 to cache PC01’s password and replicate the password to RODC01. RWDC01 will also update RODC01’s revealed list (
msDS-RevealedList) to include PC01.
Note
In looking at step 7, you may be wondering why RWDC01 checks the password replication policy rather than assuming RODC01 can cache the password since it requested it. The reason here is that we must assume that RODC01 has been compromised, and that as part of that incident the local copy of the password replication policy on RODC01 may have been modified and additional accounts surreptitiously added to the PRP allowed list.
Let’s now look at the process of user Brian logging in to his machine. We’ll of course assume that the preceding seven steps have completed successfully. The following are the steps taken when Brian attempts to log into his machine:
Brian presents his credentials to PC01, and PC01 sends a KRB_AS_REQ to RODC01 for user Brian.
When RODC01 receives the KRB_AS_REQ, it will check its local database to see if it already has Brian’s password cached locally. For this example, we’ll assume that this is, in fact, not the case.
Since RODC01 does not have the password cached locally, it must contact RWDC01 and provide the KRB_AS_REQ it received.
RWDC01 will generate a KRB_AS_REP and forward it back to RODC01.
RODC01 will in turn provide this reply to PC01, completing the authentication request for user Brian. RWDC01 will also update RODC01’s Auth-2 list (
msDS-AuthenticatedAtDC) to include user Brian in that list.
At this point, user Brian has a valid Kerberos ticket-granting ticket signed with the domain krbtgt account. Following step 5, RODC01 will initiate steps 6 and 7 from before, except this time RODC01 will attempt to cache user Brian’s password locally.
It is very important to realize, however, that the logon process for user Brian is not yet complete! Before Brian can use his workstation, he must obtain a Kerberos service ticket (TGS) for PC01. Continuing with our example, when PC01 sends a TGS ticket to RODC01 for user Brian, RODC01 will be unable to decrypt that TGT because it was encrypted with the domain krbtgt account, whose password is never cached on an RODC. The following steps show the process for Brian to obtain a TGS ticket for PC01:
PC01 sends a KRB_TGS_REQ to RODC01 for user Brian to access PC01. The KRB_TGS_REQ includes Brian’s TGT from the previous example.
RODC01 is unable to decrypt the TGT included in the TGS request since it is encrypted with the domain krbtgt account.
RODC01 transmits the KRB_TGS_REQ to RWDC01, which replies with a KRB_TGS_REP.
RODC01 receives a valid KRB_TGS_REP. Rather than forwarding the KRB_TGS_REP to PC01, RODC01 transmits an error to PC01.
Note
The specific Kerberos error that RODC01 sends to PC01 tells PC01 that user Brian’s TGT has expired.
PC01 prepares a new KRB_AS_REQ for user Brian and transmits it to RODC01.
Since RODC01 now holds cached credentials for user Brian, RODC01 is able to construct a new KRB_AS_REP locally (and thus a new TGT for Brian), encrypt it with RODC01’s local krbtgt account, and transmit it to PC01.
PC01 sends a new KRB_TGS_REQ to RODC01 for user Brian, this time including the new TGT for Brian.
RODC01 is able to decrypt the TGT in the KRB_TGS_REQ and construct a KRB_TGS_REP that includes a service ticket permitting user Brian to use PC01.
Note
You may be wondering what would happen if an RWDC received a TGT that was encrypted by an RODC. Each RODC’s krbtgt account is replicated to all of the RWDCs in the domain, so RWDCs can decrypt Kerberos tickets encrypted by an RODC. The TGT includes unencrypted information in the header that allows an RWDC to determine which RODC’s krbtgt account to use when decrypting the message.
After completing these steps, user Brian is able to use PC01. During subsequent logons by user Brian to PC01, the steps taken to obtain a service ticket (TGS) are much simpler:
PC01 sends a KRB_TGS_REQ to RODC01 for user Brian to access PC01. The KRB_TGS_REQ includes Brian’s TGT, which has been encrypted by RODC01.
RODC01 decrypts the TGT in the KRB_TGS_REQ and constructs a KRB_TGS_REP that includes a service ticket permitting user Brian to use PC01.
After reviewing these examples, you may have begun to notice the importance of caching both the user and computer passwords on the RODC. In order for a user authentication to succeed, the RODC must possess the passwords for both the user and the computer. If either of these is not present, the RODC will need to communicate with a writable domain controller over the WAN. If the WAN is unavailable, the user logon will fail.
Warning
The writable domain controller that the RODC contacts must be running Windows Server 2008 or newer. If only Windows Server 2003 domain controllers are available, the logon request will fail.
Populating the password cache
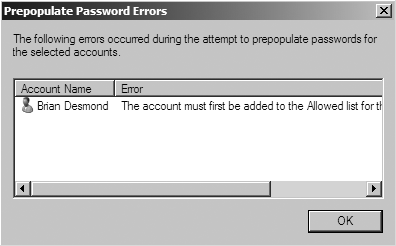
Since the success of a logon processed by an RODC can be entirely dependent on whether or not the WAN (or more specifically, a Windows Server 2008 or newer writable domain controller) is available, you may want to prepopulate the RODC’s password cache. You can prepopulate the password cache using the Prepopulate Passwords button shown in Figure 9-21. When you click this button, you will be able to search Active Directory for users and computers. After selecting the users and computers for which you wish to prepopulate the cache, you will be shown a confirmation dialog similar to Figure 9-25.
If any errors occur, you will be shown a dialog similar to Figure 9-26 advising you of those errors. Any principals whose passwords are successfully prepopulated will appear in the list shown in Figure 9-21.

RODCs and Write Requests
RODCs have a great deal of special logic encoded in them to handle write requests they receive from clients. Perhaps the most obvious and common example of a write operation is a user or computer password change request. Other common examples are dynamic DNS registrations and updates to logon timestamp information.
User password changes
The behavior of an RODC when a user changes his password varies depending on what mechanism the user is using for the password change (such as Kerberos or LDAP), and the operating system of the client. Let’s take the most common example of a user pressing Ctrl-Alt-Delete on his workstation and selecting the “Change Password” option.
Clients running Windows Vista and newer (as well as Windows Server 2008 and newer) will attempt to make the password change via Kerberos. When an RODC receives a Kerberos password change request, it will be forwarded to a writable domain controller. The RODC will also immediately request that the RWDC replicate that user’s password to the RODC. The RWDC will then follow the normal process discussed earlier for replicating a password to an RODC.
On a client running Windows XP or earlier (and server operating systems running Windows Server 2003 or earlier), the client will contact a writable domain controller directly and the RODC will have no knowledge of the password change. The next time the RODC replicates with a writable domain controller, it will erase its local copy of that user’s password. The user authentication process discussed earlier ensures that the next time the user attempts to log on, the RODC will again cache that user’s password if permissible.
Note
If you have loaded the RODC hotfix package discussed in Prerequisites, the client will contact an RODC to change its password and the RODC will chain that request to an RWDC. The password will still not be requested for immediate replication, however.
If the user account password change request is made via LDAP (such as for the Outlook Web Access change password web page), the change will be made directly on a writable domain controller. The RODC will have no knowledge of the password change, and the next time the RODC replicates with a writable domain controller, it will erase its local copy of that user’s password. The user authentication process discussed earlier will ensure that the next time the user attempts to log on, the RODC will again cache that user’s password if permissible.
Note
When an RODC erases its local copy of a password, the old password is still physically stored in the Active Directory database. However, the replication metadata for the user is updated such that when queried, the database reports that the password field is null.
Computer account password changes
When a computer attempts to change its password, it will contact the RODC via its secure channel. The RODC will chain that password change request to a writable domain controller and request that the RWDC replicate the new password to the RODC. The RWDC will then follow the normal process discussed earlier for replicating a password to an RODC.
The lastLogonTimeStampAttribute
The lastLogonTimeStampAttribute sometimes defies
the conventional wisdom we’ve been presenting throughout this chapter.
If a user or computer’s password is cached on the RODC, the RODC will
locally write a new timestamp to the lastLogonTimeStampAttribute for that user or
computer if the RODC determines that an update to the lastLogonTimeStampAttribute attribute is
necessary. Simultaneously, the RODC will forward the lastLogonTimeStampAttribute update to a
writable domain controller. Since the forwarded lastLogonTimeStampAttribute is slightly
newer, the RODC’s lastLogonTimeStampAttribute value for the
user or computer will be overwritten with a slightly later value via
normal replication.
Note
The lastLogonTimeStampAttribute update will
not be forwarded if the WAN is unavailable or the RODC is unable to
contact a writable Windows Server 2008 domain controller.
Last-logon statistics
If you have enabled tracking of last-logon statistics
information as discussed in Chapter 16, the RODC will
write updates to those attributes locally. However, unlike the
lastLogonTimeStampAttribute, the
RODC will not forward these updates to a writable
domain controller.
Logon success/failure information
When an RODC processes a logon successfully, it will write new
values for the lastLogon, logonCount, and badPwdCount attributes for the user or
computer locally. As is the case with a writable domain controller,
these attribute changes will never be replicated or chained to a
writable domain controller. If an RODC processes a logon failure, it
will update the badPwdTime and
badPwdCount attributes. Likewise,
these changes will never leave the RODC either by replication or by
chaining.
NetLogon secure channel updates
Certain attributes of computer accounts (such as the computer’s
name, dNSHostName, and operating
system information) that are stored in Active Directory are provided
to domain controllers via a computer’s NetLogon secure channel. When
an RODC receives these updates, it will chain them to a writable
domain controller. The RODC will initiate a request for immediate
replication of the computer object, and if the computer’s password is
permitted to be cached, that request will succeed.
Replication connection objects
The Knowledge Consistency Checker (KCC) on an RODC will locally write the connection objects an RODC requires in order to replicate to the RODC’s database. These changes will never replicate and are not necessary outside of the RODC.
DNS updates
RODCs leverage existing functionality in the DNS protocol in order to return a writable domain controller to the client. When a client is ready to make a dynamic DNS update, it will first contact the DNS server (in this case, the RODC) and request an authoritative name server for the zone it is trying to update by way of accessing the zone’s SOA (Start of Authority) record.
When an RODC generates the SOA record for a read-only DNS zone, it will attempt to locate a nearby Windows Server 2008 or newer writable domain controller that is a name server for the zone and that is also reachable. The RODC completes this process via a DC locator call. In the event that the RODC is unable to find a suitable Windows Server 2008 or newer domain controller, it will randomly select, from the list of available name servers, a name server that is not the RODC itself. The name server that the RODC ultimately selects during this process will be specified as the master server in the SOA record.
In order to keep the RODC’s local version of the DNS zone up to date, the RODC will queue a request for replicating the client’s record from the master server that the RODC selected for placement in the SOA record. Enqueueing this replication request is best-effort, which means that if it fails, the RODC will not try again to queue a replication request for that DNS record. Instead, the RODC will receive the update during the next normal replication cycle.
Note
If there is already an entry in the replication queue for the record in question, the RODC will not queue a second replication request.
By default, the RODC will process the replication queue every five minutes and attempt to replicate a maximum of 100 entries from the queue. For each entry in the queue, the RODC will verify that the entry is at least 30 seconds old, or else it will bypass it and attempt to replicate that entry during the next cycle. By default, when the queue depth reaches 300 entries, no more entries will be enqueued until the queue depth is below 300 entries.
Warning
The DsPollingInterval
registry setting controls a number of activities in addition to the
frequency of the DNS replication queue processing. These activities
primarily include querying Active Directory for changes to
AD-integrated DNS zones that are hosted on the DNS server. You
should thus use caution when modifying this frequency.
There are five registry settings that you can use to control the
RODC DNS service’s attempts to replicate dynamically updated DNS
records. All of these registry settings are located under HKLMSystemCurrentControlSetServicesDNSParameters.
Table 9-3 details each of the
registry settings you can configure.
Note
All of the registry settings in Table 9-3 are REG_DWORD values.
Registry value | Description | Unit | Default value | Min. value | Max. value |
| Controls the frequency of the polling thread that the DNS service uses to query Active Directory for all AD-integrated DNS configuration settings. | Seconds |
|
|
|
| Controls whether the special DNS record-replication behavior is enabled or disabled. | Boolean |
|
|
|
| Specifies the maximum number of entries that can be in the replication queue at any given time. | Entries |
|
|
|
| Specifies the maximum number of records that the RODC will attempt to replicate in any given pass of the queue. | Entries |
|
|
|
| Indicates the minimum number of seconds an RODC will wait between enqueuing a replication request for a DNS record and processing the request. | Seconds |
|
|
|
Warning
The primary purpose of the MaximumRodcRsoAttemptsPerCycle setting is
to limit the potential for a denial-of-service attack on a writable
domain controller by way of flooding that domain controller with too
many replication requests at once. Make sure to measure the impact
on domain controller load if you increase this value.
In the event that you reach the maximum queue length (300
entries, by default), the RODC will log an event (event ID 4400,
message “The DNS server is experiencing high SOA query load.
This may be caused by a large number of local client machines
performing updates. Single object replication of DNS records
corresponding to SOA queries is being throttled. This may delay
replication of updates to this RODC DNS server, however scheduled
replication will not be affected.”) in the DNS Server event
log indicating that this situation has occurred, and no further
replication requests will be enqueued until the queue is processed and
its depth is decreased. If you are encountering this situation
frequently, you may need to increase the maximum queue length by
modifying the MaximumRodcRsoQueueLength registry
setting.
The W32Time Service
As a rule, RODCs will synchronize time with writable Windows Server 2008 and newer domain controllers. An RODC will not synchronize its time with another RODC.
When an RODC receives a request for time synchronization from a client, the manner in which the request is processed varies greatly depending upon whether or not the RODC has the client’s password cached. If the RODC has the client computer’s password cached locally, the RODC is able to process and sign the time-synchronization request as a standard writable domain controller would. If, however, the RODC does not have the client’s password cached, then a writable domain controller must be involved.
When the RODC receives a time-synchronization request it cannot process, there are a number of steps involved:
The RODC forwards the request to a Windows Server 2008 or newer writable domain controller.
The writable domain controller processes the request and signs it using the client computer’s password, and then returns the response to the RODC.
The RODC in turn receives the response and forwards it to the client, who processes the response.
In order to handle the forwarding of requests and responses, the RODC maintains a local table of client time-service requests that it has forwarded. This table is known as the chaining table. The table contains three fields:
The client’s IP address (either IPv4 or IPv6)
The timestamp from the NTP request
The client’s RID
When an RODC receives a reply from the writable domain controller, it searches the table for a matching request based on the RID and request timestamp. Once the RODC finds a match, it forwards the response back to the source IP.
Note
In the event that the RODC is unable to find a match in the table, the RODC assumes that it originated the request. If the request is signed with the RODC’s computer account password, then the RODC updates its local clock as necessary. Otherwise, the RODC discards the response.
Any entry in the RODC’s chaining table has a maximum lifetime of up to four seconds by default, and any given client (as defined by the client’s IP address) can have a maximum of four entries in the chaining table at any given time. In total, the chaining table can contain a maximum of 128 entries by default. In the event that either of these maximums is exceeded, new requests are simply discarded until the chaining table has additional room for them.
Each time a new entry is added to the chaining table, the RODC will examine the chaining table and determine if any entries should be removed. RODCs will examine the chaining table for stale entries if more than 75% of the maximum number of entries are in use (96 entries by default). Any entry that is older than the maximum lifetime will be removed.
All of these defaults are configurable via a number of registry
settings, shown in Table 9-4. These registry
settings are located under HKLMSystemCurrentControlSetServicesW32TimeTimeProvidersNtpServer.
Registry value | Description | Unit | Default value | Min. value | Max. value |
| Controls whether the chaining of time requests by RODCs is enabled. | Boolean |
|
(chaining enabled) |
(chaining disabled) |
| Controls the maximum lifetime of an entry in the chaining table. | Seconds |
|
|
|
| Controls the maximum number of entries in the chaining table. | Entries |
|
|
|
| Specifies the number of entries any given host can have in the chaining table. | Entries |
|
|
|
Warning
The purpose of controlling the size of the chaining table is to
ensure that the chaining table does not exhaust memory resources on
the RODC. If you increase ChainMaxEntries, take this warning into
account.
If you disable the password chaining behavior on an RODC (by
setting ChainDisable to 1), the RODC will be able to communicate with
down-level (e.g., Windows Server 2003) domain controllers in addition to
writable Windows Server 2008 and newer domain controllers. If you make
this configuration change, RODCs will no longer be able to process
client time-synchronization requests.
Application Compatibility
As with any major change to your infrastructure, prior to large-scale deployment of RODCs in your environment, you will need to perform significant testing in order to understand application behavior issues as they relate to RODCs.
Applications that attempt to write to Active Directory using LDAP will receive an LDAP referral from an RODC to a writable domain controller. So long as the application is capable of chasing the referral, the write will succeed, and the next time the RODC replicates, that write will be reflected locally. In the event that the WAN is down, the referral will fail. The application will need to be able to handle this situation.
Note
You can disable an RODC’s ability to issue write referrals by
setting the RODCMode registry value
to 1. The RODCMode registry value is a REG_DWORD located at
HKLMSystemCurrentControlSetServicesNTDSParameters.
Another scenario where an application may fail is if it expects the results of a write to be immediately available on the local domain controller. One of the issues resolved by the RODC compatibility package is a bug in the Windows print-spooler service. The print spooler publishes printers to Active Directory via LDAP (resulting in a referral to a writable domain controller), and then immediately tries to read the published printers from the local domain controller. If the printer isn’t present on the local domain controller (which is the case with a local RODC), the spooler service determines that publication of the printer has failed.
If an application is using legacy RPC calls to make changes to Active Directory, those RPC calls will fail if they are targeted to an RODC. The application must explicitly target a writable domain controller in order for the writes to succeed. The RODC will replicate the changes through normal replication.
Further, if you have added attributes to the filtered attribute set (FAS), applications will need to be aware that those attributes will not be available from Active Directory on an RODC. If an application requires access to an attribute in the FAS, the application will need to communicate with a writable domain controller. For more information on the filtered attribute set, see Chapter 5. Keep in mind that the FAS cannot be enforced in a multidomain forest until your forest is at the Windows Server 2008 or better functional level. This is because an RODC that is also a global catalog may replicate one of the Global Catalog naming contexts from a Windows Server 2003 domain controller. Windows Server 2003 domain controllers are unaware of the FAS, and as such they will include filtered attributes when replicating with an RODC. Filtering occurs at the replication source, not at the RODC, so the RODC will process inbound replication for filtered attributes and store them in its database.
In general, the most important thing you will need to do is test all of the applications in your environment that will potentially communicate with an RODC. You will likely find applications that require updates to their code or upgrades from the manufacturer. One application that you should be aware of is Microsoft Exchange. Exchange is unable to work with RODCs, and as such you should not collocate Exchange servers and RODCs in the same site.
Note
Microsoft has compiled a list of applications that are known to work with RODCs at this link.
RODC Placement Considerations
When you place RODCs in your network, there are a few rules and considerations you should think about as you work on your design. The first rule to remember is that an RODC will never talk to another RODC.
If you’re thinking of placing multiple RODCs in a given site, this is a very important rule to remember. Think of a situation where you have a branch office with two RODCs for the same domain. Let’s call them RODC01 and RODC02. Let’s also assume you have a user Brian who works out of this site. On RODC01, Brian’s password is cached; however, on RODC02, Brian’s password is not cached. When the WAN becomes unavailable at this site and a writable domain controller is unable to be contacted, Brian attempts to log onto his workstation. Brian’s workstation contacts RODC02, and because the WAN is unavailable and RODC02 does not have Brian’s password cached, logon fails. Brian’s workstation will not try to contact a different domain controller and will instead simply tell Brian his password is invalid. Having multiple RODCs in a site can provide redundancy where necessary, but it can also provide a great deal of unpredictability. If you are planning to deploy multiple RODCs to a site, we recommend you prepopulate each RODC’s password cache and maintain that cache with an automated process.
When you create a trust between a given set of domains, a special
type of object called a trustedDomain
is created in Active Directory to represent that trust. The trustedDomain object includes a password that
is used for communicating with the remote domain in the trust. RODCs
will never cache trust passwords, which means that any time a user who
is in a site serviced by an RODC wishes to communicate with a resource
in a trusted domain, the RODC must go to a writable domain controller to
get the necessary Kerberos tickets. This is true even when the resources
the user wishes to access are in the same site as the user. If the WAN
is down, the user will be unable to access those resources since a
writable domain controller for the user’s domain cannot be
contacted.
If you place RODCs in your perimeter network, you will need to pay
special attention to applications that need to write to Active Directory
as typically those writes will always fail. The assumption in this
scenario is that you will close the firewall such that member servers in
the perimeter network cannot communicate with writable domain
controllers in the trusted network, since if you didn’t do this, there
would be no point in deploying RODCs in the perimeter network to begin
with. Applications will fail to write to Active Directory since the RODC
will issue a write referral to a writable domain controller that the
client will be unable to contact. In this scenario we recommend you set
the RODCMode registry setting
discussed earlier to 1.
In order for dynamic DNS registrations to succeed for member servers in the perimeter network, you will need to allow perimeter network servers to contact writable domain controllers on TCP and UDP port 53. Domain join operations will fail for member servers in the perimeter network unless you precreate the computer account on a writable domain controller, ensure that the computer account is allowed to be cached by RODCs in the perimeter network, and then prepopulate the RODC password caches with that computer account’s password.
Note
In order for the prepopulation of the computer account’s password to succeed, you will need to set it to a nonstandard value before you attempt to prepopulate the cache. To do this you can run net user <ComputerName>$ <Password>, substituting the computer’s name and a password where appropriate. Be sure to include the trailing $ in the computer name.
Administrator Role Separation
One often-sought-after feature for domain controllers is the ability to separate administration of the domain controller hardware platform and operating system from administration of the Active Directory service. On a writable domain controller, this is simply impossible since any administrators on the domain controller can make changes that could elevate their privileges across the forest and lead to compromise of the forest. RODCs introduce the ability to delegate administrative control of the operating system to a third party, and we highly recommend that you do this as a best practice, even if you are administering RODCs out of an Active Directory management team!
By delegating administrative rights to the RODC operating system to a group other than the Domain Admins group, you remove the need to ever log into an RODC as a domain administrator. Keep in mind the paradigm of treating an RODC as being compromised by default when you consider this recommendation. If you log into a compromised RODC with an account with domain admin rights, you could be giving away your domain admin password; or perhaps the OS has been modified to run a login script under your domain administrator login that makes compromising changes to the directory via an RWDC.
You can configure a multitude of different local roles on an RODC; however, we expect the most common local role you will configure is the Administrators role. The list of available roles includes:
Administrators
Users
Guests
Remote Desktop Users
Network Configuration Operators
Performance Monitor Users
Performance Log Users
Distributed COM Users
IIS_IUSRS
Cryptographic Operators
Event Log Readers
Certificate Service DCOM Access
Incoming Forest Trust Builders
Terminal Server License Servers
Pre-Windows 2000 Compatible Access
Windows Authorization Access Group
Server Operators
Replicator
Account Operators
Backup Operators
Print Operators
In order to configure the local Administrators role on an RODC,
you can use either ntdsutil or the Active Directory
Users and Computers tool. ADUC limits you to configuring the
Administrators role by specifying a user or group in the managedBy attribute of the RODC’s computer
account. Figure 9-27
shows this configuration. This change will become effective on the RODC
when the updated managedBy attribute
replicates to the RODC.
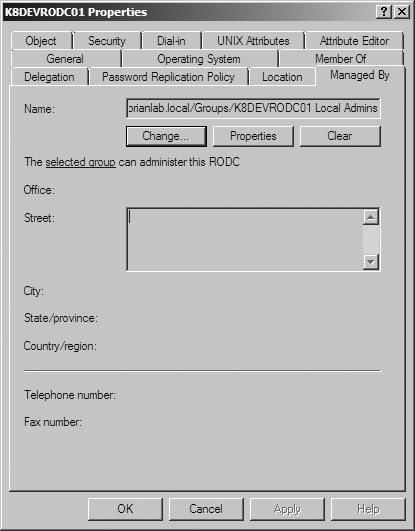
If you want to configure a role other than the Administrators role or you prefer to complete this configuration via the command prompt, you will need to use ntdsutil. To add a group called COHOVINESRODC01-Admins to the local Administrators role on RODC01, you would run these commands after launching ntdsutil:
local roles
connections
connect to server RODC01
quit
add COHOVINESRODC01-Admins Administrators
The change will become effective immediately, and members of the RODC01-Admins group will be able to administer the RODC without concern that they will have administrative access to the domain or forest.
Note
Users who are members of the local Administrators role can modify the members of this role and other local roles.
We highly recommend that you define a domain group that has local Administrators-level access to each RODC in your environment. This group should contain accounts that do not have any elevated privileges in your environment (i.e., normal user accounts). You should use these accounts for performing all administrative functions on an RODC. If you need to perform an administrative task that requires domain-level administrative permissions, perform that task remotely, as any attempt to log on interactively to the RODC either at the console or via Terminal Services could allow compromise.
Promoting an RODC
When you promote a server to be an RODC, you’ll need to answer a few extra questions during the promotion process. Figure 9-28 shows the questions you’ll be asked by Server Manager when you promote a new RODC.

There are three questions in particular that you’ll need to answer. First, you can optionally specify a group (or user) to delegate administrative rights over the RODC to, as discussed in the section Administrator Role Separation. You can always make this change later if you don’t know at promotion time. Next, you can preconfigure the groups of users that are allowed to have their passwords cached on the RODC. The wizard preconfigures this list for you. Likewise, the wizard prepopulates the list of groups of users whose passwords cannot be cached. You can, of course, customize this as well.
If you’d like to promote an RODC from PowerShell with the parameters listed in Table 9-5, you can do so using this command:
Install-ADDSDomainController`-AllowPasswordReplicationAccountName`@("COHOVINESAllowed RODC Password Replication Group")`-NoGlobalCatalog:$false`-CreateDnsDelegation:$false`-CriticalReplicationOnly:$false`-DatabasePath"C:WindowsNTDS"`-DelegatedAdministratorAccountName"COHOVINESCOHO-TOK-ADC01 Delegated Admins"`-DenyPasswordReplicationAccountName`@("BUILTINAdministrators","BUILTINServer Operators",`"BUILTINBackup Operators","BUILTINAccount Operators",`"COHOVINESDenied RODC Password Replication Group")`-DomainName"cohovines.com"`-InstallDns:$true`-LogPath"C:WindowsNTDS"`-NoRebootOnCompletion:$false`-ReadOnlyReplica:$true`-SiteName"Tokyo"`-SysvolPath"C:WindowsSYSVOL"`-SafeModeAdministratorPassword`(ConvertTo-SecureString-AsPlainText-Force-String"password")`-Credential(Get-Credential)
Parameter | Description |
| An array of groups or users that are allowed to have their passwords cached on the RODC. |
| Whether this RODC should not be made a global catalog (watch out for the double negative here!). |
| Whether a DNS delegation should be created. |
| Whether the promotion
option should perform all replication or only critical
replication. If you set |
| Where to store the ntds.dit file. |
| The user or group to delegate administrative access of the RODC to. |
| An array of groups or users that are not allowed to have their passwords cached on the RODC. |
| The domain to promote the RODC into. |
| Whether the DNS server role should be installed locally. |
| Where to store the database transaction log files. |
| Whether to restart the
server when promotion is complete. If this is set to |
| The Active Directory site the domain controller should be promoted into. |
| Where to store the Sysvol share. |
| The password for DS Restore Mode. |
| The credentials to use to access the target domain. |
Prestaging RODC domain controller accounts
If you consider the compromised-by-default paradigm we discussed earlier in this section, you will probably conclude that using a domain admin account to promote an RODC is not the most secure choice. Fortunately, Active Directory has a solution for this, in the form of the Add-ADDSReadOnlyDomainControllerAccount PowerShell cmdlet. This cmdlet will do all of the work necessary as a domain admin ahead of time and allow you to delegate promotion of the RODC to any user or group in Active Directory. This feature has a twofold benefit of increasing security and allowing you to delegate promotion if you’re going to be dependent on junior resources to complete the installation of RODCs.
The following command precreates an RODC account for COHO-TOK-ADC01 in the Tokyo site of the cohovines.com domain. It also delegates promotion responsibilities to the COHOVINESCOHO-TOK-ADC01 Delegated Admins group.
Add-ADDSReadOnlyDomainControllerAccount`-AllowPasswordReplicationAccountName`@("COHOVINESAllowed RODC Password Replication Group")`-DomainControllerAccountNameCOHO-TOK-ADC01`-DomainNamecohovines.com`-DelegatedAdministratorAccountName"COHOVINESCOHO-TOK-ADC01 Delegated Admins"`-SiteNameTokyo`-DenyPasswordReplicationAccountName`@("BUILTINAdministrators","BUILTINServer Operators",`"BUILTINBackup Operators","BUILTINAccount Operators",`"COHOVINESDenied RODC Password Replication Group")
Once you precreate the RODC’s account, you can run the cmdlet Install-ADDSDomainController (or the Server Manager wizard) with the -UseExistingAccount switch as a member of the Delegated Admins group to complete the promotion of the RODC.
Note
If you’re trying to prestage an RODC account on a version of Windows prior to Windows Server 2012, you should use Active Directory Users and Computers instead. To prestage the account, right-click the Domain Controllers OU in ADUC and click “Precreate Read-only Domain Controller account.”
To use the prestaged account, run the following: dcpromo /UseExistingAccount:Attach.
9.4. Summary
In this chapter, we focused on how to deploy domain controllers, virtualization of domain controllers, and the read-only domain controller (RODC). Deploying domain controllers is a key step in building out an Active Directory installation and in the iterative lifecycle of the forest, as new versions of Windows become available and the organization upgrades Active Directory to the latest version.
Virtualization of domain controllers is a topic that has generated a great deal of concern and debate among Active Directory administrators for many years, and in Windows Server 2012, Microsoft addressed the technical challenges head-on. You can now safely roll back snapshots of DCs that are hosted on virtual machine generation ID-aware virtualization host platforms without concern for the impact on Active Directory. You can also clone virtual domain controllers to rapidly scale out your Active Directory infrastructure.
RODCs are a major feature in Active Directory, and they play a key part in the Active Directory deployments of many organizations. RODCs mitigate key security risks around Active Directory with regard to domain controllers that are in physically insecure locations, such as branch offices. Over the course of this chapter, we took a look at changes in behavior between RODCs and their writable counterparts.