
Chapter 10. Authentication and Security Protocols
Active Directory is a core security component on the network, and one of the key protocols involved is Kerberos, a secure and flexible authentication protocol that we’ll explore in detail in this chapter. Fortunately, Active Directory abstracts away most of the complexities of the protocol, so there are only a couple of configuration scenarios worth visiting. Those scenarios include service-specific configuration and Kerberos constrained delegation.
We’ll wrap up with a look at a couple of security features that Active Directory brings to the table including authentication mechanism assurance and managed service accounts.
10.1. Kerberos
One of the fundamental underpinnings of any network that runs on Active Directory is the Kerberos security protocol. Kerberos provides the authentication mechanism that powers user logon, application access, and communication between domain controllers (among other things). Implementing Kerberos on its own is a challenging task that Microsoft has almost completely abstracted with Active Directory. Out of the box, there’s virtually zero configuration required to start using Kerberos. In fact, if you never ran across an application that required special Kerberos-specific configuration, you would never even need to know that Kerberos was being used under the covers.
The key benefit of the Kerberos security protocol is the ability for a user to securely prove her identity and then achieve single sign-on to other services. In fact, with Kerberos, passwords never traverse the network in plain-text or encrypted formats. Instead, session-specific keys are generated for use over a short period of time through the use of various tickets. In this section, we’ll look at how the protocol works for key scenarios.
User Logon
The first scenario that’s likely to be of interest is how user logon occurs when a user sits down at her desk and presses Ctrl-Alt-Delete. We’ll look specifically at the Kerberos layer of the logon process.
The key to the single sign-on benefit of Kerberos is the first step in the logon process: obtaining a ticket granting ticket (TGT). When a user logs onto a workstation, Windows caches the TGT and uses it to obtain service tickets without needing to prompt the user for credentials again when she wants to access a service on the network.
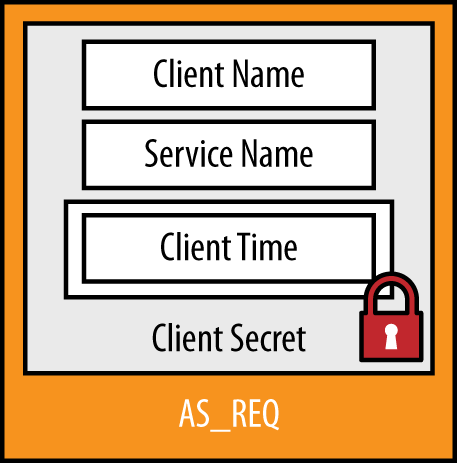
The first step in the authentication process is for the client to present a preauthentication request in an AS_REQ (authentication service request) packet. Figure 10-1 shows the contents of the AS_REQ message. The AS_REQ contains the necessary details to prove to the DC that the client is who it says it is. These details are:
- Client Name
This is the user’s username.
- Service Name
This is the service principal name (SPN) of the krbtgt service on the domain controller.
- Client Time
To prove the user’s identity, the current time on the client is encrypted with a hash of the user’s password. The domain controller attempts to decrypt this field using the password hash stored in the Active Directory database. The timestamp is then checked to ensure that it is within tolerance (+/– five minutes, by default) to prevent replay attacks.
Note
If the user is logging on with a smart card instead of a username and password, a slightly different encryption process is followed. In lieu of encrypting the time with a hash of the user’s password, the timestamp is encrypted with the user’s private key (stored on the smart card). The DC uses the user’s public key (stored in AD) to verify the validity of the signature on the request and thus authenticate the user.
Once the DC has validated the authentication request, it is ready to issue a TGT. The TGT is encapsulated in an AS_REP (authentication service response) packet, shown in Figure 10-2. The TGT contains the user’s access token as well as a copy of the session key that is used for communication between the client and the DC going forward.
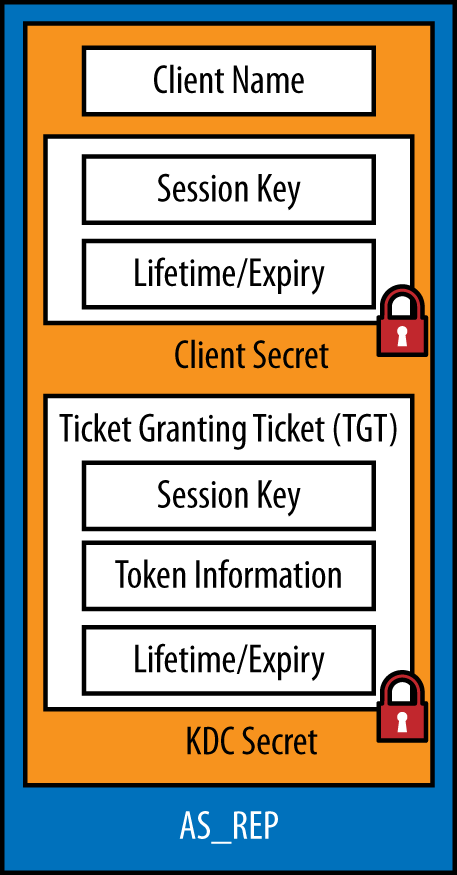
The fields in the AS_REP message are:
- Client Name
This is the user’s username.
- Session Key
This is a random cryptographic key that is used to secure future communications between DCs and the client. The session key is encrypted with a hash of the user’s password.
- Lifetime/Expiry
TGTs have a defined lifetime (10 hours by default). After 10 hours, the TGT must be renewed or a new authentication request must be made. This field is also encrypted with a hash of the user’s password.
- Ticket Granting Ticket
The TGT is the component that the client will cache in memory in order to request tickets to services. The entire TGT is encrypted with a hash of the KDC’s secret, (specifically, a hash of the krbtgt account’s password). This means that the TGT is opaque—clients can never see into the TGT.
Inside the TGT, a copy of the session key is stored so that the DC can decrypt future communications with the client, as well as a copy of the ticket expiry information. Most importantly, the user’s access token is stored in the TGT. The access token includes important information such as what groups a user is a member of, the user’s NT rights, and Dynamic Access Control (DAC) claims.
Once the client receives the AS_REP message, the client decrypts the session key and caches it in memory alongside the TGT. At this point, the user’s password is no longer necessary as all future Kerberos communications with the DC will be protected using the session key.
Service Access
Once a TGT is available, users can start accessing Kerberos-enabled services on the network transparently by simply requesting a service ticket for the service in question. The TGT obtained previously is the proof of authentication that the DC uses—thus eliminating the need for the user to provide her credentials again.
Kerberos-enabled (sometimes called Kerberized) services can be practically anything on the network. Typically these are things like file and print servers, websites, and databases, but the limit is only the ability of the application to accept authentication via Kerberos. Clients identify the service they want to access in the form of a service principal name (SPN).
Service principal names
Much like users are identified in the directory with a unique user principal name (UPN), services are identified with one or more unique service principal names. SPNs are the identifiers that clients use when they request a service ticket from a DC for a given service.
Fundamentally, an SPN is constructed in the form of a service
identifier followed by the hostname—e.g., service/host. The service component is a
predefined string that the client and server agree on—e.g., file
shares are accessed using the cifs
service name. The hostname can either be just the name of the server
or service, or the FQDN of the server or service. Often, both the
short and long names are registered. For example, a web server called
WEB01.cohovines.com would have the following SPNs
registered in Active Directorycifs service name:
http/WEB01http/WEB01.cohovines.com
SPNs can also have an optional port number if the server expects this. Microsoft SQL Server is an example of a product that adds the port to the SPN. A SQL server called DB01.cohovines.com would have the following SPNs registered in Active Directory:
MSSQLSvc/DB01:1433MSSQLSvc/DB01.cohovines.com:1433
The most important thing to take away from this discussion of SPN construction is that the service and hostname components of the SPN are essentially arbitrary. The SPN that the client application constructs in order to request a service ticket simply must match the SPN that the server has registered in Active Directory.
SPNs are stored in Active Directory in the servicePrincipalName multivalued attribute.
User, computer, and managed service accounts have the servicePrincipalName attribute. The SPN for
a service must be registered on the account under which the service is
running. If the application is running under a standard user or a
managed service account, the SPN(s) should be registered on that
object. If the application is running as Local
System or Network Service, the SPN(s)
should be registered on the computer object.
You can register SPNs using a tool such as ADSI Edit or the
Attribute Editor in AD Users and Computers by simply adding them to
the servicePrincipalName attribute
of the object in question. You can also use the
setspn.exe command-line tool.
The advantage of setspn.exe is that you can also perform a search for duplicates before registering the SPN. For example, to register the SQL Server SPNs discussed earlier on server DB01, where SQL Server is running under the svc.DB01SQL user account, you would run the following commands:
setspn -s MSSQLSvc/DB01:1433 svc.DB01SQL
setspn -s MSSQLSvc/DB01.cohovines.com:1433 svc.DB01SQL
You can also use the setspn.exe utility to unregister (remove) SPNs, search for existing SPN registrations, or check for duplicate SPNs across the forest. For a complete listing of parameters for setspn.exe, check out http://bit.ly/WRjA0A.
Note
For a discussion of how to find duplicate SPNs and what happens when you have duplicates, check out http://bit.ly/X4KlA9.
Service tickets
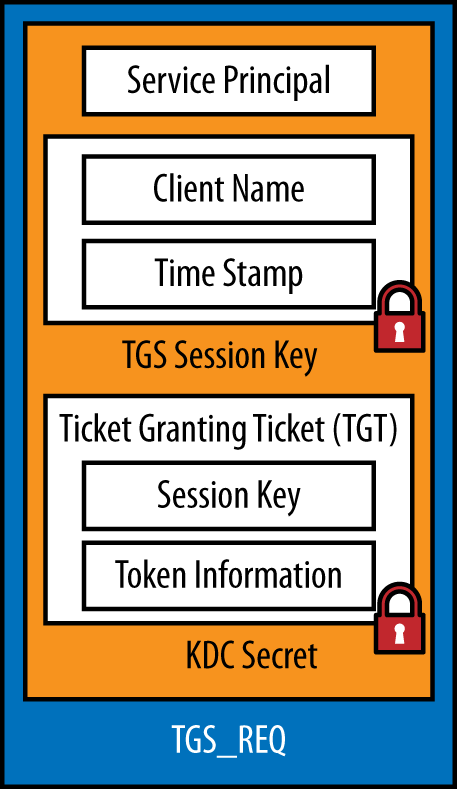
Fundamentally, when the user decides to access a service for the first time, a service ticket request is constructed in a TGS_REQ (ticket granting service request) packet. The TGS_REQ contains the fields shown in Figure 10-3. These fields are:
- Service Principal
This is the SPN that uniquely identifies the service to which the user is trying to connect.
- Client Name
This is the user’s username. This field is encrypted with the session key that was established during the authentication process.
- Timestamp
This field prevents replay attacks by ensuring that the request cannot be reused over a long period of time. By default, the request is only valid for +/– five minutes from the server’s clock. This field is also encrypted using the session key.
- Ticket Granting Ticket
A copy of the TGT is included in the request. The DC uses this to build an access token for the service as well as to ensure that the user is in fact authenticated (and that the TGT has not expired).
When the DC receives the TGS_REQ message,
it first attempts to match the Service Name field to a matching
servicePrincipalName value in
Active Directory. There are two steps to this process. First, a
standard search is conducted to see if an explicit match can be found.
If an explicit match isn’t found, Active Directory checks for an
implicit match.
Every account that has one or more SPNs with the HOST service name (e.g., HOST/SRV01.cohovines.com) receives several
dozen additional SPNs automatically via the implicit matching process.
The purpose of this process is to limit the amount of duplicate data.
If this implicit matching process did not exist, the 52 entries in
Table 10-1 would be duplicated on
every single computer account in AD!
Note
You can customize the list of implicitly mapped SPNs by
editing the sPNMappings attribute
of the CN=Directory Service,CN=Windows
NT,CN=Services object in the Configuration NC. You can add
additional mappings for the HOST
service name, or add implicit mappings for another service
name.
There are a few possible outcomes from the SPN lookup process:
A match is found and a service ticket can be issued.
Multiple matches are found (duplicate
servicePrincipalNameattribute values in the forest). In this case, an error is returned since Active Directory doesn’t know which match is actually intended.No match is found. An error is returned.
The default list of SPNs that are implicitly mapped to
HOST is provided in Table 10-1.
|
|
|
|
|
|
|
|
|
|
|
|
|
|
|
|
|
|
|
|
|
|
|
|
|
|
|
|
|
|
|
|
|
|
|
|
|
|
|
|
|
|
|
|
|
|
|
|
|
|
|
|
Assuming everything checks out with the Service Name field in the TGS_REQ, the DC will validate the TGT (e.g., say that it isn’t expired) and move forward with issuing the client a service ticket for the service in question. This ticket is issued in a TGS_REP (ticket granting service response) packet, shown in Figure 10-4.

The TGS_REP has the following fields:
- Service Principal
This is the SPN of the service for which the service ticket is valid. This field is encrypted with the session key that was established earlier during the authentication process.
- Timestamp
The timestamp of the message, used to prevent replay attacks. This field is also encrypted with the session key that was established earlier during the authentication process.
- Service Session Key
This is a second key that is cached by the client for encrypting communications with the specific service. This field is also encrypted with the session key that was established earlier during the authentication process.
- Service Ticket
The service ticket is what the client will present to the service to request access and cache in memory for subsequent access to the service. Much like the TGT, the service ticket is opaque to the client—it is encrypted with a hash of the service’s password.
The service ticket contains the name of the client, the service’s SPN, a copy of the service session key that the client will use to encrypt communications with the service, and a timestamp.
Inside the service ticket is a copy of the access token that was calculated when the user’s TGT was originally issued. The service can use this information (such as group membership) to authorize the user’s access to the service.
Like the TGT, the service ticket contains an expiry date after which time the ticket will need to be renewed in order to continue.
Application Access
Once a client has a service ticket for a service, the client presents the ticket to the service in order to request access. The service ticket is presented to the service in an AP_REQ message. Unlike the messages we’ve discussed thus far, AP_REQ messages are presented in a different manner for every application. For example, for web applications the message is encoded in the HTTP headers, while LDAP expects it in the bind request.
Applications can also optionally support mutual authentication (whereby the service proves its identity back to the client) through the use of AP_REP messages. This is optional and not implemented in most cases.
Logon and Service Access Summary
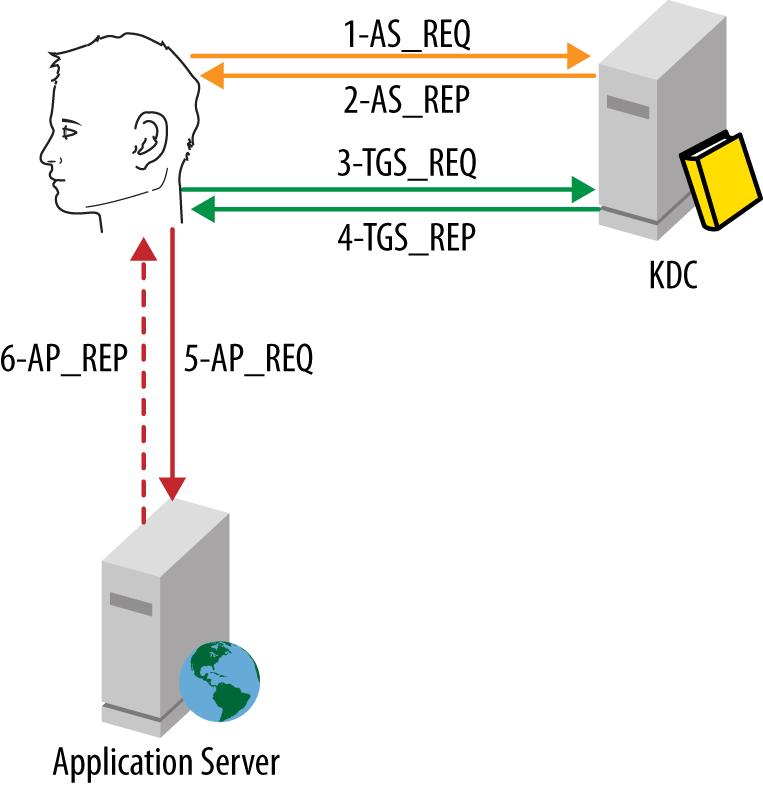
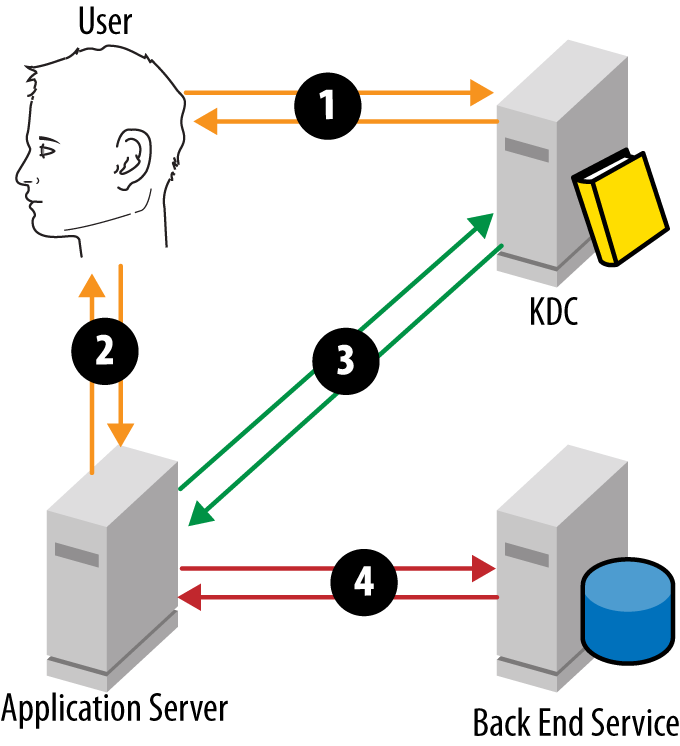
Figure 10-5 summarizes the process we’ve discussed so far. To review, the following steps happen when a user logs onto his workstation and attempts to access a service:
An AS_REQ message is sent to begin the authentication process. This message proves the user’s identity by encrypting a message with a hash of the user’s password. Using a hash ensures that the actual password is never transmitted over the network.
The domain controller validates the request and produces a ticket granting ticket. The TGT is sent back in an AS_REP message. The client caches the TGT in memory and uses it for subsequent requests for service tickets.
The client sends a TGS_REQ message to the DC to request a service ticket for a specific service. Rather than providing credentials again, the client sends the TGT that it cached in memory after step 2.
The DC validates the TGS_REQ and constructs a service ticket for the service. The service ticket, encrypted with a hash of the services’s secret, is sent back to the client in a TGS_REP message. The client caches this ticket in memory for subsequent use when authenticating directly to the service.
The client presents the service ticket to the service in an AP_REQ message. The service uses this to authenticate the user. The service might also use the user’s access token (contained in the ticket) to perform authorization before allowing access.
Optionally, the service can respond with an AP_REQ message for mutual authentication of the service. This is not especially common and entirely optional.
As you follow this process, you can see how Kerberos enables single sign-on as well as a higher degree of security. Since the TGT is cached in memory on the client, the user’s password is no longer necessary and can be discarded. Over the course of the TGT’s lifetime, the client can present the TGT as many times as necessary to a domain controller to request a service ticket for a specific service on the network. Those service tickets are then cached in memory on the client and presented to the services any time the client needs to authenticate to them.
Delegation and Protocol Transition
One of the features of Kerberos that is often used by applications—especially web applications with a database tier—is called Kerberos constrained delegation (KCD). As we’ll see in a minute, KCD enables an application to impersonate a user and make a request to another service as that user.
An extension of KCD is a feature called protocol transition, which is often used by single-sign-on gateways. In both cases, configuring these features can be a bit daunting.
Delegation
There are a couple of common models that applications use when they need to present (or modify) data from another system. The first model is known as the trusted subsystem, illustrated in Figure 10-6. With the trusted subsystem model, the user authenticates to the application (the web server, in this case), and then all of the authorization for the data is performed by the application. The application makes requests to the database using a shared service account.

The downside to the trusted subsystem model is that the application is responsible for implementing an authorization model. The alternative is to depend on the backend system (a SQL server in this case) to perform the authorization and simply return the data that the user is allowed to access, as shown in Figure 10-7. In order to achieve this, the web server must impersonate each user when it connects to the backend SQL server.

To perform this impersonation, the web server needs the ability to request a service ticket for the SQL server for each user. In order to receive a service ticket, the web server completes the following steps (Figure 10-8):
The user requests a service ticket to the frontend service.
The user presents the service ticket to the frontend server as part of the request.
The frontend server submits the user’s service ticket to the DC and requests a service ticket to the backend service for the user.
The frontend server submits the service ticket to the backend service and interacts with the service in the context of the user.
This process is known as delegation. Since a third-party service is being given the right to impersonate a user and access another service, this is a sensitive operation. Consequently, services can’t simply perform this operation without authorization.
Authorization is granted in Active Directory in the form of an allowance for a service to delegate to other specific services. This is known as constrained delegation. The easiest way to configure delegation is via the Delegation tab in the AD Users and Computers (ADUC) MMC snap-in.
Delegation is configured on the frontend service’s account as a permission to delegate to one or more SPNs. Remember, this is the service account (or managed service account) if the service is running as that account, and the computer account if the service is running as Local System or Network Service.
Consider a scenario where a web application running as
Network Service on the
COHO-CHI-WEB01 server needs to delegate to a SQL
server with an SPN of MSSQLSvc/DB01.cohovines.com:1433 running
under the svc.DB01Service user account. To
configure this, find the COHO-CHI-WEB01 computer
account in ADUC:
Select the Delegation tab shown in Figure 10-9.
Note
If you are configuring delegation on a user account, the Delegation tab is only visible if one or more SPNs are registered on that user or the user account is already configured to allow delegation to a service. You can add a temporary bogus SPN to the account, or you can add the SPNs that can be delegated directly to the
msDS-AllowedToDelegateToattribute.Select “Trust this computer for delegation to specified services.”
Warning
The “Trust this computer for delegation to any service (Kerberos only)” option shown in Figure 10-9 is called unconstrained delegation. This was the only option supported in Windows 2000 and is highly dangerous. If you enable this option, the frontend service can impersonate an authenticated user to any service on the network!
You should not use unconstrained delegation without thorough risk review.
Click Add and then click “Users or Computers”.
Find svc.DB01Service. Click OK.
Select the SPN you want to delegate to, as shown in Figure 10-10.
Click OK.


This is all that’s necessary to allow the
COHO-CHI-WEB01 server to delegate to the MSSQLSvc/DB01.cohovines.com:1433 SPN. If you
are running Windows Server 2012 and you meet the following
requirements, you can also configure delegation in a different way
using Windows PowerShell:
The frontend service is running on a Windows Server 2012 or Windows 8 machine.
The backend service is running on a Windows Server 2003 or better machine.
At least one Windows Server 2012 domain controller exists in the frontend service’s domain.
At least one Windows Server 2012 domain controller exists in the backend service’s domain.
While we discussed previously that you would configure the list of principals that the frontend service is allowed to delegate to, with the new model, the backend service is configured with a list of principals that are allowed to delegate to it. You can now also delegate permissions in Active Directory to configure constrained delegation.
To configure the scenario discussed earlier, you would run the following PowerShell command:
Set-ADUsersvc.DB01Service-PrincipalsAllowedToDelegateToAccountCOHO-CHI-WEB01$
This model also enables KCD across domain boundaries. Previously, KCD could only be performed when both the frontend and backend service identities were located in the same domain.
Protocol Transition
Protocol transition is a highly sensitive variant of KCD that enables delegation to be performed without presenting the user’s service ticket to the domain controller to prove that the user authenticated to the frontend service. This feature is commonly used by web-based single-sign-on applications that have a friendly forms-based authentication. Rather than presenting a service ticket to the application, users authenticate to the application directly, perhaps by entering their Active Directory credentials or another set of credentials that the application recognizes.
Next, the application makes a request to Active Directory for a service ticket in the user’s name for a specific service. Since this operation requires the frontend service to be trusted to request service tickets for users without proving that the user has authenticated, additional access must be granted. This access is granted by selecting the “Any Protocol” option in Figure 10-9 when KCD is configured.
10.2. Authentication Mechanism Assurance
Authentication mechanism assurance (AMA) is a feature that was introduced in Windows Server 2008 R2 to provide conditional access to resources based on the smart card certificate that a user uses to access the network. Typically, the feature is used when different types of certificates are issued to users based on the level of assurance that has been reached about the user’s identity. For example, one level of assurance might simply be tied to verifying a government-issued photo ID for the user when she is hired, while another level of assurance might involve two forms of ID and a background check.
When smart card certificates are issued, they include object identifiers (OIDs) that identify various properties of the certificate. One of these properties might be the level of assurance that correlates to the user to whom the certificate was issued.
With AMA, Active Directory can dynamically inject the SID of a group into a user’s access token at logon based on the presence of an OID in the user’s smart card certificate. This can be used to dynamically secure resources such that they can only be accessed when a user is accessing the network with a certificate with specific properties. You can then check for the presence of this group in access control lists, applications, and so forth.
Since this feature is not often implemented, we refer you to Microsoft’s Step-by-Step guide for implementing AMA if you want to use the feature. The guide is available at http://bit.ly/YDlBev.
10.3. Managed Service Accounts
Service accounts represent a gap in the security plan for many organizations. Normal user accounts typically have a well-defined password policy as well as a deprovisioning process associated with them. Service accounts, on the other hand, often have neither of these key security strategies applied to them. It is also not atypical for IT organizations to take shortcuts such as sharing service accounts between applications or using a common password across multiple service accounts.
All of these issues lead to a security gap in the area of service accounts. When IT personnel leave the organization, knowledge of service accounts and their passwords leaves with those employees. Since those passwords are often set to never expire and also rarely (if ever) change, and service accounts often have elevated access, there is an obvious security hole related to ex-employees’ continued potential ability to access these accounts. Service accounts also provide an attractive target for an attacker, given the accounts’ roles in the organization’s IT infrastructure.
Managed service accounts (MSAs) are a feature Microsoft first introduced in Windows Server 2008 R2 to help mitigate this risk. Windows Server 2012 introduces a much improved version of MSAs, called group managed service accounts (gMSAs). In both cases, the MSA is a special type of security principal that services, IIS application pools, and in some cases scheduled tasks can run as. Rather than having a conventional password, MSAs (and gMSAs) establish a secret with the directory and then rotate that password every 90 days (by default). This mitigates the risk involved with service accounts.
Unfortunately, the first iteration of MSAs in Windows Server 2008 R2 had a key limitation: the service could only run on a single server at a given time, since there was no mechanism to communicate passwords between servers. This limited the utility of MSAs, in clustering and load balancing scenarios in particular. Fortunately, the gMSAs introduced in Windows Server 2012 solve this problem.
Preparing for Group Managed Service Accounts
Before you can begin using gMSAs, you need to prepare Active Directory. You’ll need to have at least one Windows Server 2012 domain controller (DC) in the domain in which you want to create the gMSA. Windows Server 2012 DCs run the new Group Key Distribution Service (GKDS). The KDS is responsible for calculating gMSA passwords and providing those passwords to authorized clients.
Note
gMSAs can authenticate to any DC. Windows Server 2012 DCs are only required for password management operations.
Before you can begin using gMSAs in a domain, you must create a KDS root key for that domain. You can do this with the Add-KdsRootKey PowerShell cmdlet. By default, a KDS root key generated by simply running Add-KdsRootKey is not effective for a period of 10 days. This is designed to allow the key to propagate to all Windows Server 2012 DCs before it becomes effective.
If you want to make a key available immediately, run Add-KdsRootKey -EffectiveImmediately. You can also modify the effective date at creation time. If, for example, you know that your domain will converge within eight hours, you can create a key that is effective in eight hours by running the following commands:
$effectiveDate=(Get-Date).AddHours(8)Add-KdsRootKey-EffectiveDate$effectiveDate
Once you have generated a root key and it has become effective, you can start taking advantage of gMSAs.
Using Group Managed Service Accounts
In order to use a gMSA, you must be using a Windows 8 or Windows Server 2012 client. gMSAs are supported for conventional Windows services, IIS application pools, and scheduled tasks. Very few applications support natively specifying a gMSA during setup, so chances are you’ll need to install the application using a conventional service account and then change the application’s identity later using the Services MMC snap-in.
Warning
While this trick should work for most applications, some applications may take a dependency on the SID or username of the service account specified during setup. In this case, changing the service account using the Services snap-in would break the application.
As an example, we’ll configure an IIS application pool to use a new gMSA. The first step is to provision the gMSA. There is currently no GUI option available, so this task must be completed via Windows PowerShell. To create the gMSA, run the following command:
New-ADServiceAccount`-SamAccountNamesvc.cohowebsite`-Namesvc.cohowebsite`-DisplayName"Coho Vines Website"`-DNSHostName"www.cohovines.com"`-PrincipalsAllowedToRetrieveManagedPassword`@("COHO-CHI-WEB01$","COHO-CHI-WEB02$")
In this command, we specify the following parameters:
- SamAccountName
The username to assign to the service account. Windows automatically appends a dollar sign ($) to the end of the account.
Note
You may be wondering why Windows appends a $ to the SamAccountName value you specify. A piece of trivia that may help further your understanding of MSAs (and gMSAs) is that they are a derivative of the
computerobject class in the schema. This means that they inherit all of the attributes of thecomputerclass in addition to the attributes specific to the MSA object classes.- Name
This corresponds to the
nameattribute of the object in Active Directory. We generally use the same value as the SamAccountName for this field.- DisplayName
A friendly name to show in management tools.
- DNSHostName
A DNS FQDN corresponding to the service.
Note
If this parameter is not applicable to your scenario, you can enter a bogus value.
- PrincipalsAllowedToRetrievePassword
A list of objects in AD that can retrieve the password for the account. This is generally a group containing the computers the service is running on, or a list of computer objects. In the example, we have specified the computers the service will run on.
Note
If you use a group to control access to the gMSA, you will need to reboot the group members before they can start using the gMSA.
In addition to the parameters listed here, there are a number of
other useful parameters of the New-ADServiceAccount
cmdlet. You can review a complete listing at http://bit.ly/ZQjFll or by running
Get-Help New-ADServiceAccount
      -Detailed
.
Once you have created the MSA, you must install it on the
server(s) that will be using the MSA. This is a straightforward process
achieved with the Install-ADServiceAccount cmdlet.
The Install-ADServiceAccount cmdlet is part of the
Active Directory PowerShell module. If you have not already installed
this module on the server that you’ll be installing the MSA on, run
Install-WindowsFeature
      RSAT-AD-PowerShell
to do so.
To install the gMSA we created earlier, run Install-ADServiceAccount svc.cohowebsite.
Next, configure the IIS application pool. In order to signify that this
is an MSA, you need to append a dollar sign to the username and leave
the password fields blank, as shown in Figure 10-11.
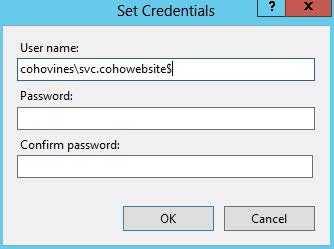
For services, you should take the same approach of specifying the username with a $ appended and leaving the password fields blank. Scheduled tasks are a bit more involved, since the Task Scheduler GUI doesn’t support MSAs. You’ll need to create the scheduled task using the command line instead. The following sample creates a task that runs a fictitious batch script called C:ScriptsScheduledBatch.bat every morning at 3 A.M. using the svc.BatchJob gMSA (each command should be on a single line):
$taskAction=New-ScheduledTaskAction-Execute"C:ScriptsScheduledBatch.bat"$taskSchedule=New-ScheduledTaskTrigger-Daily-At3AM$taskIdentity=New-ScheduledTaskPrincipal-UserIdCOHOVINESsvc.BatchJob$`-LogonTypePasswordRegister-ScheduledTask-TaskName"Scheduled Batch"-Action$taskAction`-Trigger$taskSchedule-Principal$taskIdentity
For more information about each of the cmdlets used in this example, refer to these links:
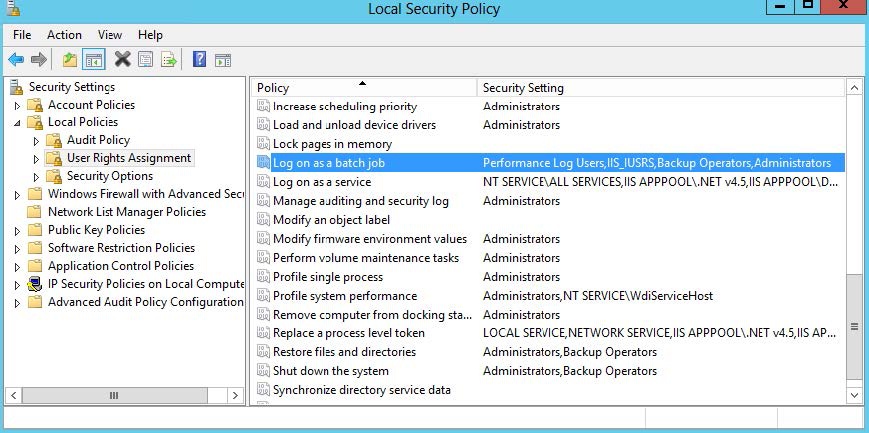
You will also need to grant your MSA the “Log on as a batch job”
Windows right before the scheduled task will start working. You can do
this either via Group Policy or the server’s local security policy. To
make this change on the local server, launch the Local Security Policy
Editor (Start→Run→secpol.msc
10.4. Summary
In this chapter, we explored a key feature of the overall Active Directory infrastructure—Kerberos. The Kerberos security protocol is used for authentication to the network and to services on the network. We also looked at a common Kerberos configuration requirement called Kerberos constrained delegation. Finally, we looked at Active Directory security features such as authentication mechanism assurance and managed service accounts.