
Chapter 11. Group Policy Primer
Group Policy is a large topic that deserves a book in itself (and there are several of those) to be properly covered. We will discuss Group Policy as it applies specifically to the design and administration of an Active Directory installation in this book, but not as it applies to the actual settings and operations on a workstation.
The goal of policy-based administration is for an administrator to define the environment for users and computers once by defining policies, and then to rely on the system to enforce those policies. This chapter is an introduction to Group Policy and how to manage it. Chapter 15 covers how to begin designing Group Policy and the OU structures in support of Group Policy.
The scope and functionality of Active Directory group policies encompass a number of key points:
They can be targeted to individual computers and users, sites, domains, and organizational units.
They can apply to users, computers, or groups of either.
They can set values and automatically unset them in specified situations.
They can run scripts at user logon and logoff and computer startup and shutdown.
They can do far more than just a desktop lockdown.
With Group Policy, administrators can control the behavior of workstations and servers as well as managing the end user experience across the organization. There are literally tens of thousands of settings that you can apply to control everything from screensaver timeouts to desktop backgrounds to workstation power management, and practically everything in between. We’ll take a look at the mechanics of applying these settings and how things work under the hood with regard to Group Policy in this chapter, but we won’t look at the actual settings you can apply.
11.1. Capabilities of Group Policy Objects
The Group Policy Management Console (GPMC) is the best tool for managing group policy objects (GPOs). In addition to the GPMC, the Group Policy Management Editor (GPME) MMC snap-in is used for editing the actual settings in GPOs. The GPMC provides a single interface to manage all aspects of GPOs, including editing (through the GPME), viewing the resultant set of policies (RSoP), and linking to domains, sites, and OUs. If you’re still using Windows XP or Windows Server 2003 to manage your group policies, you’ll need to download and install the GPMC on your machine. The GPMC installation is available from http://bit.ly/YFv199. Newer versions of Windows include the GPMC as an optional feature or in the Remote Server Administration Tools (RSAT) download. If you are using the GPMC on Windows 7 or Windows Server 2008 R2, the hotfix available at http://support.microsoft.com/kb/2466373 corrects an annoying problem that affects it in some cases.
There are four different policy areas that a GPO supports. These areas are registry settings, security settings, group policy preferences, and software installation. Most registry settings in a GPO have three states: enabled, disabled, and unconfigured. By default, all settings in a GPO are unconfigured. Any unconfigured settings are ignored during application, so the GPO comes into play only when settings have actually been configured. In some cases the setting needs no other parameters, while in other cases a host of information must be entered to configure the setting; it all depends on what the setting itself does.
Warning
Enabling and disabling most settings is fairly straightforward. However, due to Microsoft’s choices for the names of certain settings for GPOs, you actually can have the choice of enabling or disabling options with names such as “Disable Access to This Option.” By default, this setting isn’t in use, but you can disable the disable option (i.e., enable the option) or enable the disable option (i.e., disable the option). Be careful and make sure you know which way the setting is applied before you actually widely deploy the GPO.
GPOs can apply a very large number of changes to computers and users that are in Active Directory. These changes are grouped together within the GPME under the headings of Policies and Preferences. There are two sets of these headings, one under Computer Configuration and one under User Configuration. The items under the two headings differ, as the settings that apply to users and to computers are not the same.
Group Policy Storage
Group policies are stored as a number of components that collectively enable the Group Policy functionality both at the client side and for the administrator. This data is replicated using a number of methods, depending on the component and platform. Throughout this section, we’ll discuss the key components of group policies as well as the replication engines available and how to work with them.
ADM or ADMX files
Some of the settings under Administrative Templates might seem to make more sense if they were grouped in one of the other sections. However, the Administrative Templates section holds the settings that are entirely generated from the administrative template (ADM) files in the system volume (SYSVOL), so it makes more sense to include all the ADM data together. ADM files contain the entire set of options available for each setting, including explanations that are shown on the various property pages in the GPME.
Typically, a large portion of the disk space consumed by a domain’s SYSVOL is accounted for by the ADM files. ADM files don’t play a part in the application of group policies, but rather are there solely to populate the Group Policy Object editor and GPMC reports. The Group Policy toolset included with Windows Server 2008 and newer supports a new type of ADM file that has an ADMX extension. ADMX files serve the same purpose as ADM files; however, they are in a new XML format that cannot be interpreted by older versions of the Group Policy tools. Each ADMX file that Microsoft provides is accompanied by ADML files for each language Windows supports. Localized strings for different languages can be stored in separate ADML files, which are referred to by the accompanying ADMX file. So, English-speaking users can see Administrative Template policy descriptions in English, whereas a French-speaking user, looking at the same GPO, will see those descriptions in French.
Note
Microsoft has a free tool called the ADMX Migrator available for converting custom ADM files into the new ADMX format, as well as for graphically creating new ADMX files. You can get this tool at http://bit.ly/13tdQiR.
Windows Server 2008 and newer Group Policy tools also support the concept of a central store for ADMX files. The central store eliminates the duplicate storage of ADM files within each group policy and instead stores them once per domain. This can greatly reduce the amount of disk space the domain’s SYSVOL share requires and also decrease replication requirements. You will need to create the central store manually in order to utilize this feature. Fortunately, creating the central store is quite straightforward:
Create a folder called PolicyDefinitions in the SYSVOL policies subfolder. If, for example, your domain was called mycorp.com, you would create PolicyDefinitions under \mycorp.comsysvolmycorp.compolicies.
Copy the contents of the %SystemRoot%PolicyDefinitions folder into the PolicyDefinitions folder you created in step 1. You should obtain the contents of the PolicyDefinitions folder from a machine with the latest version of Windows and the latest accompanying service pack.
Note
You should only use Group Policy tools from the corresponding version of Windows and Windows Server. If, for example, you are using the Windows Server 2012 Group Policy tools, do not attempt to edit policies using the Windows Server 2008 Group Policy tools. There are incompatibilities in ADMX file formats between the versions.
Restart any open Group Policy tools. The Group Policy Editor and the GPMC will automatically begin utilizing the central store.
Keep in mind that Windows Vista SP1 and Windows Server 2003 or earlier Group Policy toolsets cannot leverage ADMX files or the central store, so in order to use the central store you must migrate to editing group policies with the newer tools. To take advantage of the central store, you only need to upgrade your Group Policy management tools. It does not matter what version of Windows your domain controllers are running, but if they are running Windows Server 2003, you should no longer use the Group Policy tools that are included with Windows XP and Windows Server 2003.
Note
Once you have set up the central store, ADM files will not be cleaned up automatically. You will need to do this by hand. The blog post at http://bit.ly/XDRTWl has a sample script to help you clean up old ADM files.
How GPOs are stored in Active Directory
GPOs themselves are stored in two places: group policy configuration (GPC) data is stored in Active Directory, and certain key group policy template (GPT) data is stored as files and directories in the system volume. They are split because while there is definitely a need to store GPOs in Active Directory if the system is to associate them with locations in the tree, you do not want to store all the registry changes, logon scripts, and so on in Active Directory itself. Doing so could greatly increase the size of your DIT file.
To that end, each GPO consists of the object holding GPC data, which itself is linked to a companion directory in the system volume that may or may not have GPTs stored within it. The GPT data is essentially a folder structure that stores administrative template–based policies, security settings, applications available for software installation, and script files. GPT data is stored in the DC’s system volume (SYSVOL), in the policies subfolder.
Note
Third-party developers can extend GPOs by incorporating options that do not reside in the normal GPT location.
The GPO objects themselves are held as instances of the groupPolicyContainer class within a single
container in Active Directory at this location: CN=Policies,CN=System,dc=mycorp,dc=com.
Through a process known as linking, the GPOs are associated with the locations in the tree that are to apply the group policy. In other words, one object can be linked to multiple locations in the tree, which explains how one GPO can be applied to as many organizational units, sites, or domains as required.
Let’s consider the groupPolicyContainer class objects
themselves. Take a look at Figure 11-1; we are using ADSI Edit to
show the view of the Policies container and its children. Here you can
see a number of groupPolicyContainer objects shown with a
GUID as the cn field. The displayName attribute of these objects holds
the name that administrators of Active Directory would see when using
one of the normal tools to view these objects. Each GPO also has a
gPCFileSysPath attribute that holds
the full path to the corresponding directory in the system
volume.
If you were to look under the Policies container on a default installation, you would find only two children. These children would correspond to the Default Domain Policy and the Default Domain Controllers Policy, the only GPOs created automatically by the system on installation. These GPOs have fixed names across all domains:
{31B2F340-016D-11D2-945F-00C04FB984F9} is always the Default Domain Policy.
{6AC1786C-016F-11D2-945F-00C04fB984F9} is always the Default Domain Controllers Policy.

Group Policy replication
Historically, the SYSVOL container has replicated using the NT File Replication Service (NTFRS), which can perform multimaster replication of a file share. However, NTFRS has never been known for flexibility, or even, in some cases, reliability. Consequently, Windows Server 2008 introduced the ability to replicate the Sysvol folder hierarchy with a new file and folder replication technology called Distributed Files System Replication (DFS-R). DFS-R has substantially enhanced functionality and is much more reliable. It is in your best interest to migrate SYSVOL replication to this service when it becomes possible. For an extensive FAQ on DFS-R, visit http://bit.ly/11H9Czp.
Domains that are built starting with the Windows Server 2008 domain functional level automatically use DFS-R to replicate the Sysvol container, but domains that are upgraded or built at a lower functional level will continue to use NTFRS. In order to migrate to DFS-R replication of Sysvol, the domain in question must be at the Windows Server 2008 or newer domain functional level. To move to DFS-R, you will use the dfsrmig utility.
The Microsoft Storage Team Blog has an extensive series on the process of migrating Sysvol to DFS-R replication, so rather than try to replicate the detail of this content, we will outline the process and point you directly to the source: http://bit.ly/13tg2qL. Each of the subsequent blog posts in the series is linked at the bottom of the page. At a high level, there are four stages of the migration process:
Migration start
Sysvol prepared state
Sysvol redirected state
Eliminated state
In the prepared state, new DFS-R objects get created in Active Directory, and each domain controller creates a new Sysvol_DFSR folder into which it copies the contents of its SYSVOL folder. The DFS-R service then begins initializing itself. Once all of your domain controllers have reached the prepared state, you can continue to step 3.
When you move to the redirected state, each domain controller updates its Sysvol_DFSR folder with any changes made to the active Sysvol share since it entered the prepared state. The domain controller then modifies the Sysvol share so that the Sysvol_DFSR folder is shared out as Sysvol. Once all your domain controllers have reached the redirected state, you can continue to step 4.
When you move to the eliminated state, the NTFRS settings for replicating Sysvol are removed, and the old Sysvol folder is removed from the filesystem. At this point, your migration to DFS-R replication of Sysvol is complete.
Note
At any time prior to step 4, you can roll back one step or all the way back to step 1. Once you reach the eliminated state, however, you cannot roll back to NTFRS.
11.2. How Group Policies Work
The remainder of this chapter takes an in-depth look at group policy objects, focusing on two areas:
How GPOs work in Active Directory
How to manage GPOs
Group policies are very simple to understand, but their usage can be quite complex. Each GPO can consist of two parts: one that applies to a computer (such as a startup script or a change to the system portion of the registry) and one that applies to a user (such as a logoff script or a change to the user portion of the registry). You can use GPOs that contain only computer policies, only user policies, or a mixture of the two.
GPOs and Active Directory
Any GPO is initially created as a standalone object in Active Directory. Each object can then be linked one or more times to three different types of locations: sites, domains, and organizational units. GPOs for domains and organizational units are held in the domain relating to their application, but creating a GPO for a site stores that GPO in the forest root domain by default; administrators can change this if they wish.
Warning
You cannot link group policies to containers. Users and computers that are stored in a container will apply policies linked to the domain or their site, however.
In the normal state of affairs, an administrator would customarily browse to a site, domain, or organizational unit in the GPMC, and then create a GPO and link it to that object. At this point, it appears that you have created a GPO at that location in the tree rather than what really happened, which was that the system created the GPO as a standalone object in the Policies container and then immediately linked it to that container.
To apply a GPO to a set of users or computers, you simply create a GPO and link it to a site, domain, or organizational unit. Then, by default, the user portion of the GPO will apply to all users in the tree, and the computer portion of the GPO will apply to all computers in the tree.
Thus, if we were to create a policy and link it to a domain, all computers and users of that domain would process the policy. If we were to create a policy and link it to an OU, all users and computers in that OU, and all users and computers within OUs beneath that OU (and so on down the tree), would process the policy.
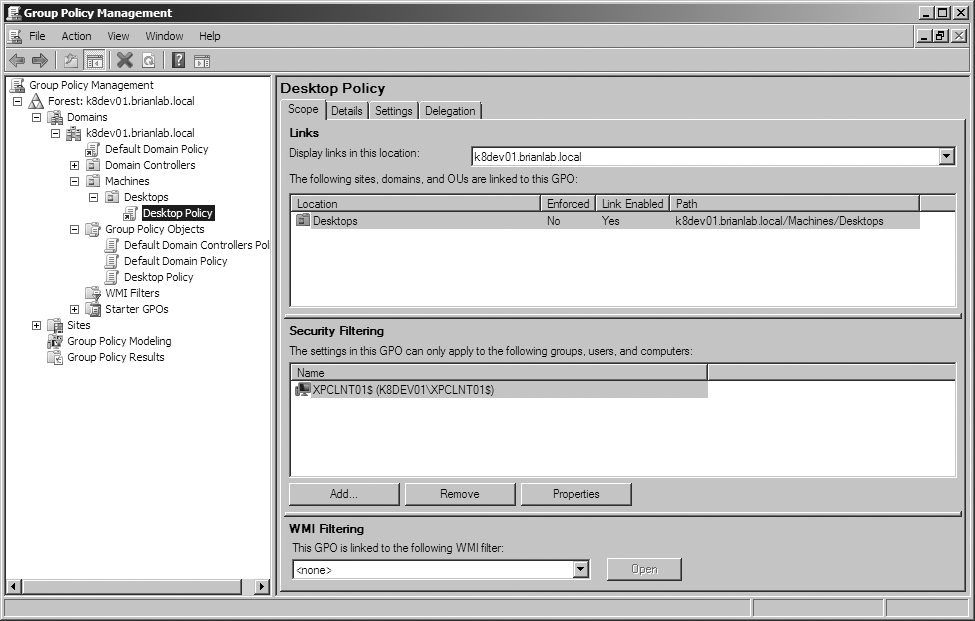
To identify the links on a GPO, you simply look at the Scope tab of the GPO’s properties in the Group Policy Management Console. Figure 11-2 shows the results of a scan for the locations in the domain where the Desktop Policy GPO has been linked. In this case, the Desktop Policy has been linked only to the Desktops OU.

We want to make three major points here:
GPOs can be linked only to sites, domains, and organizational units.
A single GPO can be linked to multiple locations in the tree.
GPOs by default affect all of the users and computers in the linked scope.
This generates further questions. If multiple policies apply to different locations in a tree, can multiple GPOs apply to the same location, and if so, what takes precedence? Why would you want to apply one GPO to different parts of the tree? In addition, how can we stop the GPO from applying to the entire set of users and computers in the tree? Let’s consider each of these questions to understand policies better.
Prioritizing the Application of Multiple Policies
Let’s say that we create and link a GPO for all users in a site to run a logon script that loads an Intranet home page local to that site. Let’s also say that we create and link a domain GPO to set the My Documents folder location for each user in the domain. Finally, we have two user logon scripts that we need to run in a specific order for specific organizational units in that domain. GPOs are applied in a specific order, commonly called LSDOU. Local policies are applied first, and then site policies, then domain policies, and then finally OU policies are applied in the order of the OU hierarchy. This order of application is illustrated in Figure 11-3.

If multiple GPOs are linked to a single site, domain, or organizational unit, the administrator can prioritize the order in which the GPOs from that level are processed. To account for this, the GPOs for the site that the user resides in are applied first, in prioritized order from lowest to highest. No other sites have any influence over this. Then the GPOs for the domain that the user resides in are applied in prioritized order. GPOs applied to parent domains in the domain tree have no influence on objects in domains lower down the tree. Domain trees do not impact GPO application at all.
The OU structure, however, has a significant bearing on what happens with GPOs. GPO links are inherited down an OU tree. So, while a child organizational unit can have its own GPOs linked to it, it also will inherit all of its parent’s GPO links. These organizational unit GPOs are applied in order according to the OU hierarchy once the site and domain GPOs have been processed.
Note
There are exceptions. You can block inheritance, force an override, and even define ACLs on objects. We’ll cover all these topics later in this section.
For example, Paul Burke’s user account has the following distinguished name (see Figure 11-4):
cn=PaulBurke,ou=Databases,ou=Gurus,ou=Financial Sector,dc=mycorp,dc=com
When Paul logs onto his machine, the site GPOs are applied first, and then the mycorp.com domain GPOs. Next come the GPOs on the Financial Sector organizational unit, then the GPOs on the Gurus organizational unit, and finally the GPOs on the Databases organizational unit. From this, it’s fairly easy to see how organizational unit hierarchy design has a significant effect on GPO precedence.

Remember that GPOs have a computer part as well as a user part. When a computer starts up, any site GPOs that have computer settings are applied in prioritized order. These are followed by any domain GPOs with computer settings, and so on down the organizational unit hierarchy until any GPOs on the organizational unit that the computer resides in are applied. During boot up, the user portions of these GPOs are ignored. Later, when a user logs on, the same process applies, this time with the user settings. The computer settings are ignored during user logon.[2]
Warning
There are several policies that can only be set on a GPO linked at the domain. These policies are the ones that affect account settings for the domain users, such as the Kerberos, lockout, password aging, and password complexity policies. No matter how hard you try, only the settings at this level will enable you to have different password and lockout policies at an OU level. Any use of the lockout and password policy settings at the OU level will only affect local user accounts on the machines to which the policies apply.
To apply different password or lockout policies to different sets of users, refer to Chapter 12, where we discuss fine grained password policies.
Standard GPO Inheritance Rules in Organizational Units
Any unconfigured settings anywhere in a GPO are ignored, and only configured settings are inherited. There are three possible scenarios:
A higher-level GPO has a value for a setting, and a lower-level GPO does not.
A GPO linked to a parent OU has a value for a setting, and a GPO linked to a child OU has a non-conflicting value for the same setting.
A GPO linked to a parent OU has a value for a setting, and a GPO linked to a child OU has a conflicting value for the same setting.
If a GPO has settings configured for a parent organizational unit and the same policy settings are unconfigured for a child organizational unit, the child inherits the parent’s GPO settings. That makes sense.
If a GPO has settings configured for a parent organizational unit that do not conflict with the settings in a GPO configured for a child organizational unit, the child organizational unit inherits the parent GPO settings and applies its own GPOs as well. A good example of this is two logon scripts; these scripts don’t conflict, so both are run.
If a GPO has settings configured for a parent organizational unit that conflict with the same settings in another GPO configured for a child organizational unit, the child organizational unit does not inherit those specific GPO settings from the parent organizational unit. The settings in the GPO child policy take priority.
Note
While we only refer to parent organizational units in this section, the parent can be a site, domain, or local policy as well.
Blocking Inheritance and Overriding the Block in Organizational Unit GPOs
It is possible to force the settings of a GPO linked to an OU in the tree to be applied as the final settings for a child.
Blocking inheritance is a fairly simple concept. If you block inheritance to a specific organizational unit, GPOs linked to parent organizational units up the tree are not applied to objects in this specific organizational unit or its children.
Warning
Local policies are processed even when Block Inheritance is checked.
Refer back to Figure 11-4. If we decide to block inheritance at the Databases organizational unit, user PaulBurke will receive only GPOs directly defined on the Databases organizational unit. If we decide to block inheritance at the Gurus organizational unit, PaulBurke will receive only GPOs on the Databases organizational unit and those inherited from the Gurus organizational unit. The organizational unit that you block inheritance at stops any higher-level GPOs from applying to the branch starting at the blocked organizational unit. In fact, we can block inheritance on any of the organizational units within the mycorp.com domain. For example, blocking inheritance on the Financial Sector organizational unit makes sense if we want to block domain and site-level GPOs from applying.
This can cause problems if not carefully managed. For example, let’s say that you have delegated control over an organizational unit branch to a group of administrators and allowed them access to manipulate GPOs on that branch. You may be applying GPOs to organizational units farther up the hierarchy that you wish this delegated branch to receive. However, your branch administrators have the ability to block inheritance of these parent organizational unit policies of yours. The branch administrators also have the ability to configure a setting that conflicts with one you set in a parent GPO; the branch administrator’s child setting will take precedence in conflicts.
You can block inheritance by right-clicking a domain or organizational unit in the GPMC and selecting Block Inheritance, as shown in Figure 11-5.

To prevent this, you can check the Enforced option on an individual GPO link. This allows administrators to force GPOs to be inherited by all children of an organizational unit. However, it has one further effect: it prevents GPO settings in child organizational units from overriding conflicting settings in a parent OU. The Enforced option is available by right-clicking on a group policy link in the GPMC and selecting Enforced, as shown in Figure 11-6.

Note
The Enforced setting is configured on a per-group policy link basis. You cannot set a given group policy object to be globally enforced through the domain.
Let’s say that we change a registry setting using a GPO on the Financial Sector organizational unit. Unfortunately, another administrator then sets the same registry setting (among many others) to a conflicting value on the Gurus organizational unit and also blocks inheritance at the Databases organizational unit. By default, the registry setting will be correctly applied only to the Financial Sector organizational unit, as the Gurus organizational unit receives the different setting (child overrides parent on conflicts due to inheritance rules), and the Databases organizational unit doesn’t inherit either policy. To fix both problems, we could set the original Financial Sector organizational unit GPO link to Enforced. This would prevent the specific setting on the GPO on the Gurus organizational unit from modifying it without affecting any of the other GPO settings. Our GPO would also be forced down past the Block Inheritance set up at the Databases organizational unit.
Note
If you perceive a trust issue in who can modify a given policy, it is suggested that you consider setting up an ACL on that policy to restrict the abilities of others to edit that GPO, leaving just a core group of administrators with the relevant permissions. This will ensure that the GPO is not changed without the knowledge of the core group. Of course, the fundamental issue is allowing anyone to have access to make any changes that you do not implicitly trust. Trying to secure bits and pieces from administrators you don’t trust is a losing battle. If you do not trust someone to be an administrator, he should not be one.
While it’s important to be aware of the Block Inheritance and Enforced settings, we generally don’t recommend that you make use of them in your Group Policy deployment unless you absolutely have to. Both of these settings modify the default expected behavior, and as a result they make troubleshooting more complicated. If you do take advantage of either setting, be sure to document your reasons so that administrators aren’t left guessing in the future.
Summary
If Block Inheritance has been checked for a child-level OU and Enforced has not been checked for any parent GPOs, the child GPO will not inherit any policies from any parent GPOs farther up the hierarchy.
If Enforced has been checked for a parent-level GPO, the child-level OU will inherit all of the enforced GPO’s configured policies, even if those policies conflict with the child’s policies and even if Block Inheritance has been set for the child.
When Policies Apply
We’ve already said that the computer portion of a GPO applies
during boot up and the user portion of a GPO applies during logon.
However, that isn’t the only time that a policy can apply. The policies
also can be set to refresh periodically after a certain time interval.
How often this occurs and what conditions are attached to this refresh
operation are specified under the SystemGroup
Policy key under the Administrative Templates section of the
Computer section of a GPO.
Set the refresh value to 0 to have the policy continually apply every seven seconds. This could be very useful for a test environment, but obviously not for a production environment.
Note
If you need to trigger a group policy refresh outside of the normal schedule, you can use the gpupdate tool included with Windows. If any policies were modified that can only be applied at computer startup or user logon, gpupdate will ask if you want to reboot or log off. Windows also includes a tool called gpresult to display details on what policies are applied.
Windows 8 clients include the Invoke-GPUpdate PowerShell cmdlet, which has the same functionality as gpupdate.
Refreshing is very useful for users who do not shut down their computers or log off from the system for days. In that case, GPOs apply in the normal way, but at very irregular intervals over long periods at a time. Setting up policy refresh means that you can apply those settings to such users at whatever interval you decide.
Group Policy Refresh Frequency
By default, Windows workstations and member servers refresh their policies every 90 minutes, and domain controllers refresh their policies every 5 minutes. In order to avoid having all machines retrieving their policies at once from the domain controllers, there is a random offset interval added to the refresh period on every machine. This offset interval, by default, is a random value up to 30 minutes on workstations and member servers, and 0 minutes on domain controllers. Both the refresh interval and the offset interval are configurable. To modify these settings, you can modify the registry of a computer or you can edit a group policy object that applies to the computer. The GPO settings are in the Group Policy section of the System portion of the Administrative Templates section.
The registry entries for computer policies are under the
HKLMSoftwarePoliciesMicrosoftWindowsSystem
key. The specific values are listed in Table 11-1.
Registry value name | Description |
| Description: refresh interval for domain members Data
type: Valid range: 0 – 64,800 minutes |
| Description: offset interval for domain members Data
type: Valid range: 0 – 1,440 minutes |
| Description: refresh interval for domain controllers Data
type: Valid range: 0 – 64,800 minutes |
| Description: offset interval for domain controllers Data
type: Valid range: 0 – 1,440 minutes |
The registry entries for user policies are under the HKCUSoftwarePoliciesMicrosoftWindowsSystem
key. The specific values are listed in Table 11-2.
Registry value name | Description |
| Description: refresh interval for users Data
type: Valid range: 0 – 64,800 minutes |
| Description: offset interval for users Data
type: Valid range: 0 – 1,440 minutes. |
Warning
While we provide the registry values here that Group Policy will use, we do not recommend that you edit these registry values manually. Always use a group policy object to configure these settings instead.
Combating Slowdown Due to Group Policy
Introducing Group Policy into your environment will affect computer startup and user logon times to a degree. Exactly what degree varies from environment to environment, and you will need to test in yours to come up with a representative figure. We do not recommend foregoing Group Policy in an effort to speed up your startup and logon times, but we do recommend being frugal when planning the number of policies that will apply to a given user or computer. There are some things you can take into consideration with regard to speed when planning your Group Policy deployment.
Limiting the number of GPOs that apply
Microsoft has its own take on designing your Active Directory infrastructure for GPOs. The recommendation is that you should not have organizational unit structures more than 10 deep, so that applying policies doesnot take too much time during logon. Note that the issue isn’t the number of OUs; it is the number of policies linked to the OUs. So, if you have 5 policies linked, you’ll see the same performance hit if these are linked over 3 OU levels or 10 OU levels.
Limiting cross-domain linking
It is possible for an administrator of one domain to create a GPO and for it to be applied to a site, domain, or organizational unit in another domain. For example, if the administrator of child.mycorp.com is given access to centralized setup GPOs within mycorp.com, she can link the mycorp.com GPOs to domains or organizational units in the child.mycorp.com domain.
While this is a feasible setup, it is generally not recommended. In order for clients in the child.mycorp.com domain to apply policies from mycorp.com, they must contact a domain controller in mycorp.com so they can access the Sysvol share in mycorp.com. This will slow down logon and startup times, especially if the connectivity is slow. In lieu of linking policies between domains, we generally recommend that the policies be physically duplicated in each domain. Duplicating policies by way of import/export is discussed later in this chapter.
For more information about GPOs and WAN links, see the upcoming sidebar How GPOs Work Across Slow Links.
Limiting use of site policies
Applying site policies has the same limitations as cross-domain linking if you are running in a multidomain environment. By default, site-based policies are stored on the domain controllers in the root domain of the forest. For clients to apply these policies, they must contact a domain controller in the root domain to retrieve the policy.
We generally recommend that organizations pursue alternatives to site-based policies. Site-based policies are often confusing for administrators to manage and troubleshoot, as the administrator must remember to check the site, in addition to the domain and organizational units, for policies. Furthermore, site-based policies often require traversing one or more WAN links in order to retrieve the policies.
Use simple queries in WMI filters
If you have a Windows Management Instrumentation (WMI) filter applied to a GPO, a WMI query will be run before the GPO is applied to a user or computer. If the WMI query is very complex, it could significantly impact the time it takes to process the GPO. If you have multiple GPOs that contain a WMI filter, you need to pay special attention to the impact those queries will have. If you are using WMI filters, check out the free WMI Filter Validation Utility. This utility will allow you to test WMI filters as well as see how long they take to apply.
Security Filtering and Group Policy Objects
As each GPO is an object in Active Directory and all objects have access control lists (ACLs) associated with them, it follows that it must be possible to allow and deny access to a GPO using that ACL. With ACLs, it is possible to allow and deny access to apply GPOs based on security group membership. It is also possible to go to an even finer-grained level of detail and set access controls for an individual computer or user. Figure 11-7 shows that only one computer, XPCLNT01, can apply the policy pictured.
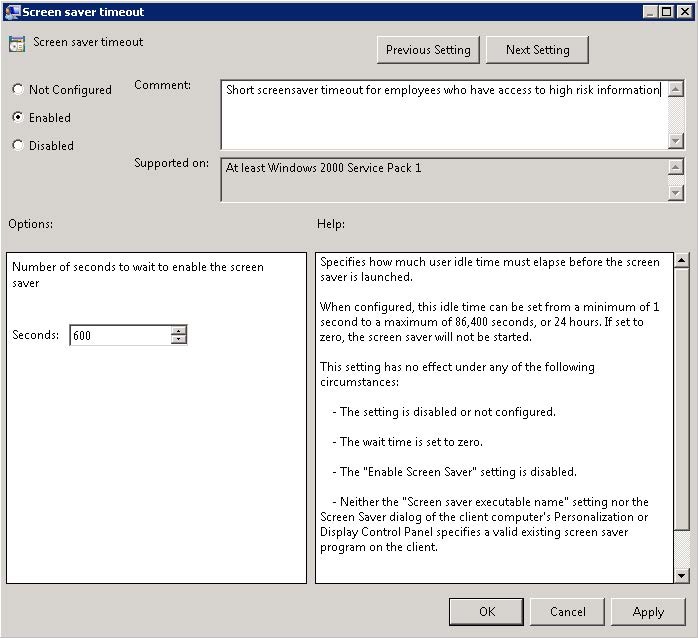
This is a significant feature of GPOs, and one that you can use heavily to your advantage. Let’s take a simple example, in which we need to ensure that users in the Finance Department receive a more restrictive screensaver timeout. The users in the Finance Department are in the People OU, along with all of the other company employees. In order to ensure that the screensaver timeout policy only applies to users in the Finance Department, we take the following steps:
Create a Screensaver Timeout GPO.
Configure the “Screensaver Timeout” setting (User ConfigurationPoliciesAdministrative TemplatesControl PanelPersonalization).
Remove Authenticated Users from the GPO’s security filter and add the Finance Users group.
Link the GPO to the People OU.
Once this is complete, only users who are members of the Finance Users group will be able to apply the Screensaver Timeout GPO. All other users in the People OU will ignore the policy.
Loopback Merge Mode and Loopback Replace Mode
Up until now, we’ve only been able to apply the User Configuration section of a GPO when users were located somewhere under where the GPO was linked. From time to time, scenarios arise where you will want to apply User Configuration policies based on what machine the user is logging into rather than where the user is located in the domain’s OU structure. The solution to this is a Group Policy feature known as loopback mode.
There are two scenarios where loopback mode is very commonly used. The first is in the case of kiosk machines. If your company has computers available for employee use in common areas, such as building lobbies, you may only want to allow users to access Internet Explorer from the kiosk machine and prevent access to other programs. Another scenario is the case of remote desktop servers (RDSs) and Citrix deployments. In these cases, you will generally want users of the RDS server to receive a controlled desktop environment when they connect, but you will not want to apply that level of control to the users’ desktop computers.
Loopback mode is a computer policy that you must enable. You can find the settings under Computer Configuration→Policies→System→Group Policy→User Group Policy loopback processing mode. If you open that setting, you get the dialog box shown in Figure 11-8, which allows you to switch between the two modes of loopback operation: merge mode and replace mode.
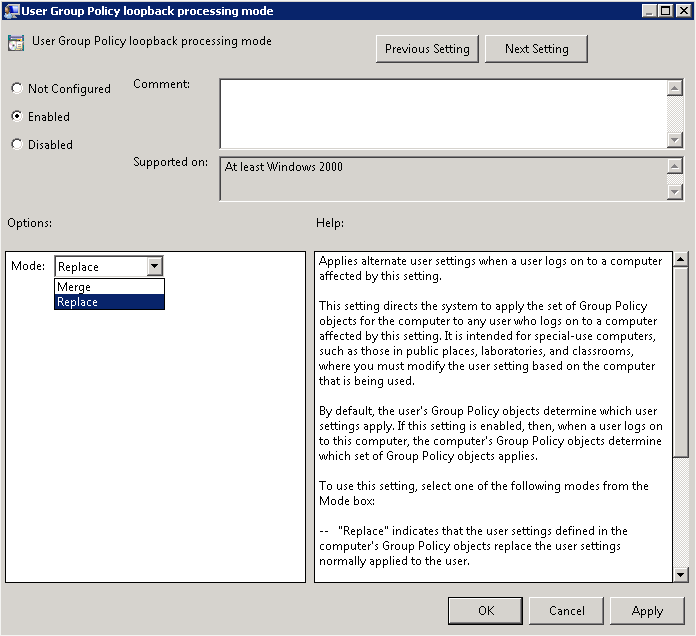
At this point, you are probably wondering what the difference is between the merge and replace modes. In merge mode, when a user logs onto a machine, his user policies are first applied in the normal manner, as shown in Figure 11-3. Once the user policies have been applied, the User Configuration sections of any GPOs that apply to the computer are then applied. Any settings that conflict (that is, they are defined in both the normal user policies and the policies applying to the computer) are overridden by the settings in the policies applying to the computer. In replace mode, by contrast, the GPOs that would normally apply to the user are ignored during logon. Instead, the User Configuration sections of any GPOs that apply to the computer are applied.
When you are planning to take advantage of loopback mode, it is critical to remember that loopback mode is a global setting for a computer, not a per-GPO setting. This means that if loopback mode is enabled in any GPO that applies to a computer, loopback processing will be enabled for all users that log onto that computer, and further, the User Configuration settings in all of the GPOs that apply to that computer will be applied.
Warning
The idea that loopback mode is enabled on a per-GPO basis is a common misconception amongst Active Directory administrators. Make sure you are aware of this behavior before enabling loopback mode!
Summarizing Group Policy Application
Consider the organization in Figure 11-9. The organization uses a domain called mycorp.com that spans two sites, Main-Site and Second-Site. Marketing computers exist in Main-Site, and finance computers in Second-Site. Policy A applies to Main-Site only, policy B applies to the entire domain, and policies C, D, E, and F apply to the organizational units as indicated. Policy G applies to Second-Site.
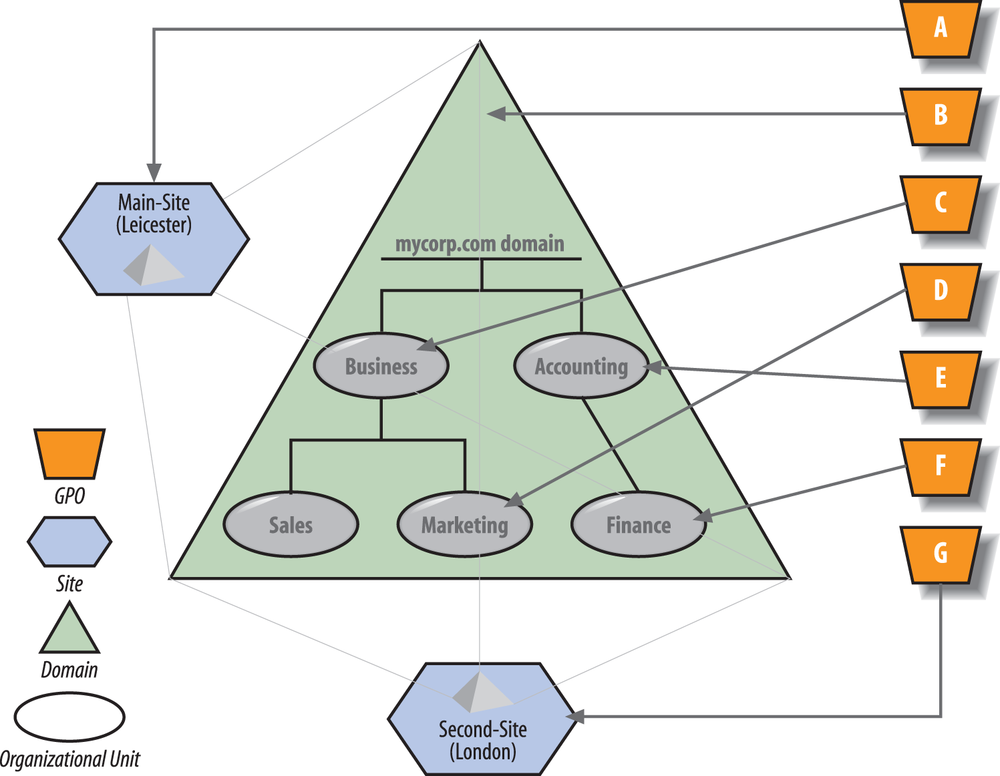
Table 11-3 summarizes the application of policies with and without loopback mode processing. When loopback is not turned on, the only real difference comes from the site policies (A or G) that are applied. When you turn merge mode on for all the GPOs, it becomes more obvious what will happen. In each case, the policies relating to the user are applied first, in order, followed by the entire set of policy items that would apply to a user residing in the computer location. Take the example of a finance user logging on at a marketing computer in the main site:
The user portion of the site policy that the user is logging on from (A) is applied.
The user portion of the domain policy (B) is applied.
The user portion of the Accounting organizational unit policy (E) is applied.
The user portion of the Finance organizational unit policy (F) is applied.
The user portion of the site policy (A) is applied again.
The user portion of the domain policy (B) is applied again.
The user portion of the Business organizational unit policy (C) is applied.
Finally, the user portion of the Marketing organizational unit policy (D) is applied.
Loopback mode in use | OU in which user resides | Where computer resides | Resultant set of policies |
No | Marketing |
| ABCD |
No | Finance |
| GBEF |
No | Marketing |
| GBCD |
No | Finance |
| ABEF |
Merge | Marketing |
| ABCDABCD |
Merge | Finance |
| GBEFGBEF |
Merge | Marketing |
| GBCDGBEF |
Merge | Finance |
| ABEFABCD |
Replace | Marketing |
| ABCD |
Replace | Finance |
| GBEF |
Replace | Marketing |
| GBEF |
Replace | Finance |
| ABCD |
Remember that policies applied later can override the policies that were applied earlier, so the user portions of the policies applying to the location of the computer will always override previous policies if there is a conflict. With policy order ABEFABCD, D can override C, which can override B, which can override A, which can override F, and so on. Also, in all these cases, if any of the computer GPOs do not have any defined settings in the user portion, those policies are ignored.
Loopback replace mode is used when the user portions of the GPOs that apply to a computer are to be the only ones set. For the finance user logging onto a marketing computer in the main site, the only policies that get applied to that user are ABCD, the user portions of the GPOs that apply to the marketing computer.
WMI Filtering
Windows Management Interface filtering enables you to associate a WMI query with a GPO, which will run for each user and computer to which the GPO applies. A WMI filter can utilize any WMI-based information that is accessible from the client’s machine, including computer hardware and configuration, user profile, and environment settings. This presents a lot of options for targeting GPOs to clients that have certain properties.
Warning
WMI filters will only run on Windows XP and newer operating systems. If a policy with a WMI filter attached applies to a Windows 2000 computer, the WMI filter will be ignored.
For example, let’s say you want to apply a certain GPO if a client is accessing your network over a virtual private network (VPN) connection. Depending on which VPN software the client is running, your WMI query could check for the existence of a process or service, or even an IP address range. If the query returns true, the GPO will be applied; if it returns false, it will not be applied.
Group Policy
That’s a lot of information on GPOs. Let’s summarize what we’ve covered about the workings of GPOs so far:
GPOs exist in a split state. The configuration data for the GPO, known in shorthand form as GPC data, is held in the AD object itself. The template files and settings that tell the GPO what its capabilities are, known in shorthand form as GPT data, are stored in the SYSVOL.
Individual GPOs can be linked to multiple sites, domains, and organizational units in Active Directory, as required.
GPOs can contain policies that apply to both computers and users in an OU. The default operation of a GPO on a container is to apply the computer portion of the GPO to every computer in that container during boot up and to apply the user portion of the GPO to every user in that container during logon. GPOs can also be set to refresh periodically.
Multiple GPOs linked to a particular container in Active Directory will be applied in a strict order according to a series of priorities. The default prioritized order corresponds to the exact order in which the GPOs were linked to the container. Administrators can adjust the priorities as required.
While GPOs exist only in a domain environment due to their dependence on Active Directory, individual domain or workgroup computers can have local policies defined for them.
GPOs are inherited down the organizational unit hierarchy by default. This inheritance can be blocked using the properties of an OU, domain, or site. Administrators can also set a policy to be enforced. This allows a policy to override all lower settings and bypass any blocks.
Loopback mode allows the administrator to specify that user settings can be overridden on a per-machine basis. Effectively, this means that the user parts of policies that normally apply only to computers are applied to the users as well as (merge mode) or instead of (replace mode) the existing user policies.
WMI filtering allows you to configure a WMI query that can be used as an additional criterion to determine whether a GPO should be applied. If the filter evaluates to true, the GPO will continue to be processed; if it evaluates to false, the GPO will not be processed. This is a powerful feature because you have a vast amount of WMI data available to determine whether GPOs should be applied.
A number of things can slow down processing on a client, including attempting to process many policies one after the other. Use of loopback mode, especially in merge mode, can significantly impact performance. Attempting to apply GPOs across domains can also lead to slowdowns, depending on the network speed between the domains. Finally, complex queries in WMI filters can have a negative impact on GPO processing.
Policies are applied in a strict order known as LSDOU. This notation indicates that local policies are applied first, followed by site GPOs, domain GPOs, and finally any organizational unit GPOs hierarchically down the tree. At each point, the policies are applied in prioritized order if multiple policies exist at a location.
When policies are to be applied to a client, the system identifies the entire list of policies to be applied before actually applying them in order. This is to determine whether any blocking, overriding, or loopback settings have been put in place that could alter the order or application of the policies.
ACLs can be used to limit the application of GPOs to certain individual users or computers or groups of users or computers. Specifically setting up the ACLs on a GPO to deny or allow access means that you can tailor the impact of a policy from the normal method of applying the GPO to all users or computers in a container.
Finally, both user profiles and policies can be applied across a slow link, but the speed that the system uses to determine whether a link is slow is configurable by the administrator within an individual GPO. In addition, while security settings and administrative templates normally are applied by default, the exact settings that will apply across a slow link when one is detected are configurable by the administrator. The only exception is that administrative templates will always be applied; the administrator has no control over this.
11.3. Managing Group Policies
As we discussed earlier, the primary tool you’ll be using with Group Policy is the Group Policy Management Console (GPMC). The GPMC provides an interface to view and edit policies, understand where policies are applied in your organization, and troubleshoot issues. You can use the Group Policy Modeling and Group Policy Results functions in the GPMC to understand how policies will apply to users and computers as well as to look at actual results on an end user machine.
Using the Group Policy Management Console
The GPMC is a one-stop shop for all your GPO management needs. You can browse a forest and see where GPOs are applied, you can create and link GPOs, and you can import and export, back up and restore, delegate control, and view RSoP reports, all from the GPMC.
When you open the GPMC, it will default to showing the domain in which your user account is located. If you need to edit GPOs in another forest, right-click the Group Policy Management node in the tree and click Add Forest. If you need to edit GPOs in another domain in the forest, right-click the Domains node and click Show Domains.
When you are editing GPOs, the Group Policy tools connect to and use the PDC emulator FSMO role owner by default. This ensures that multiple copies of the GPME on different machines are all focused on the same DC. This behavior may be overridden if the PDC is unavailable. If this happens, the GPMC will display an error dialog and the administrator may select an alternate DC to use. An administrator can also manually target a different domain controller in the GPMC.
If GPOs are edited on multiple DCs, this can lead to inconsistencies because the last person to write to the GPO wins. For this reason, you should avoid editing GPOs on multiple DCs.
Refer back to Figure 11-7 to see what the GPMC looks like when viewing a GPO. As you can see in the left pane, you can browse through the domains in a forest down to specific organizational units. If you right-click on an organizational unit, you’ll get many of the same options as shown in Figure 11-6.
In Figure 11-7, the Desktops organizational unit has been expanded to show that the Desktop Policy GPO has been linked to it (i.e., icon with a shortcut/arrow symbol). A virtual Group Policy Objects container is expanded, which shows all of the GPOs that have been created in the domain. There is also a virtual WMI Filters container that holds any WMI filter objects that have been created. Note that the Group Policy Objects, WMI Filters, and Starter GPOs containers are virtual. By virtual, we mean that the GPMC is simply displaying these objects in dedicated containers to make the GPMC more useable. In reality, these objects are not stored in dedicated containers in Active Directory.
Note
You can also browse the GPOs that have been linked to a site by right-clicking on the Sites container and selecting Show Sites. You have the option of which sites to display.
If we take a look at Figure 11-7 again, we can see that Desktop Policy was selected in the left pane, and several options and settings are displayed in the right pane. The following list is a summary of what’s available on each tab:
- Scope
Under the Scope tab, you can view the domains, sites, or organizational units that have been linked to the GPO and delete them if necessary. You can also view what security groups the GPO applies to, and add and remove groups to and from the list. Finally, you can set the WMI filter that should be associated with the GPO.
- Details
The Details tab contains information about who created the GPO, the dates on which it was created and last modified, and the current user version and computer version. The only thing that can be set on this tab is beside GPO Status, which defines whether the user and/or computer settings are enabled.
- Settings
The Settings tab provides a nice shortcut to view which settings have been configured in a GPO. Unlike in the GPME, where you have to drill down through each folder to determine which settings have been configured, you can view the Settings tab for a GPO in the GPMC to see only the options that have been set.
- Delegation
The Delegation tab is similar to the Delegation of Control Wizard, but it’s specifically for GPOs. We’ll cover this screen in more detail later in the chapter.
Using the Group Policy Management Editor
While the GPMC is used for creating and managing the application of GPOs, actually editing the contents of a GPO requires another tool, known as the Group Policy Management Editor (GPME). The GPME can be launched from the GPMC for any GPO by right-clicking and selecting Edit, as shown in Figure 11-10. Inside the GPME, settings are divided under Computer Configuration and User Configuration, and then again under Policies and Preferences. Policies are the settings you’re used to if you’ve worked with Group Policy before. Preferences might be new to you—we’ll take a look at the group policy preferences functionality that Microsoft acquired in 2006 in the next section.

We won’t spend too much time on the Policies section of the GPME, as each setting is a bit different in terms of how it is configured, but you should take some time to click through and become familiar with the interface.
You’ll find that the bulk of the policies you might want to apply are located under the Administrative Templates section of the interface. If you’re not sure where to find what you’re looking for, there are a couple of resources at your disposal. First, you can right-click Administrative Templates and select Filter Options. From here you can configure a keyword search of all the settings available, as well as filter based on what products or versions of Windows they apply to. In Figure 11-11, we’re looking for settings that contain the word “screensaver” that have been configured in the policy. Once you’re done searching, right-click again and uncheck Filter On, or click the filter button in the GPME toolbar to remove the filter.

If you’re simply looking for a specific setting in order to configure it or understand what it does, you might find the free web-based Group Policy Search tool at http://gps.cloudapp.net useful. This tool allows you to filter, do more complex keyword searches, and review all of the data from the ADMX files that is also displayed in the GPME.
One of the relatively new features of the GPME is the ability to attach comments to Administrative Template settings, as shown in Figure 11-12. Previously you had to document your group policy choices in a separate tool (or, as is the case at many companies, not at all). With the comment functionality, your group policies can become self-documenting. You can leave a reminder for yourself about why a setting is in place, and ensure that future administrators aren’t left guessing.
Note
You can also apply comments to individual GPOs by right-clicking the group policy at the top of the tree in the GPME, clicking Properties, and selecting the Comment tab.
Group Policy Preferences
Microsoft acquired a company called DesktopStandard in 2006, and as part of that deal it acquired a product called PolicyMaker. PolicyMaker morphed into group policy preferences and started shipping with Windows with Windows Server 2008. With group policy preferences, you can graphically configure many components of the desktop experience that previously required complex startup and logon scripts. Some of the highlights of group policy preferences functionality include:
Drive mappings
Shortcuts
Printers
Registry settings
Power management
Warning
Some of the options available through group policy preferences enable you to store a username and password (such as for a drive mapping or a scheduled task). These passwords are not encrypted in a secure manner. The Group Policy team at Microsoft discusses this on its blog.
Take a look under Preferences in the GPME to explore all of the different options you can configure with group policy preferences. Microsoft has also published a whitepaper about group policy preferences that you can download from http://bit.ly/14lRcbp.
Note
While group policy preferences started shipping with Windows Server 2008, it has no dependency on the version of Active Directory you’re using. As long as you’re using the Group Policy tools from Windows Server 2008 or newer, you can take advantage of group policy preferences.
Group policy preferences work a bit differently than normal group policyies in terms of their application. Namely, the settings are only applied during startup and logon. Background refreshes of GPOs will not apply the preferences settings. Because of this, preference settings are not enforced in the same way as normal policies. Users can often work around or undo the changes that are made by group policy preferences.
With most Group Policy settings, when you remove a setting from a policy or a machine from the scope of a policy, those settings will be removed. Group policy preferences, on the other hand, do not behave this way. If, for example, you map a drive with group policy preferences, you will need to create a preference item to un-map that drive rather than simply deleting the drive mapping preference. This behavior is controlled with the Action option in the properties of each preference item, as shown in Figure 11-13.
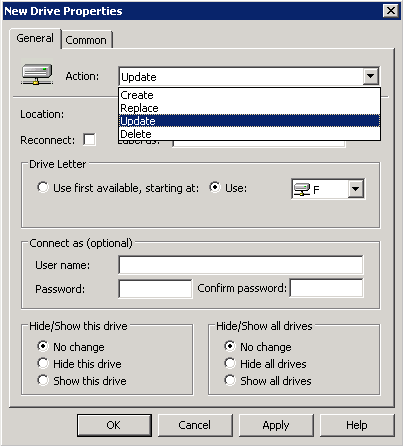
You have four options when configuring the behavior of a preference item:
- Create
This will create a new entry.
- Replace
This will remove any related settings on the client machine and overwrite them with the settings configured in the preference item. In the case of a mapped drive, this will un-map a matching mapped drive and remap it.
- Update
This will update an existing setting with the settings configured in the preference item, or create the setting if it does not exist on the client machine.
- Delete
This will remove the matching setting from the client machine.
Note
Generally we recommend the use of the Replace option if you want to make sure that the setting on the client machine matches exactly what is configured in the preference item.
Deploying group policy preferences
Before you can start using group policy preferences, you may need to deploy one or more updates to your client workstations. Group policy preferences uses a special component called a client-side extension (CSE) to process the settings. Some versions of Windows include the CSE, and others don’t. Table 11-4 shows what versions of Windows will require the installation of the CSE.
Warning
If you are currently using the DesktopStandard ProfileMaker product, installing group policy preferences will uninstall ProfileMaker. You will need to migrate your ProfileMaker configuration to group policy preferences as part of the upgrade. Check out http://bit.ly/YRHXbi for more information on this process.
Release | ||||
RTM | Service Pack 1 | Service Pack 2 | Service Pack 3 | |
Windows XP | Not supported | Not supported | Separate install | Separate install |
Windows Server 2003 | Not supported | Not supported | Separate install | N/A |
Windows Vista | Separate install | Separate install | Included | N/A |
Windows Server 2008 | Included | Included | Included | N/A |
Windows 7 | Included | Included | N/A | N/A |
Windows Server 2008 R2 | Included | Included | N/A | N/A |
Windows 8 | Included | N/A | N/A | N/A |
Windows Server 2012 | Included | N/A | N/A | N/A |
The CSE is available for download from http://support.microsoft.com/kb/943729 for platforms that don’t include group policy preferences out of the box. The CSE is also offered via Windows Update and the Windows Software Update Service (WSUS) to the relevant versions of Windows.
In addition to the CSE, you will probably want to deploy the latest hotfix rollup for group policy preferences, which fixes a number of bugs and performance issues. As of the time of writing, that hotfix was located at http://support.microsoft.com/kb/2622802. Microsoft Product Support Services (PSS) will be able to tell you what the latest version is. If you are using item-level targeting for group membership, you’ll want to have http://support.microsoft.com/kb/2561285 at a minimum to resolve performance issues.
Finally, if you’re going to be deploying the group policy preferences CSE to machines running Windows XP SP2 or Windows Server 2003 SP1 or SP2, you will also need to deploy XMLLite to those machines. You can get XMLLite from http://support.microsoft.com/kb/915865.
Item-Level Targeting
One of the really powerful features of group policy preferences is known as item-level targeting (ILT). ILT allows you to control the application of settings on a per-item basis based on granular expressions that rely on dozens of properties of the user and computer to which the policy applies. Normally, to filter what settings apply to different sets of users or computers, you need to create separate GPOs and then apply security filtering or a WMI filter. With ILT, you can filter individual preferences within a GPO.
To configure ILT for a preference, open Properties, then select the Common tab. On the Common tab, check “Item-level targeting” as shown in Figure 11-14, and click Targeting.

Figure 11-15 shows a sample usage of ILT. In this example, users who are in the Executives group, and users who are both in the Finance Department and are Headquarters Employees will receive the preference. Other users will not.

Running Scripts with Group Policy
Logon scripts have been a facet of Windows domains since Windows NT. You can still define a single logon script to be run on the properties of a user account in Active Directory, and Windows clients will run the script at logon; however, Group Policy offers a much richer experience for logon scripts. You can run multiple scripts at logon, and in addition you can define scripts that run during logoff, computer startup, and computer shutdown. While this functionality is generically referred to as “scripts,” you can run batch files, Visual Basic (VB) scripts, executables, or Windows PowerShell scripts.
Note
In order to run a PowerShell script at user logon/logoff or computer startup/shutdown, the client machine must be running Windows 7/Windows Server 2008 R2 or newer.
You can specify one or more logon or logoff scripts in a Group Policy with the GPME. The logon and logoff script settings are located under User ConfigurationPoliciesWindows SettingsScripts (Logon/Logoff). Double-click the Logon node to configure logon scripts. On the Scripts node you can specify any type of script or executable except Windows PowerShell scripts. PowerShell scripts are specified on the PowerShell Scripts node. The only difference in configuring PowerShell scripts versus standard scripts is that Group Policy allows you to define whether PowerShell scripts are run before or after the scripts/items specified on the Scripts tab.
Note
You can find startup and shutdown scripts inside the GPME by browsing to Computer ConfigurationPoliciesWindows SettingsScripts (Startup/Shutdown).
Figure 11-16 shows a single VB script configured to run at logon. When you configure any type of script (logon/logoff or startup/shutdown), you will need to store the file (and any dependencies) in a location that is accessible to all of the users or computers that will be executing the script. Generally speaking, the easiest place to store these files is inside the Group Policy template (GPT) folder in Sysvol. By placing the files inside Sysvol, you ensure that all of the domain controllers in the domain will be able to replicate the files alongside the GPOs they are associated with.
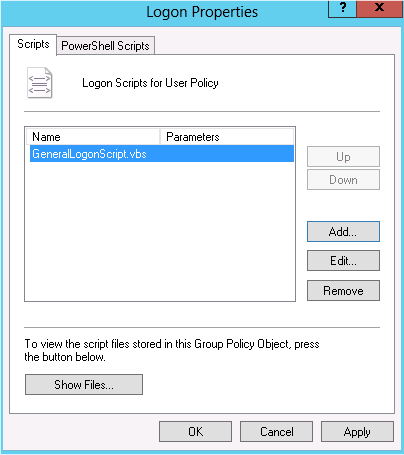
If you click the Show Files button in Figure 11-16, Windows Explorer will open to the scripts folder specific to the GPO you are editing and the type of script. You can use this handy shortcut to drag and drop files into the GPT location in Sysvol.
Logon (and startup) scripts are extremely common in organizations that have adopted Group Policy. These scripts are often used to configure common user experience settings such as drive mappings or printers, or perhaps to update the configuration of computers in the domain. The downside of running scripts at logon or computer startup is that they can cause noticeable performance issues.
Even the best-written scripts can encounter a scenario that the script writer didn’t think of, and when that scenario comes about, computer performance can be adversely affected. For this reason, we have placed the section on scripts and Group Policy after the section on group policy preferences. In our experience, the vast majority of tasks administrators are performing with a logon or startup script can be completed with group policy preferences. With this in mind, wherever possible, we recommend the use of group policy preferences over logon scripts and startup scripts.
Group Policy Modeling
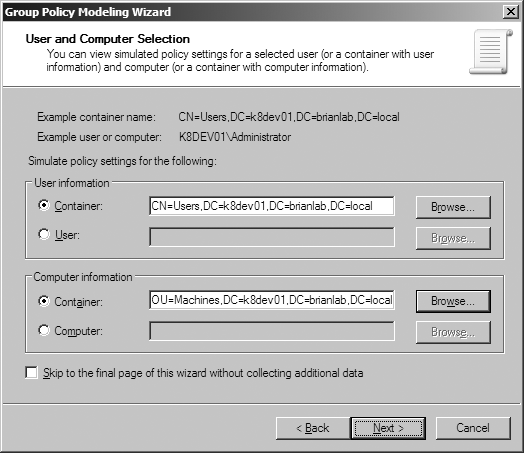
While the Group Policy Results Wizard allows you to see the effective settings for a user and/or computer, it is dependent on that user having logged into the computer in question before. The GPMC includes a second wizard that is helpful for generating “what-if” reports for various scenarios. You can specify a specific user and computer to model or specific locations in the OU hierarchy, as shown in Figure 11-17.
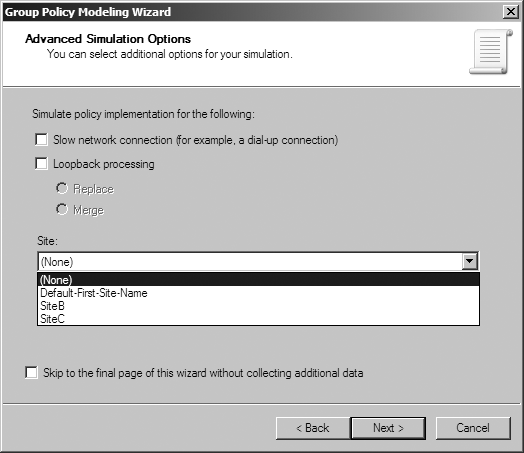
The wizard will allow you to simulate conditions such as slow links, loopback processing, or site affinity, as shown in Figure 11-18. You can also simulate a change to the user or computer’s security group membership if, for example, you are testing changes to security filtering for a policy. Figure 11-19 shows the report that is created by the GPMC. The Summary and Settings tabs are similar to the results reports, and the Query tab displays a summary of the parameters you specified in the modeling wizard.
Like with the Group Policy results reports, you can rerun and export modeling reports as well as view the RSoP MMC by using the “Advanced View” right-click option.
Delegation and Change Control
When planning your group policy deployment, you have to work out how you will maintain firm control over GPOs once you start deploying them. Specifically, you need to consider who will be managing your GPOs and how you will keep control over the wide-ranging changes they can make.
The importance of change-control procedures
The best way to keep track of GPOs in your organization is through a series of change-control procedures. These work well whether your GPO administrators are domain administrators or not. The complexity of the change-control system used for group policies varies from organization to organization. Some organizations opt to manage all of their group policies in their configuration management database (CMDB); others implement simpler systems such as Word documents or Excel spreadsheets. It is important that you test any group policy changes in the lab before applying them in production, due to the potential for disrupting service if a faulty policy change is applied. Microsoft offers a tool called Advanced Group Policy Management (AGPM, part of the Microsoft Desktop Optimization Pack [MDOP]) to assist with implementing group policy management permissions and change-control procedures.
Designing the delegation of GPO administration
There are three types of permission that can be considered here:
The permission to allow sets of users to link policies (and manage the block inheritance setting) to a domain or an organizational unit branch
The permission to allow sets of users to create GPOs
The permission to allow sets of users to change the GPOs themselves
Link delegation can be easily accomplished using the
Delegation of Control Wizard that you can access by right-clicking an
organizational unit, domain, or site in the Active Directory MMC and
choosing Delegate Control. You’ll want to use the “Manage Group Policy
links” task. Here you are actually delegating read and write access to
the gPLink and gPOptions attributes of objects. If you’re
interested in how these attributes work, set up a few GPOs in your
Active Directory environment and use ADSI Edit to examine the
attributes of the OUs to which you link the GPOs.
Note
We discuss the Delegation Control Wizard in detail in Chapter 16.
Permission to create GPOs is limited to those accounts indicated in the upcoming sidebar Default GPO Permissions by default. However, you can add users to the Group Policy Creator Owners security group, and members of that group can create new GPOs.
Note
For information on modifying the default GPO permissions, reference Microsoft Knowledge Base article 321476 at http://support.microsoft.com/kb/321476.
If a member of Group Policy Creator Owners creates a GPO, that user is set as the Creator Owner[3] of the GPO and can continue to manage it. The Creator Owner of a GPO can manage the GPO even if that user is removed from all groups that give GPO management privileges.
Note
GPC data in Active Directory (i.e., the actual Active Directory object itself) is configured not to inherit security permissions from its parent containers.
You can delegate edit access to the creators of new GPOs by placing those users into the Group Policy Creator Owners group. If you also want to delegate edit access to more people or to GPOs that a user is not the Creator Owner of, use the GPMC:
Navigate to the Group Policy Objects folder under the domain in which the GPO you want to grant permission to is contained.
Click on the GPO you want to delegate and open the Delegation tab in the right pane, as shown in Figure 11-20.
Click the Add button to bring up the object picker.
Select the users or groups you want to have access.
Pick the permissions you want to grant. You have three options:
Read
Edit settings
Edit settings, delete, modify security

Warning
A word of warning before we finish up here: correctly applied, GPOs are fundamental to the well-being of your Active Directory environment and your network at large. Policies incorrectly applied to the root of the domain could lock down the Administrator account or disallow logons at domain controllers. This is obviously a worst-case scenario, but it has happened. More common are mistakes such as a mistyped registry value that forces users to an invalid proxy server and thus stops Internet Explorer from working, or forgetting to add a security filter and accidentally applying a policy to all machines (the default) when it was only meant to apply to a few machines.
These changes have the potential to affect all users or computers throughout the tree, so we would caution you to keep GPO administrators to a very select subset. If you allow non-administrators the ability to create, change, and delete GPOs, they have to be able to take responsibility for and be accountable for their actions. Users who are already administrator-equivalent will automatically be able to administer GPOs and should already be held accountable.
Using Starter GPOs
One of the new features for Group Policy beginning with the Windows Server 2008 toolset is Starter GPOs. Starter GPOs allow you to define a template GPO that can then be duplicated in the GPMC. Starter GPOs are stored and replicated alongside normal group policies in the Sysvol container, in a new folder called StarterGPOs.
The first time you access the Starter GPOs node in the GPMC, you will be prompted to create the StarterGPOs folder in Sysvol. Starting with Windows Server 2008 R2, a series of read-only Starter GPOs are automatically created. These Starter GPOs include the settings necessary to implement the Windows XP SP2 and Windows Vista Security Guides from Microsoft. At the time of writing, there were no comparable Starter GPOs for Windows 7 or Windows 8. In addition, read-only Starter GPOs to enable the necessary ports for Group Policy remote management through the Windows Firewall are included.
Note
The settings you can define in custom Starter GPOs are limited to the settings in the Administrative Templates section of a GPO.
Creating a Starter GPO is nearly identical to creating a normal GPO. Simply right-click the Starter GPOs virtual container in the GPMC and click New.
You may have noticed that the New GPO dialog has an additional selection for the Starter GPO, as shown in Figure 11-21. If you select a Starter GPO at this time, the settings from that Starter GPO will be imported into your new GPO, providing a baseline to start with.

Group Policy Backup and Restore
Restoring the Sysvol container from a system-state backup of a domain controller is an involved and somewhat painful process. Fortunately, with the introduction of the GPMC, there is an easy GUI and script-based mechanism for backing up and restoring some or all of your group policies. To back up all of the group policies in the domain with the GPMC, right-click on the Group Policy Objects virtual container and select the Back Up All option. You will be presented with a dialog similar to Figure 11-22. You must provide the GPMC with a path to an empty folder to back up all of the GPOs to, and optionally a comment to include in the backup. Once the wizard completes, you can zip the target folder and have a portable and easy-to-work-with backup.
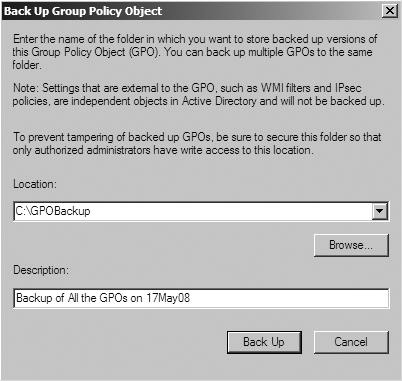
If you want to back up an individual policy, simply right-click it under the Group Policy Objects container and select Back Up. The GPMC only supports restoring policies on a per-policy basis. To restore a policy, right-click it under the Group Policy Objects container and select “Restore from Backup.” The wizard will prompt you for the path to the backup. You must point the wizard to the parent folder of the backup. Thus, if you were restoring from the backup created in Figure 11-22, you would point the restore wizard to C:GPOBackup.
If you need to restore all of the GPOs in a backup at once, you can use the RestoreAllGPOs.wsf script that is included in the GPMC sample scripts discussed in the Scripting Group Policy section of this chapter. Similarly, you can use the BackupAllGPOs.wsf script to back up all of the GPOs in a domain. There are also individual group policy backup and restore scripts called BackupGPO.wsf and RestoreGPO.wsf, respectively. In addition to these scripts, you can take advantage of the Backup-GPO and Restore-GPO cmdlets included with Windows Server 2008 R2 and newer.
You can also use the GPMC backup and restore functionality to copy group polices between domains, or perhaps between a test environment and production. The GPMC includes a Migration Table Editor tool that will be invoked when you need to modify references to security principals in the source domain so that the policy will continue to function in the target domain. For more information on migrating group policies, see the whitepaper Migrating GPOs Across Domains with GPMC.
Scripting Group Policy
Historically, one of the hurdles to efficiently managing GPOs with Active Directory has been the lack of scripting support. The GPMC provides a number of scripting capabilities via COM-based objects that can be accessed from VB scripts, PowerShell, and so forth. Windows Server 2008 R2 introduced a number of PowerShell cmdlets for use with Group Policy, and Windows Server 2012 expanded on this selection.
There are a number of useful sample scripts (over 30) for working with the GPMC that Microsoft distributes freely on its website. Once you download and run the installer, the scripts will be stored in %ProgramFiles%Microsoft Group PolicyGPMC Sample Scripts.
The following is a partial list of some of the tasks you can perform via scripts with the GPMC objects:
Create a GPO with the default settings.
Copy a GPO.
Import GPO settings.
Set GPO permissions.
Delete a GPO.
Search for GPOs.
List GPOs.
Retrieve GPO information.
Back up GPOs.
Restore GPOs.
Generate a RSoP report for GPOs.
The PowerShell cmdlets that come with Windows Server 2008 R2 and Windows Server 2012 enable you to script the creation and management of GPOs as well as report on and script settings that are set via administrative templates. You cannot script settings that are set with client-side extensions, such as for the Windows Firewall or Restricted Groups. Table 11-5 provides a listing of the PowerShell cmdlets for Group Policy as well as their purposes.
PowerShell cmdlet | Purpose |
Backup-GPO | Export a GPO or all the GPOs in the domain to the local filesystem. |
Block-GPInheritance | Configure an OU not to inherit Group Policy settings. |
Copy-GPO | Duplicate a GPO with a new name. This cmdlet can also be used to copy GPOs across domains. |
Get-GPInheritance | Display the Group Policy inheritance settings for an OU. |
Get-GPO | Display information about a group policy object. |
Get-GPOReport | Generate a report in HTML or XML format detailing the contents of a GPO. |
Get-GPPermission | List a permission entry in the ACL on a GPO. |
Get-GPPermissions | List the permissions specified on a GPO (e.g., for security filtering or delegation of editing). |
Get-GPPrefRegistryValue | Display group policy preferences registry settings specified in a GPO. |
Get-GPRegistryValue | Display Group Policy settings that are registry-based. Effectively, this is all of the settings in the Administrative Templates section of a GPO. |
Get-GPResultantSetOfPolicy | Run RSoP and display the results for a user and/or computer. |
Get-GPStarterGPO | Display information about a Starter GPO. |
Import-GPO | Import one or more exported GPOs from the filesystem into an existing GPO. These exported GPOs would be created with the Backup-GPO cmdlet or the associated Back Up option in the GPMC. |
Invoke-GPUpdate | Refreshe group policies on the local machine or remotely on a target machine. |
New-GPLink | Link a group policy to an OU, domain, or site. |
New-GPO | Create a new GPO. |
New-GPStarterGPO | Create a new Starter GPO. |
Remove-GPLink | Remove a group policy link from an OU, domain, or site. |
Remove-GPO | Delete a GPO from Active Directory. |
Remove-GPPrefRegistryValue | Remove one or more group policy preferences registry settings from a GPO. |
Remove-GPRegistryValue | Remove one or more registry settings from a Group Policy. Effectively, this is any of the settings in the Administrative Templates section of a GPO. |
Rename-GPO | Rename a GPO in Active Directory. |
Restore-GPO | Restore one or more GPOs that were backed up with Backup-GPO. |
Set-GPInheritance | Toggle the Group Policy inheritance settings for an OU. |
Set-GPLink | Modify the link order (precedence), “enforced” flag, or link status (enabled/disabled) for a group policy link on an OU, domain, or site. |
Set-GPPermission | Modify the permissions on a GPO (e.g., for security filtering or delegation of editing). |
Set-GPPermissions | Modify the permissions specified on a GPO (e.g., for security filtering or delegation of editing). |
Set-GPPrefRegistryValue | Modify one or more group policy preferences registry settings in a GPO. |
Set-GPRegistryValue | Modify one or more registry settings in a Group Policy. Effectively, this is any of the settings in the Administrative Templates section of a GPO. |
In addition to the cmdlets included with Windows, there are a number of third-party management extensions for Group Policy that deliver a great deal of value. One company that offers a number of PowerShell-based solutions is SDM Software at http://www.sdmsoftware.com.
11.4. Troubleshooting Group Policy
If at any point you need to debug group policies, there are a few options available. We will look at a few of them here, including the Resultant Set of Policy (RSoP) tool. We’ll also see how to force a group policy update and explore the various logging options that are available, depending on what version of Windows the client machine is running.
Group Policy Infrastructure Status
The Windows Server 2012 GPMC includes a new health report for Group Policy that focuses on Active Directory and Sysvol replication status. The health report checks the status of each group policy in the domain and ensures that the policy and its associated metadata are consistent across all of the domain controllers in the domain. In order to do this, the GPMC selects one domain controller as the baseline and then compares each domain controller against that baseline.
You can access the infrastructure status by clicking on a domain in the GPMC and then opening the Status tab. Figure 11-23 shows the status for a domain that is in good health.

Group Policy Results Wizard
The Group Policy Results Wizard is a frontend for the Resultant Set of Policy tool. RSoP is a very powerful tool that will identify what GPO settings have been applied to a user or computer. Before RSoP, administrators were left to do their own estimates as to what GPOs took precedence and what settings were actually applied to users and computers. RSoP removes much of the guesswork with an easy-to-use wizard interface.
Windows Server 2012 improves the RSoP reporting to include a number of additional data points. These include the processing time for each CSE in the policy, the policy that contributed each setting, loopback processing and link speed data, and whether inheritance blocking was a factor in the resultant policy set.
To start the Group Policy Results Wizard, open the GPMC, right-click the Group Policy Results folder, and launch the wizard. Figure 11-24 shows the initial screen, where you will be prompted to select a target machine to run the RSoP session on.
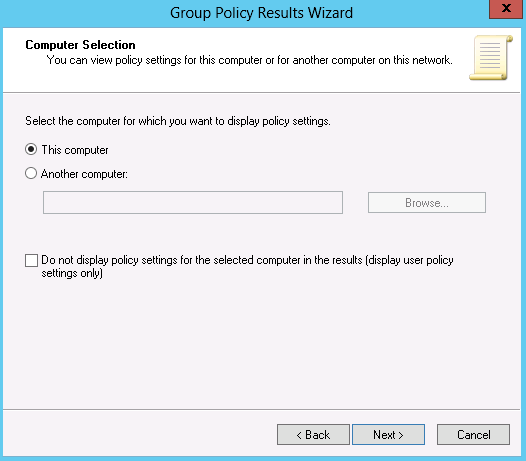
The next screen, as shown in Figure 11-25, allows you to optionally specify a particular user for whom to display the policy settings. If you only need computer settings, you can skip this step. The wizard will only display users who have logged onto the target machine successfully in the past.
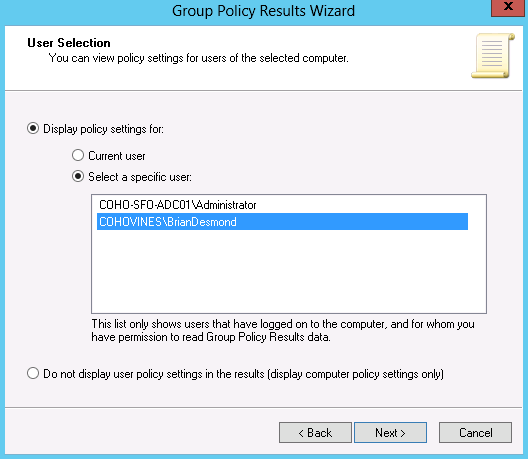
Once you finish the wizard, the GPMC will create a report similar to the one shown in Figure 11-26. This report is divided into three sections:
The Summary tab gives a high-level overview of what factors affected policy application, filters that were applied, and so forth.
The Details tab allows you to view every setting that was applied and the GPOs from which they originated.
The Policy Events tab gives you a consolidated view of event log entries related to group policy processing.

Note
If you are looking for the Resultant Set of Policy view rather than the HTML report style pictured in Figure 11-26, right-click the report and click Advanced View.
One of the nice features of the Group Policy Results tool is that the reports are saved, so you can reference them later. You can also right-click the report in the tree at the left and rerun the query or export the report.
You can also run an RSoP session from the command line; see the sidebar Using the GPResult Tool.
Forcing Group Policy Updates
Sometimes when troubleshooting an issue, you may not want to wait
for a policy to refresh in the normal time period. Fortunately, there is
a command-line tool to force an update called
gpupdate. You can simply run gpupdate to update the group policy settings;
however, there are other options available that are documented if you
run gpupdate /?. Windows 8 and Windows Server 2012
clients also include the Invoke-GPUpdate PowerShell
cmdlet that offers the same functionality as
gpupdate.
The version of GPMC included with Windows Server 2012 (and the accompanying PowerShell cmdlets) introduces the ability to remotely refresh group policies on one or more machines. This feature works by remotely creating a scheduled task on the target machine(s) that refreshes the group policies locally. You can use this feature with clients running Windows Vista or newer and servers running Windows Server 2008 or newer. In order to schedule the task, the machine you are running GPMC from must have access over the network (e.g., through firewalls) to run remote procedure calls (RPCs) to the target machines. If you are using the Windows Firewall, you will need to either deploy the Group Policy Remote Update Firewall Ports Starter GPO in advance or open the ports and services listed in the Starter GPO on each client.
To remotely refresh group policies for all of the machines in a specific organizational unit, you can right-click the OU in the GPMC and click Group Policy Update. You will receive a confirmation prompt similar to Figure 11-27 that tells you how many machines will be affected by the request. After the request begins, the GPMC will provide you with a live status report, as shown in Figure 11-28. The status report confirms that the group policy refresh has been scheduled on the remote machine but not whether or not the refresh has succeeded. You can export the results to a CSV file for manipulation with a script or Microsoft Excel by clicking the Save button.

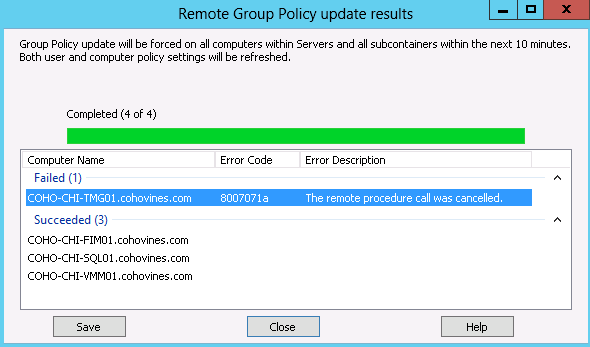
Enabling Extra Logging
When Group Policy works, it is an extremely valuable tool to administrators. But as with any technology, from time to time you may need to dig into what’s going on behind the scenes in order to troubleshoot an issue with Group Policy. Fortunately, Group Policy comes with a large amount of diagnostic logging that can be enabled when you need to troubleshoot a problem. The format of the logging and how you enable it varies depending on the version of Windows.
Group Policy Logging in Windows 2000, Windows XP, and Windows Server 2003
You can turn on verbose logging in the event log for group
policy-related events simply by setting a registry key. Once the key
exists with the correct value, logging is done automatically; a reboot
is not necessary for the new value to take effect. The value, a
REG_DWORD, is called RunDiagnosticLoggingGroupPolicy and needs to
be created with a value of 1 in the HKLMSoftwareMicrosoftWindows
NTCurrentVersionDiagnostics key.
The value of 1 sets the logging to verbose
mode; setting the value to 0 is the same as having
the key absent and is known as normal logging. In other words, the key
makes a difference only when set to a value of 1.
It’s really as simple as that.
Note
This key is actually one of four currently supported keys that you can use at this location. You also can create the following keys::
RunDiagnosticLoggingIntellimirrorRunDiagnosticLoggingAppDeployRunDiagnosticLoggingGlobal
If the verbose logging in the event log is not providing enough
information, another option is to enable debug logging for policy and
profile processing. To do so, create a value called UserEnvDebugLevel as a REG_DWORD in the HKLMSoftwareMicrosoftWindowsNTCurrentVersionWinlogon
key. Assign UserEnvDebugLevel the
value 10002 in hexadecimal format. Restart the computer, and from then
on, extensive logging information will be recorded on the machine in
the file %SystemRoot%DebugUserModeUserenv.log.
For more information, check out Microsoft Knowledge Base article
221833, which can be found at http://support.microsoft.com/kb/221833.
The UserEnv debug log file is extremely
dense, so chances are you will need to search for keywords such as
“error” if you are not used to reading the log. Keep in mind that some
errors are normal even though they are flagged as errors. Be sure to
disable the UserEnvDebugLevel
setting once you are finished with it.
Note
For a comprehensive listing of group policy logging settings, check out the free ADM file available for download at http://bit.ly/Xa5Y30.
Group Policy Logging in Windows Vista/Windows Server 2008 and Newer
Newer versions of Windows publish Group Policy diagnostic information directly to the event log via Event Tracing for Windows (ETW). To view Group Policy tracing information in Windows Vista/Windows Server 2008 or newer, launch the Event Viewer, browse to Applications and Services LogsMicrosoftWindowsGroupPolicy, and open the Operational log. You will find a wealth of information related to the actual processing of group policies as well as performance.
If you’re troubleshooting an issue with group policy preferences, you’ll need to explicitly enable logging and then parse through the resultant trace files. Microsoft has an excellent article on enabling logging for group policy preferences at http://bit.ly/Yd8eVH.
Group Policy Diagnostic Best Practices Analyzer
Microsoft has a free tool available from its website called the Group Policy Diagnostic BPA. BPA stands for Best Practices Analyzer, and it’s a breed of tool Microsoft has been releasing for various tools and products over the past several years. The Group Policy Diagnostic BPA can help with troubleshooting. To get the most appropriate version of the tool for your environment, go to http://support.microsoft.com/kb/940122.
Third-Party Troubleshooting Tools
Independent software vendor SDM Software has developed a Group Policy troubleshooting toolset that can visually report on Group Policy processing health on clients, and visually analyze many of the logging options discussed earlier in this chapter. For more information, visit http://www.sdmsoftware.com/products/freeware/.
The GPO Guy community website is also an excellent resource for Group Policy information. The site provides free tools, and hosts an email discussion list for Group Policy topics.
11.5. Summary
One of the big selling points of Active Directory has always been Group Policy. In this chapter, we covered the details of how group policies are stored in Active Directory, how GPOs are processed by clients, the GPO precedence order, the effects of inheritance, and the role ACLs play.
There are a number of tools available for managing Group Policy. Perhaps the most important is the Group Policy Management Console (GPMC), which is a one-stop shop for all your GPO needs. With the GPMC, you can perform virtually any function necessary from a single interface. Another benefit of the GPMC is that it installs several COM objects that allow you to script many of your GPO management functions.
There are a number of troubleshooting and diagnostic tools available for discerning what happened when things go wrong that we introduced in this chapter as well.