CHAPTER 4
Sharing and Securing with User Accounts
Every person who uses your computer is called a user, and each user should have his or her own user account on the computer. Giving each person a user account is like giving each person his or her own separate PC, but much cheaper. Each user can personalize the desktop and other settings. Each person can have a separate collection of pictures, music, videos, and other files. Each user can also set up a separate e-mail account.
User accounts allow parents to create and enforce parental controls in Windows 10. This is a great tool for parents who can't always monitor when and how children use the computer. Parental controls allow you to control and monitor children's computer use 24 hours a day, 365 days a year, even when you aren't around to do it yourself.
User accounts also add a level of security to your computer. Many security breaches occur not because of a problem with the computer or Windows, but because the user is in an account that grants malware (bad software) permission to do its evil deeds. Of course, people don't realize that they're granting permission because the program doesn't ask for permission. It gets its permission automatically from the type of user account you're currently logged into.
Creating and managing user accounts is easy. But before getting into the specifics, this chapter looks at how you, as a user, experience user accounts.
Logging In and Out of User Accounts
When you start your computer, Windows 10 presents the Lock Screen. This screen shows a background picture and can run background apps such as a calendar app or mail app before you log in. To advance beyond the Lock Screen, click a mouse button, gesture down (press the down arrow on your keyboard), press the spacebar, or press Enter. If you're on a tablet, swipe up to get to the login from the lock screen. You're shown the login screen. This screen displays the last user logged in at that computer. If you have multiple user accounts on your computer, you can log in using the previous user account (if that's you) or select a different user.
To log in, enter the password for the chosen account and press Enter or click the arrow at the right end of the password text box. If you want to log in using a different login name, click the Sign-in options link under the default user name or choose from the list of users that appears at the bottom left side of the screen. You can also click on the user name list at the top of the Start menu, which presents a list of users who can log in to the computer. Select the user you want to log in with, and then enter that user's login credentials to start Windows 10.
For accounts that don't have an associated password, simply click the name for that user, and Windows loads to the Windows 10 Start screen.
Where am I now?
To see the name of the user account you're currently logged in to, look at the middle of the Windows 10 Start menu. In Figure 4.1, the user account name is Jeffrey Shapiro, but you'll see a username that has been set up on your computer. If Windows 10 came preinstalled on your computer, the username may be a generic name, such as Owner or User.

FIGURE 4.1 Username on the new Windows 10 Start menus.
Switching accounts
You have a few ways to switch from the account you're currently logged in to to another account (assuming that you have more than one user account on your computer already).
The quickest way is to display the Start menus and then click your account name in the middle of the screen. Figure 4.2 shows an example of a list of users. You can use the following methods to change users:
- Click Sign Out: This option logs you out of Windows and sends you to the Windows startup screen. Press Enter, slide the screen up, or roll the mouse button down to display the sign on screen. Select a username by clicking the back arrow to display all users set up on this computer.
- Click a username: When you click your username at the Start menu, all user accounts for your computer appear. Click the name you want to switch to. Windows suspends the current user and displays the login screen for the selected name. Enter the password for that username to continue.
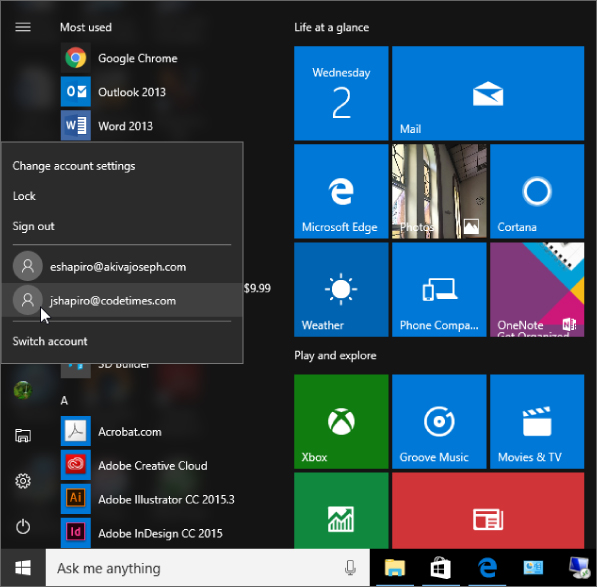
FIGURE 4.2 Available users who can log in to the current computer.
You also can change users by using the Power options. Click the Start button, then click the Power icon. Three menu options appear, as shown in Figure 4.3. The options are described in the following list:
- Sleep: This option saves the system state to disk and powers down the computer, but the computer can be restored more quickly than shutting down and starting up.
- Shut Down: This option closes all open programs and shuts down the computer. Press the power button to restart the computer and show the login screen. The Power Options/System Settings applet allows you to decide what the power button does when you press it. You may need to change your computer's BIOS configuration as well.
- Restart: This option closes all programs, shuts down the computer, and then restarts the computer to the login screen.
- Hibernate: This option turns off the PC, but the apps stay open. When you turn the PC back on, you resume where you left off. By default this option is not checked. If you want to have this option shown in the list of power options, check mark it in the Power & Sleep settings in the Control Panel. To find the settings, press Alt-X, select Control Panel, and then select Hardware and Sound. Under Power option, select Change what the power options do. Select the Change settings that are currently unavailable and check the Hibernate button.

FIGURE 4.3 Windows Power options.
Sign-in Options
Windows 10 provides several sign-in options, available from the Accounts panel in Settings. To access the options, click the Accounts panel and then click the Sign-in options link.
The six options are the following:
- Require sign-in: This link lets you toggle on or off the requirement to sign in when you wake your computer from sleep.
- Windows Hello: This allows your computer to recognize either your face your fingerprint. You need to have additional hardware installed for this feature to work.
- Password: This link takes you to the page where you can create and manage your passwords (see the next section).
- PIN: Clicking this link prompts you for your password, after which you can enter and confirm a number with which to log on.
- Picture password: This link takes you to the page where you can create and manage a picture password (see “Picture Passwords” later in this chapter).
- Lock Screen: This option is under the Related settings section of the sign-in options screen. It lets you set the background picture, Screen timeout settings, and screen saver information.
- Privacy: This option shows your email address on the sign-in screen.
The Sign-in Options page is shown in Figure 4.4.

FIGURE 4.4 Windows sign-in options.
Creating Strong Passwords
In this section we talk about techniques for creating, managing, and password-protecting user accounts, but before we get into the details, we provide some basic information on passwords in general. These tips are useful not only for passwords for user accounts, but for all types of accounts you create, including online accounts.
A password that's easily guessed is a weak password. A strong password is one that isn't easily guessed and is immune to password-guessing attacks. The two most common forms of password-guessing attacks are the dictionary attack and the brute-force attack. Both types of attacks rely on programs that are designed to try to crack people's passwords and gain unauthorized entry to their user accounts.
A dictionary attack tries many thousands of passwords from a dictionary of English terms and commonly used passwords. A brute-force attack tries thousands of combinations of characters until it finds the right combination of characters needed to get into the account.
Both types of attacks are rare in a home PC environment. They'e also easily frustrated by common techniques such as forcing a person to wait several minutes before trying again after three failed password attempts. Nonetheless, the general guidelines used to protect top-secret data from password-guessing attacks can be applied to any password you create. A strong password is one that meets at least some of the following criteria:
- It is at least eight characters long.
- It does not contain your real name, user account name, pet name, significant date (such as birthday), or any name that's easily guessed by other family members or co-workers.
- It does not contain a word that can be found in a dictionary.
- It contains some combination of uppercase letters, lowercase letters, numeric digits, and symbols (such as !, &, ?, @, and #).
We realize that few people need Fort Knox–style security on their personal PCs. You don't want a password that's difficult to remember and a pain to type. But any steps you take to make the password less easy to guess are well worth the effort. Some websites offer password checkers, programs that analyze a password and tell you how strong it is. Or go to any search engine, such as www.google.com, and search for “password checker.”
Remembering passwords
The most common problem with passwords is forgetting them. When you set up a password for a website, you can usually be reminded what the password is by clicking an “I forgot my password” link at the sign-in page. But no such link exists for passwords that protect your Windows user accounts. Therefore, be sure not to forget your Windows passwords!
Before you password-protect a user account, take the time to come up with a password that you (or the user) can remember. Make sure you use exactly the same uppercase and lowercase letters that you'll be typing. Windows passwords are always case sensitive, which means the difference between uppercase and lowercase letters matters.
For example, say you jot down your password as Tee4me!0 (with a zero as the last character). But later you type it in as tee4Me!o (with the last character being the letter o). Still later, you forget the password and dig out the sheet of paper. The tee4me!o you wrote down doesn't work, because the password is actually Tee4Me!0.
Devising a password hint
With Windows passwords, you can specify a password hint to help you remember a forgotten password. But still, using hints is tricky. Anyone who uses your computer can see the password hint. So, the hint shouldn't be so obvious that it tells a potential intruder what the password is. For example, create a hint that triggers your memory of the password but doesn't repeat the exact uppercase and lowercase letters you used.
Writing down your passwords isn't a good idea because other people may be able to access them. But if you need to keep track of multiple passwords, consider using a password-protected Excel spreadsheet to store all your passwords. Then, you need to remember only one — the password for the Excel file. Alternatively, password-keeper applications are available to achieve the same result.
The bottom line on remembering passwords is simple: You have no margin for error. A password that's “sort of like” the one you specified is not good enough. It must be exactly the one you specified. You must treat passwords as though they are valuable diamonds. Keep them safe and keep them secure, but don't keep them so safe that even you can't find them!
If you choose to not have a password, you will not be able to use the other sign-in options.
That's enough general advice about passwords. Next, you need to find out about types of user accounts.
Picture Passwords
Picture passwords were introduced in Windows 8, and Windows 10 extends this new way to log in to your computer. Picture passwords are designed to be used with touchscreen PCs and tablets so you don't have to type in characters. Instead you choose a picture, draw a combination of three gestures on the picture that become your “password,” and then save those combinations with that picture. You use those gestures to gain access to your computer, much like what happens when you type in a password on your keyboard.
Creating a picture password
You set up a picture password through the Accounts area in Settings. Click on the Sign-in options link and then click Add, shown in Figure 4.5, to display the Create a Picture Password dialog box. Type your user password and click OK to verify your password. Now you're now ready to select a picture and set up gestures to create the picture password.

FIGURE 4.5 Creating a picture password.
Click Choose Picture and select a picture you want to use. Click Open to see the picture. Figure 4.6 shows an example of a picture that can be used for setting a picture password. If you are happy with your choice, click the option “Use this picture.”

FIGURE 4.6 Use any picture, like the one shown here, for your picture password.
It's time to draw the gestures to create the combination you want to use for the password. You can draw any combination of these three gestures: taps, circles, and straight lines. Remember the following when you set up the gestures:
- Position of the gestures
- Size of the gestures
- Direction of the gestures
- Order in which you make the gestures
For example, on a picture of the flag of the United States, the following are suggested gestures:
- Draw a circle around three stars on the flag.
- Tap the lowest white stripe.
- Draw a straight line from the top-right corner of the blue border down to the bottom of the lower red stripe.
As you draw each gesture, Windows does two things. First, it shows each gesture using a white outline arrow for straight lines, a white circle outline for circles, and a white dot for taps. Second, it shows the sequence of each gesture as 1, 2, or 3.
If you make a mistake, click Start Over and restart the gestures.
After you complete the gestures once, you must confirm them before they're saved. Simply repeat your three gestures. If you forget one, click Start Over and redraw the gestures — and be sure to remember your gestures this time!
When you've successfully redrawn the gestures in their correct order, click the Finish button, shown in Figure 4.7. You're returned to the Users screen of PC Settings.

FIGURE 4.7 Windows confirms that your picture password is complete.
Testing your picture password
After you create a picture password, test it soon to commit the gestures to memory. To do this, return to the Windows Start menu and sign out. Sign back in to your account, this time using the gestures on the picture that displays. After you draw the correct gestures of your picture password, you're presented with the Windows desktop and Start menu.
Types of User Accounts
Windows 10 offers five basic types of user accounts: the built-in Administrator account, user accounts with administrative privileges, standard accounts, the Guest account, and Microsoft accounts, which can be used to access Microsoft resources and services such as Office 365 and the Family Safety features of Windows 10. They vary in how much privilege they grant to the person using the account.
With Windows 10, you also have the choice of setting up the user accounts as local or Microsoft accounts. You can read about these types of accounts in the following sections.
Microsoft accounts
With Microsoft accounts, you have the greatest flexibility for taking advantage of many of the newest Windows 10 features. To set up a Microsoft account, you must use a valid e-mail address. You can use an existing account, such as one you use at your office or a third-party account such as Gmail, Yahoo! Mail, or something similar. If you don't have one, you can set up an e-mail account during the Windows 10 user account setup.
A Microsoft account provides the following features:
- Allows you to log in to a computer on which you haven't previously set up a user account. (Conversely, with local accounts, you must set up a local account on each computer on which you want to log in.)
- Provides access to Microsoft services like Office 365, Windows Phone accounts, and OneDrive.
- Enables you to download apps from the Windows Store.
- Syncs settings across multiple computers. For example, if you work on two or more computers, logging in with the same Microsoft account on each one enables you to keep your favorites, history, sign-in info, and languages synced between the two computers.
- Enables you to access your saved files and photos from multiple computers if using OneDrive.
Creating a new e-mail address for a Microsoft user account
If you don't have an e-mail address, you can set one up as you create a new Microsoft user account. First, click the Accounts panel in Settings. The accounts options panel is displayed, as shown in Figure 4.8.

FIGURE 4.8 The Microsoft account page.
You have two ways to add a new Microsoft account. The first way is to click the link that reads Sign in with a Microsoft account. If you have another Microsoft account, enter the e-mail address and password for that account. If you don't have an account, you can click Add an account to create one.
The other way is to click Family & Other people and then click Sign in with a Microsoft account. This page is shown in Figure 4.9.

FIGURE 4.9 Other user accounts page.
Now click the Add someone else (+) button to this PC link. The option to choose how this person will sign into Microsoft appears as shown in Figure 4.10.

FIGURE 4.10 Adding more users to the PC.
Windows 10 enables you to set up a new outlook.com, hotmail.com, or live.com e-mail address, or an e-mail address for your own domain. Enter an e-mail address and wait for Windows to validate it as shown in Figure 4.11.

FIGURE 4.11 Successful validation.
Now that you have validated the e-mail, you can begin to set up the user account.
You also can access your school or workplace network. To do so, simply click the Access work or school link on the left of the Accounts page and click the Connect button on the right. Enter the e-mail address associated with the account that was just validated and then click Continue. Windows 10 connects to your server or organization on the Internet or local network and begins to set up the user account on the computer automatically.
Local accounts
Local accounts are useful when you do not need to keep computers synced. When you use local accounts, you set up accounts for each user that will be using a computer as a stand-alone user. If you need to set up one account that can be used on multiple Windows 10 computers, you must set up Microsoft accounts or domain accounts.
Local accounts are also limiting in that you cannot use them to access the Windows Store to download apps, or services like SkyDrive. Remember that to access Windows Store apps, you must set up and use a Microsoft account.
The built-in administrator account
A single user account named Administrator is built into Windows 10. This is not the same as an administrative account you create yourself or see on the login screen. This account is hidden from normal view. It doesn't show up on the usual login screen.
The built-in Administrator account has unlimited computer privileges. So, while you're logged in to that account, you can do anything and everything you want with the computer. Any programs you run while you are in that account can also do anything they want. That makes the account risky from a security standpoint, and very unwise to use unless absolutely necessary.
In high-security settings, a new computer is usually configured by a certified network or security administrator who logs in to the Administrator account to set up the computer for other users. There, the administrator configures accounts on the principle of least privilege, where each account is given only as much privilege as necessary to perform a specific job.
When the administrator is finished, he or she typically renames the built-in Administrator account and password-protects it to keep everyone else out. The account is always hidden from view, except from other administrators who know how to find it. All this is standard operating procedure in secure computing environments, although hardly the norm in home computing.
In Windows 10, you really don't need to find, log in to, and use the built-in Administrator account unless you're an advanced user with a specific need, in which case you can get to it through Safe Mode. As a regular home user, you can do everything you need to do from a regular user account that has administrative privileges.
Administrative user accounts
Most of the time when you hear reference to an Administrator account in Windows 10, that reference is to a regular user account that has administrative privileges. This is an account that has virtually all the power and privilege of the built-in Administrator account. But it also has lots of security built in to help thwart security threats that might otherwise abuse that account's privileges and do harm to your computer.
Ideally, you should create one user account with administrative privileges on your computer. If you intend to implement parental controls, you need to password-protect that account to keep children from disabling or changing parental controls.
Standard accounts
A standard user account is the kind of account everyone should use for day-to-day computer use. It has enough privilege to do day-to-day tasks such as run programs, work with documents, use e-mail, and browse the web. It doesn't have enough privilege to make changes to the system that would affect other people's user accounts. It doesn't have enough privilege to allow children to override parental controls. And most important, it doesn't have enough privilege to let malware such as viruses and worms make harmful changes to your system.
If you use a standard account all the time, and use a built-in administrative account only when absolutely necessary, you'll go a long way toward keeping your computer safe from Internet security threats.
Guest account
The optional Guest account exists to allow people who don't regularly use your computer to use it temporarily. Basically, it lets them check their e-mail, browse the web, and maybe play some games. It definitely doesn't let them make changes to your user account or anyone else's. Its limited privileges also help protect your system from any malicious software they might pick up while online.
Creating and Managing User Accounts
The best way to handle user accounts in a home setting is for one person to play the role of administrator, even if that person isn't a professional. In a home environment, that person most likely is a parent who needs to define parental controls. To begin, log in to a user account that already has administrative privileges. If you have only one user account, or you're taken straight to the desktop at startup, that account probably has administrative privileges.
As with most configuration tasks, you can create and manage user accounts through the Computer Management application, which you can access by right-clicking the Start button. Or you can create local accounts from the Accounts applet we just used to create a Microsoft account.
If you're in a standard account on a computer that already has a password-protected administrative account, you must enter the password for the Administrator account. Or, if the administrative account doesn't have a password, press Enter to leave the password box empty.
Changing user accounts
When you create a user account, you give it a name and choose a type. After you've created a user account, you can change the name and type to better suit your needs. Use the Setting, Accounts page shown in Figure 4.8 or the Accounts screen shown in Figure 4.10 to make changes to accounts.
Changing a user account type
You can change an Administrator account to a standard account, or vice versa, from the main Accounts page. For example, if you've been using an administrative account for your day-to-day computing since buying your computer, you may want to change it to a standard account for the added security that a standard account provides. At least one user account must have administrative privileges, so you can make this change only if at least one other user account on the system has administrative privileges.
To change an account's type, click the account's icon or name on the Accounts page. Then click the Change an Account link at the bottom right of the accounts page. That page lets you change the account in a number of ways when you click Change, or simply remove the account.
Password-protecting an account
You have the option to set up local accounts without password protection (Microsoft accounts require passwords). If you share your computer with other people, chances are you want to keep some people out of the Administrator account. Likewise, you want to keep some users from having administrative privileges. Passwords are especially important with parental controls. If the administrative account isn't password-protected, the kids won't take long to figure out how to bypass your controls.
To password-protect a user account, go to the main page for the user account. For example, if you're on the Accounts page, click the user account that you want to password-protect and then click Sign-in Options. You're taken to the page that lets you change the password. If you've been using the account for a while without a password, heed the warnings. If it's a brand new account, you have nothing to worry about.
To password-protect the account, type your password in the New Password text box. Then press Tab or click the Confirm New Password text box and type the same password again. You don't see the characters you type — only a placeholder for each character.
Next, enter a password hint in the Type a Password Hint text box. The hint should be something that reminds you of the forgotten password, but not a dead giveaway to someone trying to break into the account. Click Create Password after you've filled in all the blanks.
If you see a message indicating that your passwords don't match, retype both passwords. Make sure you type the password exactly the same in both boxes. Then click the Create Password button. You're taken back to the main page for the user account when you've successfully entered the password in both boxes and provided a password hint.
You can repeat the process to password-protect as many accounts as you wish. If you'recreating user accounts for people other than yourself, set a default password for the account and let the other users manage their own passwords. In our opinion, every account should have a password.
Changing the account picture
Every user account has an associated picture. The picture is like an icon, giving you a quick visual reference without having to read the name. The picture you choose can be any one of several built-in pictures, or it can be a picture of your own choosing.
If you decide to use your own picture, try to avoid using one that comes straight from a digital camera. The file size for such pictures is too large for a user account picture. Your best bet is to crop out a section from a photo and size it to about 100 &cmdarr; 100 pixels. The picture you choose can be of almost any format. By selecting all files, you can see the file types that are available.
To change the picture for a user account, click Accounts and then click Your Account. As shown in Figure 4.12, the panel shows the Account Picture, which is the current picture of the selected user (or the default image if you didn't select one). Click Browse and then select the area on your computer to locate a new picture. For example, click This PC, and then Pictures, to display your Pictures folder. You also can use an attached webcam to snap a picture or a five-second video to use as an account picture. To do this, you must have a webcam connected to your computer. On the same page, under Create a Picture, click Camera to start your camera (of course, this technique doesn't work if you don't have a camera or webcam working on your computer):

FIGURE 4.12 Account Settings page with user account picture options.
- To snap a still picture, click the screen. Use the cropping and resizing tools to select the portion of the picture to use. Click OK to save that picture as your new account picture.
- To take a five-second video, click Video Mode and click the screen to start the video. Click the screen again to stop the video and to review the video. Click Retake if you aren't satisfied with the video. Click OK when you want to keep the video and to set it as your account picture.
The picture or video you selected replaces the original picture.
Enabling or disabling the local Guest account
Every Windows 10 has a built-in Guest account. The Guest account is for anybody who needs to use your computer on a temporary basis. For example, on a home computer, you might use the Guest account for houseguests so that they can check their e-mail and browse the web. The Guest account has limited privileges, so you don't have to worry about guests messing things up while using your computer.
The Guest account is turned off by default. You can keep it that way until you need it. To activate the Guest account, go to the Computer Management application and drill down on Local Users and Groups under the System Tools tree and expand the list of users. Click the Guest Account icon. On the General tab, uncheck the Account is disabled option. Likewise, if you ever need to disable the Guest account, simply check the same option. To change or set a password, simply right-click on Guest and choose the first option, Set Password.
Navigating through user account pages
In Windows 10, user account management involves using two environments, including the Control Panel and the Accounts page on the Settings application. You can use the Control Panel to complete almost all user account tasks described earlier, even those that use the new Accounts page on the Settings application. When you get to a task, all you need to do is choose options and read text that's right on the screen. Windows provides links to advance to configuration screens. Some links are blue text (the standard web hypertext color), and others use new Windows 10 buttons to display new settings or options for a task. You use Back and Forward buttons to move from page to page.
Cracking into standard user accounts
If a local standard user forgets his or her password, you can use an account that has administrative privileges to reset the standard user's password. If you're an administrator and you want to see what a standard user is up to, you can use the same technique.
To change the password for a local standard user account, follow these steps:
- Log in to a user account that has administrative privileges.
- Go to the Manage Accounts page (press Windows Key+X and choose Control Panel, click User Accounts, and click Manage another account).
- Click the password-protected account for which the user has forgotten the password.
- Click the Change the password link.
- Enter a new password, and then enter it again to confirm it.
- Type a password hint.
- Click Change Password to save the new password.
The local standard user account now has a new password. Share this password with the user so he or she can sign into Windows.
Deleting User Accounts
An administrator can easily delete user accounts. If nobody has ever used a user account, deleting the account is no big deal. But if someone has used the account, the decision to delete it is more complicated. When you delete a user account, you also delete all e-mail messages downloaded to the computer, Internet favorites, music, pictures, and videos. You can also delete that user's saved files if you aren't careful. Doing this by accident is a disaster because you have no way to undo the deletion.
If you want to save the user's e-mail messages and Internet favorites, export them to the user's Documents folder first. Read the Windows online Help for more information on exporting Microsoft Edge favorites. Also, refer to your e-mail program's help for information on saving e-mail messages to a local drive — for example, to your Documents folder.
Assume you understand the consequences and have no intention of deleting an account just for fun. Only administrators can delete user accounts. So if you're in a standard account, you at least need to know the administrative password to delete a user account. You also need to log in to any account except the one you intend to delete. Then follow these steps:
- Display the Control Panel, click User Accounts, and click Manage Another Account.
- Click the account you want to delete.
- Click Delete the Account and read the resulting message. Then click one of the following buttons:
- Delete Files: Click this button only if you intend to delete everything associated with the account, including all files that the user has created and saved.
- Keep Files: Click this option to save the user's files. You will still lose the user's saved e-mail messages, Internet favorites, and user account.
- Read the next page to make sure you understand the consequences of your choice. Then click Cancel if you change your mind, or click Delete account if you're sure you know what you're doing.
If you choose Delete account, the user's account no longer exists. If you choose Keep Files, the user's saved files (those from his account's profile) move to a folder on the desktop. That folder has the same name as the user account you just deleted. Otherwise, nothing of the user's account, not even the saved files, remains. (If you choose Cancel in Step 4, the entire account remains intact and unchanged.)
If you create a new user account with the same name as the one you just deleted, the new account is still an entirely new account. It doesn't inherit any files or settings from the account you previously deleted.
Using User Accounts
As mentioned at the beginning of this chapter, each user account is like its own separate PC. Every user has his or her private Documents, Pictures, Music, and Video folders for storing files. Each user account can have its own Windows apps, e-mail account, and Internet favorites. Each user can customize the desktop, Start screen, and other settings to that user's own liking.
When you start your computer, the Windows lock screen appears. Press Enter, swipe up (on a tablet or touch screen), press the spacebar, or roll the mouse wheel up to display the sign-in screen. You also see the sign-on screen when you sign out of your user account. If you click a user account that isn't password-protected, you're taken straight into the account. But if you click the picture for a password-protected account, a password prompt appears.
To get into the account, enter the appropriate password. If you enter the wrong password, a message appears letting you know that the user account name or password is incorrect. You can click OK to try again. You can't get into the user account until you've entered the correct password for that account.
The first time you or someone else logs in to a new user account, the process is just like starting Windows 10 on a brand new PC. The desktop has the default appearance. All the document folders in the account are empty. You have no e-mail accounts, no Internet favorites, and no Windows apps installed. To use e-mail, the user must set up the Windows account with an e-mail account, preferably an account used only by that person.
The user has access to all the programs installed on the computer (except for rare cases in which someone installed a program for personal use only). The user likely has Internet connectivity through the same network or Wi-Fi as all other user accounts.
If the user account is a standard account, some limitations control what the user can do. For example, Windows settings are not synced with other devices, such as a Windows Phone or tablet. In addition, the user can't make changes to the system that would affect other users. That's where Windows 10's User Account Control security comes into play.
Understanding User Account Control
User Account Control (UAC) is the general term for the way administrative and standard user accounts work in Windows 10. As you scroll through pages in the Control Panel, notice that many links have a shield icon next to them.
Items that have a shield icon require administrative approval. Items without a shield icon don't. For example, any user can change his or her Windows password, with or without administrative approval.
Options that have a shield icon next to them require administrative approval. But you don't have to be logged in to an administrative account to use those options. You only have to prove that you have administrative privileges. To prove you have administrative privileges on this computer, enter the password for the administrative user account and click Submit (or OK in some dialog boxes).
When someone who doesn't know the administrative account password encounters the User Account Control dialog box, he or she is stuck. Users who don't know the password can't go any further. This prevents the standard user from doing things that might affect the overall system and other people's user accounts. It also prevents children from overriding parental controls. (You learn how to set up parental controls in Chapter 6.)
Privilege escalation in administrative accounts
If you happen to be logged in to an administrative account when you click a shielded option, you don't need to enter an administrative password. After all, if you're in an administrative account, you must already know the password required to get into that account. You don't need to prove that you know that password again. But, by default, you still see a prompt telling you that the program you're about to run makes changes to the system. Click Continue to proceed.
Clicking something to get to the item you clicked may seem irritating, but the prompt works that way for a reason. The dialog box lets you know that the program you're about to run is going to make changes to the overall system. You expect to see that dialog box after you click a shielded option. With time and experience, you'll learn to expect it when you do other things that affect the system as a whole, such as when you install new programs.
Sometimes the prompt appears when you don't expect to see it. For example, when opening an e-mail attachment, you don't expect to see that message. After all, opening an e-mail attachment should show you the contents of the attachment, and not make a change to the system as a whole. Seeing the warning in that context lets you know that something fishy is going on, most likely something bad in the e-mail attachment. Click Cancel to not open the attachment, thereby protecting your system from whatever virus or other bad thing lies hidden within the e-mail attachment.
On a more technical note, UAC operates on a principle of least privilege. When you're in an administrative account, you run with the same privileges as a standard user. This arrangement protects your system from malware that would otherwise exploit your administrative account to make malicious changes to your system.
When you enter a password or click Continue in response to a UAC prompt, you temporarily elevate your privileges to allow that change to be made. After the change is complete, you return to your more secure standard user privileges. This procedure has been common in high-security settings for years, and it's considered a security best practice.
Turning UAC on and off
If possible, you should follow standard best practices and keep UAC active on your own computer. But if UAC proves to be impractical, you can turn it off.
Even though UAC is much improved from Windows Vista, Windows 7, and 8/8.1, UAC is not always a very popular Windows 10 feature. After all, nobody wants a feature that makes them do more work, even when the extra work is nothing more than an occasional extra mouse click. Furthermore, sometimes UAC is just impractical. For example, if you give your kids standard user accounts, they can't install their own programs. But if you give them administrative accounts, you can't institute parental controls.
Before you turn off UAC, we recommend that you first ensure that all the other security measures discussed in Part II of this book are installed and working on your PC. UAC is just one component of an overall security strategy. The more components you have on and working, the better.
Changing UAC settings is a simple process. From the Windows 10 Start menu, select Control Panel, and click User Accounts. Or from the desktop, press Windows+X and click Control Panel. Click User Accounts. Click User Accounts again, and then Click Change User Account Control settings. If prompted to do so, enter an administrative password to get to the dialog box shown in Figure 4.13.

FIGURE 4.13 User Account Control Settings dialog box.
You can choose from the following options:
- Always Notify: Windows notifies you if programs try to install software or make changes to the computer, or if you make changes to Windows settings.
- Notify Me Only When Apps Try to Make Changes to My Computer (Default): Windows does not notify you when you make changes to your computer, but if programs attempt to make changes, Windows notifies you by dimming the desktop and displaying a warning.
- Notify Me Only When Apps Try to Make Changes to My Computer (Do Not Dim My Desktop): Windows does not notify you when you make changes to your computer, but it notifies you when programs attempt to make changes. However, Windows does not dim the desktop; instead, it displays a message.
- Never Notify: Windows does not notify you of changes (this option turns off UAC). The only safe time to use this option is when you need to install a program that doesn't work with UAC. Turn off UAC, install the program, and then turn on UAC again.
To turn UAC off, drag the slider down to Never Notify. Or, if it was already off and you want better security, drag the slider up to the desired level. Then click OK.
If you turned off UAC, when you click a shielded option you receive no prompting for credentials or status checking. The settings are basically the same as they were in Windows XP and other earlier versions of Windows.
Creating and Using Password Reset Disks
A password reset disk is an important part of any password-protected PC. It's the only method of password recovery that allows you to retain all data in an account in the event of a forgotten password. Advanced features such as EFS (Encrypting File System) encryption, personal certificates, and stored network passwords can be recovered only by using a password reset disk.
The trick is that you need to create the password reset disk before you forget the password. You can't create the disk after you've forgotten the password. Keep the disk in a safe place where you can find it when you need it, but where others can't find it to gain unauthorized access to the administrative account.
A USB flash drive or memory card works equally well. However, a memory card works only if your computer has slots for inserting a memory card.
Choosing a memory device for the password reset
A USB flash drive (also called a jump drive) is a small device that plugs into a USB port on your computer and looks and acts like a disk drive. A memory card (SD Card) is a storage device commonly used to save pictures in digital devices, such as cameras or smartphones. If your computer has slots for such cards, you can slide a card into the slot and treat the card just as you would a USB flash drive.
To see examples and prices, check out some online retailers. Then search the site for flash drive, jump drive, or memory card reader to view available products. If you're considering memory card readers, the kind that plug into a USB port are the easiest to install. Many retail department stores that sell computer or office supplies also carry flash drives.
To create the Password reset disk, perform the following steps:
- Insert your Flash drive or SD card into the computer.
- Press Windows+S to bring up the search bar. Type User Accounts.
- Select User Accounts.
- Click Create a password reset disk.
- Click Next.
- Select Next.
- From the drop-down menu, select the device where you want the password reset disk to be created.
- Type your password (this is the password that you use to log in to your computer from the login screen).
- Click Next.
- When the progress bar reachs 100 percent, click Next.
- Click Finish.
Running Programs as Administrator
Most newer programs work with UAC's privilege escalation on the fly. But sometimes a program doesn't work, especially if it's an older program. You can run many programs with administrative privileges by right-clicking the program's startup icon and choosing Run as Administrator, as in the example shown in Figure 4.14.

FIGURE 4.14 Run a program as administrator.
If the option to run the program as an administrator is not available, one of the following is true:
- The program doesn't require administrative privileges to run.
- You're already logged in to an administrative account.
- The program is always blocked from running with elevated privileges.
Add the Built-in Administrator Account to the Login Screen
The built-in Administrator account is intentionally hidden to discourage users who don't have sufficient knowledge to understand the risks involved in using such an account. Typically, the way to get to it is by starting the computer in Safe Mode. If you're an advanced user and you want to be able to get to that account from the sign-on screen, you simply have to enable the account. Here's how:
- Log in to an account that has administrative privileges.
- At the desktop, press Windows+X and click Computer Management.
- In the left column of the Computer Management tool that opens, click Local Users and Groups.
- In the center column, double-click the Users folder.
- Right-click the Administrator account and choose Properties. You can also double-click the account to get the properties screen.
- Clear the check mark beside Account Is Disabled and click OK.
- Close the Computer Management window.
When you log out of your current account, you see the Administrator account on the sign-on screen. It also appears there each time you start the computer.
Advanced Security Tools
IT professionals and highly experienced users can also use the Local Users and Groups and Local Security Policy consoles for more advanced security configuration. Detailed instructions on using these security configuration tools are beyond the scope of this book and not something for the average user to mess with. However, if you want to access the Local Users and Groups tools, at the desktop press Windows+X and click Computer Management. Then click Local Users and Groups in the left column.
To get to Local Security Policy, type local in Search and click Local Security Policy. To find the new settings related to UAC, expand Local Policies in the left column and then click Security Options. The new UAC settings are at the bottom of the list in the content pane.
Using Credential Manager
Credential Manager (see Figure 4.15) enables you to manage your usernames and their associated passwords (collectively called credentials) for servers, websites, and programs. These credentials are stored in an electronic virtual vault. When you access a server, site, or program that requests a password, Credential Manager can submit the credentials for you so that you don't have to type them yourself. If your password cache has dozens of sets of credentials in it, you'll be more than happy to have Credential Manager at work for you.

FIGURE 4.15 Store usernames and passwords in Credential Manager.
Although you can add credentials to your vault directly, you don't need to do so in most cases. Instead, you can let Windows do it for you. To do so, navigate to a server or other computer on your network or to a web server that prompts you for credentials. Enter the username and password in the Windows Security dialog box, select Remember My Credentials, and click OK. Windows stores the credentials in Credential Manager.
You can add credentials directly to your vault if you want to. For example, if you have lots of credentials you use with multiple servers or sites, you may want to prepopulate your credential vault so that you don't have to wait to enter them until the next time you visit that resource.
To add credentials directly, open the User Accounts and click Credential Manager. Click the Windows Credentials icon and then click Add a Windows Credential. In the resulting form (as shown in Figure 4.16), enter the following:
- Internet or Network Address: Type the path to the resource. For example, enter \fileserverDocs to specify the Docs share on a server on the network named fileserver. Or, enter portal.mycompany.com if your company intranet portal is located at
https://portal.mycompany.com. - User Name: Enter the username you want to use to log on to the specified service.
- Password: Enter the password associated with the username.

FIGURE 4.16 Manually add a Windows credential.
You can also add a certificate resource, which associates a network resource with a security certificate that is already installed in the Personal certificate store on your computer. In this case, verify that you've already installed the certificate, click Add a Certificate-Based Credential (see Figure 4.16), type the resource URL, and click Select Certificate to select the certificate.
The final type of credential you can add is a generic credential, which is used by applications that perform authentication themselves instead of relying on Windows to perform the authentication. As with a Windows credential, you specify the URL, username, and password for a generic credential.
Managing Profile Properties and Environment Variables
From the earliest days of DOS, the PC operating system we old computer geeks used before Windows came along, environment variables have been used to store information used by the operating system. For example, the TMP and TEMP variables tell Windows where to store temporary files. The PATH variable tells Windows where to look for programs if it can't find them in the current directory. A number of other system and user variables serve similar purposes.
In most cases, you don't need to change environment variables. But if you do — such as when adding a folder to the PATH variable — you can do so through your user account properties. Open the User Accounts object in the Control Panel and click Change My Environment Variables. In the Environment Variables dialog box, shown in Figure 4.17, click the user variable that you want to change, click Edit, modify as needed, and click OK. You can also click New and then add a new user environment variable.

FIGURE 4.17 The Environment Variables dialog box.
Wrapping Up
When two or more people share a computer, user accounts enable each person to treat the computer as though it was his or her own. Users can personalize settings to their liking and keep their files separate from other users. Windows 10 Microsoft Accounts provide an account structure that enables multiple devices (Windows computer, Windows Phone, Windows tablets, and so on) to sync settings, apps, and other personalized items.
User accounts also work in conjunction with parental controls. A parent can set up a password-protected administrative account and then use that account to set up parental controls. You can create standard accounts for children and allow them to log in to their own accounts only.
User accounts also add security to your system by requiring all users to have limited privileges. The general term for security through user accounts is User Account Control (UAC). Some key points to keep in mind:
- At least one person should play the role of administrator for the computer. That person should create a password-protected user account with administrative privileges.
- The administrator should create a standard account for himself or herself and one for each person who shares the computer.
- All users (including the administrator) should use their standard accounts for day-to-day computing.
- All accounts should have strong passwords.
- All the tools for creating and managing user accounts are accessible from User Accounts and Family Safety in the Control Panel.