CHAPTER 13
Using Computers Remotely
Remote Assistance lets you turn control of your computer over to a trusted expert for advice, troubleshooting, or general support. Remote Desktop allows you to control a remote computer from whatever computer you happen to be using. This chapter covers both of these topics.
Using Remote Assistance
Remote Assistance is a way to give control of your computer to a trusted expert. A trusted expert is any computer expert you trust not to damage your computer or steal any personal information. It may be someone from Desktop Support at your place of business. It may be a friend or relative who happens to be a computer expert. Whoever it is, you have to find that person yourself. Remote Assistance provides you with only the ability to let a trusted expert operate your computer from afar—it doesn't provide the trusted expert.
Setting up Remote Assistance
Before you try to use Remote Assistance, make sure that it's enabled in your user account. Doing so requires administrative privileges. You find options for enabling and disabling Remote Assistance in the System Properties dialog box. Here's a quick and easy way to get to those options:
- At the Windows taskbar, start typing the word assistance. The Allow Remote Assistance Invitations to Be Sent from This Computer link appears in the results area. Clicking this option opens the System Properties dialog box direct to the Remote tab. (To open Remote Assistance open Control Panel and click the System option.) Choose the Allow Remote Access to Your Computer option in this dialog box.
- If prompted, enter an administrative password. The Remote tab of the System Properties dialog box, shown in Figure 13.1, opens.
- If you want to allow the computer to be used in Remote Assistance sessions, select the Allow Remote Assistance connections to this computer check box. Otherwise, the computer cannot be used for Remote Assistance.
- Optionally, click the Advanced button. Then, to allow trusted experts to control the computer remotely, select the Allow this computer to be controlled remotely option.
- Optionally, set a time limit on how long Remote Assistance invitations remain open, as shown in Figure 13.2. Also, you can limit Remote Assistance to other computers running Windows Vista or later versions of Windows.
- Click OK.
- Click OK again.

FIGURE 13.1 The Remote tab of the System Properties dialog box.

FIGURE 13.2 The Windows Remote Assistance Settings screen.
The next section assumes that you've allowed Remote Assistance in the preceding steps.
Requesting Remote Assistance
Before you allow a trusted expert to take over your computer online, you need to agree on a time. For security, you should agree over the phone or in person.
If you know the e-mail address of an expert you can trust to help with your computer, follow these steps and then send a Remote Assistance request:
- Open Control Panel, choose System and Security, select Troubleshoot common computer problems, and then select Get help from a friend from the left side panel.
- The Remote Assistance dialog loads with information on how to request Remote Assistance, as shown in Figure 13.3.
- Click the Invite someone to help you option. A window like the one shown in Figure 13.4 appears.

FIGURE 13.3 Creating an invitation for someone to help you solve a problem on your computer.
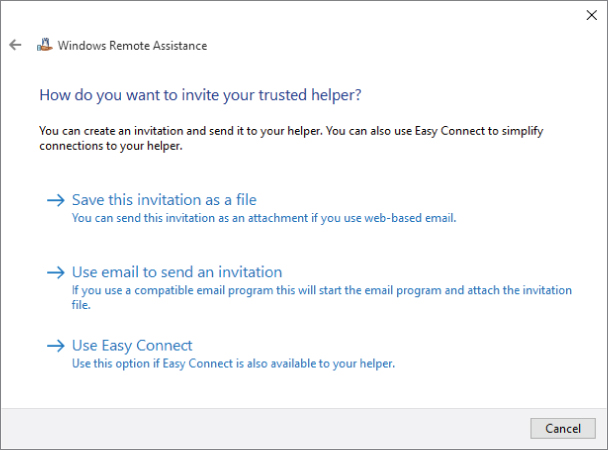
FIGURE 13.4 The Windows Remote Assistance window.
How you proceed from there depends on how you use e-mail. If you use Windows Mail or another e-mail client that's compatible with Windows 10, follow these steps:
- Click Use e-mail to send an invitation. You e-mail client loads with an invitation e-mail ready to send.
- Type the expert's e-mail address in the To box and click Send.
- If your e-mail client isn't configured to send mail immediately, open that program and perform a Send/Receive.
If you use a browser-based e-mail client, follow these steps instead:
- Click Save this invitation as a file.
- Choose a location in which to save the file and click Save.
- Compose an e-mail message to the expert and attach the Invitation (or
Invitation.msrcincident) file to that message using the standard method for your e-mail service. Then send the message normally. - Compose a second message to the expert and enter the Remote Assistance password that shows on your screen. Send the message.
The e-mail message is sent to the trusted expert. In the meantime you will receive a Windows Remote Assistance message providing you with the helper's connection password. This is shown in Figure 13.5.

FIGURE 13.5 The Windows Remote Assistance password window.
The trusted expert needs to receive your e-mail and open the attached file. Remember to also provide the password in the Remote Assistance window to your trusted expert. Remote Assistance doesn't send that password in the e-mail so you must send it to the other person in a separate e-mail or by phone. Then the trusted expert can enter the password in the Remote Assistance window on his or her end.
After your expert has done that, you see a new message on the screen (like the one shown in Figure 13.6), asking whether you're willing to allow that person to connect to your computer. Choose Yes.

FIGURE 13.6 Allowing someone to connect to your computer.
When connected, the trusted expert sees your screen and options for chatting, requesting control of the computer, sending a file, and starting a voice conversation. To operate your computer from afar, the expert takes control of your computer, which he or she can do by clicking Request Control at her end. Depending on the Windows version that the trusted expert is using (such as Windows Vista), you may see another message asking if you're willing to share control. Choose Yes.
You can see everything the expert is doing while they have control of your computer. On your computer and the expert's computer, the following icons represent the main actions that can be performed in the Remote Assistance window for actions:
- Request Control: Seen from the helper's windows, this option allows the expert to take control of your computer from a remote location.
- Stop Sharing: On your side, this keeps the expert connected visually, but the expert can't operate your computer.
- Pause: On your side, this temporarily breaks the expert's connection to your computer. Click Continue to reestablish the connection.
- Settings: This takes you to a Settings dialog box, where you can opt to exchange contact information or save a log of the session. On your side, there is also an option to use the Esc button to stop sharing. This option is provided in case you lose control of your mouse and need to end the sharing immediately.
- Chat: This opens a chat window so that you and the expert can communicate during the session.
- Help: This opens Windows Help and Support.
At any time, you can click the Stop Sharing button on your screen to take back control of your computer. Similarly, the expert on the other end can click Stop Sharing to stop the sharing session and give you back control of your computer.
While the expert has control of your computer, he or she can use your computer just as you can. As the expert moves around your computer, opening applications, setting options, or displaying the Windows 10 interface, you can sit back and watch. This is one way in which you can learn new troubleshooting steps or application procedures if you're stumped on how to make something work or improve Windows performance.
When the expert has finished working or if you want to stop sharing your desktop, click the Stop Sharing button and close the Remote Assistance window. The expert can click the Disconnect button to end the session.
Using the Remote Desktop App
The Remote Desktop app allows you to control a computer from a remote location. It's often used to access computers on a corporate network from a home PC or vice versa. It's also very commonly used by system administrators to remotely manage Windows servers. The Remote Desktop app is different from Remote Assistance in that, with Remote Desktop app, you're remotely logging on to a computer and controlling it remotely as a single user. With Remote Assistance, the session includes the local user and the remote expert.
Before you can connect to a remote computer on your office network, a network administrator on the corporate side needs to set up that capability, enabling Remote Desktop Connection inbound to the network (or providing a VPN connection to the remote network for the user). Likewise, if you want to connect to your home computer from the office, you need to configure your home firewall to forward port 3389 to the home computer you want to manage. How you configure the firewall depends on the firewall, so we can't give you specific steps. At this point, we assume that whichever direction you're going, the necessary network and firewall changes are in place to make it possible.
To connect to the remote computer, you need to know either the hostname of the computer or its IP address. If the computer is on your local network segment, you can use the computer name. To connect to a computer on a remote network segment, you need to use either the fully qualified domain name (FQDN) of the remote computer, a private IP address on a private network or its externally (public) facing IP address. This IP address is the public address that is mapped in the firewall to the private address assigned to the computer. The computers you connect to must be set up to allow Remote Desktop connectivity.
When you have the information you need, making the connection should be easy. You have to be online, of course. If the company requires connecting through a virtual private network (VPN), make that connection as specified by your company's network administrator. With Windows 10, you also have the option of using a Remote Desktop Gateway server, if your company allows it. With the Remote Desktop Gateway server, a VPN is not required to be set up.
Next, open Remote Desktop by clicking the Windows 10 Remote Desktop on your computer section of the All apps list. The Remote Desktop app opens, as shown, expanded, in Figure 13.7. If you can't find the Remote Desktop app for some reason, connect to Windows Store and search for Remote Desktop App and install it (don't confuse this app with the classic Remote Desktop Connection application, which is built in to Windows 10). The screen in Figure 13.7 appears.

FIGURE 13.7 The Remote Desktop app.
When you first open the app, you can connect directly to a PC by entering the name in the search bar at the bottom of the screen. You can also connect to apps and desktops that an administrator has granted you access to, as well as connect to a corporate network by way of a Desktop Gateway server.
To add a connection, click the top left of the screen and select Settings. This brings up a window on the right side of the screen. Select Manage RemoteApp and desktops. Choose Add a new connection. Enter either the email address or the URL of the computer you wish to connect to.
If the remote computer is password protected, the Log In window appears, as shown in Figure 13.8. Enter credentials that will allow you access to the remote computer. If you don't have an account on the remote computer, or you don't know the username and password of a user on that remote computer, you aren't allowed to connect to it.

FIGURE 13.8 Enter credentials to connect to the remote computer.
After you enter the credentials, you can click the Remember My Credentials check box to store those credentials for the remote computer. This enables you to connect to the remote computer next time without entering credentials. Click Connect.
If the identity of the remote computer cannot be verified or reached, the following message appears: “RemoteApp and desktop resources aren't available. Talk to your network administrator to find out how to access these resources” (see Figure 13.9).

FIGURE 13.9 The Remote Desktop app cannot connect to a remote PC.
To connect to Remote App and desktops, you need to supply the email address or URL from your organization to gain access to the apps and desktops that you have authorization for.
Allowing remote connections on a home network
You can also use Remote Desktop to control your Windows 10 PC from any other PC within your home network. For example, say you have a notebook computer that you use for work, and a home computer for personal use. You no longer need to hook up a monitor, keyboard, or mouse to the home computer; instead, you can simply open a Remote Desktop connection to the home computer any time you need to use it. Likewise, you can connect to the other computers in the house when you need to fix something on them.
Because the notebook computer has a wireless connection to your home network, you can use your personal PCs from anywhere in the house, even outside on the deck when the weather is nice.
To set up this type of remote connection, you first need a home network. The computer you want to control remotely needs a version of Windows that offers Remote Desktop, including all versions of Windows 10, 8/8.1, Windows 7, Windows Vista, and Windows XP. Finally, you can log in only to password protected accounts on the Windows computer. The account can be a standard account, but it must be password protected.
The remote computer also must have an edition of Windows that supports Remote Desktop. Home editions of Windows, such as Windows 10 Home, do not include Remote Desktop capability, which would allow you to connect to them remotely. However, they include a client that enables them to connect to other computers that do support Remote Desktop.
Assuming that you have all the hardware and software to meet the requirements, the first step is to set up the Windows 10 computer to allow remote connections. Doing so requires administrative privileges and the following steps:
- On the Windows 10 computer, log in to an account that has administrative privileges.
- Display the Desktop.
- Press Windows+X.
- Launch Control Panel.
- Choose Large Icons or Small Icons from the View By drop-down list.
- Choose System and then click on the Advanced system shield icons in the left side of the dialog box. The System Properties dialog box now loads.
- On the Remote tab, under the Remote Desktop heading, choose the Allow remote connections to this computer option.
- Click the Select Users button.
- Use the Add button to add usernames of people who are allowed to connect remotely. The administrator is added to the list automatically. In Figure 13.10, we've added the username Kevin as the third person who can connect remotely.
- Click OK in each open dialog box.

FIGURE 13.10 After adding a user (Kevin) as a Remote Desktop user.
Make sure you know the computer name or IP address of the Windows 10 computer. You can see the name to the right of the Computer Name label on the main page of System Properties. To find the IP address of the computer, log in to the computer you want to control remotely. On the desktop, press Windows+X and choose the Command prompt. Then type ipconfig in the command console window and press Enter. The IP address appears on the IPv4 Address line and is in a form similar to the following: 192.168.2.12.
Connecting from a remote home network PC
To connect remotely to the Windows 10 PC from another network in your local area network (LAN) or home network, you can also open the Remote Desktop app we discussed earlier on your local computer. However, for this task we will use the classic Remote Desktop Connection application, which you can launch from the Windows Accessories in the All Apps list. See also the next section in this chapter.
In the window that opens, enter the remote computer's IP address or computer name and click Connect. If the user account name of the computer at which you're sitting is different from the user account on the Windows 10 computer, click Use Another User. Type in the username and password for the user account on the Windows 10 computer and click OK or press Enter.
Depending on the display settings you used for the connection, the remote computer's screen either appears in a window or fills your local display. If you're running the connection in full-screen mode, move the mouse to the top of the screen to access the connection bar, which you can use to minimize, restore, or close the connection. From the local computer, you use the remote computer exactly as you would if you were sitting at that computer. When you've finished with your remote session, log out of the remote user account. That is, click the connection bar and click the close button. If you're connecting remotely to an earlier version of Windows, such as Windows 8.1, 8, 7, or Windows Vista, click the Start button on the remote computer and choose the Log Off option.
For more information, check the Remote Desktop Help on both computers that you intend to use in your own local network.
Using Classic Remote Desktop
Although the new Windows 10 Remote Desktop app provides a Windows 10 interface and is easy to use, you may be more comfortable using the previous version of Remote Desktop Connection. If so, you can still run it, but you must launch it from its executable filename: MSTSC.EXE. Use either of these methods to launch it:
- Click the Start button, click on All apps, and from the Windows Accessories folder, click the Remote Desktop Connection icon.
- Open the command prompt. Type MSTSC and press Enter.
The Remote Desktop Connection window appears (see Figure 13.11).

FIGURE 13.11 The classic Remote Desktop Connection window.
Before you connect to a remote computer, you may want to click the Show Options button and look at the options on the various tabs. The only required option is the name or IP address of the computer to which you're connecting. The following sections describe the tabs and options.
Display
Use the Display Configuration settings on the Display tab (shown in Figure 13.12) to specify the screen resolution for the Remote Desktop Connection. If you have multiple monitors connected to the local computer, you can select the option Use All My Monitors for the Remote Session to span the Remote Desktop session across your multiple monitors.

FIGURE 13.12 The classic Remote Desktop Connection Display tab.
Use the Colors drop-down list to specify the color depth for the remote session. A lower color depth provides faster response for the remote session.
The Display the Connection Bar When I Use the Full Screen option, if enabled, causes Remote Desktop to display a connection bar at the top of the display when the remote session is using full-screen mode. Moving the mouse to the top of the display shows the connection bar, which then enables you to minimize, restore, or close the remote session window.
Local Resources
The settings on the Local Resources tab (shown in Figure 13.13) enable you to configure how Remote Desktop uses local and remote resources. For example, click the Settings button in the Remote Audio group to open a dialog box that enables you to specify whether Remote Desktop plays audio from the remote computer at the remote computer, brings it to your local computer, or does not play the sounds. You can also specify similar settings for remote recording.

FIGURE 13.13 The classic Remote Desktop Connection Local Resources tab.
Use the drop-down list in the Keyboard group to specify how Remote Desktop treats Windows key combinations such as Alt+Tab—sending them to the local computer or remote computer, or sending them to the remote computer only when using full-screen mode.
The Local Devices and Resources group lets you specify how local resources such as your printers, Windows Clipboard, ports, disk drives, and other resources are made available during the remote session. This capability can be extremely useful. For example, by enabling the drives on your local computer for the connection, you make them accessible in the File Manager on the remote computer. This means that you can easily drag and drop files between the two systems. By enabling the Clipboard, you can cut and paste between the systems.
Experience
The options on the Experience tab (see Figure 13.14) help you control the performance for the remote session. You can choose an option from the drop-down list, which determines which options in the list below the drop-down are enabled. You can also simply select the options you want to use.

FIGURE 13.14 The classic Remote Desktop Connection Experience tab.
Advanced
The Advanced tab (shown in Figure 13.15) offers options that control authentication alerts and Remote Desktop Gateway. The drop-down list on the Advanced tab lets you specify what action Remote Desktop Connection takes when you connect to a remote computer that doesn't satisfy the security requirements as defined by your local system security policy. You can choose to have Remote Desktop Connection drop the connection, warn you so that you can choose the action to take, or connect without warning you.

FIGURE 13.15 The classic Remote Desktop Connection Advanced tab.
The Settings button opens the RD Gateway Server Settings dialog box (see Figure 13.16), which lets you specify how Remote Desktop Connection works with a Terminal Services Gateway Server, now called Remote Desktop Gateway Server. RD Gateway acts essentially as an intermediary between your computer on the Internet and remote computers behind a firewall, such as at your office. RD Gateway uses SSL (port 443) rather than the usual port 3389 used by Remote Desktop Connection. RD Gateway, therefore, makes connecting to remote computers possible without having a VPN or opening port 3389 in the firewall. What's more, it enables connection to multiple back-end computers, rather than just the one that would otherwise be possible with a hole in the firewall for port 3389.

FIGURE 13.16 The RD Gateway Server Settings dialog box.
Remote Desktop Connection can detect the RD Gateway server settings automatically, or you can specify them manually. The first two options on the RD Gateway Server Settings dialog box let you specify which method to use. If you choose to specify the settings yourself, you can enter the server name, login method, and whether to bypass the gateway for computers on your local network. If you enter the settings manually, you also have the option of specifying that Remote Desktop Connection will use your RD Gateway credentials to authenticate on the remote computer to which you are connecting.
Wrapping Up
Remote Assistance and Remote Desktop Connection provide a means to both view and remotely control other computers. Key points of this chapter are as follows:
- If you know a trusted computer expert who can help with your computer, use Remote Assistance to get live help online.
- Some corporations allow employees to connect to a corporate network from home using Remote Desktop Connection.
- If you have a home network and suitable versions of Windows, you can use Remote Desktop to control one PC on the network from another PC in the same network, or from the Internet.