CHAPTER 24
Getting Older Programs to Run
You can run almost any program that's installed on your computer just by clicking its tile on the Windows 10 Start menu. But every rule has exceptions. Chief among the list of exceptions are old programs that were written to work with earlier versions of Windows. Or, even worse, programs that were written to run on DOS.
That isn't to say Windows can't run old programs. Most of the time, it can run an older program as is, without any changes at all on your part. This is especially true if the program was written for Windows XP or later versions of Windows. So, before you assume that you have to do something to try to get an older program to run, try running the program normally. If it runs, you're set. If it doesn't run, this is the chapter you need.
Understanding Program Types
A couple of types of programs can be considered “old” in the context of this chapter:
- DOS programs: These programs were developed to run under various versions of the Disk Operating System (DOS), the precursor to Windows.
- Windows programs: These Windows applications were written for Windows ME and earlier versions of Windows.
What does “16-bit” mean? Three classes of Windows applications exist: 16-bit, 32-bit, and 64-bit. The number of bits indicates the maximum amount of addressable memory supported by the program. Table 24.1 indicates the differences.
TABLE 24.1 Processor Technology and Directly Addressable Memory
| Technology | Meaning | Memory Addresses |
| 16-bit | 16 | 65,536 |
| 32-bit | 32 | 4,294,967,296 |
| 64-bit | 64 | 18,446,744,073,709,600,000 |
Windows NT, Windows 2000, and Windows XP were all originally 32-bit operating systems. Windows XP was also offered in a 64-bit edition. Windows 98 and earlier were 16-bit operating systems. Windows Vista and Windows 7 were offered in two versions, 32-bit and 64-bit. Likewise, Windows 8/8.1 and Windows 10 are available in 32-bit and 64-bit versions. Suffice it to say, the higher the bits, the more capable the operating system. For the purposes of this chapter, the key point is that you can run a program on the OS it was designed for or (possibly) on a later version, but you can't go backward. For example, you can run a 32-bit application on a 64-bit OS, but you can't run a 64-bit program on a 32-bit OS.
DOS programs
Let's make a distinction between DOS programs and DOS commands that you can run in Windows 10. DOS programs were written specifically to run on a DOS without (and before) Windows. It's so unlikely that you would want to run an old DOS program on Windows 10 that we don't even cover the topic in this chapter (although we do have a copy of Zork — an interactive adventure game from the late 1970s — lying around somewhere that would be fun to play again…). That doesn't mean you can't run that DOS program under Windows 10. Many of them run without any major problems.
DOS commands are developed by Microsoft and included as part of the Windows package, instead of being developed and marketed by third parties. We cover DOS commands to some degree later in this chapter.
Old programs to avoid altogether
Windows 10 is a revision of the Windows 8.1 operating system, so almost all Windows 8.1 programs should have no problems running on Windows 10. Likewise, many of your basic Windows 7, Vista, and Windows XP application programs work. But you should validate compatibility for other kinds of programs before attempting to run them under Windows 10. These include:
-
Old disk utility programs: Older disk utility programs such as Norton Utilities (later it went by Symantec Norton Utilities) and various disk compression and
partitioning tools should never be run on Windows 10. Many older DVD- or CD-burning programs are likely to cause problems, too. If you have such a program, you should upgrade to the Windows 10 version of that program or find a similar product that's designed to work with Windows 10.
- Old backup programs: If you have an older backup program, using it in compatibility mode could prove disastrous. Even if you can perform the backup, there's an outside chance you won't be able to restore from the backup if and when you need to. Consider using Windows File History, which comes with your copy of Windows 10.
- Old cleanup programs: Older programs that purport to keep your computer running in tip-top shape, clean up your registry, and so on should not be used at all in Windows 10. If you like the program, look into getting a version that's specifically written for or certified by the developer as compatible with Windows 10.
- Old optimizing programs: Programs designed to make your computer run at maximum performance don't necessarily make Windows 10 run that way. In fact, they may do more harm than good. If you use such programs, check to see if a Windows 10 version is available before you install the old version.
- Old antivirus programs: Virus detection and removal is dicey business and must be handled with great care. Antivirus programs written for pre–Windows 10 versions of Windows should never be installed or run on a Windows 10 computer unless certified by the developer as compatible. The same goes for anti-spyware and other anti-malware programs. Better to seek out a Windows 10 version of the program than to presume the older version will work. Better yet, use Windows Defender, which comes preinstalled on your computer.
Installing Incompatible Programs
To install an older program, first try installing it normally. For example, if it's on a CD, insert the CD and wait for the installation program to appear automatically. If nothing starts automatically, open your root folder (open File Explorer and choose the root folder or This PC). Then click the icon to open the drive that contains the installation disc and double-click the setup launcher program (typically setup.exe, setup, install.exe, or install). If Windows 10 determines that the program is older, you see the Program Compatibility Assistant.
If you believe that the program installed normally, click the option that indicates that the program installed properly. Otherwise, click the option that specifies compatibility mode. Windows 10 assigns some compatibility mode attributes to the program and tries the installation again. With any luck, the second try does the trick.
If you still have problems, here are some things to consider:
- If you're installing from a standard user account, log out and log in to an administrative account; then try to install from that account.
- If you have to create any file or folder names, use names that conform to the DOS 8.3 conventions (keep filenames to eight characters maximum with no blank spaces and provide a three-character extension).
- If you get stuck in an installation program, use the Applications tab in Task Manager to end the stuck program.
If all else fails, contact the program publisher (if it's still in business) or look for information about that program online. Only the program publisher really knows if the program runs in Windows 10 and what's required to get it to run.
Using the Program Compatibility Troubleshooter
Installing a program is one thing; getting it to run after it's installed is another. If an installed program doesn't start or isn't working right, try using the Program Compatibility Troubleshooter on it.
The Program Compatibility Troubleshooter provides a step-by-step means of configuring and testing an older program so that it runs in Windows 10. Before you bother to use the troubleshooter, try running the installed program without it. You may discover that the program runs just fine without any compatibility settings and save yourself quite a bit of trouble.
If you're sure an installed program isn't running, or is not running correctly, follow these steps to start the Program Compatibility Troubleshooter:
- Open Control Panel and click the Troubleshooting icon.
- When the Troubleshooting applet opens, click the Programs option and then click the Program Compatibility Troubleshooter.
- On the first page of the troubleshooter, click Next. The troubleshooter now gathers a list of applications for troubleshooting (see Figure 24.1).
- Select a program and click Next.
- If you want Windows 10 to try to determine the right settings on its own, click Try Recommended Settings. To specify your own settings, click Troubleshoot Program. The following steps assume you've selected the second option.
-
Next, the wizard prompts you to answer questions about the program (see Figure 24.2). Selecting any of the first three options causes the wizard to prompt you with related questions. For example, if you choose the option The Program Worked in Earlier Versions of Windows But Won't Install or Run Now, the wizard asks you to specify on which version of the OS it worked previously (see Figure 24.3). Likewise, choosing the option The Program Opens But Doesn't Display Correctly results in a screen that prompts you to the test the program for display setting issues.
Complete the wizard by selecting options that relate to the problems you're having with the program.

FIGURE 24.1 Program Compatibility Troubleshooter.

FIGURE 24.2 Program Compatibility questions.

FIGURE 24.3 Select a Windows version under which your program previously worked.
The process is mostly trial and error. If the program runs when you finish the wizard, great. Otherwise you can run it again to try different settings until you get the program to work correctly.
Here are some general guidelines to help you get your program running:
- If the program doesn't install or doesn't run, run the wizard, choose the option The Program Worked in Earlier Versions of Windows But Won't Install or Run Now and specify the operating system for which the program was written. For example, if it is a Windows XP game, choose Windows XP from the OS list provided by the wizard.
- If you have problems with the program's display, choose the option The Program Opens But Doesn't Display Correctly and click Next. Choose the symptoms the program is exhibiting and click Next to let the wizard set display options as needed.
- If you think the program is having permissions issues (for example, the program says it can't write a file), choose the option The Program Requires Additional Permissions. The wizard configures the program to run as an administrator, which should resolve the issue.
You have no guarantee that the Program Compatibility Troubleshooter will make the program run. Some programs are so old and so far removed from modern computing capabilities that you have no way to force them to run. In those cases, the only hope is to contact the program publisher or search online for solutions or a compatible version of the program.
Quick-and-Dirty Program Compatibility
The Program Compatibility Wizard provides an easy way to choose and test settings for program compatibility. Those settings are stored on the Compatibility tab of the program file's properties sheet. You can use the wizard to change compatibility settings, or you change settings manually right in the properties sheet by following these steps:
- On the Start menu, right-click the program shortcut you want to examine. Choose More.
- Choose Open File Location (see Figure 24.4).
- Right-click the program's icon and choose Properties.
- In the Properties dialog box that opens, select the Compatibility tab. You'll see the options shown in Figure 24.5.
- Select the Run This Program in Compatibility Mode For check box, and then choose the operating system for which the program was written. If the program installs and runs, but exhibits other symptoms (such as display problems), leave this option unselected.
- If you're having problems with the program's display, choose appropriate display settings in the Settings group.
- If the program seems to have permission problems, select Run This Program as an Administrator.
- If you want to apply the settings for everyone who uses the program, click the Change Settings for All Users button to open a similar Properties dialog box and set properties there as needed.
- Click OK.
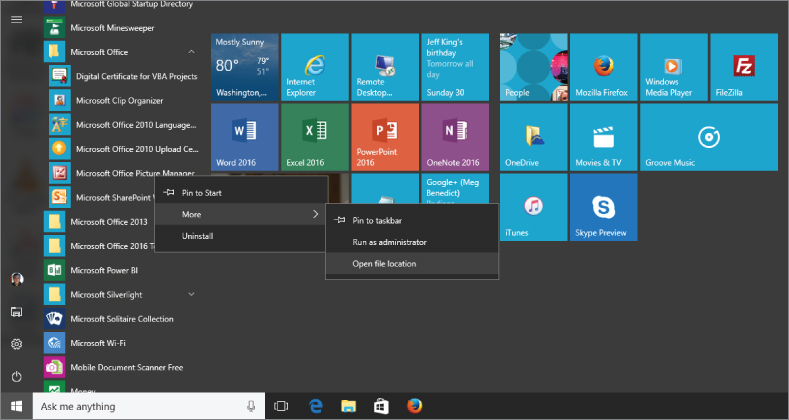
FIGURE 24.4 Display program options.

FIGURE 24.5 Compatibility settings.
The compatibility settings stick to the program so you can start the program normally, from the All Programs menu, at any time. Keep in mind that you can't force all programs to run in Windows 10.
Using DOS Commands in Windows 10
If you've used personal computers since the DOS days, you may want to enter the occasional DOS command. DOS commands let you do things you can't do in Windows. For example, in those rare instances where you can't delete a file in Windows, using a DOS erase or del command with the /F switch often does the trick. You can use the DOS dir command to print filenames from a folder to print out or a text file.
Using commands in Windows 10 has one big catch. User Account Control (UAC) may prevent you from doing things you'd otherwise take for granted. You can get around many of those by using the Run as Administrator option to open the command prompt. Here are two different ways to open the Command Prompt window, but not as an Administrator:
- From the desktop, press Windows+X and click Command Prompt.
- In the Cortana search box, type cmd and press Enter. The Command Prompt window appears (see Figure 24.6).

FIGURE 24.6 Open Command Prompt.
The Command Prompt window that opens is much like DOS. By default, when logging in under an account that is not the Administrator account you're taken to the home directory for your user account. But you can navigate around using the DOS cd command. For example, enter cd.. to go to the parent directory, or cd “program files” to go to the Program Files folders.
To see a list of all supported commands, enter help at the command prompt. For the syntax of a command, type the command followed by /?. For example, entering dir /? displays the Help for the dir command.
You can copy and paste a lengthy pathname to a cd command to simplify opening that folder in a DOS window. In Windows, open the folder in File Explorer, click the folder to the left of the breadcrumb list, and highlight the path in the address bar as in Figure 24.7, and press Ctrl+C to copy it.

FIGURE 24.7 Select a directory path.
In the Command Prompt window, type cd and a space. Then right-click the Command Prompt window, right-click, and click Paste. Press Enter, and you'll be in that folder.
Use the dir command with various switches to view, or optionally print, all the filenames in a folder and also its subfolders if you like. For example, say you navigate to the Music folder for your account (C:UsersyourUserNameMusic). From that folder, entering dir /s lists all file and folder names for all artists, albums, and songs in your Music folder.
You can use the /b, /n, and /w switches to choose how you want the information displayed. For example, entering dir /s /w. shows filenames in the wide format.
You can send the output to a text file so you can open and edit the file before you import it into Excel or Access to make it more like tabular data. To send output to a file, end the command with a filename (or path and filename). For example, entering the following from the Music folder puts the output listing in a file named MyMusic.txt in the Music folder.
dir /s /w >MyMusic.txtYou can then open that MyMusic.txt file with any text editor or word processor to clean it up. If you have database management skills, you can import the data to Access or a similar program and treat it like any other tabular data.
To exit the Command Prompt window, enter the exit command or just close the window.
Wrapping Up
This chapter has focused on techniques for getting older programs to work in Windows 10. Windows 10 offers several tools to help with compatibility issues. Whether you have any luck with them depends on how old and how incompatible the program is. Most of your programs will run fine under Windows 10. A few won't, until you upgrade to the Windows 10 version, but those should be few and far between. The main points are as follows:
- Most programs written for Windows Vista, Windows 7, and Windows 8.1 are already compatible with Windows 10 and require no special handling.
- When you attempt to install an older program, the Program Compatibility Assistant kicks in automatically to help out.
- The Program Compatibility Wizard helps you with installed programs that don't start or run correctly.
- Compatibility settings are stored in the program file's properties sheet on the Compatibility tab.
- To use DOS commands in Windows 10 with minimal flack from UAC, choose Run as Administrator to open the Command Prompt window.